Audit Trail
Application > General Setup > Security > Audit Trail
Overview
Audit Trail allows you to monitor every data change made to any record in the system through the user interface. The feature tracks the following types of changes:
- New entry (Insert) — a new record is created
- Change (Update) — an existing record is modified
- Removal (Delete) — a record is removed
The System Administrator enables audit tracking for each screen — for example, Purchase Orders or Vendors. In Etendo, each screen stores its data in what the system calls a table; this term appears in the setup steps below. See System Administrator Setup below.
This page is organized in two sections. System Administrator Setup covers the one-time technical configuration — business users can skip directly to Using the Audit Trail, as the system administrator handles the configuration. Using the Audit Trail covers how to view audit data once setup is complete.
System Administrator Setup
To track audit information, the System Administrator completes two steps:
- Enable the audit trail for one or more tables.
- Update the audit trail infrastructure by recompiling the application.
Both steps are described in the following sections.
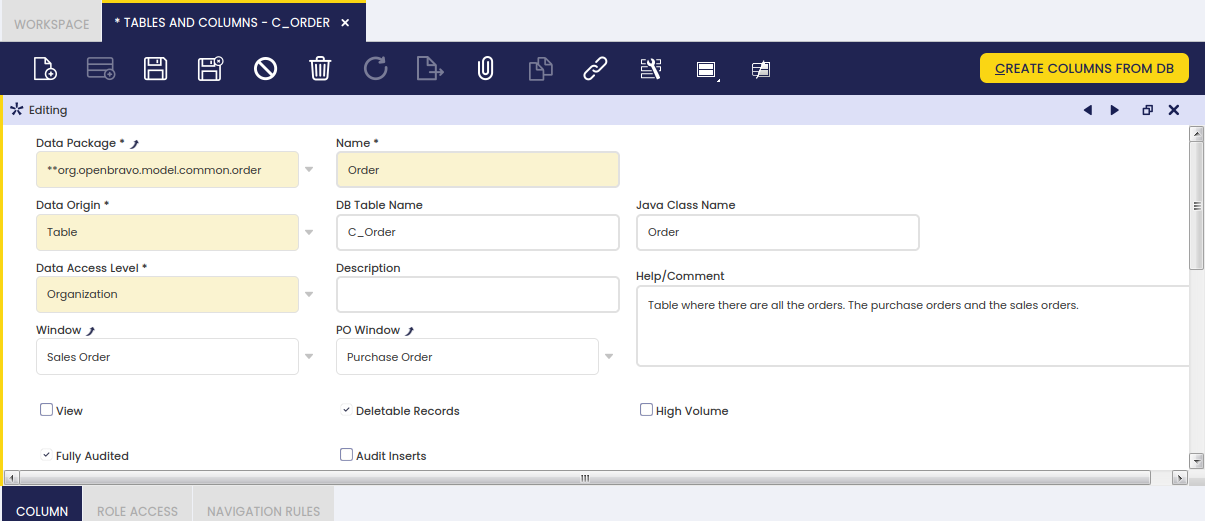
Enabling Audit Trail for a Table
Application Dictionary > Tables and Columns
Info
The Application Dictionary is a system configuration area accessible only to System Administrators. It is not part of the regular business menus.
The System Administrator enables or disables the Audit Trail for a table through the table definition in the Application Dictionary.
- Switch to the System Administrator role. To do this, click your username in the top-right corner of the screen and select System Administrator from the role list.
- Go to
Application Dictionary>Tables and Columns. - In the list that appears, find and open the entry for the screen you want to audit — for example, Purchase Orders.
- Switch to Edit View by clicking the pencil icon in the toolbar.
- Check the Fully Audited box and click Save (the floppy disk icon in the toolbar).
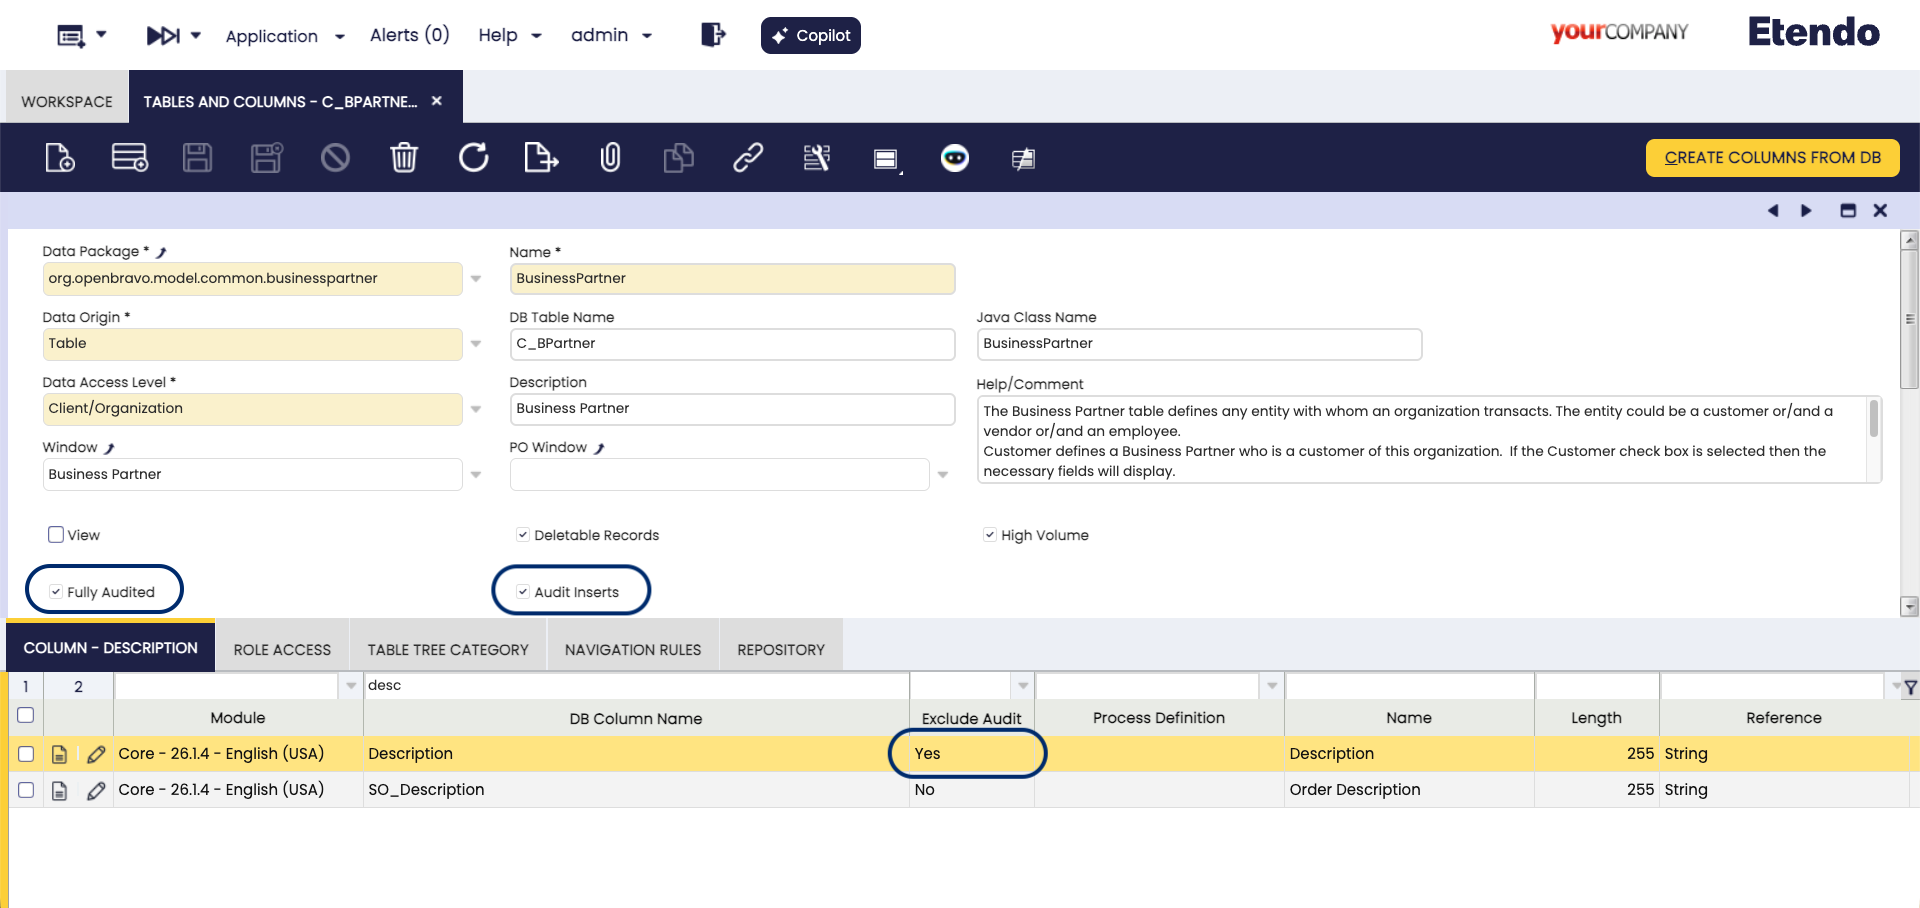
Audit Inserts
By default, when a table is set to Fully Audited, the system records that a new record is created but does not save the values entered at that moment.
To also save those initial values, check the Audit Inserts field on that table. This is optional.
Excluding Columns
By default, all fields in an audited table are tracked. To stop tracking changes to a specific field — for example, a Description field that changes frequently and is not important to audit — open the Column tab inside Application Dictionary > Tables and Columns, find the field, and check the Exclude Audit box.
Update Audit Trail Infrastructure
After enabling or disabling the Audit Trail for a table, or after any change to that table's structure, the System Administrator must update the system infrastructure by recompiling the application. Until they do, the audit trail does not reflect the latest settings.
Warning
This step requires stopping and restarting the application server. Plan this during a maintenance window and coordinate with the rest of the team.
The System Administrator must run the following command from the Etendo root directory:
The full sequence is:
- Stop Tomcat.
- Run the command above.
- Start Tomcat.
Disable Filtering by User
The System Administrator can remove the User filter from both the Record History and Deleted Records views. This is useful when the number of users in the system is large and affects performance.
- Go to
Application>General Setup>Application>Preference. - Click New.
- Enter
Show Audit Trail User filterin the Property field. - Type
Nin the Value field. - Click Save.
Using the Audit Trail
There are two ways to view audit data: the Audit Trail Popup, which shows the history of a specific record, and the Audit Trail Window, which allows searching across all audit records.
The Audit Trail Popup
For each table where the audit trail is enabled, the Audit Trail button  appears in the toolbar of the corresponding window. Click it to open the Audit Trail Popup.
The popup shows the history of the record currently displayed in the window. It has two view modes:
- Record History — shows changes to a single record
- Deleted Records — shows records deleted from a single tab
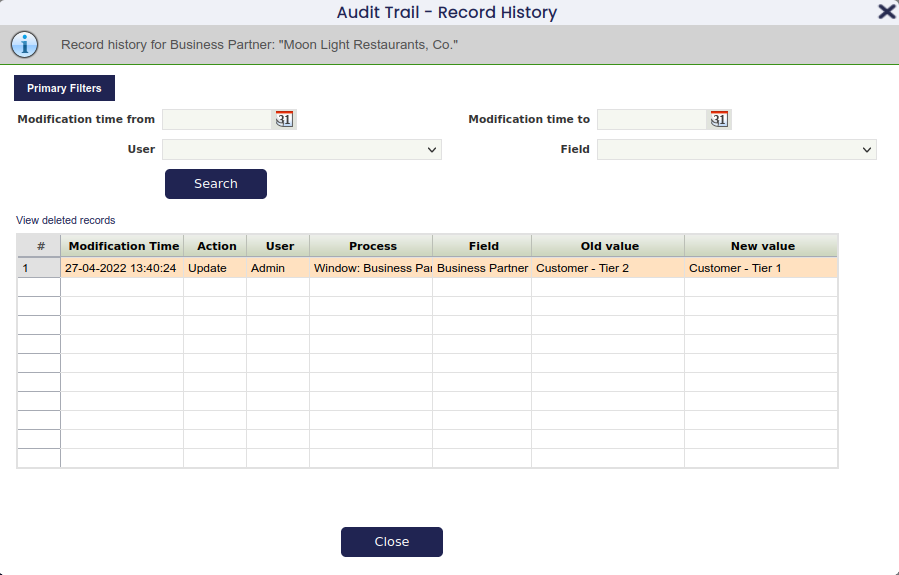
Record History View
This view opens when you click the Audit Trail button from an existing record.
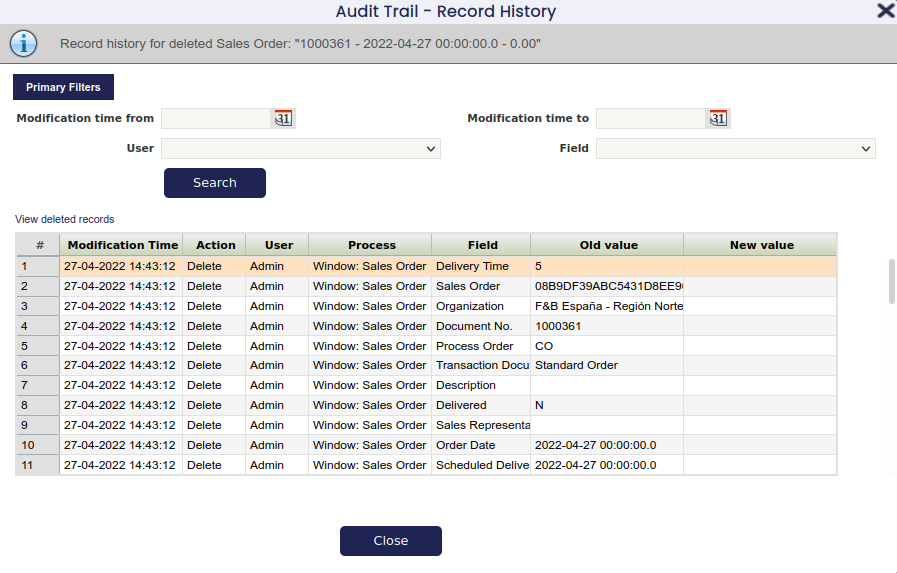
At the top of the popup, the record type (for example, Sales Order) and the specific record — such as 1000175 - 2016-04-03 (the order number and date) — are shown. These identify whose history you are viewing. Below that, filters allow you to narrow the changes shown, which is useful for records with many modifications.
The grid shows all changes made to the record while the audit trail was enabled, sorted from the most recent change to the oldest.
Info
Only fields visible in the corresponding tab are shown.
Each row represents one changed field. If a record was edited, one row appears for every field that changed. If a record was created or deleted, one row appears for every field in that record.
To switch to the Deleted Records view, click the Deleted Records link above the grid. This view shows records deleted from the current tab.
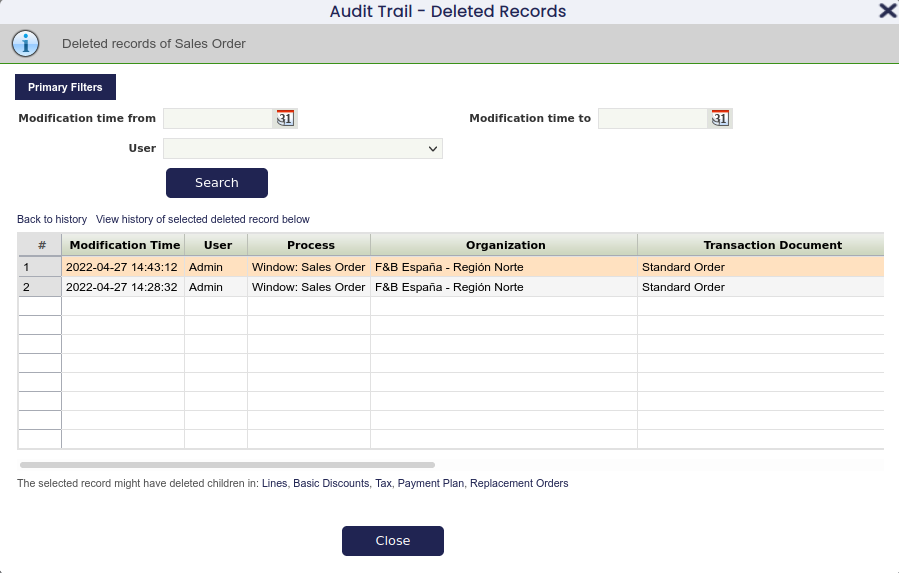
Deleted Records View
This view shows records deleted from a tab that are no longer accessible through the normal interface.
The top area shows the record type. Below it, filters let you narrow the records shown. The grid displays one row per deleted record, with the same columns as the normal grid view for that tab.
Back to History
Select Back to history to return to the Record History view, showing the same records as before.
History of Selected Record
Select View history of selected deleted record to see the full change history of a specific deleted record. This opens the Record History view, which indicates that the system is displaying the history of a deleted record.
The screenshot below shows the history of a deleted Sales Order. It includes entries for the deletion as well as the earlier creation and modification of the record.
Child Tabs
When a record has lines — for example, a Sales Order has order lines — the popup can filter deleted lines to show only those belonging to a specific Sales Order. This is called filtering by parent record.
If the parent record still exists:
- Go to the lines tab of the Sales Order.
- Click the audit trail icon to open the Record History view.
- Click the Deleted Records link to switch to the Deleted Records view.
Because the lines tab has a parent (the Sales Order), the view automatically filters to show only lines belonging to that Sales Order. The top area confirms the filter is active:

If the parent record has also been deleted:
- Go to the Deleted Records view of the Sales Order tab.
- Find the Sales Order whose deleted lines you want to view.
- Click the Lines link below the grid.
The view then shows the deleted lines belonging to that Sales Order.
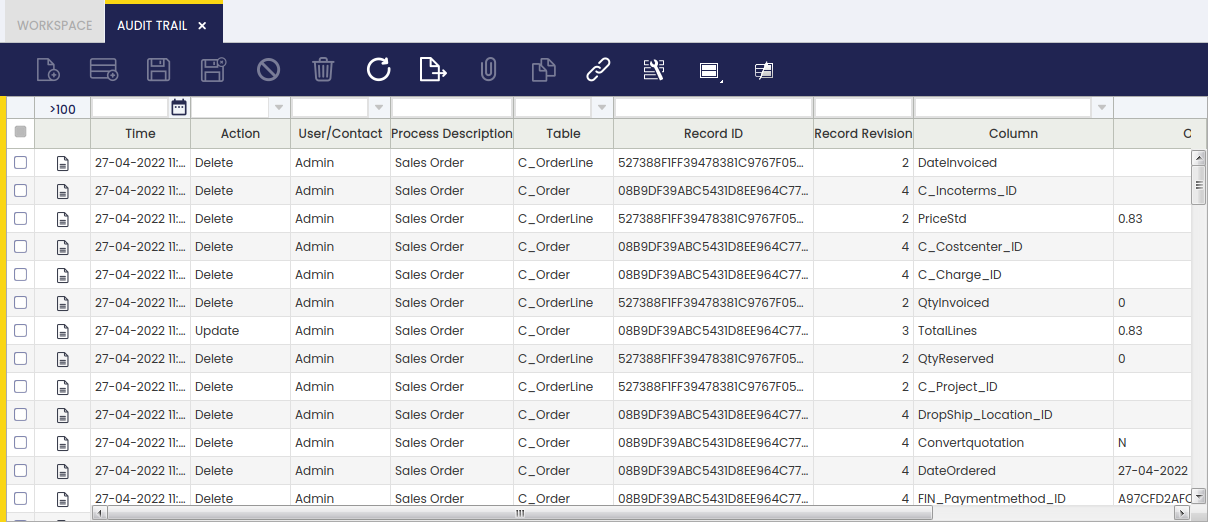
Audit Trail Window
The Audit Trail window displays a read-only view of all recorded data changes in the tables for which the audit trail is enabled. No edits are possible from this window.

This window shows audit data as it is stored internally by the system. Some values may look different from what you see in the normal screens — for example, a date may appear in a different format, or an item may be identified by an internal code rather than its name. This is expected. Use the search and filter fields at the top of the window to find the record you are looking for.
For each tracked change, the window shows which screen (for example, Purchase Orders) and which field was modified. It also shows a system-assigned code that identifies the exact record — you do not need to use this code; it is there for reference only.
Limitations
The audit trail records all data changes for enabled tables, with the following exceptions:
- Very long text fields (such as notes or descriptions exceeding a certain length) are not audited.
- Files or binary data attached to records (such as document attachments) are not audited.
These field types cannot be audited by the standard Audit Trail. If tracking them is required for a specific business process, raise the requirement with the system administrator, who can advise whether an alternative solution is available.
This work is a derivative of General Setup by Openbravo Wiki, used under CC BY-SA 2.5 ES. This work is licensed under CC BY-SA 2.5 by Etendo.