How to use an Agent as MCP Server
Overview
Beta Version — Important Notice
It is under active development and may contain unstable or incomplete features. Use it at your own risk. The module behavior may change without notice. Do not use it in production environments.
This guide shows you how to connect to Etendo Copilot agents using the Model Context Protocol (MCP). Each agent automatically exposes an MCP server that you can connect to from various MCP-compatible clients like Claude Desktop, VS Code, Gemini CLI, and custom applications.
| Mode | Description | Best for |
|---|---|---|
| Simple | Chat naturally with the agent | Conversations, questions, general use |
| Direct | Execute specific tools directly | Automation, workflows, development |
Concepts
Connection Modes
There are two types of communication with the MCP server, both established through the API exposed by each agent:
- Simple Mode: Provides access to the agent as an external "black box". The client interacts naturally with the agent, without visibility into its internal configuration, tools, or prompt.
- URL:
http://HOST:PORT/AGENT_ID/mcp
- URL:
- Direct Mode: Provides direct access to the agent's prompt and tools. In this mode, the external client behaves as if it were an Etendo agent itself, with access to the same tools, data, and definitions available to the internal agent.
- URL:
http://HOST:PORT/AGENT_ID/direct/mcp
- URL:
Tip
In Direct Mode, call get_agent_prompt before using other tools. The prompt explains the agent purpose, capabilities, and the expected usage of the exposed tools.
Authentication Modes
The MCP configuration dialog lets you choose how the client authenticates against the agent MCP server:
| Authentication Type | How it works | Best for |
|---|---|---|
| OAuth 2.1 | Uses a clean MCP URL and lets the client complete authentication through a browser login flow | Clients with native MCP OAuth support |
| Token in Header | Sends the Etendo token in a custom HTTP header such as etendo-token |
Clients that support custom headers |
| Token in URL | Appends the token as ?token=... in the MCP endpoint URL |
Clients that cannot send custom headers |
Agent Types
Etendo Copilot supports two kinds of agents, each with two connection modes. The agent type defines the role, and the mode defines how you interact with it.
| Agent Type | Simple Mode (Talk) | Direct Mode (Control) |
|---|---|---|
| Multi-Model | Use ask_agent to chat naturally |
Access all tools directly + get_agent_prompt for setup |
| LangGraph | Use ask_agent_supervisor to talk to supervisor |
Use ask_agent_<MemberName> for team members + get_agent_prompt |
Multi-Model Agent: A single agent that combines multiple AI models and tools.
- Simple Mode: Best for natural conversations. The agent picks the right tools automatically.
- Direct Mode: Best for workflows or integrations. You run tools yourself and can read the agent's instructions.
LangGraph Agent: A supervisor that manages a team of specialized agents.
- Simple Mode: Talk to the supervisor, who delegates tasks to the right team members.
- Direct Mode: Talk directly to individual team members and see how the supervisor organizes them.
| Use Case | Recommended Setup |
|---|---|
| Conversational chat interface | Any Agent + Simple Mode |
| Automated business workflows | Multi-Model + Direct Mode |
| Complex, multi-skill analysis | LangGraph + Simple Mode |
| Development and debugging | Any Agent + Direct Mode |
| API integrations | Multi-Model + Direct Mode |
| Multi-domain problem solving | LangGraph + Simple Mode |
Architecture
The MCP server runs alongside the agent and communicates using HTTP transport with optional Server-Sent Events (SSE) for streaming responses.
When OAuth is enabled, the MCP server also exposes the OAuth discovery and authorization endpoints required by compatible MCP clients. Users authenticate through an Etendo login page, and the client receives the authorization result automatically.
The OAuth login flow includes two possible UI paths:
- Default role and organization: The user enters username and password, enables Use default role and organization, and completes authentication directly.
- Manual role and organization selection: The user enters username and password without enabling the checkbox. If the credentials are valid, the flow continues to a second screen where the user must choose a Role and an Organization before authentication is completed.
Setup
Prerequisites
- Etendo Copilot is installed and running.
- At least one agent is configured in the Agent window.
- You have an Etendo session token or OAuth-capable MCP client credentials.
Step 1: Get the MCP configuration snippet
Application > Service > Copilot > Agent
- Open the Agent window in Etendo.
- Select your agent and click Server MCP Config button.
-
Configure connection options:
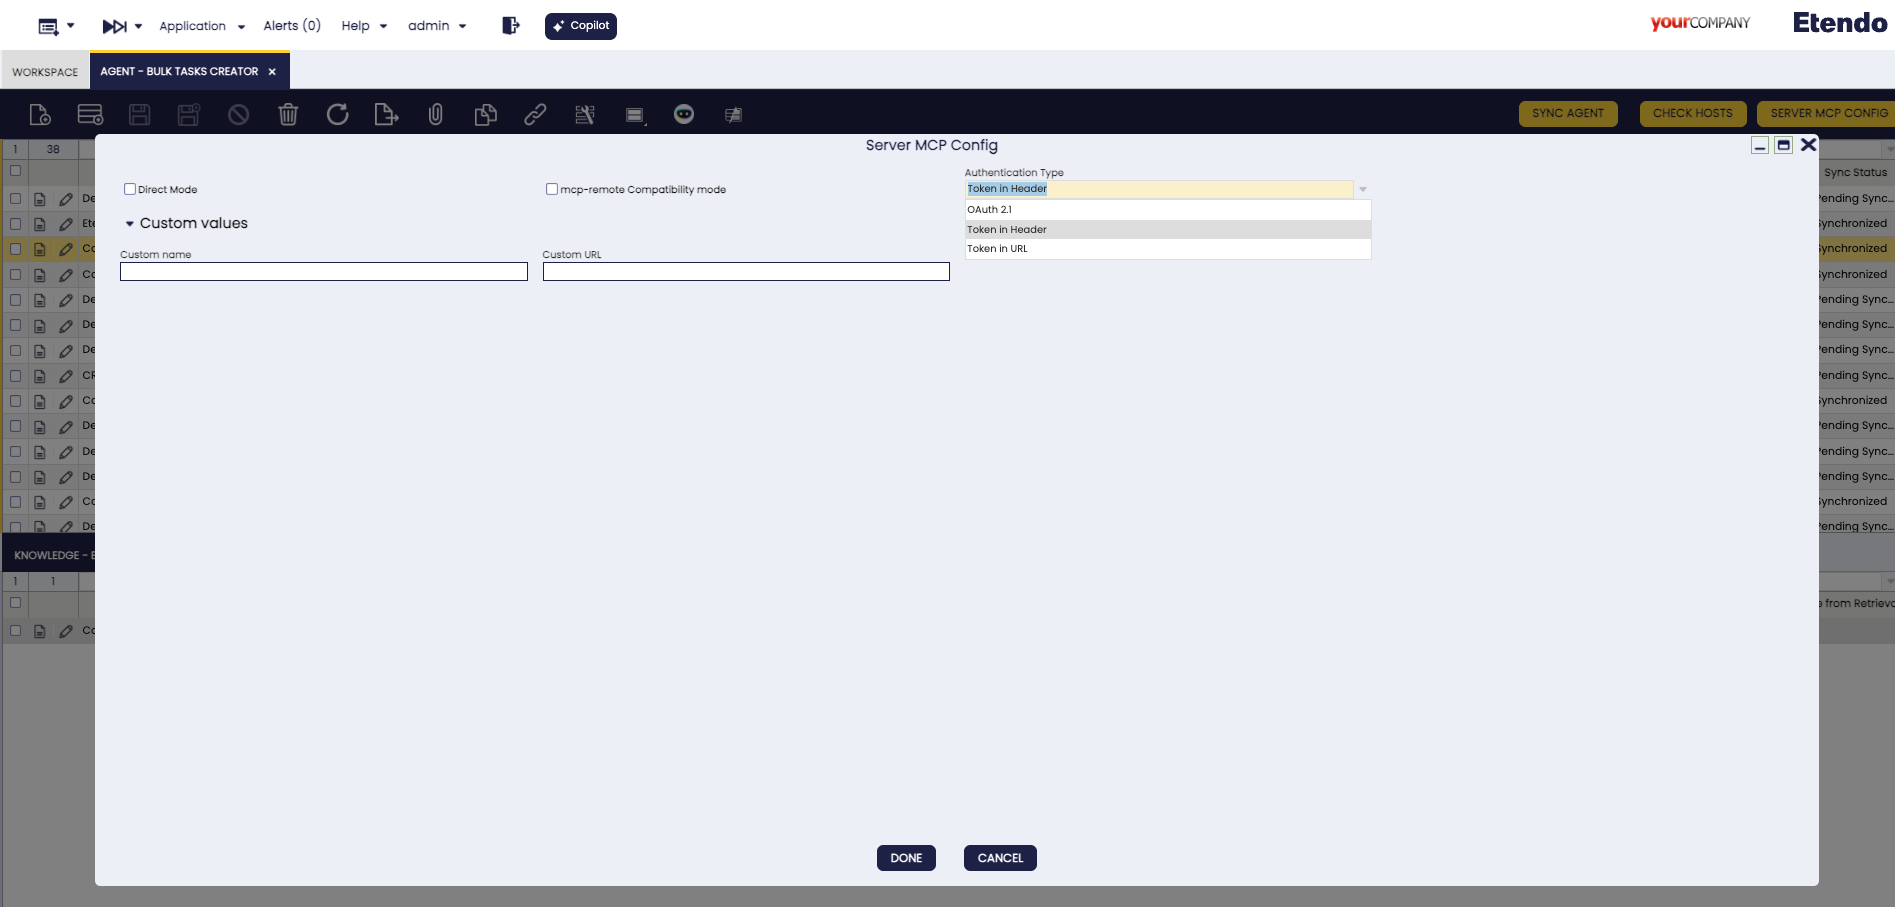
MCP configuration dialog showing connection mode, authentication type and optional custom values. - Direct Mode: Check for tool execution, uncheck for conversation.
- Authentication Type: Choose
OAuth 2.1,Token in Header, orToken in URL. - MCP-remote compatibility: Check for better client compatibility.
- Custom values: Optional URL and name overrides. If you set a Custom URL, it takes priority over the default URL resolution used by Etendo.
Authentication Type
OAuth 2.1
- Generates a clean MCP URL without embedding the token.
- The MCP client handles authentication and opens a browser login flow when needed.
- The login UI first requests username and password.
- If Use default role and organization is enabled, authentication finishes immediately after a successful login.
- If the checkbox is not enabled, the flow continues to a second page where the user selects the role and organization.
- Recommended when your MCP client supports OAuth 2.1 for MCP servers.
Token in Header
- Sends the token through the
etendo-tokencustom HTTP header. - This is the default option.
- Recommended for clients that support custom HTTP headers.
Token in URL
- Appends the token as
?token=...in the generated MCP URL. - Useful for clients that cannot send custom headers.
- Use only in trusted environments because the token becomes part of the URL.
MCP-remote Compatibility Mode
What it does: Uses the
mcp-remotelibrary to add compatibility for MCP clients that do not handle Etendo MCPHTTPtransport directly.When to use:
- Claude Desktop and similar clients that need a stdio-compatible bridge.
- IDE extensions or tools with limited native
HTTPMCP support.
Configuration difference:
- Standard mode: Direct MCP HTTP configuration.
- Compatibility mode: Uses
npx mcp-remoteas a wrapper around the generated MCP endpoint.
-
Copy the generated configuration from the popup.
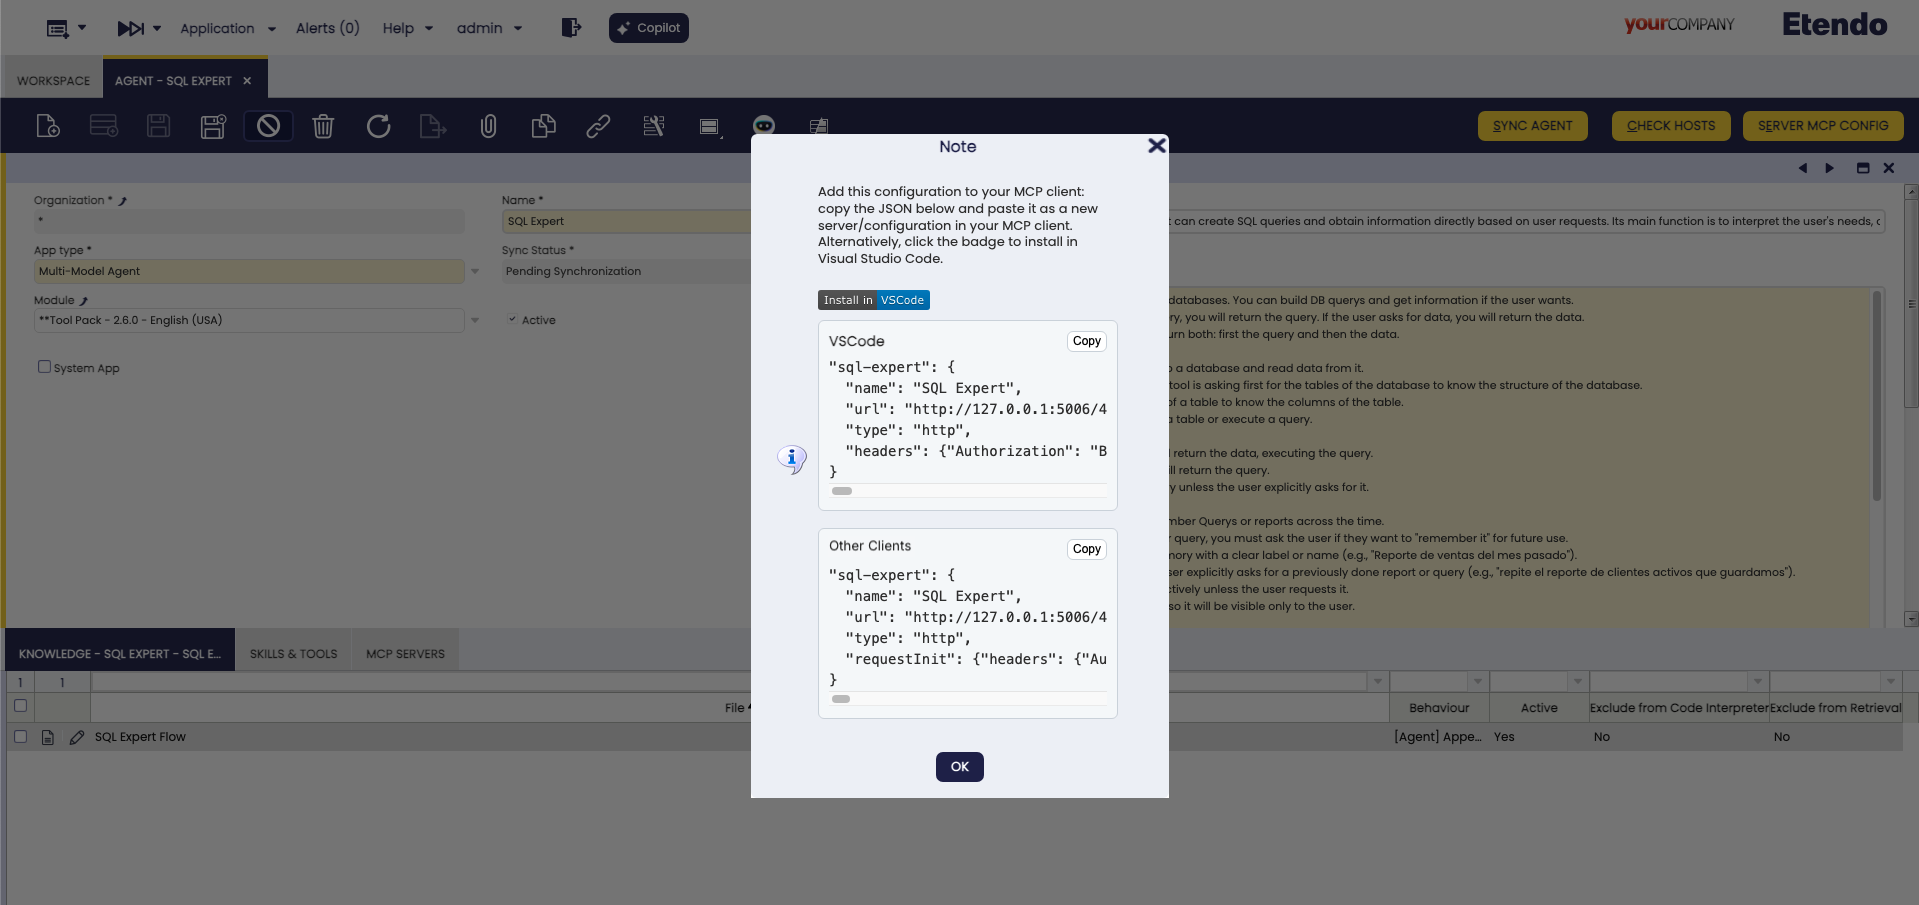
Generated MCP configuration snippet ready to copy and paste into the client configuration file.
Step 2: Configure your client
Choose the example that matches your client and the selected Authentication Type.
About AGENT_ID
AGENT_ID in all examples below is a placeholder. The actual value is the unique identifier assigned to the agent in Etendo. When using the Server MCP Config dialog, the generated configuration replaces this placeholder automatically with the correct agent ID.
VS Code Configuration with OAuth 2.1
Add to your VS Code settings:
"mcp": {
    "servers": {
        "etendoAgent": {
            "type": "http",
            "url": "http://localhost:5006/AGENT_ID/mcp"
        }
    }
}
This configuration uses a clean URL. If the client supports MCP OAuth, it will open the browser login flow automatically.
VS Code Configuration with Token in Header
Add to your VS Code settings:
"mcp": {
    "servers": {
        "etendoAgent": {
            "type": "http",
            "url": "http://localhost:5006/AGENT_ID/mcp",
            "headers": {
                "etendo-token": "Bearer your-token-here"
            }
        }
    }
}
VS Code Configuration with Token in URL
"mcp": {
    "servers": {
        "etendoAgent": {
            "type": "http",
            "url": "http://localhost:5006/AGENT_ID/mcp?token=your-token-here"
        }
    }
}
Gemini CLI Configuration with Token in Header
Create or update your Gemini CLI config:
{
    "mcpServers": {
        "etendoAgent": {
            "type": "http",
            "httpUrl": "http://localhost:5006/AGENT_ID/mcp/",
            "headers": {
                "etendo-token": "Bearer your-token-here"
            }
        }
    }
}
Gemini CLI Configuration with Token in URL
{
    "mcpServers": {
        "etendoAgent": {
            "type": "http",
            "httpUrl": "http://localhost:5006/AGENT_ID/mcp?token=your-token-here"
        }
    }
}
Claude Desktop Configuration with MCP-remote and OAuth 2.1
Add to your Claude Desktop config:
{
    "mcpServers": {
        "etendoAgent": {
            "command": "npx",
            "args": ["mcp-remote", "http://localhost:5006/AGENT_ID/mcp"]
        }
    }
}
Claude Desktop Configuration with MCP-remote and Token in Header
Add to your Claude Desktop config:
{
    "mcpServers": {
        "etendoAgent": {
            "command": "npx",
            "args": ["mcp-remote", "http://localhost:5006/AGENT_ID/mcp", "--header", "etendo-token: Bearer your-token-here"]
        }
    }
}
Claude Desktop Configuration with MCP-remote and Token in URL
{
    "mcpServers": {
        "etendoAgent": {
            "command": "npx",
            "args": ["mcp-remote", "http://localhost:5006/AGENT_ID/mcp?token=your-token-here"]
        }
    }
}
Step 3: Expose the port
Localhost Development Warning
If you see this message: "The MCP URL begins with http://localhost, which only works in development environments"
- What it means: The generated MCP endpoint uses
localhost, so only clients running on the same machine can connect to it. - When you will notice it most: This warning is especially relevant for Token in Header and Token in URL configurations, because those modes generate a concrete endpoint that the client must call directly.
- Where it is configured:
context.url.copilot.mcpis read fromgradle.properties, not from the web server or Apache configuration. - What
context.url.copilot.mcpdoes: This property defines the public base URL that Etendo uses when generating MCP configuration snippets and OAuth metadata. - Resolution order: Etendo first uses the Custom URL field from the popup if it was provided, then
context.url.copilot.mcpfromgradle.properties, and finally falls back tohttp://localhost:<copilot.port.mcp>where the default MCP port is5006. - For production or remote clients: Configure
context.url.copilot.mcpingradle.propertieswith the externally reachable Copilot URL, for examplehttps://your-domain.example.com:5006. - For one-off tests: You can also use the Custom URL field in the dialog to override the generated base URL without changing the global property.
- Example: If Copilot is exposed at
https://copilot.example.com, the generated endpoint should look likehttps://copilot.example.com/AGENT_ID/mcpinstead ofhttp://localhost:5006/AGENT_ID/mcp.
Example gradle.properties entry:
Port Exposure Required for Production
Port 5006 is the default Copilot MCP port. In production or remote deployments, this port must be reachable from the client machine.
Depending on the infrastructure:
- Firewall: open port
5006for inbound TCP traffic. - Docker: add
-p 5006:5006to the container run command. - Cloud security group: add an inbound rule allowing TCP on port
5006. - Reverse proxy (Apache/Nginx): configure the proxy to forward traffic to Copilot on port
5006. In this case, the port does not need to be publicly exposed directly.
The port can be changed via the copilot.port.mcp property in gradle.properties:
Step 4: Test the connection
-
Start your MCP client — VS Code, Gemini CLI, Claude Desktop, etc.
-
Confirm the server is available: In the client's tool list or inspector, verify that at least one tool appears — for example,
ask_agentin Simple Mode, or the agent's own tools in Direct Mode. If no tools appear, go to the Troubleshooting section. -
Try agent interaction:
Simple Mode:
Direct Mode: In the client's tool list, invoke
get_agent_promptwith no parameters. Review the returned output to understand the agent's available tools and expected inputs. Then invoke any tool from the list directly — for example, asearch_customerstool with{"query": "test", "limit": 1}. -
If you selected OAuth 2.1:
The OAuth login flow works as follows:
- The MCP client opens the Etendo login page in the browser.
-
Enter your username and password.
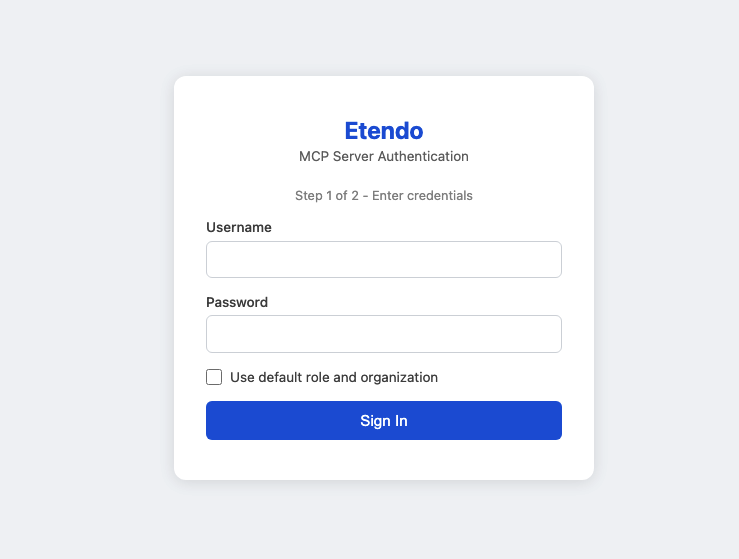
Etendo OAuth login page: enter username and password, then optionally enable Use default role and organization. -
If Use default role and organization is enabled, Etendo completes the authentication immediately.
- If the checkbox is not enabled, and the credentials are valid, Etendo opens a second page.
-
On the second page, select a Role and an Organization.
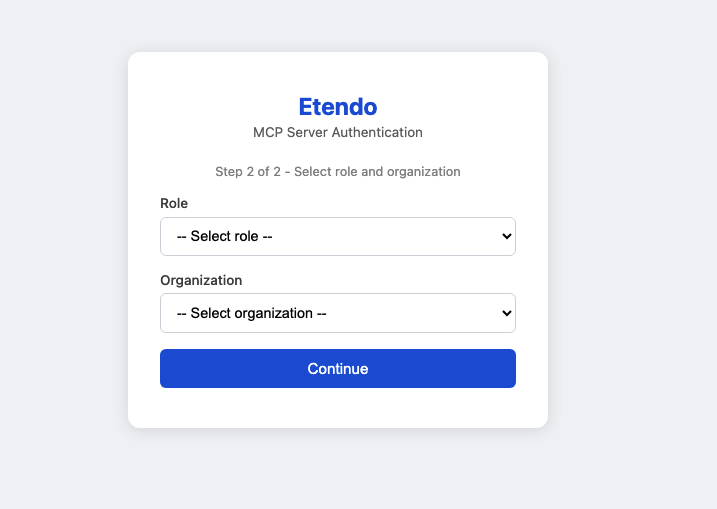
Role and Organization selection screen shown when Use default role and organization is not enabled. -
After the selection is confirmed, the OAuth flow completes and the MCP client continues the connection.
Use Cases
Simple Chat Interface
- User: "What can you help me with?"
- Agent: "I can help you with Etendo operations, data analysis, reporting, and more. What would you like to know?"
- User: "Show me recent sales data"
-
Agent:
[Uses internal tools]
"Here's the recent sales data: [displays results]"
Direct Tool Execution
-
Developer:
Uses
get_agent_prompttool -
Result: "I am an Etendo sales assistant with access to customer data and reporting tools..."*
-
Developer:
Uses
search_customerstool directlyParameters: {"query": "enterprise clients", "limit": 10}
-
Result: Returns list of enterprise customers without conversational wrapper
Troubleshooting
Common Issues
Port not reachable:
- The client times out or cannot connect despite a correct configuration.
- Likely cause: port
5006is not open on the server. - Fix: open the port in the firewall, add a Docker port mapping (
-p 5006:5006), or configure a reverse proxy to forward traffic to Copilot. See the Port Exposure Required for Production note above.
Connection fails:
- Verify the selected authentication type matches your client capabilities.
- If you use
Token in Header, verify the Etendo token is valid. - Check the agent ID is correct.
- Ensure Copilot service is running.
OAuth login does not start:
- Confirm your MCP client supports OAuth 2.1 for MCP servers.
- Verify the generated URL does not include a token if you selected
OAuth 2.1. - Make sure the browser can reach the Etendo login page exposed by the MCP server.
OAuth login stops after credentials:
- If Use default role and organization is disabled, expect a second page asking for Role and Organization.
- If that second page does not appear, verify the user has valid role and organization assignments in Etendo.
- If Use default role and organization is enabled but authentication still does not continue, verify the user has a valid default role and organization configured.
Client cannot send headers:
- Use
Token in URLinstead ofToken in Header. - If needed, enable MCP-remote compatibility mode and regenerate the configuration.
Tools not available:
- Check user permissions in Etendo.
- Verify agent configuration includes required tools.
- Confirm connection mode matches your needs.
- In Direct Mode, call
get_agent_promptfirst to understand how the toolset should be used.
Authentication errors:
- If you are using token-based authentication and receive a 401 error, regenerate the Etendo session token. Send a
POSTrequest to/etendo/sws/loginwith a JSON body containingusernameandpassword. The response returns a new token. Update the token in the client configuration afterwards. - Check token format includes
Bearerwhen sending it in a header. - Verify user has access to the selected agent.
- If you use
Token in URL, confirm the generated endpoint still includes thetokenquery parameter.
Security Note
Always use HTTPS in production environments. Keep your SWS tokens secure and never expose them in client-side code or public repositories. Prefer OAuth 2.1 or Token in Header over Token in URL whenever the client supports them.
Related Articles
How to Configure MCP Servers on Etendo Agents
How to Configure API Tokens for Etendo Copilot
This work is licensed under CC BY-SA 2.5 ES by Futit Services S.L..