How to Create and Update Translation Modules
Overview
This section describes the process of creating and updating translation modules in Etendo, including the Core's module.
Creating a new translation module from scratch
Create module definition
The first thing to do is to create the translation module definition into the Application Dictionary.
Logged as System Administrator role, the user selects the Application Dictionary > Module window from the Application menu and creates a new record.
Translation modules are a special kind of modules. They have to be marked as Is translation module in the Module window, and they must define the translation language in the Module Language field.
No other contents than translations are allowed in translation modules. A translation module can only contain the translation for one module. For example, in the screenshot below, we are creating a Spanish (Spain) translation module for the User Interface Application module whose declared language is English (USA).
![]()
Apart from checking the Is translation module and setting the Module Language, we need to add a dependency to the module and version we are translating. In the example, our User Interface Application Translation Spanish (Spain) module in version 1.0.0 depends on the User Interface Application module version 2.1.0.
Prepare strings to be translated
Logged with the System Administrator role, select the General Setup> Application > Language window from the Application menu. Find the language in which the user wants to create the translation module and check the System Language checkbox field. This checkbox allows this language to be selected in the user interface (Change role popup) in the next login.
![]()
![]()
Verify Languages
Each time it is necessary to create a translation for a new language, it is necessary to prepare the strings to be translated. There is an automatic process, called Verify Languages (available as well in the Language window), in which the ERP creates the necessary copies of the original strings of all the modules available in the system from their base languages to the corresponding translation language.
For example, in the case of creating a Spanish (Spain) translation for the core's module, whose base language is English (USA), the system will copy all the original English strings to the Spanish translation. The same is extended to the rest of the modules installed in the system with their respective base languages.
Using the Verify Languages button, the application will display the number of records created. If this number is equal to 0, it means that something was wrong, and the probable cause is that we have forgotten to check the System Language field.
![]()
Export the translation
Exporting the translation is an automatic process available in the General Setup > Application > Import/Export Translations window.
With the System Administrator role, select the language in which the user wants to export translation files. Export Reduced Version flag can be set to Yes to have a reduced translation version. This would exclude all translation candidates that are linked directly or indirectly to the Menu having translation strategy as "Exclude From Reduced Translation". The user could set this flag as No to have a full translation version by pressing the Export button. The process takes several seconds to export all the XML files.
![]()
Inside the attachments folder of Etendo, a new directory called lang is found, and inside it, a new one with the lowercase two-letter language code and the uppercase two-letter country code separated by an underscore character ('_'). Example: /home/EtendoERP/attachments/lang/es_ES
![]()
Inside this directory, the user can find the translation files for all the available modules into the instance. The core's translation files are stored directly into the root directory, the rest of the modules have their own folder named as their java packages. So, the user only needs to find the folder of the original module to be translated (not the translation module) and get its XML files.
Translate the module
Module translation can be done by manually modifying the exported XML files, which is a convenient method for modules with few strings to translate, or by using the Etendo Copilot wizard, Module Translation Creator.
Translate directly into the XML files
If this method is chosen, it is only necessary to open each XML file that is inside the module's directory to be translated and edit it. It is very important to open these files with a text editor.
The text to be changed for making a translation is the content of each value tag. It is not necessary to edit any attribute because they will be automatically updated when importing and exporting the files into the ERP in a next step.
![]()
Import and Export the translations
After the translation is completed, or even in the middle of a translation process, it is a good practice to import the XML files into the ERP to review the translation in context.
Finally, once the translation is OK, it is necessary export it again. Doing so, it is ensured the XML files have the final structure, with all the attributes properly set.
Info
All the XML files to be imported must be inside their correspondent module's folder of your attachments directory, overwriting the original XML files exported at the beginning of this process.
Now, at the Import/Export Translations window, we can select the language used for the translations and press the Import button. Then, the process is completed and the Export button is pressed, that will export the XML files again.
![]()
Info
During this process, it is highly recommended to keep a backup of your translated XML files.
Specific information if you are translating Core
buildstructure.xml file
Etendo's Core provides an additional file called buildStructure.xml. This file contains the information related to the names of the different stages through which the Etendo build process passes, and the error and warning messages that can be shown during a rebuild. It is also necessary to translate this file.
The structure of this file is a bit different compared to the standard Etendo XML translation files, but it is also very easy to understand. You just need to translate the content of all the attributes that start with “translated”, like translatedName, translatedErrorMessage, etc. This is an example of the buildstructure.xml file translated into Spanish.
<?xml version='1.0' ?>
<BuildTranslation>
<language>es_ES</language>
<mainStepTranslations>
<mainStepTranslation code="RB11" originalName="Initial Build Validation" translatedName="Validación de la construcción del sistema" translatedErrorMessage="La validación ha fallado. El sistema no se ha modificado y continua estable, pero los problemas descritos en la parte inferior de la ventana deberían resolverse (ya sea desinstalando los módulos afectados, o resolviendo los problemas de la forma descrita), y una nueva construcción del sistema debería iniciarse.">
<stepTranslations/>
</mainStepTranslation>
<mainStepTranslation code="RB20" originalName="Build" translatedName="Construcción del sistema" translatedSuccessMessage="La construcción del sistema se ha completado con éxito." translatedWarningMessage="Se produjeron alertas durante la compilación. La aplicación se ejecutará, pero debería comprobarlas para ver si son importantes. Ir a <a href="http://wiki.openbravo.com/wiki/ERP/2.50/Update_Tips" target="_blank" class="MessageBox_TextLink"> este enlace </a> para más información. <b>Ahora debe reiniciar el contenedor de servlets</b> para que los cambios tengan efecto." translatedErrorMessage="Ha ocurrido un error durante la construcción del sistema. Para saber qué pasos realizar a continuación, vaya a <a href="http://wiki.openbravo.com/wiki/ERP/2.50/Update_Tips" target="_blank" class="MessageBox_TextLink">este enlace</a>">
<stepTranslations>
<stepTranslation code="RB12" originalName="Database update" translatedName="Actualización de la base de datos"/>
<stepTranslation code="RB31" originalName="Reference data" translatedName="Datos de referencia"/>
<stepTranslation code="RB43" originalName="Compilation" translatedName="Compilación"/>
</stepTranslations>
</mainStepTranslation>
</mainStepTranslations>
</BuildTranslation>
Masterdata dataset
All the XML files exported through the Import/Export Translation window and the buildstructure.xml represents all the available user interface strings in the ERP. If we translate all these files, we will have a fully translated application. However, the ERP includes some other strings not related to the UI that can be also translated. Inside this group, called Masterdata, we include: country names, currencies, units of measure and month names. All this data is not exported into the XML files, however this does not mean we cannot translate it.
The way for translating masterdata is creating a system level dataset that only contains the translated strings for countries, currencies, units of measure and months.
As System Administrator, we create a new record inside the Dataset window for our core's translation module. It is important to define this dataset at System only level to ensure it will be automatically applied when we install the module.
As you can see in the screenshot, the tables to be included are: AD_Month_Trl C_Country_Trl, C_Currency_Trl and C_UOM_Trl. All of them have a filter clause that uses the language column, in the example es_ES.
![]()
Now, our Core's translation module has a dataset, so we must remember to check the Has reference data flag into the module's definition.
![]()
The dataset definition is ready, but it is pending the translation itself. To translate this dataset, we have two possibilities:
- In the ERP, as System Administrator, we can go to the Country Region and City, Currency, Unit of Measure and Month windows and translate the corresponding record inside the Translation tab (recommended method).
When finished, export the dataset using the Export Reference Data button at the Dataset window.
![]()
- Export the dataset with the untranslated strings and edit the XML file using a text editor. The dataset XML file will be stored inside the referencedata/standard directory of your translation module.
Translation bundle
As you probably know, Etendo is a distribution of modules, including Core. That means that to have a fully translated application, you must translate all the modules that are part of the distribution.
It is a good idea to create a translation bundle that covers all the modules.
Publishing the translation module
The process of publishing a translation module is similar to the standard publishing process with just one important consideration: we need to copy the translated XML files to the corresponding module's referencedata/translation folder within your module folder.
The summarized process is:
- Core only: If we have translated the masterdata dataset directly in the ERP, we need to export it through the Export Reference Data button at the Dataset window.
-
Export the database running
-
Copy the translated XML files to the translation module's referencedata/translation folder. The structure of the translation module's directory should be:
<translation module java package name> ├── referencedata │ ├── standard │ │ └── Masterdata.xml (only for core) │ └── translation │ └── es_ES │ ├── AD_ELEMENT_TRL_es_ES.xml │ ├── AD_FIELDGROUP_TRL_es_ES.xml │ ├── AD_FIELD_TRL_es_ES.xml │ ├── AD_FORM_TRL_es_ES.xml │ ├── AD_MENU_TRL_es_ES.xml │ ├── AD_MESSAGE_TRL_es_ES.xml │ ├── AD_MODULE_TRL_es_ES.xml │ ├── AD_PROCESS_PARA_TRL_es_ES.xml │ ├── AD_PROCESS_TRL_es_ES.xml │ ├── AD_REFERENCE_TRL_es_ES.xml │ ├── AD_REF_LIST_TRL_es_ES.xml │ ├── AD_TAB_TRL_es_ES.xml │ ├── AD_TEXTINTERFACES_TRL_es_ES.xml │ ├── AD_WF_NODE_TRL_es_ES.xml │ ├── AD_WINDOW_TRL_es_ES.xml │ ├── AD_WORKFLOW_TRL_es_ES.xml │ ├── buildStructureTrl.xml │ ├── C_DOCTYPE_TRL_es_ES.xml │ ├── CONTRIBUTORS_es_ES.xml │ ├── OBKMO_WIDGET_CLASS_TRL_es_ES.xml │ ├── OBUIAPP_PARAMETER_TRL_es_ES.xml │ ├── OBUISEL_SELECTOR_FIELD_TRL_es_ES.xml │ └── OBUISEL_SELECTOR_TRL_es_ES.xml └── src-db └── database ├── model │ ├── functions │ ├── sequences │ ├── tables │ ├── triggers │ └── views └── sourcedata ├── AD_DATASET_TABLE.xml (only for core) ├── AD_DATASET.xml (only for core) ├── AD_MODULE_DEPENDENCY.xml └── AD_MODULE.xml -
Finally, remember to publish the module. For more information, see Publish Modules to a GitHub Repository.
Updating Translation Modules
These are the first considerations for updating a translation module:
- We need to install/update in our instance the last version of the original module and its translation modules. To do so, find more information in Install Modules in Etendo.
- The already translated strings for this module are kept. Only the new or modified ones will be untranslated, so all the previous work done is not lost.
- Before publishing the translation module, remember to update the First Version dependency to the new version of the translated module, as we saw in the “Create module definition” chapter. Also, it is necessary to update the original module version in the build.gradle file. Apart from that, it is also a good practice to include a description of the changes of this new version inside the Update Information field of the Module window.
- To apply the updates, it is necessary to execute the command
The main steps for updating a translation module are almost the same as when creating a new translation module from scratch. The only difference is that it is not necessary to declare the System Language and to run the Verify Languages process. The rest of the process is exactly the same, starting by the “Export the translation” section.
Tips and Tricks
This section tries to provide a set of useful translation tips and tricks. Take into account that some of these tricks may require development knowledge.
Finding the context
Making a good translation requires knowing the exact context where the string we are translating appears. Unfortunately, the context in the XML file is not clear at all, and sometimes it is necessary to dive into the application to get the exact context. Here you have a list of tips for finding it:
- The first obvious thing you must take into account is the file you are translating.
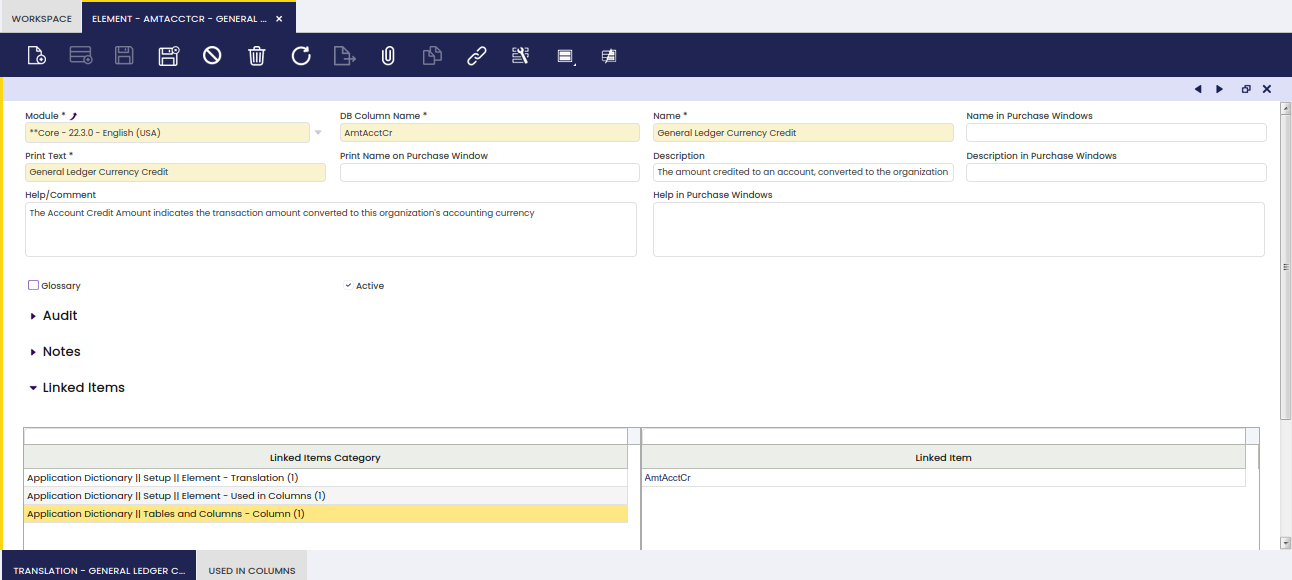
AD_MENU_TRLrepresents the Application menu entries,AD_MESSAGE_TRLhas all the messages,AD_PROCESS_TRLis in charge of the process and reports,AD_PROCESS_PARA_TRLis the process parameters, etc. - The Etendo Linked Items feature can give you all the places where a record is used. In the screenshot below, you can get the places where the element with the name “General Ledger Currency Credit” is used. In this case, linked items show that the element is only used in one column, so the user can navigate to this column and later on navigate to the related field, that will show the window where it is used.
This work is a derivative of How to Create and Update Translation Modules by Openbravo Wiki, used under CC BY-SA 2.5 ES. This work is licensed under CC BY-SA 2.5 by Etendo.