This tutorial provides an extensive, step-by-step guide to help you create a new sub-app from our base project, which can be found on Github as Subapp Base. By following these instructions, you will gain the capability to create a fully functional standalone subapplication, utilizing the power of RX and harnessing the potential of Etendo UI Library components, detailed in our comprehensive guide, installation and usage on the Storybook. This process not only enables you to develop a unique sub-app but also contributes to the expansion of your application ecosystem by integrating a classic module, thereby enhancing its overall functionality and versatility.
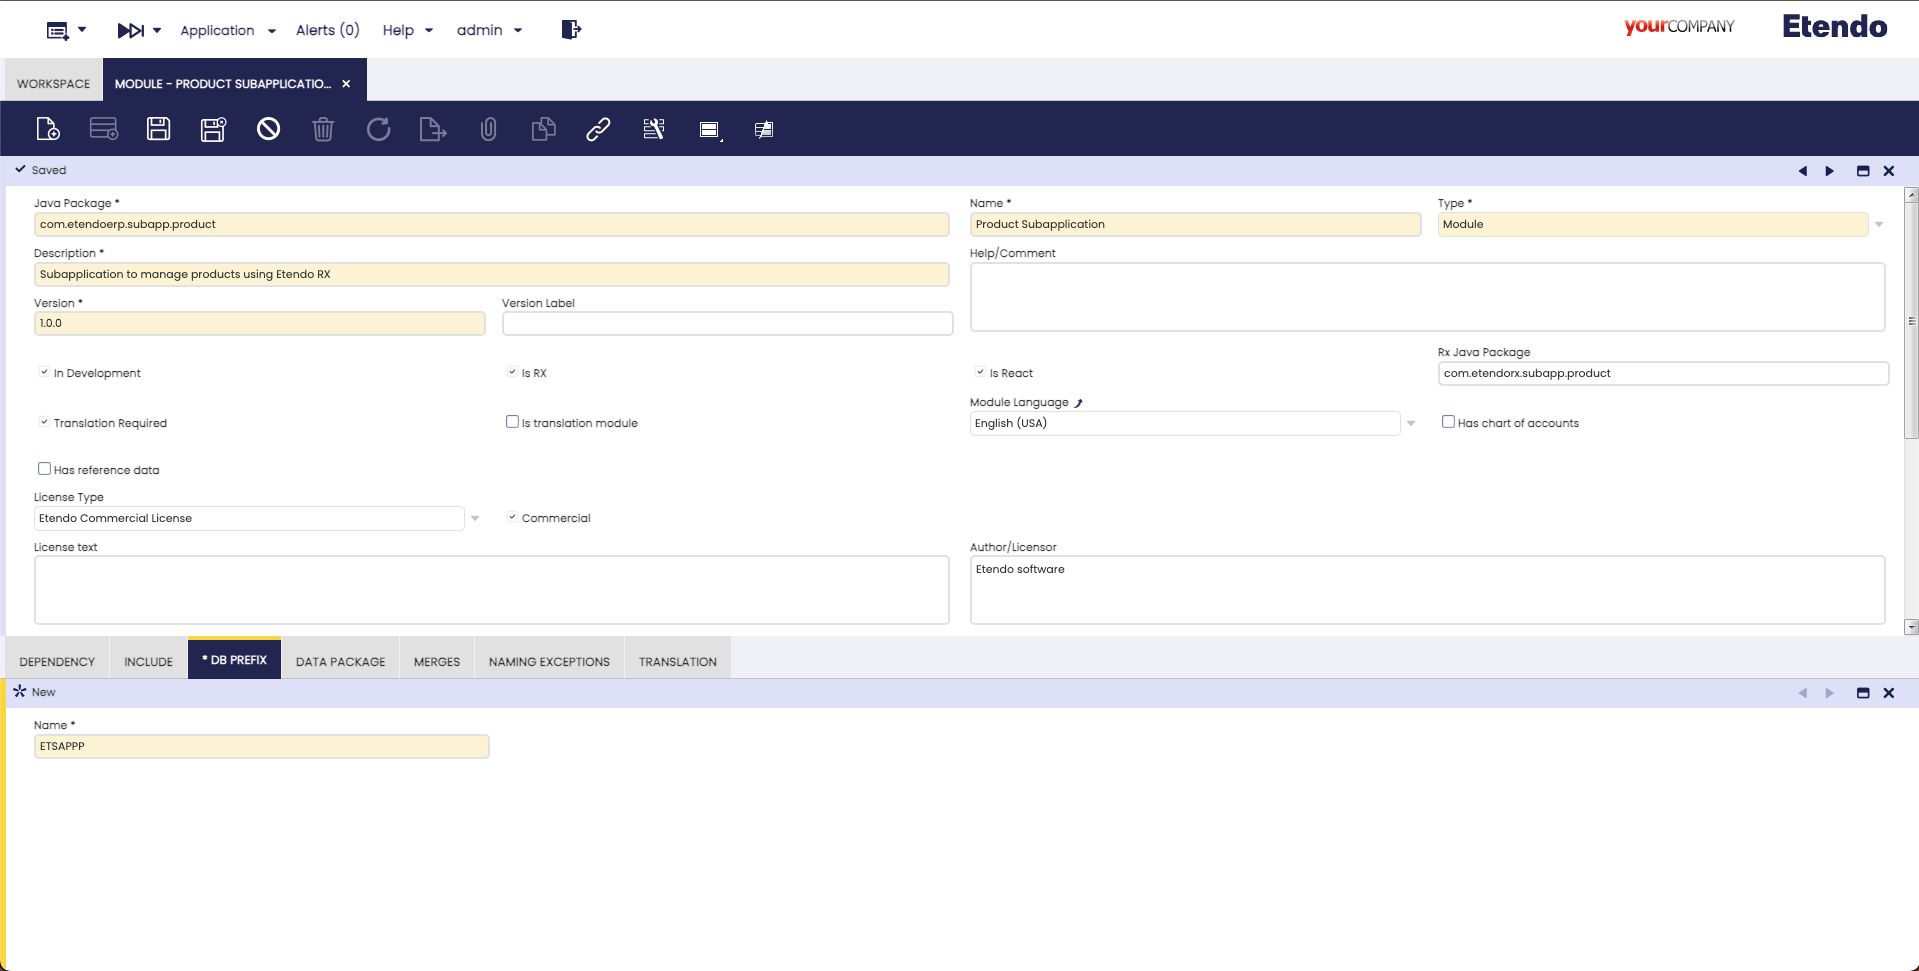
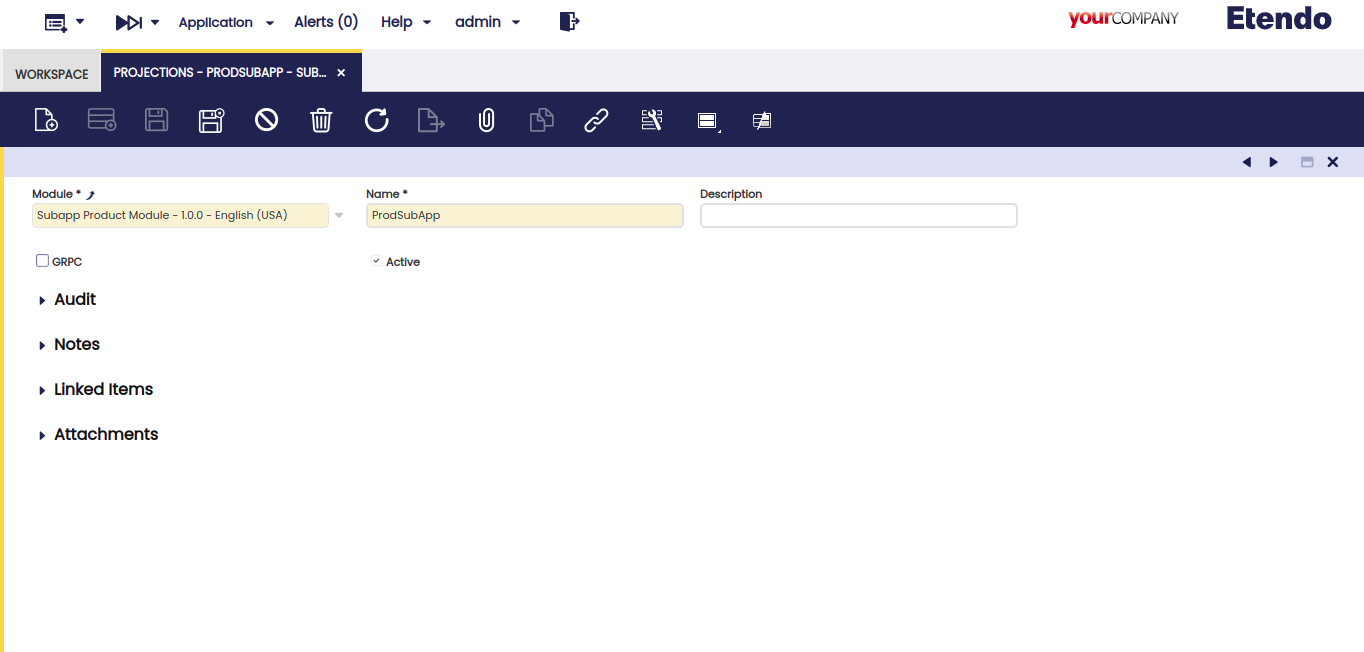
Below is a succinct representation of the required fields and expected values for the module configuration:
Field
Value
Java Package
com.etendoerp.subapp.product
Name
Product Subapplication
Type
Module
Description
Subapplication to manage products using Etendo RX
Version
1.0.0
In Development
true
Is RX
true
Is React
true
RX Java Package
com.etendoerx.subapp.product
Translation Required
true
License Type
Etendo Commercial License
Commercial
true
Tip
Notice that the name can be anything you want, but the type have to be setted as Module.
The description field is free and also required.
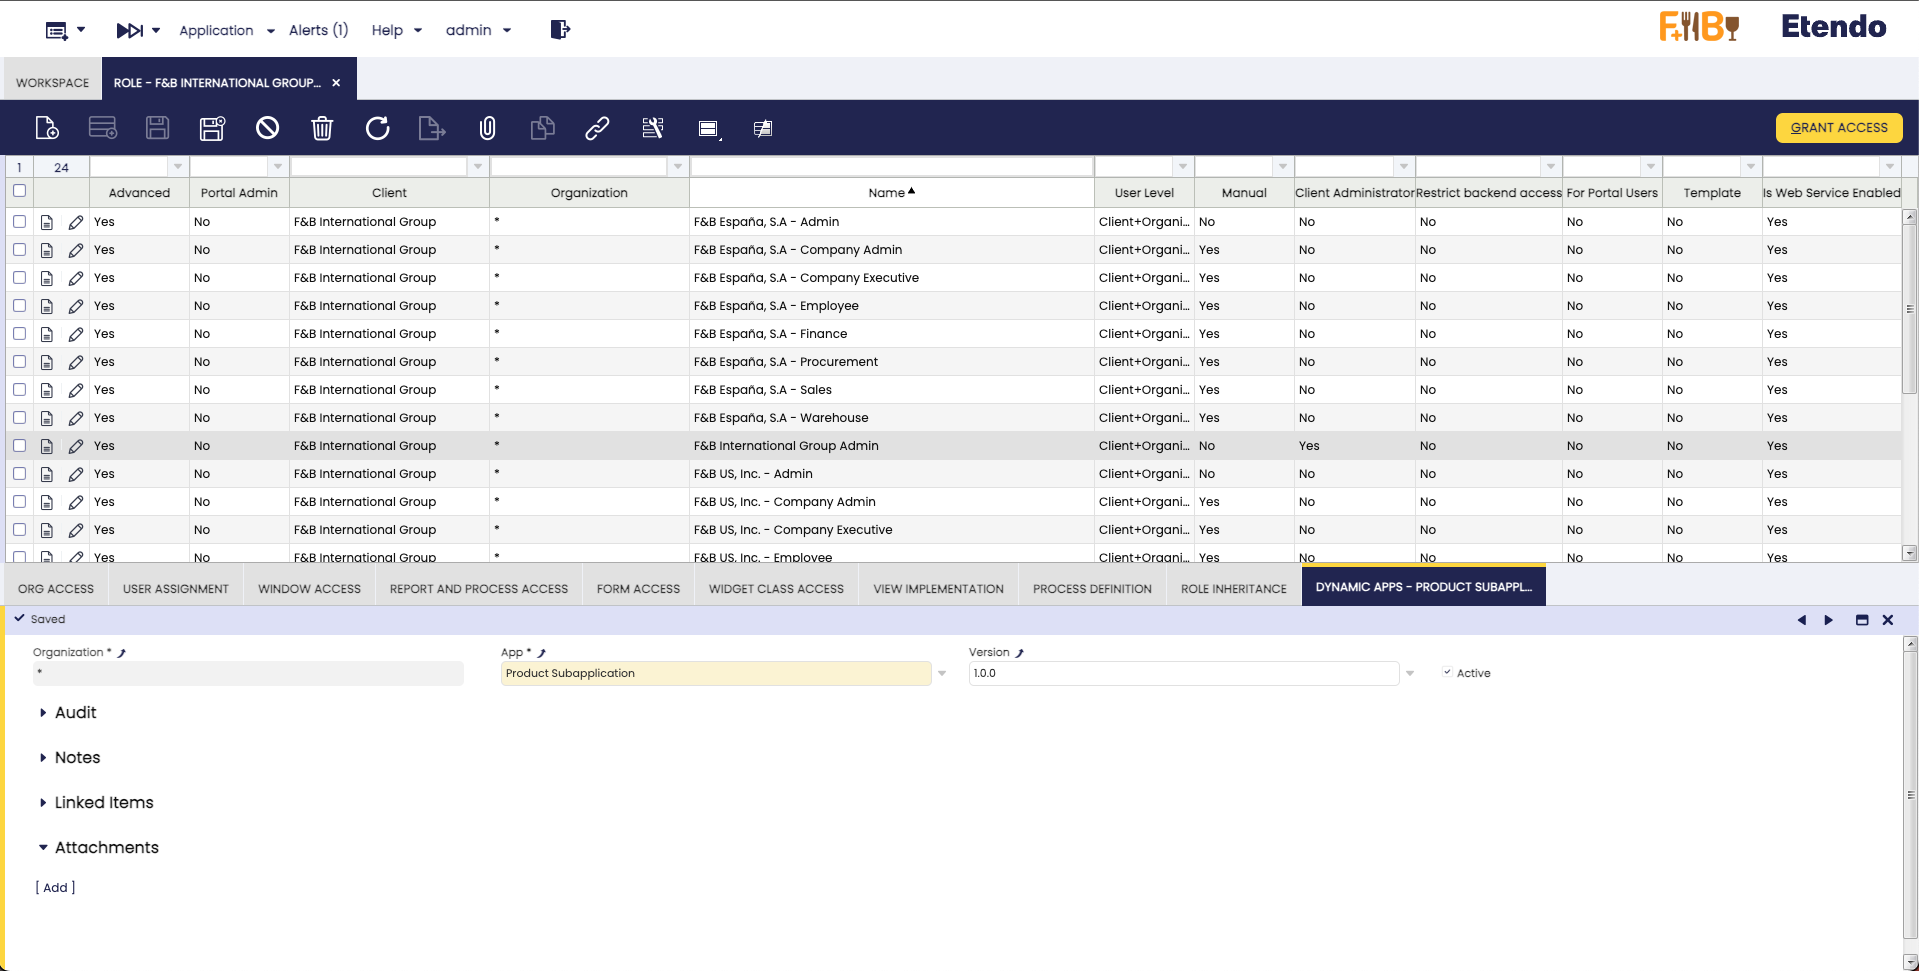
Dynamic app and role configuration
As the same as the previos section, the dynamic app and role have to be configured following the documentation about the dynamic app window.
Dynamic app
The dynamic app in Etendo must contain the following form fields and corresponding values:
Field
Value
Module
Product Subapplication - 1.0.0 - English (USA)
Name
Product Subapplication
Directory Location
/
Name
1.0.0
File Name
productSubapp.js
Active
true
Is Development
true
Role configuration
The next table reflect the settings to be configured for the role in relation to the dynamic app within the Etendo system.
Field
Value
Organization
*
App
Product Subapplication
Version
1.0.0
Active
true
Important
Keep this dynamic app as active.
At this point you have done with the etendo classic configuration.
Download the subapplication
This tutorial is based in our example of a product subapplication, which allows to manage products in a list of products (create, edit and delete) using Etendo RX.
Keep in mind
All related to the main concepts of a subapplication are explained in the concepts section in create new subapplication tutorial.
The following sections are focused on the product subapplication example.
To begin with we must have to download the latest version of the project inside the modules/<javapackage> folder in the Etendo environment. Then unzip the file and the folder must look like this:
Whole process to run a subapp in developer mode among with etendo classic and etendo mobile is detailed in Create New Subapplication
Customizing and Programming a Sub-Application
This section explains how to customize and program a subapplication. It uses as an example the Product Subapplication .
Product subapp example
This section covers an overview about the product subapplication example screens and principal parts of the subapplication where covered in Create New Subapplication.
Consideration
This subapplication example was developed for both platforms (phone and tablet).
When you create a new subapplication, you have to do the same.
The provided base subapplication is already configured for both platforms.
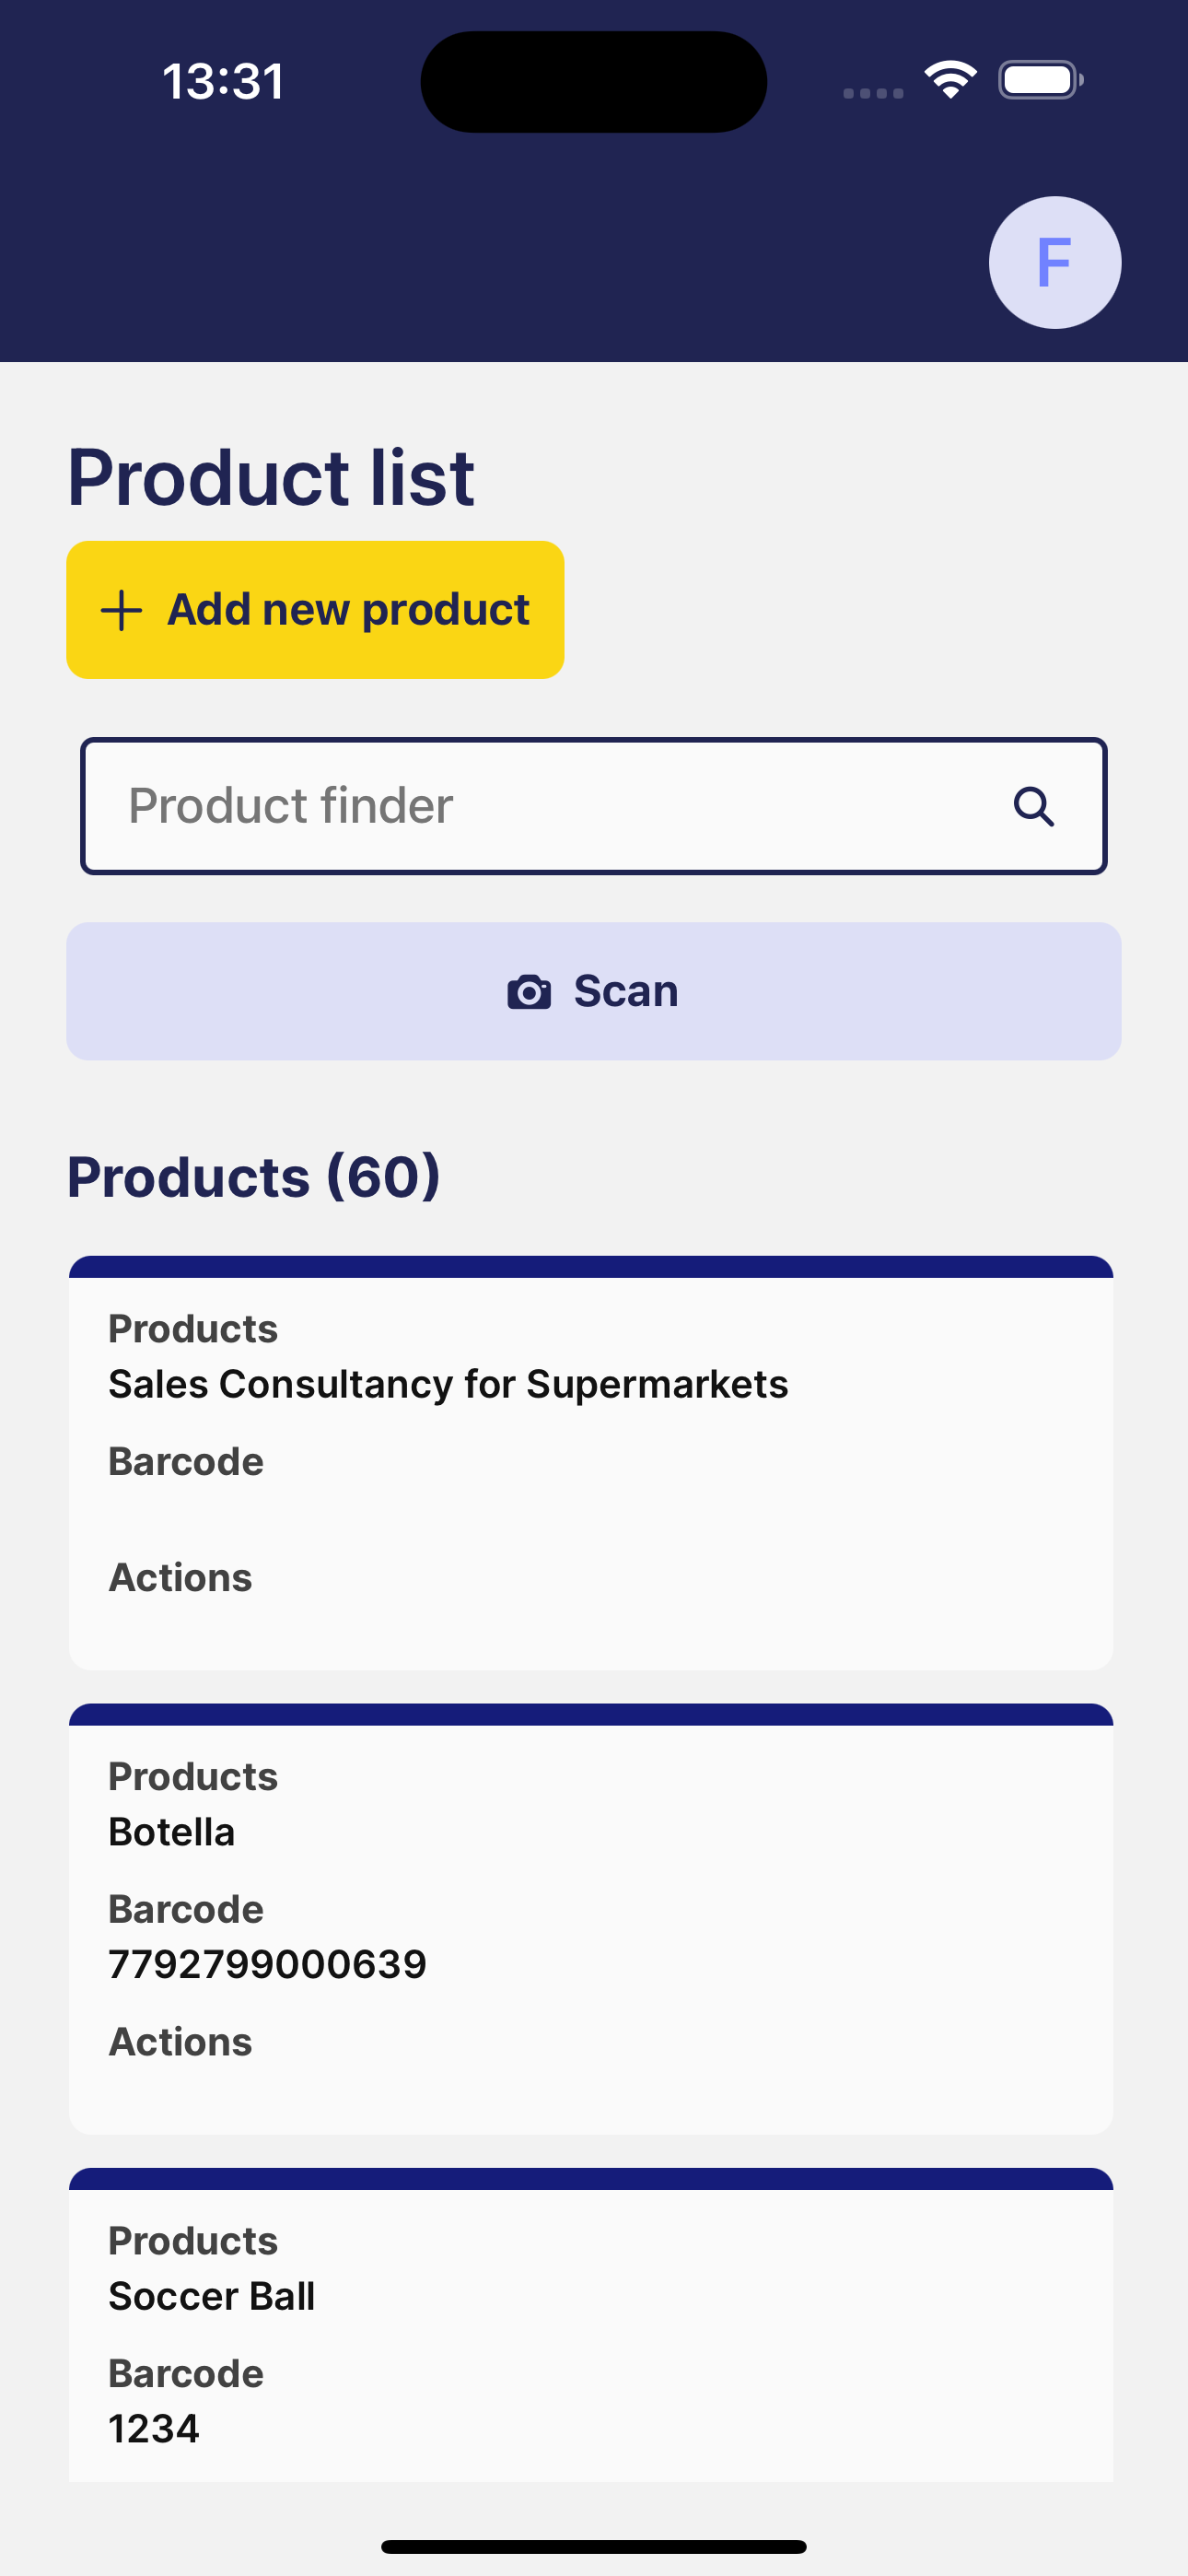
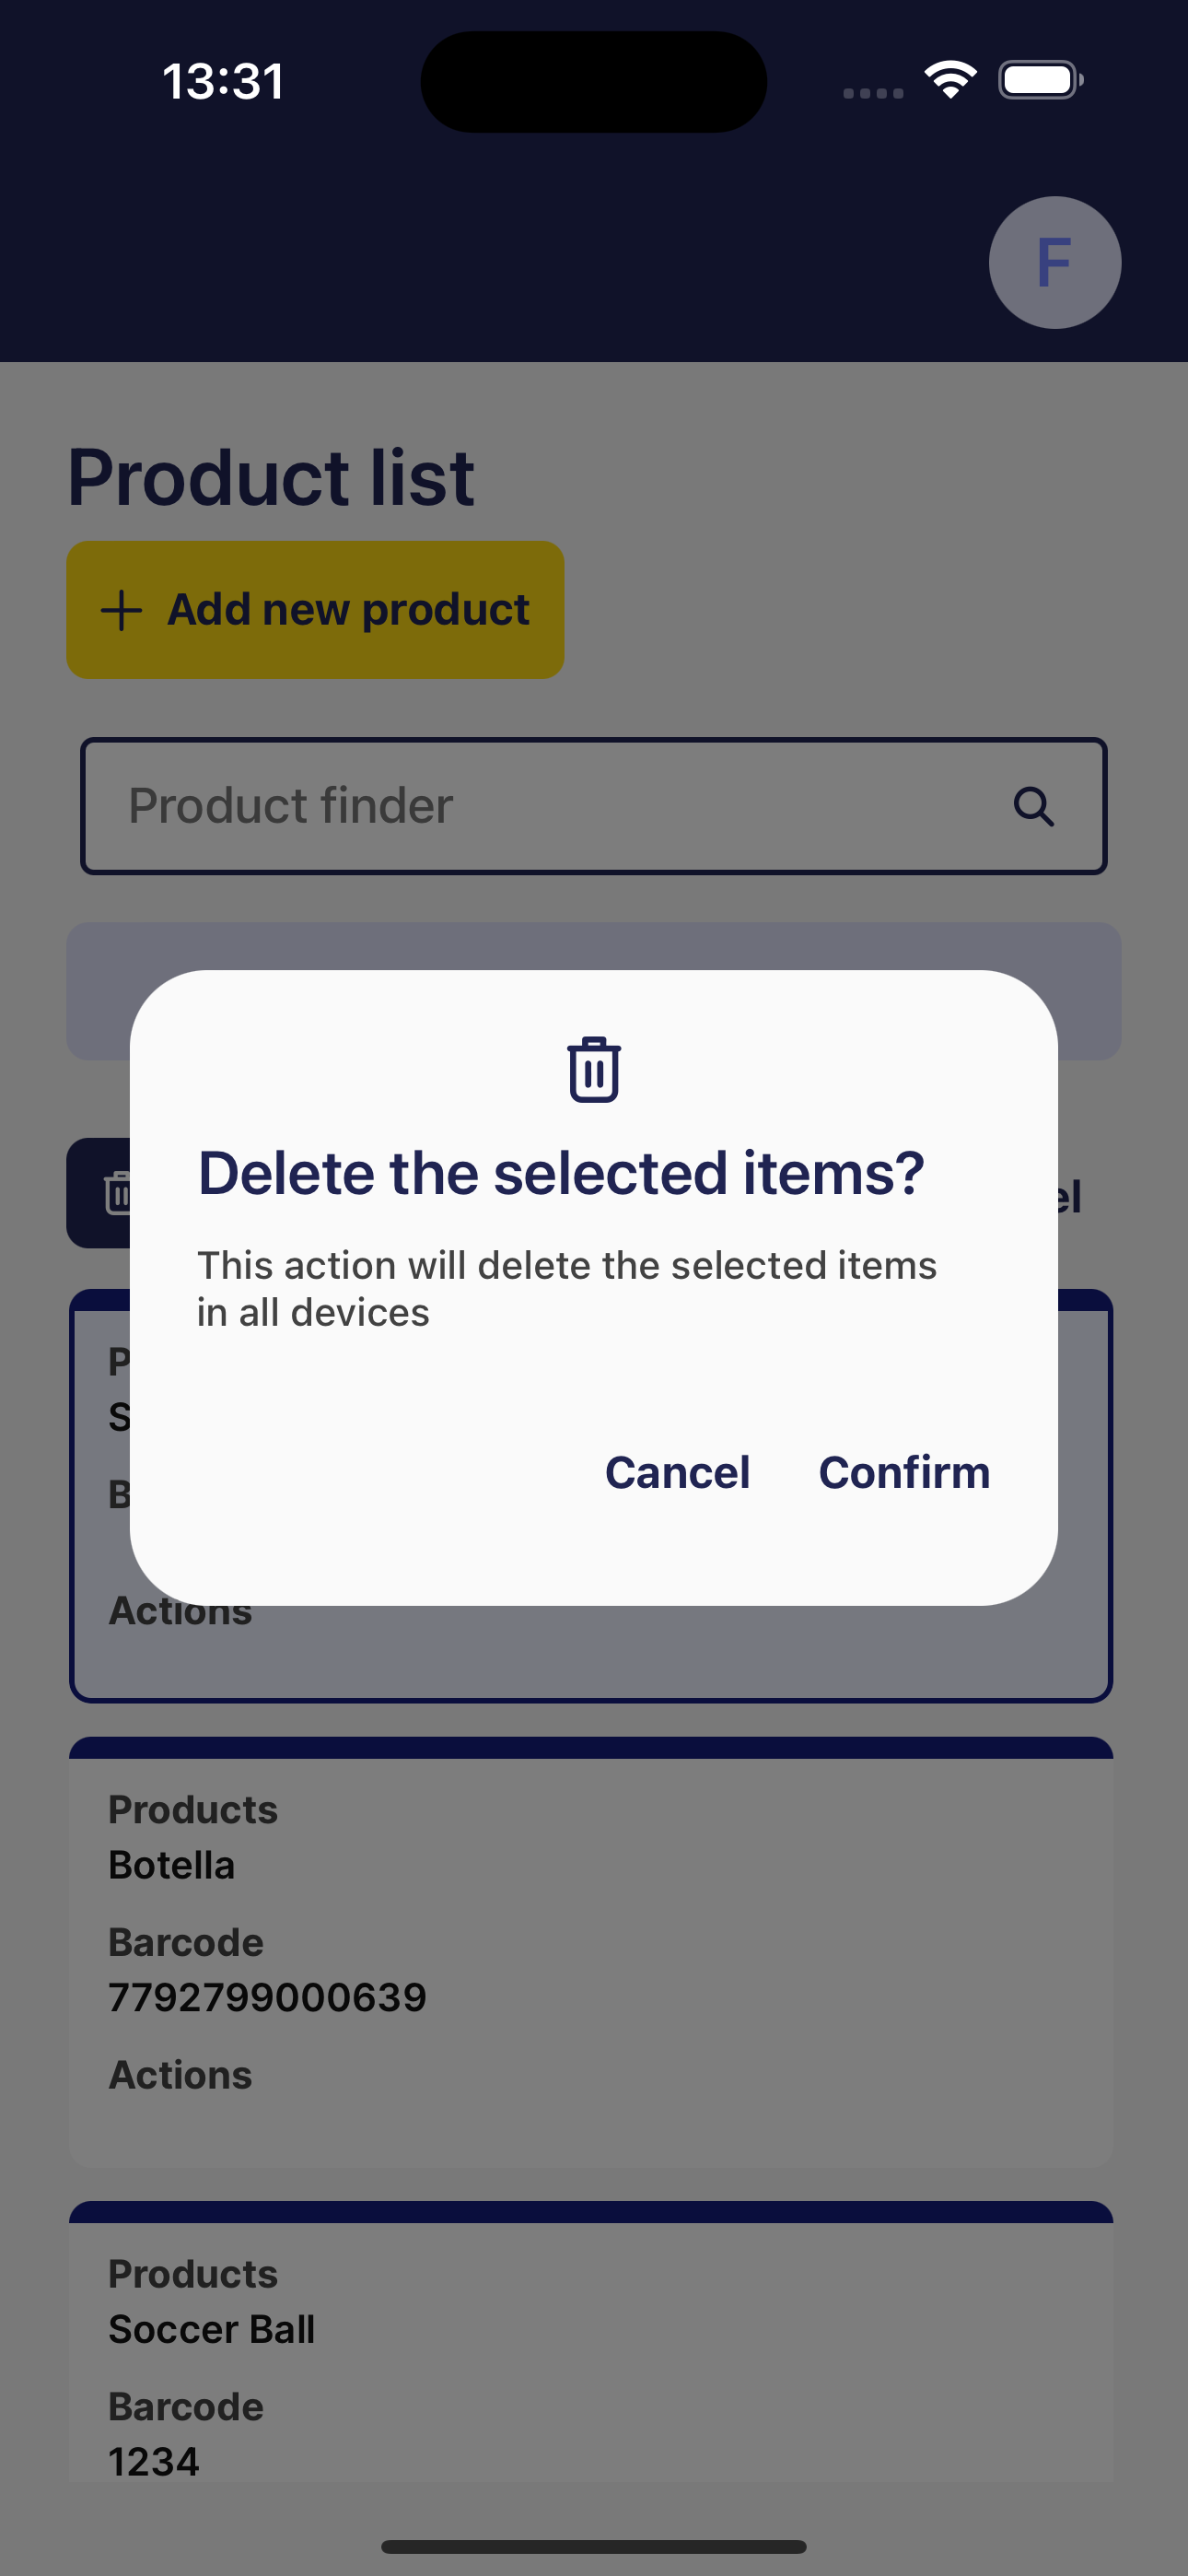
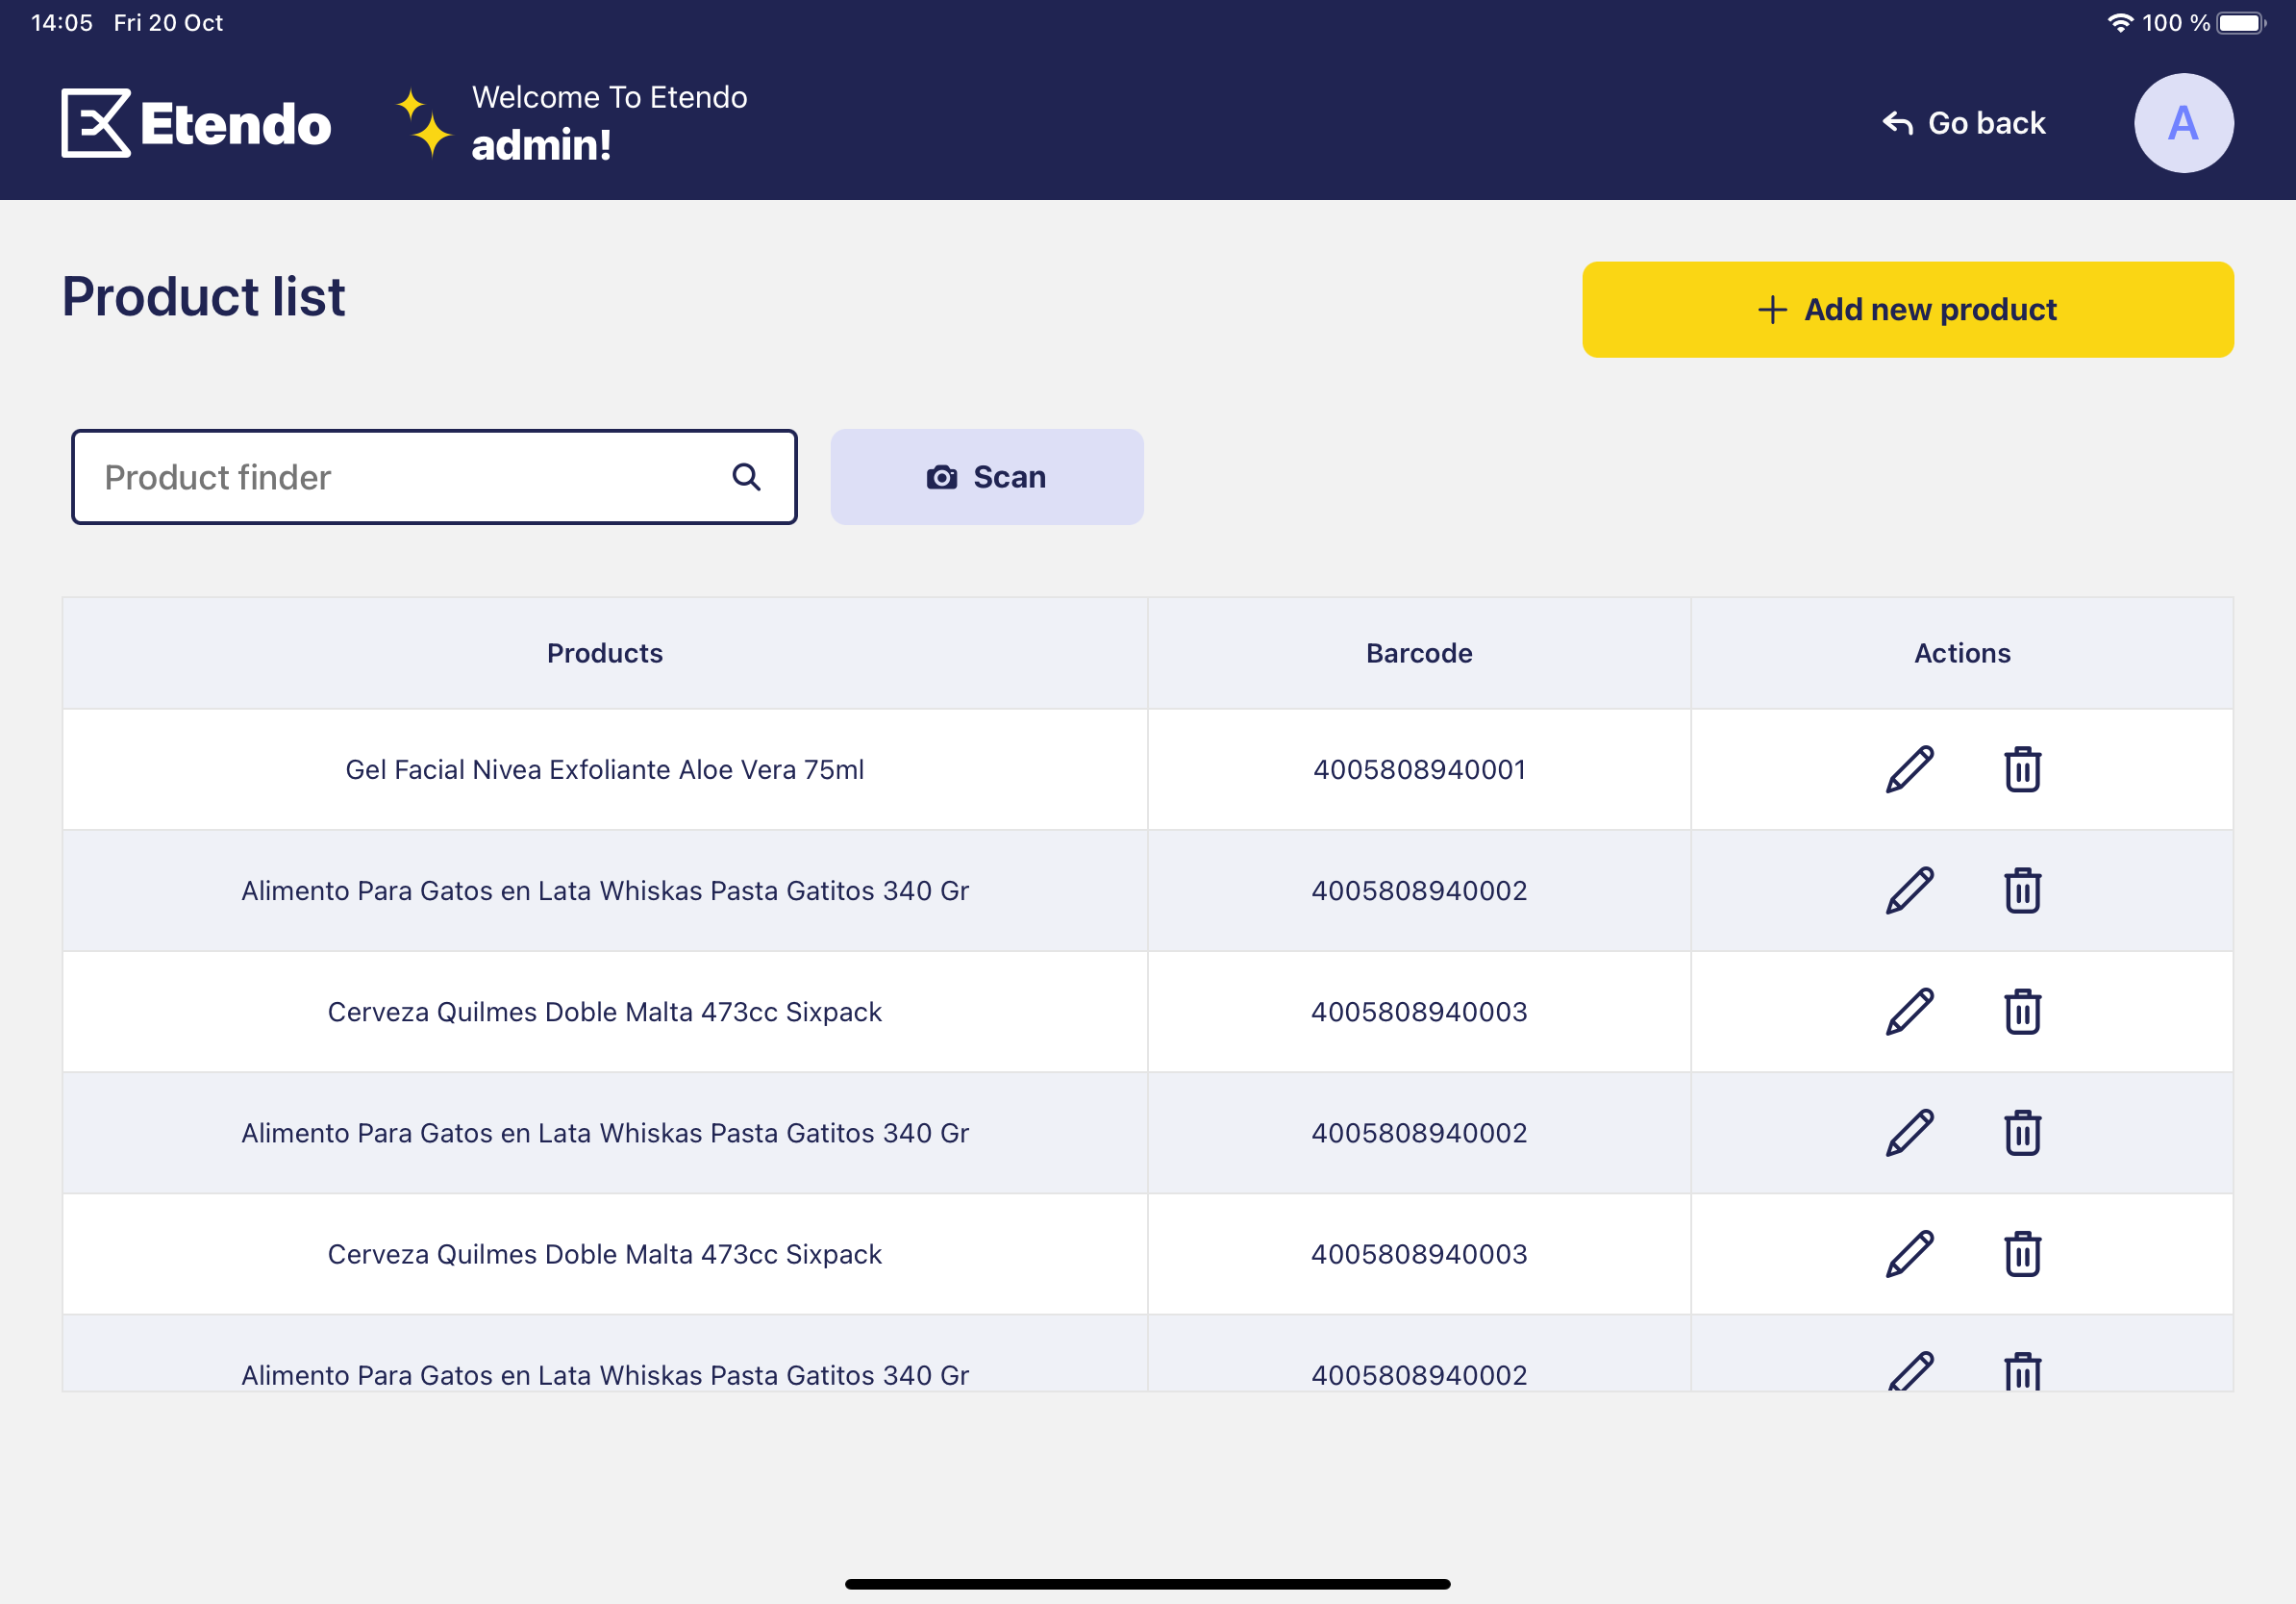
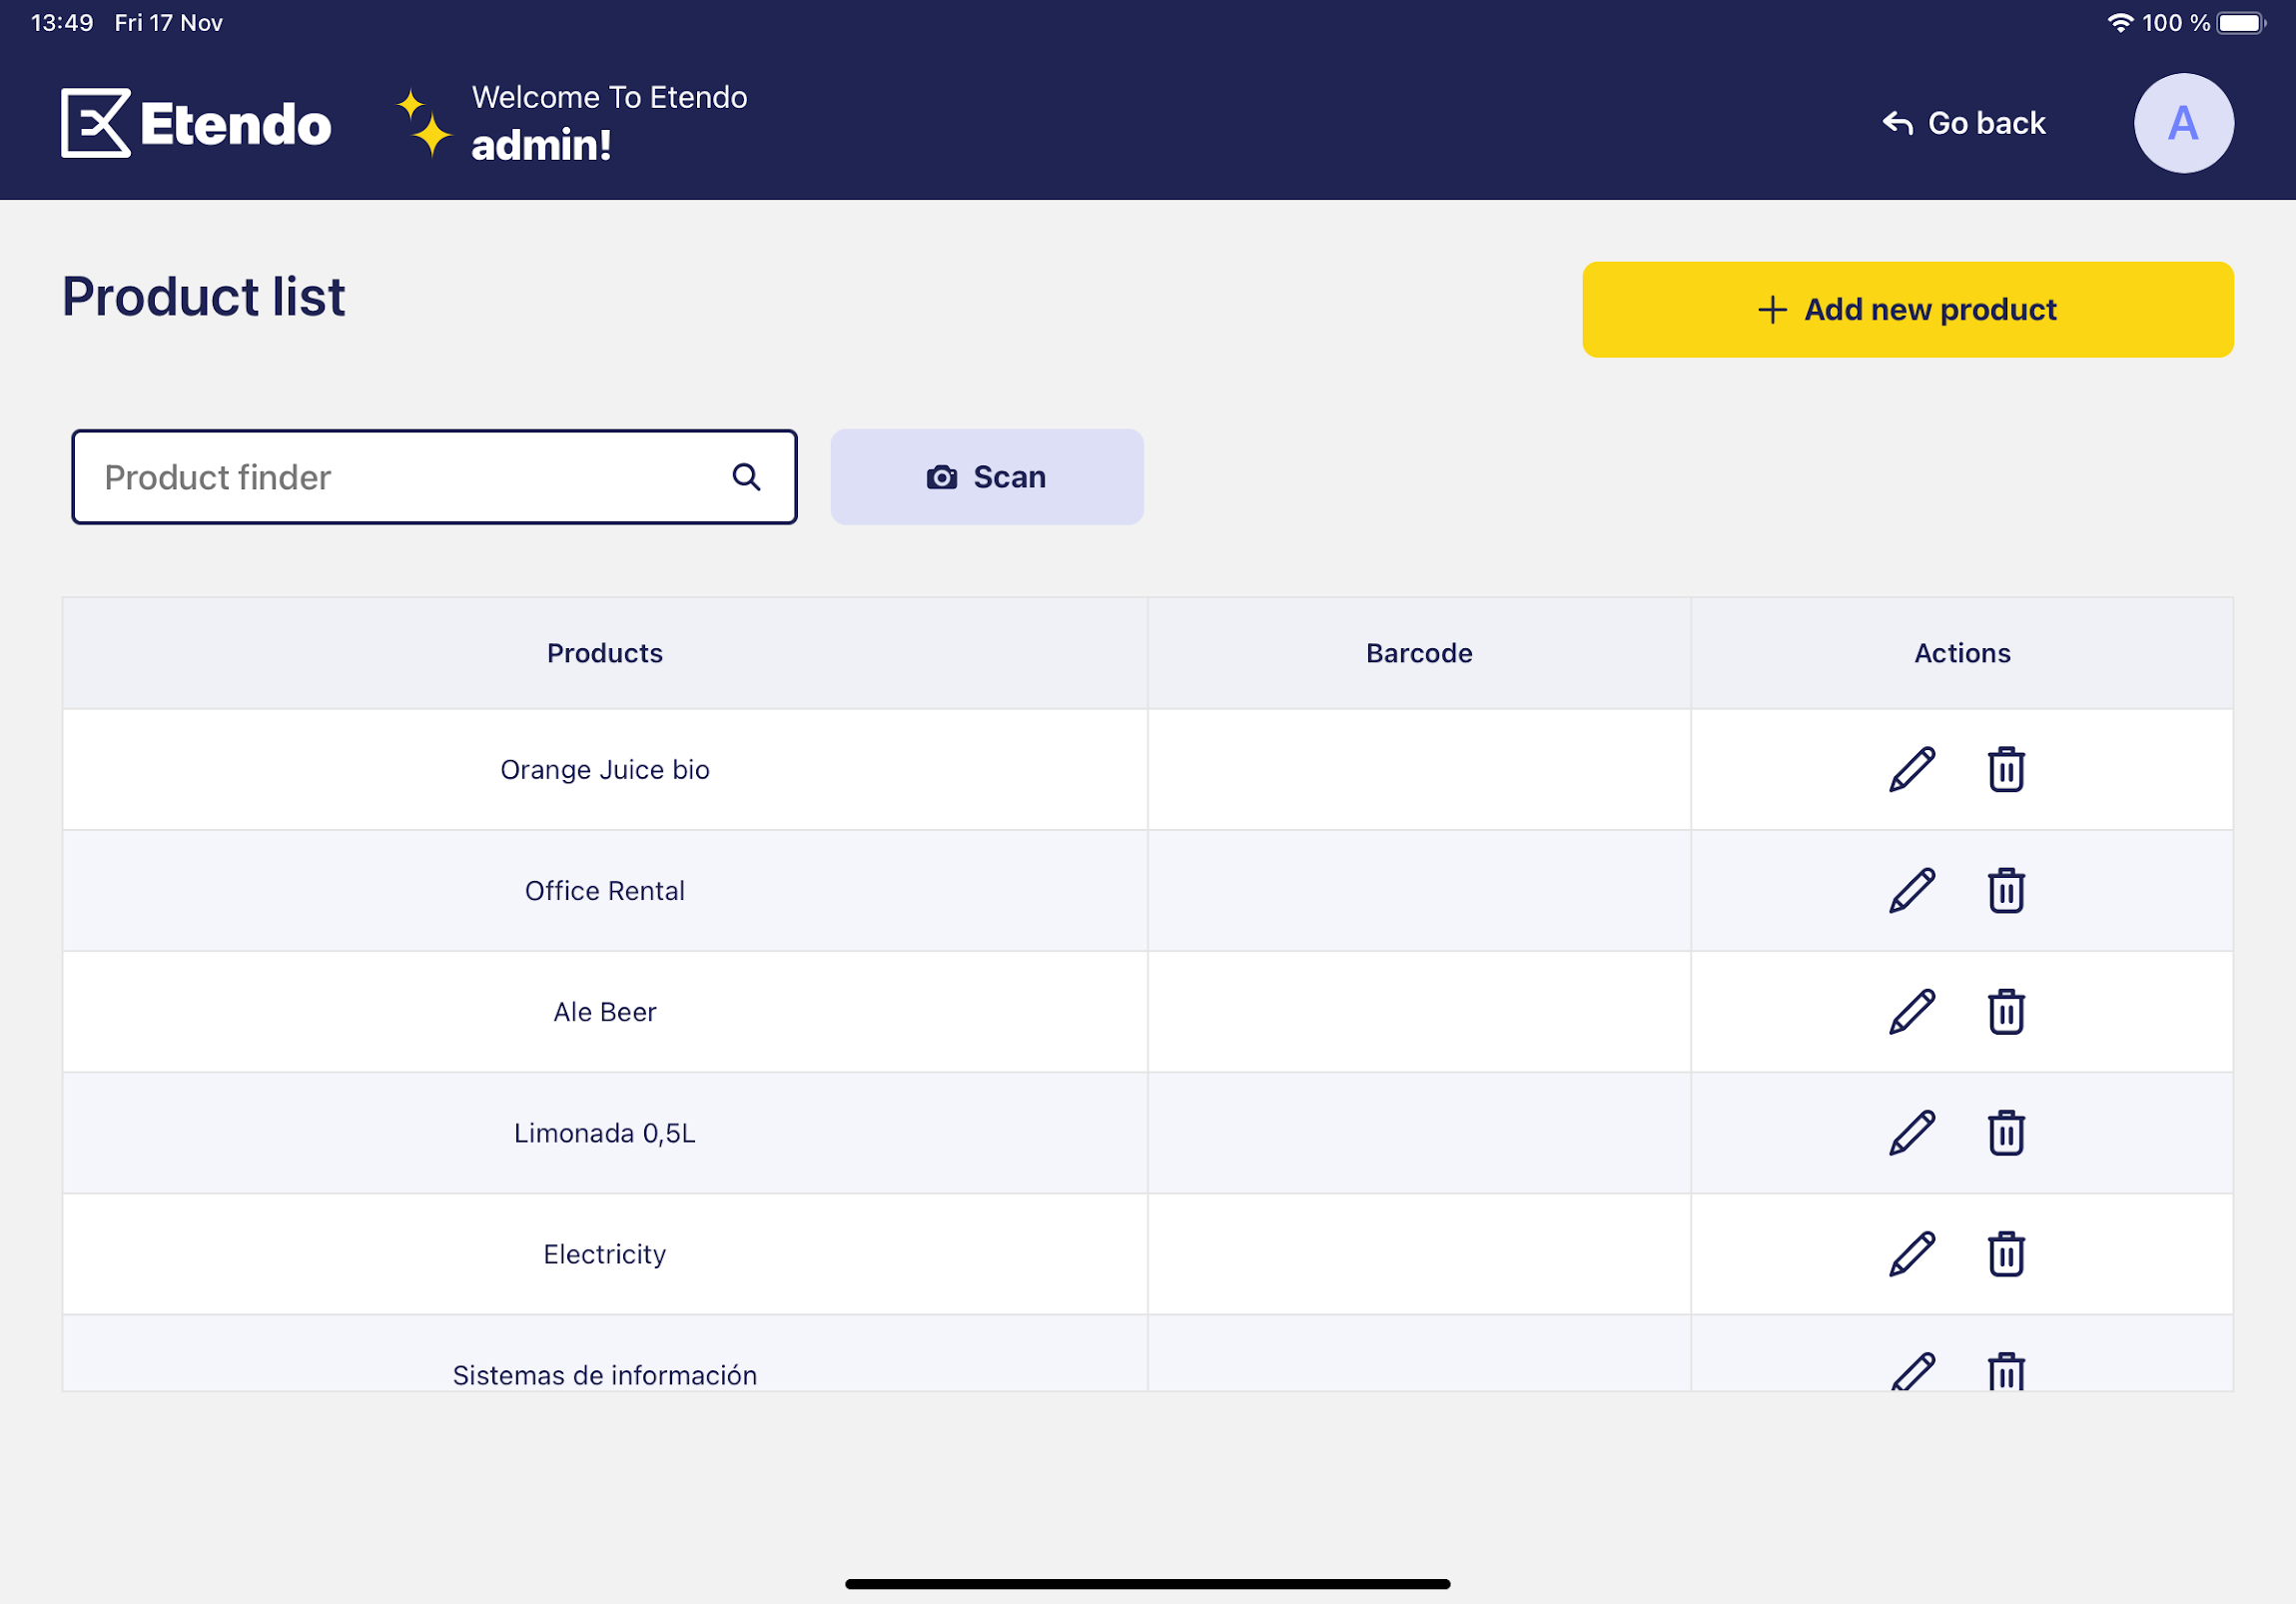
Home
This is the main screen of the subapplication. It will show a list of products. Also, it will allow us to edit and remove a product, find a product by name and navigate to the detail of a product.
The route to this screen is src/screens/home/index.tsx and it can be consulted on the Github repository.
Key Components:
Navbar: Positioned at the top, it displays the application's title and user's name, offering navigation controls.
ButtonUI: A customizable UI button from Etendo UI Library, used for actions like navigating to product details. It can be styled in terms of size, style, and includes icons.
SearchContainer: Enables product search by name, allowing the product list to be updated based on the query using the component from Etendo UI Library.
TableUI: Displays products in a table format, allowing interactions such as editing, deleting or viewing product details. Available in the tablet or web version.
Cards: Used to display product details in a card format, providing a more detailed view of the product. Only available in the mobile version.
Layout and Style: The screen is designed to be responsive for both mobile and tablet formats, with a layout comprising the navbar, button, search bar, and table. Styles are defined in the styles object for consistency.
Tablet version
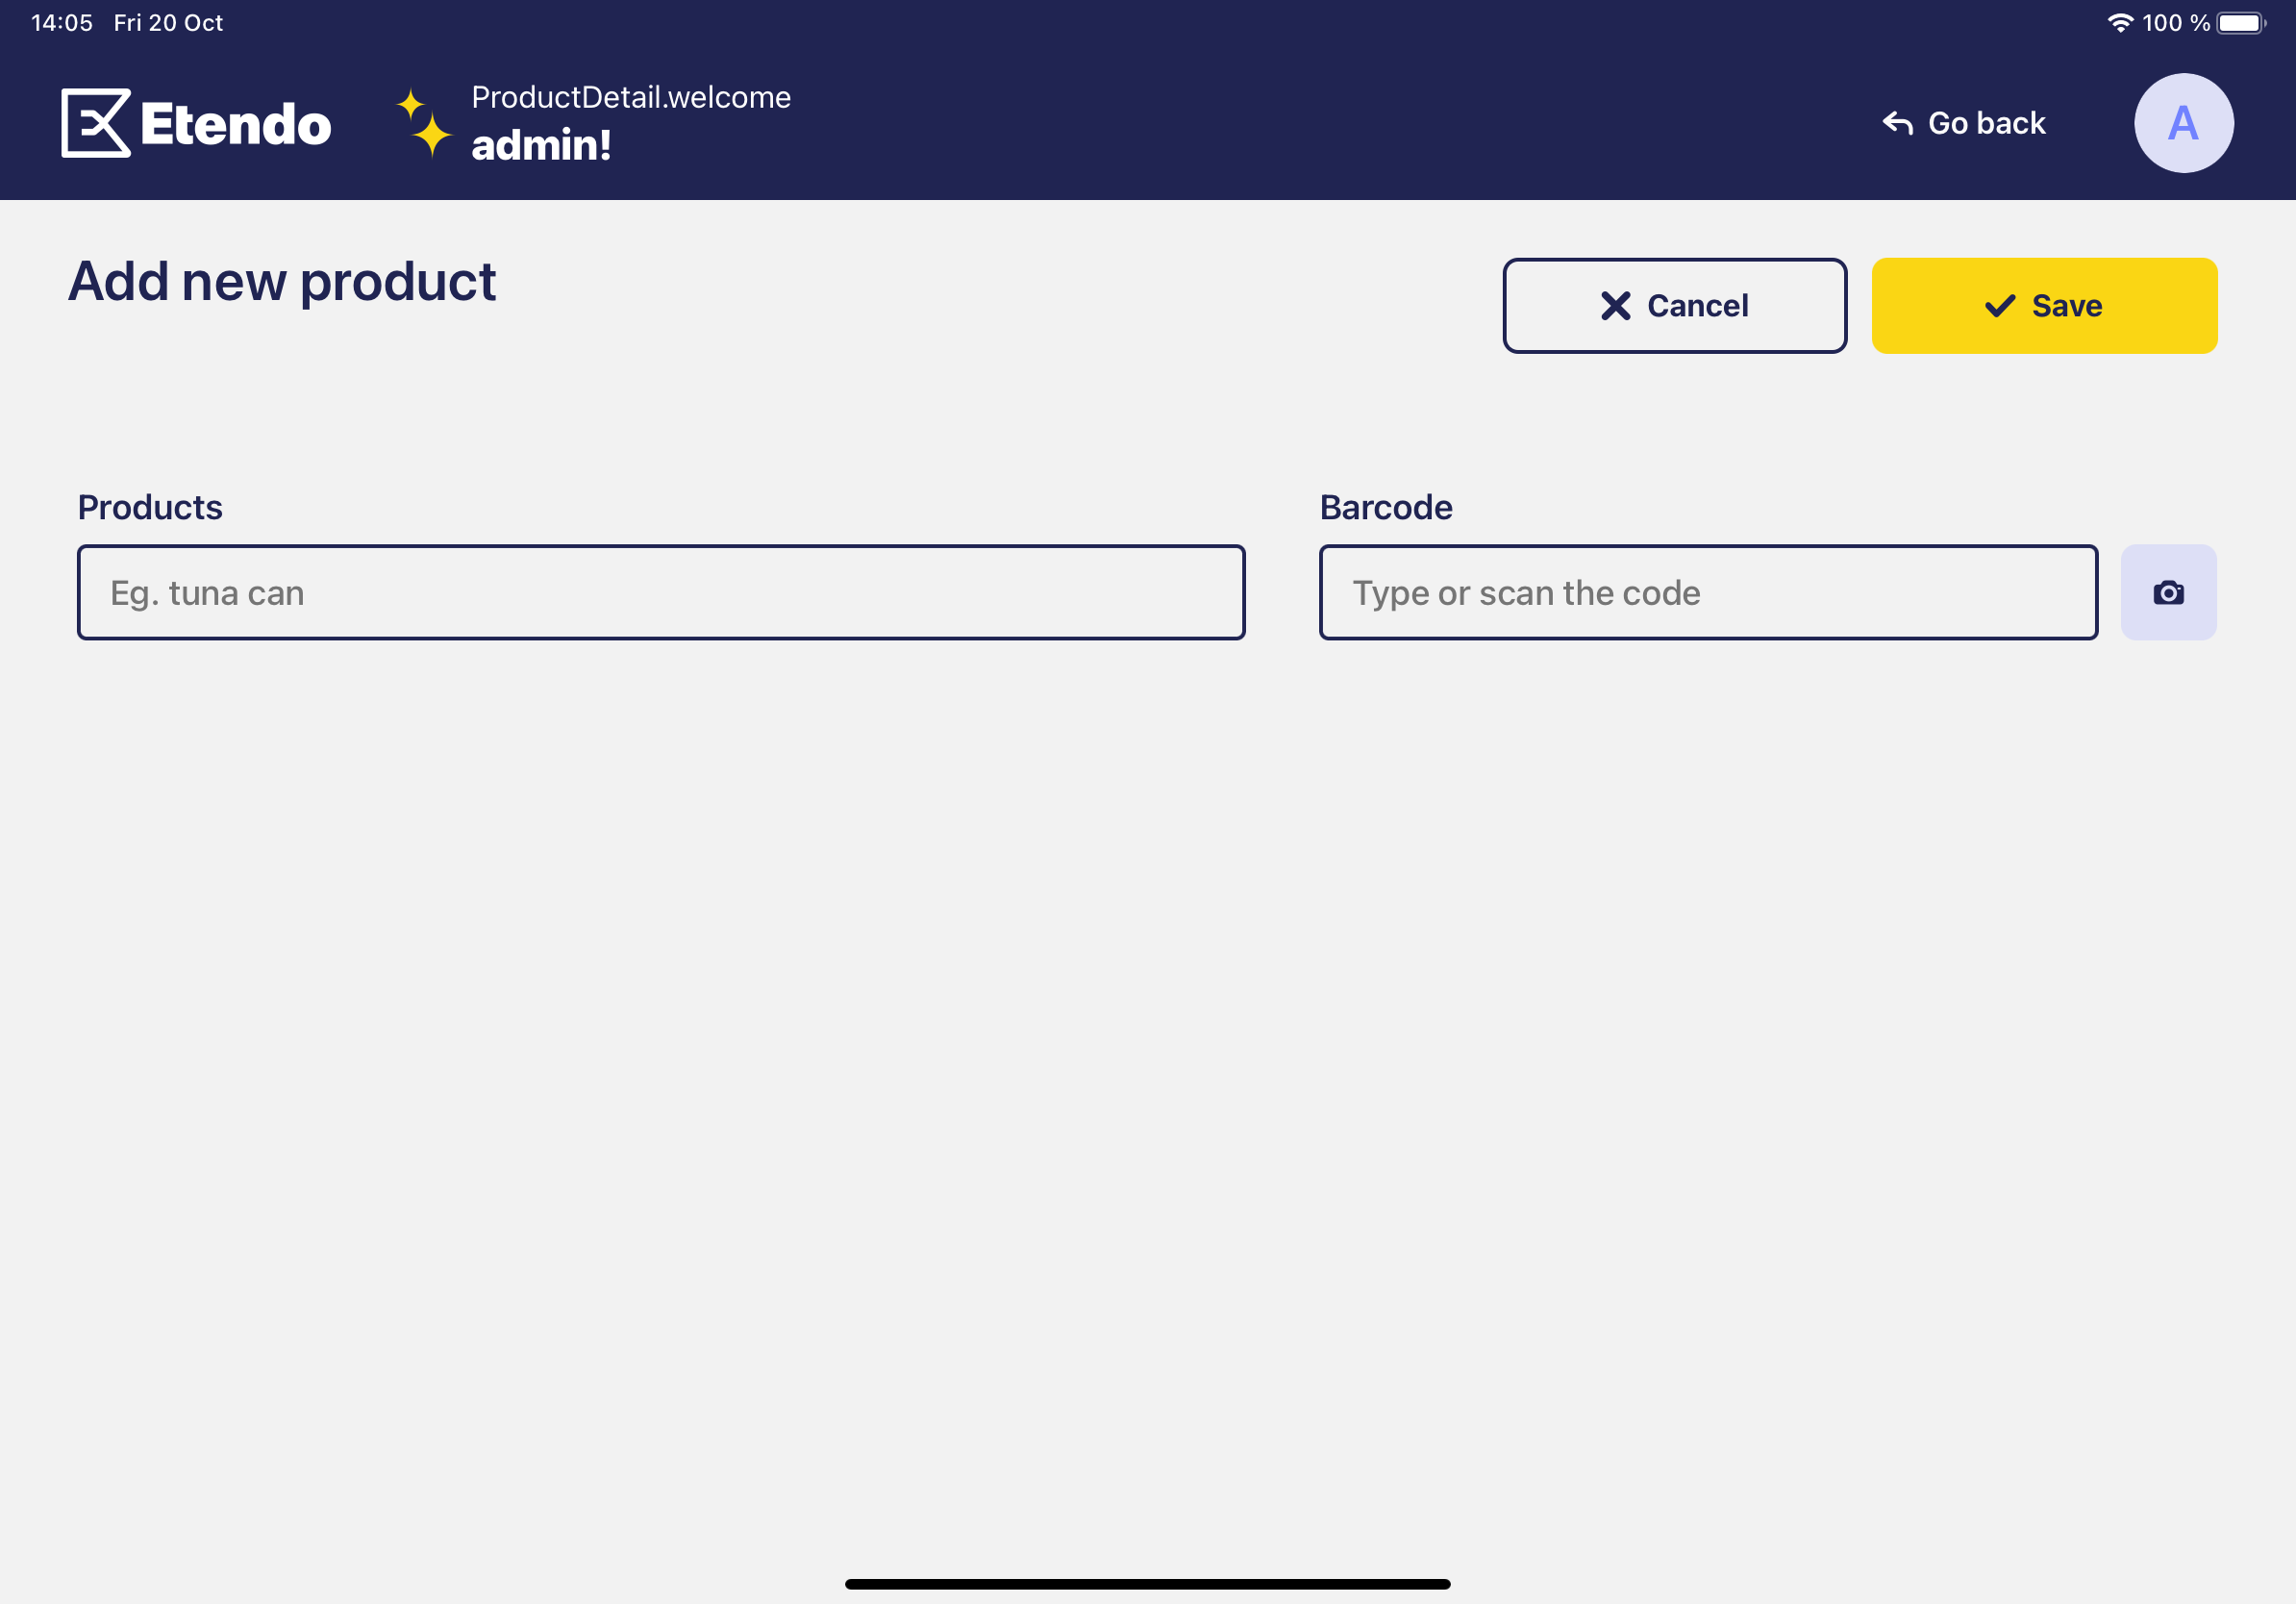
ProductDetail
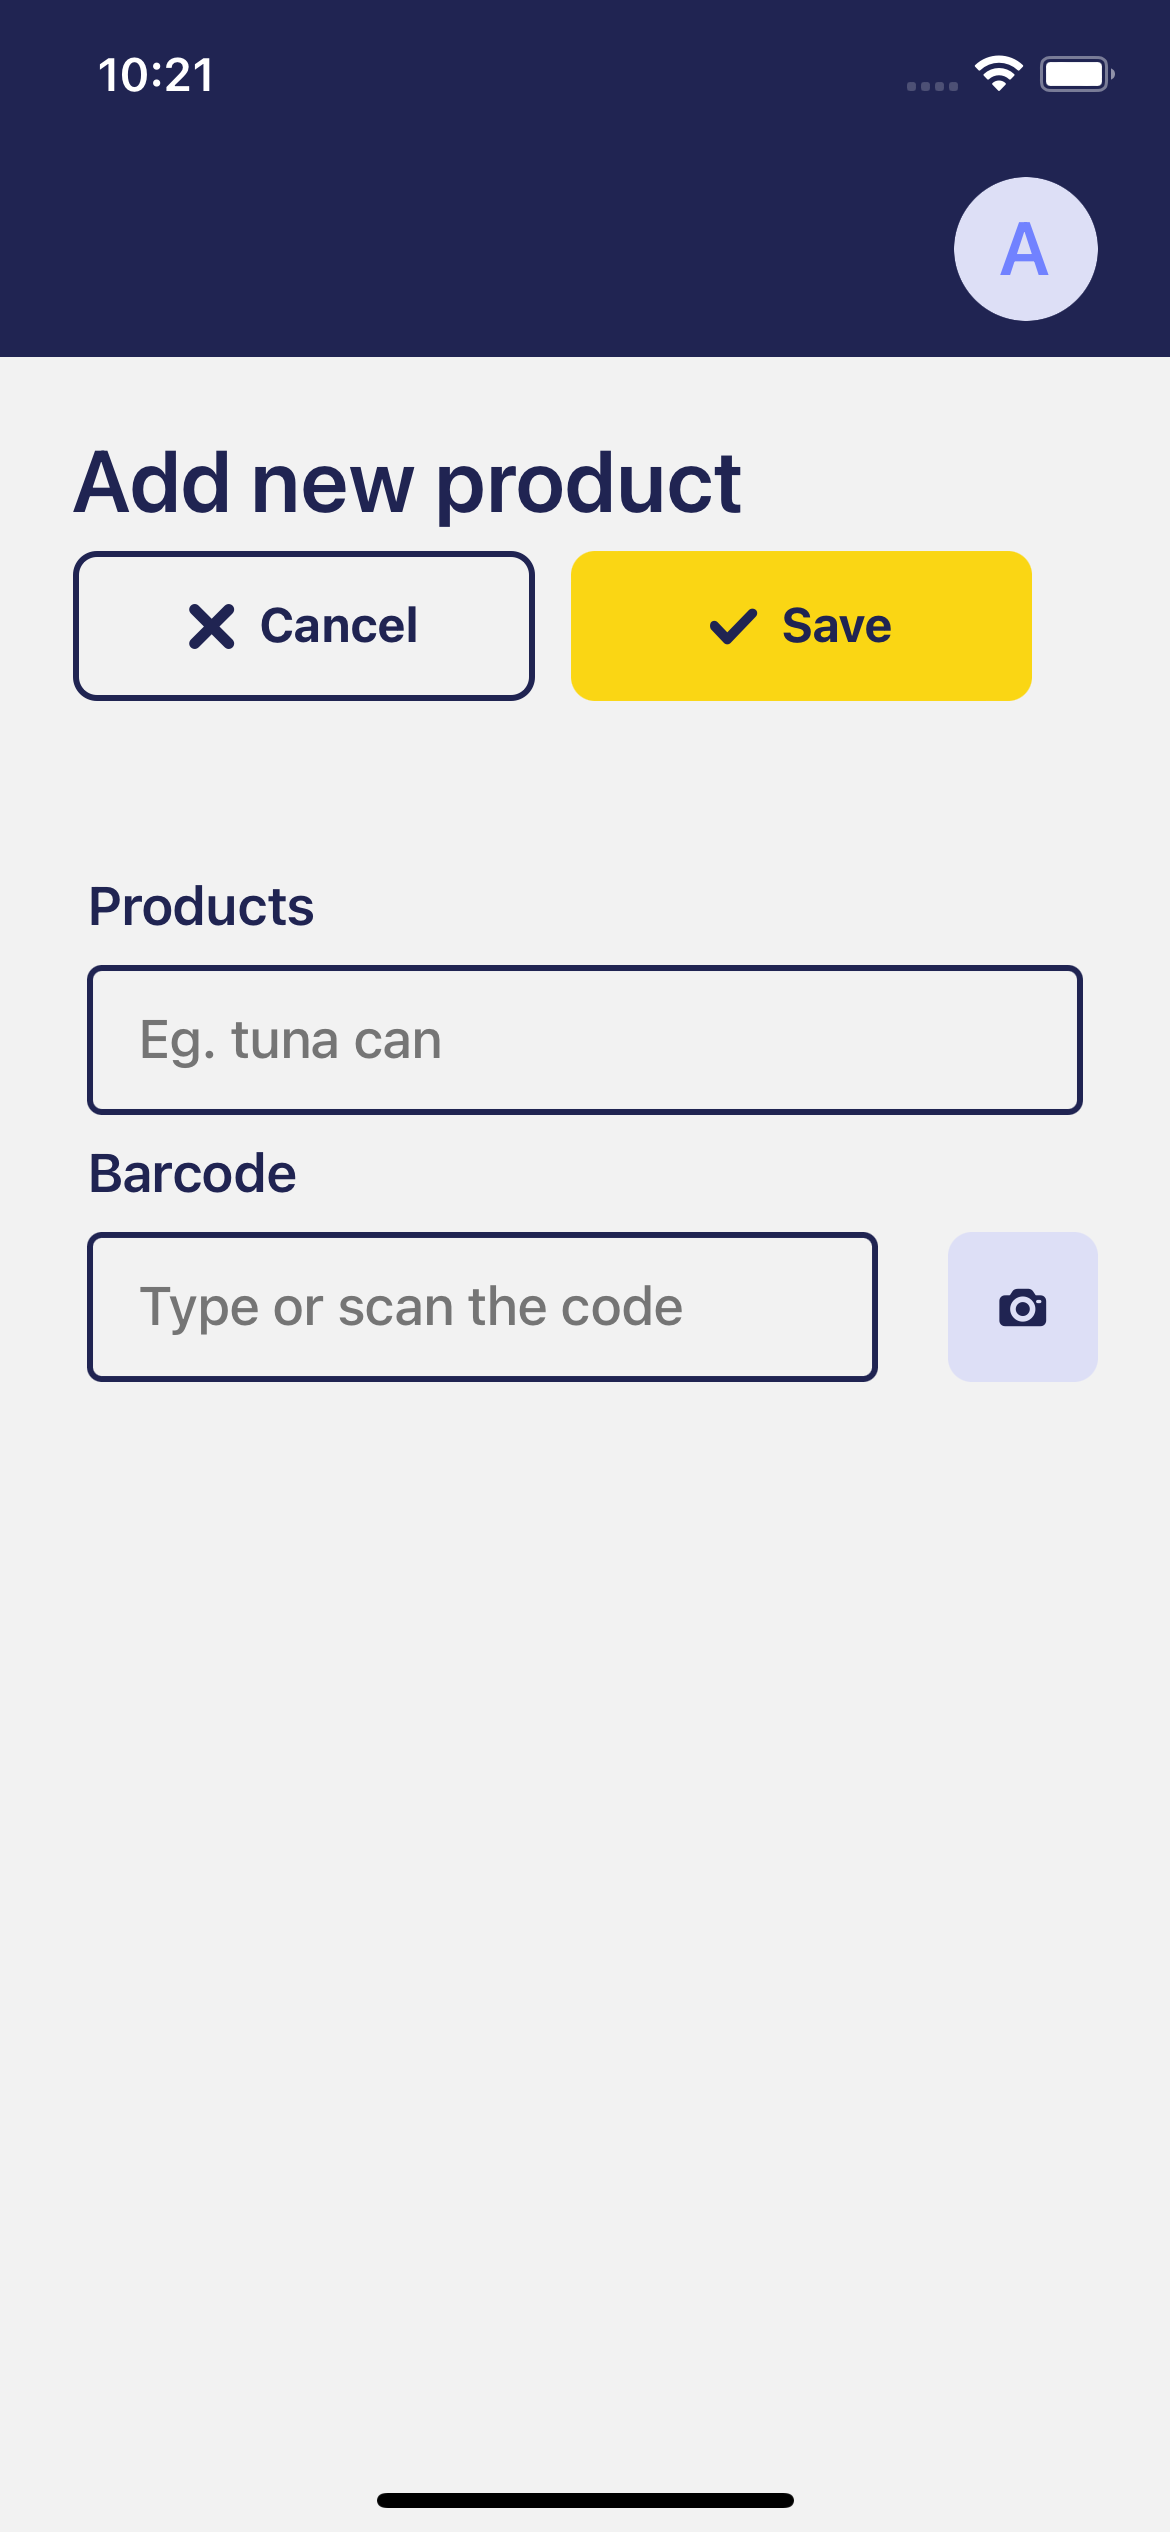
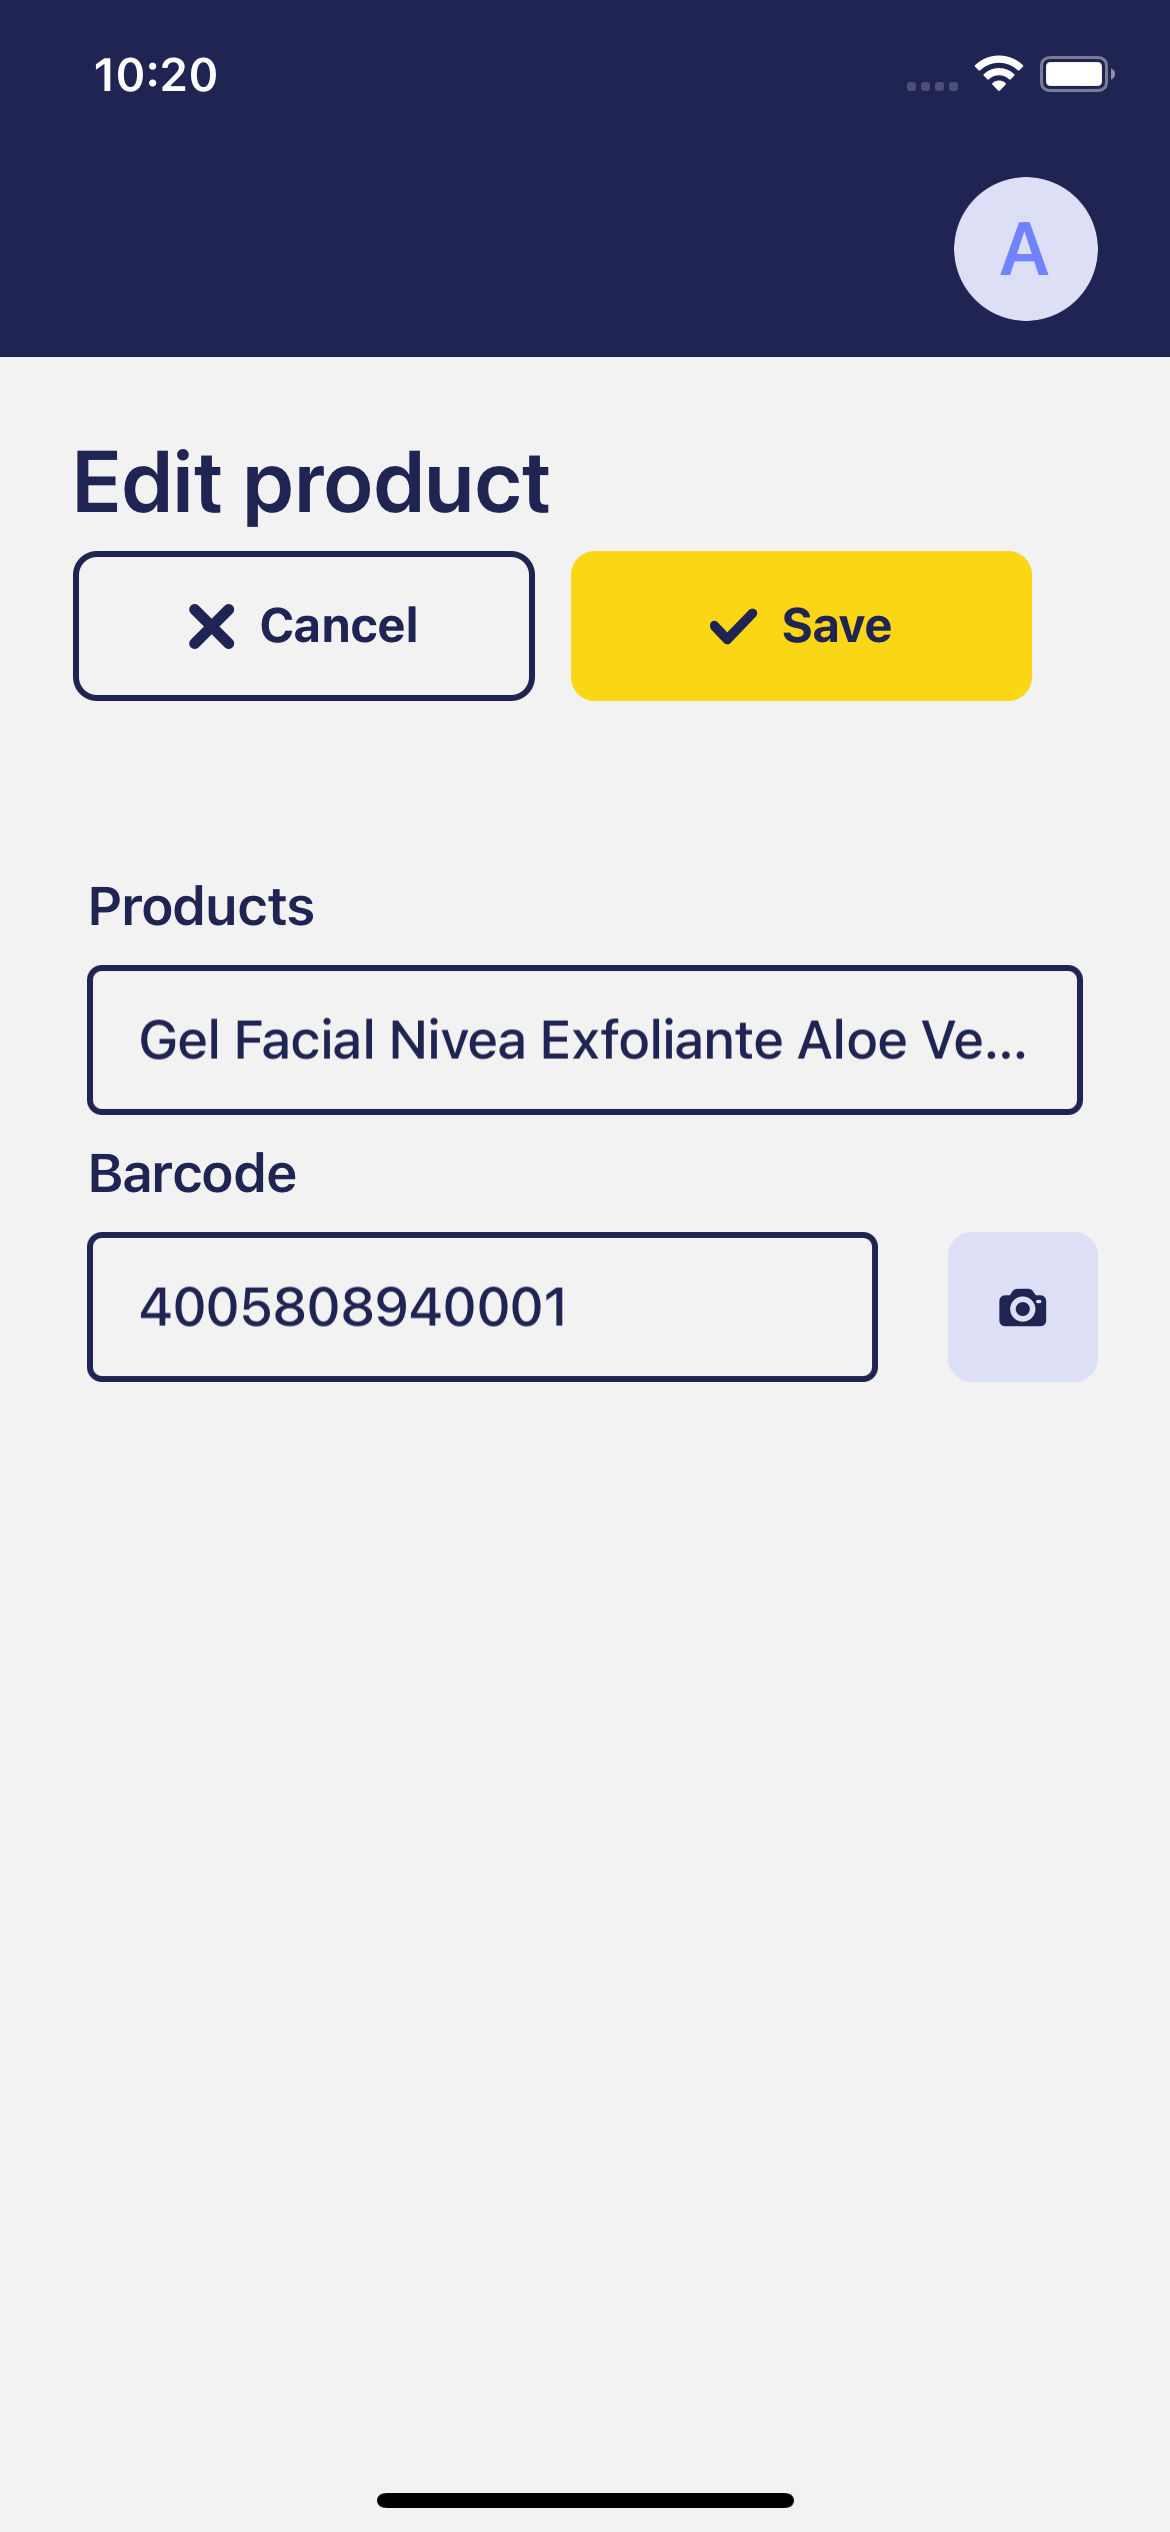
This screen will show the detail of a product. Also, it will allow us to edit the product.
It's the same screen used to create a new product. there is a flag to know if the product is new or not (productItem).
The route to this screen is src/screens/productDetail/index.tsx and it can be consulted on the Github repository{target="blank"}.
_Tablet version
Projections, Repository and Search
Info
In this section we will explain how to configure the projections, repository and search needed in this example. For more info visit Projections, Repository And Search official documentation.
Create a projection
It is required to create projections that reflect partial views of the root class and contain only the necessary properties.
To do this we will go to the Projections window and create a projection with the following properties:
Field
Value
Module
Subapp Product Module - 1.0.0 - English (USA)
Name
ProdSubApp
Description
-
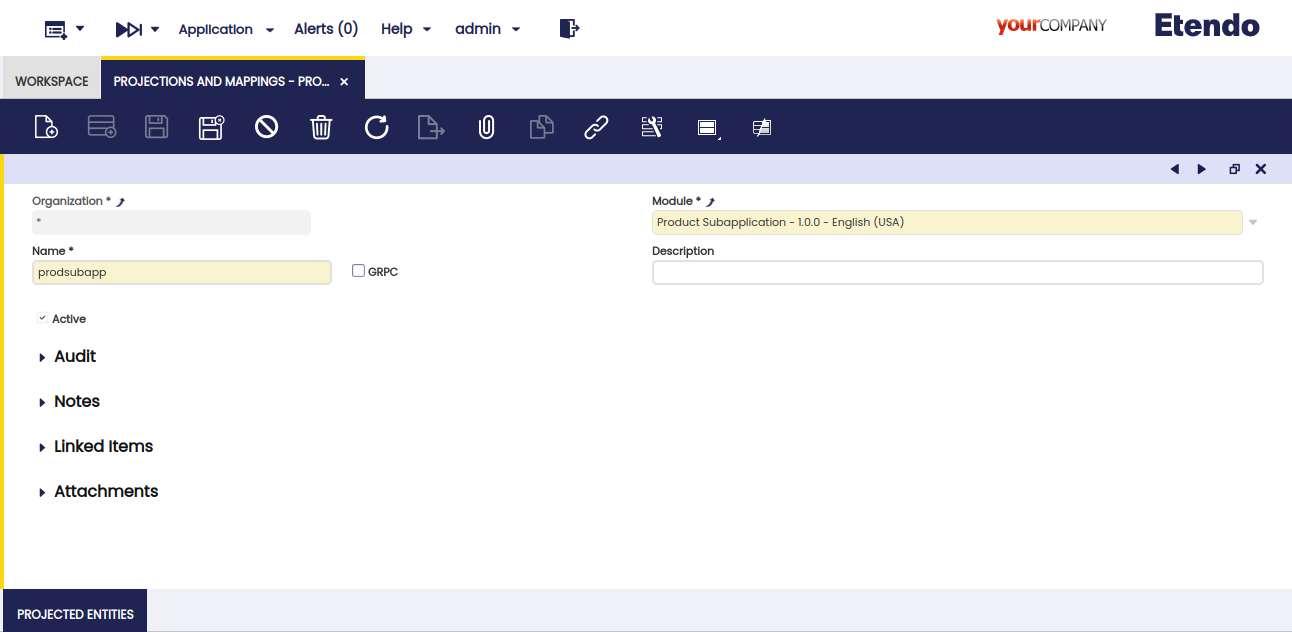
Adding the projection and mapping
Having created the projection, we now need to map it to a table from which we want to extract data. To do this, we open the Projections and Mappings window.
Next, we add a new record with the following values:
Field
Value
Organization
*
Module
Product Subapplication - 1.0.0 - English (USA)
Name
prodsubapp
GRPC
false
description
-
active
false
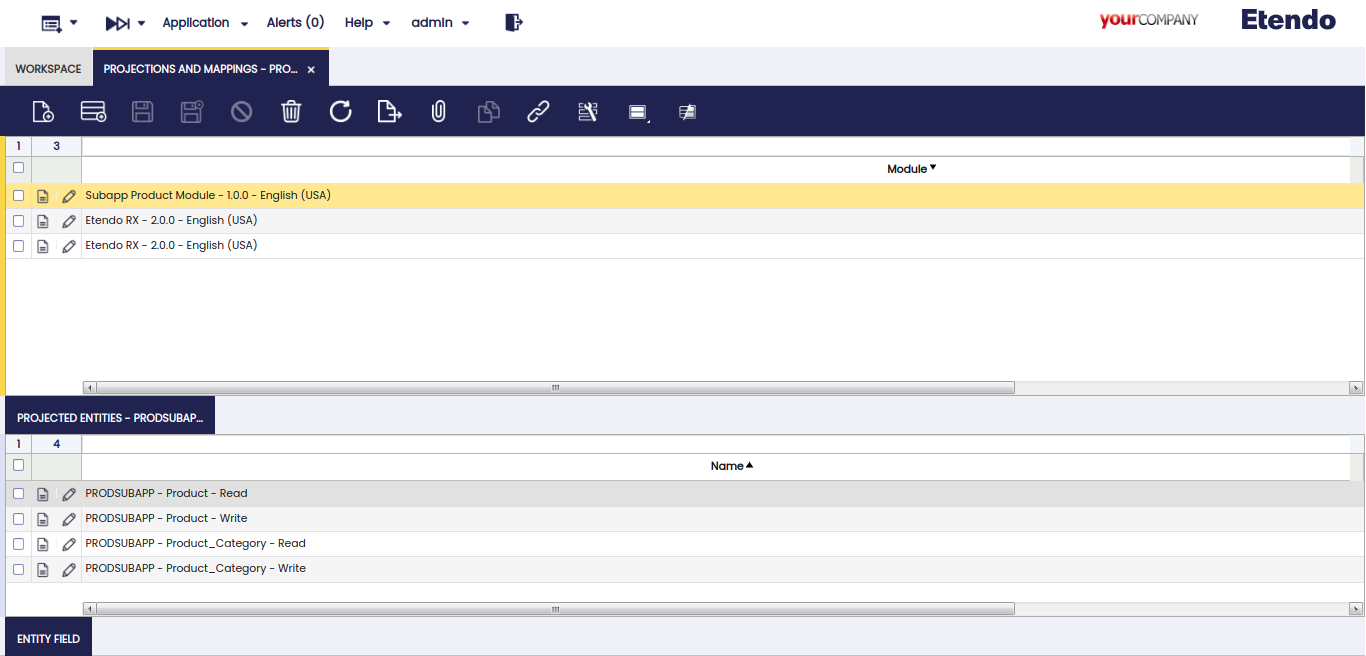
Adding projected entities
Now with the projection selected add in the Projected Entities tab the write and read projections of Product and Product_Category in which we can specify the required values from the M_Product table.
Name
Property
Organization
*
Name
PRODSUBAPP - Product - Read
Table
M_Product
Identity
false
Mapping Type
Etendo to external system
Is Rest Endopoint
true
External_Name
Product
Active
true
Name
Property
Organization
*
Name
PRODSUBAPP - Product - Write
Table
M_Product
Identity
false
Mapping Type
External system to Etendo
Is Rest Endopoint
true
External_Name
Product
Active
true
Name
Property
Organization
*
Name
PRODSUBAPP - M_Product_Category - Read
Table
M_Product_Category
Identity
false
Mapping Type
Etendo to external system
Is Rest Endopoint
true
External_Name
M_Product_Category
Active
true
Name
Property
Organization
*
Name
PRODSUBAPP - M_Product_Category - Write
Table
M_Product
Identity
false
Mapping Type
External system to Etendo
Is Rest Endopoint
true
External_Name
Product
Active
true
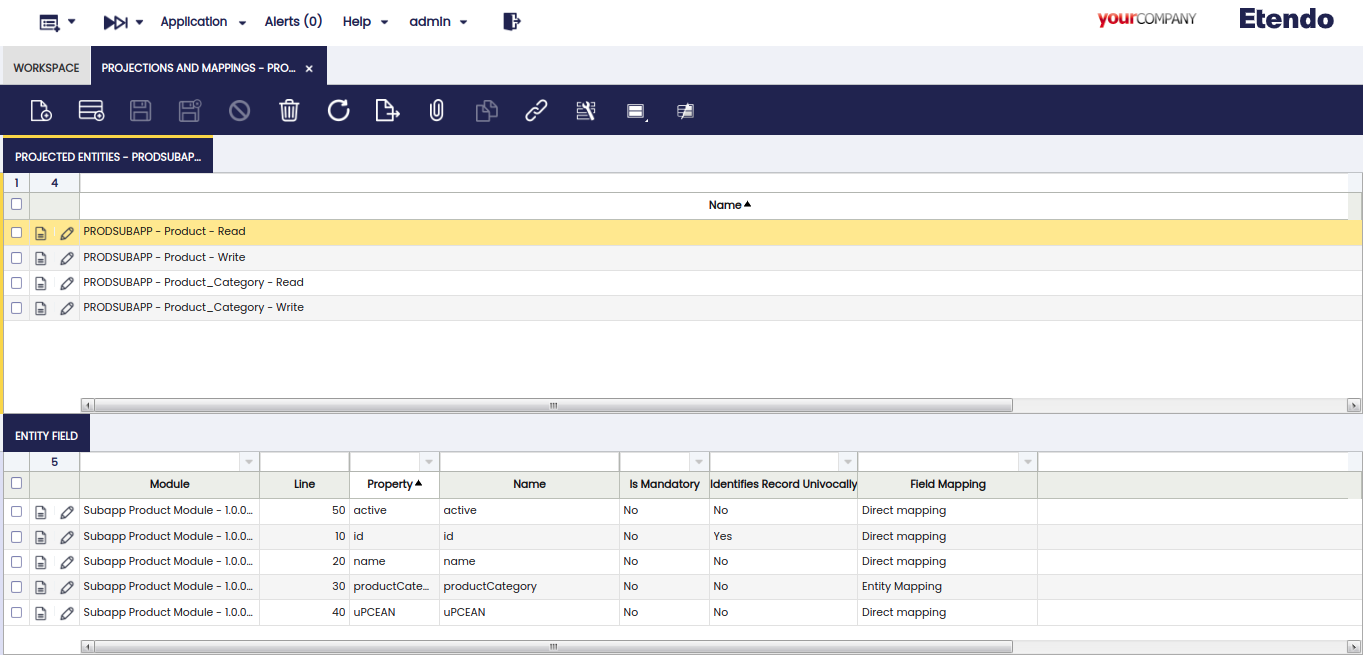
Now we define which fields we want to retrieve in the Entity Field tab by adding the following fields:
This is the M_Product - Read fields.
Name
Property
Module
Product Subapplication - 1.0.0 - English (USA)
Organization
*
Line
10
Property
id
Name
id
Is Mandatory
false
Identifies Record Univocally
true
Field Mapping
Direct mapping
Constant Value
-
Active
true
Name
Property
Module
Product Subapplication - 1.0.0 - English (USA)
Organization
*
Line
20
Property
name
Name
name
Is Mandatory
false
Identifies Record Univocally
false
Field Mapping
Direct mapping
Constant Value
-
Active
true
Name
Property
Module
Product Subapplication - 1.0.0 - English (USA)
Organization
*
Line
30
Property
productCategory
Name
productCategory
Is Mandatory
false
Identifies Record Univocally
false
Field Mapping
Entity Mapping
Related Projection Entity
PRODSUBAPP - M_Product_Category - Read
Constant Value
-
Active
true
Name
Property
Module
Product Subapplication - 1.0.0 - English (USA)
Organization
*
Line
40
Property
uPCEAN
Name
uPCEAN
Is Mandatory
false
Identifies Record Univocally
false
Field Mapping
Direct mapping
Constant Value
-
Active
true
Name
Property
Module
Product Subapplication - 1.0.0 - English (USA)
Organization
*
Line
50
Property
active
Name
active
Is Mandatory
false
Identifies Record Univocally
false
Field Mapping
Direct mapping
Constant Value
-
Active
true
This is the M_Product - Write fields.
Name
Property
Module
Product Subapplication - 1.0.0 - English (USA)
Organization
*
Line
10
Property
id
Name
id
Is Mandatory
false
Identifies Record Univocally
true
Field Mapping
Direct mapping
Constant Value
-
Active
true
Name
Property
Module
Product Subapplication - 1.0.0 - English (USA)
Organization
*
Line
20
Property
name
Name
name
Is Mandatory
false
Identifies Record Univocally
false
Field Mapping
Direct mapping
Constant Value
-
Active
true
Name
Property
Module
Product Subapplication - 1.0.0 - English (USA)
Organization
*
Line
30
Property
uPCEAN
Name
uPCEAN
Is Mandatory
false
Identifies Record Univocally
false
Field Mapping
Direct mapping
Constant Value
-
Active
true
Name
Property
Module
Product Subapplication - 1.0.0 - English (USA)
Organization
*
Line
40
Property
searchKey
Name
searchKey
Is Mandatory
false
Identifies Record Univocally
false
Field Mapping
Java Mapping
Java Mapping
PRODSUBAPPProductValueWrite
Constant Value
-
Active
true
Name
Property
Module
Product Subapplication - 1.0.0 - English (USA)
Organization
*
Line
50
Property
active
Name
active
Is Mandatory
false
Identifies Record Univocally
false
Field Mapping
Direct mapping
Constant Value
-
Active
true
This is the M_Product_Category - Read fields.
Name
Property
Module
Product Subapplication - 1.0.0 - English (USA)
Organization
*
Line
10
Property
id
Name
id
Is Mandatory
false
Identifies Record Univocally
true
Field Mapping
Direct mapping
Constant Value
-
Active
true
Name
Property
Module
Product Subapplication - 1.0.0 - English (USA)
Organization
*
Line
20
Property
name
Name
name
Is Mandatory
false
Identifies Record Univocally
false
Field Mapping
Direct mapping
Constant Value
-
Active
true
This is the M_Product_Category - Write fields.
Name
Property
Module
Product Subapplication - 1.0.0 - English (USA)
Organization
*
Line
10
Property
id
Name
id
Is Mandatory
false
Identifies Record Univocally
true
Field Mapping
Direct mapping
Constant Value
-
Active
true
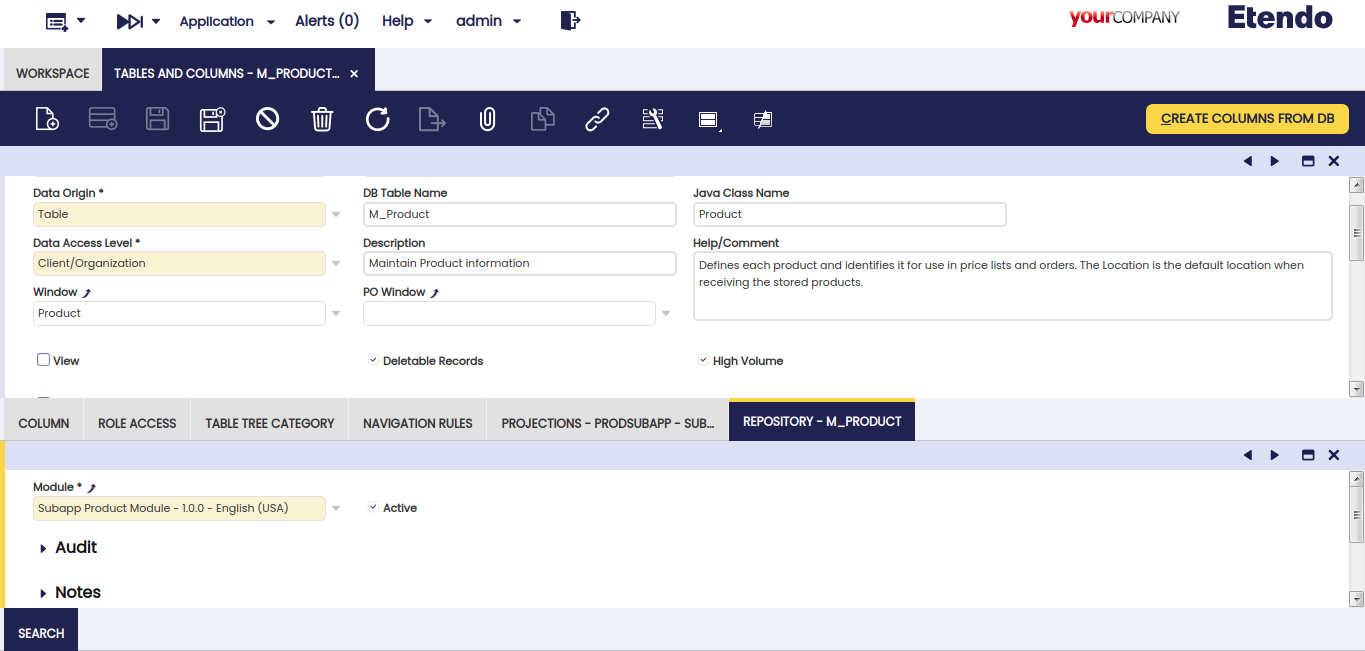
Create a New Repository
Now to interact with a data warehouse we have to create a repository in the Tables and Columns window select the table M_Product, go to the Repository tab and create a new record with the following values:
Field
Value
Module
Subapp Product Module - 1.0.0 - English (USA)
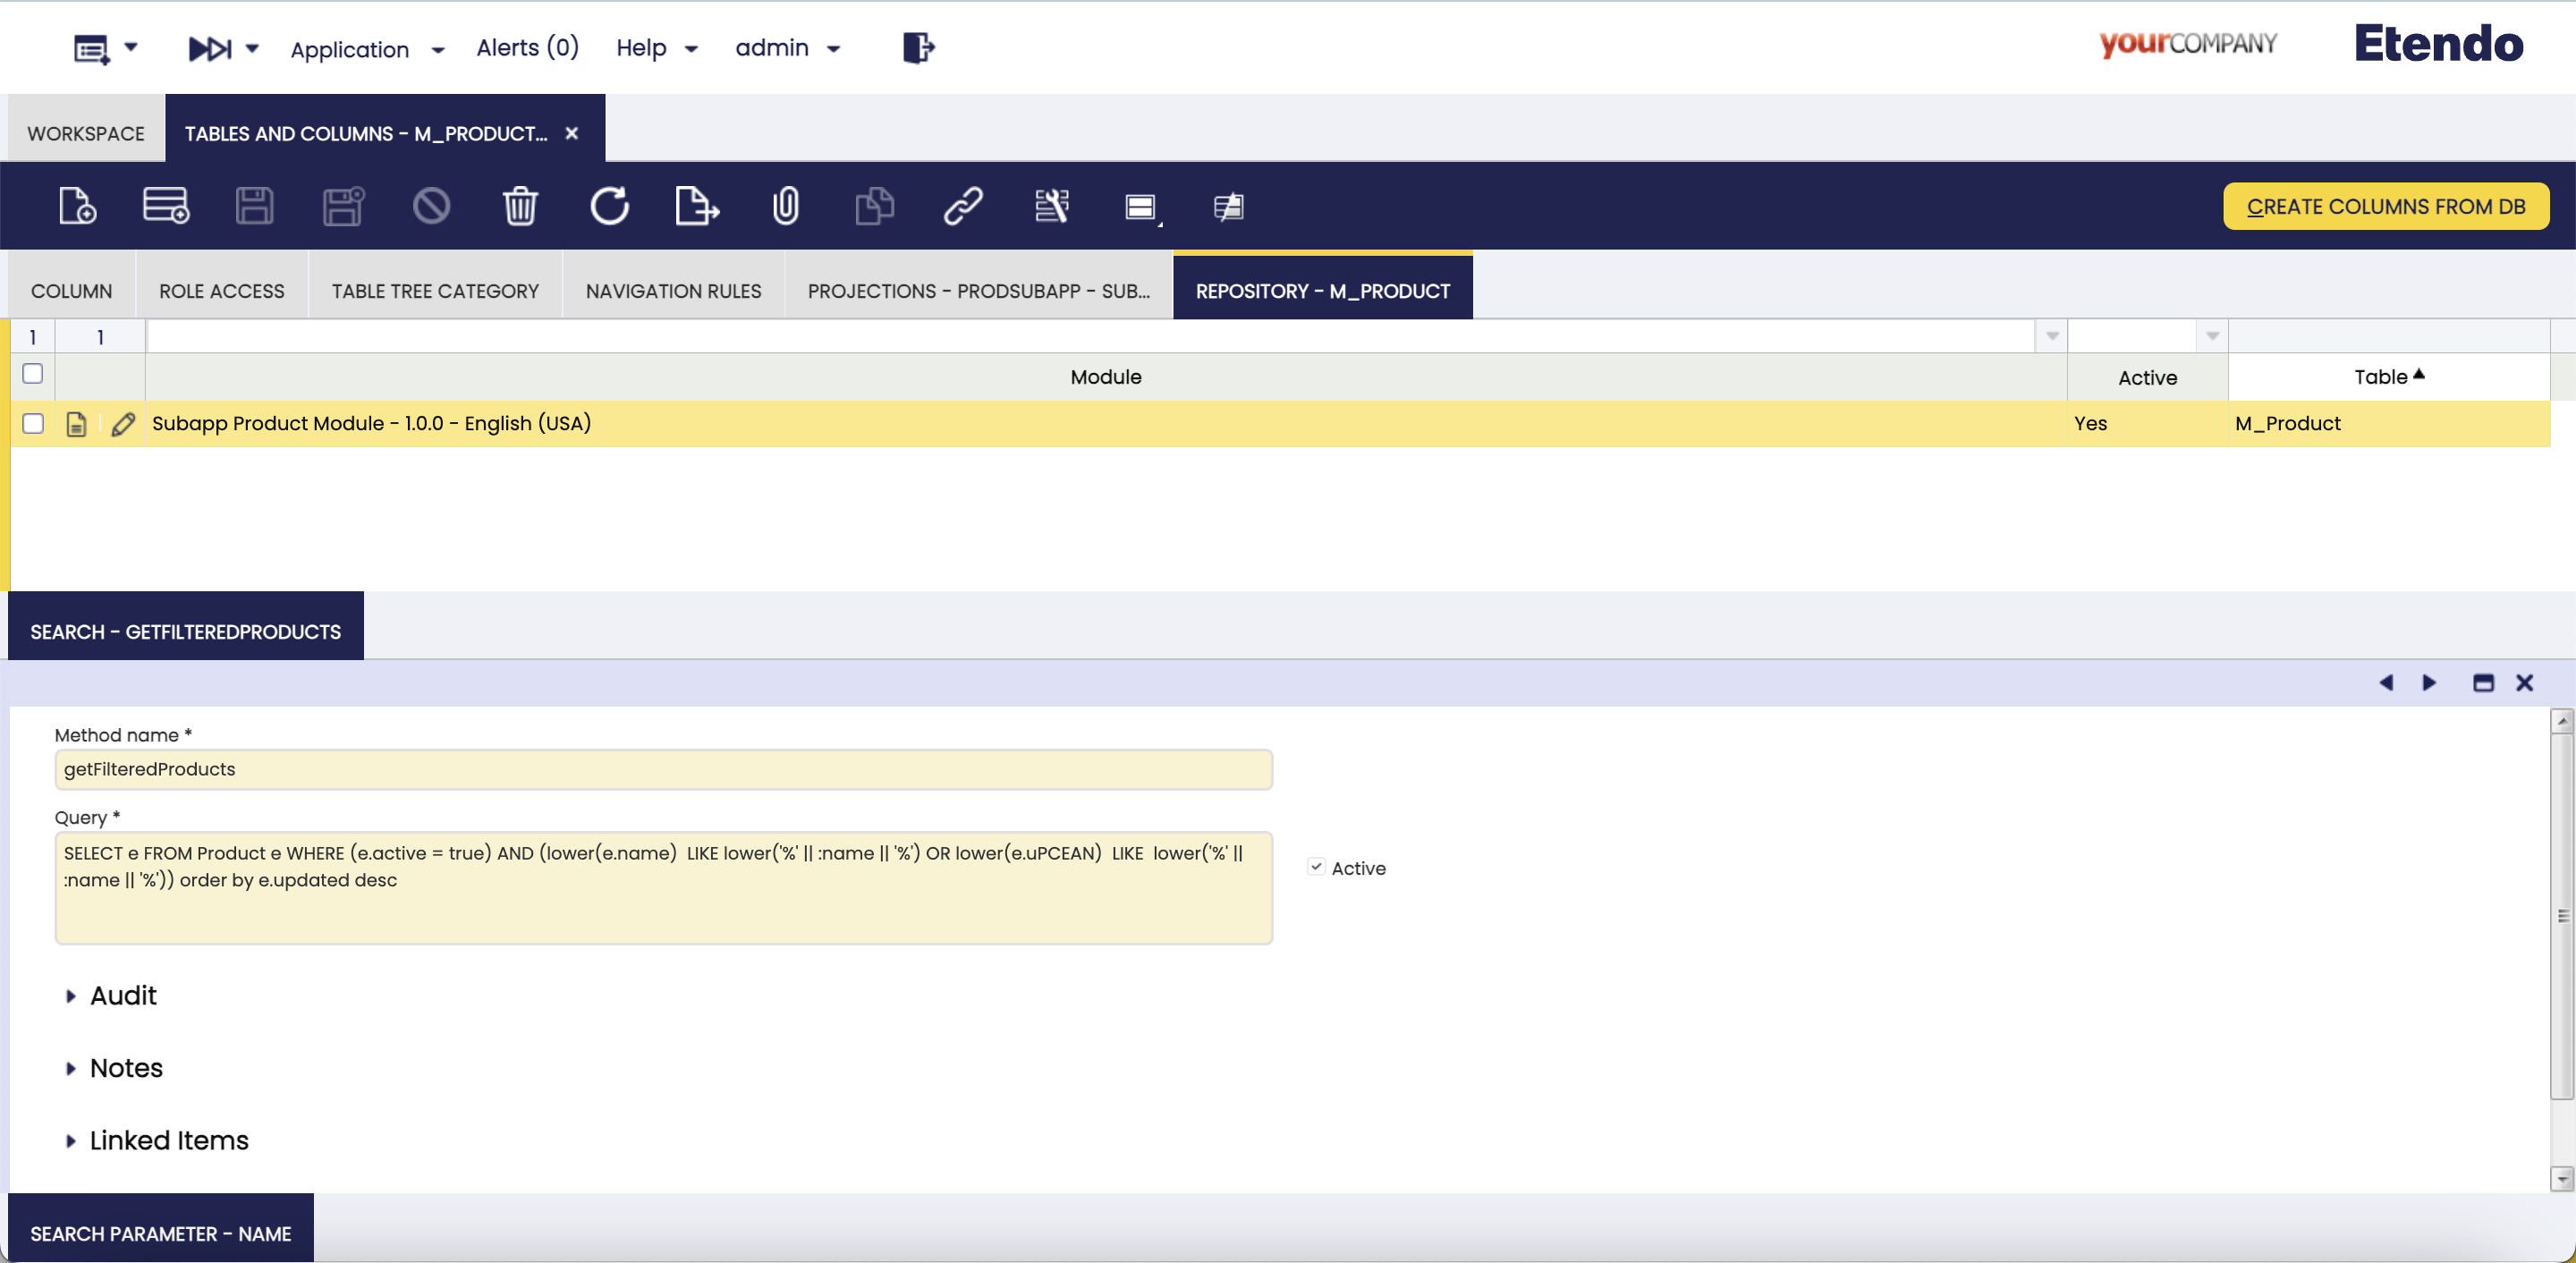
Create a New Search
Next we will define a search method to be used later when we want to consume the products. To create this new filter/search method, in the Repository tab of the M_Product table, create a new record with the following data:
Field
Value
Method Name
getFilteredProducts
Query
SELECT e FROM Product e WHERE (e.active = true) AND (lower(e.name) LIKE lower('%' || :name || '%') OR lower(e.uPCEAN) LIKE lower('%' || :name || '%')) order by e.updated desc
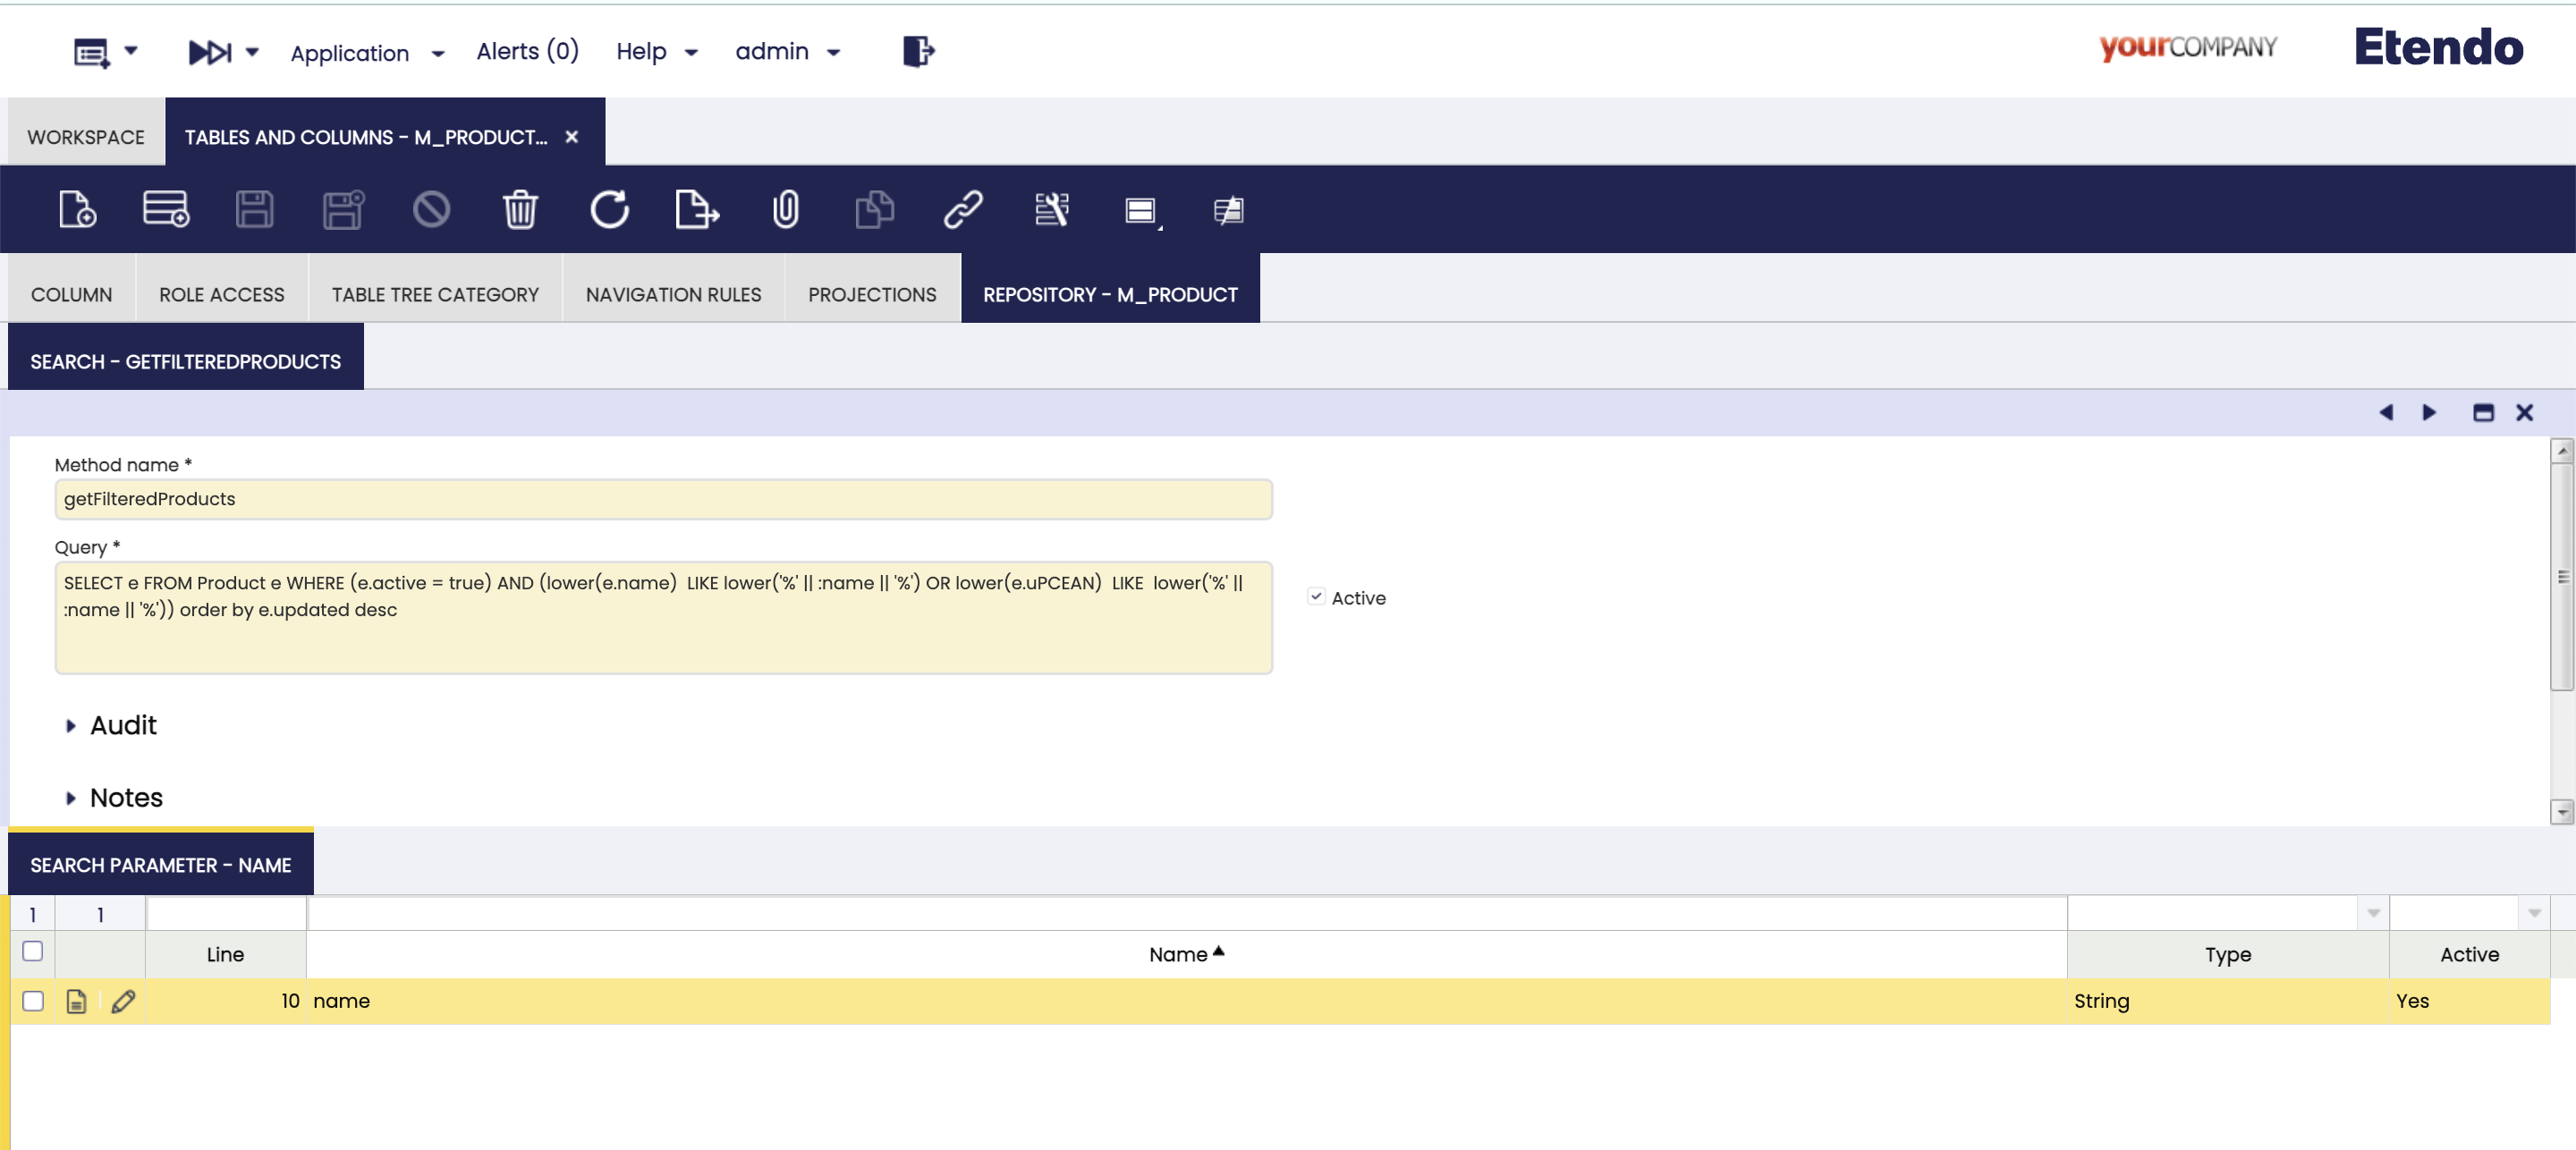
Creating a New Search Parameter
To define the parameter we defined in the previous query we need to create a new row in the Search Parameter tab and add the following record:
Field
Value
Line
10
Name
name
Type
String
Setting up the Development Environment
Before customizing and programming your sub-application, ensure your development environment is properly set up. The following steps detail how to do this:
Create a Java Package:
Create a Java package in the modules_rx directory of your Etendo environment. This package should match the Etendo RX Java package created in Etendo Classic for your sub-application. For instance, if you're developing a product sub-application, you could create a package like com.etendorx.subapp.product.
Generate Entities Using Etendo RX:
Use Etendo RX to generate entities for your sub-application's data structure. Run the command ./gradlew rx:generate.entities in the root of your Etendo environment. This generates essential directories and files like lib, src-db, and src-gen in your Java package.
Run the following command in the root of your Etendo environment:
Terminal
./gradlewrx:generate.entities
Once generated com.etendoerx.subapp.product inside modules_rx add a file named build.gradle and the src/main/java/com/etendorx/subapp/product/javamap folders inside add the ProductValue.java mapping java class.
Verify the completion of this process and the accurate creation of all essential files and directories.
Migrate the 'lib' Directory:
Move the lib directory from modules_rx/<RXJavapackage>/lib to modules/<javapakage>/<subapp-name>/lib. In our particular example, from the root of your Etendo environment, execute the following command to move the lib folder:
Completing this step ensures that the libraries are correctly placed in the project, promoting efficient integration of your sub-application.
Important
Consider moving the generated files and directories to the location described in the previous step after each execution of ./gradlew rx:generate.entities. Otherwise, your sub-application may work incorrectly. It is strongly recommended to check and confirm the location of these files after each entity generation.
In the rxconfig/das.yaml file you must declare the javapackage of the world you are developing with the following code:
das.yaml
scan:basePackage:com.etendorx.subapp.product
Restart the Etendo RX Service:
After successfully migrating the lib directory, restart the Etendo RX service to recognize the new changes. To do this, first stop the currently running Etendo RX service, and then restart it using the following command from the root of your Etendo environment:
Terminal
./gradlewrx:rx
Executing this command will relaunch the Etendo RX service with the newly integrated libraries and configurations.
Integrating Etendo RX with Etendo Sub-Application
This section details the integration of Etendo RX generated TypeScript entities with the Etendo Sub-Application, focusing on backend-frontend interactions.
Custom Hooks in React Native
Custom hooks are a fundamental aspect of React Native, offering a modular approach to managing logic in applications. These hooks allow for creating, updating, and deleting functionalities, and are instrumental in abstracting complex interactions with the backend, thereby enhancing code maintainability and readability.
Overview of Custom Hooks
Custom hooks, such as useProduct, exemplify the integration between frontend components and backend services.
Implementing Custom Hooks
Here's an example of how custom hooks are utilized:
useProduct.ts
import{useState,useEffect}from'react';import{Product}from'../../lib/data_gen/product.types';importProductServicefrom'../../lib/data_gen/productservice';// Custom hook for managing productsexportconstuseProduct=()=>{const[products,setProducts]=useState<Product[]>([]);// Fetching datauseEffect(()=>{constfetchData=async()=>{constdata=awaitProductService.BACK.getFilteredProducts();setProducts(data);};fetchData();},[]);// Function to handle product updateconsthandleUpdateProduct=async(updatedProduct:Product)=>{awaitProductService.BACK.updateProduct(updatedProduct);// Optionally, update the products state to reflect the changes};// Function to get filtered products (if needed)constgetFilteredProducts=async(filterCriteria:any)=>{constfilteredProducts=awaitProductService.BACK.getFilteredProducts(filterCriteria);setFilteredProducts(filtered);returnfilteredProducts;// This line is optional, allowing the function to return the filtered products};return{products,handleUpdateProduct,getFilteredProducts,};};
Implementing useProduct Hook in Home Component
The Home component serves as a central hub for product management within our React Native application, which allows interacting with product data. The useProduct custom hook provides functions for retrieving and updating products, which the Home component uses to maintain its state and user interface.
Example Usage
Using the Table component from Etendo UI Library, the Home component lists the products, displaying a loading spinner while the data is being fetched. The useProduct hook is used to manage the data and loading state, ensuring that the component remains responsive and user-friendly.
Home.tsx
importReact,{useEffect,useState}from'react';import{View}from'react-native';importuseProductfrom'../../hooks/useProduct';import{Table}from'etendo-ui-library';constHome=()=>{// data is the list of products, as a result of a RX consult in useProduct// loading is a boolean that indicates if the data is being loadedconst{data,loading}=useProduct();...return(<View>...<TableUIcolumns={dataColumns}data={data}// here is used to list the productsisLoading={loading}// here is used to show a loading spinneronLoadMoreData={onLoadMoreData}commentEmptyTable={locale.t('Table.textEmptyTable')}textEmptyTable={locale.t('Table.commentEmptyTable')}pageSize={PAGE_SIZE}/>...</View>);};exportdefaultHome;
Based on this, the Home component is presented as an efficient product data manager, highlighting the main actions of obtaining and visualizing products, presenting a sub-application design and allowing real-time updates and fluid interactions with the user.
Conclusion
The integration of Etendo RX with Etendo Sub-Applications using custom hooks like useProduct enhances the development process and the user experience. It provides a seamless connection between backend services and a React Native frontend
In the Home.tsx component, we observed the practical application of these hooks, which resulted in a dynamic, responsive, and user-friendly interface. This approach not only streamlines the development process but also ensures that the code remains maintainable and readable.
While the example focused on listing products using a table, it's important to note that the distributed code includes additional functionalities. These include editing, adding, and deleting products, further demonstrating the versatility and comprehensive nature of the useProduct hook within the application.
Attached below is an example of F&B International Group's products, obtained through Etendo RX, demonstrating the efficiency between backend and frontend operations in a practical sub-application context.
In essence, this integration is a significant stride in creating robust, scalable, and intuitive mobile applications within the Etendo ecosystem.