Etendo Classic Subapp Extensions
Javapackage: com.etendoerp.classic.subapp.extensions
Overview
This bundle includes the Etendo Classic Mobile Sub-Application and his configurations in Etendo Classic. For more info read Etendo Mobile.
Etendo Classic Sub App
Initial Configuration
Info
-
Initially, you should add Etendo Classic Subapp bundle in Etendo Classic.
To be able to include this subapplication, the Classic Subapp Extensions Bundle must be installed. To do that, follow the instructions from the marketplace: Classic Subapp Extensions Bundle.
For more information about the versions available, core compatibility and new features visit Etendo Classic Subapp Extensions - Release Notes -
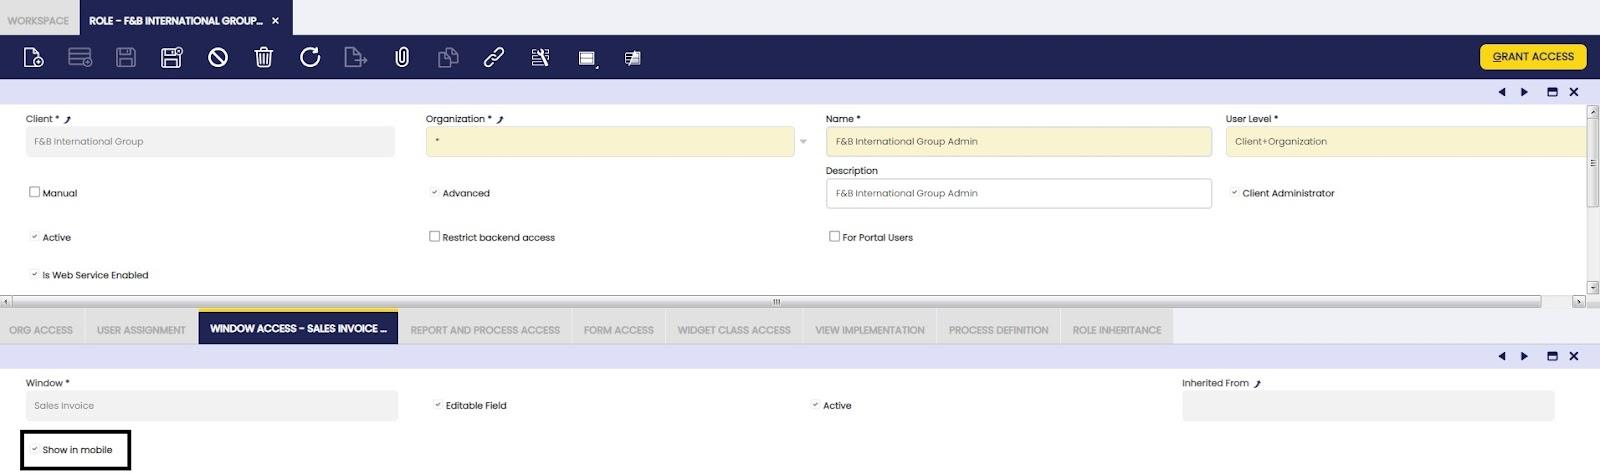
Once the subapplication module is installed in Etendo Classic, the dynamic app will be configured within it, so that it can be seen, access must be given to each Role.
To add the windows to be shown in the subapp must be configured entering the Etendo Classic under the “administrator” role in Role>Window Access tab and checking the box “show in mobile” in the required windows.
Welcome Window

In the Welcome window, the user can enter Profile, Settings and Navigation Menu.
Navigation Menu
In the Home option, the user can find an option menu from which they can access to different windows allowed according to their role. From this menu, it is also possible to:
- Go back (Option to Go back to Etendo Mobile)
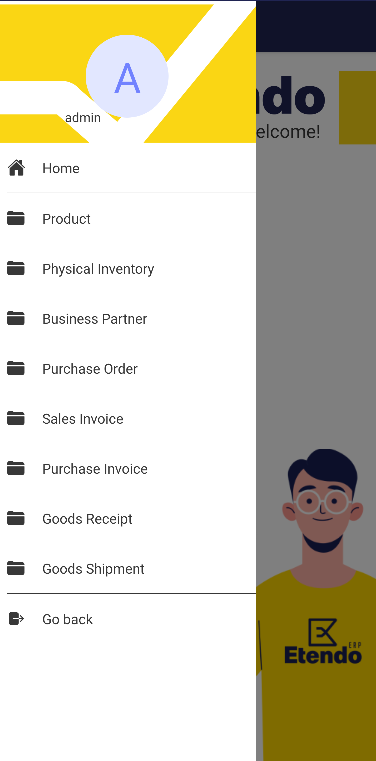
In the top section of the menu, the name and the user picture will be shown.
Functional Windows
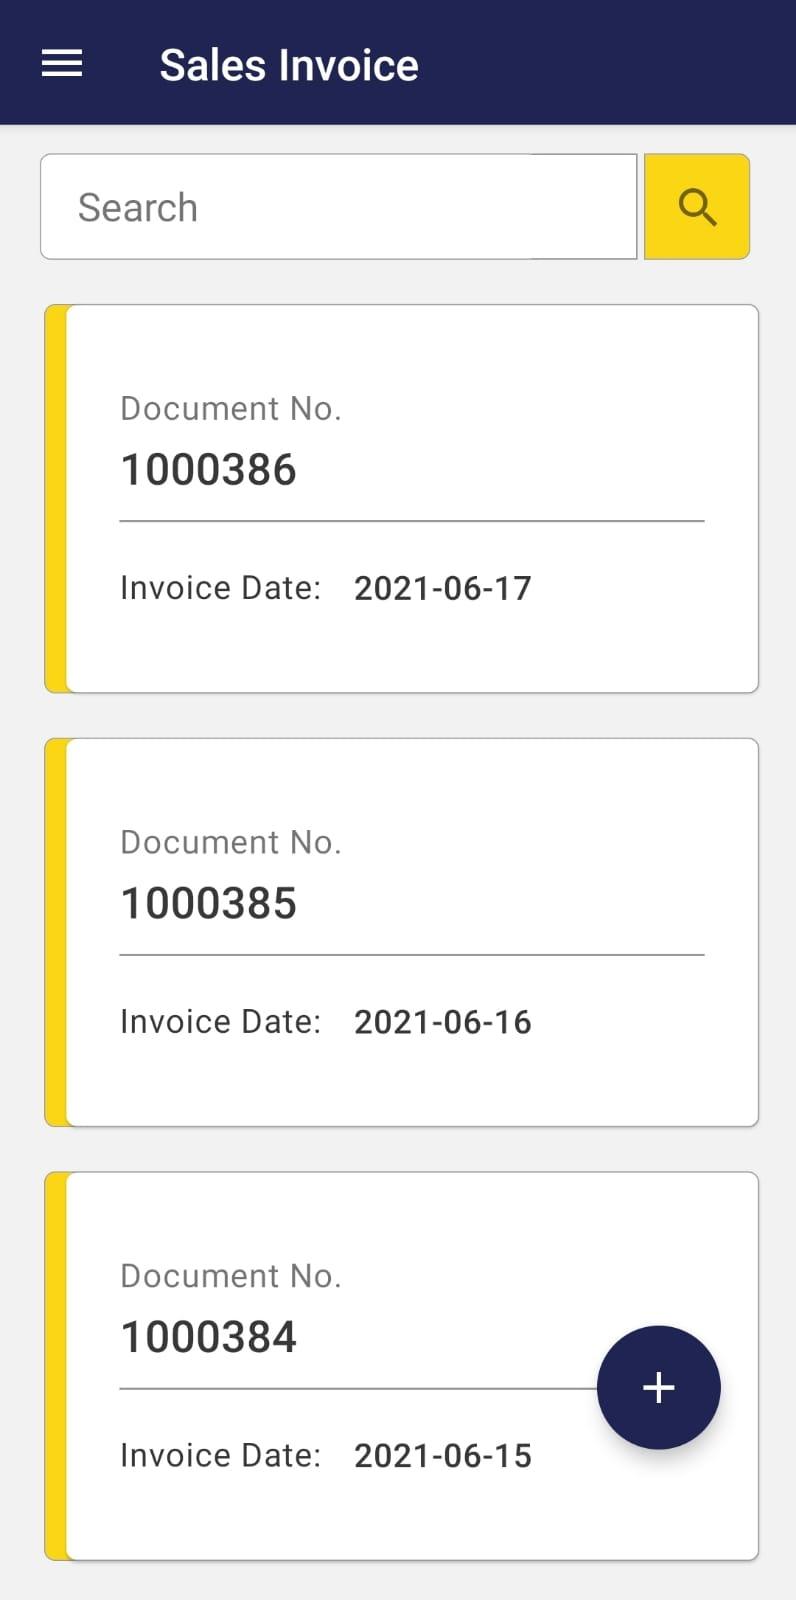
The user, according to their role, will have access to certain windows. The most common ones are: Product, Business Partner, Sales Invoice, Sales Order, Purchase Invoice, Purchase Order, among others.
The access to these windows are represented by folder icons with their corresponding name.
Each window will show its content splitting the records in small boxes, which will contain a preview of main data of these records. That data is configured by default and a customization must be required in case the user wants to add more fields to eliminate some of them, considering that only a max of 5 fields can be displayed.
The same field present in the preview, will be the criteria by which you can filter if you want to search for a record. (View Actions on records>Find a record.)
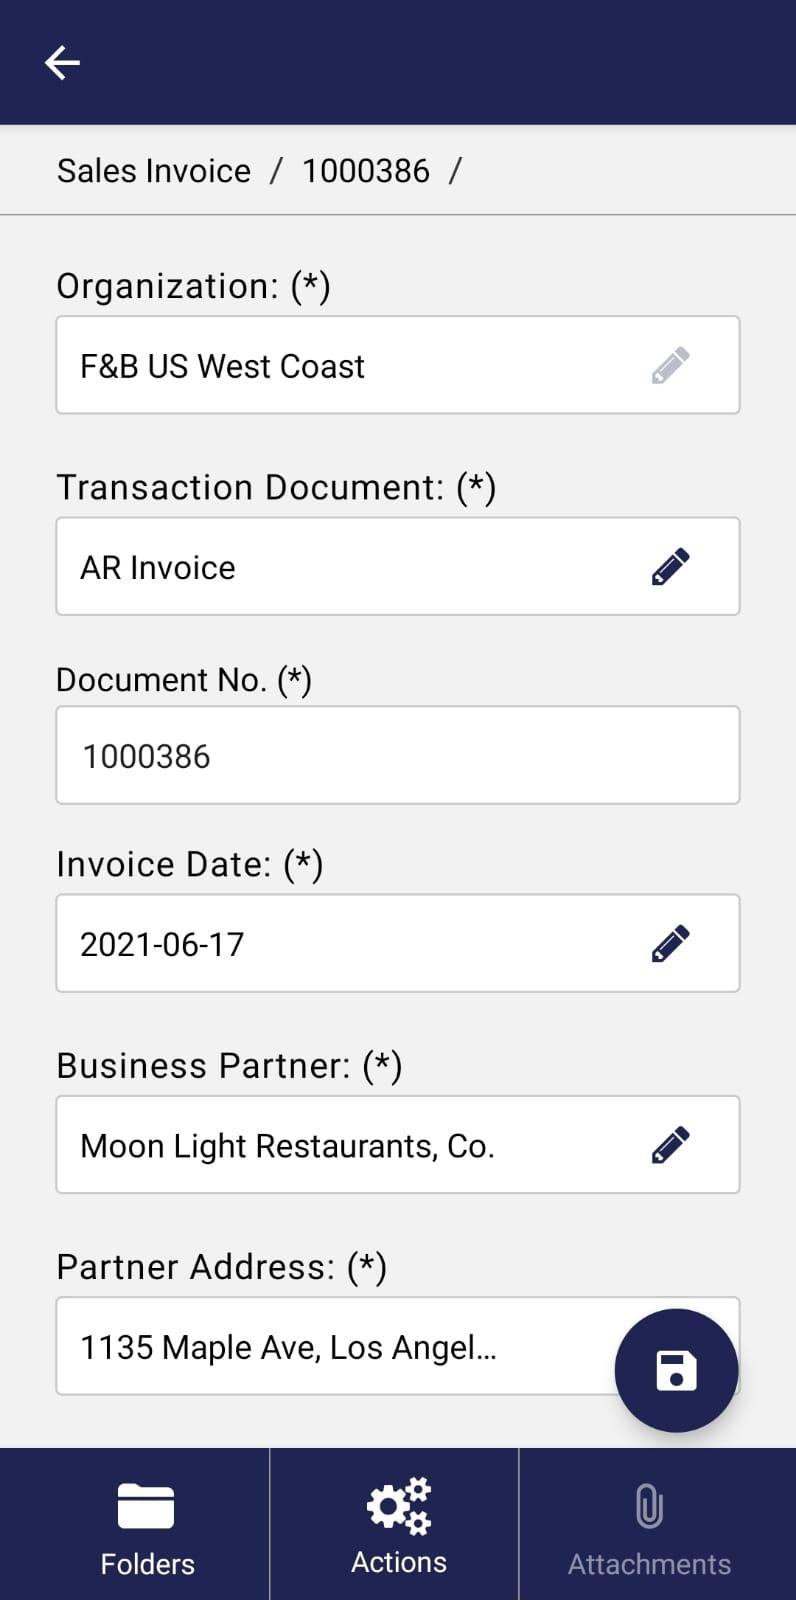
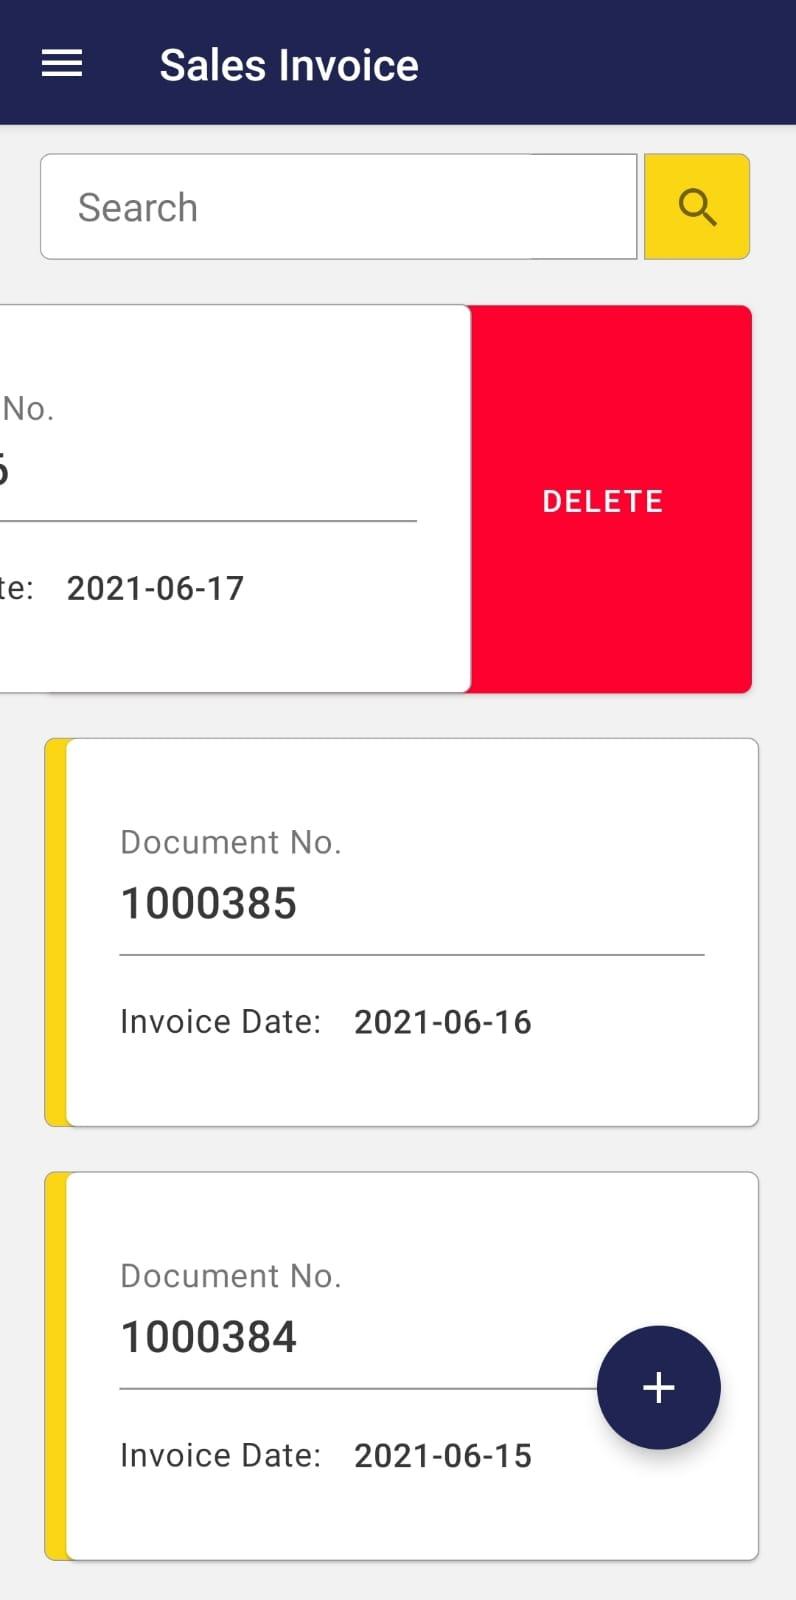
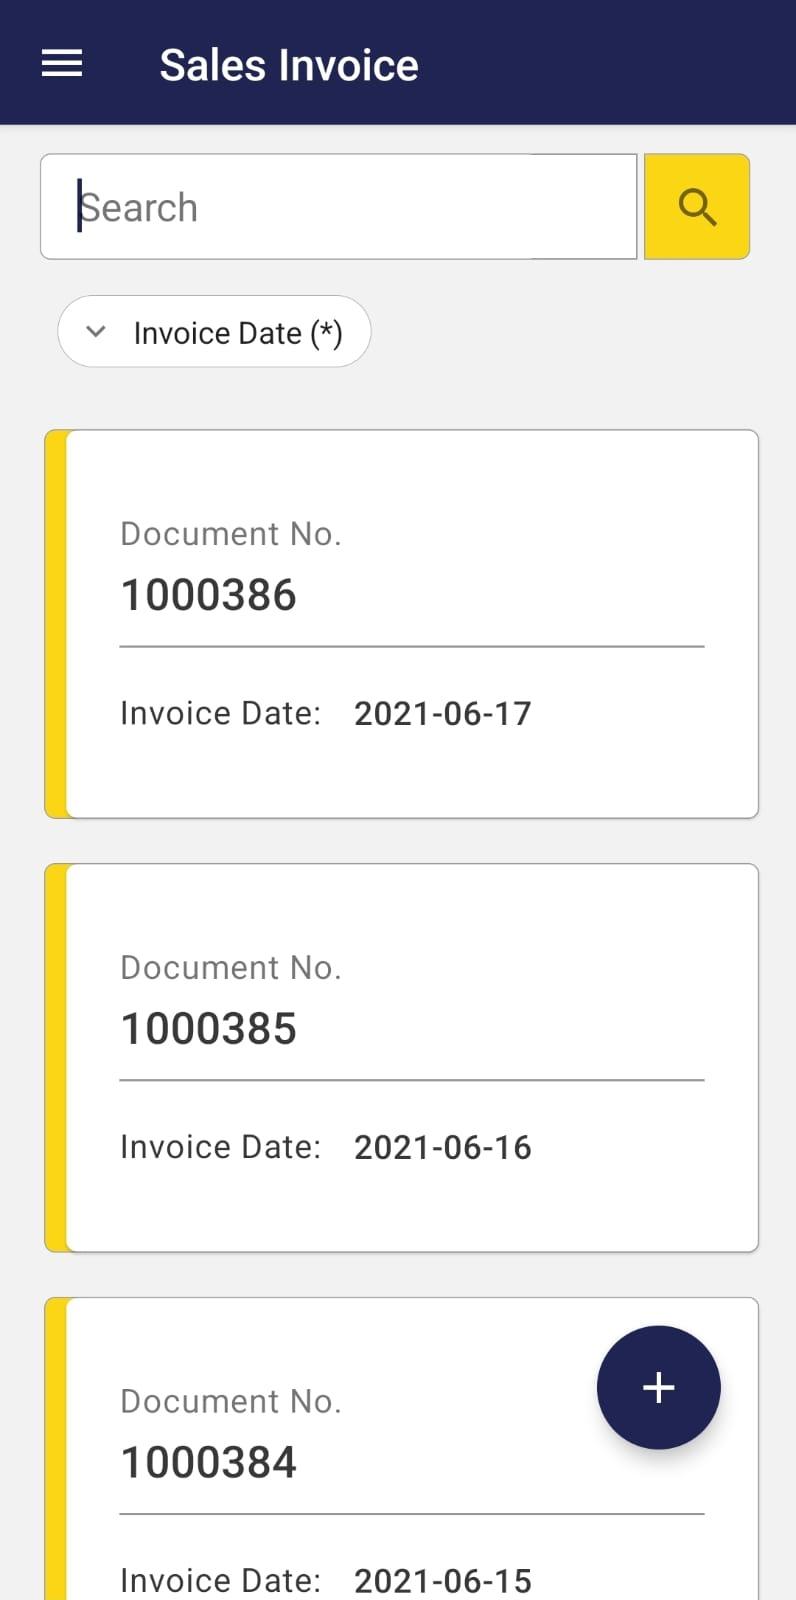
Considering as an example the Sales Invoice window, the preview of each record provides information regarding the document number and invoice date.
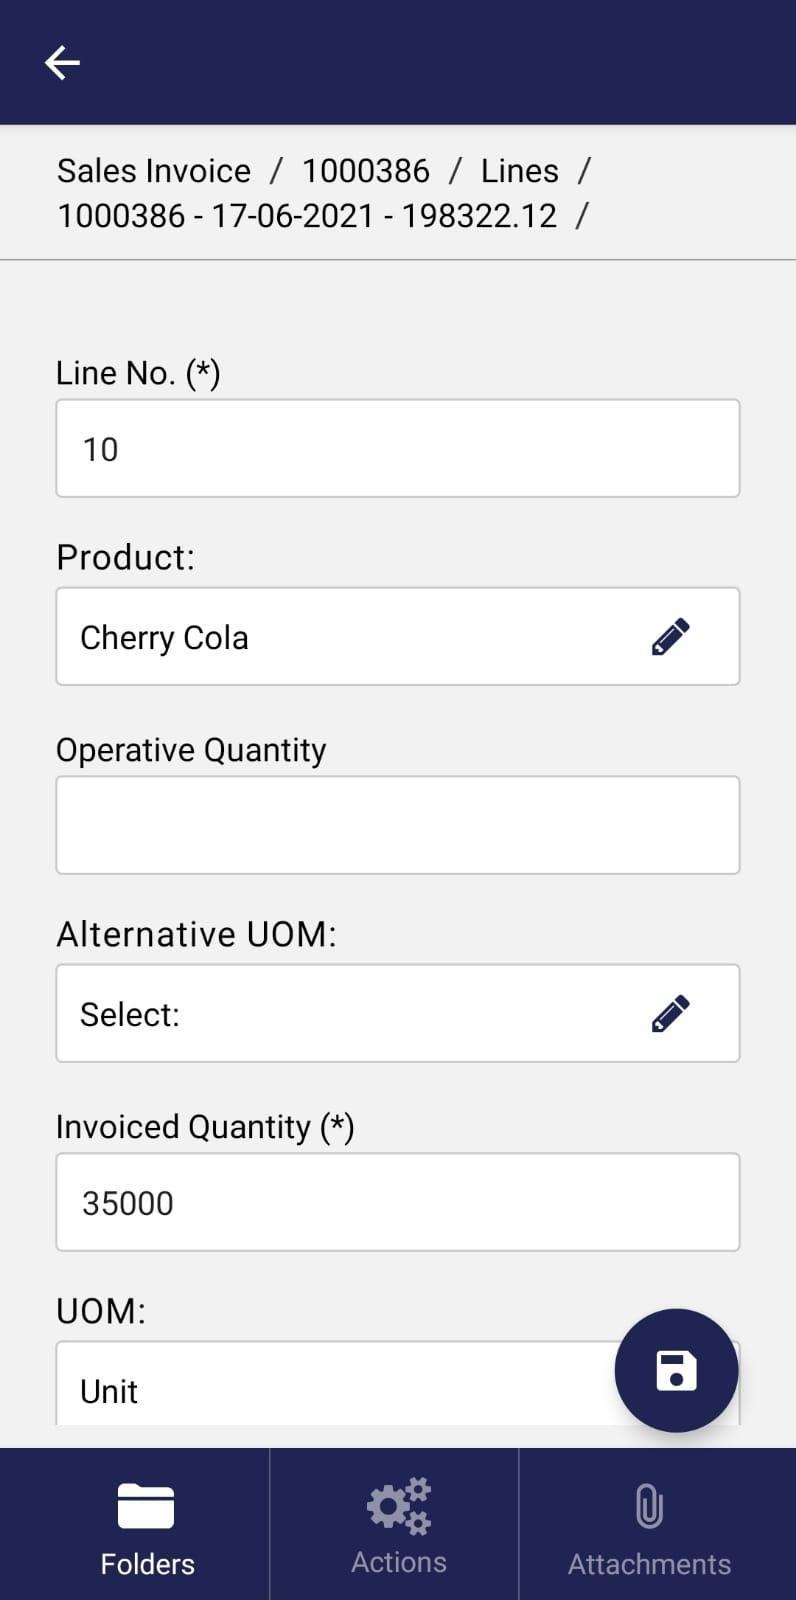
By clicking any of those boxes, detailed information about the records will be displayed.
The fields will be displayed one below the other. Those with this symbol “(*)” in their title are mandatory and those with a pencil icon are editable.
Folders button
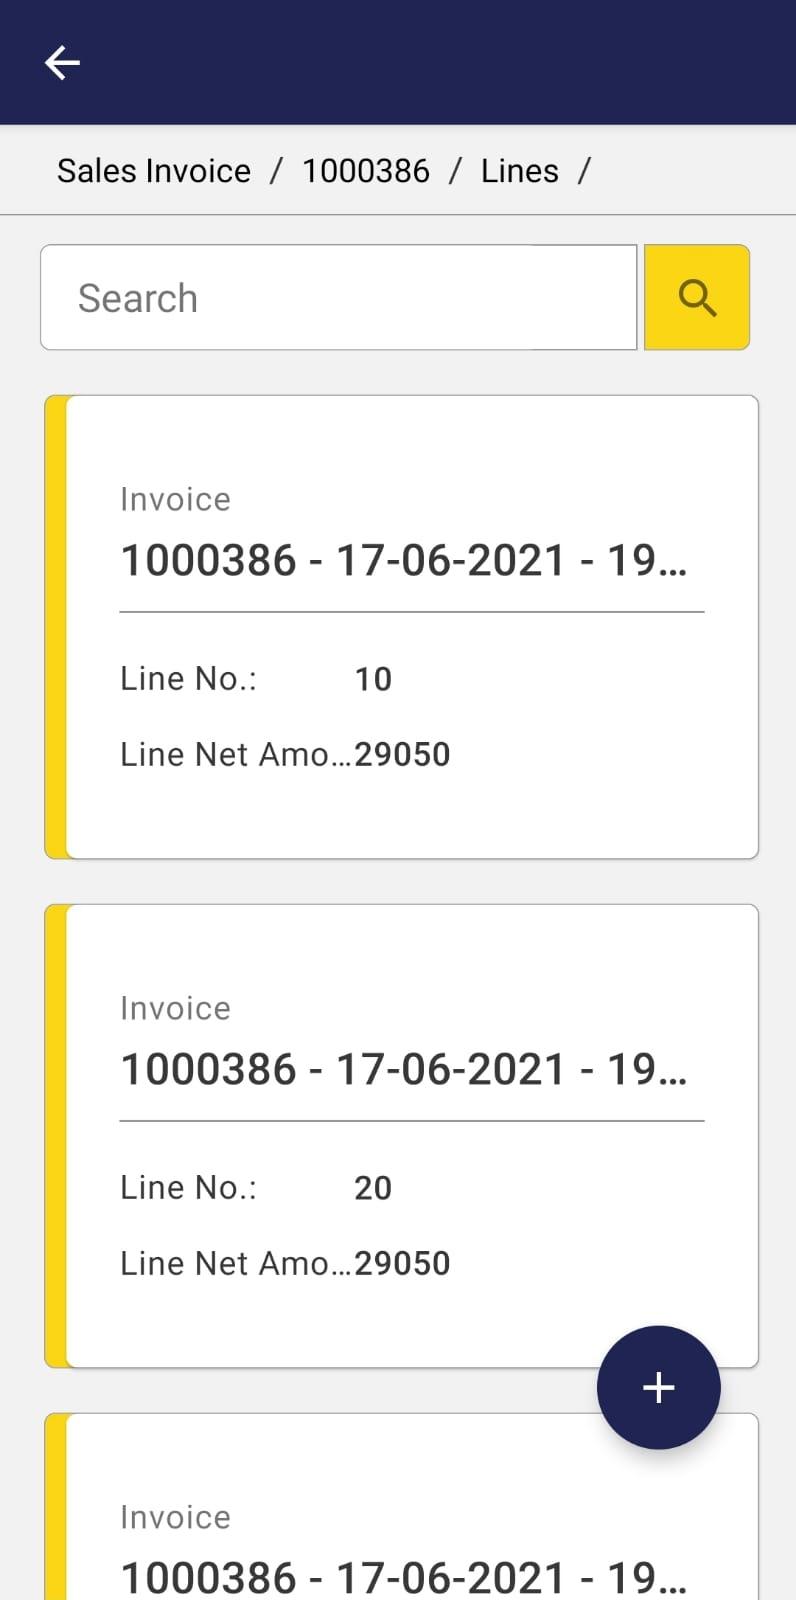
By selecting the Folders button, the user can access the different tabs of the window with information about the records being browsed.
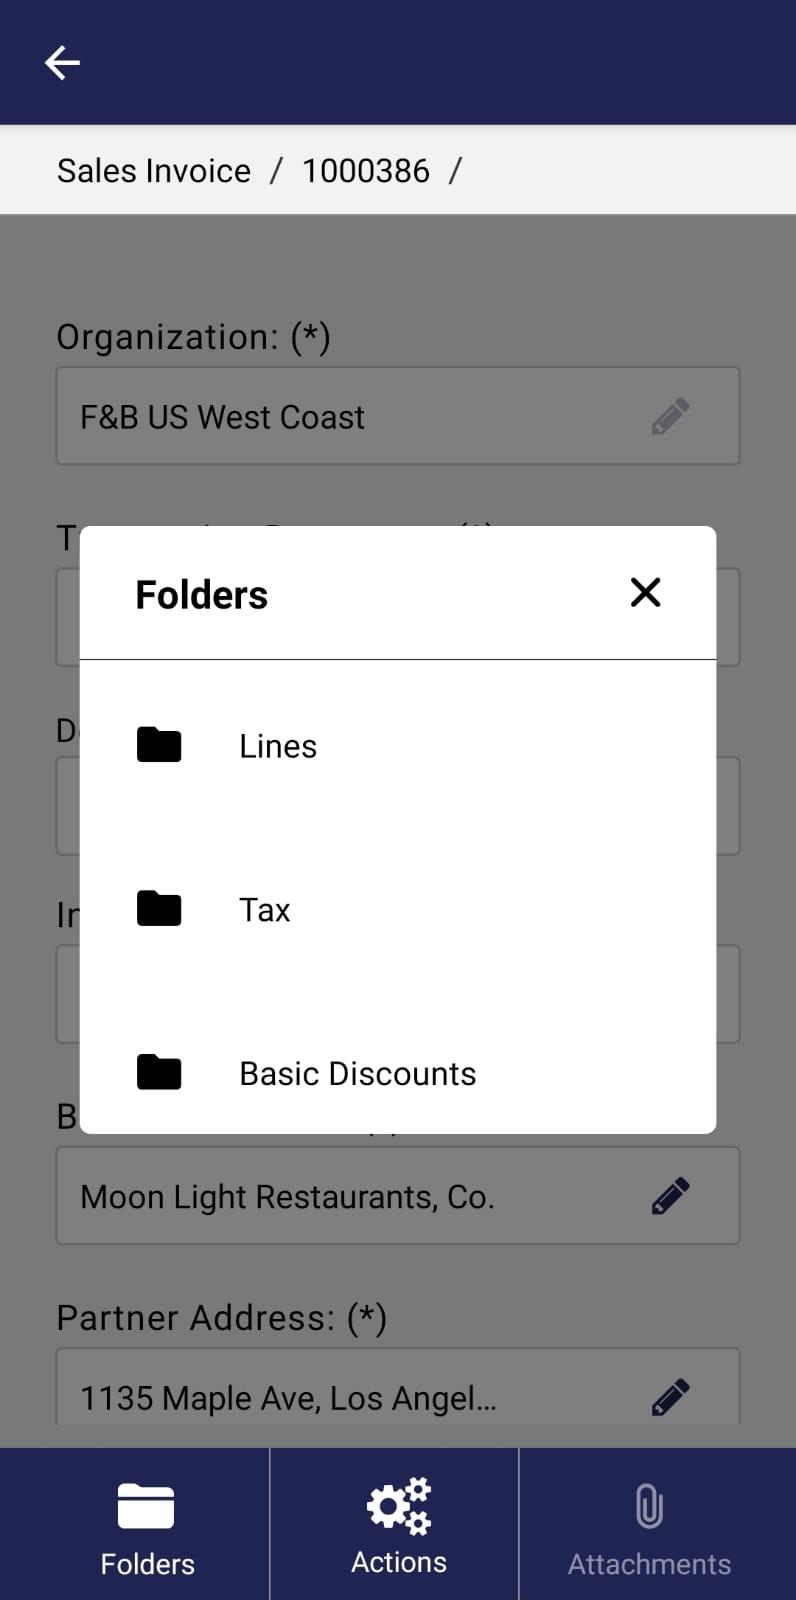
When entering any of the tabs, the view will be the same as in the parent window, e.i., the records will be displayed in small boxes and, when entering these, the fields will be displayed one below the other.
To navigate in different levels, the user can resort to the system buttons (Android) or the arrow in the upper left corner or gesture (both systems).
In addition, the "path or breadcrumbs" of which records and tabs are being navigated can be displayed at the top of the screen.
Actions button
Through this button, the user can access the list of available processes corresponding to the window being browsed and execute them.
Attachments button
Through this button, the user can attach files.
Manage Records
Create a record
To create a new record, the user must click the icon with the symbol “+” and complete the desired fields. Those with the symbol (*) are mandatory.
To edit a field, the user must click the pencil icon. If the field is a list field, click the search icon to display possible options. After selecting the correct data, press the button “Done”.
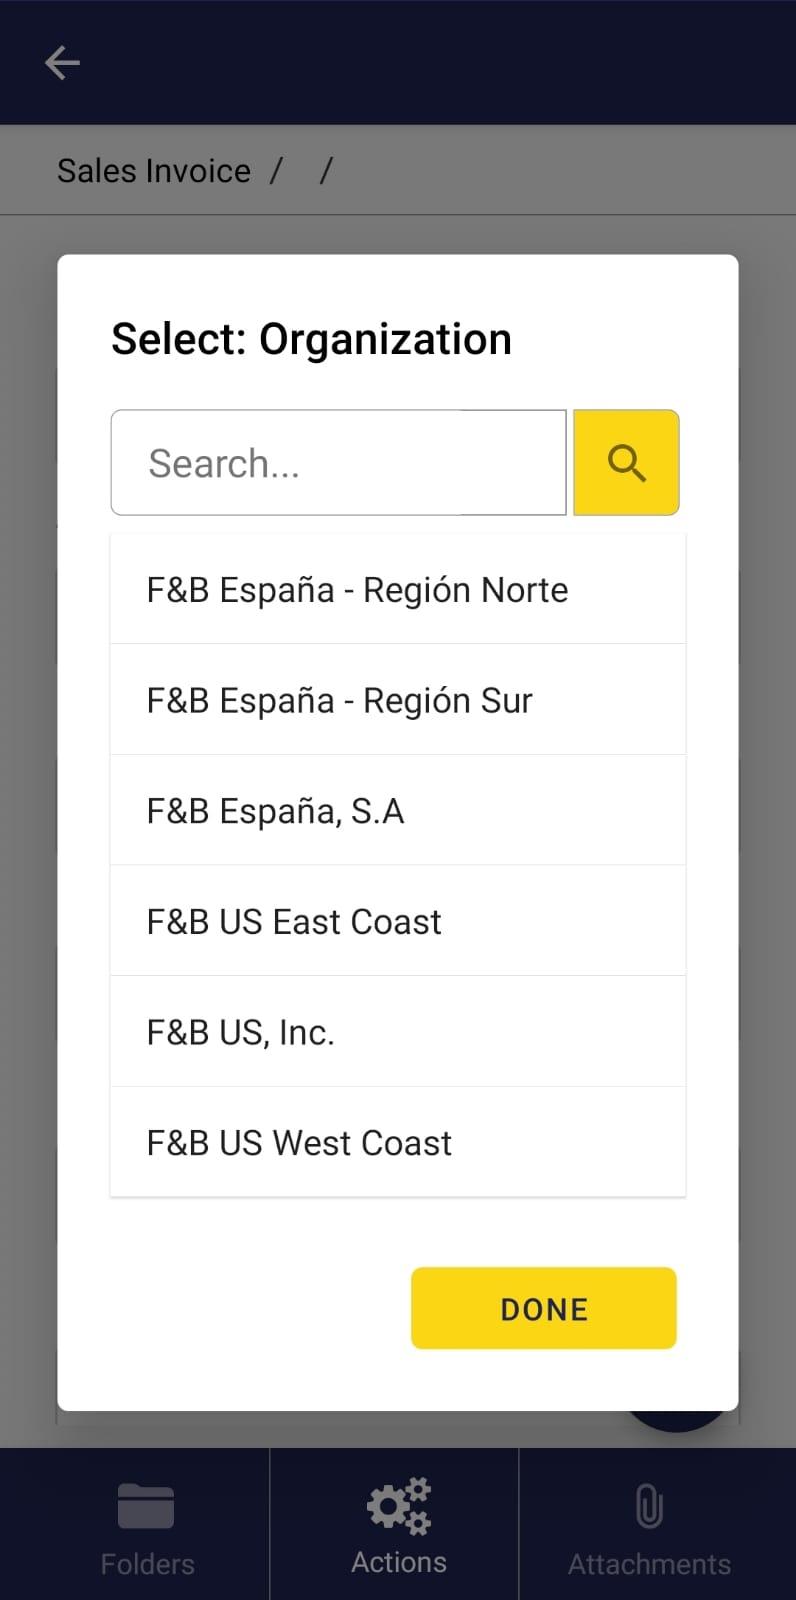
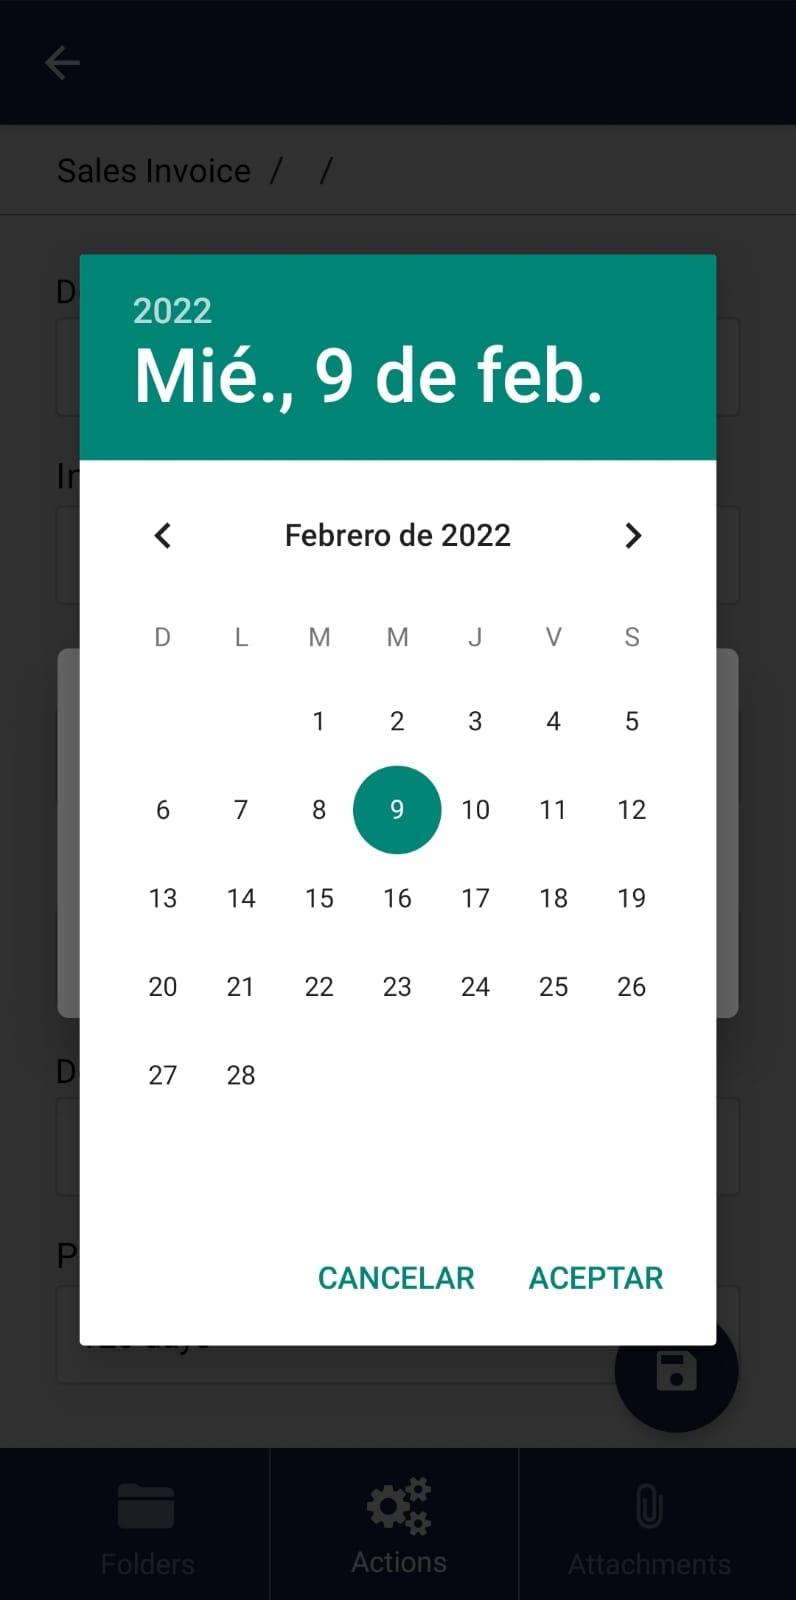
If the field is a date type, when selecting the search icon a calendar to select the desired date will be displayed.
Free text fields are edited by selecting the field and entering the desired value.
Once the user has entered the required data, click the save icon.
When the Header is complete, data can be entered in the tabs. To do so, access through the Folders button and edit the required fields, in the same way as in the main Header.
Each time a new record is created in the App, the same record will be created in the Etendo Classic as well.
It is important to consider that the document will always remain in “Draft” status and can only be completed through the Etendo Classic.
Delete a record
To delete a record, press it and drag it to the left or hold it, select all the desired records and then the delete icon.
Each time a record is deleted in the App, the same record will be deleted in the Etendo Classic as well.
Edit a record
To edit a record, select the record and then the field to be edited.
Once the changes have been made, press the save icon.
Each time a record is edited in the App, the same record will be edited in the Etendo Classic as well.
Search a record
Records can be searched by inserting a value or keyword in the top "Search" bar. This search bar is located both in the main view of each window and in each tab.
Each window will have certain filters available by field which will match those fields configured by default to be displayed in the preview of each record.
In case the user needs to add more filters or to remove some of them, customization will be required.
Continuing with the example of the Sales Invoice window, the available filters are the document number, which will be entered in the search bar together with the invoice date.
Mobile App Scanning Helpers
Javapackage: com.smf.mobile.scan
Allows to use the camera to scan codes in Etendo Mobile App
Info
For more information, visit the [Mobile Scan developer guide](/developer-guide/etendo-classic/bundles/platform-extensions-bundle/#mobile-scan).
Usage Examples
The module has by default the Inventory Scan process, which is responsible for scanning from a mobile this code, and thus change values of the Physical Inventory lines.
Now an example will be shown from the Etendo Mobile application:
When you enter the Physical inventory window and select a record, you will see the "Actions" button.
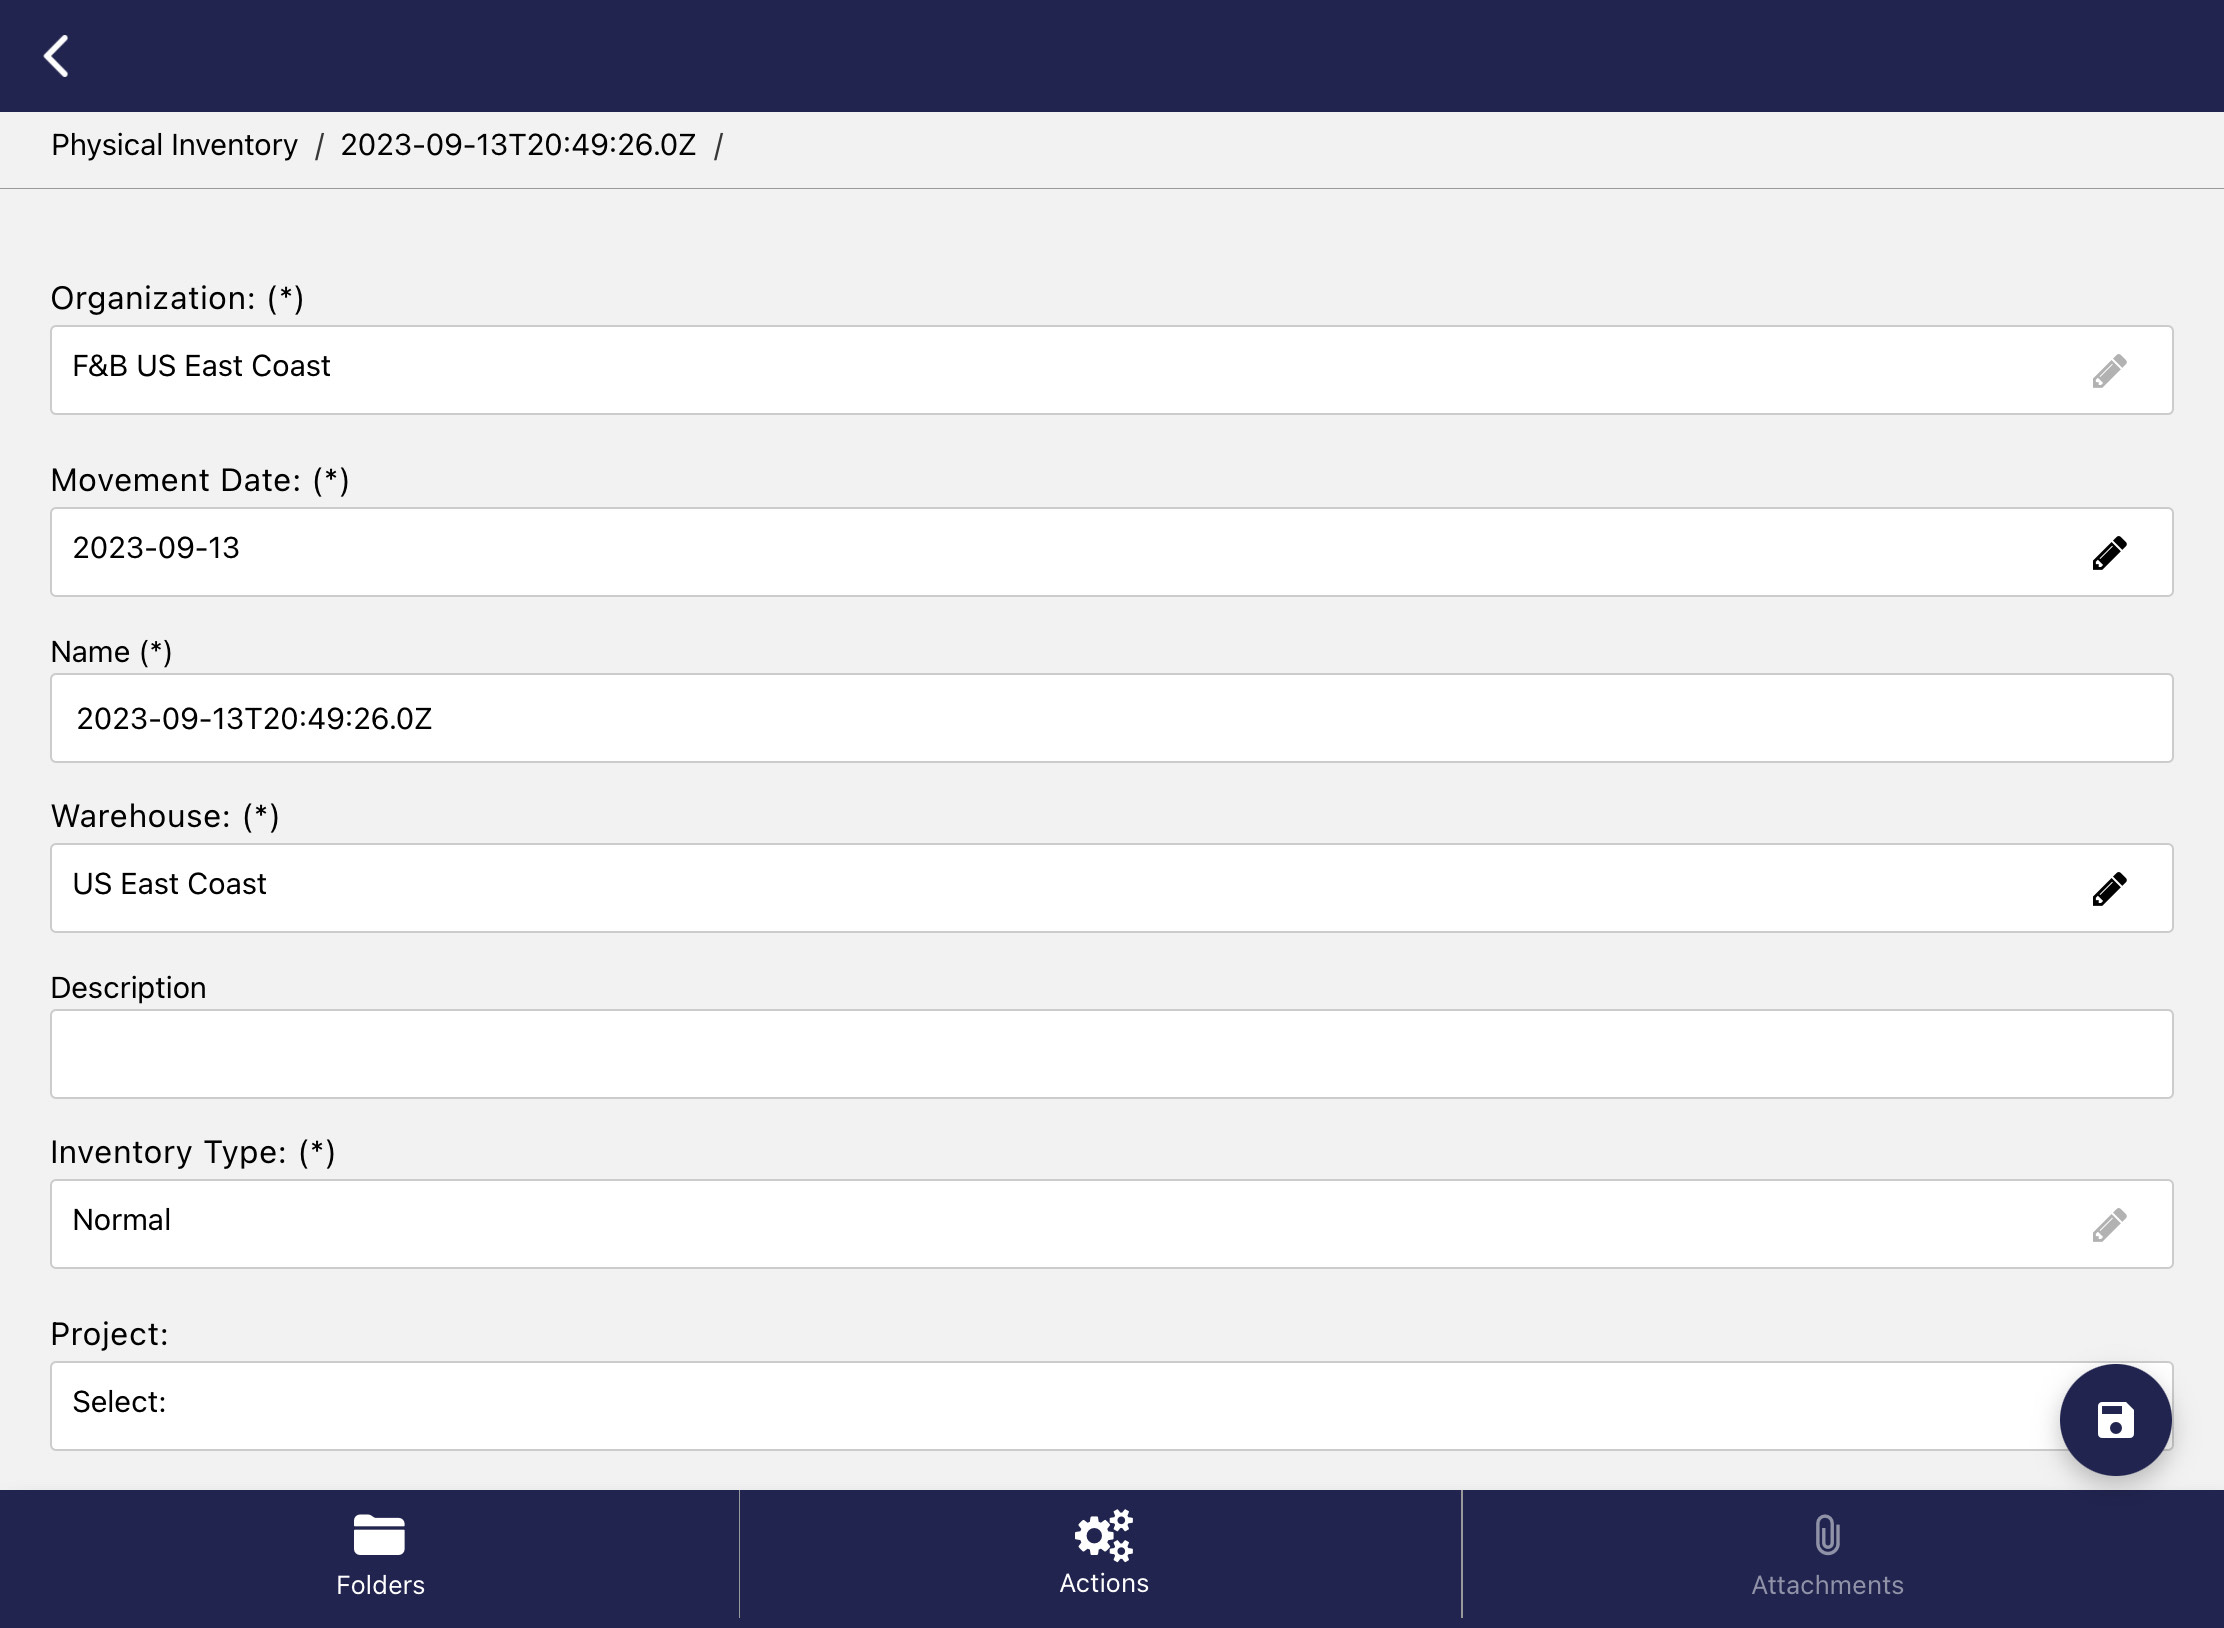
In this button, you can see the process it incorporates, called Inventory Scan.
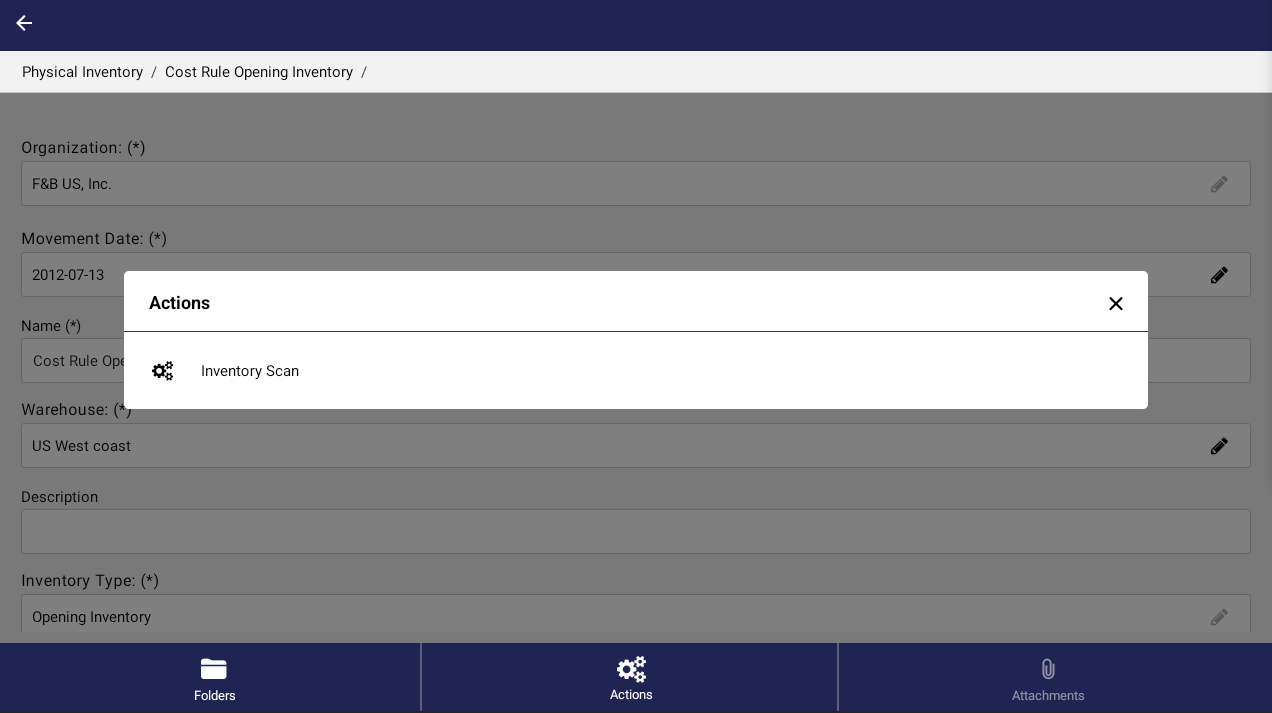
When you press this action it performs the scanning functions to be able to modify values of the physical inventory item that has been selected.
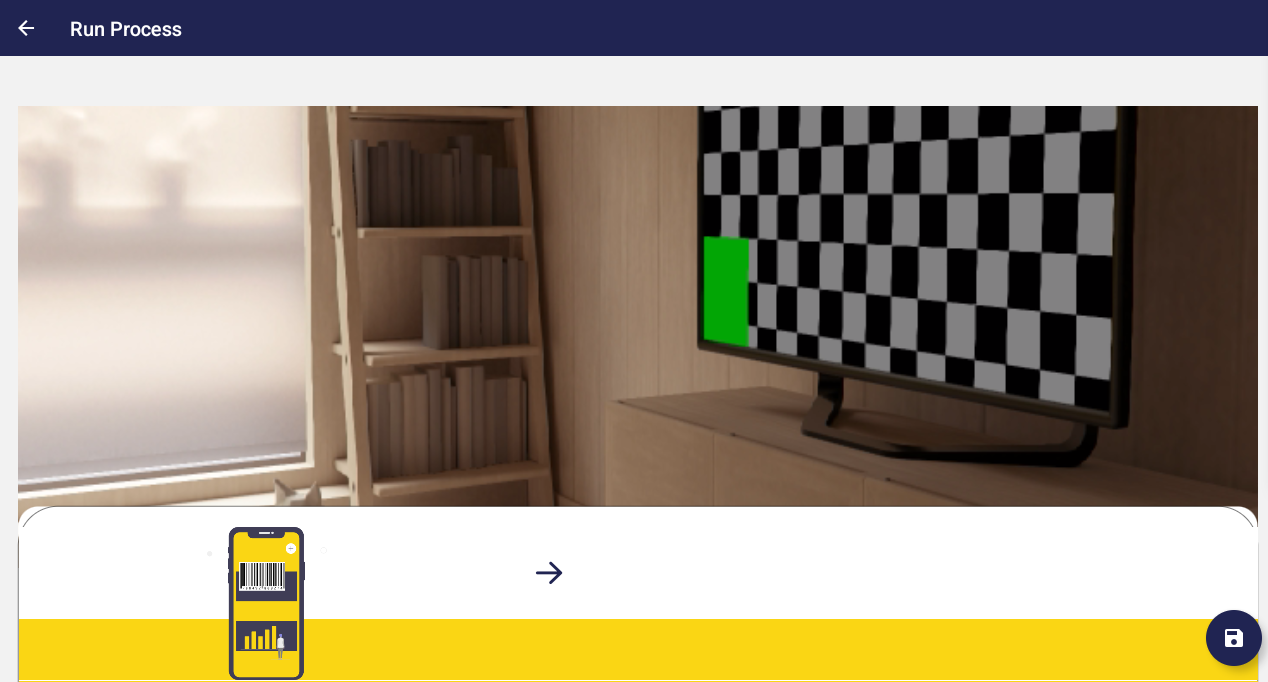
When the arrow to continue is selected, the code of the storage bin in which the product is located must be entered manually or scanned.
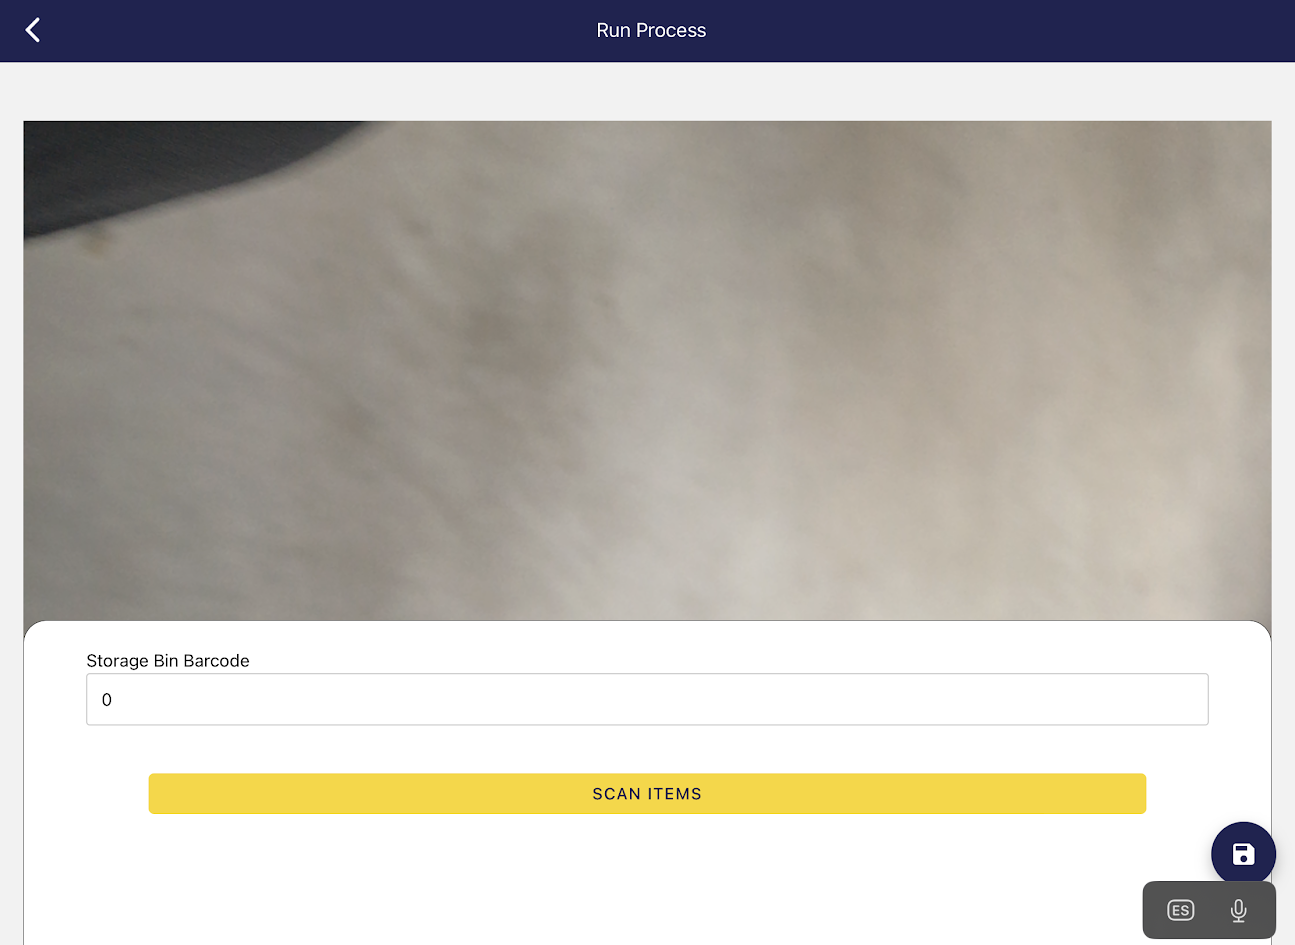
After selecting the storage bin, the product to be modified must be scanned or selected.
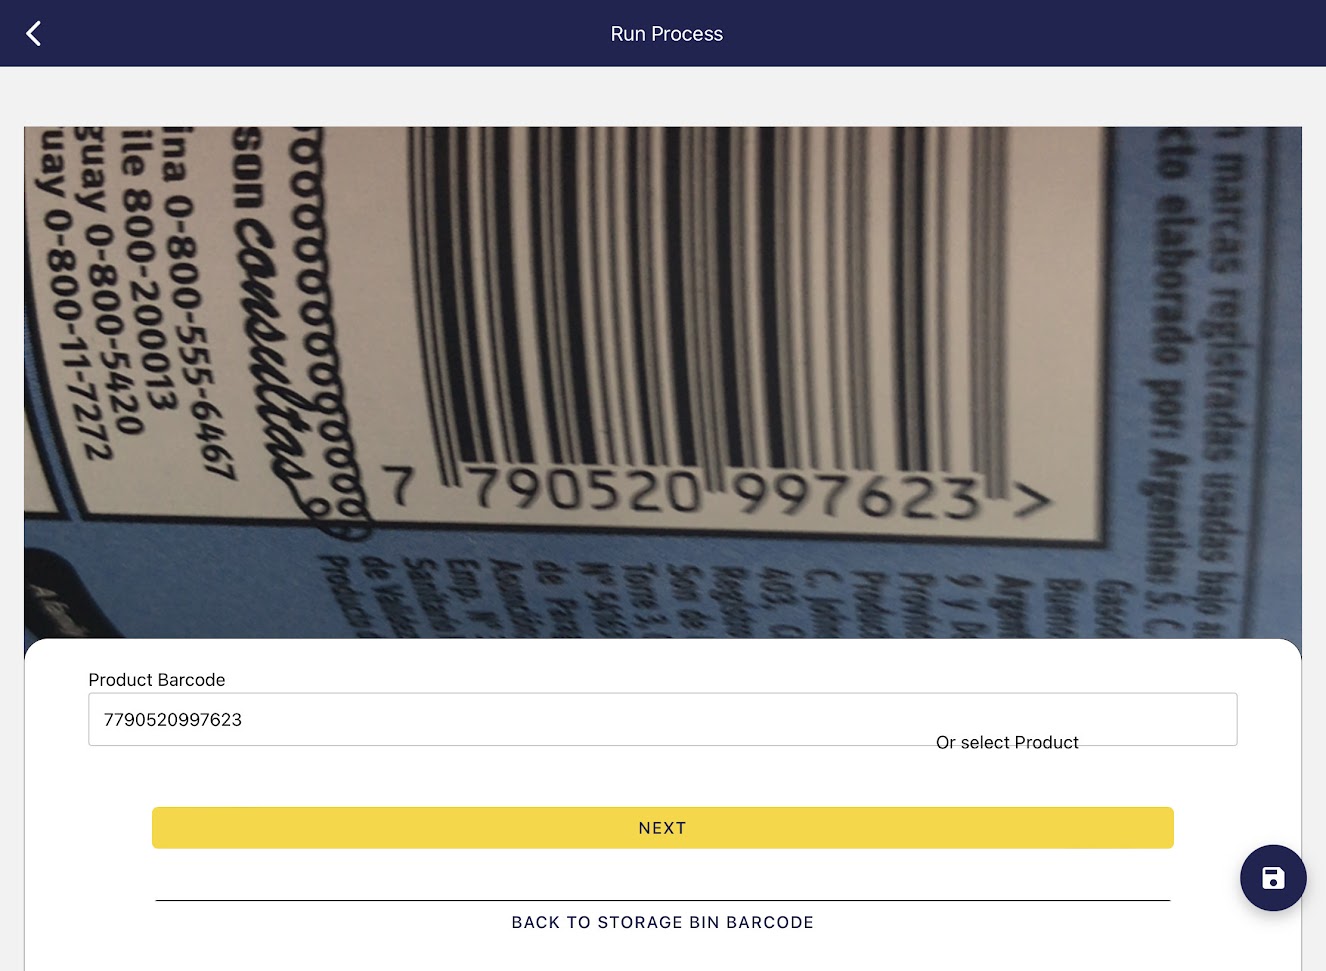
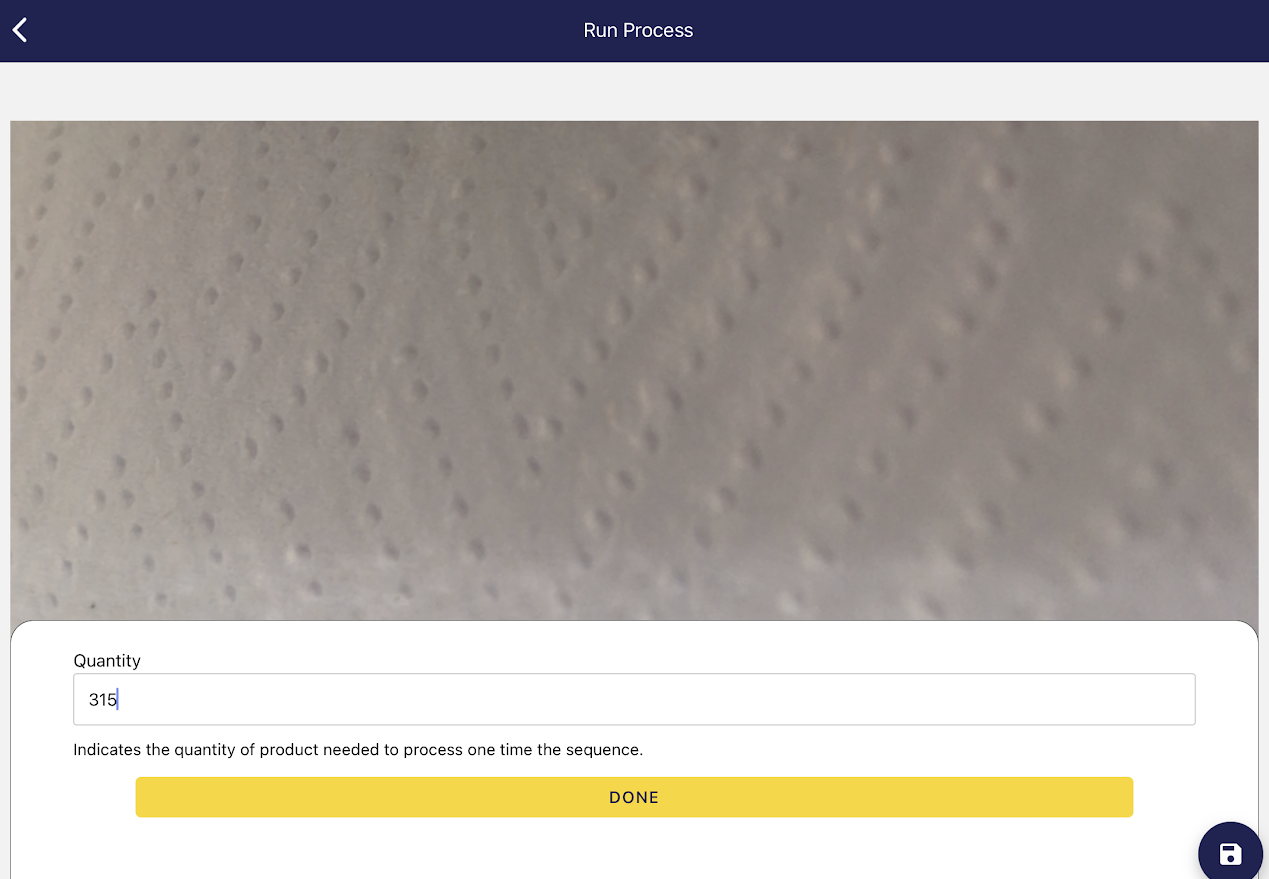
Finally, enter the amount you want to add of that product, press Done and Save.
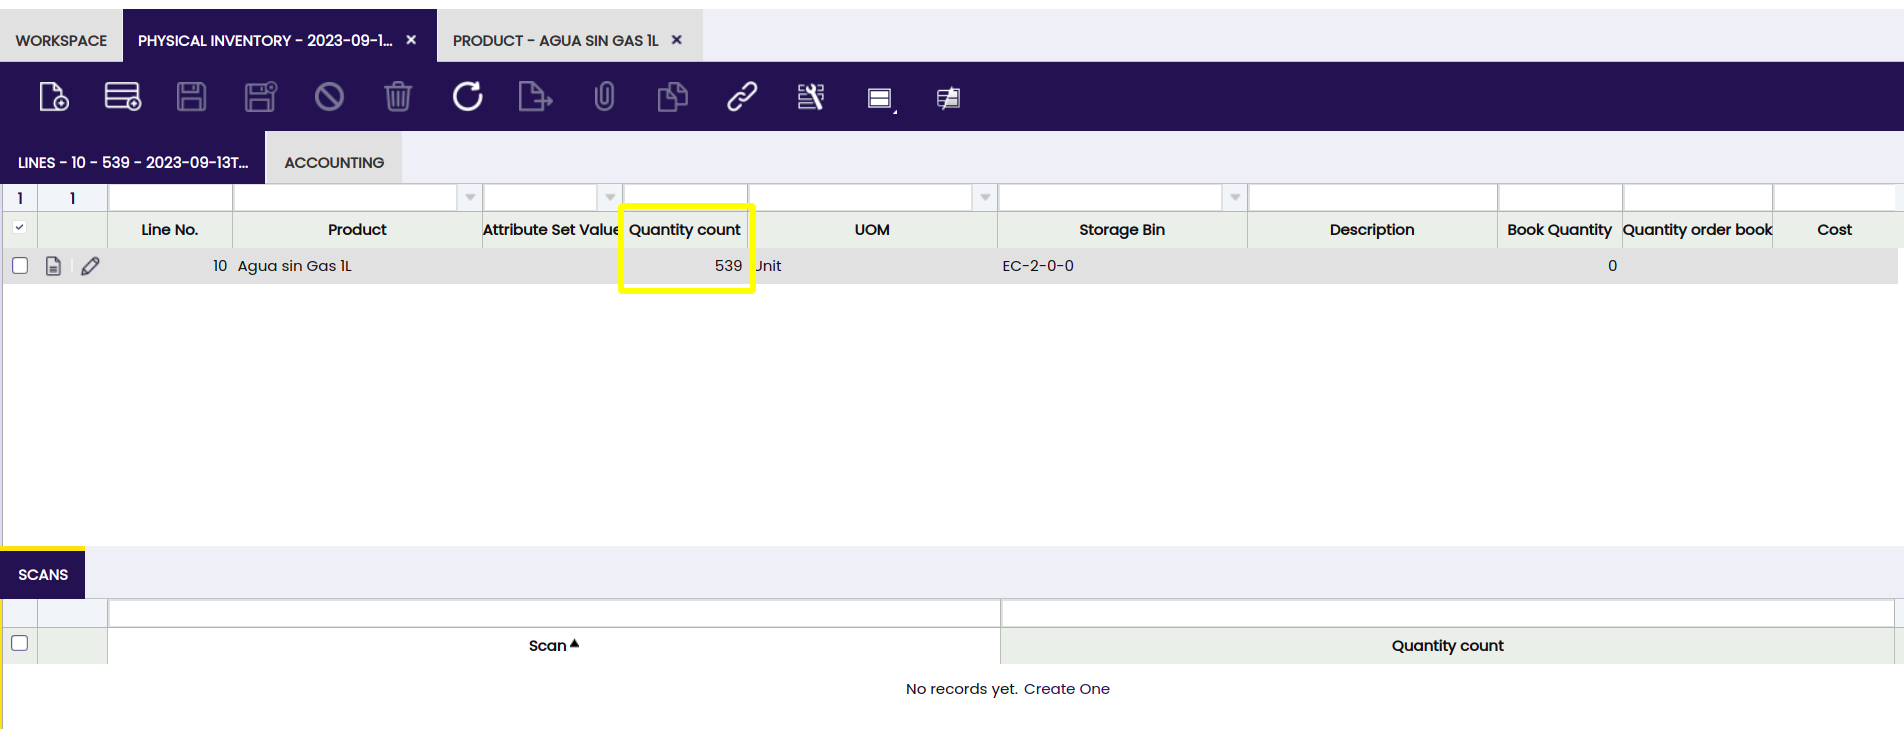
In the meantime, on Etendo Classic, a line will be added in the "Scan" tab of the physical inventory line, about the scan and the amount that has been set.

In the physical inventory header, by selecting a scan line, you can run the Process Inventory Count. This takes care of adding to the stock the quantity that has been set on the scanned product.

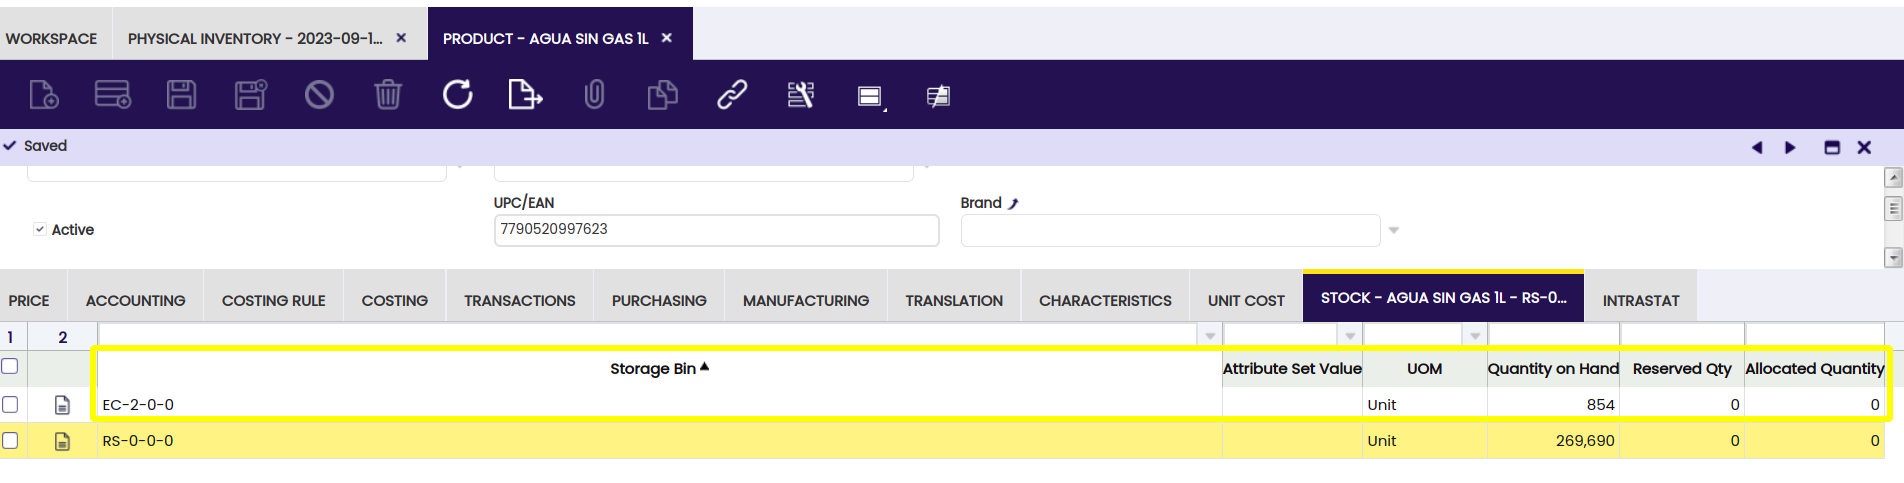
And here we will observe the quantities before the process:
And after:
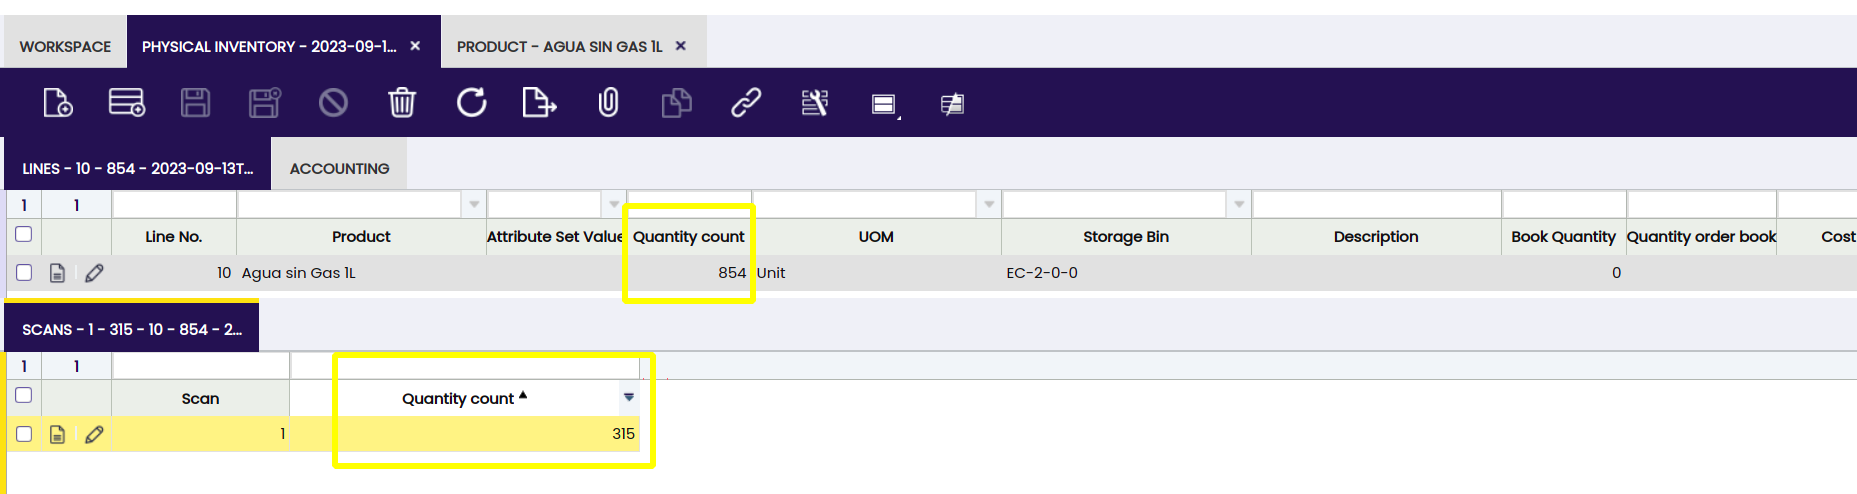
We will also notice that the Product's Stock has been updated in the indicated storage bin with the quantity of the product: