Transactions
Overview
Warehouse Management deals with all activities related to the warehouse actions necessary for sales and procurement processes.
Physical Inventory
Application > Warehouse Management > Transactions > Physical Inventory
Physical Inventory window allows the user to execute goods count process in Etendo.
Header
Goods count process requires creating an inventory count to check or to update stock quantities.
These are the steps that must be followed in order to create an inventory count:
1. The Header section identifies the "Physical Inventory" process and lists its main parameters.
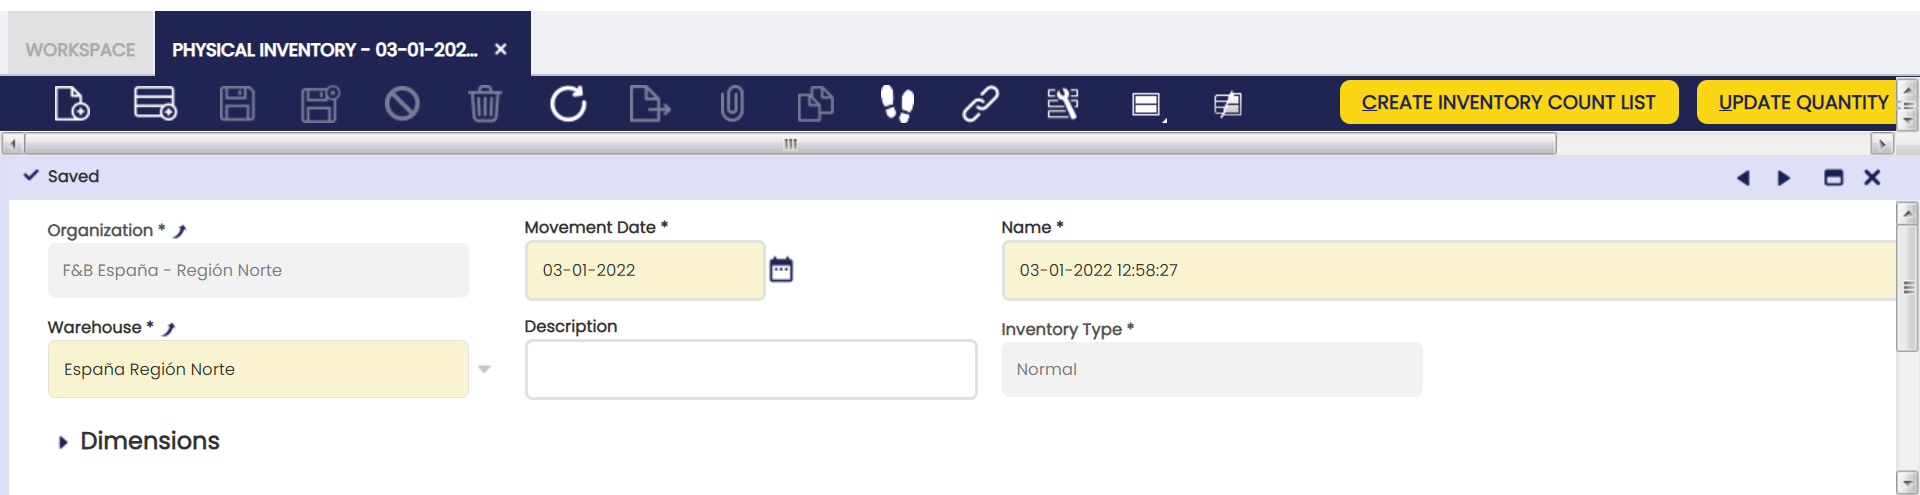
All fields are pre-filled automatically when a new record is created.
Some of the fields to note are:
- Name: This field is used to reference the physical movement not only in warehouse reports but also on general ledger, therefore it is important to use a significant name.
- Movement Date: This is the date when the movement is created and it is defaulted to the current date. This date is also used in the posting record of the Physical Inventory document to the general ledger, if any. It can always be changed, but the user should keep in mind that it is not possible to register physical inventories in the past (the "Process Inventory Count" always takes the current date and not the Movement Date to update the stock). The Movement Date should be the current date unless the user can ensure that no warehouse transactions have been processed in the meanwhile.
- Warehouse: warehouse in which the physical inventory takes place. Defaulted to the session value from the top navigation User Preferences menu.
2. There are 2 ways of entering lines into the physical inventory document:
- Automatically, by creating a list of the products available in the warehouse and storage bins defined in the physical inventory header that fulfill the filtering conditions specified by the Create Inventory Count List button.
- Manually, line by line for certain products. This is used whenever only some products need updating.
Create Inventory Count List process can be executed more than once for the same physical inventory. Although lines are created automatically by using the Create Inventory Count List process, these lines can later on be updated manually. Create Inventory Count List filter dialog has the following parameters:
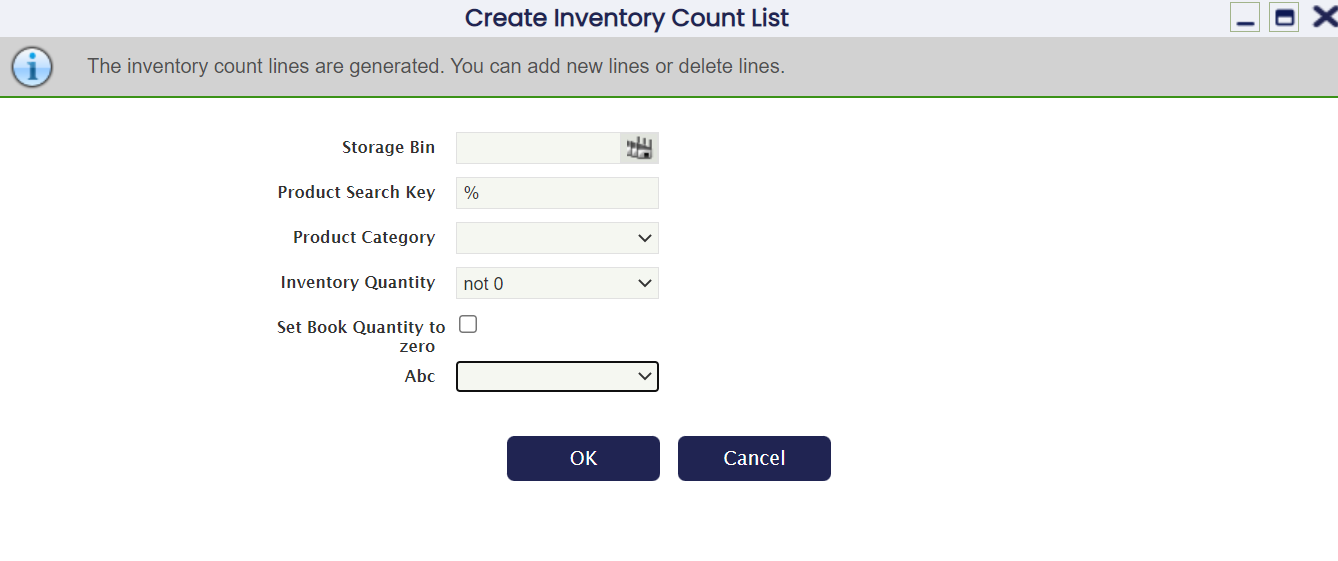
The fields to note are:
- Storage Bin: Only products on this storage bin will be filtered.
- Product Category: Only products belonging to a given product category will be filtered, otherwise all products will be shown.
- Inventory quantity: Includes or excludes products on physical inventory depending on actual quantities. The options available are:
- empty - all product on physical inventory will be shown regardless its quantity
- 0 - only products on physical inventory having 0 quantity in stock will be shown.
- <0 - only products on physical inventory having a positive quantity in stock will be shown.
- >0 - only products on physical inventory having a negative quantity in stock will be shown.
- not 0 - only products on physical inventory having a quantity in stock different to 0 will be shown.
- Set Book Quantity to Zero: this checkbox sets the Quantity Count field on the count list to zero. When the checkbox is not selected, the Quantity Count is defaulted to the same value as the Book Quantity (On Hand Quantity) of the product.
- First option is used for blind physical inventories where people who are counting items in the warehouse do not need to know the expected quantities.
- First option is used to allow the user to enter the "real" quantity count on the warehouse and storage bin. Once the inventory count is processed, the book quantity shown by the system will be updated to the quantity count entered by the user.
- ABC: Pareto Product Report
Lines
Lines tab allows the user to add or to edit individual products to be included in the inventory count list. It represents the inventory count list of a given warehouse.
Some relevant fields to note are:
- Quantity Count: that is the actual (physically counted) product stock in the Storage Bin of the warehouse.
- Book Quantity: that is the product stock in the Storage Bin according to Etendo.
- Cost: that is the unit cost of the product.
This field is optional. It can be filled in with the cost if known whenever the stock of a product is increased, otherwise the Default Cost method is used to valuate that transaction which increases the stock of the product.
The process buttons are:
- Update Quantity updates current Book Quantity field with latest product quantity from the application. This is used in case it has changed since the count list was generated. It is useful for situations when there is a significant amount of time in between generating physical inventory in Etendo and real physical count.
- Process Inventory Count finishes Physical Inventory count process after all corrections have been entered and updates the stock.
- Post allows to account the inventory count once processed.
Accounting
A physical inventory can only be posted to the ledger in case there is a difference between "Quantity count" and "Book Quantity" for a product. Otherwise there will not be anything to post to the ledger.
For instance, a product whose "Quantity count" is 6700 units at a given date, while "Book Quantity" in Etendo is 6000 units.
That physical inventory can be posted once processed, if the cost of the product has been calculated.
Physical Inventory posting creates the following accounting entries if inventory increases:
| Account | Debit | Credit** |
| Product Asset | (Quantity Count - Book Quantity) * Cost of the Product | |
| Warehouse Differences | (Quantity Count - Book Quantity) * Cost of the Product |
Physical Inventory posting creates the following accounting entries if inventory decreases:
| Account | Debit | Credit |
| Warehouse Differences | (Quantity Count - Book Quantity) * Cost of the Product | |
| Product Asset | (Quantity Count - Book Quantity) * Cost of the Product |
How to Reactivate Physical Inventories
Info
To be able to include this functionality, the Warehouse Extensions Bundle must be installed. To do that, follow the instructions from the marketplace: Warehouse Extensions Bundle.
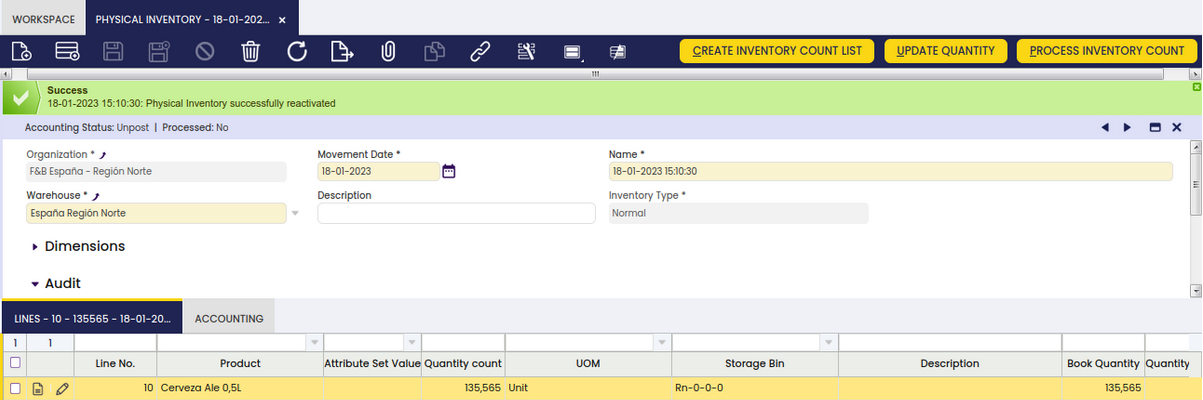
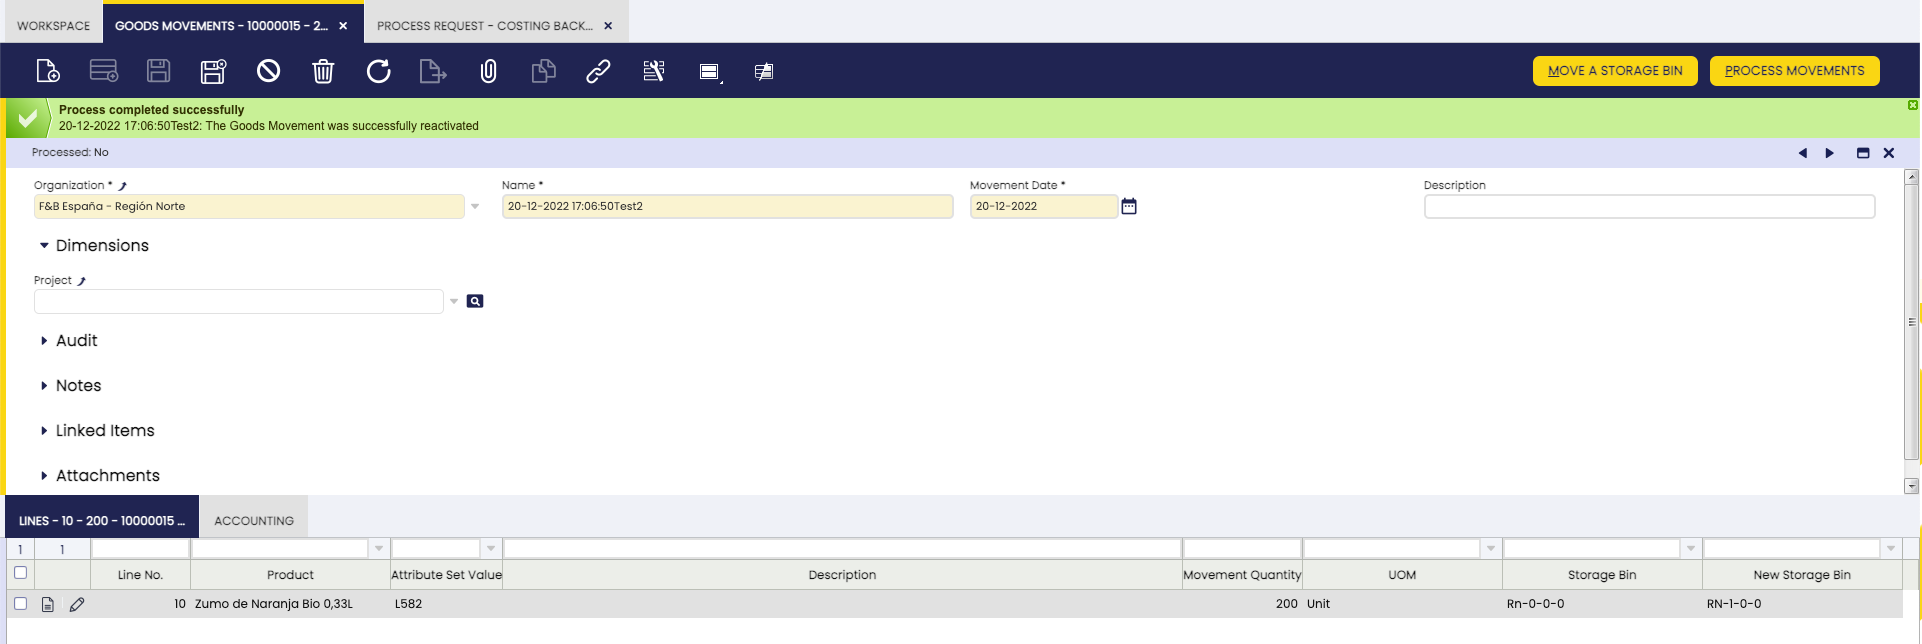
From the Physical Inventory window, it is possible to reactivate a previously generated inventory just by selecting the corresponding document and clicking the Reactivate button.
Once the Inventory is successfully reactivated, the state of the document changes to Not processed as it can be observed in the status bar.
Warning
It is not possible to reactivate documents that include transactions with quantities exceeding the existing stock quantity for a certain product in a certain storage bin. The only exception is when the configuration of the storage bin allows Over Issue. For more information, visit Storage Bin.
Bulk Posting
Info
To be able to include this functionality, the Financial Extensions Bundle must be installed. To do that, follow the instructions from the marketplace: Financial Extensions Bundle.
The Bulk Posting functionality allows the user to post or unpost multiple records by selecting the corresponding records and clicking the Bulk posting button.
Also, the Accounting Status of the record/s is shown in the status bar, in form view, or in a column, in grid view.
Info
For more information, visit the Bulk Posting module user guide.
Goods Movement
Application > Warehouse Management > Transactions > Goods Movement
Goods Movement window allows the user to make internal inventory movements among warehouses and storage bins.
Header
Internal inventory movements can be made by adding products to the lines tab or by moving all items at once.
All fields are automatically pre-filled in when a new record is created. Some of them to note:
- Name: This field will be used to reference this goods movement, not only in warehouse reports but also in the general ledger, therefore it is important to use a significant name.
This field is defaulted to the current date but it can always be changed as required. - Movement Date: that is the date of the goods movement transaction.
This field is defaulted to the current date but it can always be changed as required.
From an accounting point of view, goods movement will be reflected on this date.
As already mentioned, there are 2 ways of entering lines (or products to be moved between warehouses and storage bins):
- By adding individual products to the Lines tab.
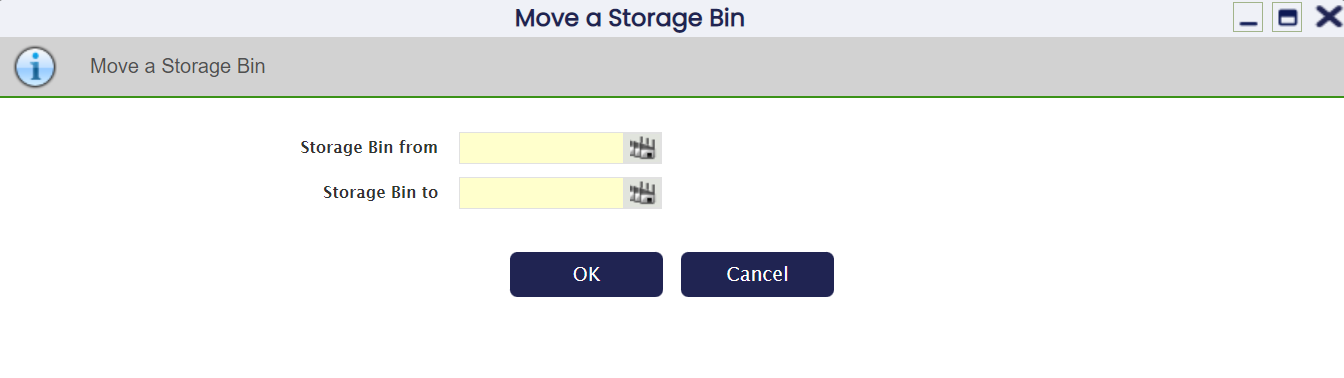
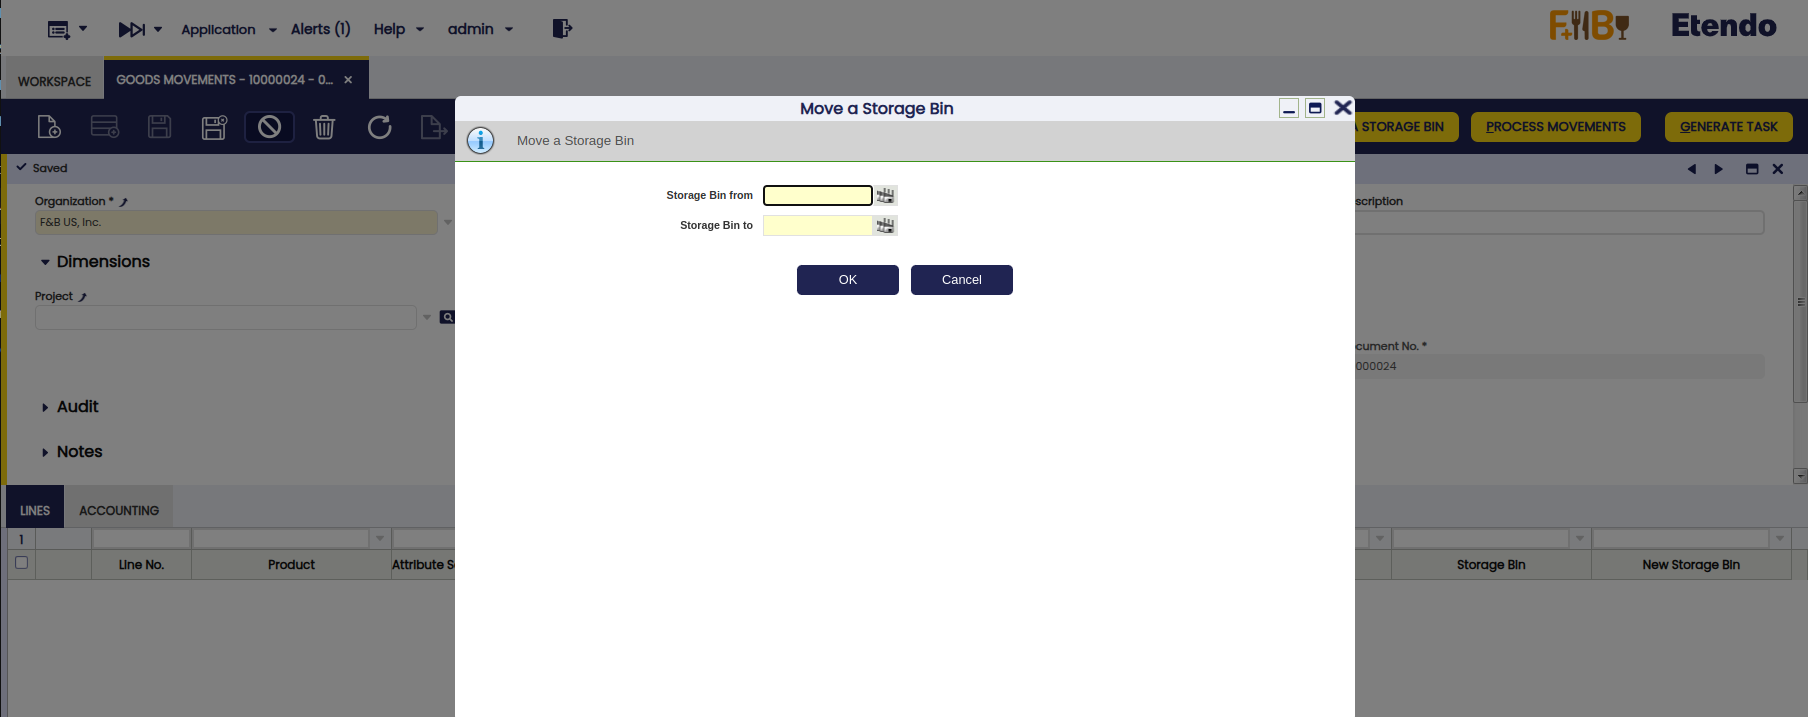
- By moving all items from one bin (Storage Bin From) to another (Storage Bin To) by using the Move Storage Bin button.
The system automatically inserts one line per every storage bin and product.
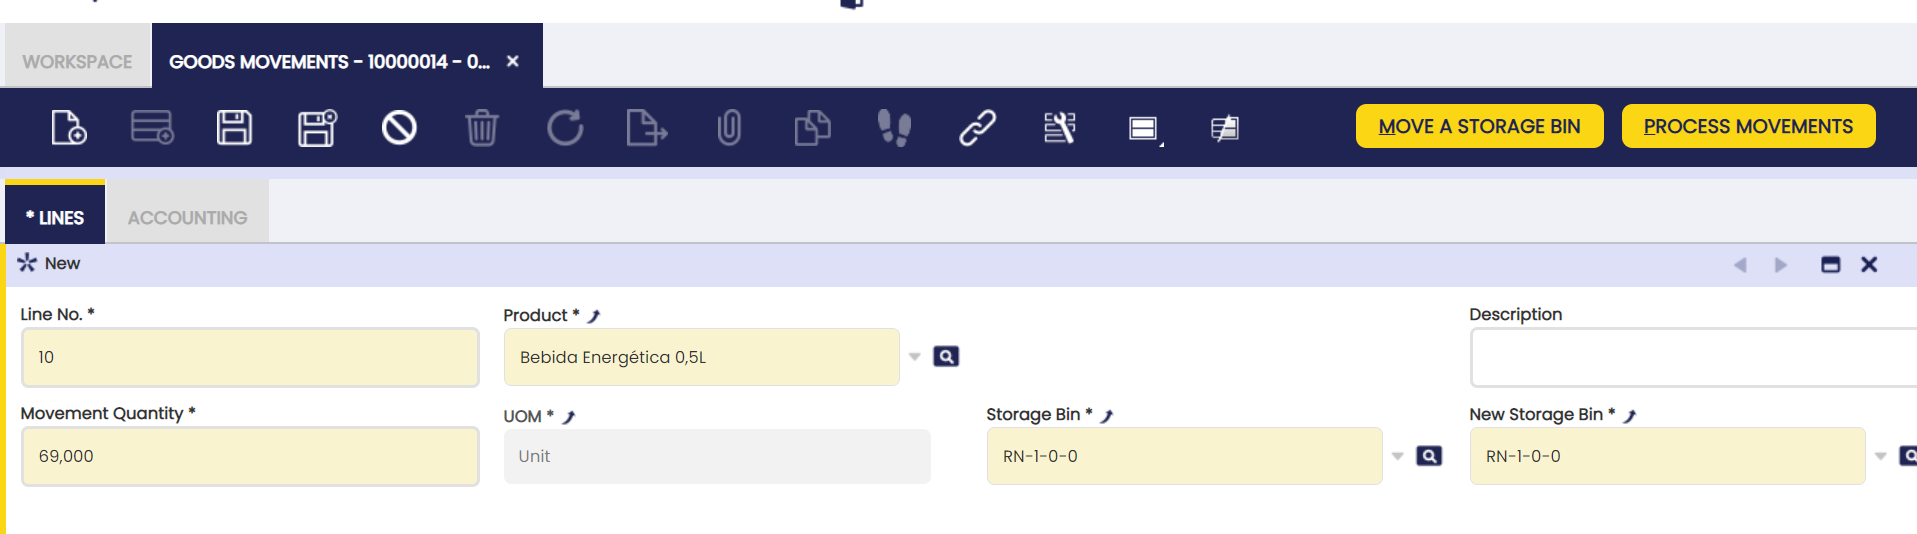
Lines
Lines tab is a list of the products moved between warehouses and storage bins.
This tab also includes information about the source, destination and the respective quantity.
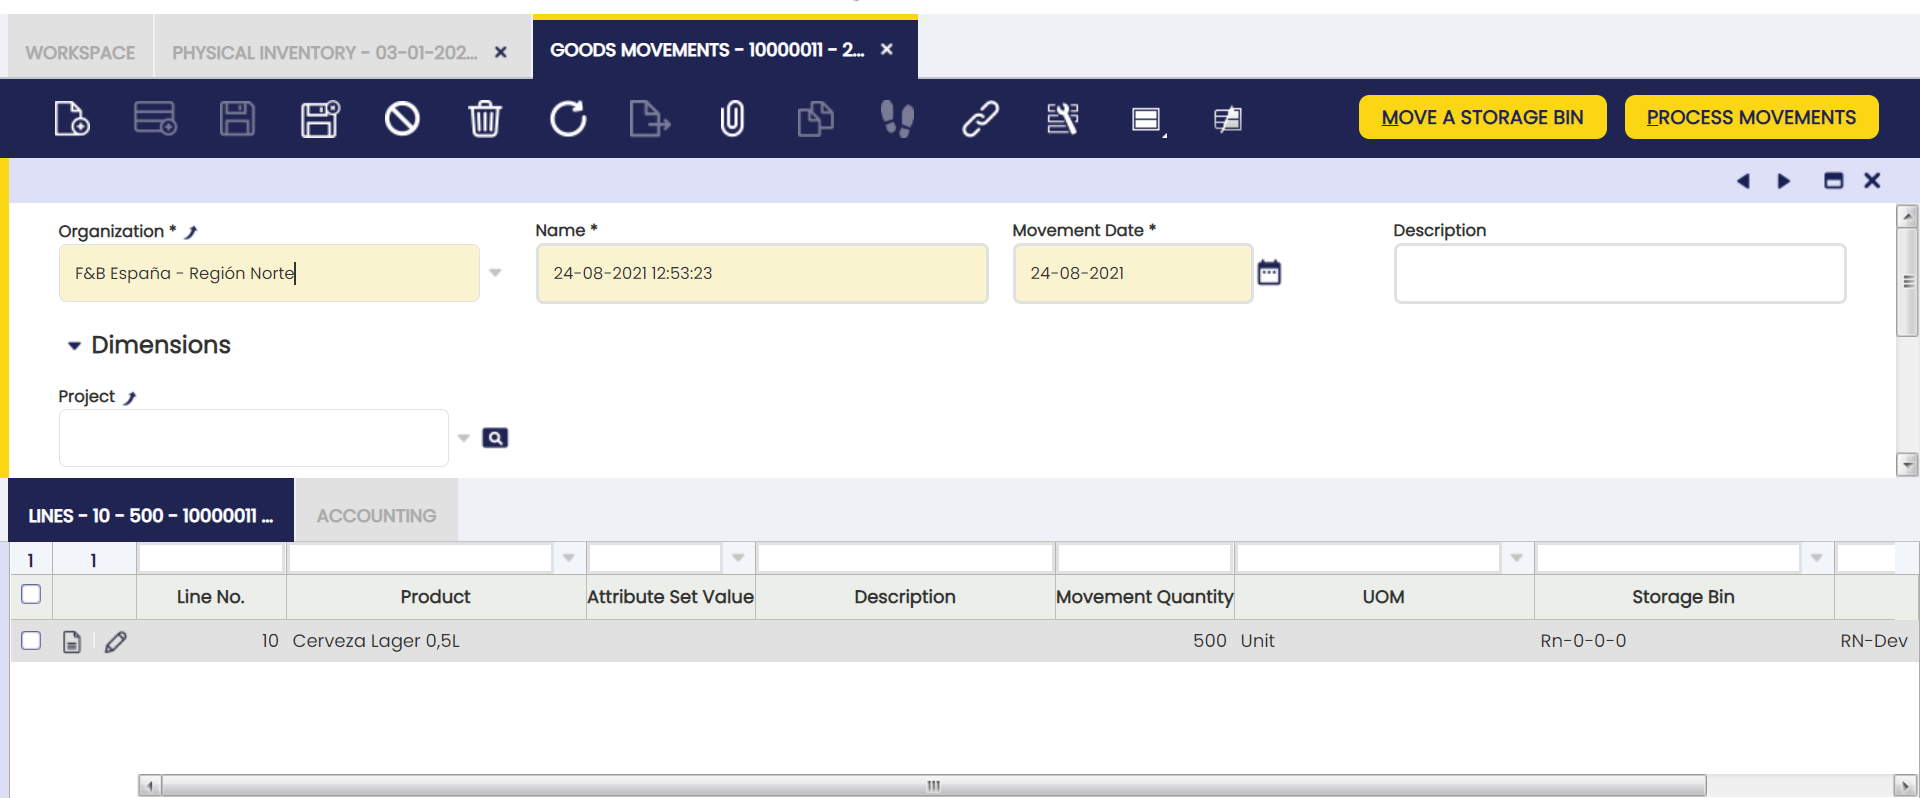
Some fields to note:
- Movement Quantity: that is the product amount to be moved.
Defaulted to the total quantity of the Product in the Storage Bin. - Storage Bin: that is the bin products are taken from.
Defaulted to the Storage Bin selected in the Product selector. - New Storage Bin: that is the destination bin for the products.
- New Attribute Set Instance: Read only field which is only visible for Referenced Inventory related box/unbox transactions. It shows the new attribute set instance after the boxing/unboxing process takes place.
Once Process Movements process is executed, the stock is updated.
Buttons
Move a Storage Bin
This button allows you to quickly transfer all products located in a Storage Bin A to another destination Storage Bin B. When you click it, the system automatically displays a list of products from the selected source location in the lines. When processing the transfer, all products are transferred from the source to the destination.
Generate Relocation Task
Info
To be able to include this functionality, the Warehouse Extensions Bundle must be installed. To do that, follow the instructions from the marketplace: Warehouse Extensions Bundle. For more information about the available versions, core compatibility and new features, visit Warehouse Extensions - Release notes.
Allows you to create a relocation task from the Goods Movement document. The system takes the information loaded in the record and its lines and sends it to Etendo Mobile, where the operator can execute the movement from the corresponding sub-application. When pressed, the automatic or manual assignment pop-up opens.
Info
For more information,visit Relocation Task
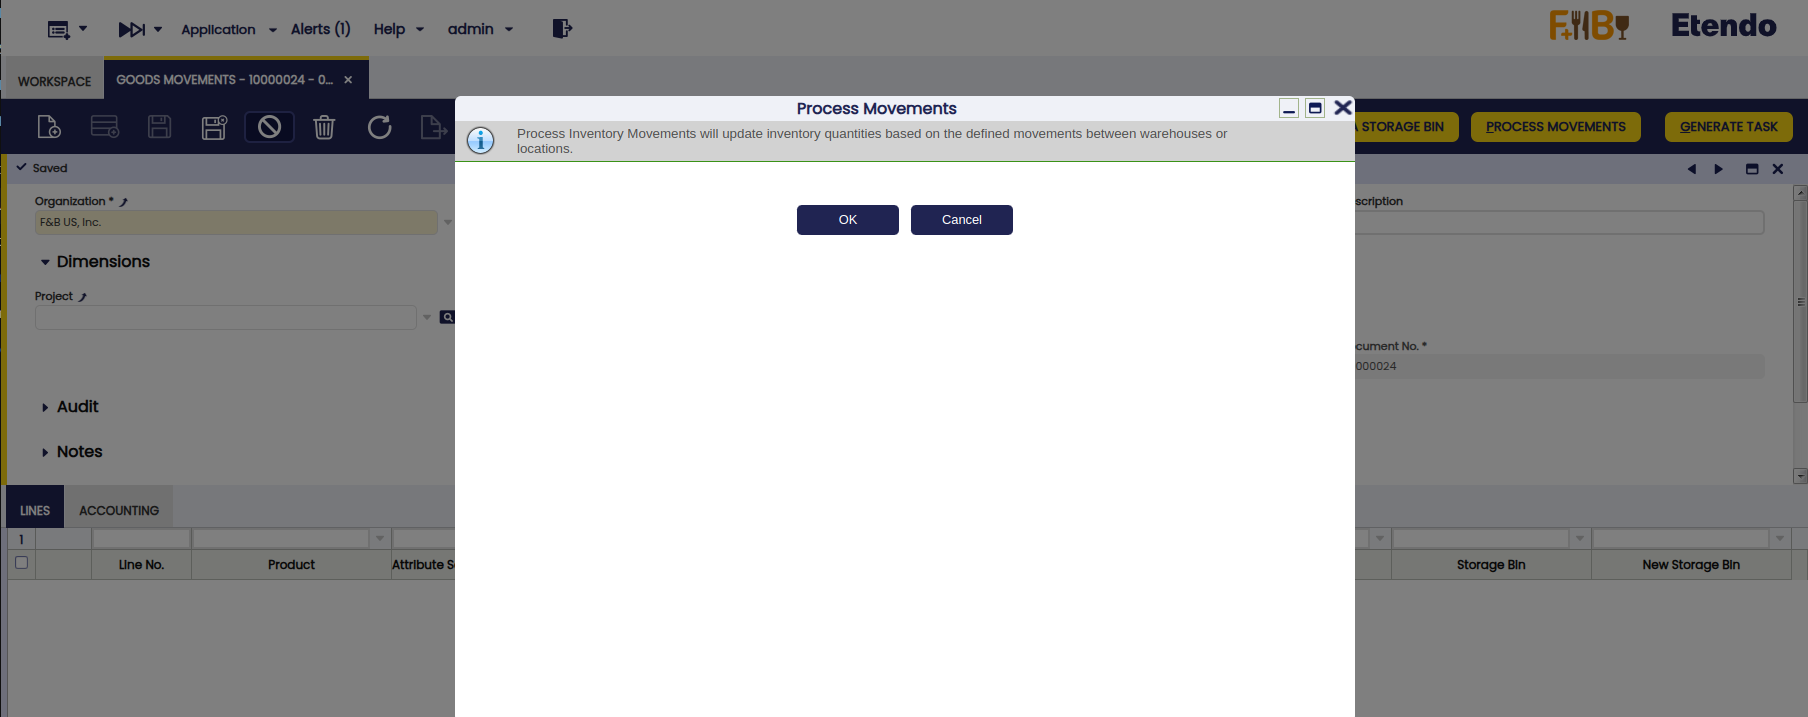
Process Movement
This button processes the Goods Movement document. When executed, the system validates the movement information and updates the stock in the corresponding locations.
Accounting
Info
A Goods Movement can be posted to the ledger if the MaterialMgmtInternalMovement table is set to Active in the Active Tables tab of the organization's general ledger configuration.
Goods Movement posting creates following accounting entries.
Posting record date: Movement Date.
| Account | Debit | Credit | Comment |
| Product Asset | Movement Line Cost Amount | One per Goods Movement Line | |
| Product Asset | Movement Line Cost Amount | One per Goods Movement Line |
Posting a Goods Movement implies to have its cost calculated:
- A validated Costing Rule in the Goods Movement legal entity is required.
- The background process Costing Background Process must be run.
- Once the cost has been calculated, the Goods Movement can be posted.
How to Reactivate Goods Movements
Info
To be able to include this functionality, the Warehouse Extensions Bundle must be installed. To do that, follow the instructions from the marketplace: Warehouse Extensions Bundle
From the Goods Movement window, the user is able to reactivate a previously generated movement just by selecting the needed movement and clicking the Reactivate button.
Once the movement is successfully reactivated, the state of the document changes to Not processed as it can be observed in the status bar.
Warning
It is not possible to reactivate documents that include transactions with quantities exceeding the existing stock quantity for a certain product in a certain storage bin. The only exception is when the configuration of the storage bin allows Over Issue. For more information, visit Storage Bin.
Bulk Posting
Info
To be able to include this functionality, the Financial Extensions Bundle must be installed. To do that, follow the instructions from the marketplace: Financial Extensions Bundle.
The Bulk Posting functionality allows the user to post or unpost multiple records by selecting the corresponding records and clicking the Bulk posting button.
Also, the Accounting Status of the record/s is shown in the status bar, in form view, or in a column, in grid view.
Info
For more information, visit the Bulk Posting module user guide.
Bill of Materials Production
Application > Warehouse Management > Transactions > Bill of Materials Production
Overview
Create and run production processes using the previously defined bills of materials.
Unlike the name suggests, this process is not part of production. This setup is used to combine different end products into another bundled product. For example, for a computer that is shipped with different keyboards or products that are shipped with different power cables. There is no actual production involved for the creation of the new product.
The set up of this screen is combined with setups in the product screen:
- the bill of materials checkbox is selected for the product
- the bill of materials tab is filled out
BOM Production
In this section the organization is selected, a name of the bundling that will be executed, as well as a date on which it will occur.
Production Plan
Add bills of materials to be produced in a specified production plan.
In this section, the product is selected and the number that is executed. Also, the storage bin in which the result of the Production will be stored must be selected.
As indicated in the Overview, the product that is selected needs to be set up correctly first:
- the bill of materials checkbox is selected
- the bill of materials tab is filled out with the information of the components that are combined plus the quantity for each component
- the Verify Bom button was clicked to set the product ready to be used
I/O Products
Create and edit the products that are going to be used in the production.
After the Production Plan tab is filled out, the Create/Process Production button is clicked to generate the information in this section. Based on the setup of the information in the bill of materials tab of the product combined with the production quantity in the production plan tab, the information of the components to be used and which quantity was generated.
After clicking the Create/Process Production button for the second time, the changes are executed.
In the popup, the checkbox 'Product quantity must be on stock' can be selected, so the process is only executed if the components are in stock. After successfully processing, the stock of the components decreases and the stock of the bundled product increases.
Warning
Currently, processes involved in the Bill Of Materials Production do not support negative stock. For this reason, if the checkbox 'Product quantity must be on stock' is not selected and there is not enough stock of the consumed products, the available quantity in stock will be used to fill the quantities in the [I/O Products] tab lines.
There is a check named Force Use Of Warehouse Of Selected Storage Bin. When enabled, the same Warehouse of the selected Storage Bin will be used to retrieve the stock to be consumed. If it is not enabled, the process will take into account all available Warehouses for the set in the header of the Document.
Bulk Posting
Info
To be able to include this functionality, the Financial Extensions Bundle must be installed. To do that, follow the instructions from the marketplace: Financial Extensions Bundle.
The Bulk Posting functionality allows the user to post or unpost multiple records by selecting the corresponding records and clicking the Bulk posting button.
Also, the Accounting Status of the record/s is shown in the status bar, in form view, or in a column, in grid view.
Info
For more information, visit the Bulk Posting module user guide.
Goods Transaction
Application > Warehouse Management > Transactions > Goods Transaction
Overview
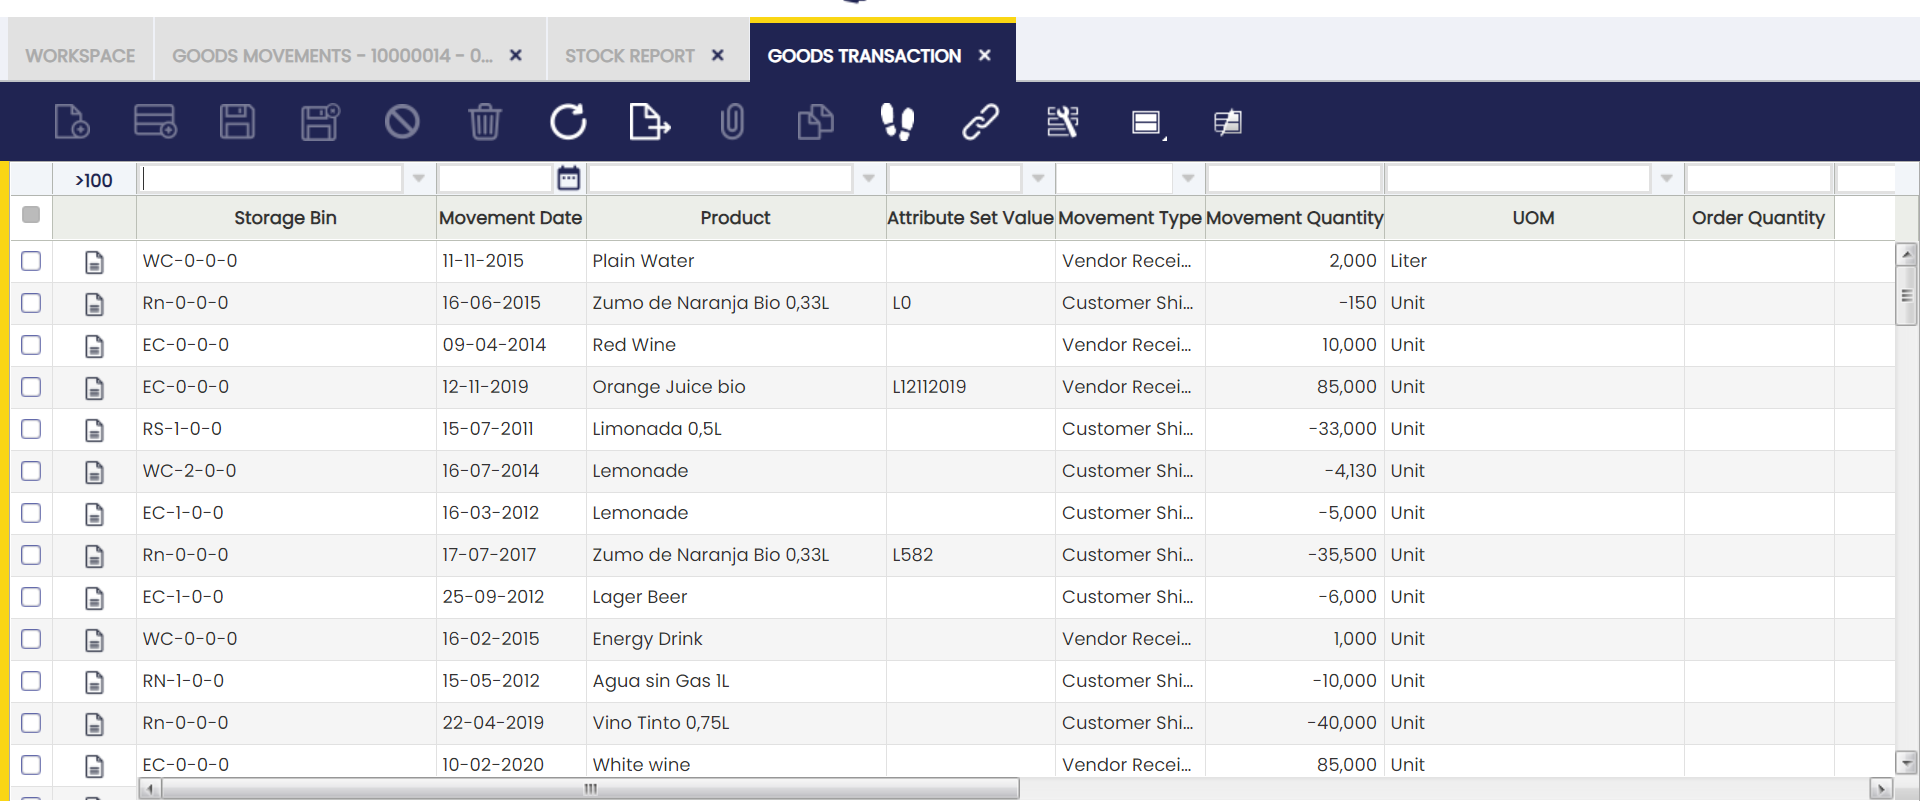
Goods Transaction window provides a read-only view with extensive filtering capabilities that shows all inventory transactions.
All real warehouse movements can be seen in this window: incoming, outgoing, movements between warehouses, physical inventories, etc.
Stock Reservation
Application > Warehouse Management > Transactions > Stock Reservation
Overview
In this window, it is possible to review and manage existing Reservations.
Stock reservations are mainly used to ensure the stock availability when delivering a Sales Order. With this feature, it is also possible to lock stock not related to any Sales Order to avoid its consumption.
A reservation identifies certain stock in the warehouse that is reserved and cannot be consumed by anyone except the owner of the reservation. Currently, there are two possible owners, a Saler Order line or the System. A reservation for a Sales Order line identifies stock that can only be consumed in shipments related to the Sales Order. A System reservation is a special reservation type that cannot be consumed by anyone. System reservations are used for Hold reservations when some stock needs to be blocked in the warehouse.
Note
Reservations are disabled by default. To be able to use them, please insert a new Preference using property Enable Stock Reservations with value Y. Then, end session and log in again to continue with the process.
This functionality comes with two types of reservations:
- Pre-Reservation: These are reservations that are not physically in the warehouse but ordered to a supplier and when there is a relationship between the line of the purchase order and a sales order line. Once the purchase order line is received, this pre-reservation is automatically converted to a reservation.
- Reservation: Refers to stock stored in the warehouse that is already reserved by a sales order line.
A reservation is always defined by the product that is desired to be reserved but other dimensions can be defined such as the warehouse, storage bin and attribute (i.e Colour, lots, serial number).
Another interesting thing is the possibility of allocating or not the reservation:
- Allocated stock means that specific stock is reserved for a sales order, rather than it being a general reservation. That particular stock can not be reserved for any other sales order.
- A Not Allocated reserved stock can be changed at any time by other existing stock but always ensuring that the Sales Order line keeps the reservation.
This functionality tries to cover several flows:
- Sales
- Procurement
- Purchasing plan (MRP)
Sales Flow
A sales order can be reserved when the document is booked and pending to be delivered. The way to make the reservation is:
-
Manual: No reservation is generated automatically. So when the order is booked the reservations needs to be done manually selecting the storage bin, attribute, etc.
-
Automatic: The reservation is automatically created and processed, reserving the available stock. This option reserves stock from any of the available warehouses belonging to the organization of the created sales order, not only from the warehouse defined in the order header.
-
Automatic - Only default warehouse: The reservation is limited only to the warehouse specified in the header of the order. This allows optimizing inventory allocation and ensuring that products are allocated according to the warehouse preferences defined in each transaction.
Info
This last option is only available if the Automated Warehouse Reservation module is installed, part of the Warehouse Extensions Bundle. To do that, follow the instructions from the marketplace: Warehouse Extensions Bundle.
For more information, visit Sales Order.
Procurement Flow
Pre-reservations can also be made from the Purchase Order. Being in the purchase order line, there is the possibility of selecting any sales order line pending to be delivered that is waiting to receive the goods in the warehouse. Once the items are received the pre-reservation is converted to reservation and the goods are reserved for that sales order line.
For more information, visit Purchase Order.
Purchasing Plan (MRP)
When launching the purchasing plan there is now the possibility of making reservations for Sales Order and pre-reservations, that is, create purchase orders linked to sales orders.
Reservation Consumption
When a Good Shipment of a reserved Sales Order is automatically created, it will consume reserved stock. The process will propose first the possible allocated stock and later any available stock based on the standard rules to retrieve stock, including reserved stock but NOT allocated (even from other reservations). If the related Sales Order does not have any reservation, only not reserved stock is proposed.
When the Goods Shipment is processed the reservation is updated to reflect the stock that has been finally delivered and update the released quantity. In this step, there are several cases:
- All the stock of the shipment matches the reserved stock. The released quantity is updated accordingly.
- A different stock is shipped.
- The stock is not reserved by any other reservation. The reservation is updated to reserve the shipped stock and if there was other stock reserved it is deleted from the reservation so the reserved quantity remains equal.
- The stock is reserved and not allocated in another reservation. The other reservation is updated to search for other available stock.
- If available stock is found, the other reservation is updated to reserve the found stock and the stock is reassigned to the current reservation.
- If no available stock is found, an error is shown as the stock is not available. The user should change the stock of the good shipment or edit the other reservation to manually search or free the conflicting stock.
- The stock is reserved and allocated in another reservation. An error is shown as the stock is not available. The user should change the stock of the good shipment or edit the other reservation to manually search or free the conflicting stock.
Reservation
The desired product to be reserved is defined in the main tab.
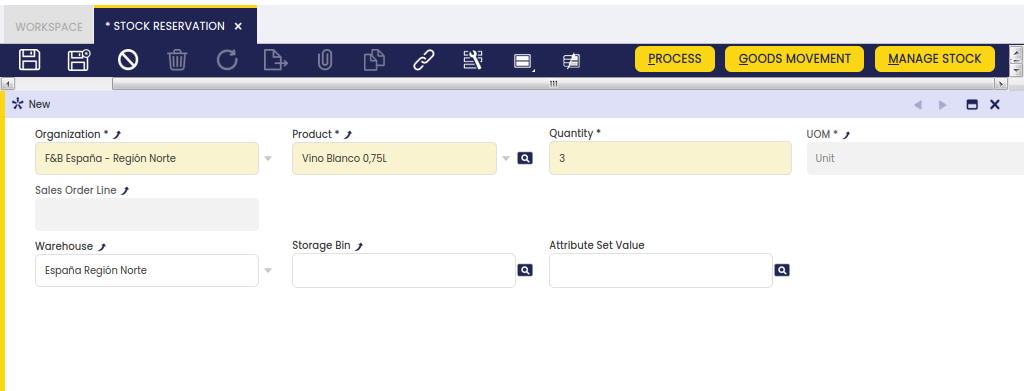
The reservation header defines each reservation. First, the Organization where the reservation is done and the Product and Quantity desired to be reserved are defined. When the reservation is for a Sales Order line, these fields are inherited from the line. Later, the owner of the reservation is defined, currently it is only possible to define Sales Order lines. If this is left blank, the reservation is considered a System reservation where the owner is the Organization. Finally, it is possible to define certain dimensions to restrict the stock that can be used to fulfill the reservation:
- Warehouse
- Storage Bin
- Attribute Set Value
Note
It is only possible to select warehouses that are defined as on hand warehouses of the organization and storage bins that belong to them.
The reservation might have different statuses:
- Draft: The reservation might already have some stock lines, but those are not yet considered as reserved stock and are available to everyone.
- Completed: The reservation has been processed. If some stock was still pending to be reserved the Complete process will try to reserve the available stock. This automatically reserved stock is left as not allocated.
- Hold: Any reservation can be set in hold status. This means that the stock is completely blocked and it is not even possible to generate a shipment for the sales order consuming the reserved stock. In this status, the button previously named “Put on Hold” changes to “Unhold” and gives the user the possibility to undo the action.
- Closed: A closed Reservation can not be reactivated afterwards. Also, when a Reservation is Closed, it's Quantity is set as the same value as the Released Quantity, preventing further inconsistency problems.
A reservation has 3 main quantities:
Quantity
Determines the quantity that is desired to be reserved. If the reservation is related to a Sales Order line this quantity must be the same as the Ordered Quantity.
Reserved Qty
It is the total quantity that is really reserved. When there is not enough stock available it is possible to have a lower Reserved Qty than the Quantity.
Released Qty
It is the quantity that has been delivered and released from the reservation. When a Good Shipment for a reserved Sales Order is processed the Released Qty of the reservation is increased by the delivered quantity.
Stock
The Stock tab identifies each existing Stock or Purchase Order selected to fulfill the reservation.
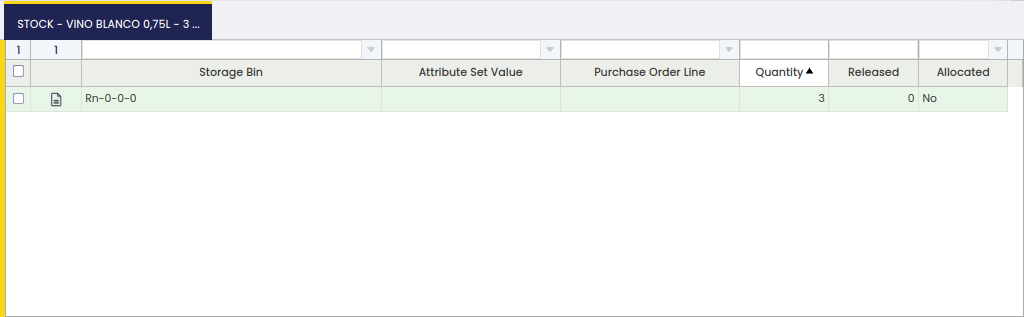
In the Stock tab, the actual reserved stock is shown. The stock should meet the dimensions defined in the header. When the stock is physically in the warehouse the reserved stock is identified by the Storage Bin and the Attribute Set Value when applied. In case of pre-reservations the stock is still not in the warehouse, so the Storage Bin property is blank and the Purchase Order line is set. When a pre-reservation is receipt and converted to reservation the storage bin where the stock has been stored is set keeping the purchase order line.
The reserved stock has 2 quantities:
Quantity
The quantity reserved.
Released Qty
The quantity that has been released or delivered.
Manage Stock
When the reservation is in Draft or Completed status, it is possible to modify the reserved stock using a pick and execute process.
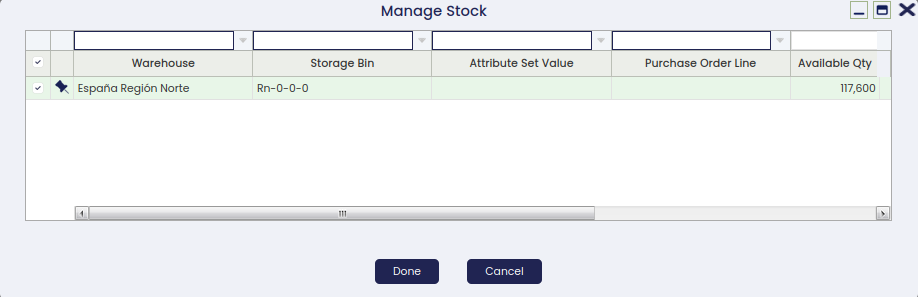
This window shows all the already reserved stock plus other available stock and not receipt Purchase Order Lines that can be used to fulfill the reservation. The available stock is filtered by the on hand warehouses of the reservation's organization and the dimensions that might be set. The Purchase Order lines are also filtered by these dimensions. For each selected line the quantity to reserve has to be set and if the stock is allocated or not. The quantity must be lower than the available quantity considering as well the quantity that might be reserved in other reservations and the sum of all the selected lines must be lower than the quantity desired to be reserved. If the reservation already has some released quantity, the quantity of the released stock must be higher or equal than the released stock
Goods Movement
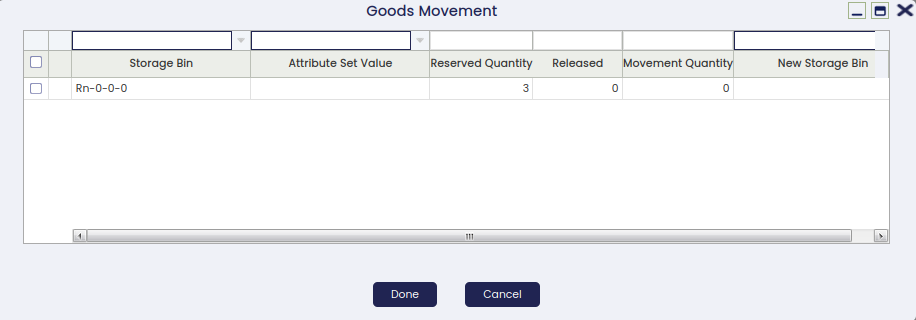
It is allowed to move an item that is reserved from its current storage bin to another one. The button Goods movement shows all the bins where the product is reserved, that is, the stock lines and it is also possible to edit the quantity to be moved and the new storage bin.
Inventory Amount Update
Application > Warehouse Management > Transactions > Inventory Amount Update
Overview
Inventory Amount Update window allows the user to change either current inventory amount or current unit cost of products in stock at a given reference date.
Once created and processed, it generates a closing and an opening inventory for the product(s), which can be reviewed in the Inventories tab.
- Closing inventory removes product "current" inventory value (at current cost, either "average" or "standard")
- Opening inventory adds product "new" inventory value (at current cost, either "average" or "standard")
Whenever an inventory amount update is created on the current date, therefore movement date is the same as transaction process date, all existing transactions remain valued at the existing cost but new ones booked starting from current date, that will be valued at the new cost.
Whenever an inventory amount update is created in the past, those closing/opening inventories will have a movement date in the past and a transaction process date. These inventories will be set as "Backdated" transactions by the Costing Background process, therefore the corresponding backdated cost adjustment can be created.
These two inventory transactions, opening/closing inventory can be reviewed in the Transactions tab of the product window and can be posted to the ledger in the Physical Inventory window.
Header
An inventory Amount Update can be created and processed in the header section of the Inventory Amount Update window.
An inventory amount update can be created, managed and processed in the header section of the Inventory Amount Update window.
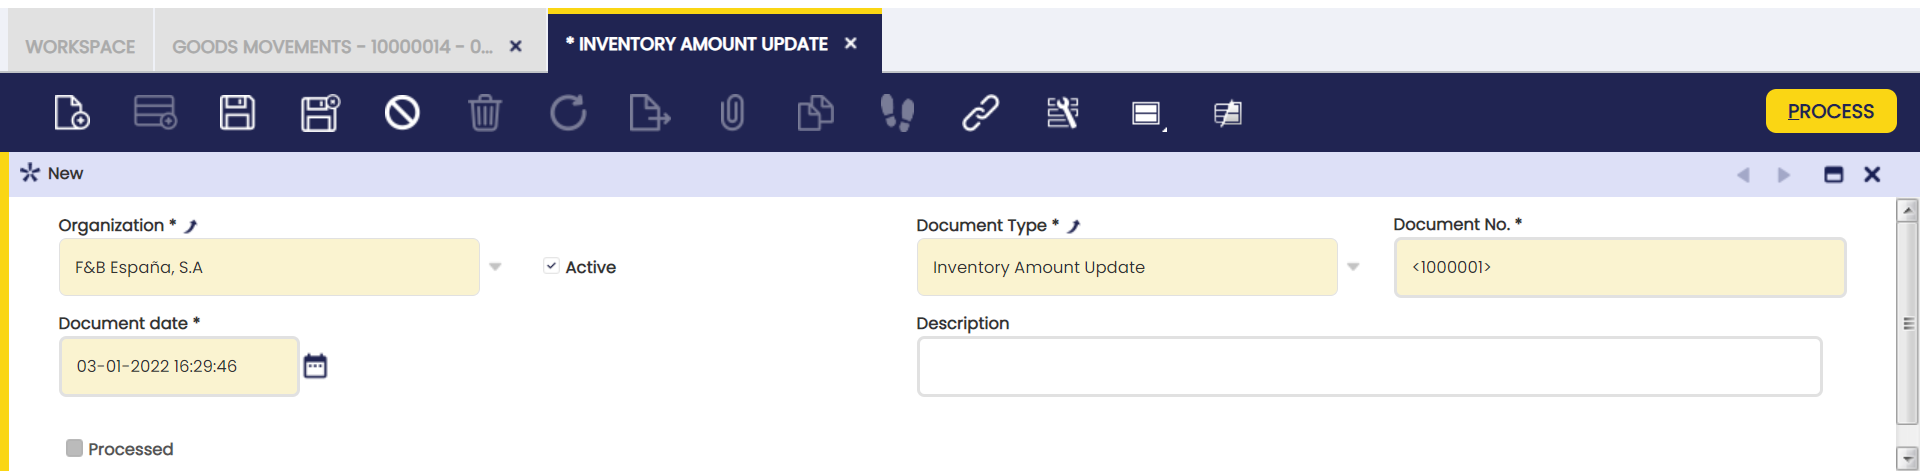
Some fields to note are:
- Document type: that is inventory amount update document type
- Document No.: that is inventory amount update document sequence
- Document Date: that is inventory amount update date.
Lines
Once an inventory amount update header has been properly created and saved, inventory amount update lines can be created in this tab.
An inventory amount update can have as many lines as products whose current cost or inventory amount needs to be modified for whatever kind of reason.
When selecting a product and entering a given reference date current inventory amount, on hand qty and current unit cost for the product are automatically filled in.
To complete the line it is necessary to fill in either the "Inventory Amount" or the "Unit Cost".
Info
It is important to remark that product quantity on hand shown in an "Inventory Amount Update" can vary if the "Fix Backdated Transaction" flag is active/not active in the corresponding Costing Rule.
For instance, a receipt of 100 units is booked for a product at the current date, and after that another receipt of 50 units is booked for a product with a movement date in the past. This last one receipt is a "backdated" transaction.
An Inventory Amount Update is launched for the product dated on between, before current date:
- if the "Fix Backdated Transaction" is active, the "Inventory Amount Update" launched for the product, will then consider the "backdated" transactions booked for that product, therefore the stock shown will be 50 units. Backdated transaction "movement date" is considered in this case.
- if the "Fix Backdated Transaction" is not active, the "Inventory Amount Update" launched for the product, will then not consider the "backdated" transactions booked for that product, therefore the stock shown will be 0 units. Backdated transaction "movement date" is not considered in this case but transaction "process date" (current date).
Some fields to note are:
- Reference Date: that is the date when inventory amount update needs to be booked/posted to the ledger, therefore it could impact the cost of product transactions dated on a later date.
- Product: that is the product whose inventory amount needs to change.
- Current Inventory Amount: once product has been selected this field shows product current inventory value at given reference date.
- Current Unit Cost: once product has been selected this field shows product current unit cost.
- On hand qty: once product has been selected this field shows product on hand quantity at given reference date.
- Inventory Amount: this field allows to enter a "new" inventory amount for the product. Once entered "Unit Cost" field is populated accordingly by taking into account On hand quantity field.
- Unit Cost: this field allows to enter a "new" unit cost for the product. Once entered, the "Inventory Amount" field is populated accordingly by taking into account On hand quantity field.
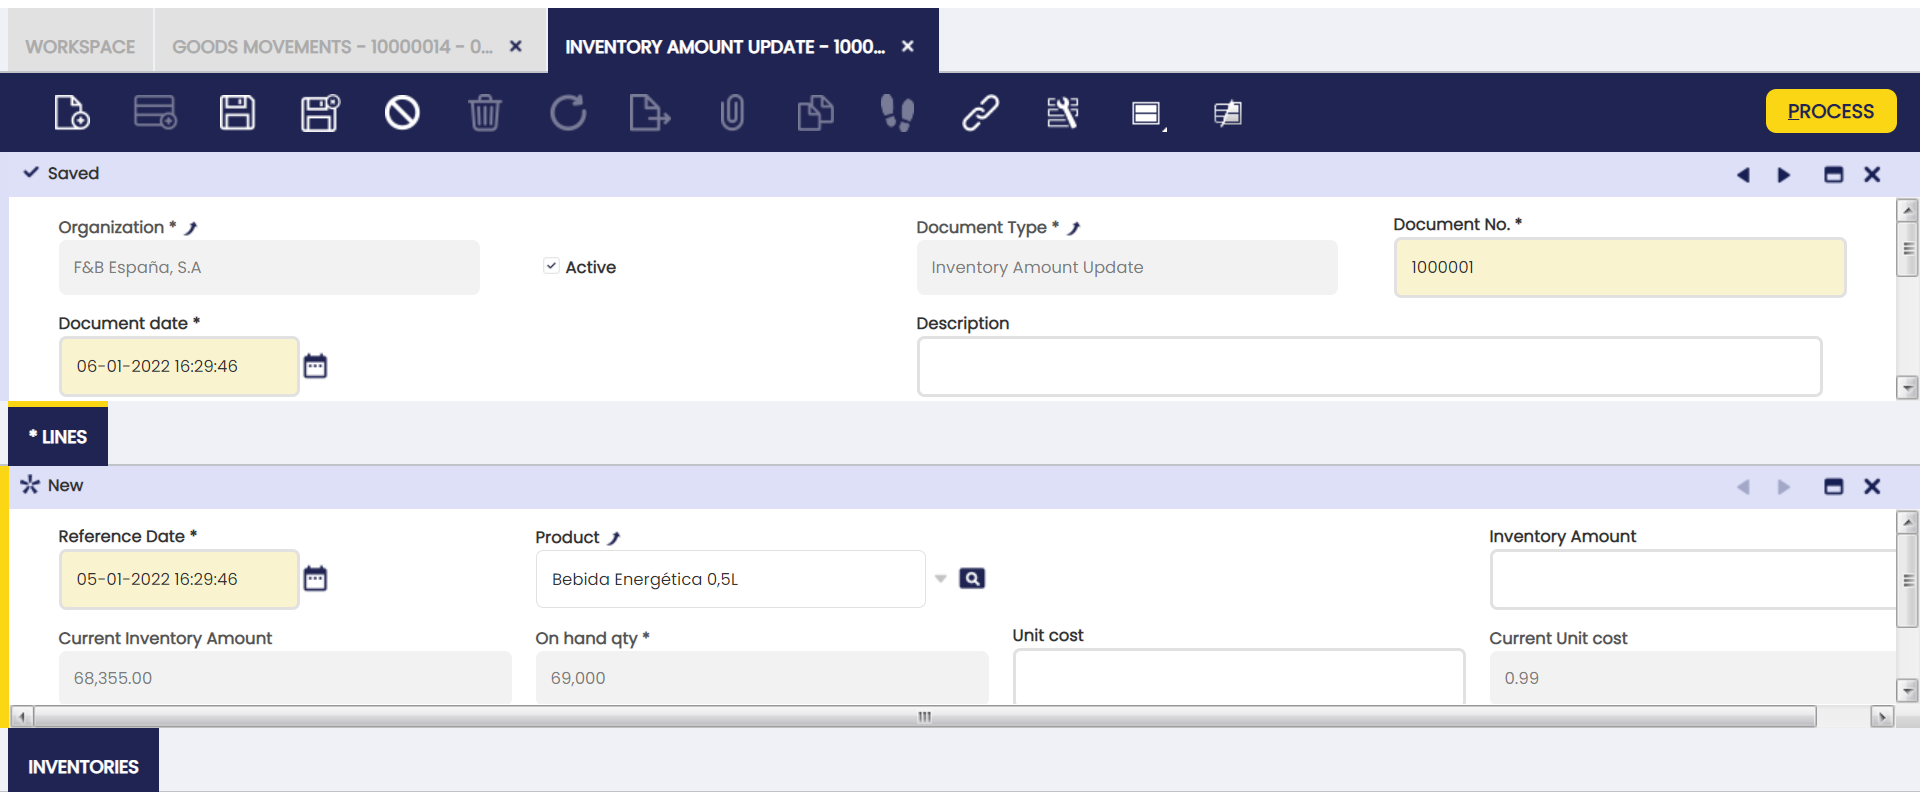
Once created, an inventory amount update can be processed by using the process button "Process".
That action creates a closing and an opening inventory transaction that can be reviewed in the inventories tab.
Inventories
A closing and an opening inventories are created for every product whose unit cost or inventory value have been modified.
This "read-only" tab contains links to detail information such as:
- Warehouse: that is the warehouse where inventory amount update has taken place.
- Close Inventory: that is the closing inventory transaction that removes current product inventory at current unit cost.
- Init Inventory: that is the opening inventory transaction that adds new product inventory at new unit cost.
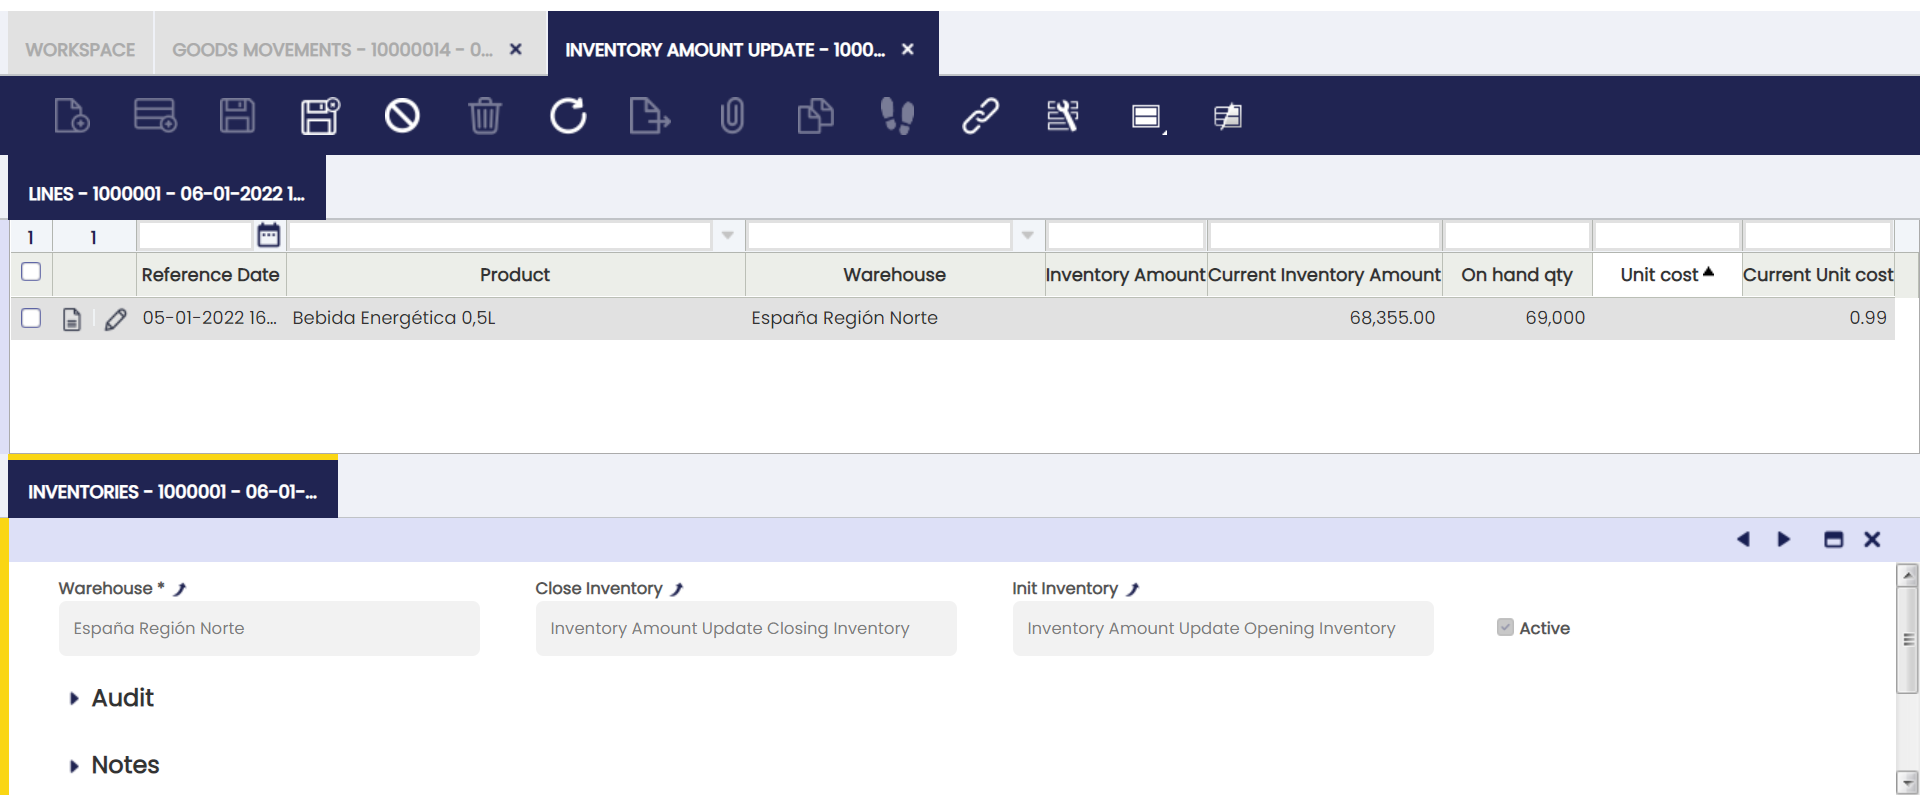
Opening and closing inventory can be reviewed and posted to the ledger in the Physical Inventory window.
Closing inventory posting creates following accounting entries:
| Account | Debit | Credit |
| Warehouse Differences | Current Inventory Amount | |
| Product Asset | Current Inventory Amount |
Opening inventory posting creates following accounting entries:
| Account | Debit | Credit |
| Product Asset | New Inventory Amount | |
| Warehouse Differences | New Inventory Amount |
Cost Adjustment
Application > Warehouse Management > Transactions > Cost Adjustment
Overview
Cost Adjustment window allows the user to review product transaction's cost adjustments caused by changes in purchase prices, landed cost allocation or manual/negative cost corrections.
Once the cost of a "Product Transaction" has been calculated by the costing background process and according to what is configured for the product(s) in the corresponding Costing Rule, it cannot be recalculated or deleted.
However, and under some circumstances, the calculated cost of a product transaction would need to be adjusted, for instance the purchase price of a purchase transaction changes after receiving the product.
If that is the case, the calculated cost of the receipt would need to be adjusted to the new purchase price.
Cost Adjustments feature is in charge of managing adjustments created on an already calculated transaction's cost.
It is important to remark that this feature takes into account the "costing algorithm" used to calculate costs, therefore it behaves differently depending on:
- If the costing algorithm used is "Average", the cost of a transaction changes and as a consequence of that the cost of the product involved changes.
In that case, a cost adjustment transaction is created in this window to reflect that change, cost adjustment transaction that can be posted to the ledger so the inventory value of the product is the same as its accounting value. - However, if the costing algorithm used is "Standard", the cost of a transaction cannot change and be adjusted, same way the "Standard" cost of the product involved remains the same.
In that case, no cost adjustment transaction will be created in this window.
As a consequence of the above "Cost Adjustment" window manage cost adjustments created for products and therefore products transactions valued at "Average" cost algorithm.
There are different types of "cost adjustments sources" which lead to the correct "average" cost of a product.
For instance, receipt transactions that were not booked in the same order than happened or receipt transactions that require to add landed costs to its already calculated cost, all of that will impact and therefore require that the "average" cost of the product changes.
It is important to remark that:
- cost adjustments are cumulative, therefore a product transaction can have more than one adjustment of any type if required to get that the average cost of that product transaction is the correct one.
- there are two types of transactions:
- those transactions whose costs need to be adjusted as "source" of the adjustment, i.e a goods receipt whose cost needs to be adjusted due to a change of the purchase price
- those transactions whose costs need to be adjusted "not as source" but because of adjusting source ones, i.e a goods shipment whose cost needs to be adjusted because the corresponding goods receipt cost changed.
Above implies that, for instance, a "Price Difference Correction" cost adjustment header can have two adjustment lines, one set as "Is Source" = Yes and the other one set as "Is Source" = No.
- beside that, there are two types of adjustments:
- those set as "Unit Cost" = "Yes", which means that the adjustment is going to change the "Unit Cost" of the transaction being adjusted besides its "Total Cost".
That is the case of adjustments such as "Price Difference Correction", “Backdated Transactions" and "Manual Cost Correction" set as "unit cost", as those ones change the "basic" cost of a transaction. - those set as "Unit Cost" = "No", which means that the adjustment is not going to change the "Unit Cost" of the transaction being adjusted but just its "Total Cost".
That is the case of "extra" costs such as "Landed Cost", or adjustments done to manage the cost under "Negative Stock" scenarios or "Manual Cost Correction" do not set as "unit cost", but as an "extra" cost.
Let us imagine a scenario when there is only one receipt transaction of 1 unit of a product, valued at 10.00 €/unit. In that case receipt costs are the ones below, which can be reviewed in the "Product" window, Transactions tab:
- Trx Orginal Cost: 10.00
- Total Cost : 10.00
- Unit Cost : 10.00
A manual cost correction set as "Unit Cost" = "Yes" is booked for the receipt for an amount of 2.00 €. That correction creates a cost adjustment that changes the cost of the receipt as shown below:
- Trx Orginal Cost: 10.00
- Total Cost : 12.00 (10.00 + 2.00)
- Unit Cost : 12.00 (10.00 + 2.00)
New average Cost of the product = Total Cost / Stock = 12.00 € / 1 unit = 12.00 €/unit
After that purchase price changes from 10.00 €/unit to 12.00 €/unit.
That change in the price is a unit cost adjustment, which creates a 0.00 € adjustment because the unit cost of the transaction is already 12.00.
This implies no change in the average cost of the product, it remains as 12.00 €/unit
However, let us imagine now that the manual cost correction booked for the receipt for an amount of 2.00 € was set as "Unit Cost" = No, that is an extra cost which needs also to be taken into account. That correction changes the cost of the receipt as shown below, unit cost does not change:
- Trx Orginal Cost: 10.00
- Total Cost : 12.00 (10.00 + 2.00)
- Unit Cost : 10.00
After that, purchase price changes from 10.00 €/unit to 12.00 €/unit.
That change in the price creates a cost adjustment in the receipt of 2.00 = 12.00 - 10.00 €, therefore calculated costs of the receipt change:
- Trx Orginal Cost: 10.00
- Total Cost : 14.00 (12.00 + 2.00)
- Unit Cost : 12.00 (10.00 + 2.00)
Now this new scenario, implies a change in the average cost to 14.00 €/unit, this new average cost includes an extra cost of 2.00 €/unit.
As briefly mentioned above, Etendo supports different sources of cost adjustments with the aim of covering different live scenarios. Those different types of cost adjustments sources are explained in the next section.
Header
Cost adjustment documents are automatically created by either the "Costing Background" Process or the "Price Correction Background" process as applicable, depending on the source of the adjustment.
Once automatically created, it can be reviewed in this window.
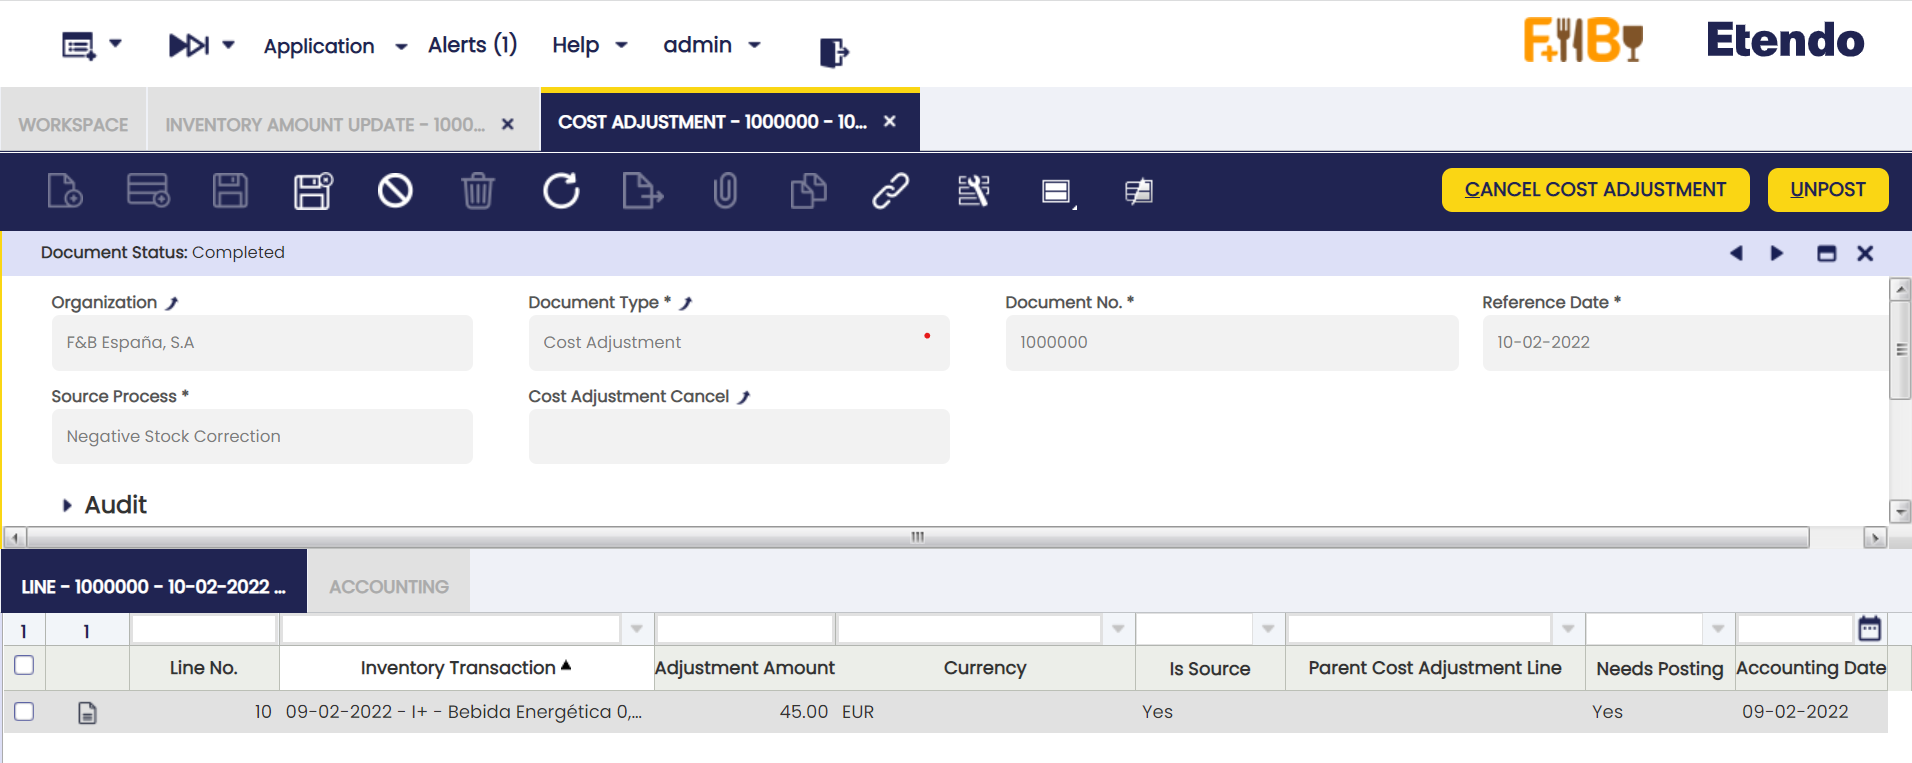
Some relevant fields to note are:
- Document Type: this is the "Cost Adjustment" document type.
- Reference Date: this is the date when the cost adjustment is created
- Source Process: the options available are:
- Backdated Transaction
- Landed Cost
- Manual Cost Correction
- Negative Stock Correction
- Price Difference Correction
All of them are going to be explained in detail in the following sections.
Backdated Transaction
The source of this cost adjustment is a product transaction (i.e a goods receipt) that should have been booked on a previous date, but it was not.
As a consequence, the calculated cost of the transactions dated on a date after that given previous date need to be adjusted, same as the calculated "Average" cost of the product.
This cost adjustment source type does not apply to products valued at "Standard" cost.
The "Standard" cost of a product remains as it was defined because the cost of a "Standard" valued product is always the same, regardless of the date when a transaction of that product is booked.
In case of a product valued at "Average" costing algorithm:
- A goods receipt dated on 06/01/2015 (Movement date) is booked dated on 06/01/2015 (Transaction date). This goods receipt once booked implies that the cost of the product (based on the corresponding purchase order price) is 105,00 €/unit.
- A goods shipment dated on 07/01/2015 (Movement Date) is also booked in Etendo dated on 07/01/2015 (Transaction Date). This goods shipment once booked implies that the cost of the product sold is 105,00 €/unit.
- Later on a goods receipt of the same product dated on 02/01/2015 (Movement date) is booked in Etendo dated on 07/01/2015 (Transaction date). Once booked this goods receipt implies that the cost of the product (based on the corresponding purchase order price) is 100.00, starting from 02/01/2015.
- This last receipt with movement date 02/01/2015 is the source of a backdated transaction cost adjustment that adjust the cost of the product sold dated on 07/01/2015 from 105,00 €/unit to 102,50 €/unit, besides that the calculated average cost changes from 105,00 to 102,50 starting from 06/01/2015.
Transactions that should have been booked on a previous date, lead to the creation of "Backdated Transaction" cost adjustments.
Info
A header and line(s) in the Cost Adjustment window are automatically created with the corresponding adjustments.
This adjustment type changes the "Unit Cost" of the product's transactions as well as the "Total Cost" and therefore the "Average" cost of the product.
Backdated transaction cost adjustments are created by:
- either running "Fix Backdated Transactions" process in existing costing rules
- or by checking "Backdated Transactions Fixed" check-box while creating a new costing rule.
Both ways, it is possible to enter a "Fix Backdated From" date which should not be part of a closed period.
Once Fix Backdated Transaction process is enabled in the corresponding costing rule, backdated transaction cost adjustments are automatically calculated by the Costing background process if applicable.
Backdated Adjustments Posting
A backdated cost adjustment can be posted to the ledger in this window.
In our example above, the last receipt with movement date 02/01/2015 is the source of a backdated transaction cost adjustment that adjust the cost of the product sold from 105,00 €/unit to 102,50 €/unit
That adjustment can be posted to the ledger. Posting will look as shown below:
| Account | Debit | Credit |
| Product Asset | Adjustment amount | |
| Cost of Goods Sold | Adjustment amount |
Landed Cost
The source of this cost adjustment is booking additional costs that need to be distributed and therefore allocated as additional product costs.
Landed cost are costs such as shipping, insurance, customs charges and other costs needed to place the product in the organization's warehouse.
Landed cost adjustments change the calculated cost of receipt transactions by changing its "Total Cost", same way the "Average" cost of the product involved also changes.
The "Unit Cost" of the receipt transaction does not change as this type of adjustment is not a unit cost adjustment but an extra cost.
This cost adjustment source type do not apply to products valued at "Standard" cost, in the sense that:
- whenever a landed cost is added to a product valued at standard cost, no cost adjustment is created but the "Variance" between the "standard" cost defined for the product and its "actual" cost is posted to a "Landed Cost Variance" account, so it can be later on analysed.
For instance:
- a purchase order containing a product is booked. After that the corresponding goods receipt and purchase invoice of the product are booked and posted to the ledger.
- Later on a purchase invoice including additional costs such as transportation cost and custom charges is booked and post to the ledger
- Landed Cost window allows to allocate the transportation costs and custom charges to the goods receipt, landed cost which are also matched to the invoice already booked.
There is no need to run any specific background process or enable any preferences to get a "Landed Cost" cost adjustment.
"Landed Cost" cost adjustments are created after processing the corresponding landed cost document in the Landed Cost window, or after processing landed cost matching.
Info
A header and line(s) in the Cost Adjustment window of this cost adjustment type is automatically created with the corresponding adjustment.
As already mentioned, landed cost adjustment does not change the "Unit Cost" of a product's transactions but its "Total Cost", same way as the "Average" cost of the product. This means that:
- the unit cost of each transaction is the original one (price * units)
- and the total cost of each transaction includes the adjustments needed to get the desired product average cost.
Landed Cost Adjustments Posting
Landed cost adjustments can be posted to the ledger in the Landed Cost window, whenever those adjustments have been created for products included in a Goods Receipt transaction.
- In this case, Goods Receipt transaction is the source of the adjustment.
Moreover, landed cost adjustments can also be created for products included in a Goods Shipment transaction.
- In this case, Goods Shipment transaction is not the source of the adjustment but the Goods Receipt.
- In this case landed cost adjustments need to be posted in the Cost Adjustment window.
Manual Cost Correction
The source of this cost adjustment is a manual change of the cost of a specific product transaction.
This adjustment type only applies to product transactions valued at "Average" cost. It does not make sense to manually change the cost of a transaction valued at "Standard" cost.
For instance:
- a goods movement between warehouses needs to be adjusted, therefore "movement from" transaction cost is changed (increased) manually by the end-user
- above change implies that the cost of the "movement to" transaction needs also to be changed (increased), therefore the corresponding "Manual Cost Correction" cost adjustment is created.
There is no need to run any specific background process or enable any preference to get a "Manual Cost Correction" cost adjustment.
"Manual Cost Correction" cost adjustments are created after changing the cost of a product transaction in the Product window, "Transactions" tab, by using "Manual Cost Adjustment" process button.
A header and line(s) in the Cost Adjustment window of this cost adjustment type is automatically created with the corresponding adjustment.
This adjustment type changes the "Total Cost" of the product transaction, however product transaction "Unit Cost" can either be changed or not, depending on what the end-user wants to get.
There is a check-box named "Unit Cost" that it shown whenever "Incremental" check-box is selected:
- If the user does not select the check-box "Incremental" that means booking a new total cost of the transaction which will remain as "Permanent". That means it will not be changed anymore.
- If the user does select the check-box "Incremental" that means booking an additional cost to allocate to the total cost of the transaction. Besides, this additional cost can either be part of the unit cost (Unit Cost check-box = Yes) of the transaction or not (Unit Cost check-box = No). Last case means an extra cost such as a landed cost.
Manual Cost Correction Adjustment Posting
This type of adjustment can be posted to the ledger in this window.
In our example above, "movement from" transaction cost is changed (increased) manually by the end-user, therefore the cost of the "movement to" transaction needs also to be changed (increased).
That adjustment can be post to the ledger. Posting will look as shown below:
"Movement From" transaction adjustment:
| Account | Debit | Credit |
| Warehouse Differences | Adjustment amount of "Movement From" transaction | |
| Product Asset | Adjustment amount of "Movement To" transaction |
"Movement To" transaction adjustment:
| Account | Debit | Credit |
| Product Asset | Adjustment amount of "Movement To" transaction | |
| Warehouse Differences | Adjustment amount of "Movement To" transaction |
Negative Stock Correction
The source of this cost adjustment is booking a transaction, i.e a goods shipment, that turns the stock of a product into a negative quantity. This type of correction is only implemented for "Average" costing calculation.
At the time of booking a new receipt of that item, regardless if that receipt turns item stock to a positive/negative/zero value, a negative cost correction adjustment is created and related to that new receipt, to get that the stock remaining of that product is valued at the last purchase price, in the case of "Average" cost calculation.
For instance:
- a purchase order of 100 units is booked at a given purchase price
- after that goods are receipt and the cost of goods is calculated based on the order purchase price
- then a shipment of 100 units is booked
- and another shipment of 5 units is booked afterwards, leading to a negative stock of the product.
A negative stock correction cost adjustment will be created whenever an incoming transaction for the product such as a goods receipt is booked. That adjustment will be allocated to the goods receipt.
This adjustment type does not change the "Unit Cost" of the receipt but its "Total Cost" same way as the "Average" cost of the product involved. This means that:
- the unit cost of each transaction is the original cost (price * units)
- and the the total cost of each transaction includes the adjustments needed to get the desired average cost.
There are two actions to take to get negative stock correction cost adjustments:
- To configure Enable Negative Stock Corrections preference with Value=Y in Preference window
- To schedule Costing Background process in Process Request window
Negative Stock Correction Adjustment Posting
This type of adjustment can be posted to the ledger in this window.
In our example above, an adjustment of this type is created whenever a new incoming transaction such as a goods receipt is booked for the product having a negative stock.
That adjustment can be post to the ledger. Posting will look as shown below in the case of a negative adjustment amount, otherwise in case of a positive adjustment amount:
| Account | Debit | Credit |
| Warehouse Differences | Adjustment amount | |
| Product Asset | Adjustment amount |
Price Difference Correction
The source of this cost adjustment is a change in either the purchase price of an order or the purchase price of an invoice after receiving the goods.
Price Difference Correction is launched only for Transactions of Type Receipt. Other Transactions, such as Return Material our Outgoing Transactions are not taken into account, since they should not modify the Average Cost due to a Price Correction.
Those goods were received at a price that has changed, therefore the calculated cost of the receipt needs to be adjusted, same as the calculated "Average" cost of the product.
"Standard" cost would remain as it was set.
For instance:
- a purchase order is booked for a product at a given purchase price
- after that the product is receipt and the "Average" cost of the product is calculated based on the corresponding order purchase price.
- a goods shipment of that product is booked, therefore that output transaction gets the calculated "Average" cost of the product.
- then a purchase invoice is received and booked for the product at a higher price than the order purchase price
- a price difference correction cost adjustments needs to be created to adjust the Goods Receipt and then affect the Goods Shipment transaction based on the new calculated Average Cost of the product.
Changes in purchase price leads to the creation of "Price Difference Correction" cost adjustments.
A header and line(s) in the Cost Adjustment window of this cost adjustment type is automatically created with the corresponding adjustment.
This adjustment type changes the "Unit Cost" and the "Total Cost" of the transactions, same as the "Average" cost of products.
"Price Difference" correction adjustments can be performed automatically or manually:
- to get that Etendo automatically performs price difference correction cost adjustments, it is necessary to activate and schedule the Price Correction Background Process
- to get that the user can manually perform price difference correction cost adjustments, it is necessary to manually run the "Process Price Difference Adjustment"
As shown in the image below, this process allows to select the Organization for which this process needs to be run, enter a given movement date and select a product or set of products for which price difference correction cost adjustments would need to be created.
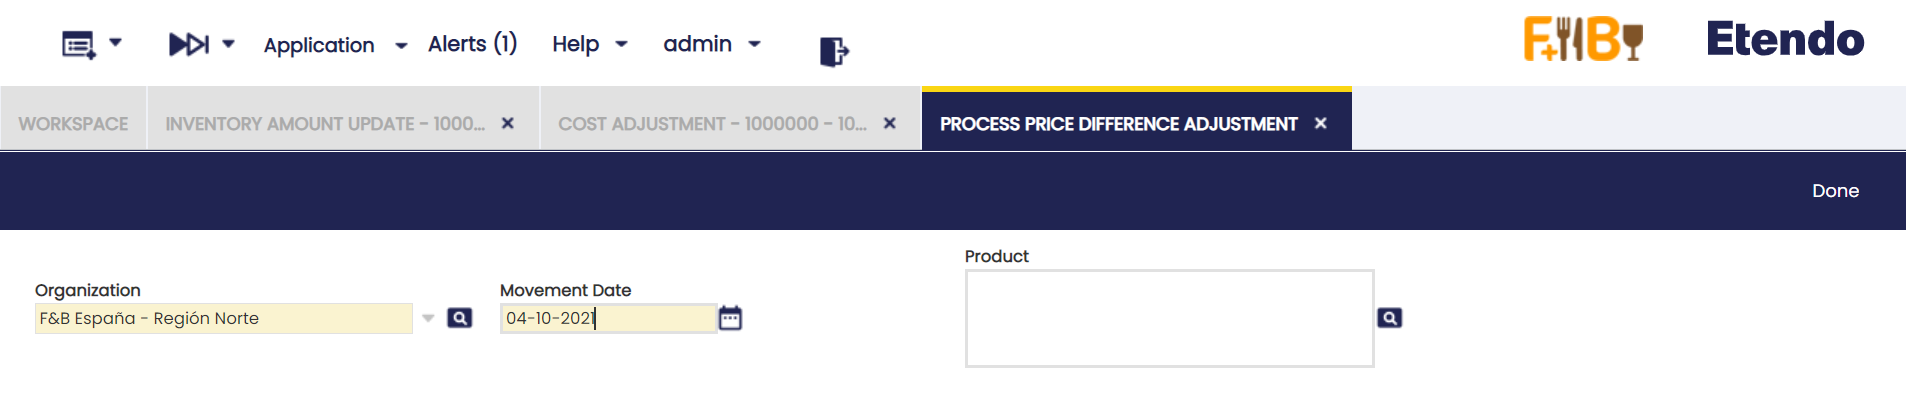
Additionally, the Costing Background Process can also create price difference correction cost adjustments, only if:
- the "Enable Automatic Price Difference Corrections property preference is set to "Y"
- and the Costing Background Process is run after booking the corresponding Purchase order, Goods Receipt and Purchase Invoice including the price difference.
Price Difference Correction Adjustment Posting
This type of adjustment can be posted to the ledger in this window.
In our example above, a change in the purchase order price (increase) implies that both the calculated cost of the "Goods Receipt" and the calculated cost of the "Goods Shipment" need to be adjusted same as the "Average" cost of the product.
That adjustment can be posted to the ledger. Posting will look as shown below :
Goods Receipt adjustment
| Account | Debit | Credit |
| Product Asset | Goods Receipt Adjustment amount | |
| Invoice Price Difference | Goods Receipt Adjustment amount |
Goods Shipment adjustment
| Account | Debit | Credit |
| Cost of Goods Sold | Goods Shipment Adjustment amount | |
| Product Asset | Goods Shipment Adjustment amount |
Line
A cost adjustment document can have as many adjustment lines as products included in the receipts to which landed cost have been allocated.
There are two types of cost adjustments transactions:
- "source", for instance a vendor receipt (V+) whose purchase price has changed
- "not source", for instance a customer shipment (C-) whose cost needs to be adjusted because of vendor receipt cost being adjusted.
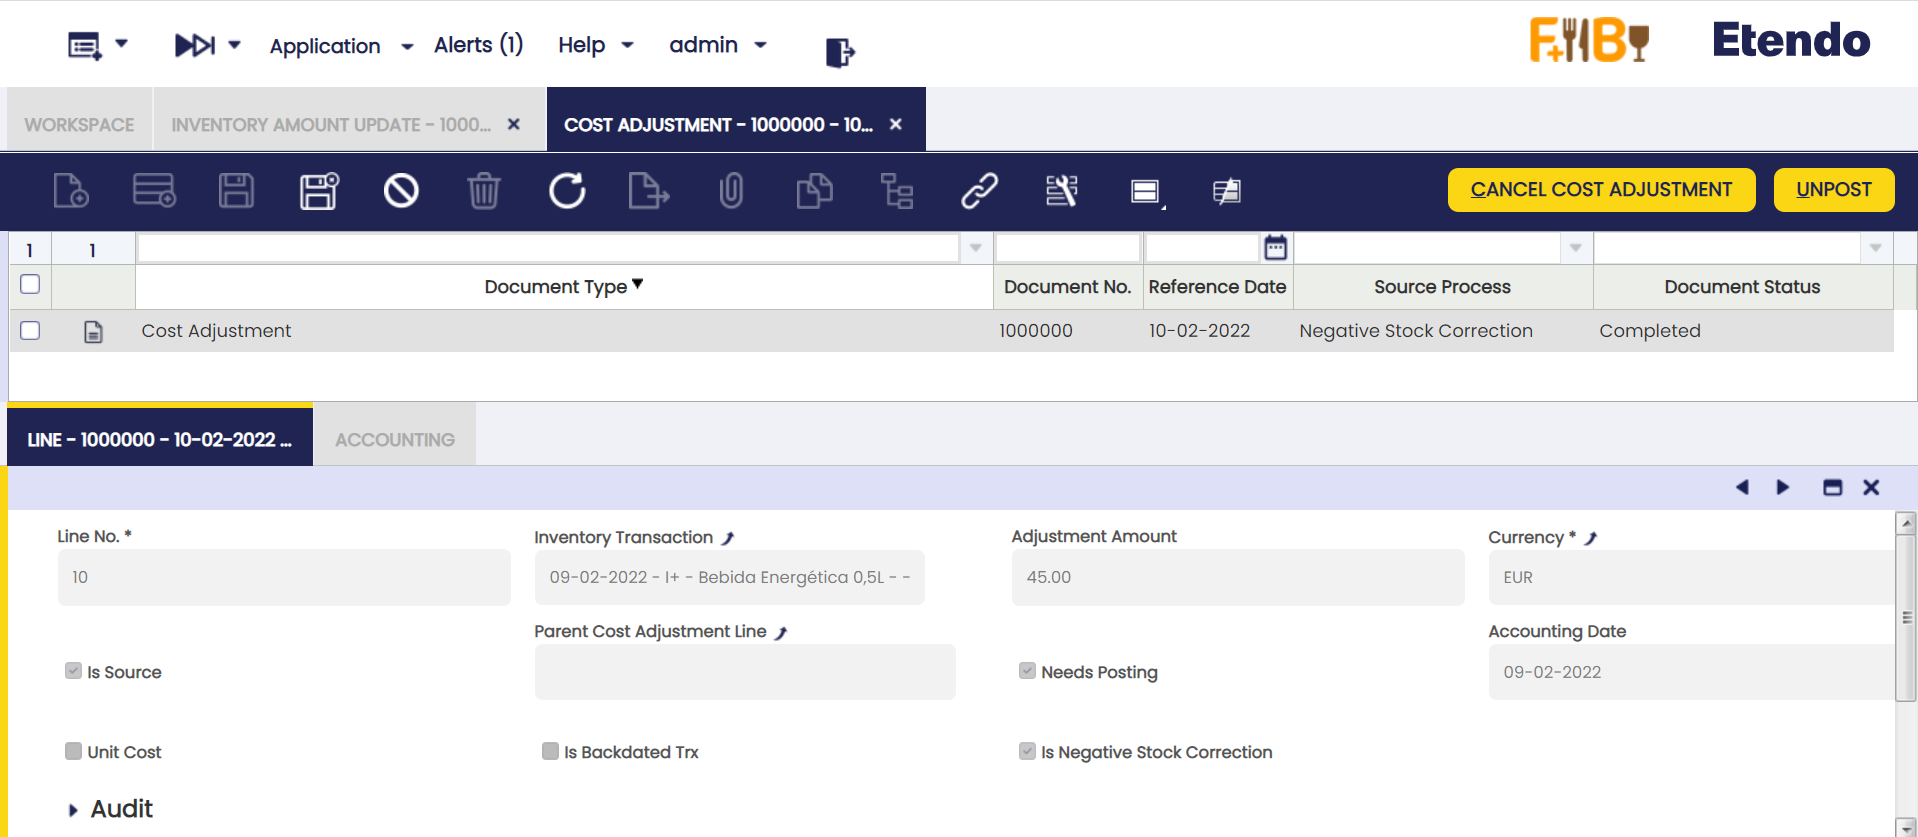
Some relevant files to note are:
- Inventory Transaction: Transactions available are:
- Vendor receipt (V+)
- Customer shipment (C-)
- Inventor in (I+)
- Inventory out (I-)
- Movement from (M-)
- Movement to (M+)
- Production (P+)
- Production (P-)
- Internal consumption (D-)
- Internal consumption (D+)
- Adjustment Amount: that is the cost adjustment amount.
An adjustment amount can also be reviewed in the Product window, "Transaction" tab, "Transaction Cost" tab always related to a "Cost Adjustment Line". - Is source: options available are "Yes" or "No" as a product transaction can be the source of an adjustment or not.
- Parent Cost Adjustment Line: In the case of a cost adjustment that is not the source, this field shows the source cost adjustment line.
- Needs Posting: options available are "Yes" or "No". Most cost adjustments needs to be posted to the ledger as they mean an increase/decrease of product asset value, however there are other whose cost adjustment is 0,00 that does not need any posting.
- Unit Cost:options available are "Yes" or "No".
- There are cost adjustments such a price difference correction which impact product unit cost
- There are cost adjustment such as landed cost which does not impact product unit cost.
It is important to remark that each Product Transaction has below listed cost:- "Trx Original Cost", that is the original cost of the product transaction
- "Total Cost", that is the sum of the original cost and all adjustment costs
- "Unit Cost", that is the sum of the original cost and all adjustment of the unit cost, that is the cost which does not include landed cost.
- Is Backdated Trx: a cost adjustment can be marked as backdated transaction if applicable.
For instance a backdated transaction cost adjustment can have two lines, one that is the backdated transaction as source and another one that is not the source neither a backdated transaction. - Is Negative Stock Correction: a cost adjustment can be marked as negative stock correction if applicable.
For instance a backdated transaction cost adjustment can have two lines, one that is the backdated transaction as source and another one that is not the source but a negative stock correction.
Accounting
This tab provides Cost Adjustment accounting information.
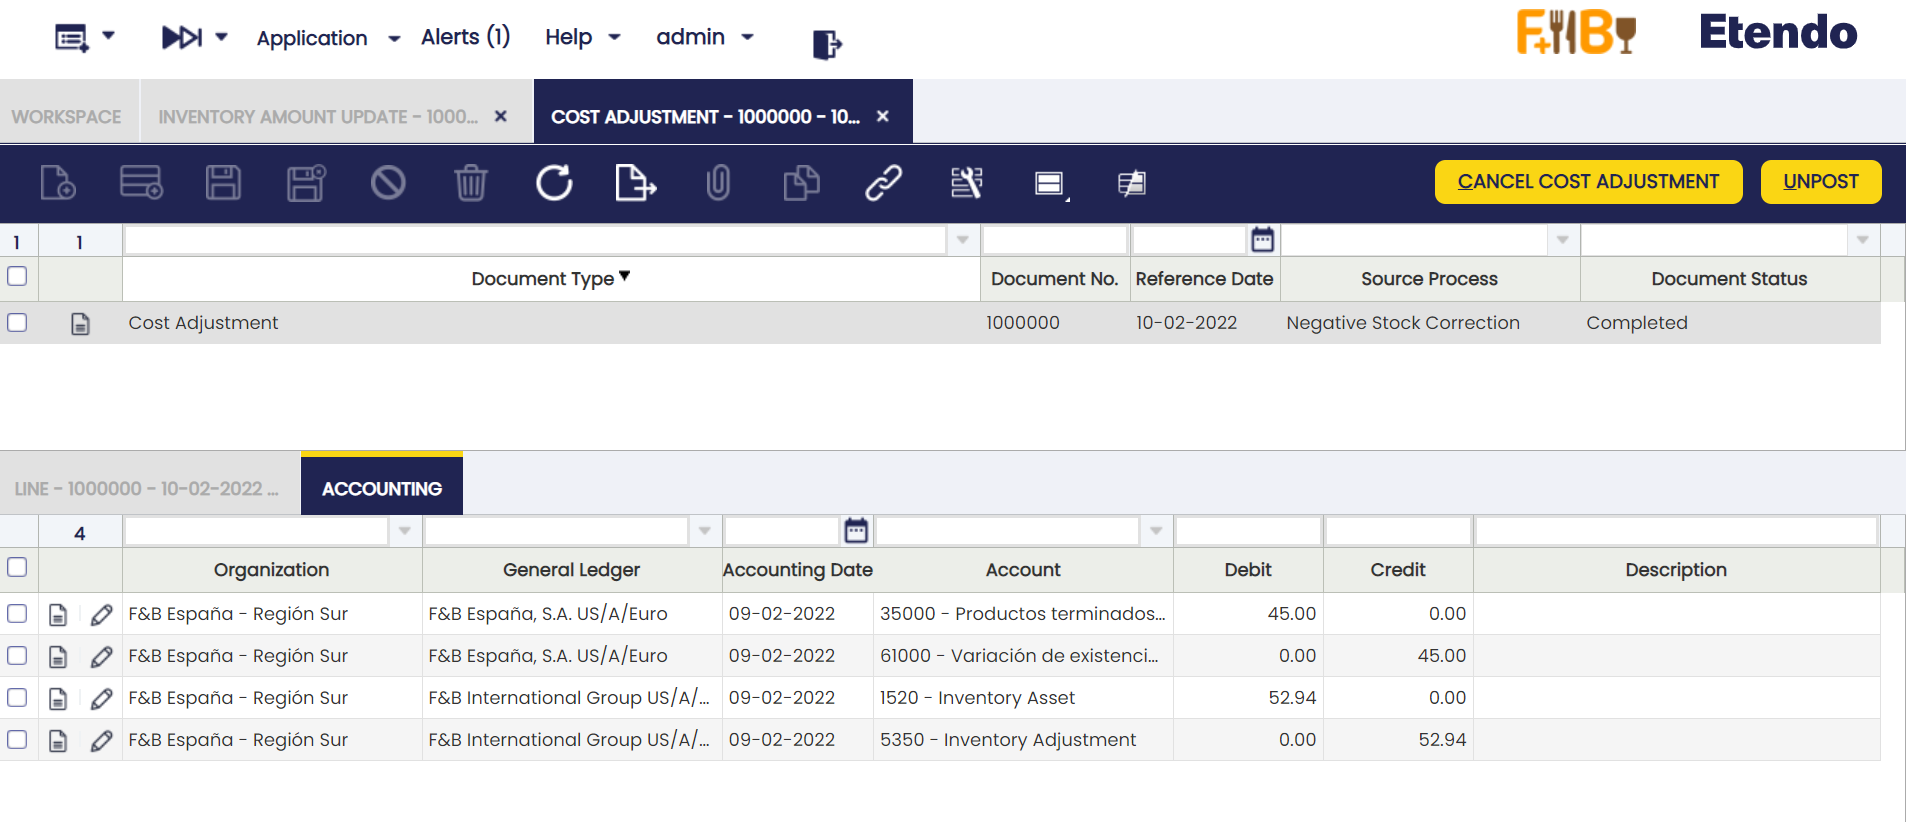
Ledger entries shown in this tab are different depending on the source of the adjustment but landed cost posting that it is managed in the Landed Cost window.
Landed cost adjustment lines are always created as "Need Posting" = No.
See below some examples of each cost adjustment type:
Price correction cost adjustment caused by a decrease in the purchase price
| Account | Debit | Credit |
| Invoice Price Variance | Cost Adjustment amount | |
| Product Asset | Cost Adjustment amount |
Price correction cost adjustment caused by an increase in the purchase price
| Account | Debit | Credit |
| Product Asset | Cost Adjustment amount | |
| Invoice Price Variance | Cost Adjustment amount |
Backdated Transactions adjustment on a product's goods receipt transaction.
Product's cost gets decreased.
| Account | Debit | Credit |
| Warehouse Differences | Cost Adjustment amount | |
| Product Asset | Cost Adjustment amount |
Backdated Transactions adjustment on a product's goods shipment transaction.
Product's cost gets decreased.
| Account | Debit | Credit |
| Product COGS | Cost Adjustment amount | |
| Product Asset | Cost Adjustment amount |
Negative correction adjustment which implies an increase of product's cost.
| Account | Debit | Credit |
| Product Asset | Cost Adjustment amount | |
| Warehouse Differences | Cost Adjustment amount |
Manual Cost correction adjustment caused by a manual increase of product's cost.
| Account | Debit | Credit |
| Product Asset | Cost Adjustment amount | |
| Warehouse Differences | Cost Adjustment amount |
Bulk Posting
Info
To be able to include this functionality, the Financial Extensions Bundle must be installed. To do that, follow the instructions from the marketplace: Financial Extensions Bundle.
The Bulk Posting functionality allows the user to post or unpost multiple records by selecting the corresponding records and clicking the Bulk posting button.
Also, the Accounting Status of the record/s is shown in the status bar, in form view, or in a column, in grid view.
Info
For more information, visit the Bulk Posting module user guide.
Referenced Inventory
Application > Warehouse Management > Transactions > Referenced Inventory
Overview
In this window, it is possible to define the containers or boxes, which includes any kind of object that can contain goods.
Many companies move and store goods grouped in a RollTainer, Case or Box. The boxes may be reusable or maybe disposable and have different sizes and purposes and are suitable for different types of goods.
Referenced Inventory is the functionality that identifies one or multiple storage details (Stock records) by using a "Reference Number".
Referenced Inventory for Core includes the very basic functionality to box/unbox stock.
Referenced Inventory
This tab shows any referenced inventory, also known as box, declared into the system regardless if it is empty or has any stock inside.
The user can create new boxes at any time. It is mandatory to define an organization, search key and the referenced inventory type.
It is important to highlight that:
- It will not be possible to delete a record if the referenced inventory is linked to any box/unbox transaction.
- The search key is unique per client. To bypass this limitation you could declare a different prefix/suffix to the referenced inventory type’s sequence.
- The organization limits the stock that can be boxed (only stock declared at this organization or any child organization).
From this window it is possible to link/unlink stock to/from a Referenced Inventory using the Box and Unbox buttons respectively.
Box
Shows a P&E with the stock not yet linked to any referenced inventory (it is not possible to box a stock already boxed).
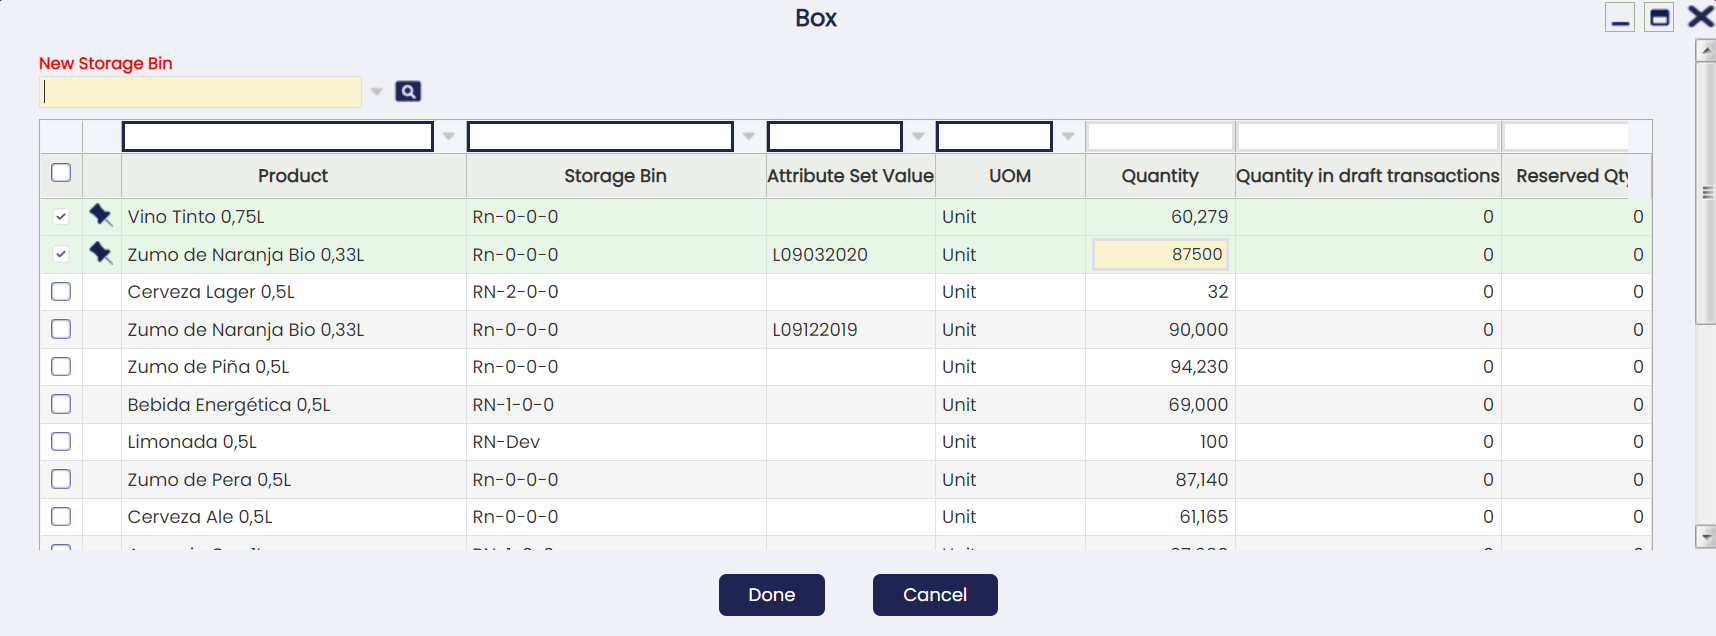
The user can select one or several records and specify the quantity to be boxed. It is also mandatory to declare the New Storage Bin where the boxed stock will be stored.
If the current storage bin of any of the selected records is different from the New Storage Bin, a goods movement will be automatically performed by the system when confirming the action to move the stock.
The box action can be run in different batches at any time, i.e. the user can select any referenced inventory not empty to add more stock.
Info
A specific Referenced Inventory can only be present in one bin, not in multiple bins at the same time. In case you want to add more stock to a not-empty Box, the New Storage Bin selector will ask the user to select the current referenced inventory bin.
When a stock is boxed, the referenced inventory search key will be automatically appended at the end of the Attribute Set Value surrounded by square brackets [] (graphical representation of a box). Example: L582[1000584]
If the stock does not have an attribute, the referenced inventory will be shown anyway in the Attribute Set Value field to indicate the stock is currently boxed. Example: [1000584]
This way, the information about the referenced inventory is clearly visible at any place where it is necessary, like the Stock Report .
UnBox
Shows a P&E with the stock currently linked to the selected referenced inventory.
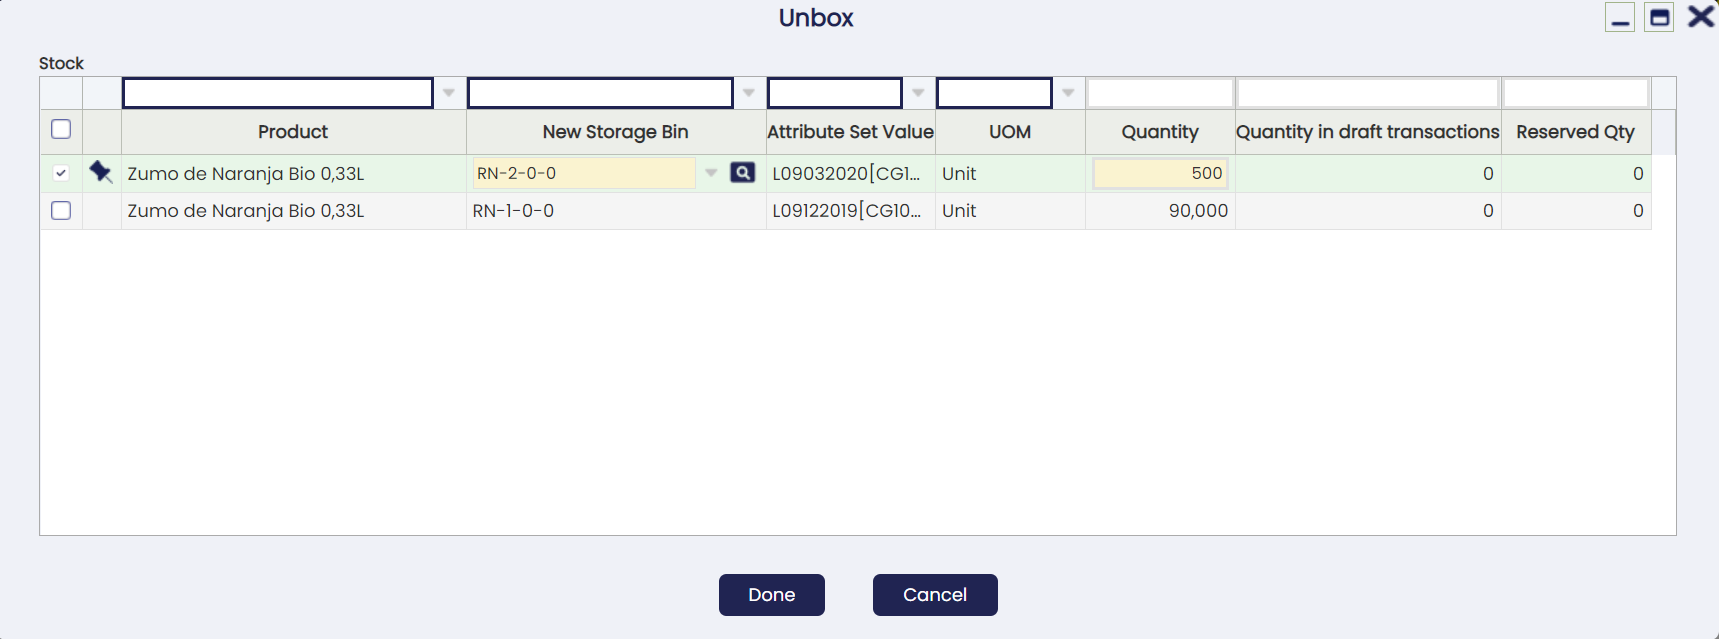
The user can select one or several records and specify the quantity to be unboxed (so it is possible to run partial unboxing) and the new storage bin where the stock will be stored after unboxing (by default it will be unboxed to the current location).
Note
In contrast to the boxing process explained before, unboxing different storage bins can be selected for each record.
Reservation Management Behavior
When running a boxing/unboxing process, the system will always try to work with not reserved quantities first. Example: if we have 10 units on hand of a product where 2 of them are reserved and we try to box/unbox 1 unit, the system will try to box/unbox first any of the 8 units not reserved.
If the box/unbox process needs to work with already reserved quantities (in the example above because we are boxing/unboxing 9 or 10 units), the system will try to reallocate on the fly any reservation or it will show an error when the reallocation is not possible. The latter might happen, for example, because the reservation is forced to a concrete bin and the box/unbox process tries to move the stock to another bin.
Contents
Stock currently linked to this Referenced Inventory.
Please note any boxed stock will have an attribute set value linked to the referenced inventory.
Box Transactions
Shows any box transaction executed in the past for this referenced inventory.
This kind of transactions are actually Goods Movements created on the fly when confirming the boxing, where the user can browse to at any time to see the details.
UnBox Transactions
Shows any unbox transaction executed in the past for this referenced inventory.
This kind of transactions are actually Goods Movements created on the fly when confirming the unboxing, where the user can browse to at any time to see the details.
This work is a derivative of Warehouse Management by Openbravo Wiki, used under CC BY-SA 2.5 ES. This work is licensed under CC BY-SA 2.5 by Etendo.