Create New Subapplication
Overview
This tutorial provides a step-by-step guide to creating a new subapplication within Etendo Mobile. By following these instructions, you will learn how to fully utilize the capabilities of Etendo RX and leverage the visual components available in the Etendo UI Library to build a functional subapplication.
The tutorial will guide you through the creation of the Product Subapp, a simple application that enables the addition, deletion, and modification of products, as well as their visualization in a grid. Upon completion, you will have the skills to create and distribute subapplications as modules, thereby extending the mobile functionality of Etendo.
Info
Before beginning, ensure that your local environment meets all necessary requirements by reviewing the Etendo Mobile Getting Started section.
Module Setup
Create New Etendo Classic Module
Application > Application Dictionary > Module
-
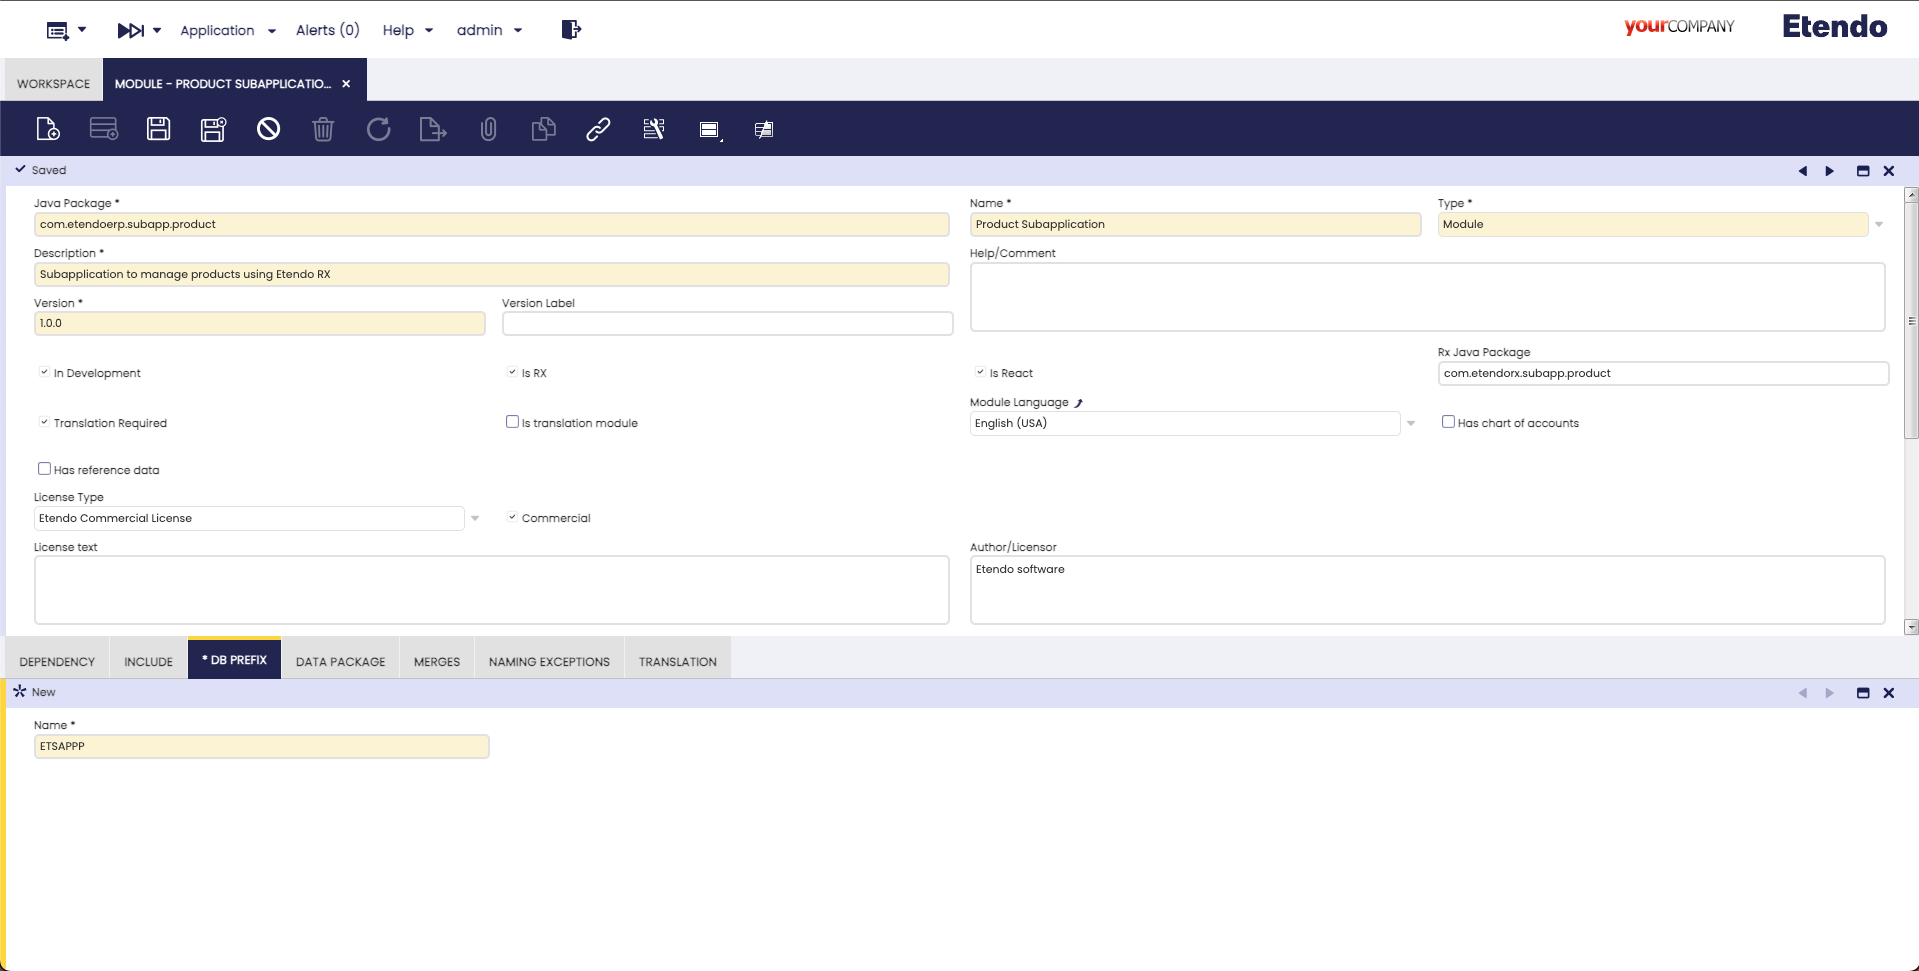
As a System Administrator role, open the Module window and create a new register. This module will be used to develop and distribute the application.
Product Subapp module configuration example Tip
- Notice that the name can be anything you want, but the type has to be set as Module.
- The description field is free and also required.
- The Is Rx checkbox indicates that this module will include RX service configurations, the RX service Javapackage must be specified.
- The Is React checkbox indicates that this module includes a subapplication and React Native code is generated.
- In this case, start from
1.0.0module version and set the DB Prefix asETSAPPP.
Dynamic App configuration
Application > General Setup > Application > Dynamic App
Configure and export dynamic applications in Etendo Classic, which are displayed dynamically in Etendo Mobile.
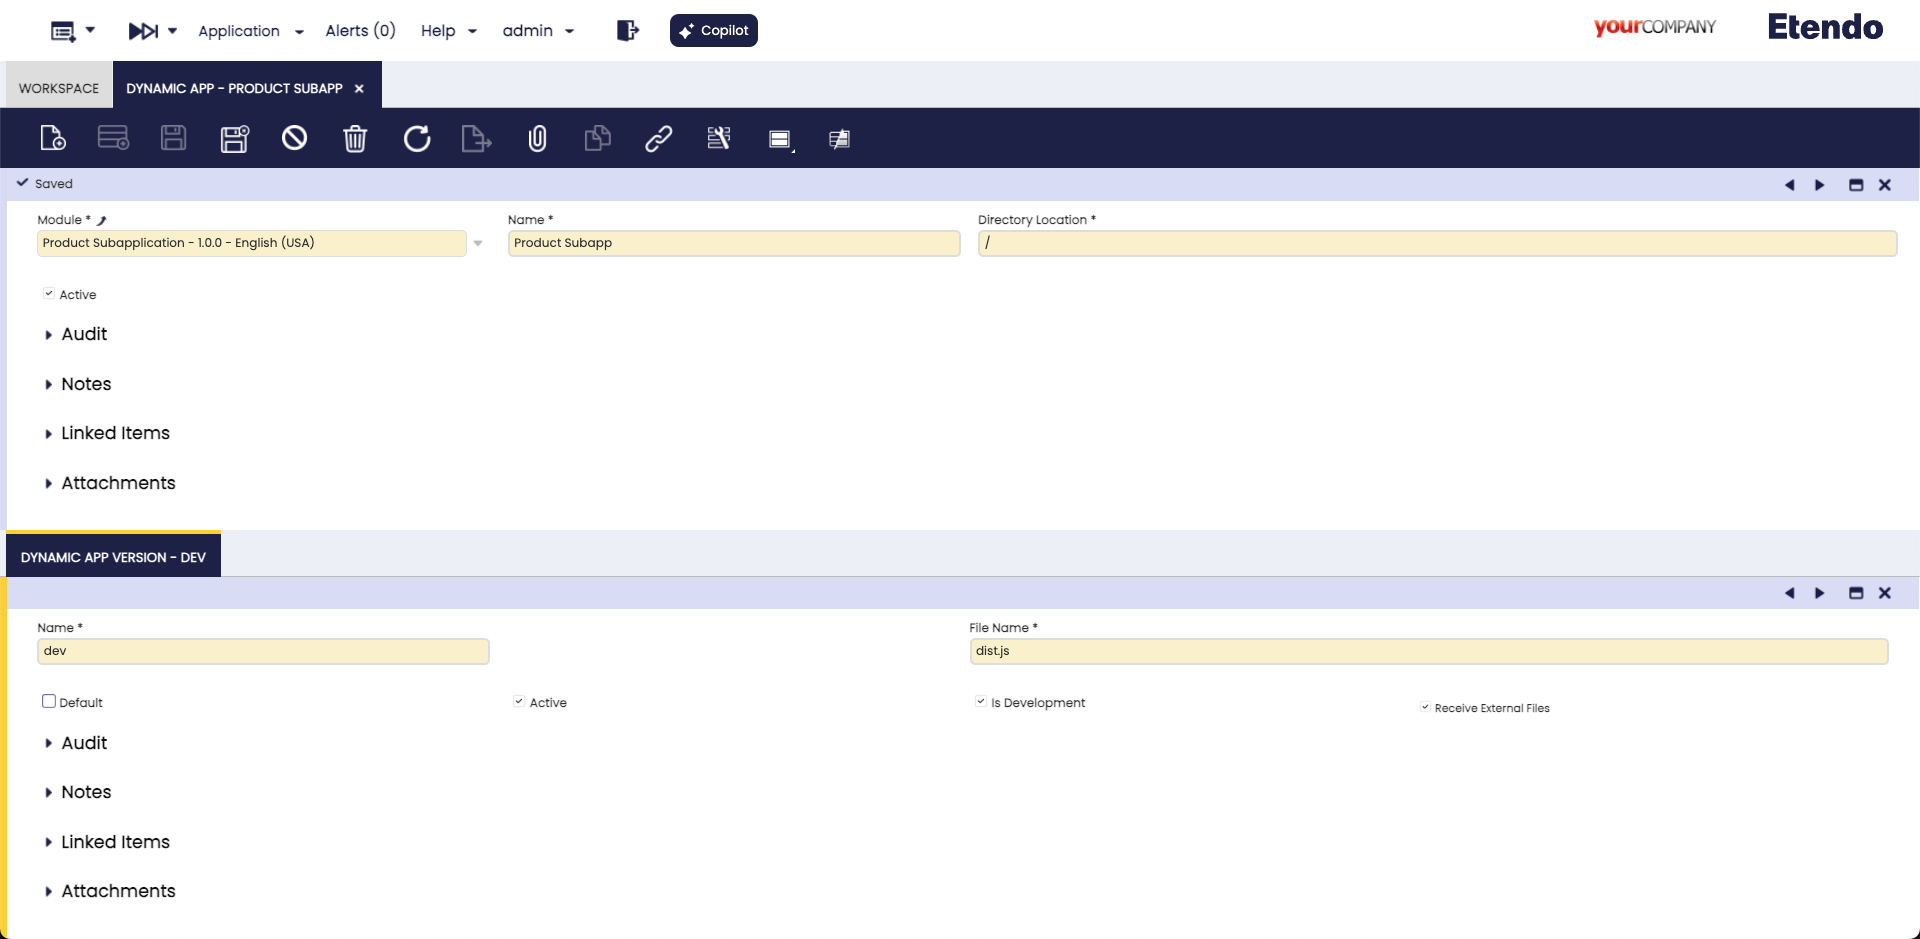
In the Dynamic App window, specify the subapplication path and version.
For the example we are following, the Dynamic App in Etendo must be configured with the following form fields and corresponding values:
Fields to note:
- Module: The module that can export the window configuration. In our example case, set
Product SubApp. - Name: Name with the application will be shown. In our example case, set
Product Subapp - Directory Location: The path where the compiled application bundle is located. In development, the path is empty
/, but in production, the path is/web/<javapackage>/. In our example case, set/ - Active: To select if this application is active or not. In our example case, set
true
The Dynamic App Version tab allows the application to be versioned, enabling both development and production versions.
Fields to note:
- Name: Name of the application version E.g.
devor1.0.0. In our example case, setdev - File Name: The bundle name of the compiled application, by default
dist.js. - Default: This check defines that this version is productive. In our example case, set
false - Is Development: This check defines that this version is in development and can be deployed locally. In our example case, set in
true - Active: To select if this application version is active or not. In our example case, set
true
Info
For more information visit the Dynamic App developer guide.
Role configuration
Application > General Setup > Security > Role
Logged in as the Group Admin role (which is the default role for accessing Etendo Mobile), the settings are applied as specified below.

Important
Keep this dynamic app as active.
Export the Module
-
After saving all the configuration, you have to export the changes. Open a terminal in the root of your Etendo Classic project and execute the following command:
Important
The output must be a "BUILD SUCCESSFUL" message.
-
A new module is created in the
/modulesfolder, with the following structure
Dockerized Services
Before starting the dockerized services, there are some configurations that need to be done in Etendo Classic
Client Setup
Application > General Setup > Client > Client
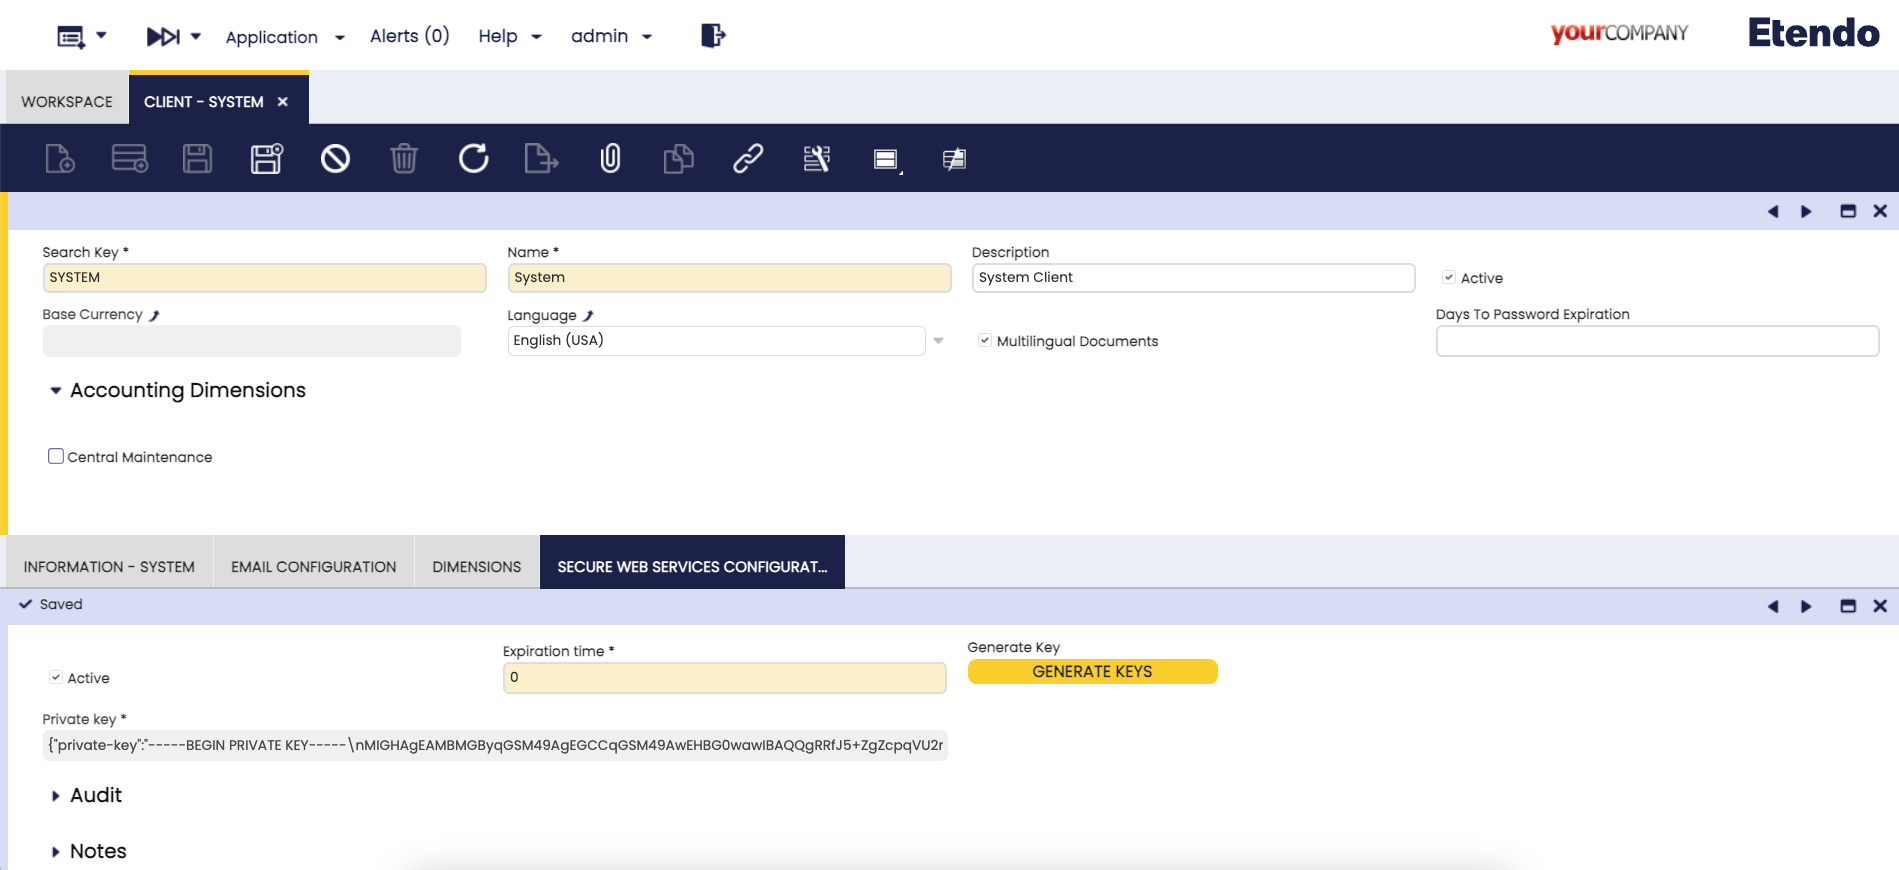
An encryption token is required for authentication.
Note
Starting from Etendo 26.1, the SWS key is automatically generated during installation (./gradlew install). No manual action is required for new installations.
To verify or manage the token, open the Client window with the System Administrator role and navigate to the Secure Web Service Configuration tab. Verify that a key exists; if not, click the Generate Key button. If the expiration time is equal to 0, the tokens do not expire. If a custom expiration was configured, ensure the token has not expired.
Security recommendation
While 0 (no expiration) is the default, the Etendo team recommends setting a reasonable expiration time in production environments and rotating tokens periodically.
RX Config window
Application > Etendo RX > RX Config
This configuration window stores the access data for Etendo RX services, which are crucial for the interaction between different services. In this case, some records need to be created.
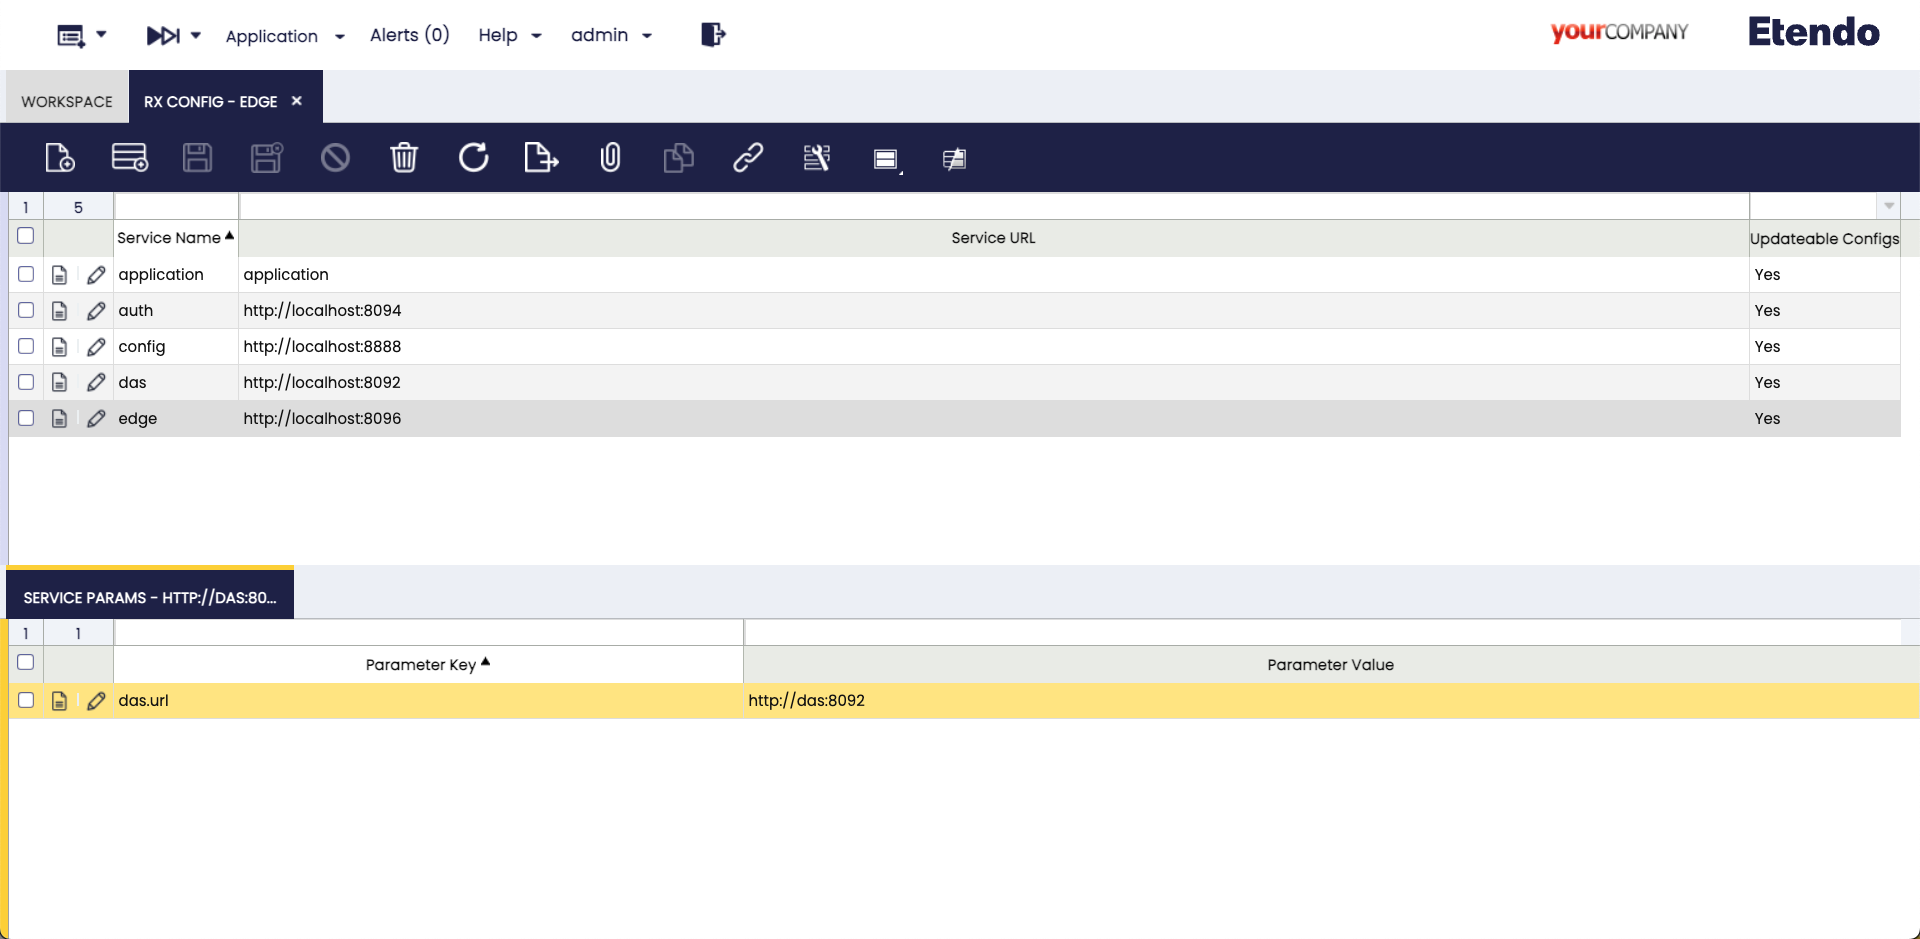
As System Administrator role, in this window, it is necessary to add the entries, one for each service to be used. The following fields should be included:
- Service Name: The name of each service.
- Service URL: The internal URL of the Docker service.
- Updatable Configs: Check this checkbox.
- Public URL: Configure the publicly accessible URL for the service.
Info
The Public URL field only needs to be configured when the sub-application is set to production.
See the configuration examples bellow and replicate them.
application
auth        http://localhost:8094
config      http://localhost:8888
das         http://localhost:8092
edge        http://localhost:8096
Also in the case of edge and auth services it is necessary to add the das.url Parameter Key with the Parameter Value http://das:8092.
Info
If using Dockerized Tomcat, the URLs within the container's network are http://auth:8094, http://config:8888, http://das:8092 and http://edge:8096.
Execute RX services
Before proceeding, it is necessary to start the Etendo RX services. These services provide a security layer (Auth Service), a data access layer (Das Service), which are essential for consuming or writing data in Etendo and Edge Service . Additionally, by selecting the isReact checkbox in the previously defined module, React code will be automatically generated, allowing for easier data access.
To launch all the services, it is necessary to define the following configuration variables in the gradle.properties file:
Info
For more information about how to handle Etendo Dockerizations, visit Docker Management.
Tomcat and PostgresSQL Dockerized (Optional)
It is also possible to run the dockerized PostgreSQL service and Tomcat service, optionally adding the Platform Extensions Bundle and the following configuration variables:
Then, to effectively run the services, it is necessary to execute the command in the terminal:
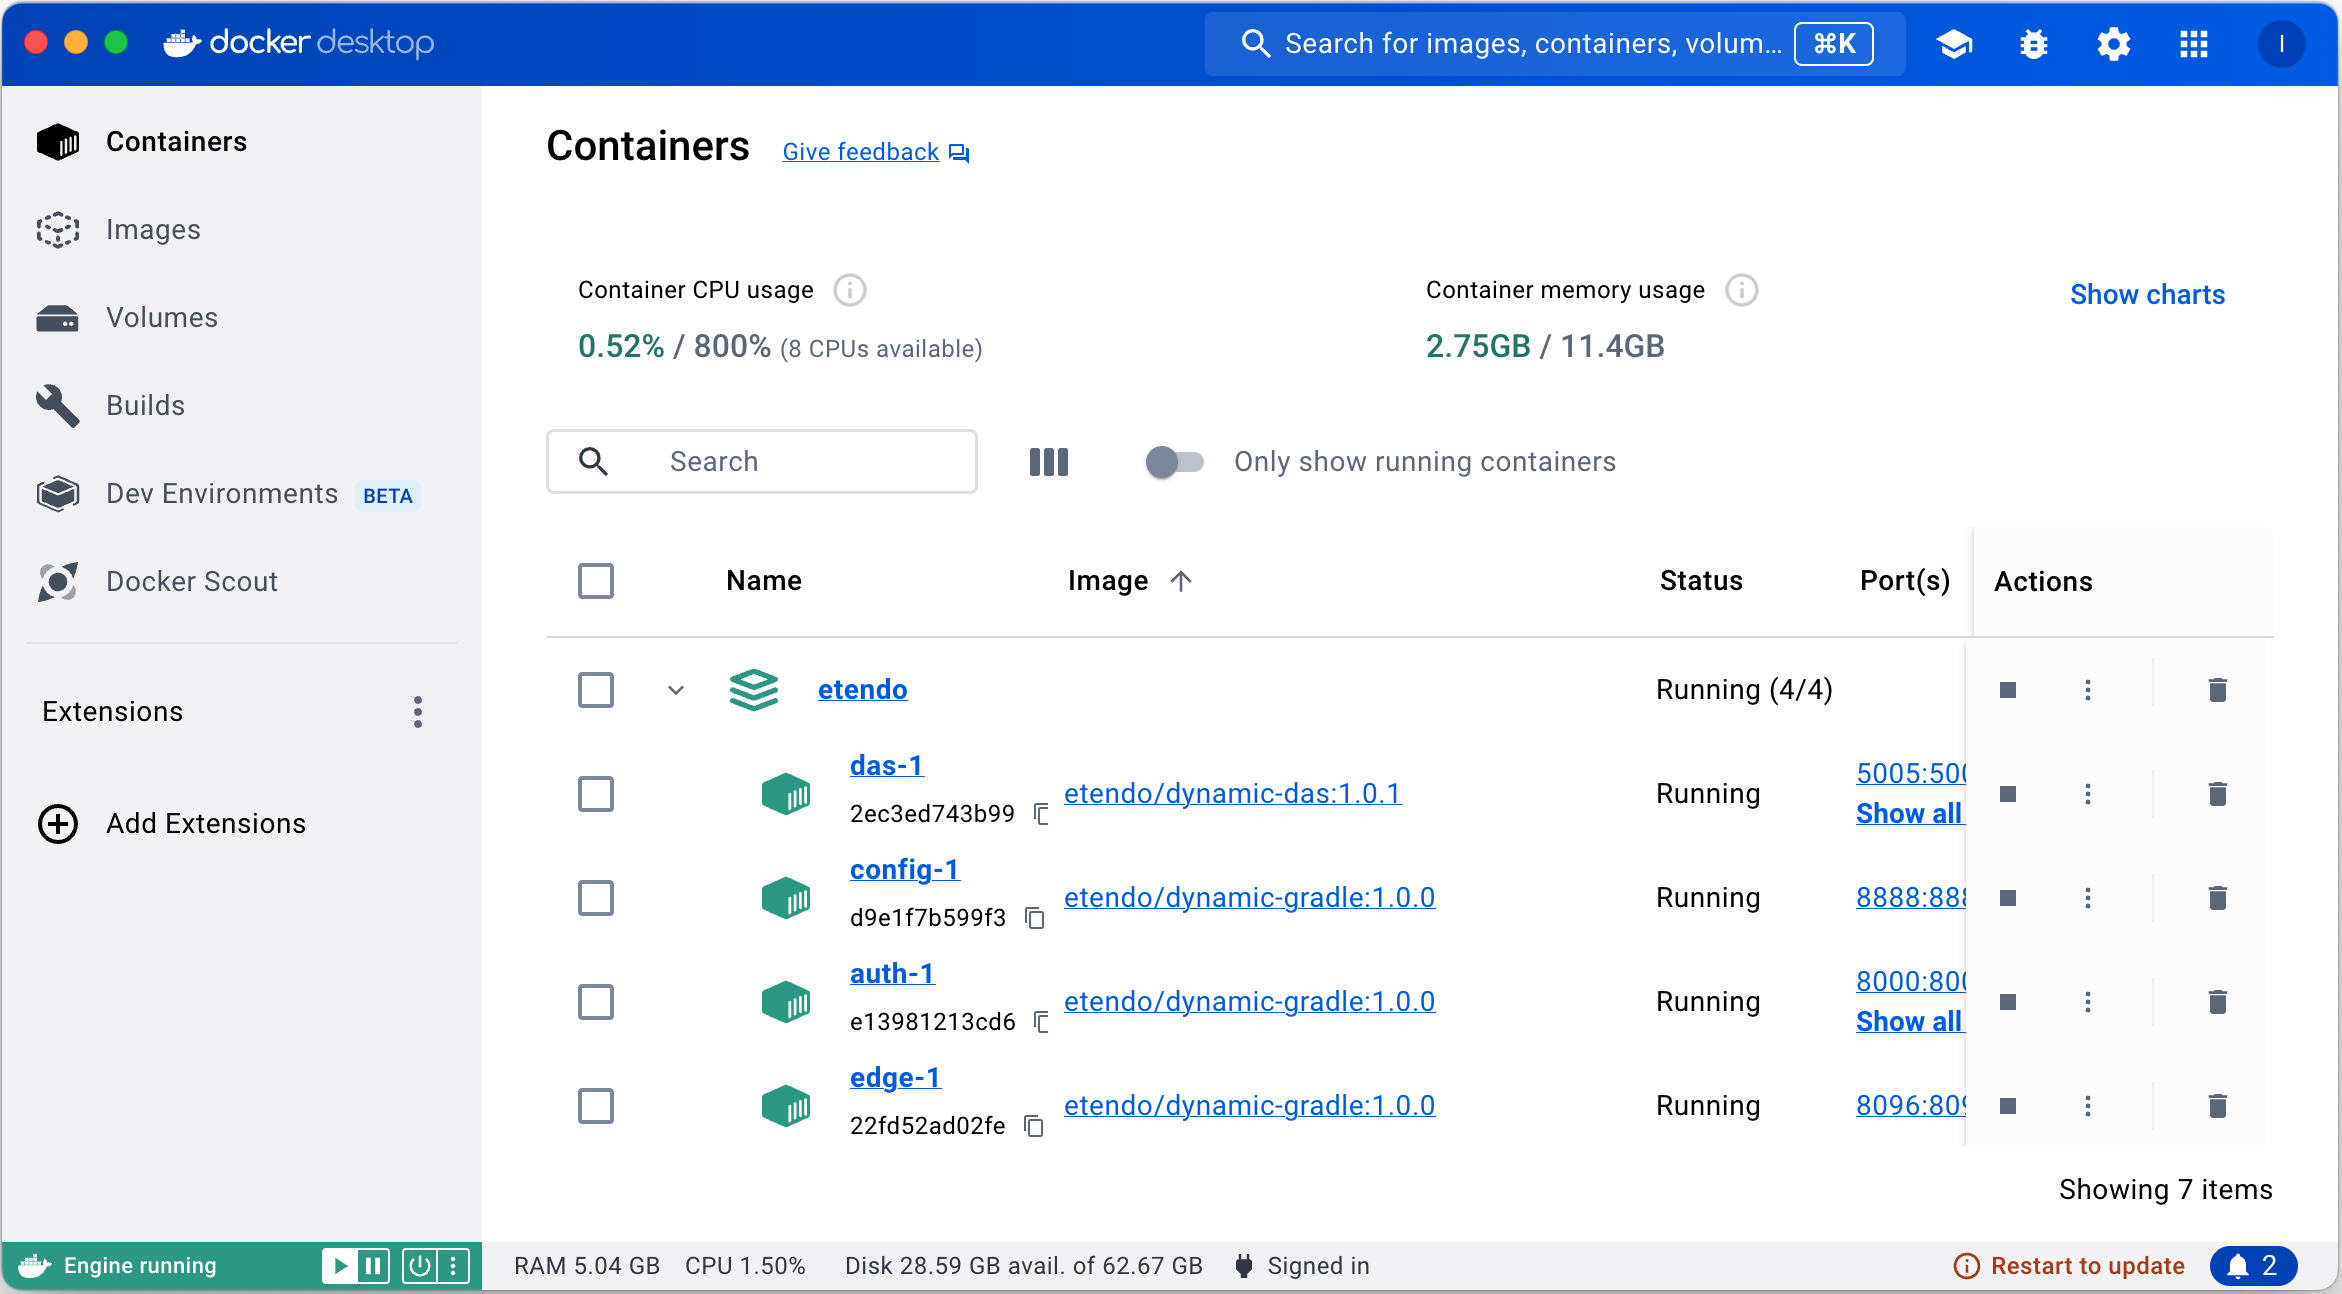
Here, all the services and their respective logs can be seen running using Docker Desktop tool.
Projections and Search
This section covers the creation of projections, mappings, and searches, which enable the generation of a dynamic REST API in the RX DAS service. These configurations allow for reading, writing, and filtering data. Projections are applied to Etendo Classic tables, creating a subset of data that can be interacted with through the API.
Create a Projection
Application > Etendo RX > Projections and Mappings
-
As a
System Administratorrole, it is required to create a projection that reflect partial views of the Product class and contain only the necessary properties. -
To do this, we will go to the
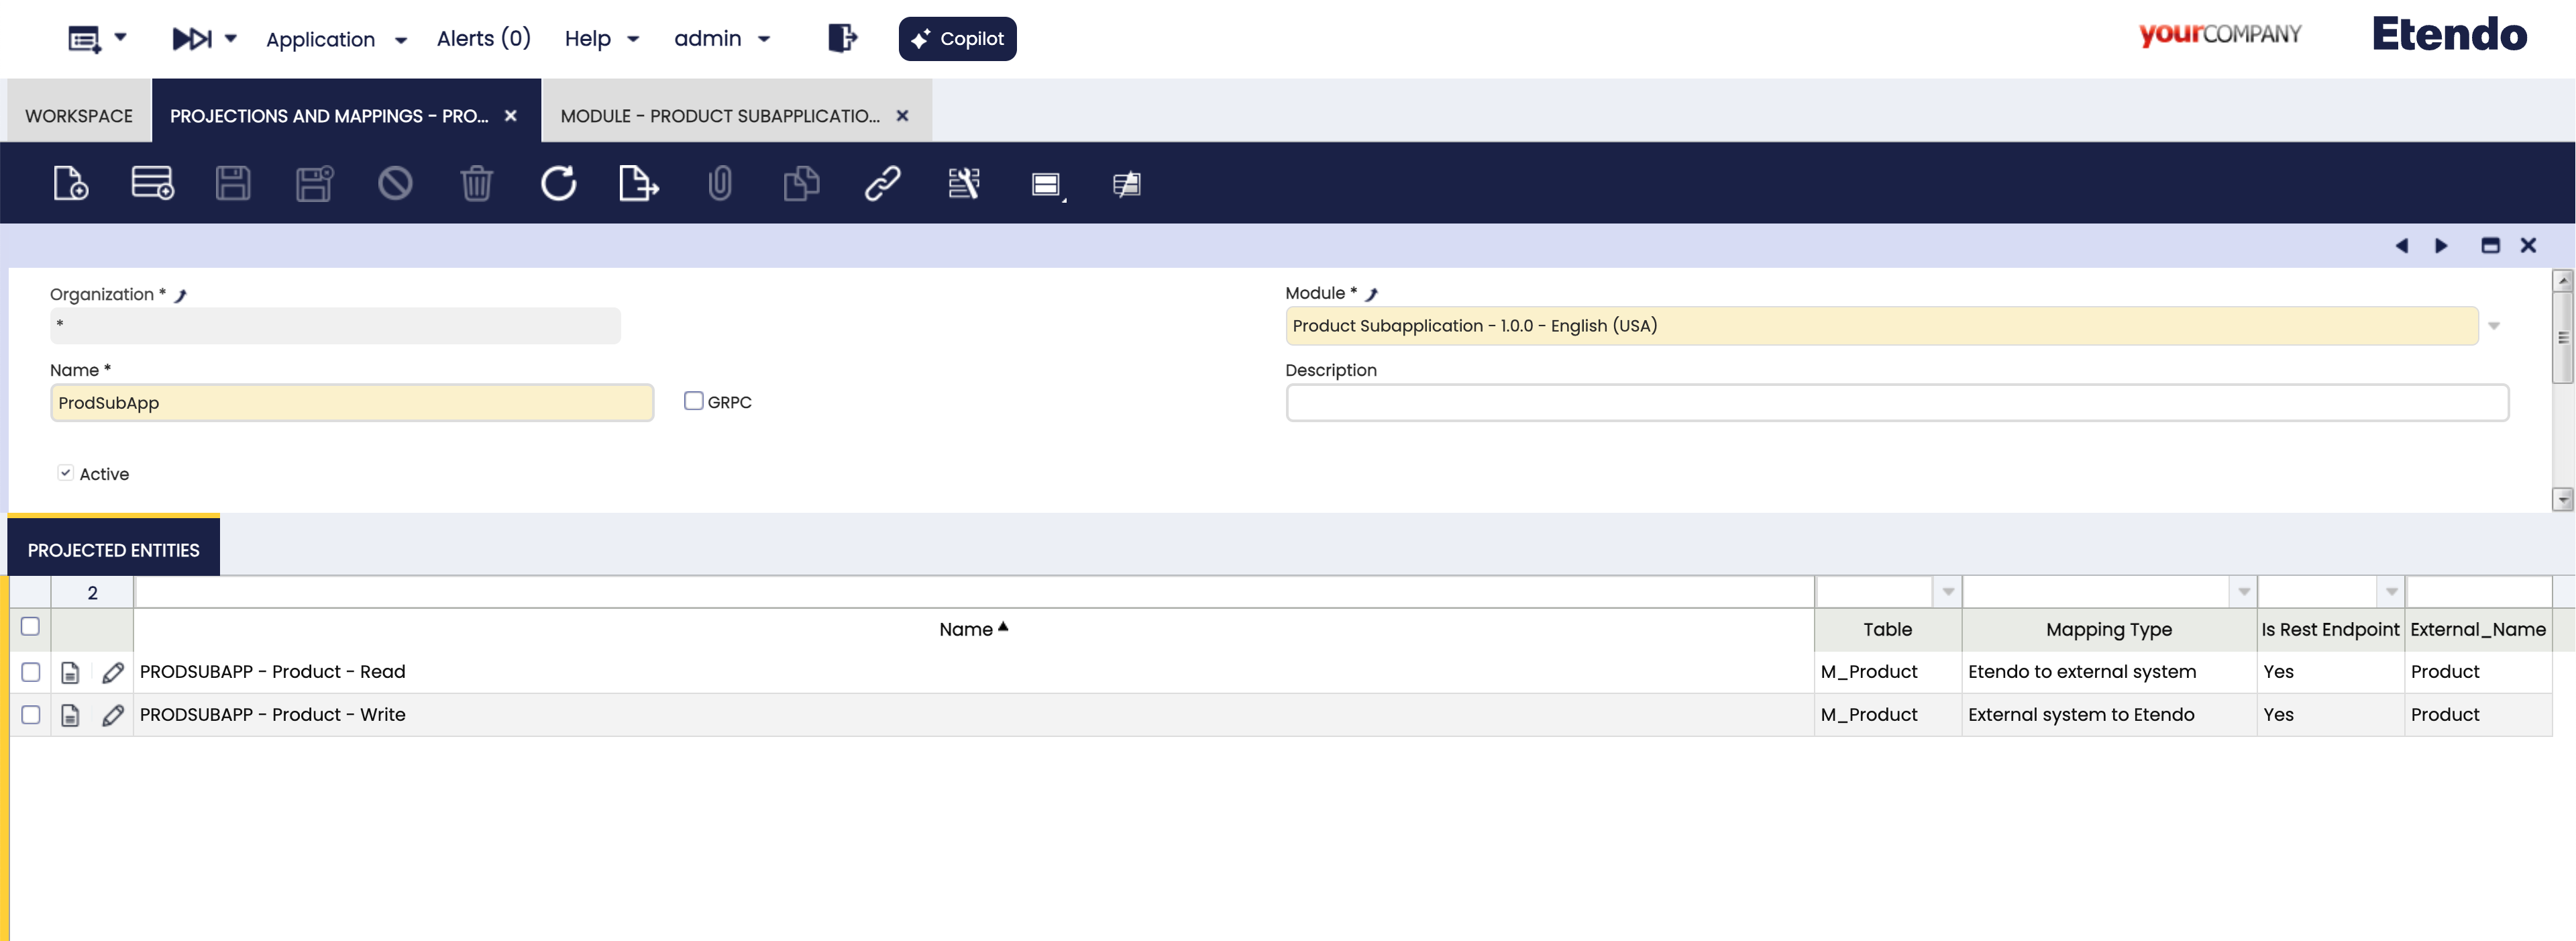
Projections and Mappingswindow and create a new projection, select the module under developmentProduct SubApplication - 1.0.0 - English (USA), where these configurations will be exported and in the name field we defineProdSubApp. -
Now, with the selected projection we add in the tab
Projected Entitiestwo projections, one for reading data, selecting the tableM_Productand in the Mapping Type field we selectEtendo to external systemand another projection for writing data, selecting again the tableM_Productand in the Mapping Type fieldExternal system to Etendo. The other fields are auto-completed with respect to these values.
Creating Entity Fields
-
Now, we define which fields we want to retrieve. To do this, we start by selecting the data reading projection
PRODSUBAPP - Product - Readand run theCreate Projection Fieldsprocess, in the pop-up we will select the fields to project. In our example case:- active
- id
- name
- productCategory
- searchkey
- taxCategory
- UOM
- UPCEAN
Note
While not all of these fields will be displayed in the application, as record editing is allowed, we are also selecting all the mandatory fields to create a product.
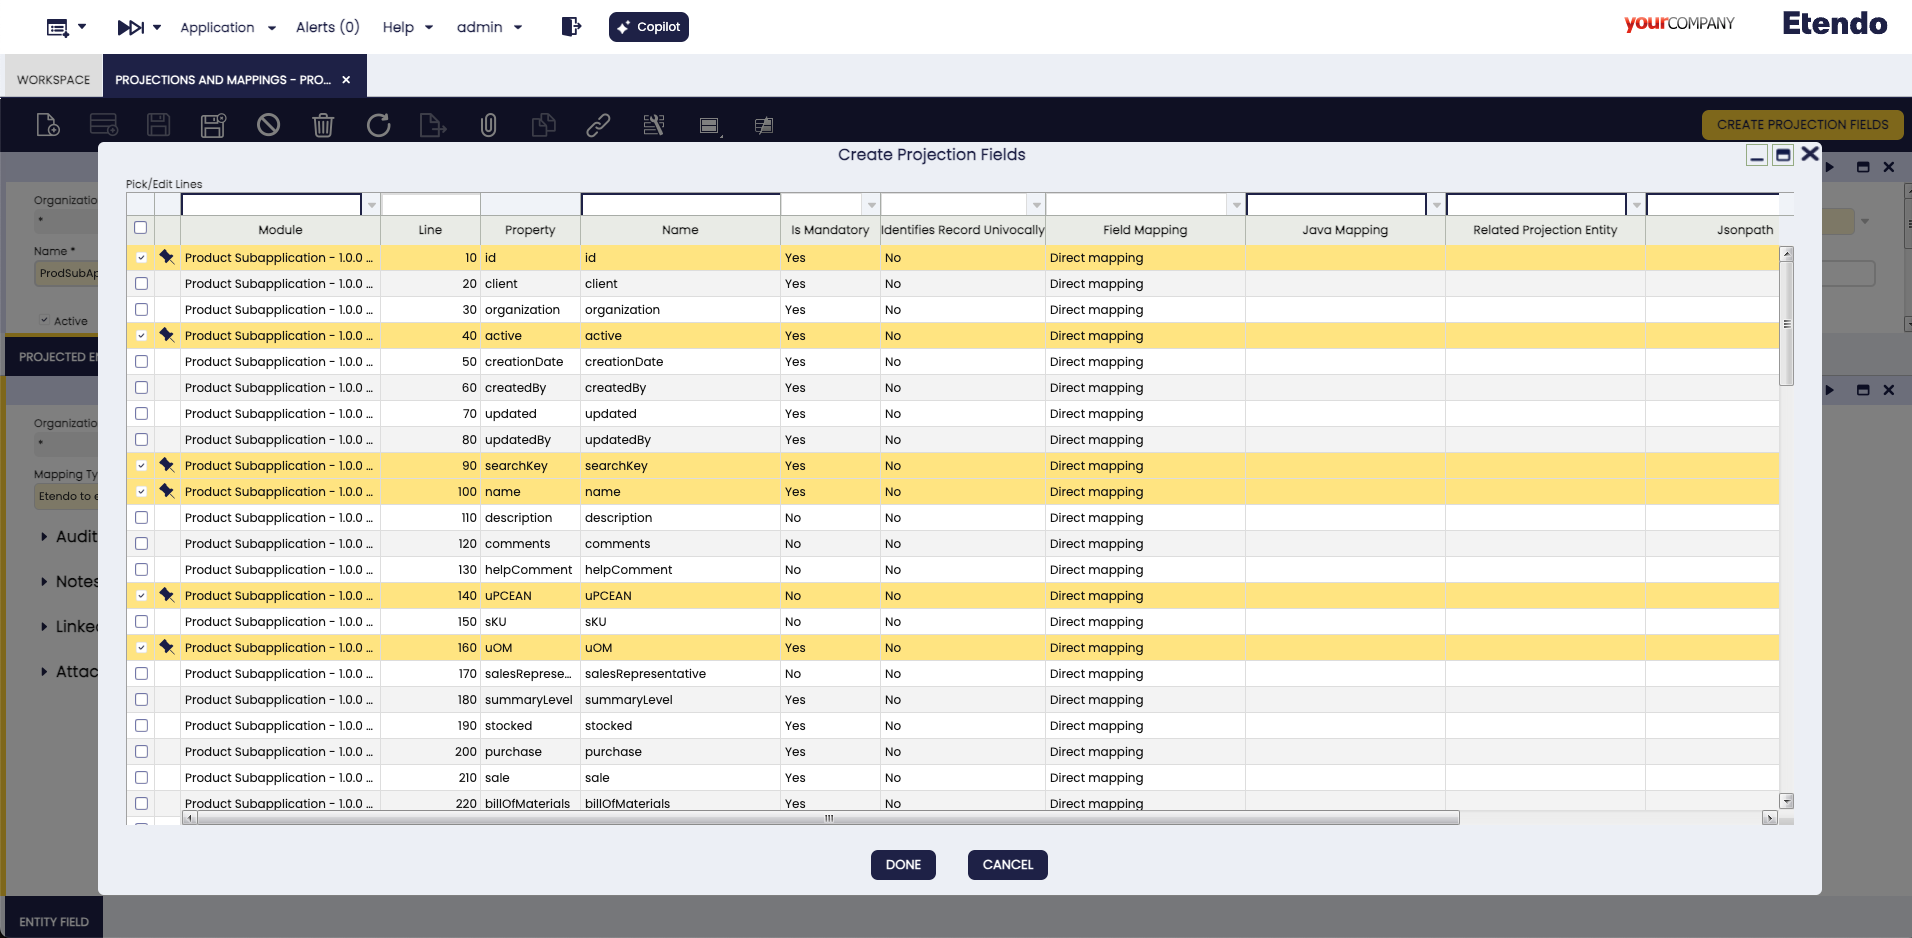
Create read projection fields process execution example -
Now we define which fields should be saved when creating or editing a record, in this case we select the write projection
PRODSUBAPP - Product - Writeand run the processCreate Projection Fieldsselecting the same fields as for the read one- active
- id
- name
- productCategory
- searchkey
- taxCategory
- UOM
- UPCEAN
Entity fields created example -
In the case of the
productCategory,taxCategoryandUOMfields in the application they will not be editable, but they must be autocompleted with a default value, for this we can use constant mappings. If new Products are created, these default values will be used.To do this, we go to the
application>Etendo RX>Constant Valueswindow and define constant IDs of default values. Here are some example IDs:Name Default Value ProductCategoryDC7F246D248B4C54BFC5744D5C27704FtaxCategory43A120C9377B4537B5D1976D9B1233D7uOM100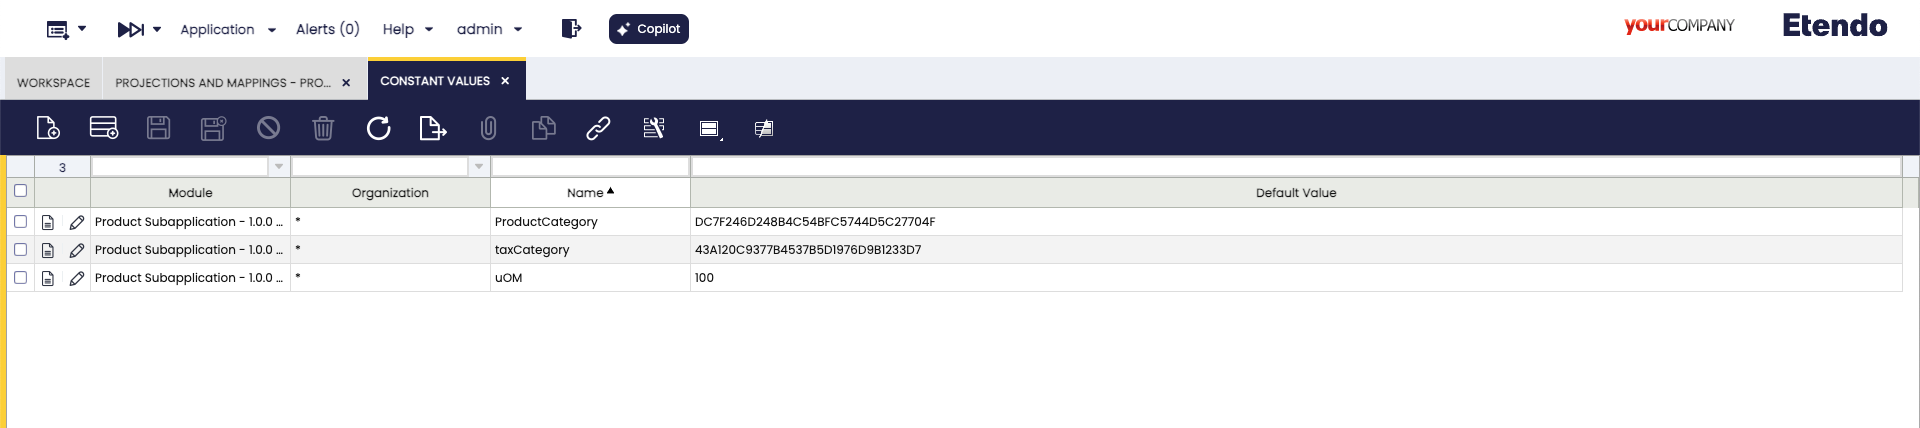
Constant values definition example -
Finally selecting the
PRODSUBAPP - Product - Writewrite projection, edit theproductCategory,taxCategoryandUOMrecords, modify theField Mappingfield toConstant Mapping, delete theJsonpathand select the corresponding value in theConstant Valuedrop-down list, defined in the previous step.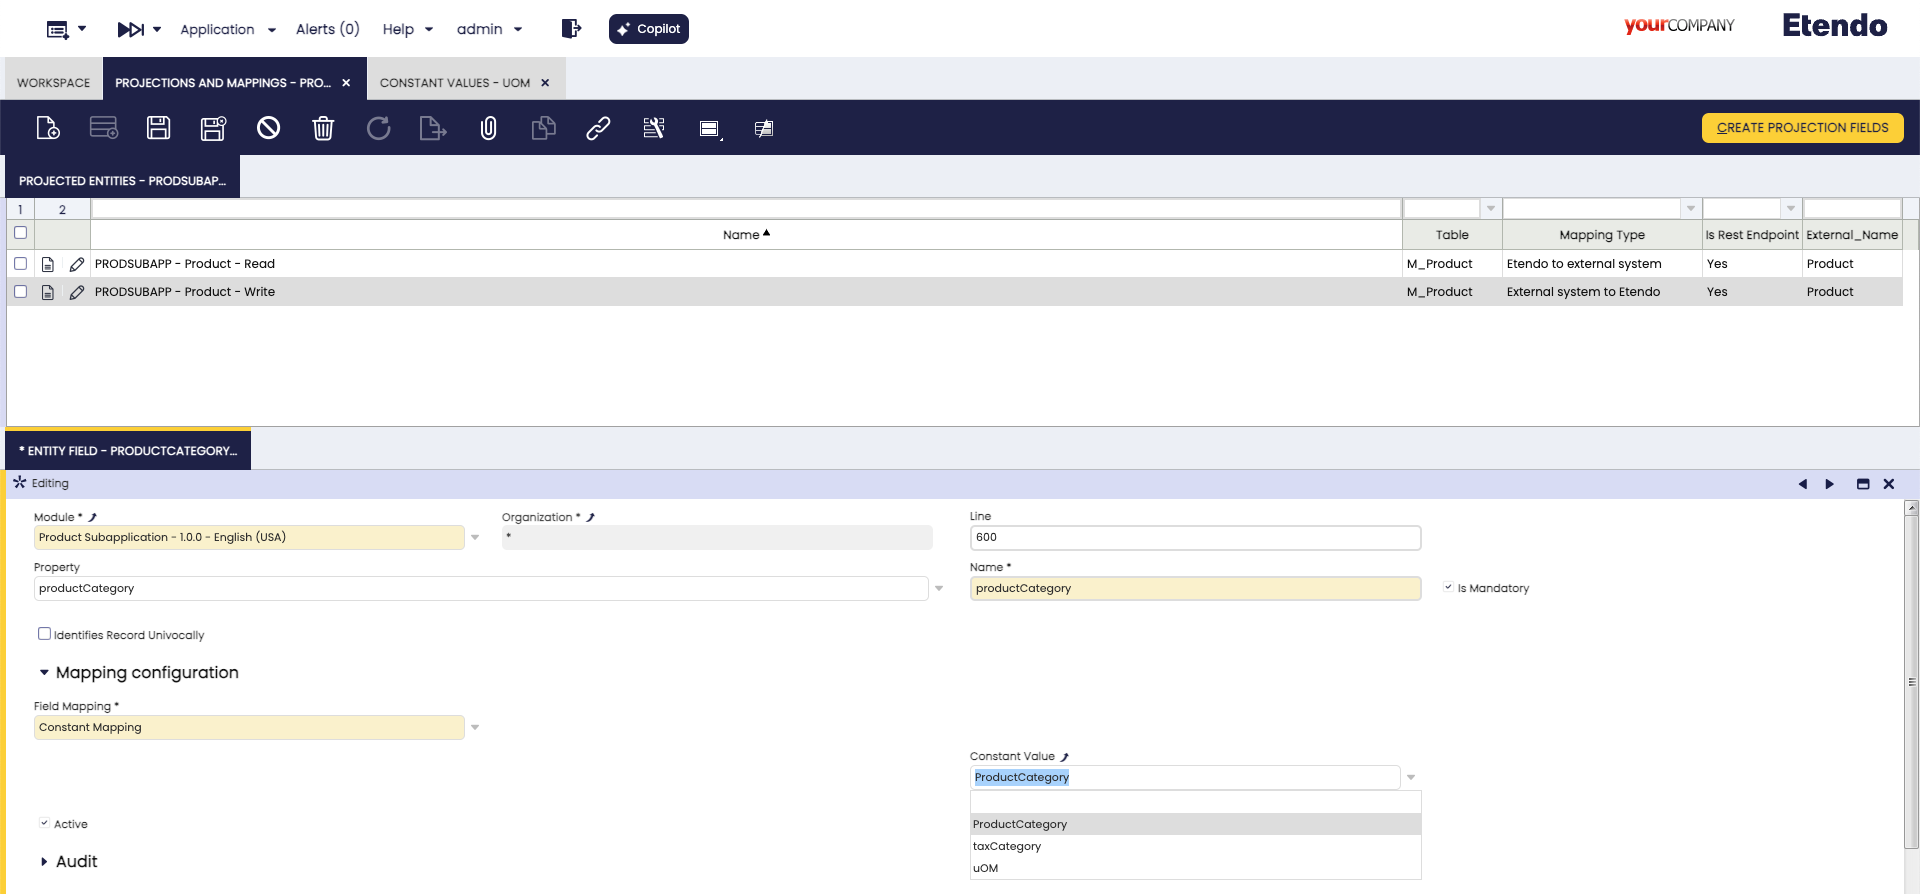
Entity field tab, constant values definition example
Create a Search in Projected Data
Now, when reading data, it is possible to create filters, for this we have to associate these filters to a table and it is possible to export this filter in the module under development.
To do this, we open the Tables and Columns window, in our example select the M_Product table, go to the Repository tab and create a new record with the development module. Then we create a new record in the Search tab
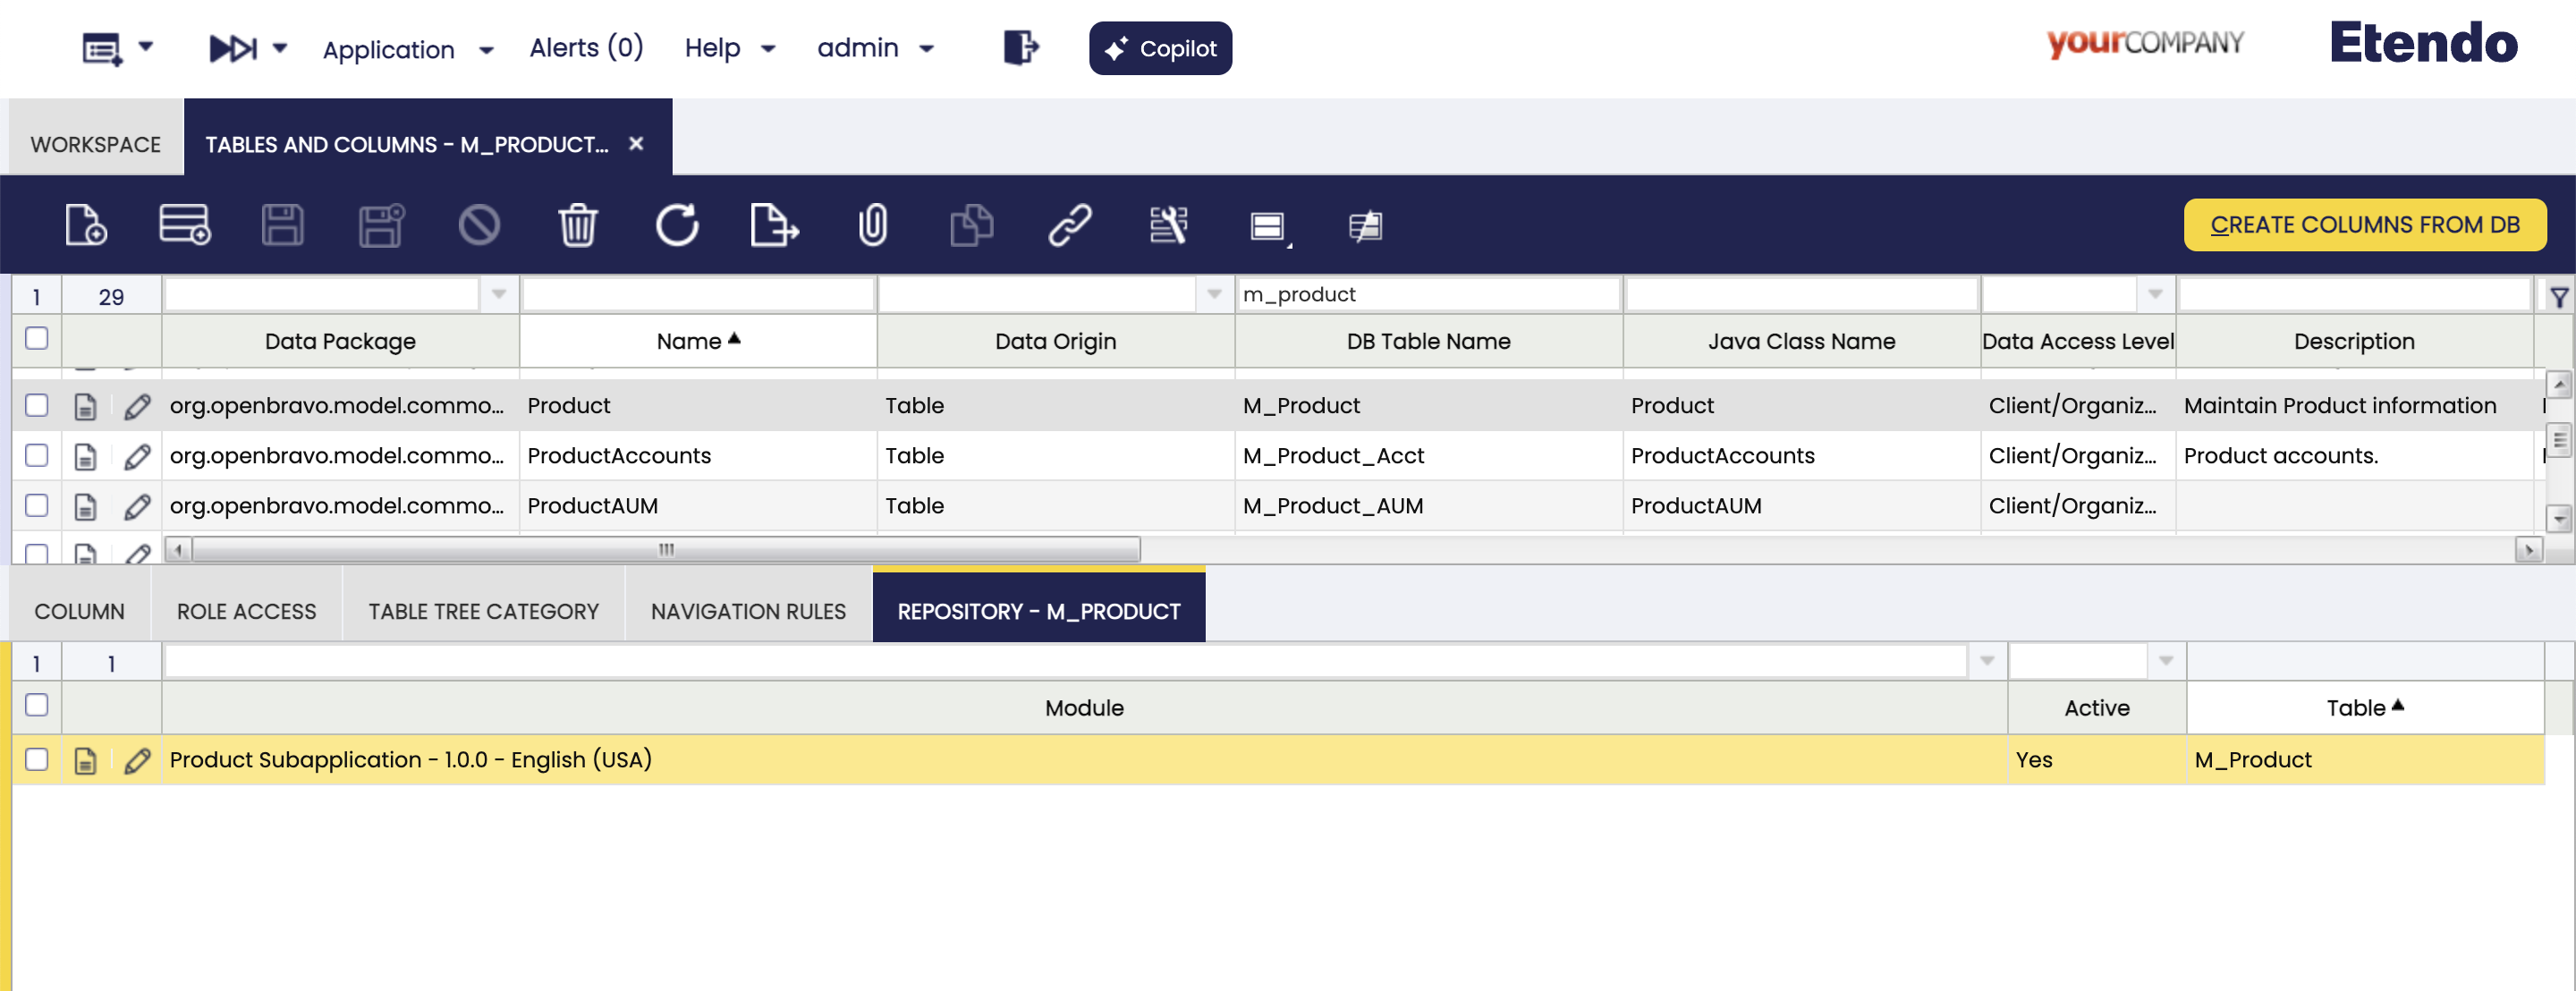
Create a New Search and Search Parameter
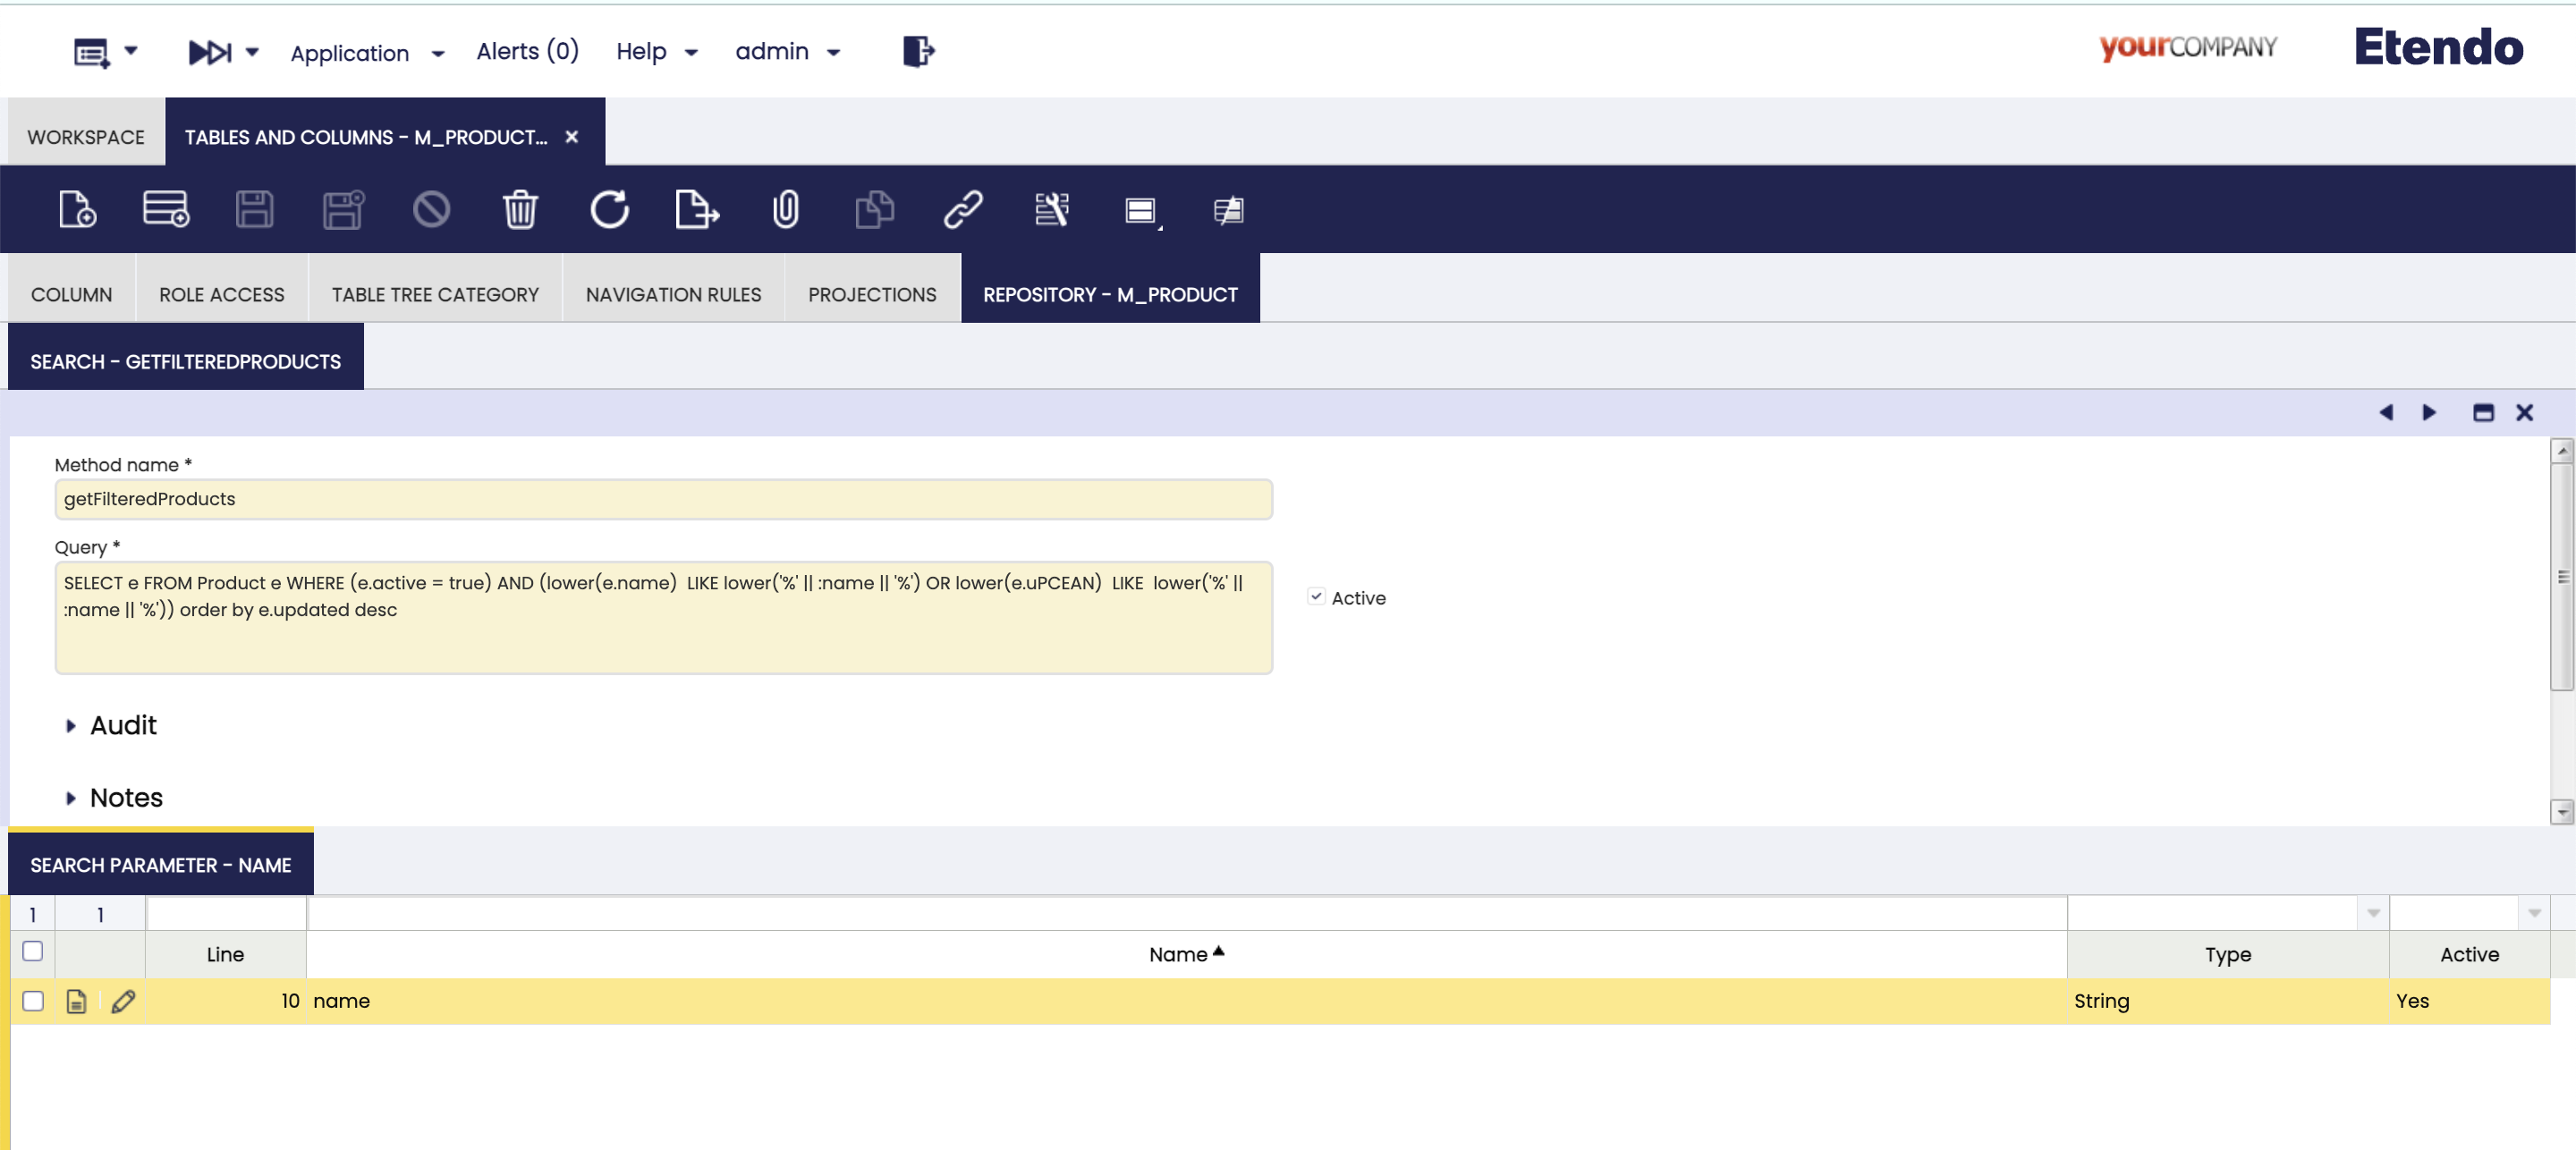
Next, we will define a search method to be used when we want to consume the products. To create this new filter/search method, in the Repository tab of the M_Product table, create a new record with the method name getFilteredProducts and the hql query filter.
SELECT e FROM Product e WHERE (e.active = true) AND (lower(e.name) LIKE lower('%' || :name || '%') OR lower(e.uPCEAN) LIKE lower('%' || :name || '%')) order by e.updated desc
As we can see in the query, it receives the:name parameter of String type that we define in the Search Parameter tab.
Restart the Etendo RX Service
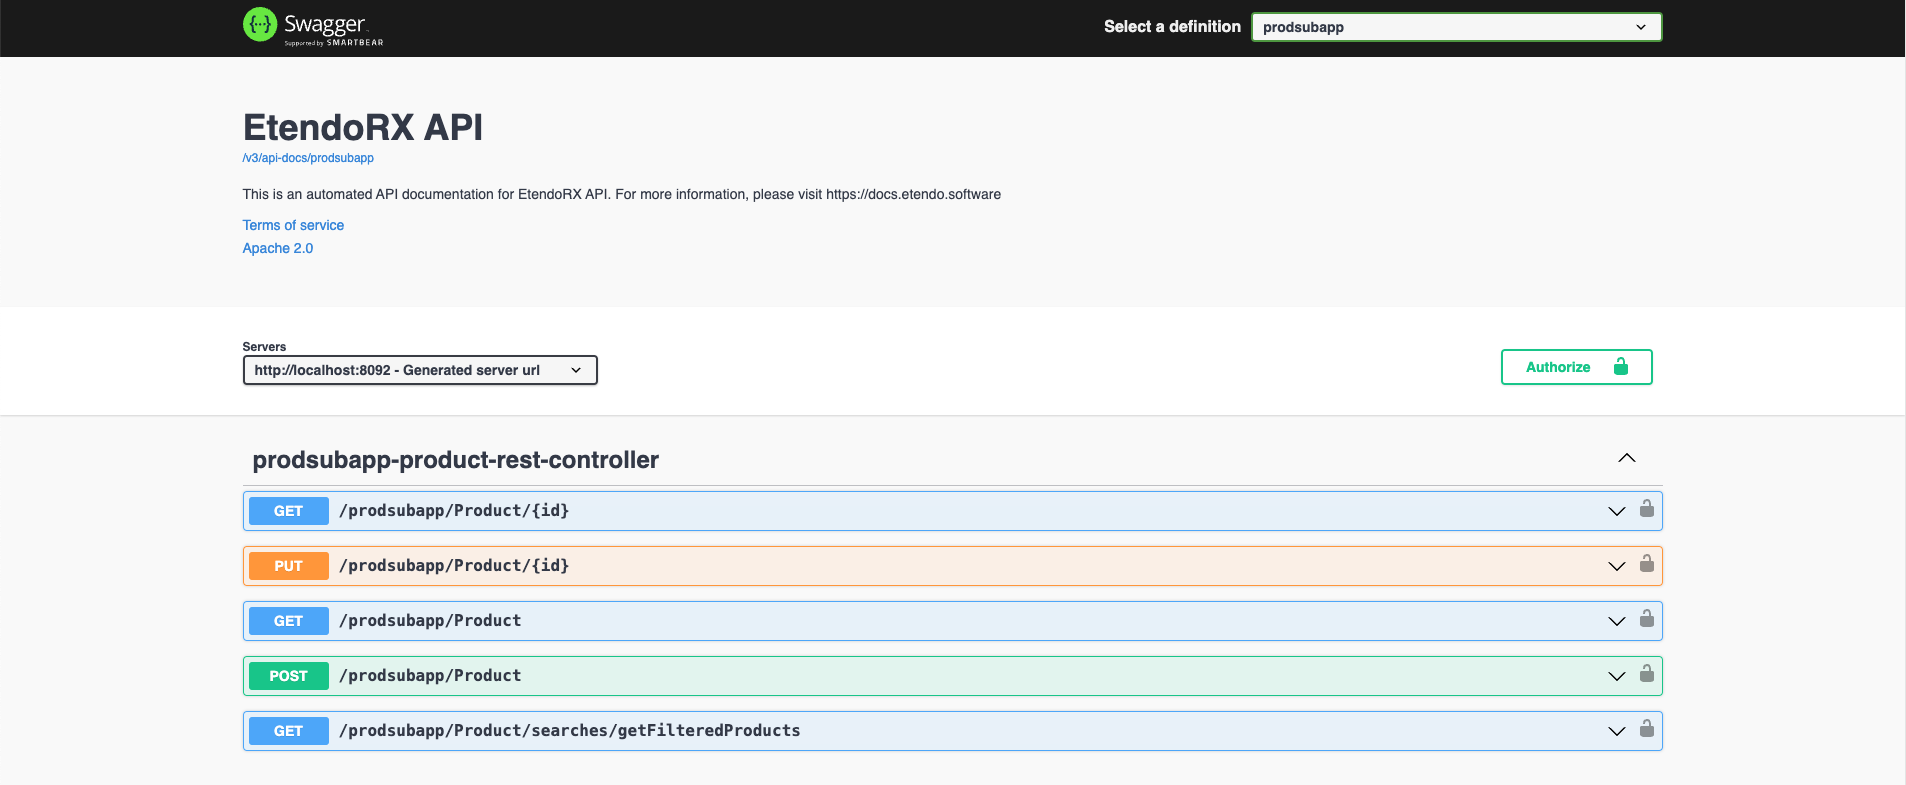
Restart the Das RX service to recognize the projections and mappings.
Info
By accessing http://localhost:8092/swagger-ui/index.html, the RX DAS Service Swagger can be visualized. This interface allows for consultation of the endpoints generated based on the previously made configurations.
Creating the Subapplication
-
Now, create the subapplication based on a template published in NPM, Etendo Subapp Data Template Typescript . Execute the Gradle command to automatically create the subapplication within the module under development.
In the example we are working on, use the following command:A new subapplication will be created within the module, with the following structure:
Product Subapp Example
This section covers an overview about the product subapplication example screens and principal parts of the subapplication.
Consideration
The applications must be developed for both platforms: phone and tablet.
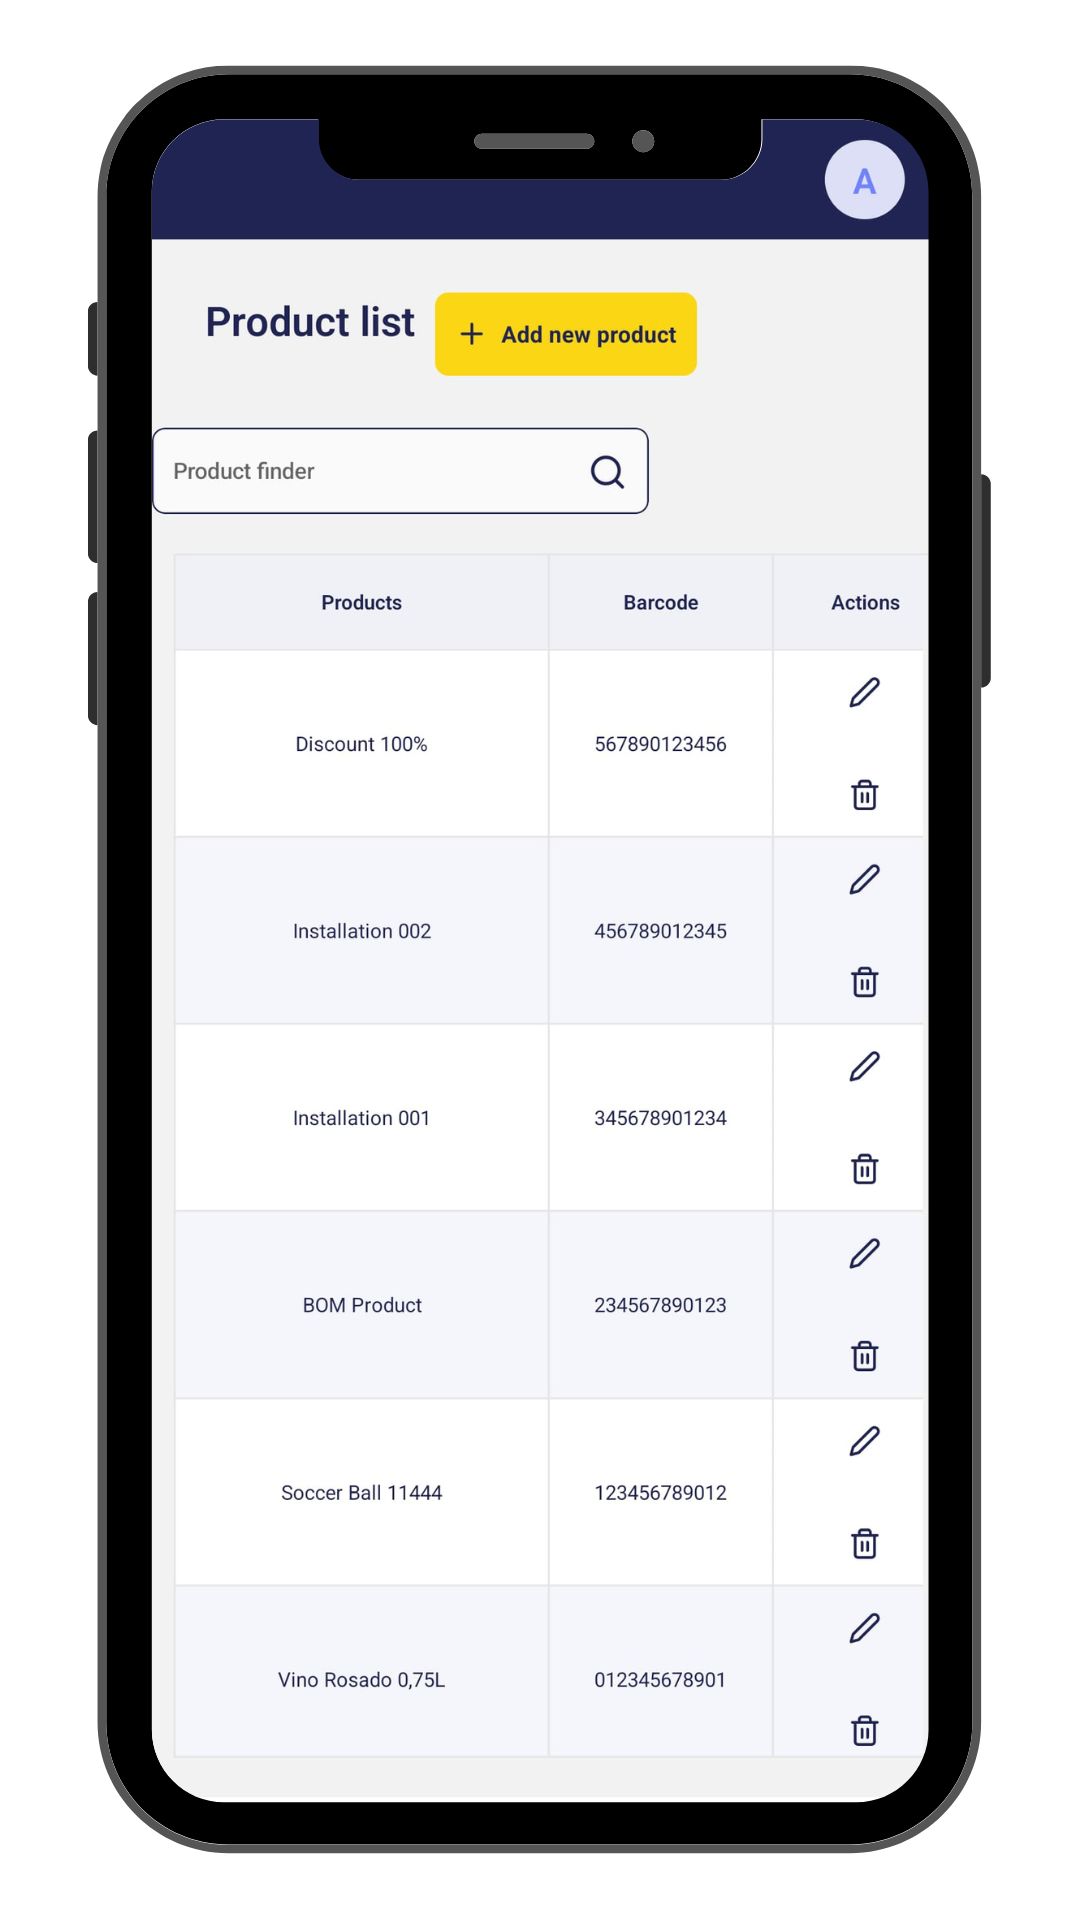
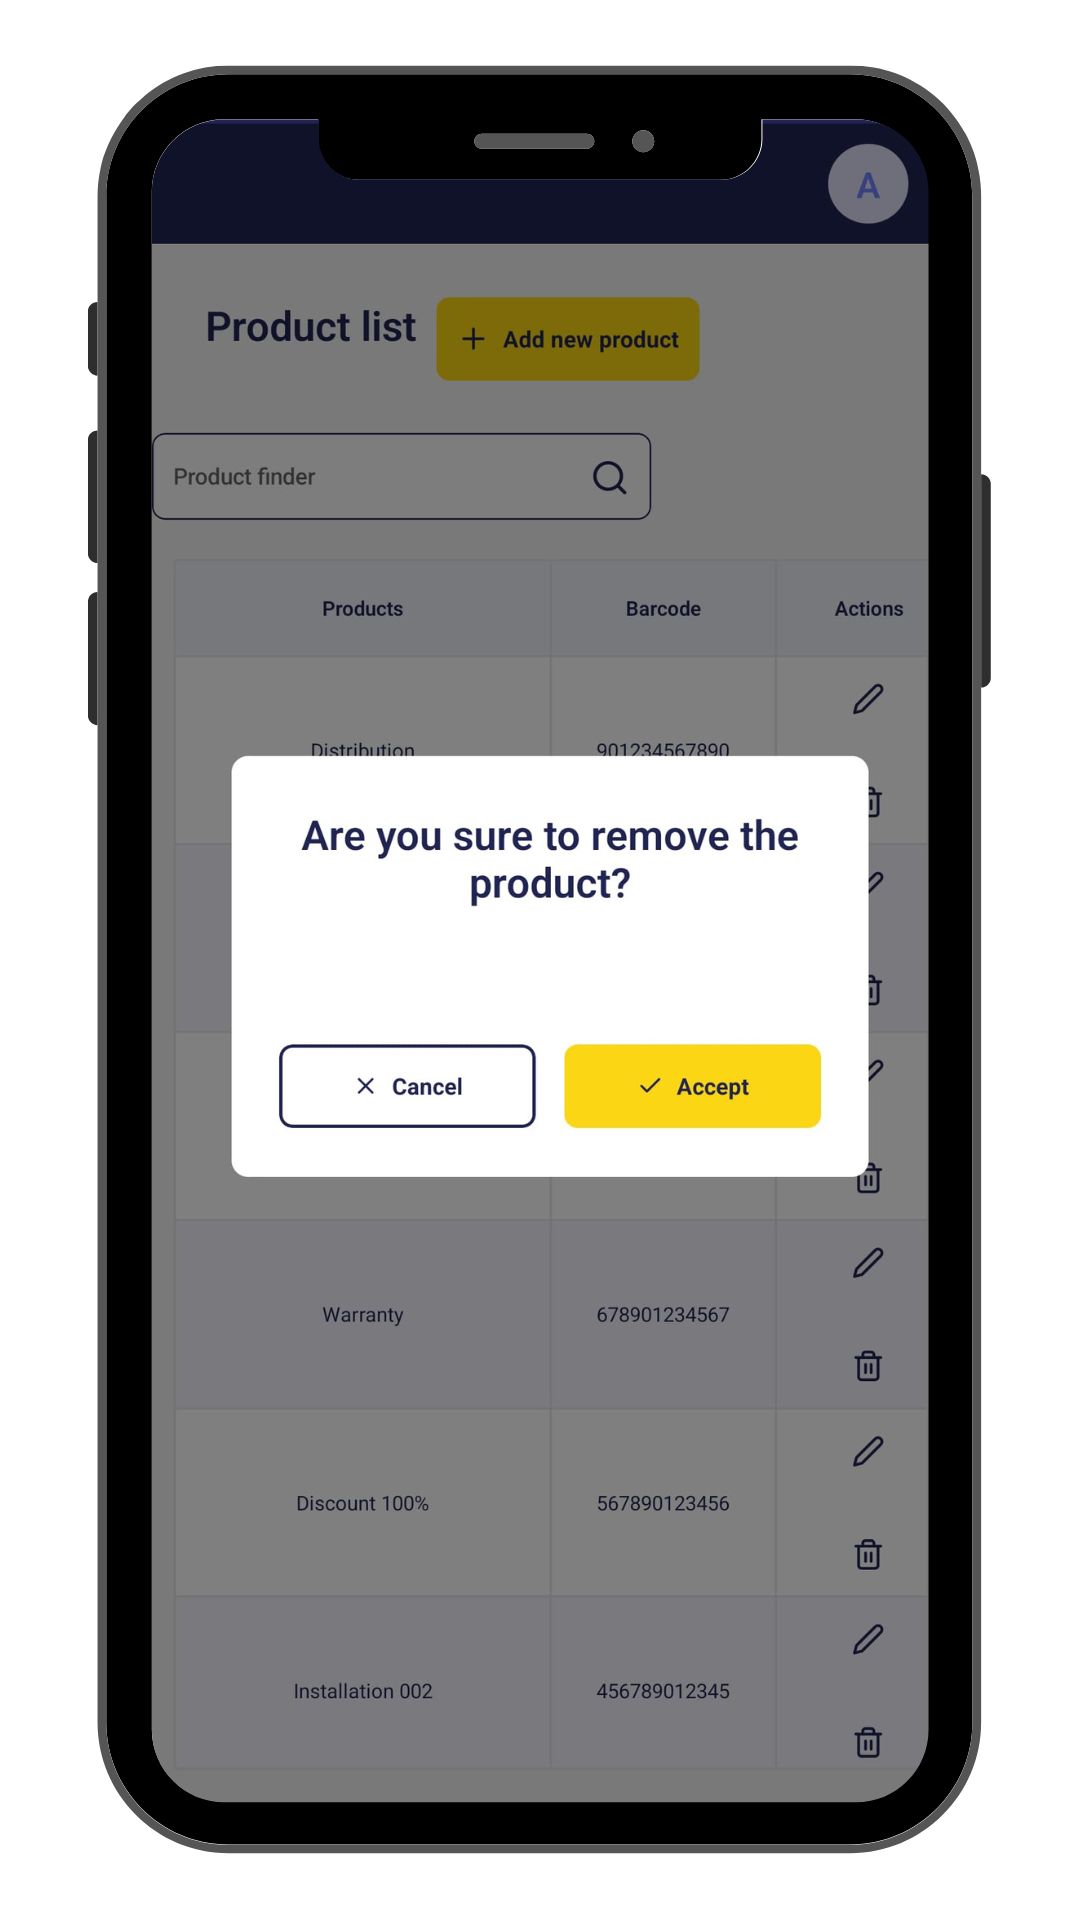
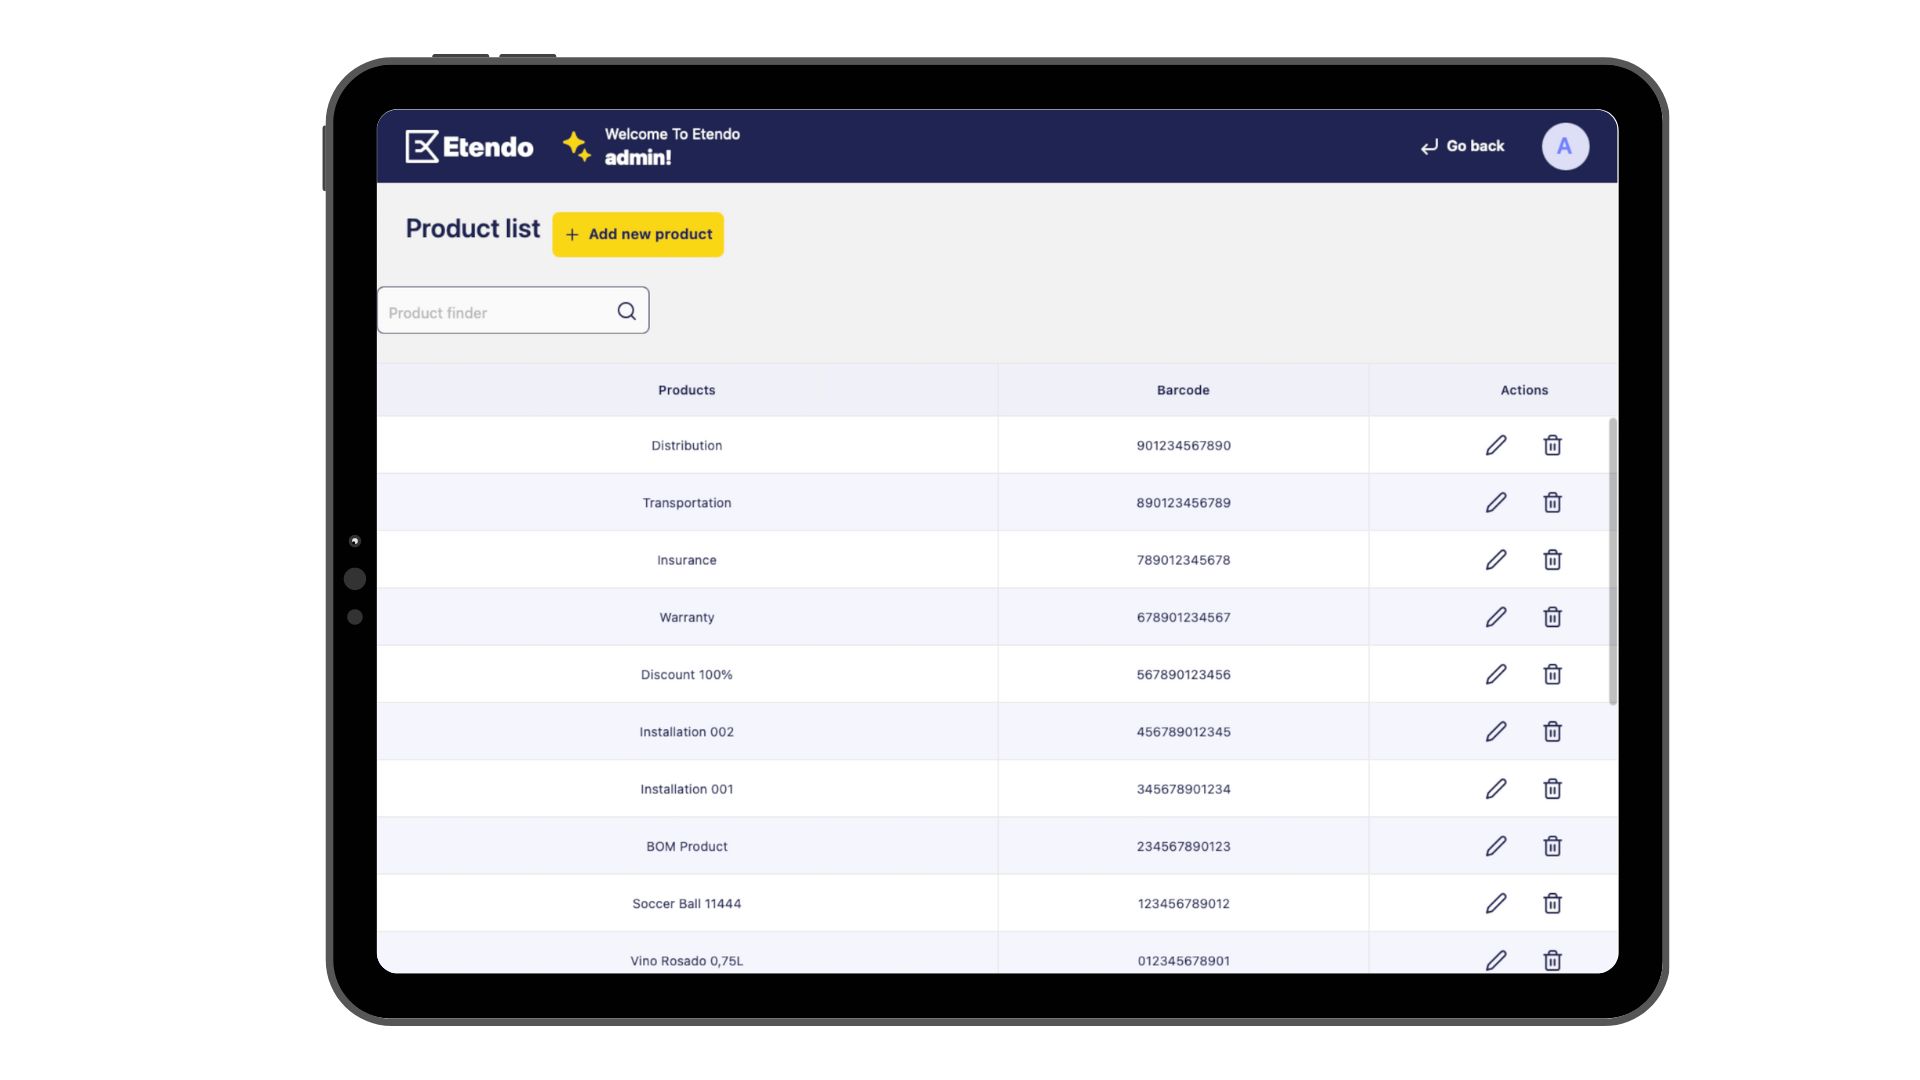
Home Screen
- This is the main screen of the subapplication. It will show a list of products. Also, it will allow us to edit and remove a product, find a product by name and navigate to the detail of a product.
Phone View
Tablet View
- The route to this screen is
src/screens/home/index.tsxand the content:
import React from 'react';
import TableList from '../../components/table/list';
import { NavigationProp } from '@react-navigation/native';
import { INavigationContainerProps } from '../../interfaces';
import locale from '../../localization/locale';
import useProduct from '../../lib/data_gen/useProduct';
import { Product } from '../../lib/data_gen/product.types';

interface TableListProps {
  navigation: NavigationProp<any>;
  route: any;
  navigationContainer: INavigationContainerProps;
}

const Home = (props: TableListProps) => {
  const { getFilteredProducts, updateProduct } = useProduct();
  return (
    <TableList
      deleteDataItem={async (item: Product) => {
        item.active = false;
        await updateProduct(item);
      }}
      {...props}
      columns={[
        {
          key: 'id',
          primary: true,
          visible: false,
        },
        {
          key: 'name',
          label: locale.t('Table.products'),
          visible: true,
          width: '50%',
        },
        {
          key: 'uPCEAN',
          label: locale.t('Table.barcode'),
          visible: true,
          width: '30%',
        },
      ]}
      getData={getFilteredProducts}
      labels={{
        dataName: 'Product',
        navbarTitle: locale.t('Home.welcome'),
        containerTitle: locale.t('Home.productList'),
        buttonNew: locale.t('Home.newProduct'),
        searchPlaceholder: locale.t('Home.typeProduct'),
        successfulDelete: locale.t('Success.deleteProduct'),
        errorDelete: locale.t('Error.deleteProduct'),
      }}
    />
  );
};

export default Home;
Product Detail
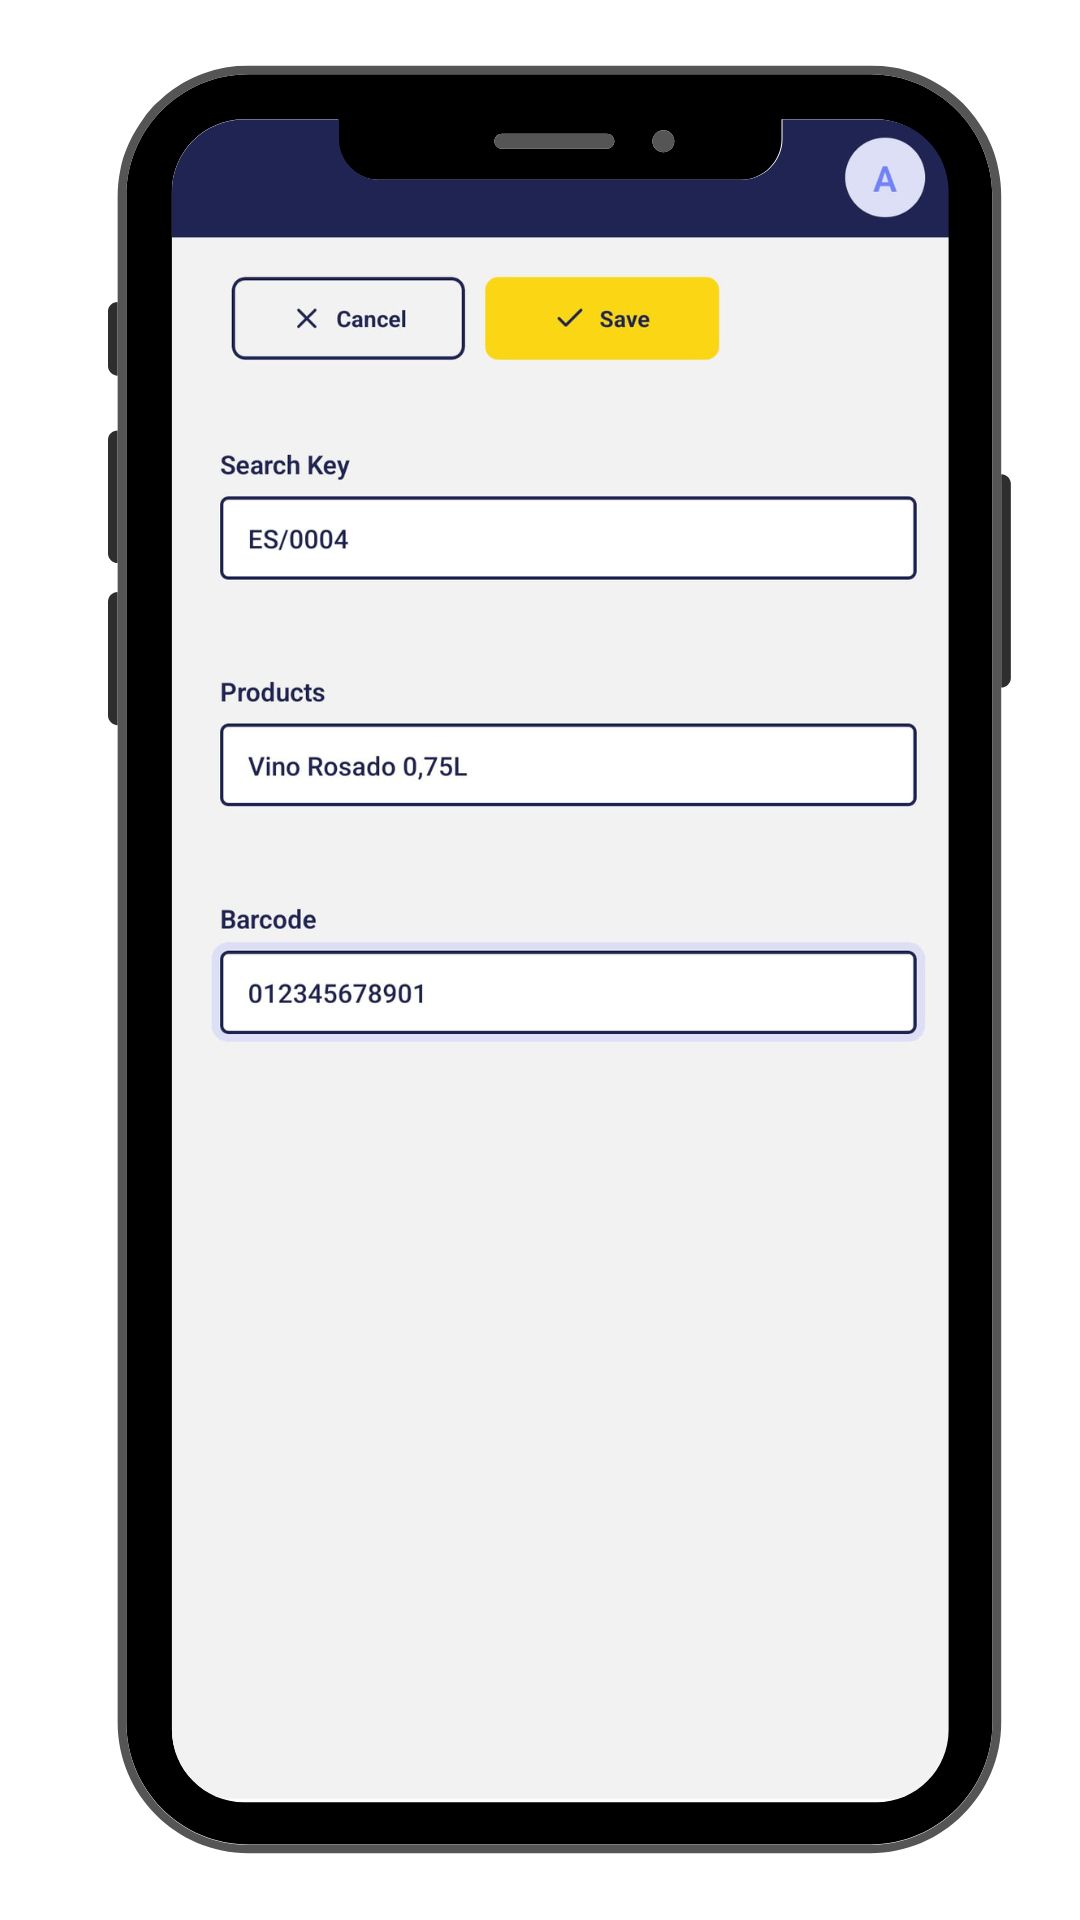
- This screen will show the detail of a product. Also, it will allow us to edit the product.
- It is the same screen used to create a new product, if the prop does not have ID.
- The route to this screen is
src/screens/productDetail/index.tsx, add the content:
import React, { useState } from 'react';
import TableDetail from '../../components/table/detail';
import { NavigationProp } from '@react-navigation/native';
import locale from '../../localization/locale';
import useProduct from '../../lib/data_gen/useProduct';

interface TableDetailProps {
  navigation: NavigationProp<any>;
  route: any;
}

const ProductDetail = (props: TableDetailProps) => {
  const { createProduct, updateProduct } = useProduct();
  const [id, setId] = useState<string>('');
  const [searchKey, setSearchKey] = useState<string>('');
  const [name, setName] = useState<string>('');
  const [uPCEAN, setUPCEAN] = useState<string>('');
  return (
    <TableDetail
      {...props}
      createData={async () => {
        await createProduct({ searchKey, name, uPCEAN });
      }}
      updateData={async () => {
        await updateProduct({ id, searchKey, name, uPCEAN });
      }}
      fields={[
        {
          key: 'id',
          visible: false,
          setValue: setId,
          getValue: id,
          labels: {
            title: '',
            placeholder: '',
          },
        },
        {
          key: 'searchKey',
          setValue: setSearchKey,
          getValue: searchKey,
          labels: {
            title: locale.t('ProductDetail.searchKey'),
            placeholder: locale.t('ProductDetail.searchKeyExample'),
          },
        },
        {
          key: 'name',
          setValue: setName,
          getValue: name,
          labels: {
            title: locale.t('ProductDetail.products'),
            placeholder: locale.t('ProductDetail.nameExample'),
          },
        },
        {
          key: 'barcode',
          setValue: setUPCEAN,
          getValue: uPCEAN,
          labels: {
            title: locale.t('ProductDetail.barcode'),
            placeholder: locale.t('ProductDetail.barcodePlaceholder'),
          },
        },
      ]}
      labels={{
        editTitle: locale.t('ProductDetail.editProduct'),
        newTitle: locale.t('ProductDetail.newProduct'),
        errorTitle: locale.t('Error.product'),
        successUpdateTitle: locale.t('Success.updateProduct'),
        successCreateTitle: locale.t('Success.saveProduct'),
        connectionError: locale.t('Error.connection'),
        navbarTitle: locale.t('Home.welcome'),
        cancel: locale.t('Common.cancel'),
        save: locale.t('Common.save'),
        successTitle: id
          ? locale.t('Success.updateProduct')
          : locale.t('Success.createProduct'),
      }}
    />
  );
};

export default ProductDetail;
Navigation
In addition, it is necessary to add the navigation configuration in the app.tsx file, in the return statement. This configuration provides the infrastructure to navigate between the different screens of the application.
<Stack.Navigator initialRouteName="Home">
      <Stack.Screen
        options={{ headerShown: false }}
        name="Home"
        initialParams={{ dataUser }}>
        {props => <Home {...props} navigationContainer={navigationContainer} />}
      </Stack.Screen>
      <Stack.Screen
        options={{ headerShown: false }}
        name="ProductDetail"
        initialParams={{ dataUser }}>
        {props => <ProductDetail {...props} />}
      </Stack.Screen>
</Stack.Navigator>
Info
For more information, visit Navigation Stack concept in Subapplication Structure Page.
Info
For more information about the language management and translations, visit Languague concept.
Info
For more information about Subapplication Params, visit Params from Etendo Mobile concept.
Running the Sub-application
-
Once the subapplication is created, the react-native code must be generated, with types and functions that interact with the RX DAS Service, for this we execute the command Gradle :
Info
Make sure that the Etendo RX services are running and without errors before executing this command.
In our example case
As we can see, it will be generated in the/subapp/src/libs/folder the functions and types that will be used for reading and writingGETandPOSTdata. -
In a terminal on path
modules/<javapackage>/subapp, install the depedencies declared in thepackage.json, following the command: -
Then, to run the subapplication in development mode execute:
Note
By default, the application run in development mode on
localhostat port3000. Additionally, changes in the/srcdirectory are automatically scanned, enabling dynamic updates to the application during development. This ensures that any modifications are reflected in real-time without restarting the application.
Visualizing the subapplications
-
Open the Etendo Mobile application on a mobile device. You can use either an emulator or a physical device.
-
In Etendo Mobile setting up the Edge service URL (Edge is an Etendo RX service, which implements a Spring cloud-driven gateway), by default the environment URL should be
http://<local-network-ip>:8096/and the context path by default/etendo.Info
To find out your IP address on the local network, you can run the command
ifconfigin a Mac or Linux terminal oripconfigin Windows CMD.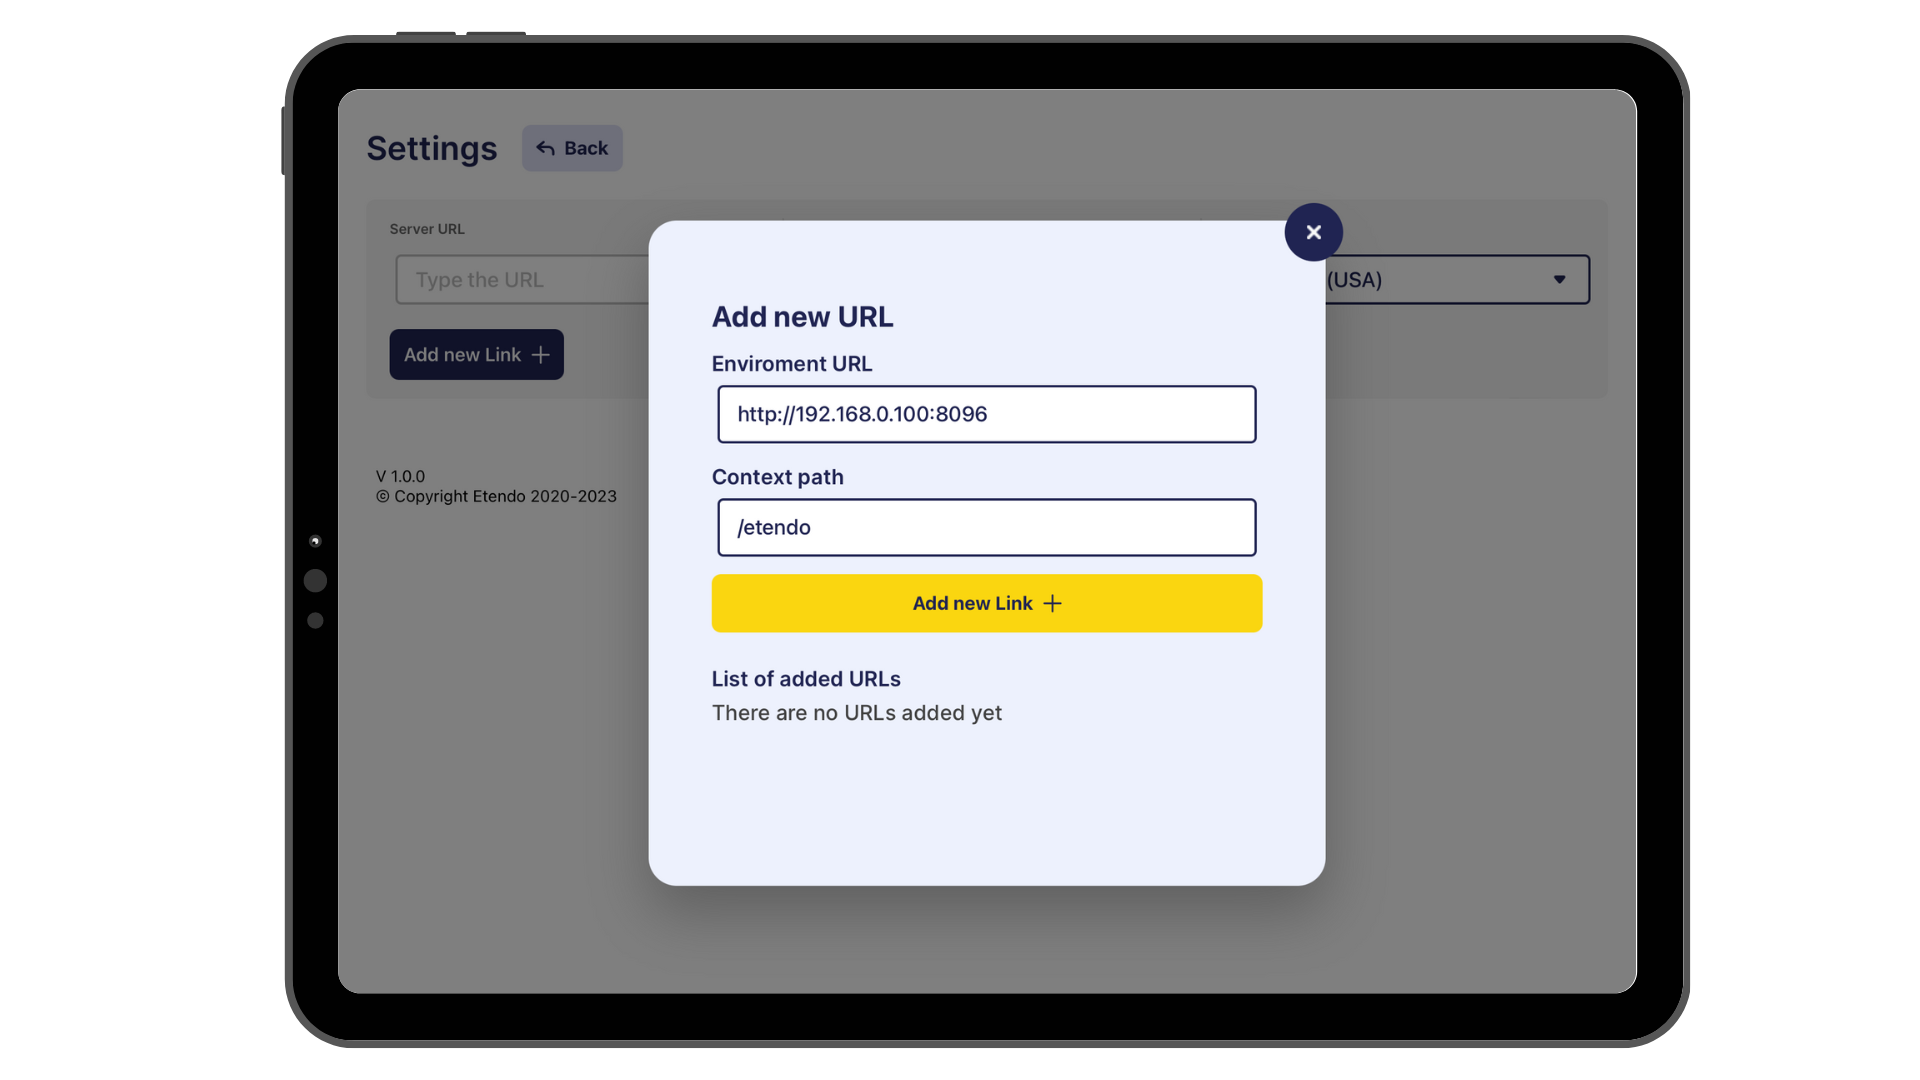
-
Login Etendo Mobile and you will see the list of subapps. Clicking on
Product Subappwill access to development mode app.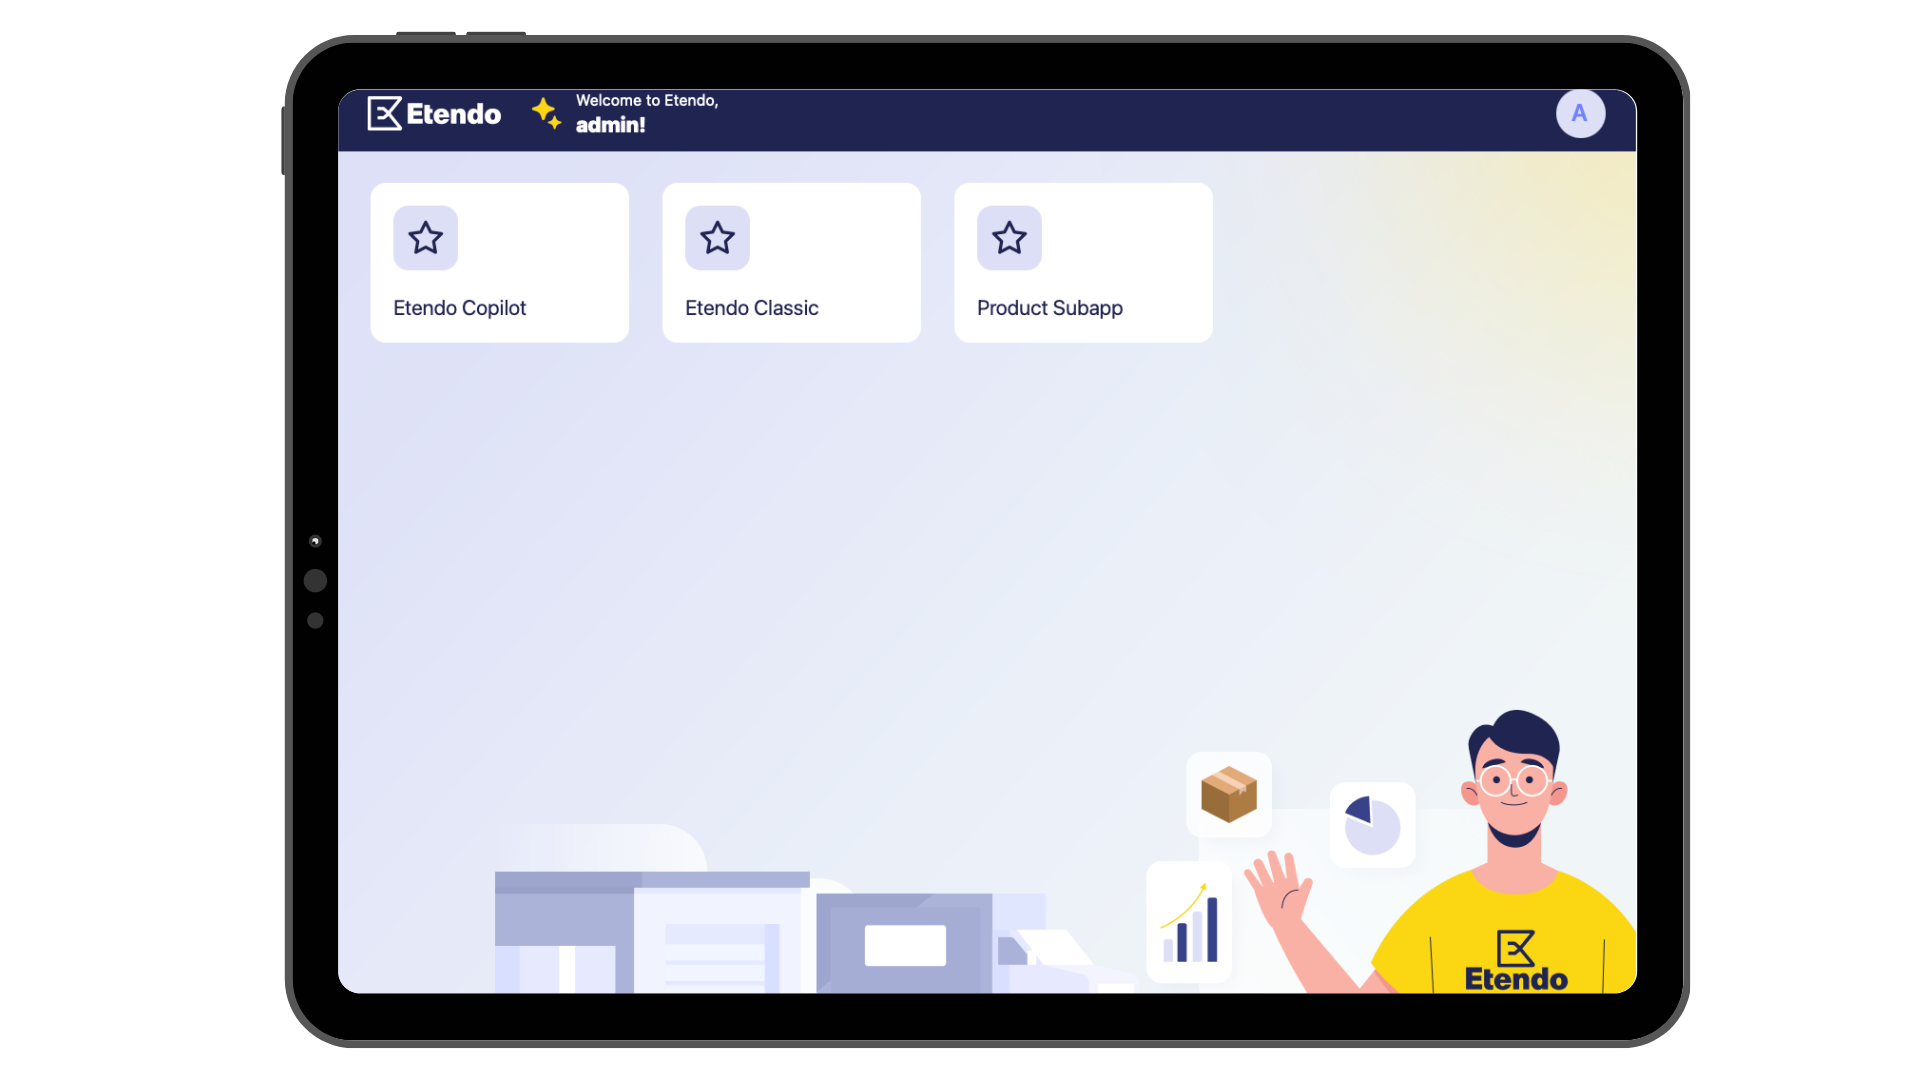
-
Now you can view, filter, create, edit and delete products.
Receiving Shared Files from Etendo Mobile
In this section, we will explain how to receive external files from another application into Etendo Mobile using as example the sub-application Documents Manager Subapp.
Important
Ensure that the Receive External Files checkbox is set to true in the Dynamic App window. This is crucial for the subapplication to appear as an option when sharing external files.
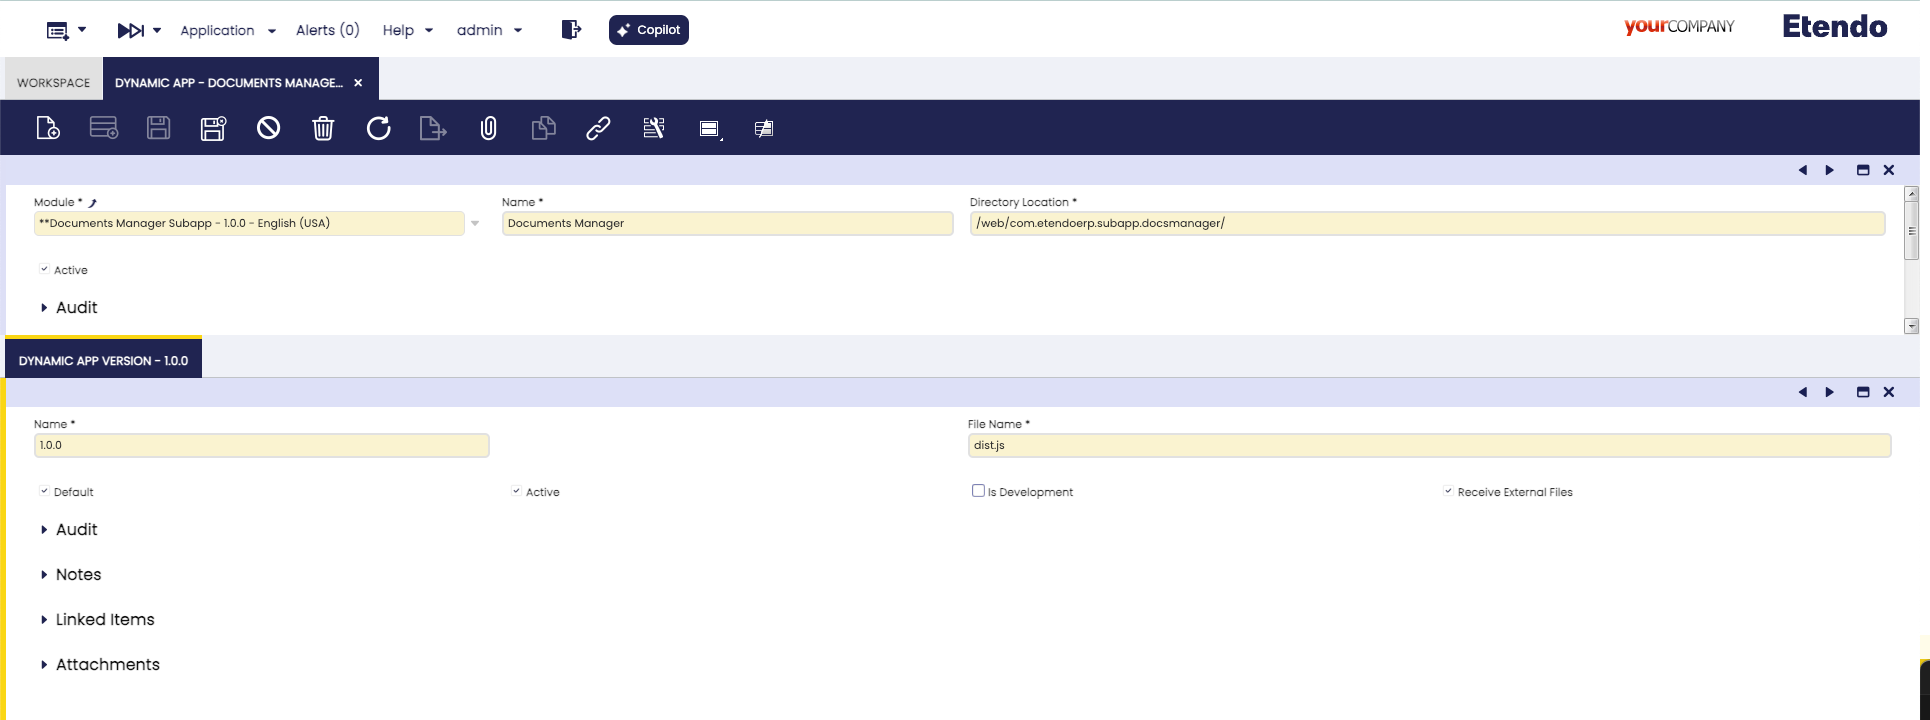
The sharedFiles parameter is passed to the subapplication and used to process the received files.
Info
For more information, visit the Documents Manager Subapp repository. There you will find an example su-application, and the explanation of how to implement the file sharing functionality in your own app.
Debug Log
This section explains how to log data in a sub-application using the logger utility function. To log any information, call the logger function with a key and a value:
Importing the Logger Function To use the logger in any file, import it as follows:
Automatic String Conversion
Objects passed to the logger function will be automatically converted to strings using the JSON.stringify function. This ensures compatibility with the logging mechanism.
Example Usage Below is an example of how to use the logger function, including handling errors:
try {
  // Your code here
} catch (err) {
  logger('Handle Error', err));
  showAlert(labels.connectionError, 'error');
}
- The error object
erris automatically converted to aStringusingJSON.stringifyand logged. - An alert is shown using
showAlertcomponent to inform the user of a connection error.
By integrating this logging utility, developers can track application behavior and debug more effectively.
This work is licensed under CC BY-SA 2.5 ES by Futit Services S.L.