Creating a New Microservice
Overview
This section provides a step-by-step guide for working with Etendo RX, which involves creating a new module with RX capabilities and building a Spring Boot project to consume orders making use of projections, repository and other JPA resources that we will create on our Etendo Classic.
Building a New Module for RX Capabilities
Note
Make sure to complete the Getting Started section in the developer guide to set up the Etendo Platform.
Accessing as Admin User
After setting the local environment up, as described in the install etendo development environment, we will need to log in to the system with administration permissions to create the new module, projections, repository, etc.
Log in to your account as an administrator. The default login credentials for this administrative account are:
- Username:
admin - Password:
admin
Once you are logged in, switch your role to System Administrator, as the image shows:
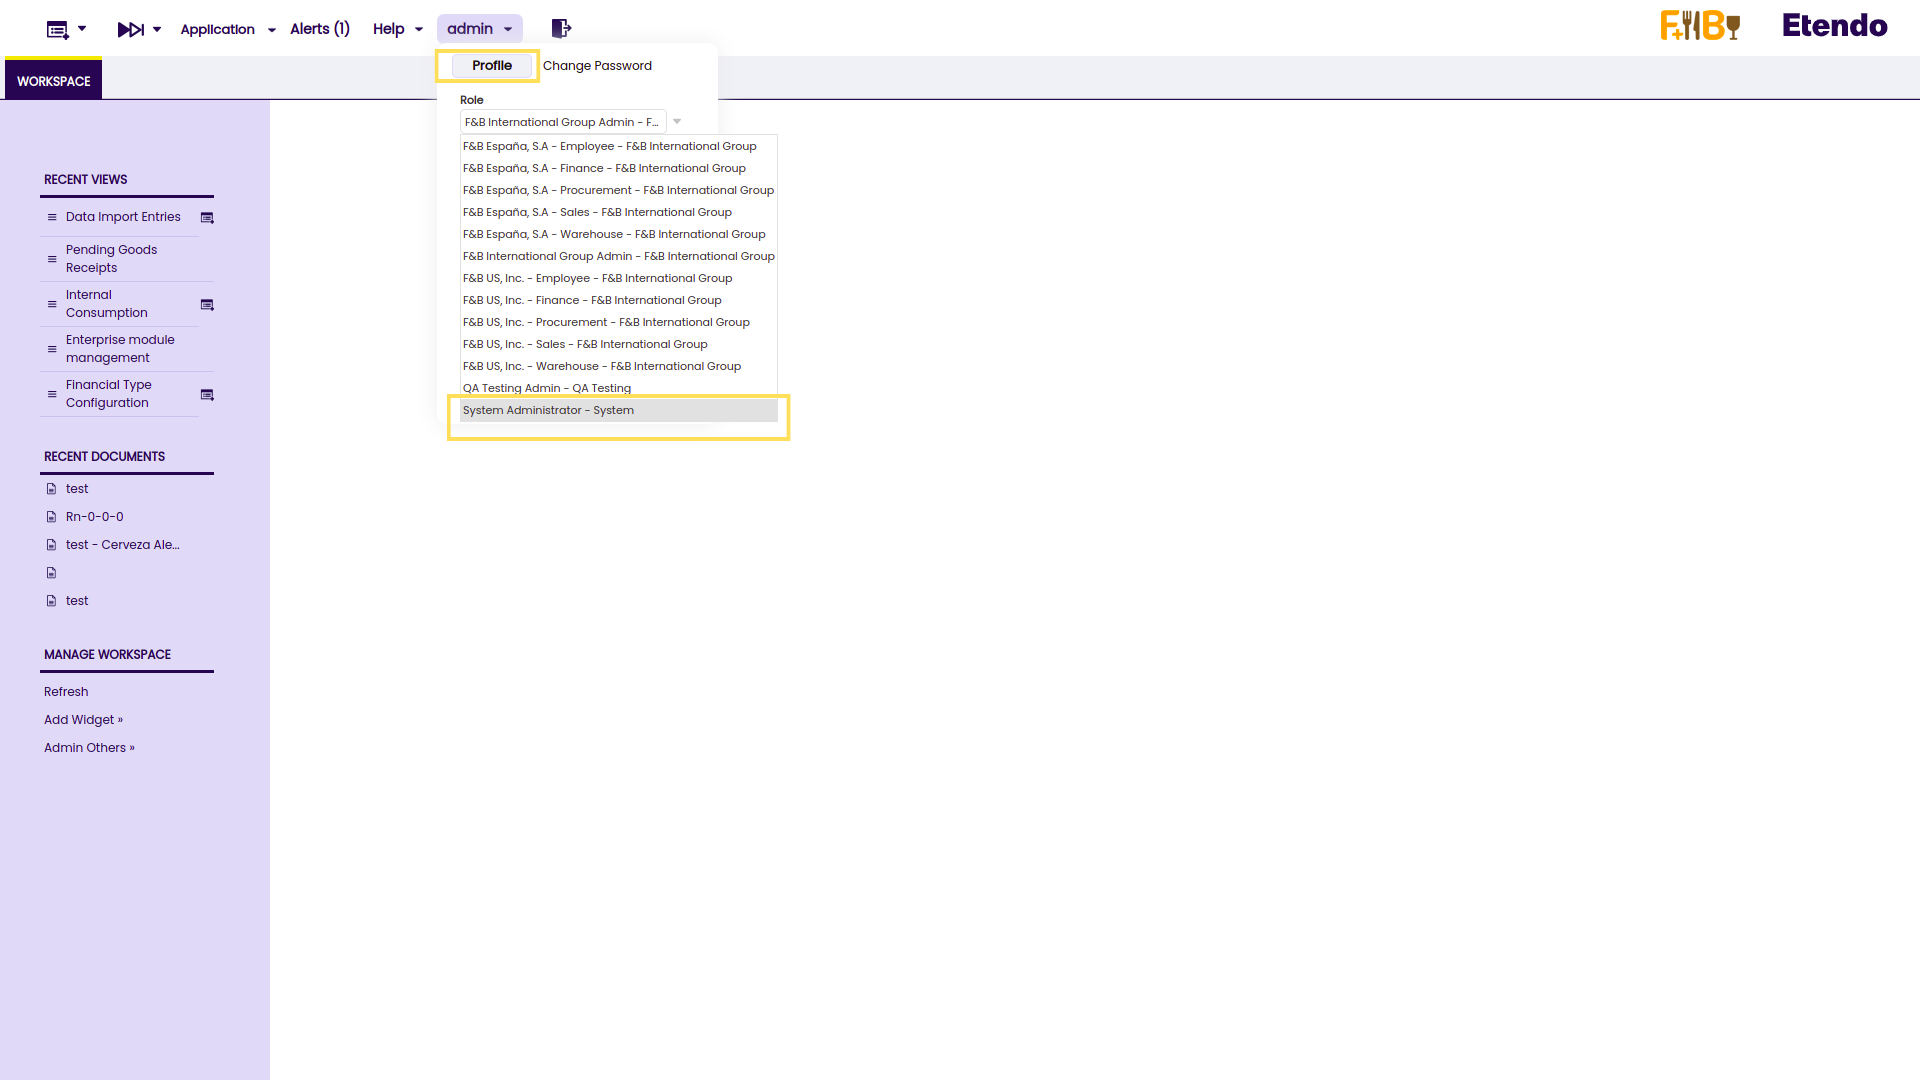
The System Administrator role allows us to access some windows and permission to create and manipulate the system to fulfill our needs.
Creating a New Module
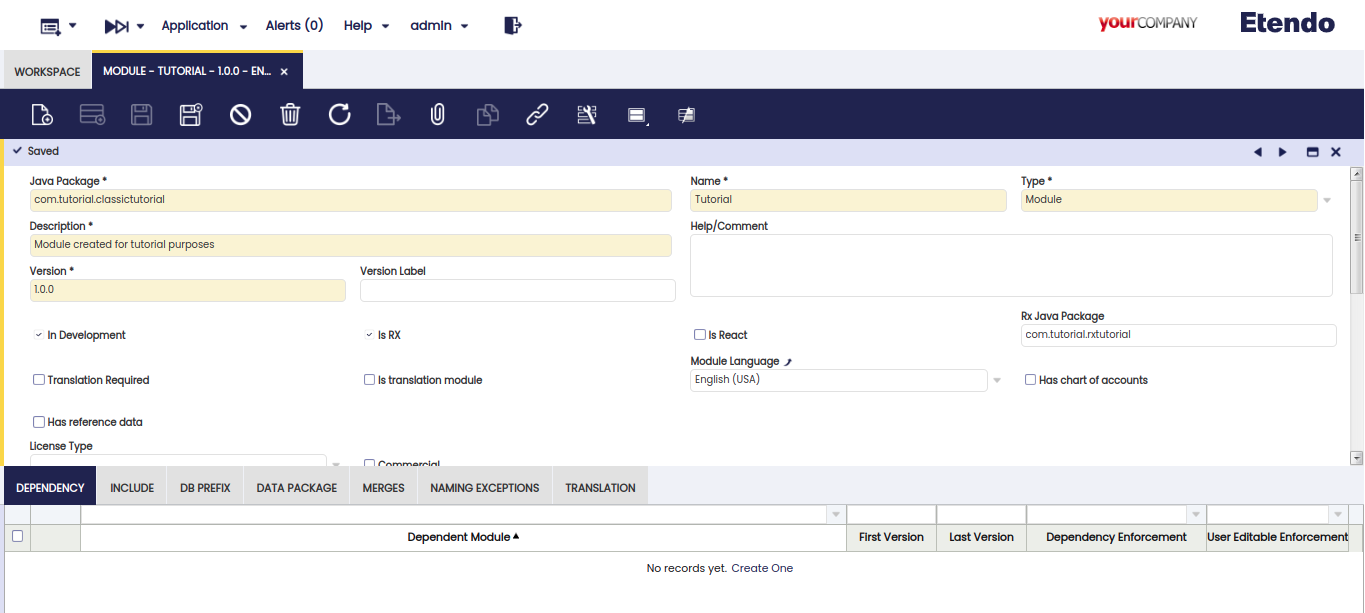
Now we will create a new module. It is a self-contained unit of code that performs a specific function and, in our case, it contains all the resources needed in this guide. To create a new module, go to the Module window, and add a new record providing the following information:
| Parameter | Value |
|---|---|
| Java Package | com.tutorial.classictutorial |
| Name | Tutorial |
| Description | Module created for tutorial purposes |
| Version | 1.0.0 |
| Is RX | True |
| Rx Java Package | com.tutorial.rxtutorial |
It should look like this:
With our new module created, we will start working with Projections.
Projection
When using Spring Data JPA to implement the persistence layer, the repository typically returns one or more instances of the root class. However, more often than not, we do not need all the properties of the returned objects.
In such cases, we might want to retrieve data as objects of customized types. These types reflect partial views of the root class, containing only the necessary properties. This is where projections come in handy.
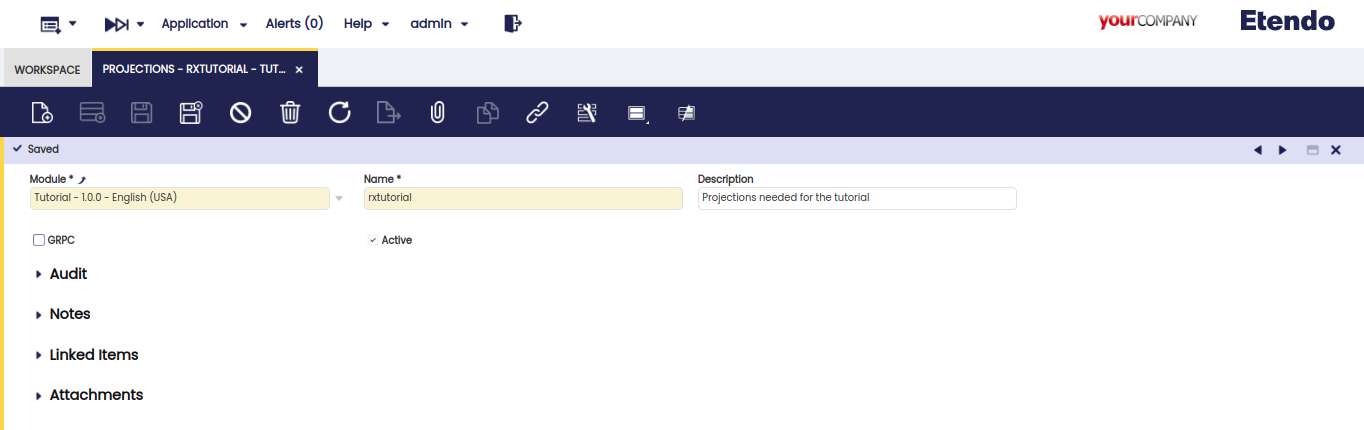
Start by opening Projections windows and creating a new projection with the following properties:
| Field | Value |
|---|---|
| Module | tutorial - 1.0.0 - English (USA) |
| Name | rxtutorial |
| Description | Projections needed for the tutorial |
Adding the projection to a table
As we create the projection, now we need to assign it to a table where we want to extract data. For this, open the Tables and Columns window and look for the Order table (as mentioned in the introduction, we want to consume orders).
Adding a Projection
Next, navigate to the Projections tab and add a new projection with the following value:
| Field | Value |
|---|---|
| Projection | rxtutorial - tutorial - 1.0.0 - English (USA) |

Adding Entity Fields
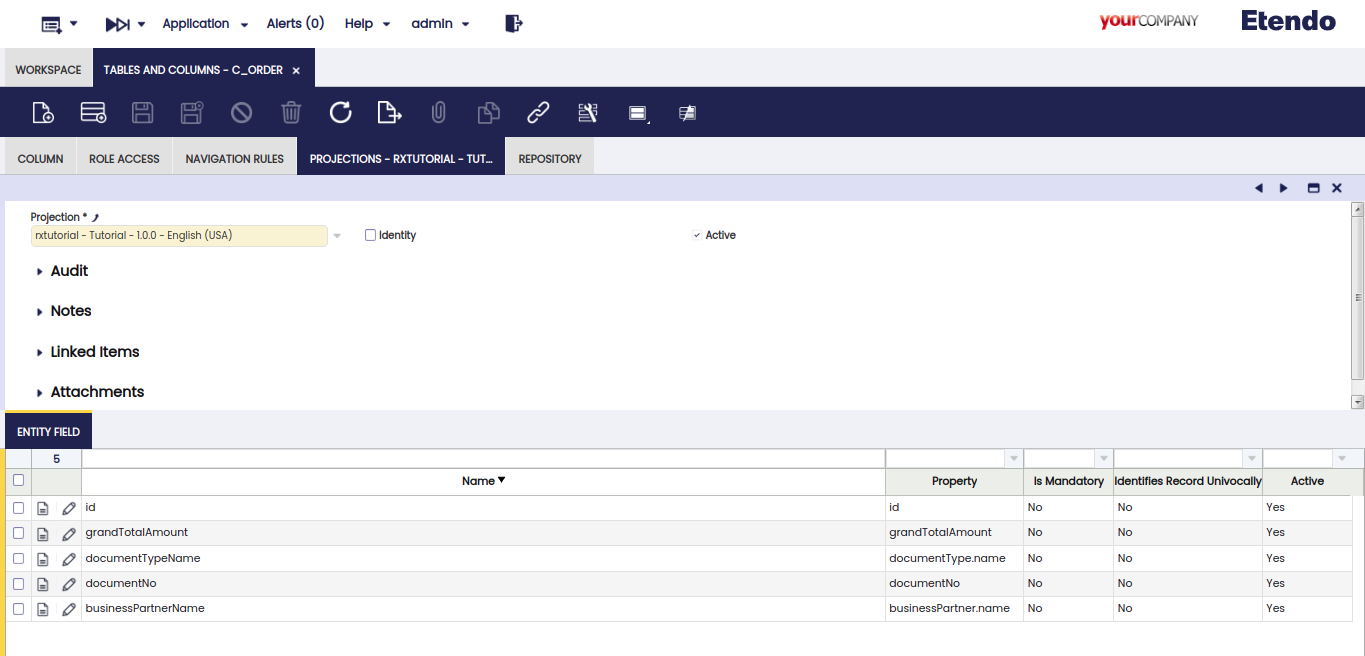
When a projection is created, we need to define which fields we want to retrieve. In our case, we will need the record ID, Business Partner name, Document No, Document Type name, and the Grand total. Under the Projection tab navigate to the Entity Field tab and add the following fields:
| Field Name | Property |
|---|---|
| id | id |
| businessPartnerName | businessPartner.name |
| documentNo | documentNo |
| documentTypeName | documentType.name |
| grandTotalAmount | grandTotalAmount |
Note
The Property field of this tab is handled with an Entity Mapping, this is like a Hibernate property. So, you can navigate the entities related from here. E.g. To get the Business Partner name, you can have it by accessing the entity businessPartner and then, adding the field that you want to filter, name in this case.
Repository
In Spring Data, a repository is an abstraction that provides the operations relative to a domain class to interact with a data store.
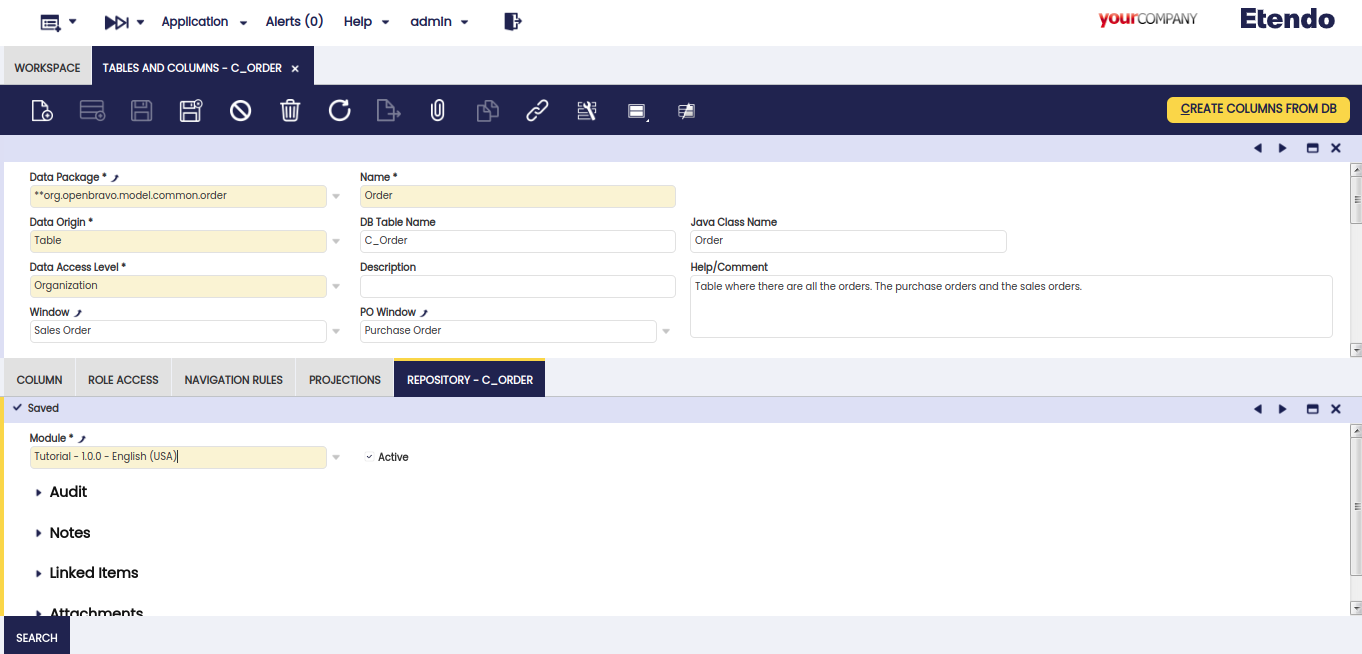
To create the repository for our purpose, and the same as we did for projections, we need to go to Tables and Columns and look for C_Order table.
Creating a New Repository
After selecting a table, in this case C_Order, we need to go to Repository tab and create a new record with the following values:
| Field | Value |
|---|---|
| Module | tutorial - 1.0.0 - English (USA) |
Search
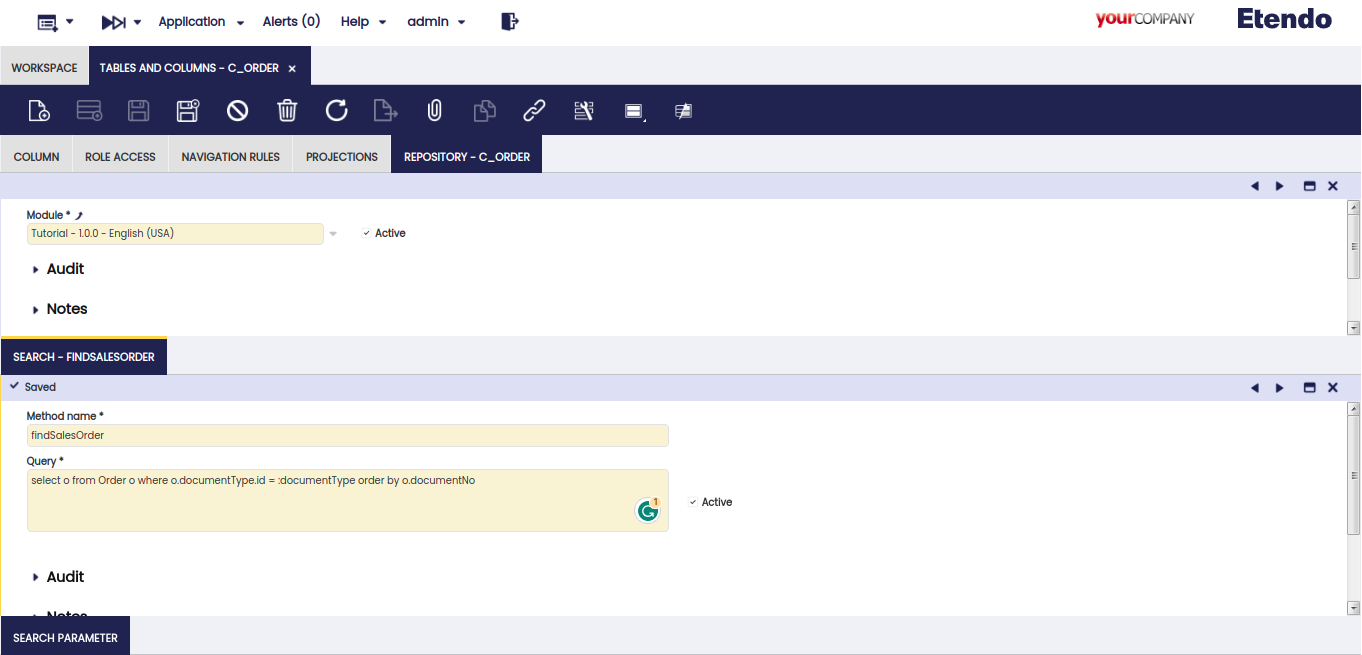
Creating a New Search
Next, we will define a search method to use later when we want to consume the orders. This query is taken as a filter for retrieving the orders.
To create this new filter/search method, under Repository tab of the C_Order table, create a new record with the following data:
| Field | Value |
|---|---|
| Method Name | findSalesOrder |
| Query | select o from Order o where o.documentType.id = :documentType order by o.documentNo |
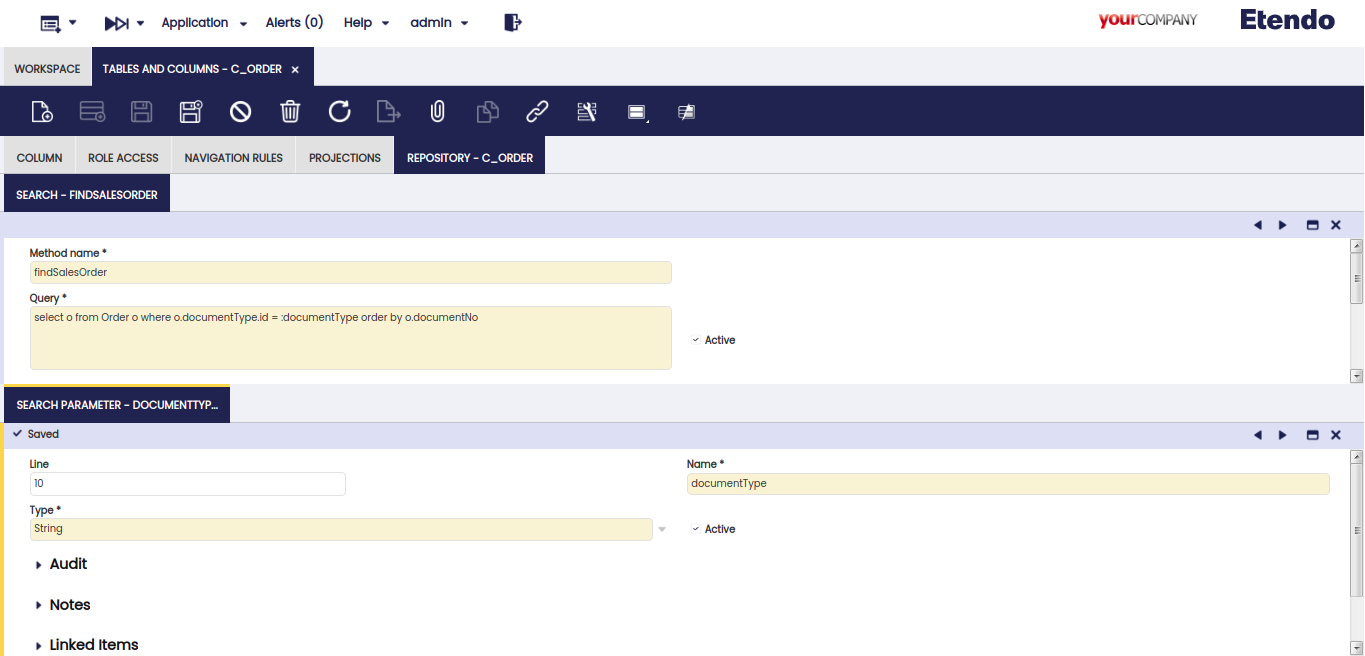
Creating a New Search Parameter
As you can see in the query above, we use a parameter called :documentType.
We can add this type of parameter to use it later by adding a corresponding value to it and filtering depending on the current needs.
To define the parameter, we need to create a new row on the Search Parameter tab of the Search tab. Fill it with the following settings:
| Field | Value |
|---|---|
| Line | 10 |
| Name | documentType |
| Type | String |
In our case, we will filter depending on the Document Type of the orders.
Creating a New Spring Boot Project
Now that we have declared the projection, fields, repository, and searches on Etendo Classic, we will need to create a new spring project to make use of these JPA resources that we have created just before. Next, you will find the steps to create the Spring Boot project and add it as a module on Etendo RX.
Project Creation
- Visit Spring Initializr to start your project setup.
-
Fill in the following details:
Field Value Project Gradle Project Language Java Spring Boot 2.7.15 (or latest 2.7.x version) Project Metadata
Field Value Group com.tutorial Artifact rxtutorial Name rxtutorial Description Etendo RX tutorial project Package Name com.tutorial.rxtutorial Packaging Jar Java Version 11 -
Add the following dependencies: Spring Web, Lombok, Config Client
-
Click on the Generate button to download your project. The page will generate a file named
rxtutorial.zip.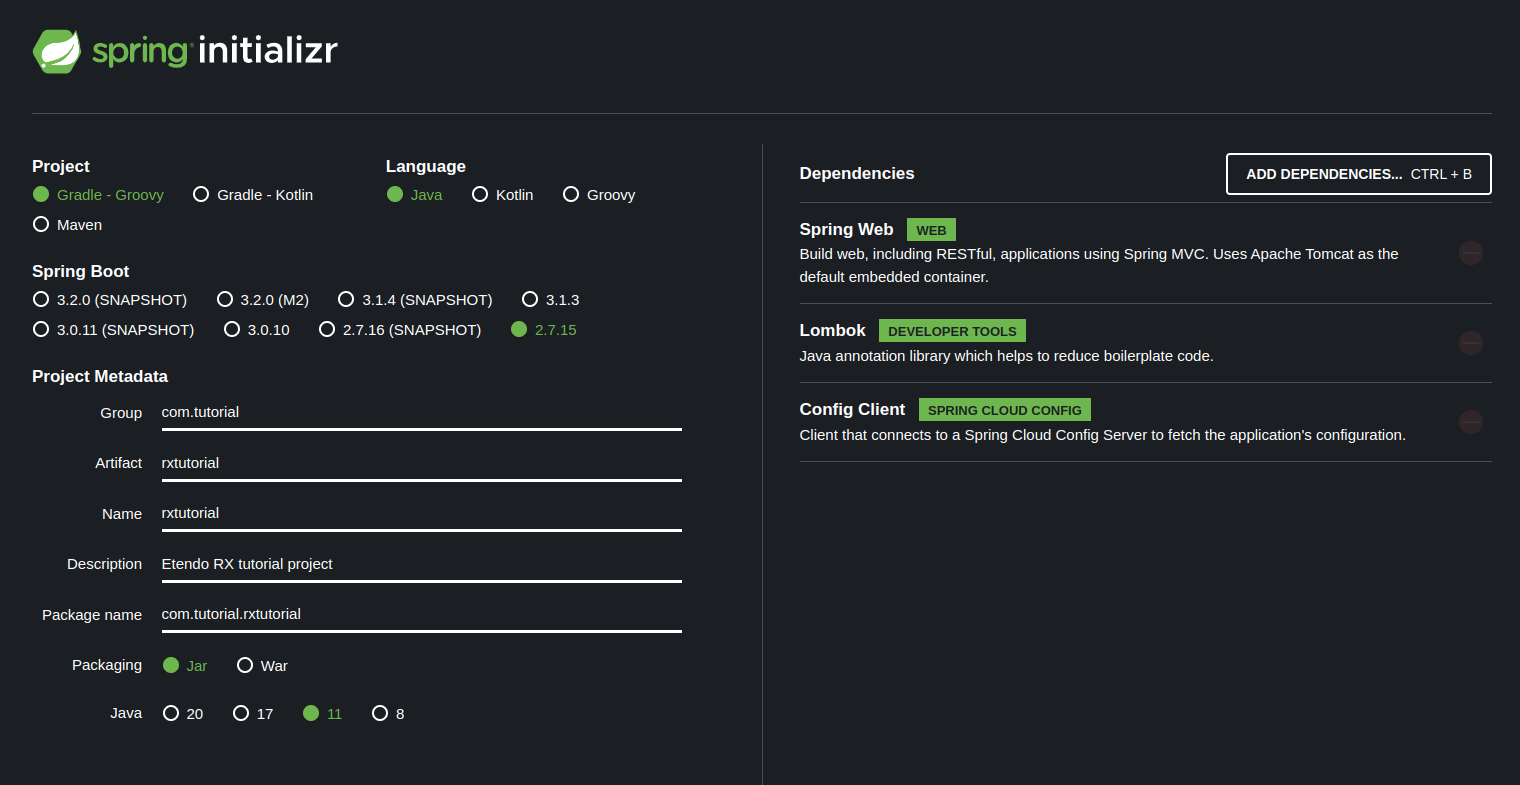
-
Uncompress the zip file to the platform project created in the first step, as:
modules_rx/com.tutorial.rxtutorial.
Info
Remember to create the com.tutorial.rxtutorial folder, inside of modules_rx before extract it.
Project Configuration
After creating the project, we need to add some configuration in order to work with Etendo Classic.
Modify build.gradle File
Remove version of spring plugins:
plugins {
    ...
    id 'org.springframework.boot' version '2.7.14'
    id 'io.spring.dependency-management' version '1.0.15.RELEASE'
}
Change it to this:
Gradle will get versions from the Etendo Platform project.
Add the following dependencies in the dependencies section:
implementation 'org.springframework.cloud:spring-cloud-starter-openfeign'
implementation 'org.springframework.boot:spring-boot-starter-hateoas'
implementation 'com.etendorx:clientrest_core:latest.integration'
Add the Etendo repository:
repositories {
    mavenCentral()
    maven {
        url = "https://maven.pkg.github.com/etendosoftware/etendo_rx"
        credentials {
            username = "${githubUser}"
            password = "${githubToken}"
        }
    }
}
Note
githubUser and githubToken were configured in the first step.
Add custom source set:
After configuring the project, we will need to generate the proper files for RX. RX generate.entities task will generate java files in thesrc-gen directory.
Execute rx:generate.entities task to do so.
Configuring a Spring Boot Project
Now we will configure the new spring boot project to define how it will run.
Updating the application.properties file
Modify your application.properties file, under the new spring boot project created on the previous steps, with the following configurations:
config.server.url=http://localhost:8888
spring.config.import=configserver:${config.server.url}
spring.application.name=rxtutorial
server.port=8101
token=
The token is empty, but now we will generate a new one.
Adding the token value
To generate the token value we need to follow these steps:
- As System Administrator role on Etendo Classic, go to RX Services window.
-
Create a new row with the following values:
Field Name Property Searchkey Tutorial Secret 123 Module Tutorial - 1.0.0 - English (USA) 
-
Change to F&B International Group Admin role.
- Go to User window.
-
Choose a user, e.g. F&B ES User
Info
Change the password for this record, you will need it later. Also, check that the user is active.
-
In the tab RX Services Access create a new row and fill it with the following values:
Field Name Property Organization * RX Services Tutorial Default Role F&B España, S.A - Sales Default Org F&B España, S.A 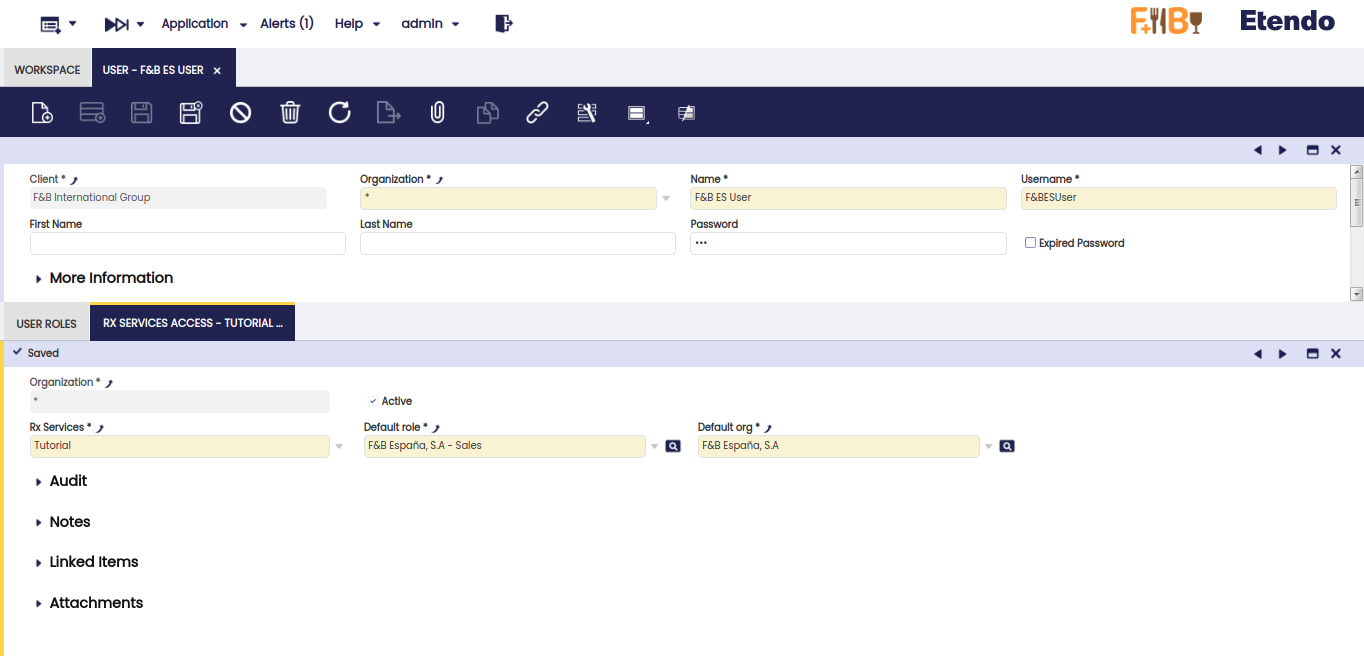
-
Let's run RX so we can make the request to the Auth service:
-
Open Postman and we will make an authenticate request.
Verbose: POST
URL: http://localhost:8094/api/authenticate
Body:
{
  "username":"F&BESUser",
  "password":"EtendoAdmin1",
  "service":"Tutorial",
  "secret":"123"
}
Warning
Remember the password changed before.
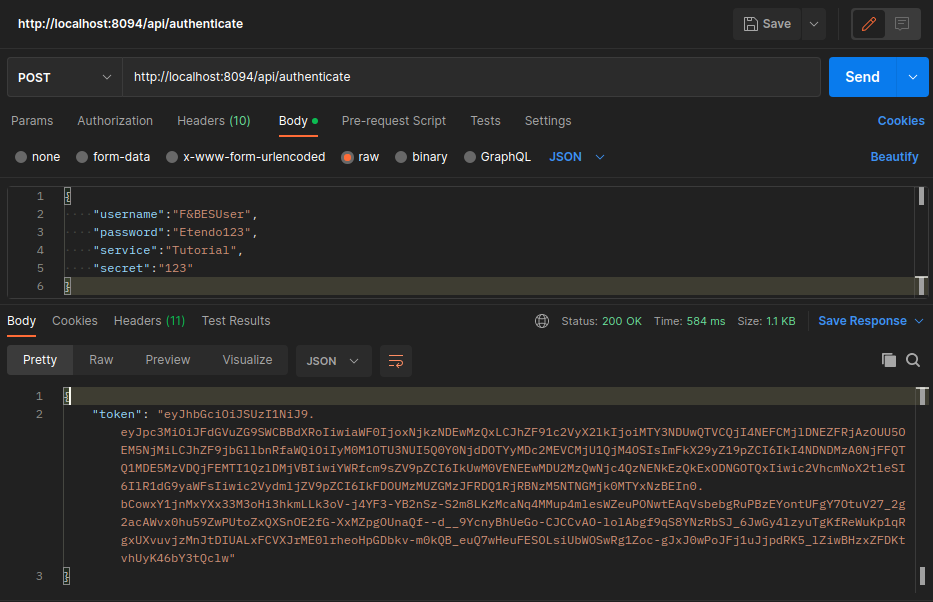
-
Take the token under the response and fill in the token property on the
application.propertiesof the tutorial module.
Adding Component Scan Annotation to the Application Class
To scan your application for annotated components, add the @ComponentScan annotation to your Application class with the necessary base packages:
Info
The path to the application class, in this case, is: modules_rx/com.tutorial.rxtutorial/src/main/java/com/tutorial/rxtutorial/RxtutorialApplication.java
Warning
Remember to add the import for ComponentScan annotation:
Hence, your Application class should look like:
package com.tutorial.rxtutorial;
import org.springframework.boot.SpringApplication;
import org.springframework.boot.autoconfigure.SpringBootApplication;
import org.springframework.context.annotation.ComponentScan;
@SpringBootApplication
@ComponentScan({
    "com.tutorial.rxtutorial",
    "com.etendorx.clientrest.base",
})
public class RxtutorialApplication {
public static void main(String[] args) {
SpringApplication.run(RxtutorialApplication.class, args);
}
}
Creating a New Spring Boot Service
In this last step before launching the microservice, we will create the logic to consume the orders using the projection and all the JPA resources that we defined in the previous steps. Follow the instructions below to create a new service:
-
Create a new file at the following path:
-
Then, copy and paste the following code into the file:
package com.tutorial.rxtutorial;

import org.springframework.beans.factory.annotation.Autowired;
import org.springframework.web.bind.annotation.GetMapping;
import org.springframework.web.bind.annotation.RequestMapping;
import org.springframework.web.bind.annotation.RestController;

import com.etendorx.clientrest.base.RestUtils;
import com.etendorx.clientrest.base.RestUtilsException;
import com.tutorial.rxtutorial.entities.org.openbravo.model.common.order.OrderRxtutorialModel;

@RestController
@RequestMapping(path = "/api")
public class RxtutorialService {
  @Autowired
  RestUtils restUtils;

  @GetMapping(path = "/")
  public String get() throws RestUtilsException {
    String url = "/Order/search/findSalesOrder?documentType=AB22CE8FFA5E4AF29F2AC90FCDD400D8&projection=rxtutorial";
    var orders = restUtils.getList(url, OrderRxtutorialModel.class);
    StringBuilder html = new StringBuilder("<html>");
    html.append("<head>");
    html.append("<style type=\"text/css\">html {font-family: sans-serif;}</style>");
    html.append("</head>");
    html.append("<title>Orders</title></head>");
    html.append("<body>");
    html.append("<h2>Orders</h2>");
    html.append("<table>");
    for (OrderRxtutorialModel o : orders) {
      html.append(
          "<tr>" +
              "<td>" + o.getDocumentNo() + "</td>" +
              "<td>" + o.getBusinessPartnerName() + "</td>" +
              "<td>" + o.getDocumentTypeName() + "</td>" +
              "<td>" + o.getGrandTotalAmount() + "</td>" +
              "</tr>"
      );
    }
    html.append("</table></body></html>");
    return html.toString();
  }
}
This file will display a simple HTML page with the retrieved orders. But first, we will take a look at the class that we just created.
This URL is the one that the process will use to consume the service, as you can see, we add here the Search filter that we created before and give it the document type parameter, with one document type id of the order that we will filter. Also, we are adding the projection to use too, same as before, it is the one created before.String url = "/Order/search/findSalesOrder?documentType=AB22CE8FFA5E4AF29F2AC90FCDD400D8&projection=rxtutorial";The orders variable will store all the orders that will be filtered with our request, as you can see, the method
getListreceives two parameters, the first one is the URL that we will use to make the request, and the second one is the model class of the retrieved object. -
Then, we simply create a StringBuilder as an HTML page that will be shown on the browser.
Run RX Services
To simplify RX executions you have a simplified run task:
Warning
Remember to configure the Auth service as described on the Getting Started page.
Run tutorial project
Now we are able to run our new microservice. For that, execute the following task:
Open your browser and you can view the generated page with the following URL: http://localhost:8101/api/
Success
You have successfully created a fully working RX service.
This work is licensed under CC BY-SA 2.5 ES by Futit Services S.L.