Remittance
Application > Financial Management > Receivables and Payables > Transactions > Remittance
Info
To be able to include this functionality, the Financial Extensions Bundle must be installed. To do that, follow the instructions from the marketplace: Financial Extensions Bundle. For more information about the available versions, core compatibility and new features, visit Financial Extensions - Release notes.
Overview
In the Remittance window, the user is able to create remittances to manage payments in or out to customers or suppliers.
A remittance is a group of payments (in/out) or orders/invoices which can be remitted to the bank for its payment. The bank will then manage either the collection of the money from the customers or the payment to the vendors/suppliers.
Configuration
To be able to use this functionality, it is necessary to configure some aspects first.
-
Remittance Dataset: it is necessary to install the Remittance dataset before using the Remittance window.
For this, go to the Enterprise Module Management window and select the corresponding dataset as shown below.

Info
For more information, visit Enterprise Module Management.
-
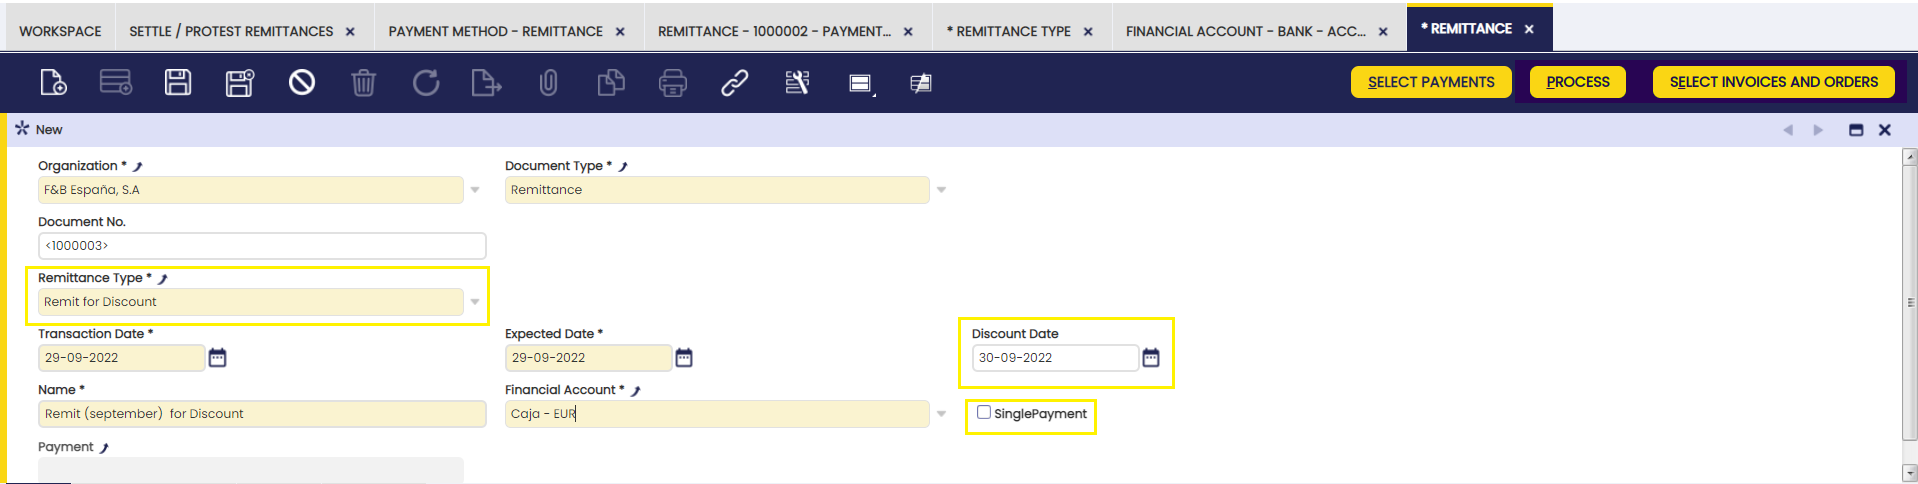
Remittance Type: It is necessary to define a remittance type with a certain payment method in the Remittance Type window.
Info
For more information, visit Remittance Type window.
-
Business Partner default bank account: For each business partner, it is possible to define a bank account that is selected by default each time creating a remittance is necessary.
Info
To read more, visit Bank Account in the Business Partner section.
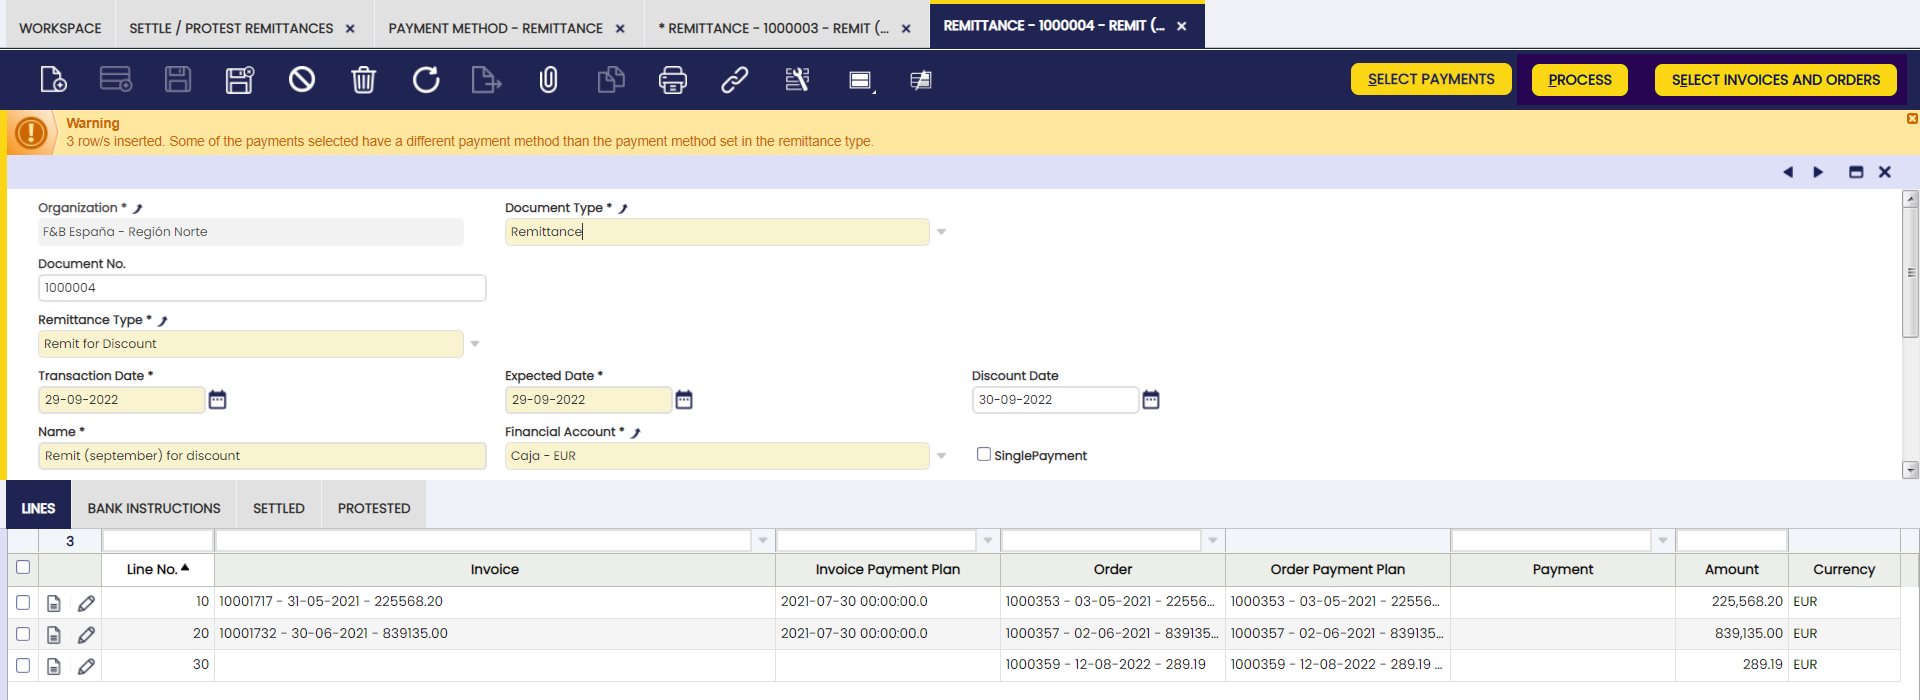
Remittance window
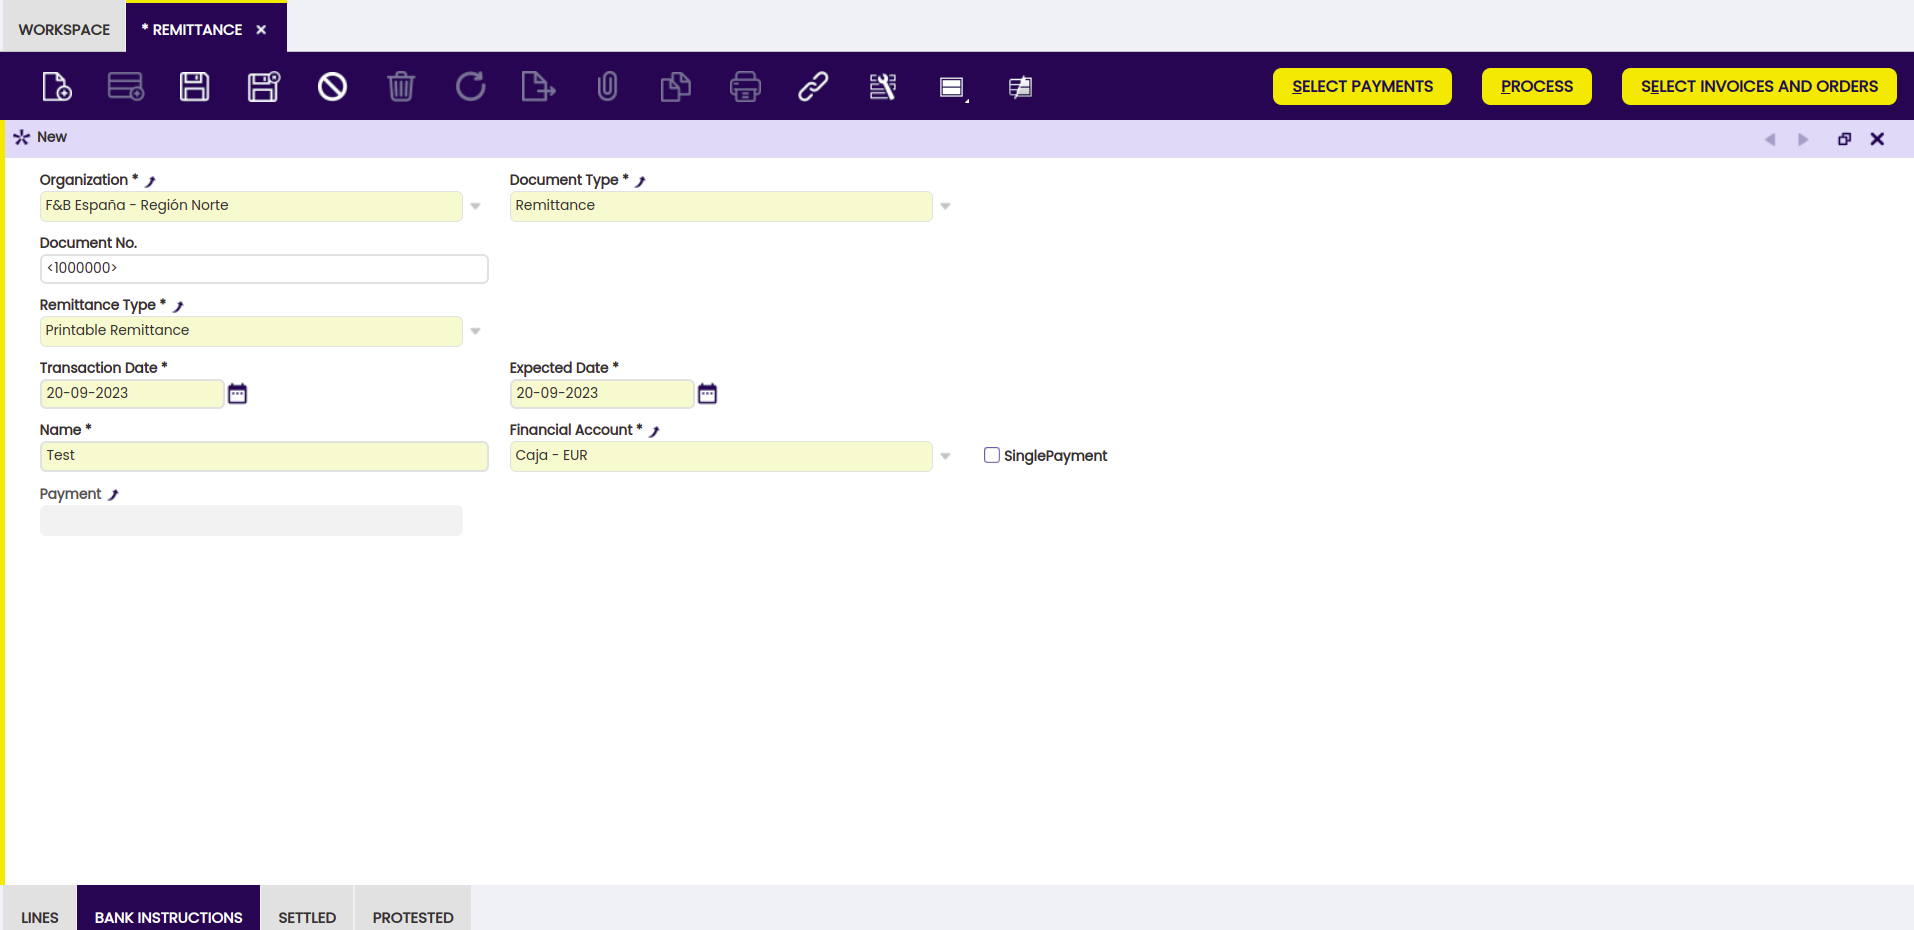
As shown in the image above, it is necessary to fill in the fields in the window and different buttons appear so as to continue with the process.
Buttons
Select Payments
Using this button, the user is able to select a payment to be included in the remittance.
Process
Using this button, the user processes the payments and groups lines according to the options shown in its corresponding pop-up window.
Info
If the Automated Remittance module in the Financial Extensions Bundle is installed, this process includes the date setting and the settlement of the remittance. For more information, visit the Automated Remittance user guide.
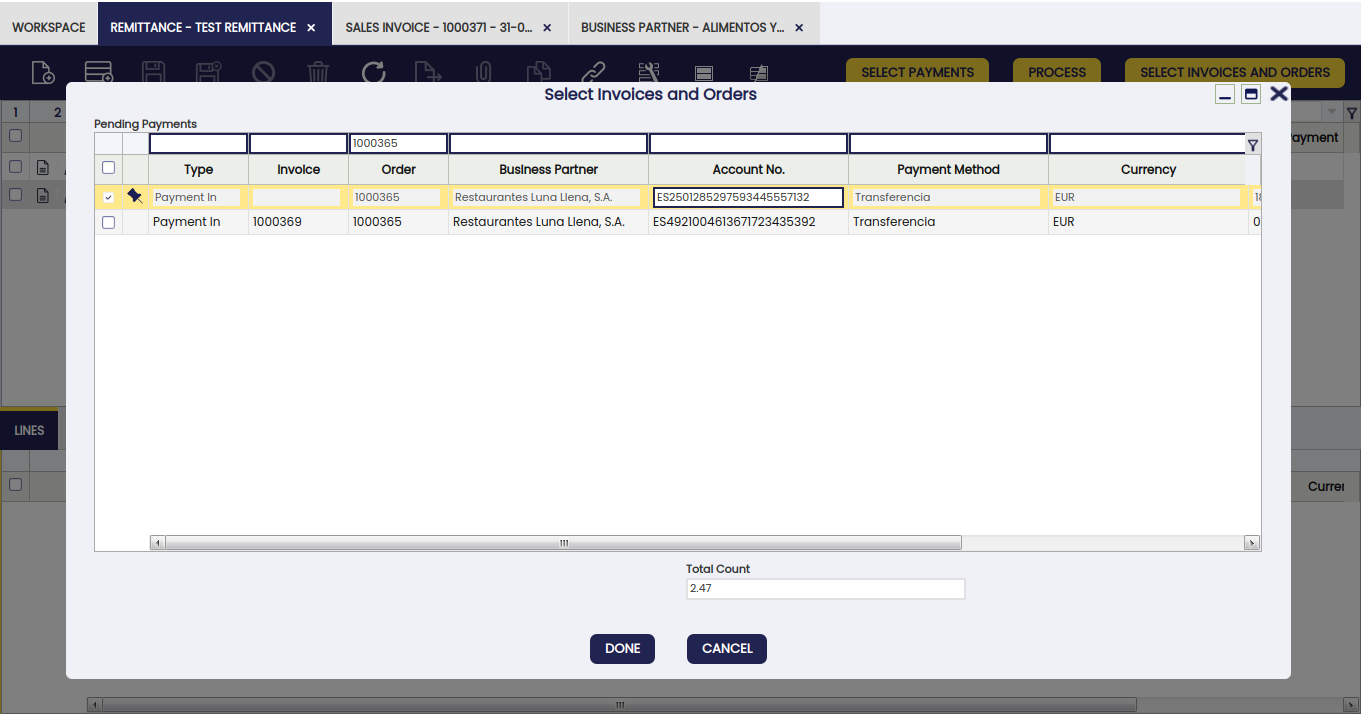
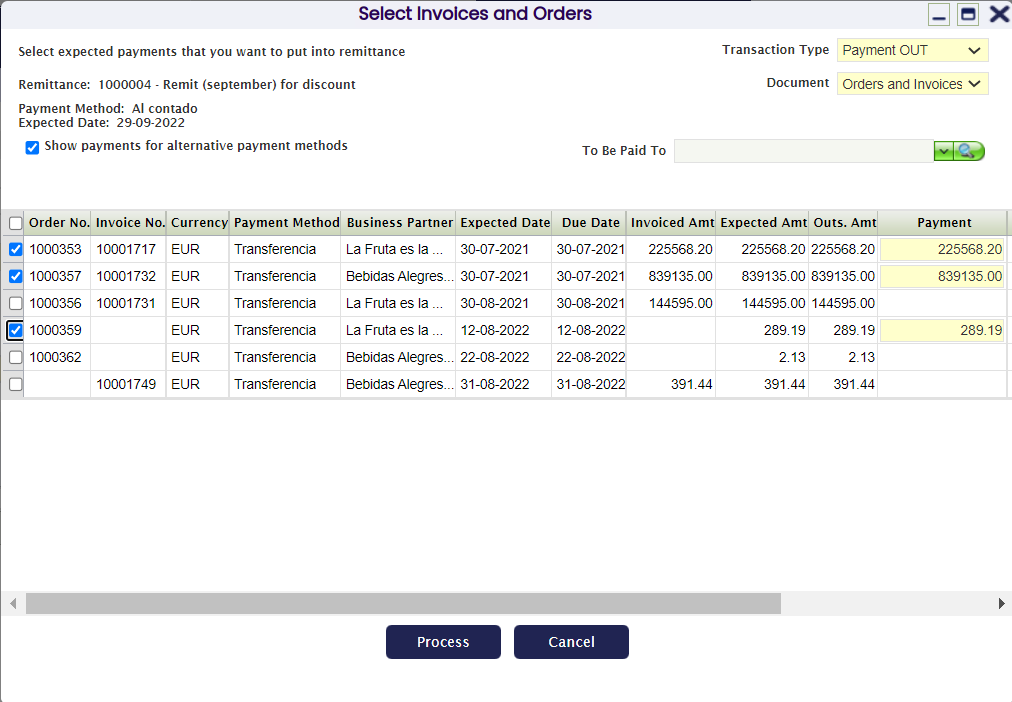
Select Invoices and Orders
In the Remittance window, the select invoices and orders button is shown. With this button, the user is able to select not only invoices, but also orders to include in the remittance. In the pop-up window shown when this button is clicked, the user can order and filter each column, payments in and out are shown at the same time and, orders and invoices are shown together.
Protest Remittance
Info
This button is only available if the Automated Remittance module in the Financial Extensions Bundle is installed. To install it, follow the instructions from the marketplace: Financial Extensions Bundle.
The Protest Remittance button allows the automatic protest of remittances. This function facilitates the management of protests and the re-settlement of future remittances.
Info
For more information, visit the Automated Remittance user guide.
Types of Remittances
There are two types of remittances:
Non-Discount Remittances: orders/invoices and purchases and/or payments (in/out) are grouped in a remittance that is sent to the bank to be managed.
- The remittance generates a series of payments according to the grouping required by the user (by business partner, due date, among others). The bank usually charges a certain amount for the management of each of these payments, hence the attempt to group them.
- The bank deducts the amount of the remittance from the financial account at the time the remittance is sent, taking care of managing the payments.
Remittances for Discount: sales orders/invoices and/or payments are grouped in a remittance that is sent to the bank. The bank advances the amount of the remittance and then manages it itself.
- The remittance generates as many payments (in/out) as those incorporated in the remittance plus one for the global amount, which is the one that is taken to the financial account due to the advance of such amount.
- The bank informs of the payments (in/out) that have been settled (normally, if in one month the bank does not respond, these payments are considered settled) and of those that have been protested.
To create a Non-Discount remittance follow these steps:
-
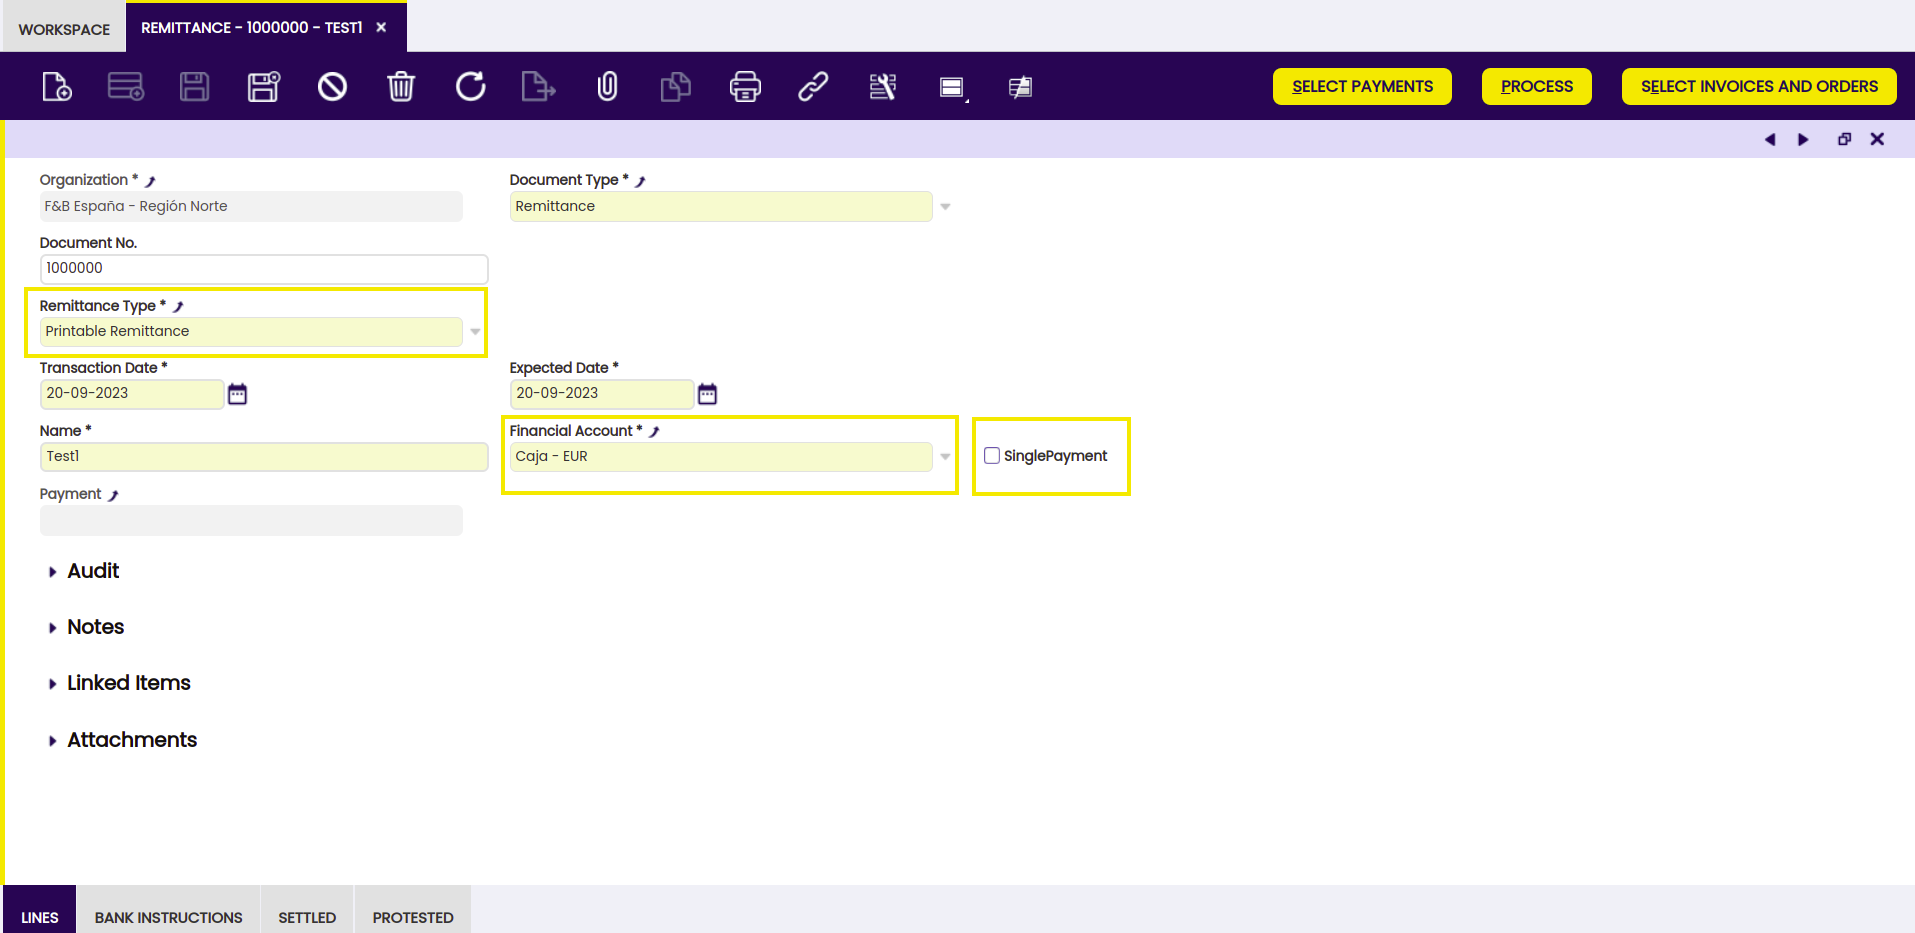
Add a new remittance to the Remittance window and select "printable Remittance" as remittance type since it indicates it is a non-discount remittance.
-
By clicking the "Select Invoices and Orders" button, the system displays a pop up with, by default, the "Show collections/payments for alternative payment methods" selector unchecked, displaying only invoices that have Remittance payment method. By checking this checkbox, the system shows all the invoices and orders pending to be taken to the bank. Select those operations needed to remit and process.

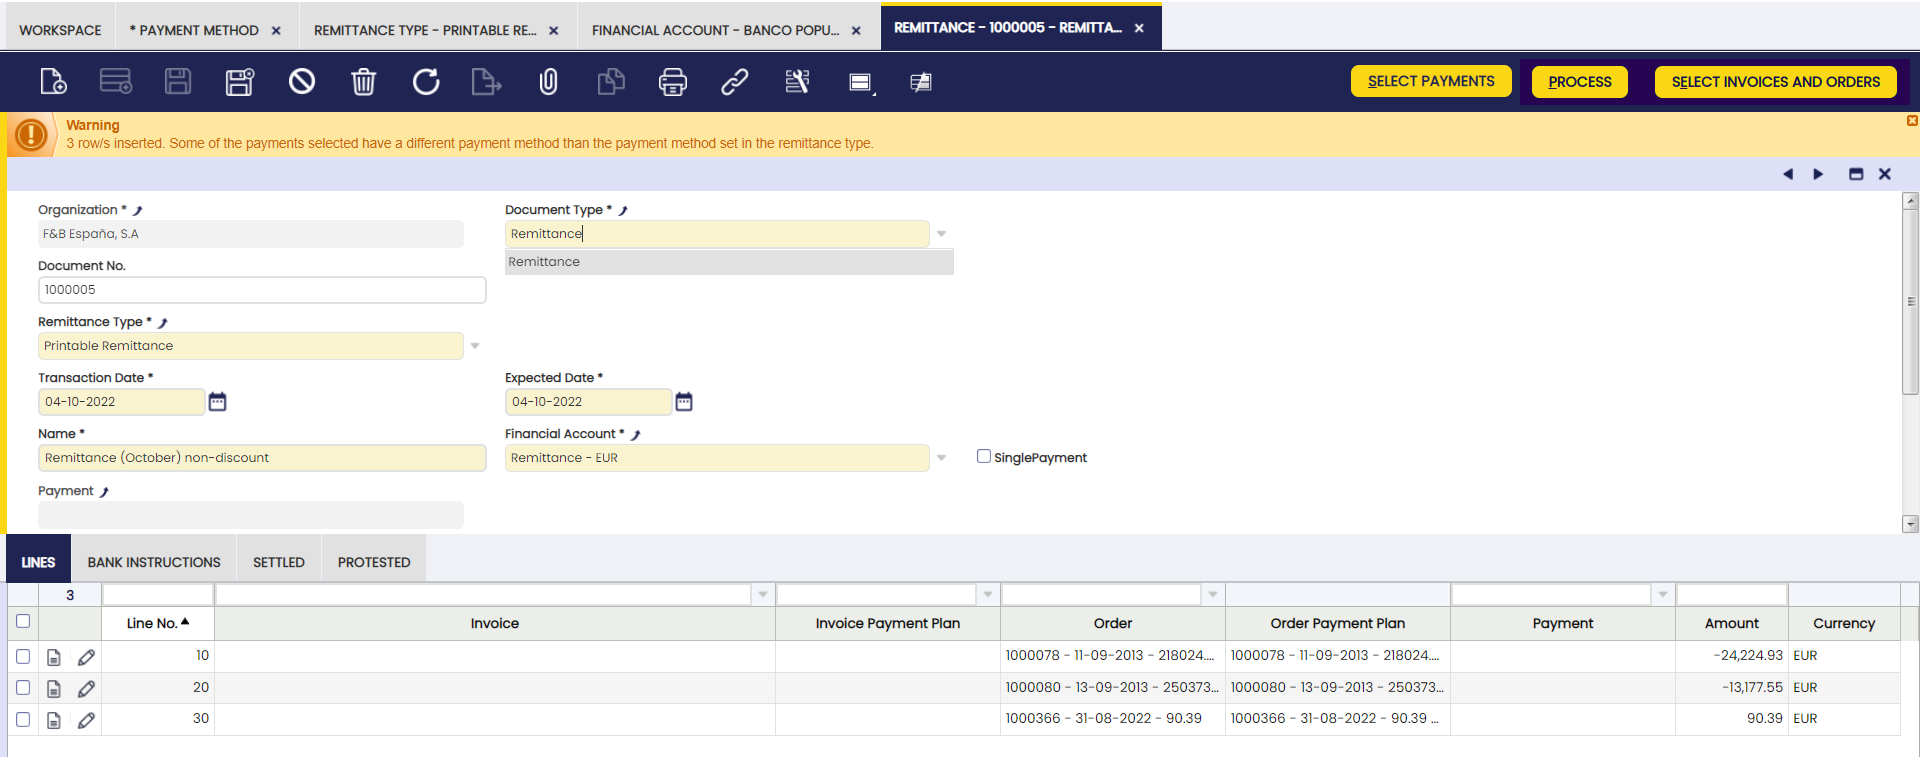
So the system inserts the selected lines:
-
If no further operations to the remittance are to be added, process the payment clicking the "Process" button.
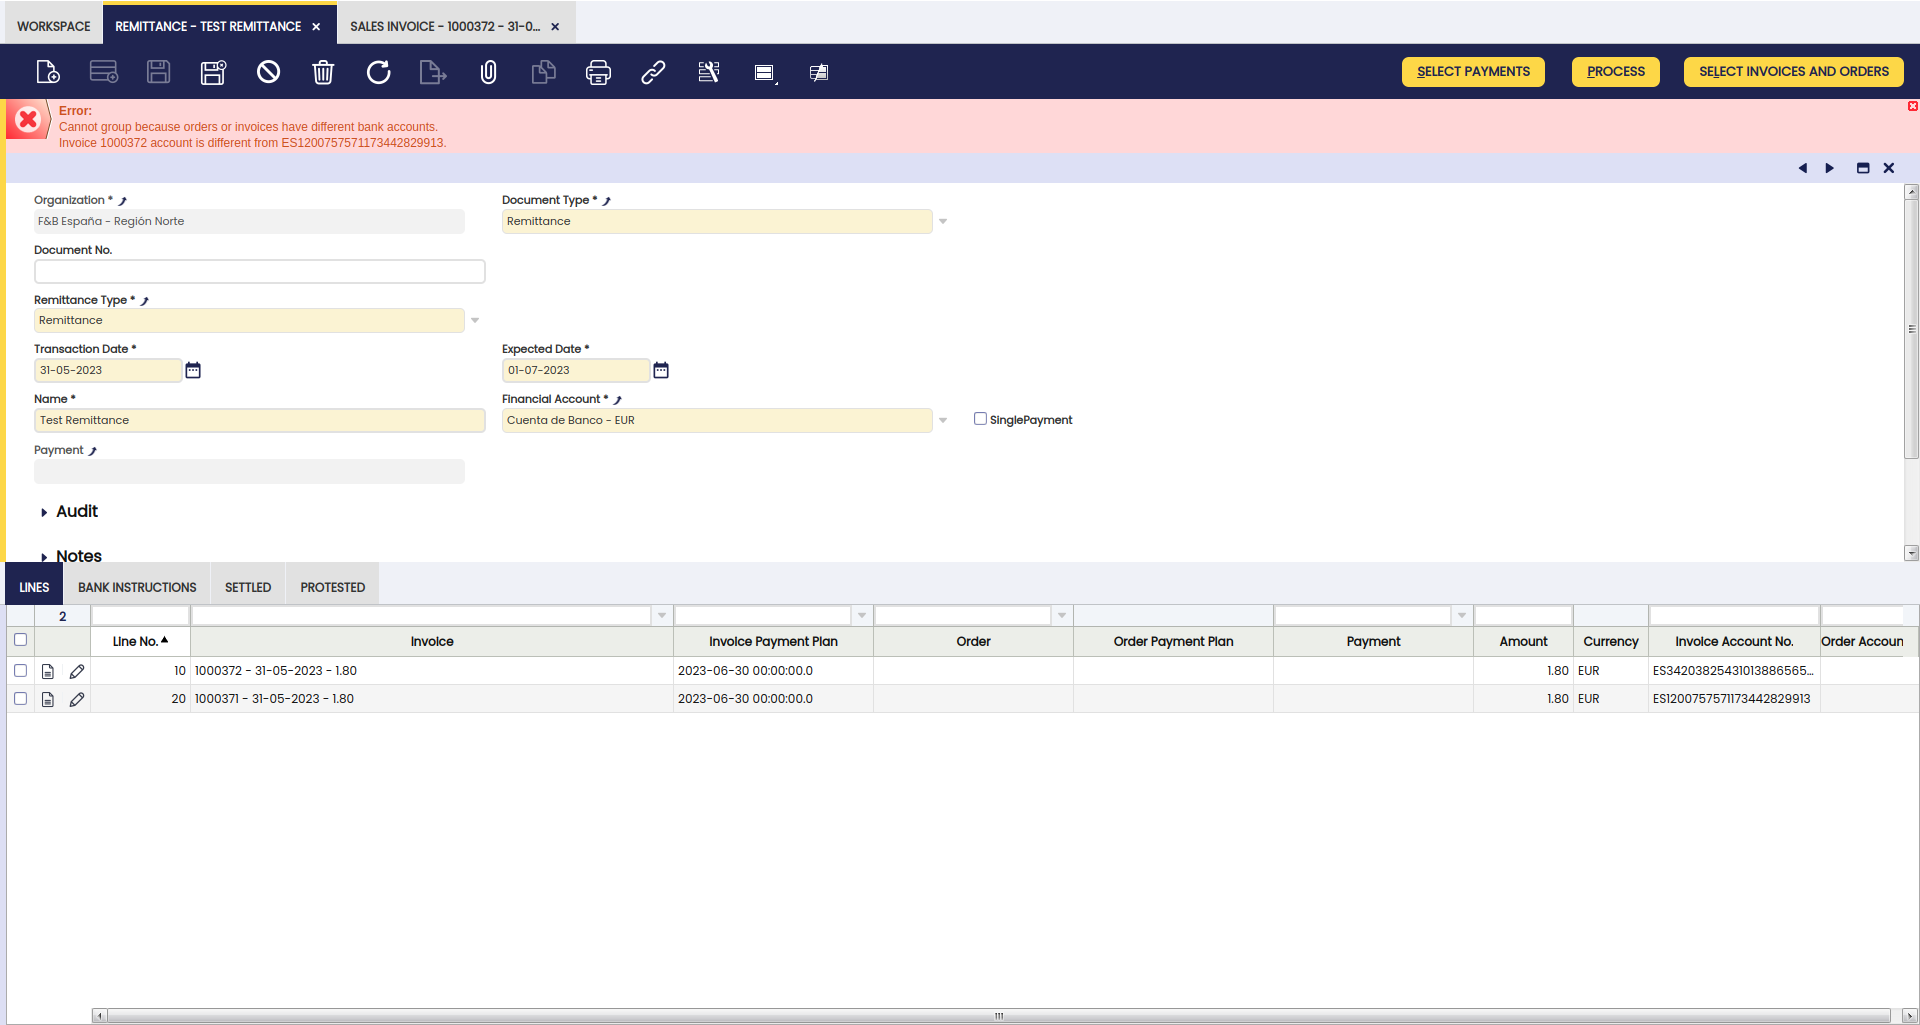
Warning
When using the "process" button and grouping lines, it is necessary for the bank accounts of those lines of a remittance document to coincide. If they are different from one another, Etendo shows an error notification as seen below.
-
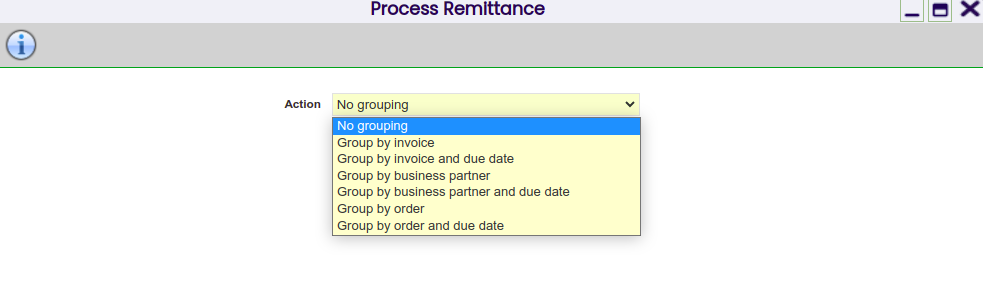
When processing, the system shows the following options:
- No grouping: generates a payment for each of the selected lines.
- Group by invoice: generates a payment for each invoice (in case there is more than one).
- Group by invoice and due date: generates a payment for each invoice and due date.
- Group by business partner: generates as many payments as there are business partners on the selected lines. It allocates the total amount of all lines that apply to each business partner.
- Group by business partner and due date: creates as many payments as there are business partners and payment dates on the selected lines.
- Group by order: generates a payment for each order (in case there is more than one).
- Group by order and due date: generates a payment for each order and due date.
Example
As an example, let us create the payment by selecting the Group by business partner option.
When processing, the 3 payments have been created for the 3 lines included in the remittance due to the fact that all of them correspond to the same business partner.
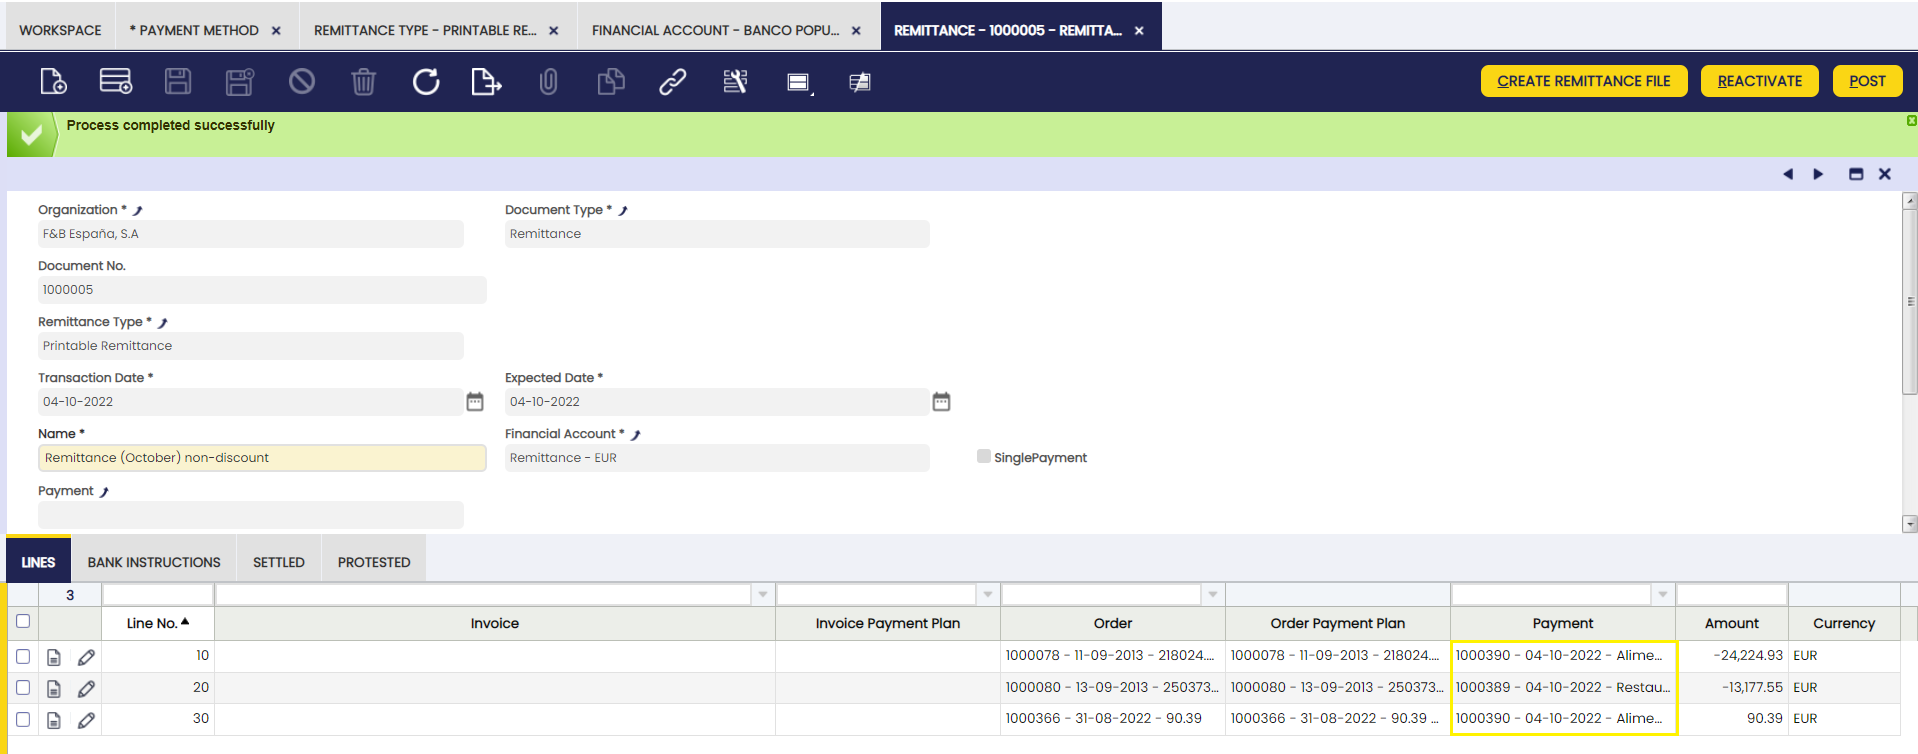
When navigating to the payment, it can be observed that the status of the payments created is "Remitted".
When the remittance is posted, an accounting entry is obtained, according to the accounts defined.
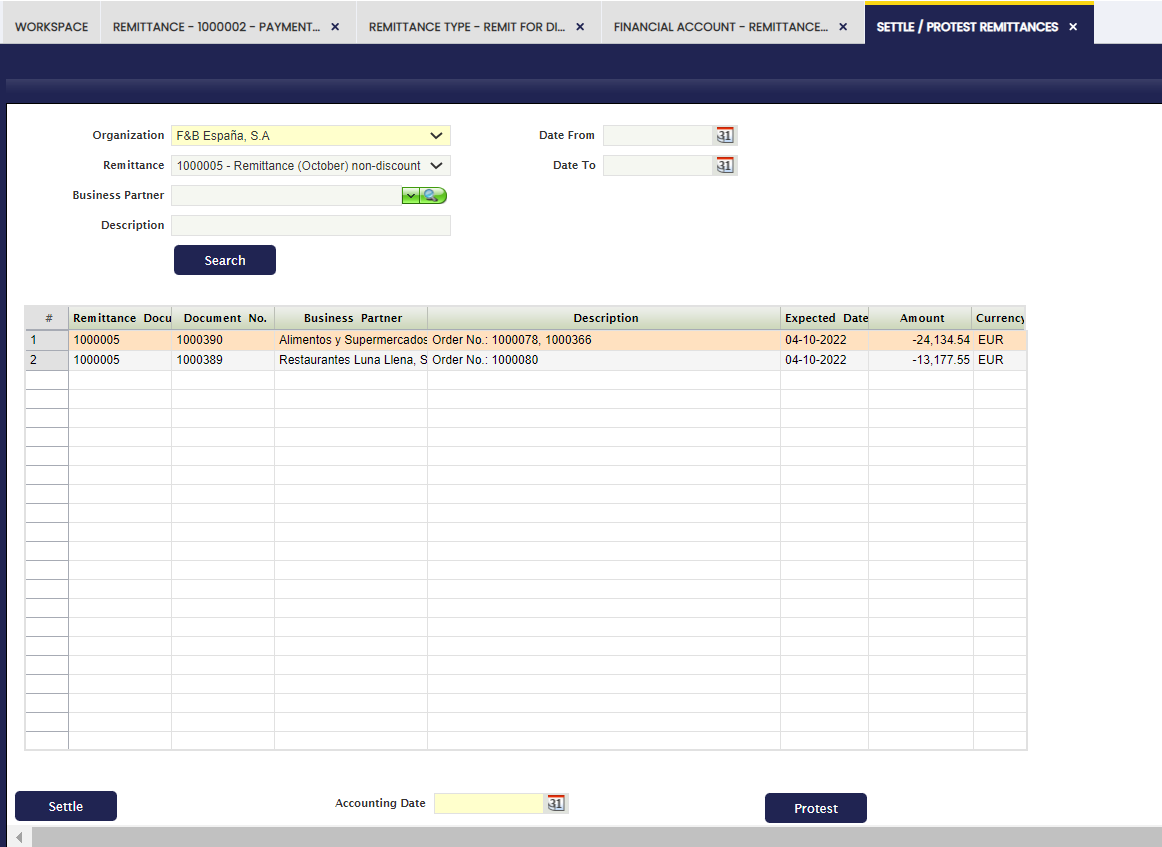
Settle/ Protest Remittance
Once the bank confirms the corresponding payments, access the "Settle/Protest Remittances" window and check the settled and protested remittances.
Info
The selected date is the posting date of the created document.
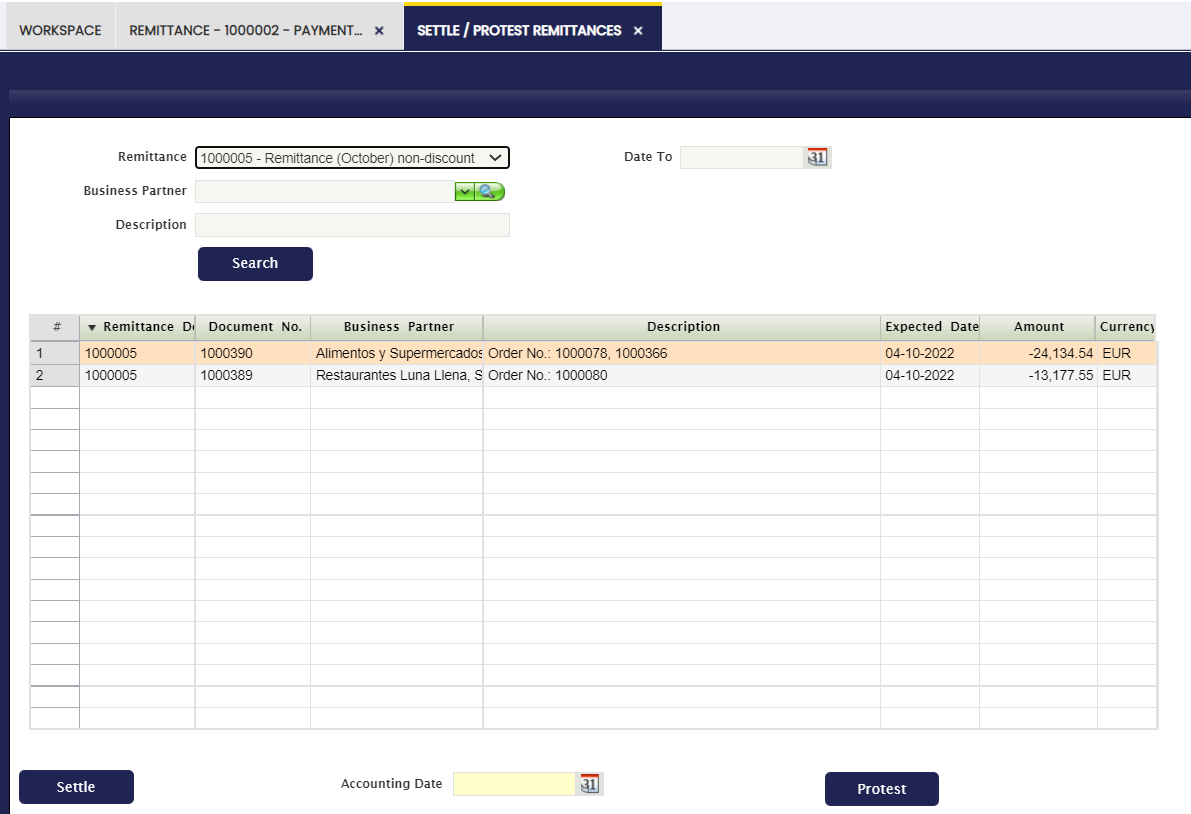
By settling the first line, it is observed that the line has been added to the settled tab of the corresponding remittance.
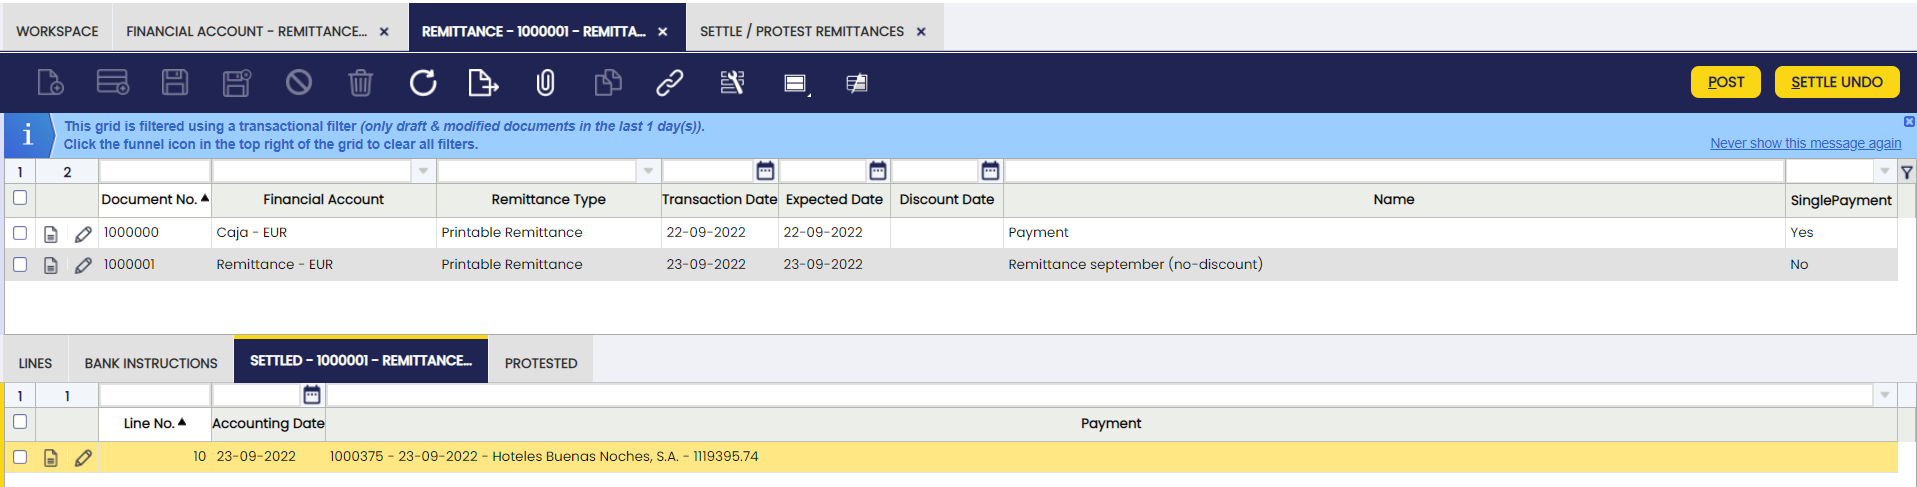
Once the remittance is posted, the accounting entry is obtained according to the indicated configuration. The posting should be line by line of the settled transactions. The returned remittance lines will appear in the returned tab.
The accounting of returned operations are accounted for in the same way as settled operations, from the 401 of the remittance statement to the 400, leaving the outstanding debt again.
Info
The returned transactions may be managed again later in other remittances or directly in the financial accounts.
The status of settled remittance transactions is changed to "Withdrawn not Cleared" and in the case of payment outs to "Deposited not Cleared".
If one of the payments has been returned, the status of the document is set to "Awaiting Execution".

Info
It is possible to print the Non-discount remittances as well as the Remittances for Discount from the printer in the toolbar.
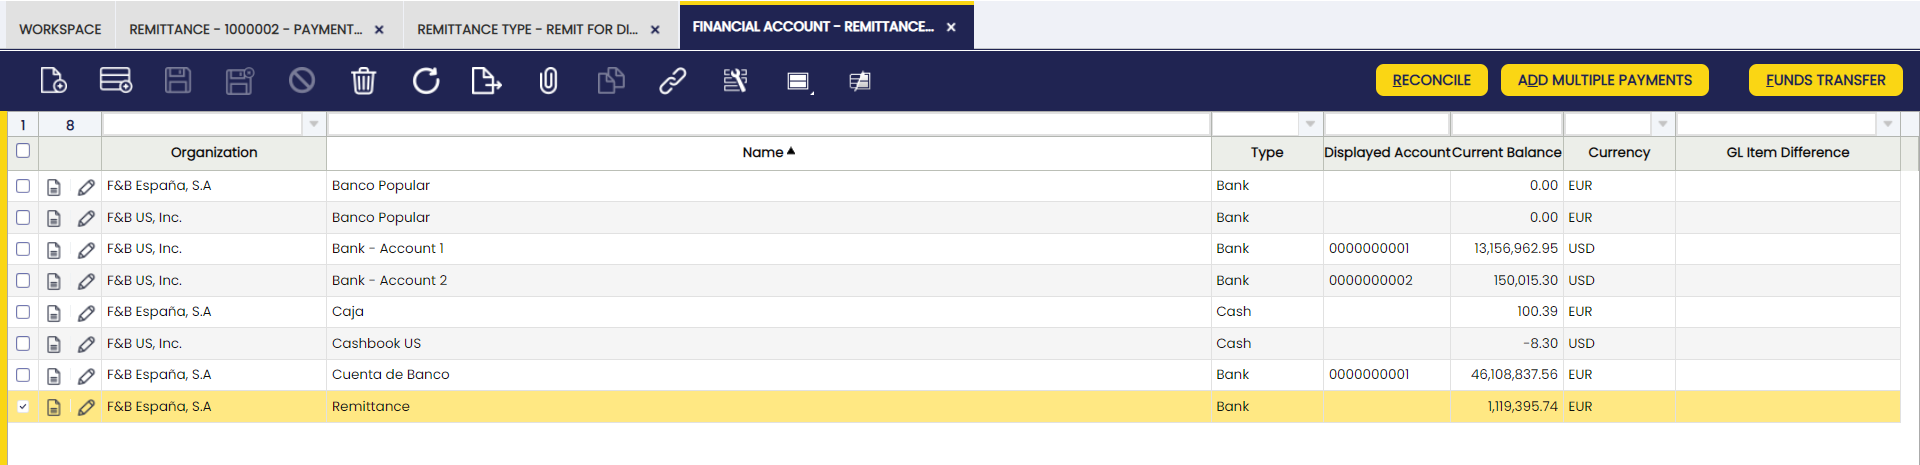
Settled payments to the financial account
Info
After the settlement, the system has automatically transferred these payments to the financial account indicated in the payments.

Reconcile Payments
The Reconcile Payments option in any remittance process refers to the action of comparing and adjusting financial records to ensure that payments are accurately and properly recorded. By using the reconcile button in the financial account window, it is possible to access the window shown below.

To create a remittance for discount follow these steps:
-
Create a remittance from the Remittances window. Select as type of remittance "Remittances for Discount". Once the header has been created, add the lines, either invoices, orders or payments, that are to be included in this remittance.
-
By clicking "Select Invoices and Orders" the system displays a pop up with, by default, the "Show collections/payments for alternative payment methods" selector unchecked, displaying only invoices that have Remittance payment method. By checking this check box, the system shows all the invoices and orders pending to be taken to the bank. Select those operations needed to remit and process.
The system inserts the selected lines:
-
If no further operations to the remittance are to be added, process the payment clicking the "Process" button.
Warning
When using the "process" button and grouping lines, it is necessary for the bank accounts of those lines of a remittance document to coincide. If they are different from one another, Etendo shows an error notification as seen below.
-
When processing, the system shows the following options:
- No grouping: generates a payment for each of the selected lines.
- Group by invoice: generates a payment for each invoice (in case there is more than one).
- Group by invoice and due date: generates a payment for each invoice and due date.
- Group by business partner: generates as many payments as there are third parties on the selected lines. It allocates the total amount of all lines that apply to each third party.
- Group by business partner and due date: creates as many payments as there are third parties and payment dates on the selected lines.
- Group by order: generates a payment for each order (in case there is more than one).
- Group by order and due date: generates a payment for each order and due date.
In this case, it is recommended to select the option "No grouping", since as many payments as operations of the remittance will be generated and a payment sum of all the operations which is the one that the bank will advance. The rest of the payments will be settled as known.
-
The next step is to take to the bank the sum payment of the remittance transactions, as in these cases the bank advances the money. From the financial account window, add the payment to the transaction and reconcile it with the bank statement.
-
Finally, settle the executed payments and/or return the necessary ones.
 The status of the settled collections changed to Settled in Remittance and the status of the total payments of the remittance operations changed to Payment cleared.
This work is a derivative of Financial Management by Openbravo Wiki, used under CC BY-SA 2.5 ES. This work is licensed under CC BY-SA 2.5 by Etendo.