Business Partner
Business Partner
Application > Master Data Management > Business Partner
Overview
A Business Partner is any entity your company does business with: customers who buy your products or services, vendors and suppliers you purchase from, and employees. Use the Business Partner window to create and manage all Business Partner records in a single place. Each type has a dedicated tab — Customer, Vendor, and Employee — with specific configuration fields for that role. A single Business Partner can belong to more than one type at the same time.
Header
The header holds the core information about the business partner — name, category, credit limit, and other details that apply regardless of whether the partner is a customer, vendor, or employee.
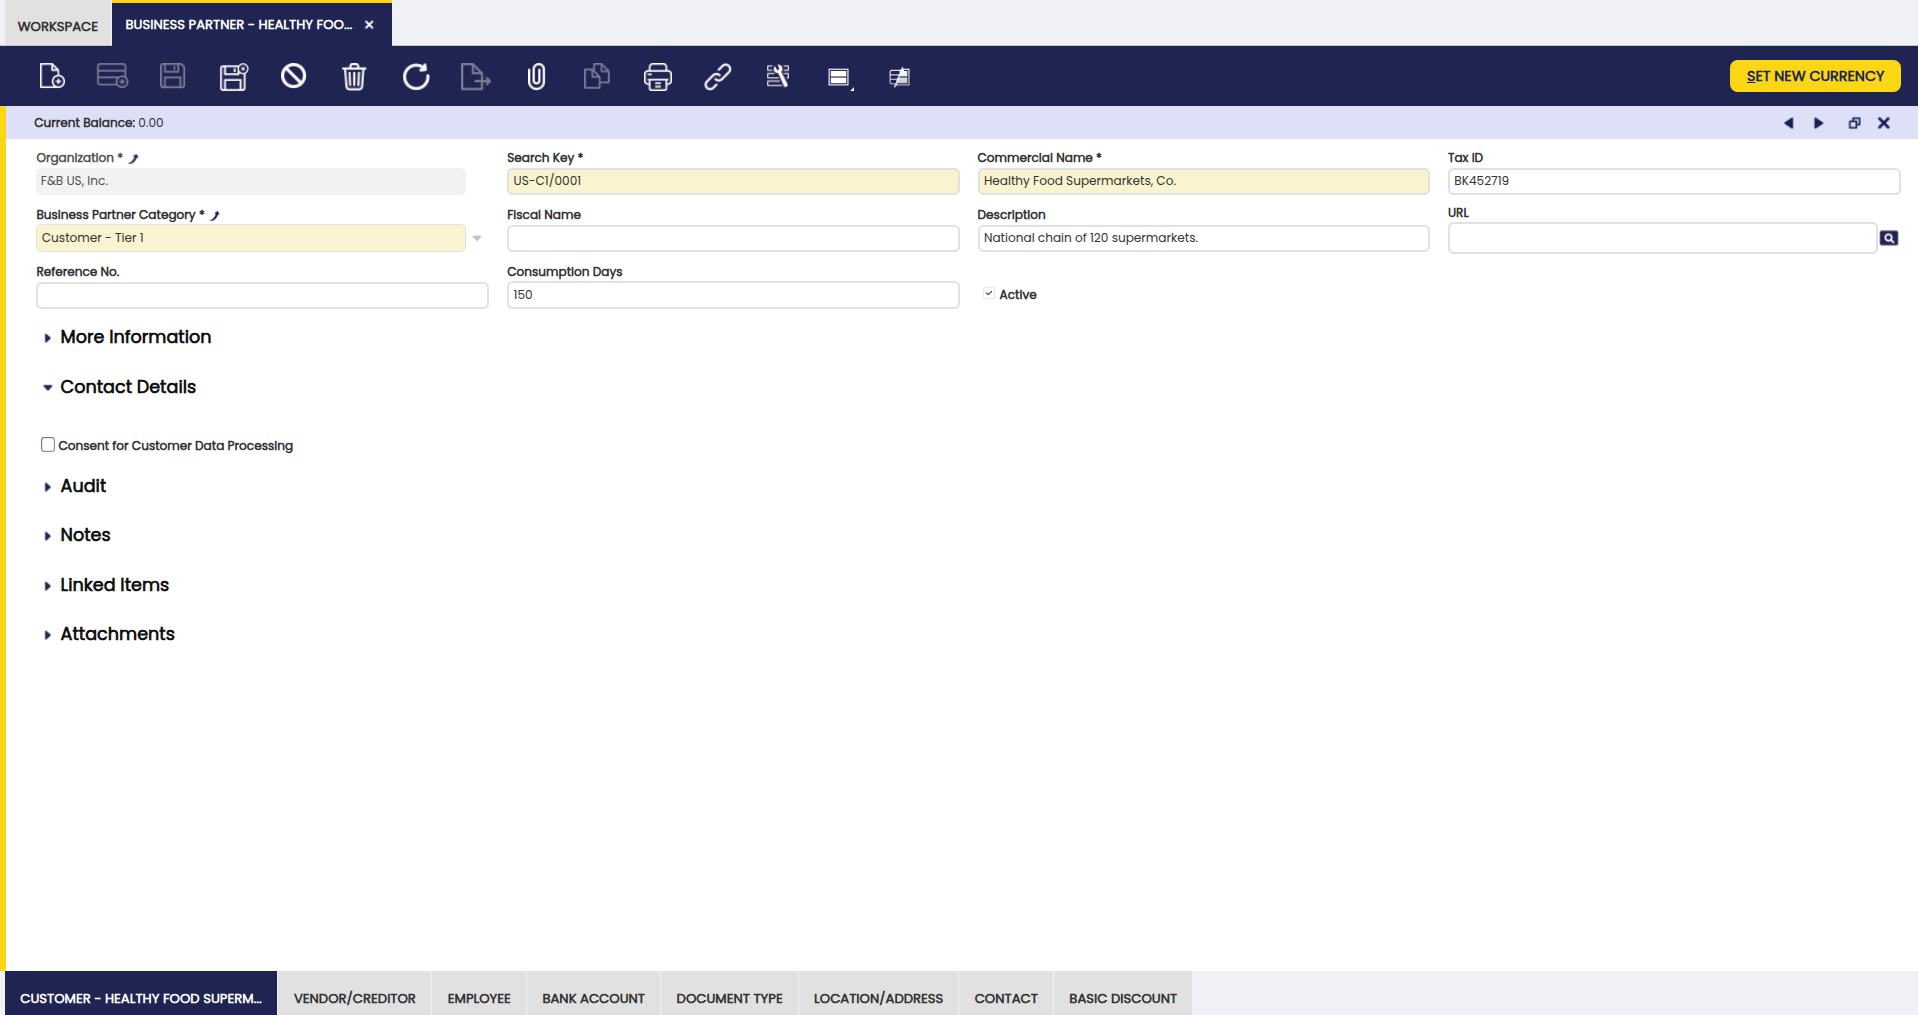
Fields to note:
-
Business Partner Category: Key field. Select a category which the business partner is going to belong to, under the following types:
- Customers
- Suppliers
- Employees
-
Search Key: A short code or abbreviation you assign to the business partner to make it easier to find later. For example, "ACME" for Acme Corporation.
- Commercial Name
- Fiscal Name: if known. If it is known, it is the one used in official documents such as invoices and tax reports, otherwise the commercial name will be used instead.
- Description: used to describe the business partner, if needed.
- URL: The business partner URL, if known.
- Reference No: which can be used as an additional way to identify a business partner.
-
Consumption Days: Defines how many days back from the current date the Copy Lines process looks for order or invoice lines to copy. For example, entering 150 means the process will show lines from orders and invoices created in the last 150 days.
Info
For more information, visit Sales Order and Purchase Order.
-
Credit Line Limit: When the total of a customer's outstanding payments exceeds this amount, Etendo shows a warning. You can still complete the invoice — this is an alert, not a block.
- Consent for Customer Data Processing: Checkbox in the business partner data model, to reflect whether a given contact consents or not that their data can be used by the organization.
Buttons
Set New Currency
Business partner currency is automatically filled in with the currency of the Price List assigned to the business partner. Once filled in, it can be changed, if required, by using the Set New Currency button.
Note
Normally, business partner currency is the same as the currency of the price list assigned to it. However, it can happen that a business partner having, for instance, an EUR price list assigned, might have USD as its by default currency. In that case, all the transactions booked in EUR for that business partner, will be exchanged to USD, therefore, the business partner balance is calculated in USD.
The Set New Currency process allows defining:
- a new currency for the business partner
-
as well as the currency conversion rate to be used to exchange customer balance to the new currency.
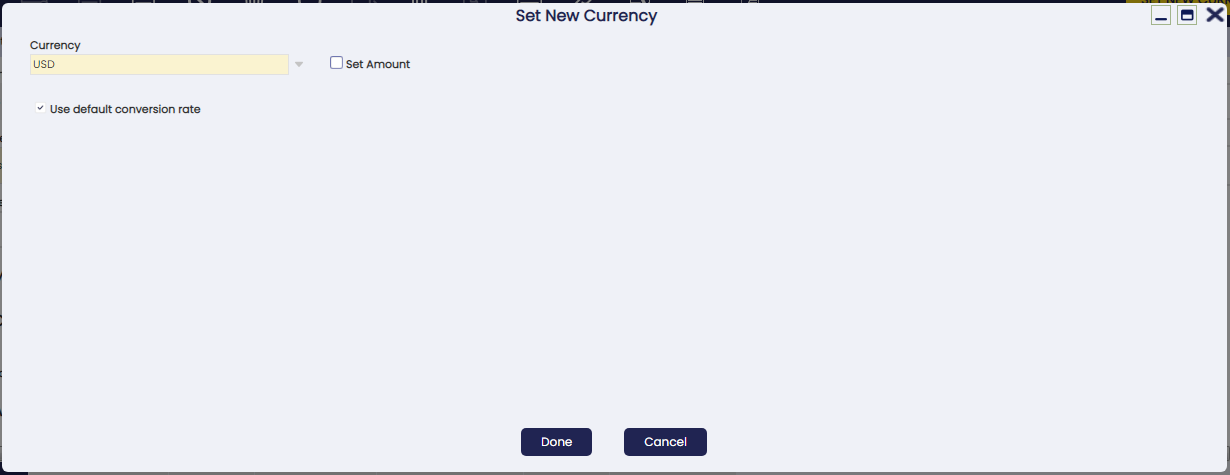
Fields to note:
-
Currency: Business partner's new currency can be entered here, for instance EUR. At first, the currency shown in the Set New Currency window is business partner price list currency, in our example USD.
-
Set Amount: Checkbox. If selected, Etendo will update the Business Partner's balance with the amount entered in the Foreign Amount field, so they stay consistent with the new currency.
-
Foreign Amount: Only shown if the Set Amount checkbox is selected. Use this field to manually enter the equivalent amount in the new currency that will replace or update the Business Partner's balance.
-
Use default conversion rate: Checkbox. It uses the conversion rate defined in Conversion Rates window, to recalculate business partner balance from USD to EUR, in our case. If this check is not selected, a new field Rate is shown to allow entering a specific conversion rate.
Available credit is money the business partner has already paid or overpaid that has not yet been applied to an invoice — it can be used to offset future charges.
Additionally, a business partner might have available credit in a given currency. If that is the case, Etendo informs the user because business partner available credit will have to be exchanged to the new currency, therefore it can be consumed in the new currency.
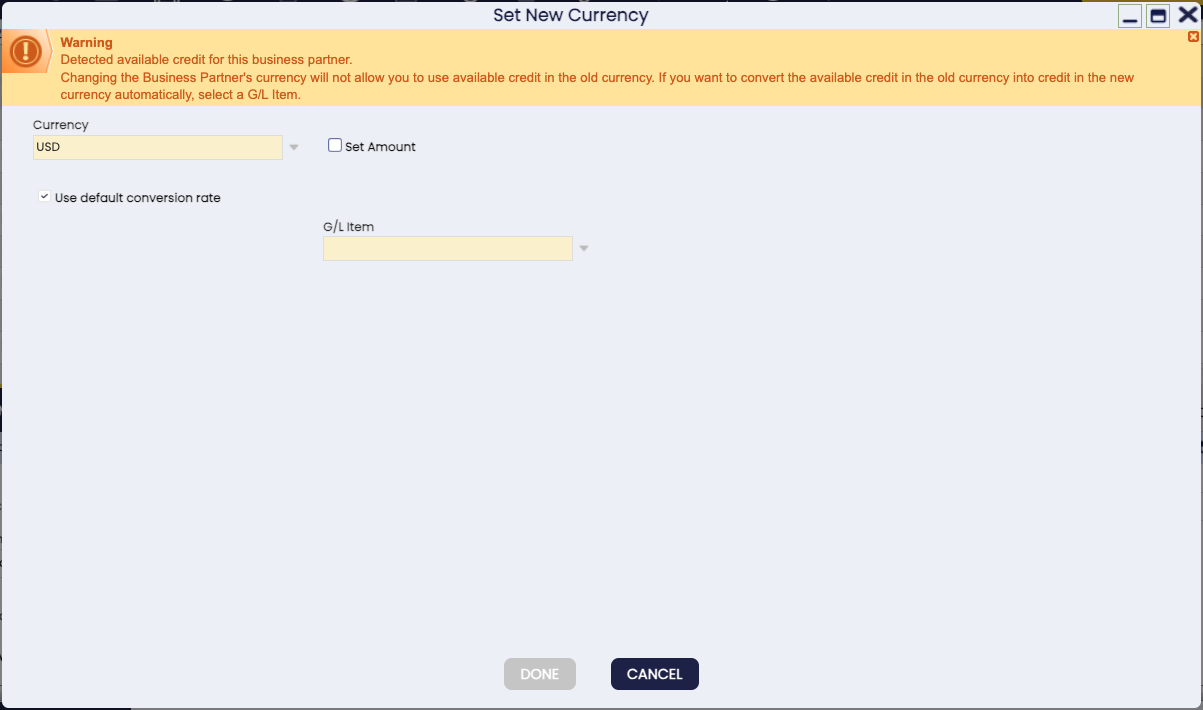
To keep your records consistent, Etendo automatically makes three internal adjustments in the background when available credit exists — you do not need to do anything:
- one that removes the available credit from the old currency.
- one that records the equivalent credit in the new currency.
- one that zeros out the balance in the original currency.
Your accounting team will see these posted automatically — you do not need to create them manually.
Example
Let us take as an example a business partner having a price list in EUR
- Price list currency: EUR
- Current balance: 306.00 EUR
- Available credit: 100.00 EUR
Because the credit reduces the balance, the net balance is 206.00 EUR (306.00 – 100.00).
Running Set New Currency
The company decides that this Business Partner should now operate in USD, so the user runs the Set New Currency process and selects USD as the new currency.
Etendo detects that the partner still has available credit in EUR. That credit must be converted into the new currency, so the system applies the conversion rate 1 EUR = 1.19 USD.
What Etendo Does Automatically
Once the process finishes:
- The Business Partner's currency changes from EUR to USD.
- The current balance becomes 245.14 USD, calculated as 206.00 EUR × 1.19 = 245.14 USD
- Etendo also makes three internal adjustments to properly move the available credit from EUR to USD, keeping accounting consistent.
Future Transactions
Now that the Business Partner's currency is USD, here is what happens with new invoices:
-
You create a new sales invoice in EUR (because the price list is still in EUR).
- Invoice total: 41.50 EUR
- Etendo converts it to USD: 41.50 × 1.19 = 49.38 USD
-
The Business Partner's new balance becomes: 245.14 + 49.38 = 294.52 USD
-
Later, you create another sales invoice in USD for 100.00 USD. While completing it, Etendo shows that the partner has available credit in USD, converted from the old EUR credit: 100 EUR × 1.19 = 119.00 USD
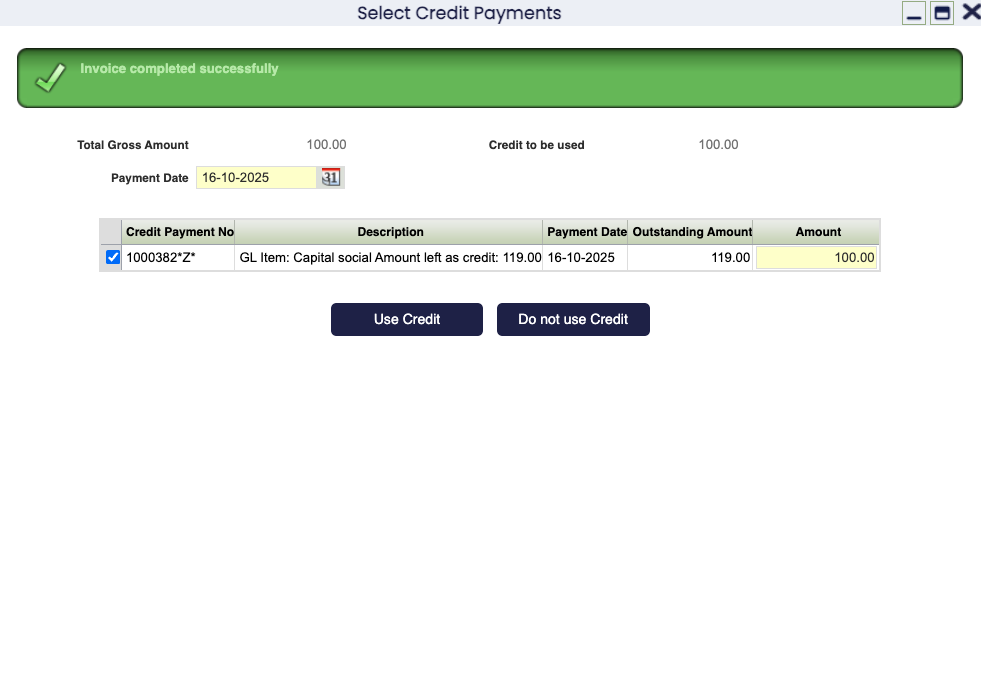
In short, the Set New Currency process updates the Business Partner's currency and converts balances and credits to the new currency using the chosen rate, existing balances and available credit are recalculated so everything matches the new currency and future transactions, even if created in the old currency (EUR), will still be correctly converted and reflected in the Business Partner's new currency (USD).
Tabs and Subtabs
Customers, vendors, and employees each require different information. The Business Partner window provides a separate tab for each type so you can configure only the fields that apply:
- Customer
- Customer Accounting
- Vendor
- Vendor Accounting
- Employee
- Employee Accounting
The tabs and subtabs mentioned above are described in the next chapters of this section.
Important
There could be other types of business partners which require to be set up as business partners in this window; business partners which have nothing to do with either a customer, or a supplier/creditor or an employee.
That is the case of banks. Banks need to be created in the business partner window header by just entering basic header information and no data in any of the business partner window tabs, but Location and Contact. The reason for this is that Bank type business partners are needed in the Remittance financial workflow.
For more information about this workflow, visit Financial Account.
Customer
Note
Customer related data can be entered and configured once the Customer checkbox is enabled.
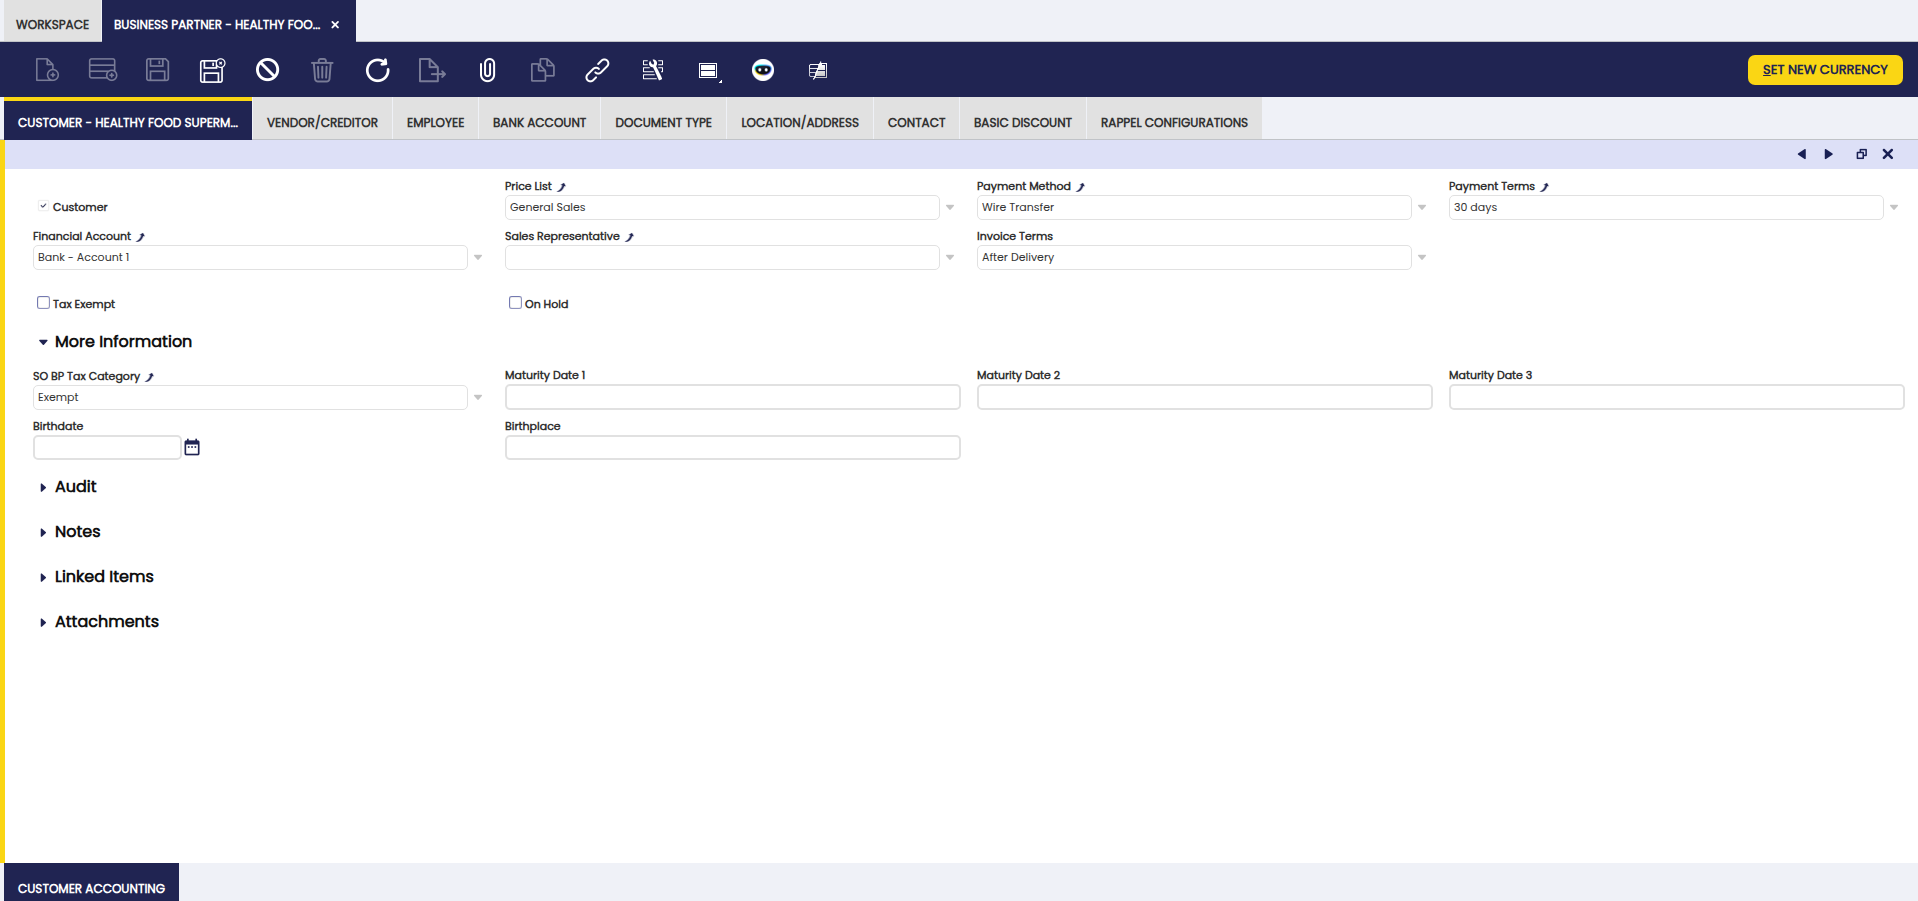
As shown above, there is a list of relevant data to be entered for customers together with current customer balance information. You could either select any data such as Price List from a previously created list of values, or, if necessary, create it by navigating to the corresponding window, and then select it.
Fields to note:
-
Price List: The one selected will be the one applied while creating sales documents such as sales orders or sales invoices for that customer.
Info
For more information, visit Price List.
Price lists are defined in a given currency, which could be the same as customer currency or not.
In case it is not, customer balance will be calculated by taking into account either the conversion rate defined in the Conversion Rates window or the one entered in the process Set New Currency which can be run to change the currency of a business partner. -
Payment Method: The one selected will be the one applied while creating and managing the payments received from that customer.
If a Financial Account is linked to the customer, the payment method to select here will be one of the payment methods linked to the financial account.Info
For more information, visit Payment Method.
-
Payment Terms: The one selected will be the one used while managing sales invoices payment plan.
Info
For more information, visit Payment Term.
-
Financial Account: The one selected will be the one used while collecting and reconciling the payments made by that customer.
Info
For more information, visit Financial Account.
-
Invoice Terms: Controls when a sales invoice is generated for this customer. Select one of the following options:
Info
For more information, visit Generate Invoices.
- After Order Delivered: The invoice could be automatically generated once all the goods of the sales order have been shipped
- After Delivery: The goods of the sales order will be automatically invoiced as they are shipped, even if there are partial shipments
- Do not invoice: No invoice will be generated automatically
- Immediate: The invoice will be generated on the next run of the Generate Invoices process.
-
Customer Schedule after Delivery: The invoice will be generated according to the calendar agreed with the customer and once the goods ordered have been shipped. If this is the option selected, a new field named Invoice Schedule is automatically displayed for you to select the corresponding Invoice Schedule or calendar.
Info
For more information, visit Invoice Schedule.
-
Credit Line Limit: If the sum of all pending payments is over the credit limit specified for a customer, the system will alert you by saying that this customer has reached the credit limit whenever this business partner is selected in a sales document (order, shipment or invoice).
-
Tax Exempt: Check this if the customer is legally exempt from taxes. When enabled, Etendo will only apply tax rates that have been explicitly marked as exempt, so no standard tax will be added to their invoices.
-
Sales Representative: Select a customer sales representative. A sales representative is an employee set as such.
-
On Hold: This checkbox allows blocking a customer, therefore some specific documents cannot be fulfilled for it. If checked, the On Hold section is shown with the following setup, which can obviously be changed as required:
- Sales Order: Blocked
- Goods Shipment: Blocked
- Sales invoice: Blocked
- Payment In: Not blocked
Above defaulted configuration means that it is not possible to complete either a sales order, a goods shipment or a sales invoice for the customer, only receiving a payment is possible.
More Information
-
Sales Order Business Partner Tax Category (SO BP Tax Category): This field can be found under the More Information section.
Use this field to restrict the tax rates available on sales documents for this customer to only those in the selected tax category.Info
For more information, visit Business Partner Tax Category.
-
Maturity Date 1: It indicates the day of the month, the first deadline, that invoices are due.
-
Maturity Date 2: It indicates the day of the month, the second deadline, that invoices are due.
-
Maturity Date 3: It indicates the day of the month, the third deadline, that invoices are due.
-
Birthdate: Data about the customer.
-
Birthplace: Data about the customer.
Customer Accounting
Use the Customer Accounting tab to configure the ledger accounts to be used while posting customer related transactions such as customer receivables and customer advances to the general ledger.
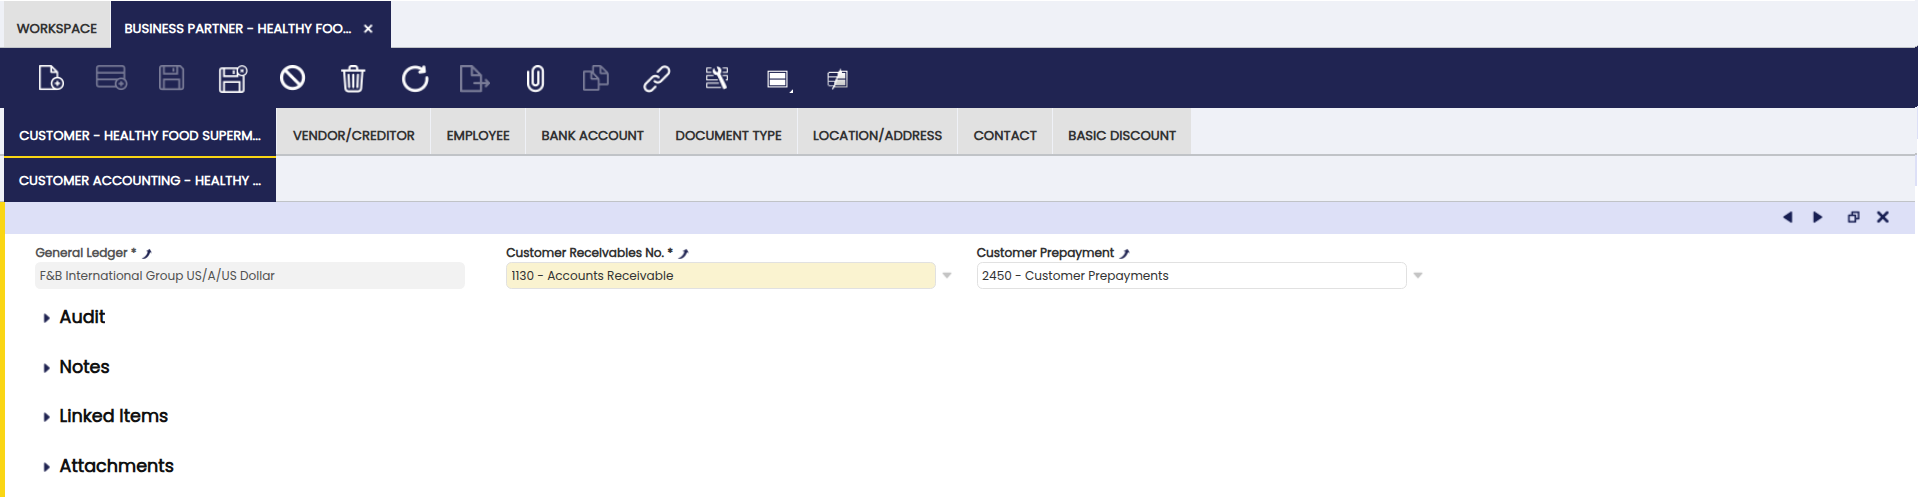
As shown above, you can configure, for each customer and general ledger, the accounts to be used in:
-
the Customer Receivables transactions such as sales invoices posting.
Info
For more information, visit Sales Invoice.
-
the Customer Prepayment transactions, such as those cases when the company shipping the goods requires the customer to advance part or full amount of the debt.
At first, these accounts are inherited from the Defaults accounts of the organization's general ledger for which the business partner is being created. They can always be changed.
Important
If your accounting team needs to automatically generate a dedicated ledger account for each new business partner, this can be configured in the Organization window. This is an advanced setup — contact your system administrator if you are unsure whether it applies.
Vendor/Creditor
Note
Vendor or Creditor related data can be entered and configured once the Vendor checkbox is enabled.
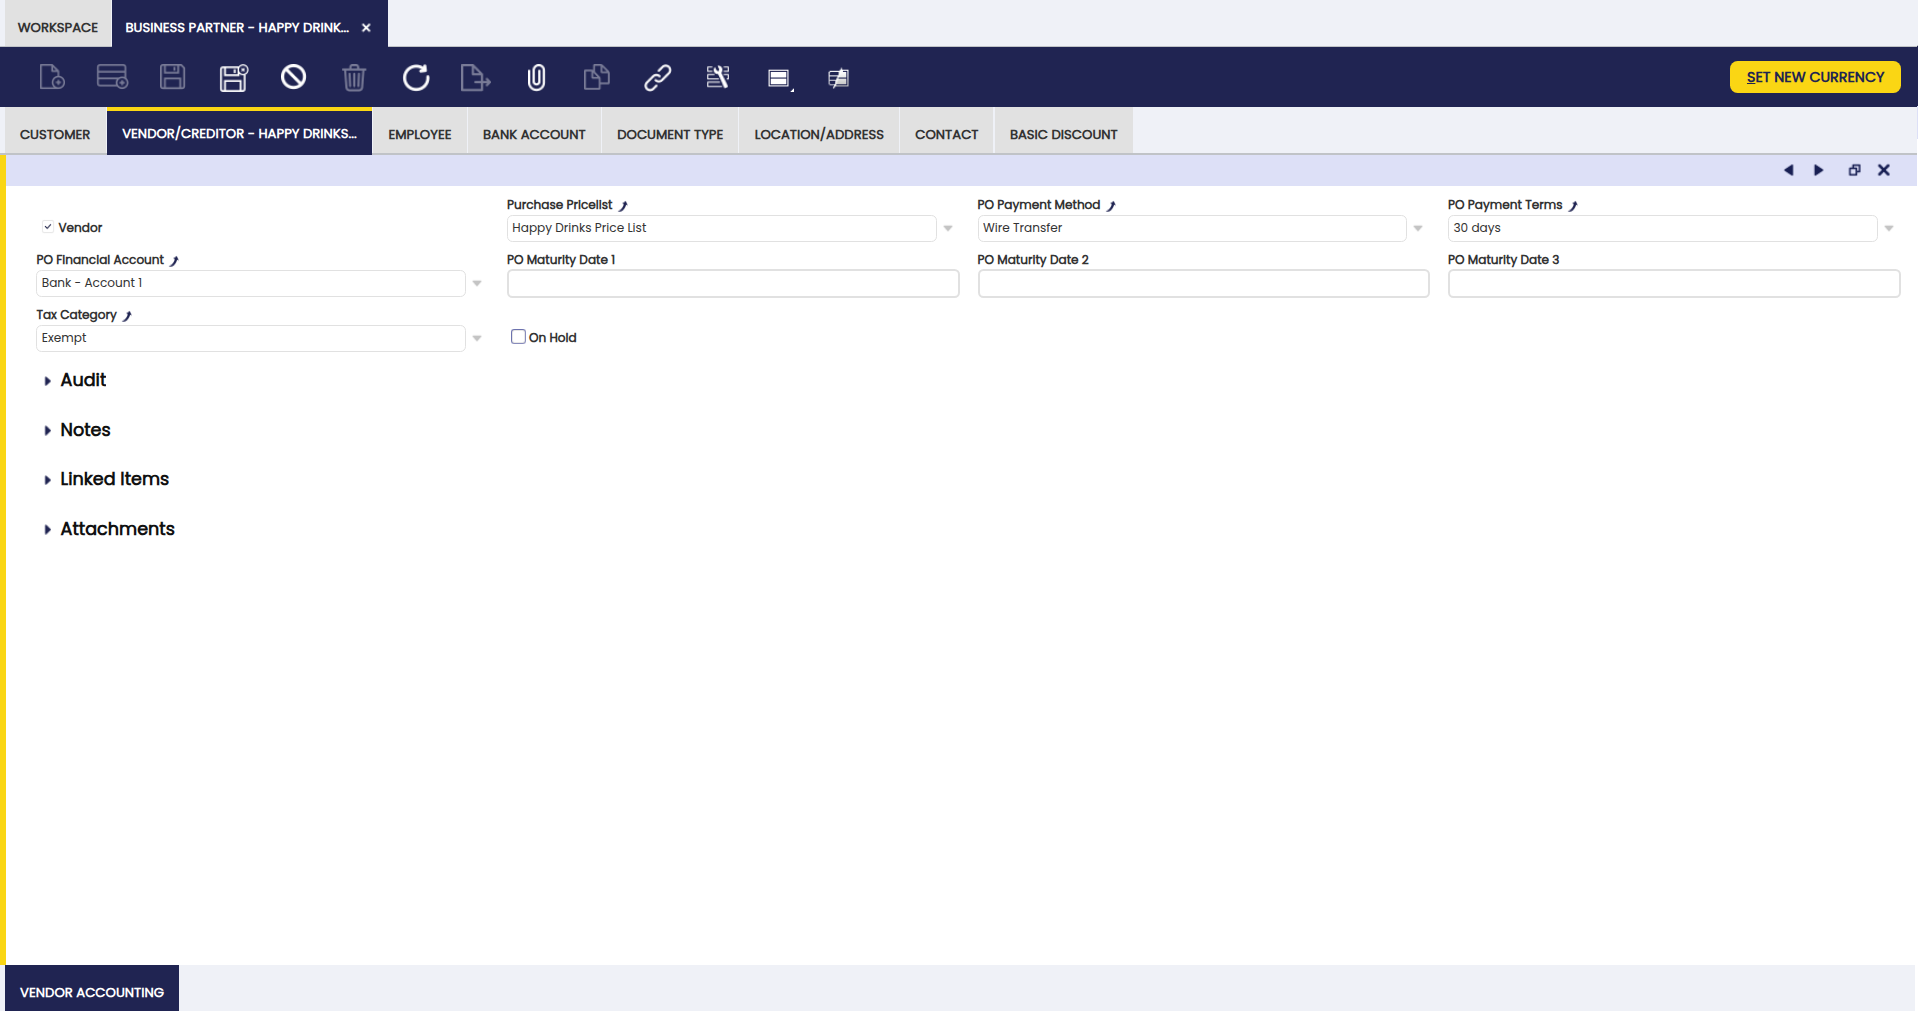
As shown in the image above, there is a list of relevant data to be entered for suppliers or creditors, also known as vendors:
-
Purchase Price List: The one selected will be the one applied while creating purchase documents such as purchase orders or invoices for that vendor.
If a Business Partner has already generated Credit, it will not be possible to select a Price List in a different Currency from the generated Credit. In that case, it is possible to convert Credit to a different Currency.Info
For more information, visit Price List.
-
Payment Method: The one selected will be the one applied while creating and managing the payments made to that vendor.
If a financial account is linked to the vendor, the payment method to select will be a payment method linked to that financial account.Info
For more information, visit Payment Method.
-
Payment Terms: The one selected will be the one used while managing supplier invoices payment plans.
Info
For more information, visit Payment Term.
-
Purchase Order Maturity Date 1 (PO Maturity Date 1): Adjusts the payment due date to fall on a specific day of the month. For this to work, the payment term assigned to the vendor must have Fixed Due Date enabled and Next Business Day disabled — settings your accounting team configures in the Payment Terms window. The final due date is calculated from the payment term and then shifted to the maturity date.
Example
For example, the defined payment term is 30 days and the PO Maturity Date 1 is set to 10. If the invoice date is the 1st of the month, based on the 30 days payment term, the payment due date is the 1st of the next month, but since the PO Maturity Date is set to 10, the payment due date as a result is the 10th of next month.
-
PO Maturity Date 2: A second PO Maturity Date can be set to be combined with the payment term and the first PO Maturity Date.
Example
For example, the payment term is 30 days, the PO Maturity Date 1 the value is 10, the PO Maturity Date 2 is 20. The example given in PO Maturity Date 1 will remain the same. However, if the invoice date is the 11th of the month, the payment due date will be the 20th of next month: the 30 days of the payment terms are taken into account and since the 10th of the month is passed the second maturity date of the 20th is taken into account.
-
PO Maturity Date 3: A third PO Maturity Date can be set to be combined with the payment term and the first and second PO Maturity Date.
-
Financial Account: The one selected will be the one used while withdrawing and reconciling the payments made to a supplier.
Info
For more information, visit Financial Account.
-
Tax Category: Use this field to restrict the tax rates available on purchase documents for this vendor to only those in the selected tax category.
Info
For more information, visit Tax Category.
-
On Hold: This checkbox allows blocking a vendor, therefore some specific documents cannot be fulfilled for it. If checked, the On Hold section is shown with the following setup which can be changed as required:
- Purchase Order: Blocked
- Goods Receipt: Not blocked
- Purchase Invoice: Blocked
- Payment Out: Blocked
Above defaulted configuration means that it is not possible to complete either a purchase order, a purchase invoice or to make a payment but to receive goods sent by the vendor.
As already mentioned if a business partner of any type is blocked, it is not possible to Complete (or book) some document types. However, it is always possible to Void them. Etendo shows an error message stating that it is not possible to complete a document for a business partner set as on hold.
Vendor Accounting
Use the Vendor Accounting tab to configure the ledger accounts to be used while posting vendor related transactions such as vendor liabilities and vendor advance payments to the general ledger.
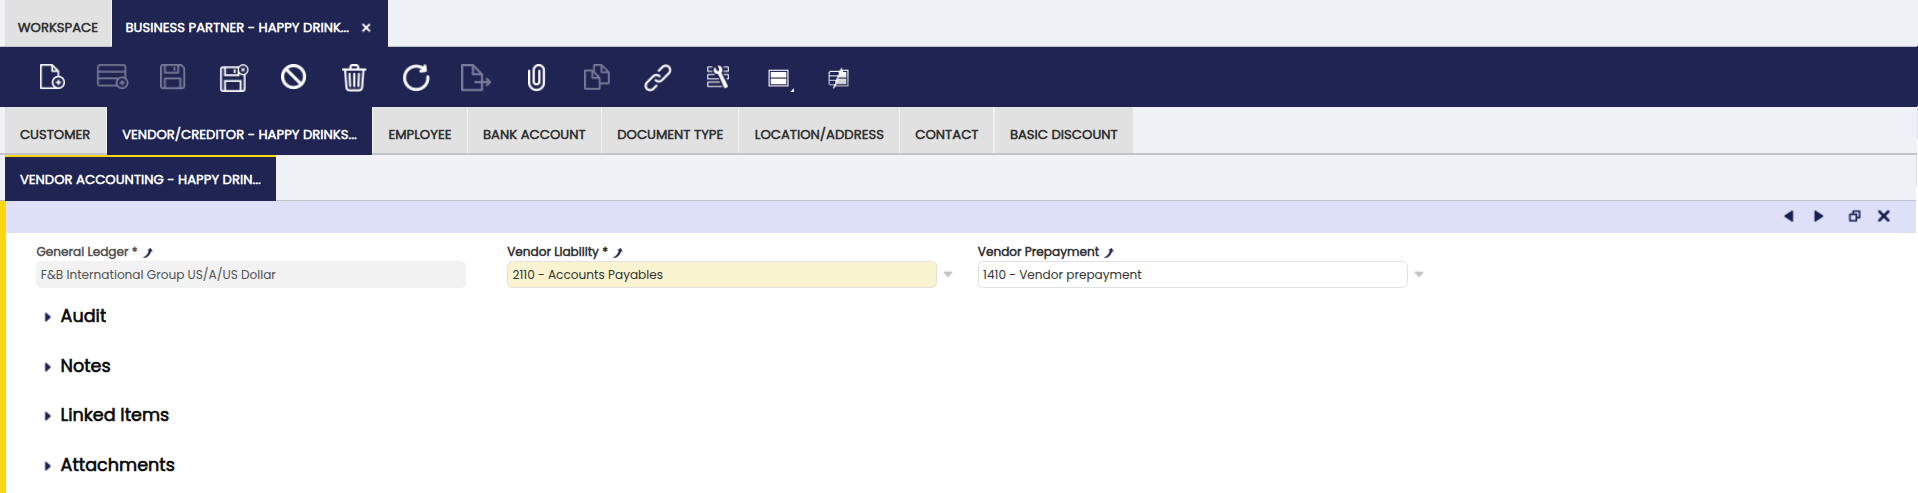
Configure for each supplier or creditor and each general ledger your organization uses the ledger accounts to be used in:
-
the Vendor Liability transactions such as purchase invoices posting.
Info
For more information, visit Purchase Invoice.
-
the Vendor Prepayment transactions such as those cases when the supplier of the goods requires the company to pay in advance part or full amount of the debt.
Info
For more information, visit Vendor Prepayments.
At first, these accounts are inherited from the Defaults accounts of the organization's general ledger for which the business partner is being created. They can always be changed.
Important
If your accounting team needs to automatically generate a dedicated ledger account for each new business partner, this can be configured in the Organization window. This is an advanced setup — contact your system administrator if you are unsure whether it applies.
Employee
Note
A business partner can be set up as employee once the checkbox Employee is enabled.
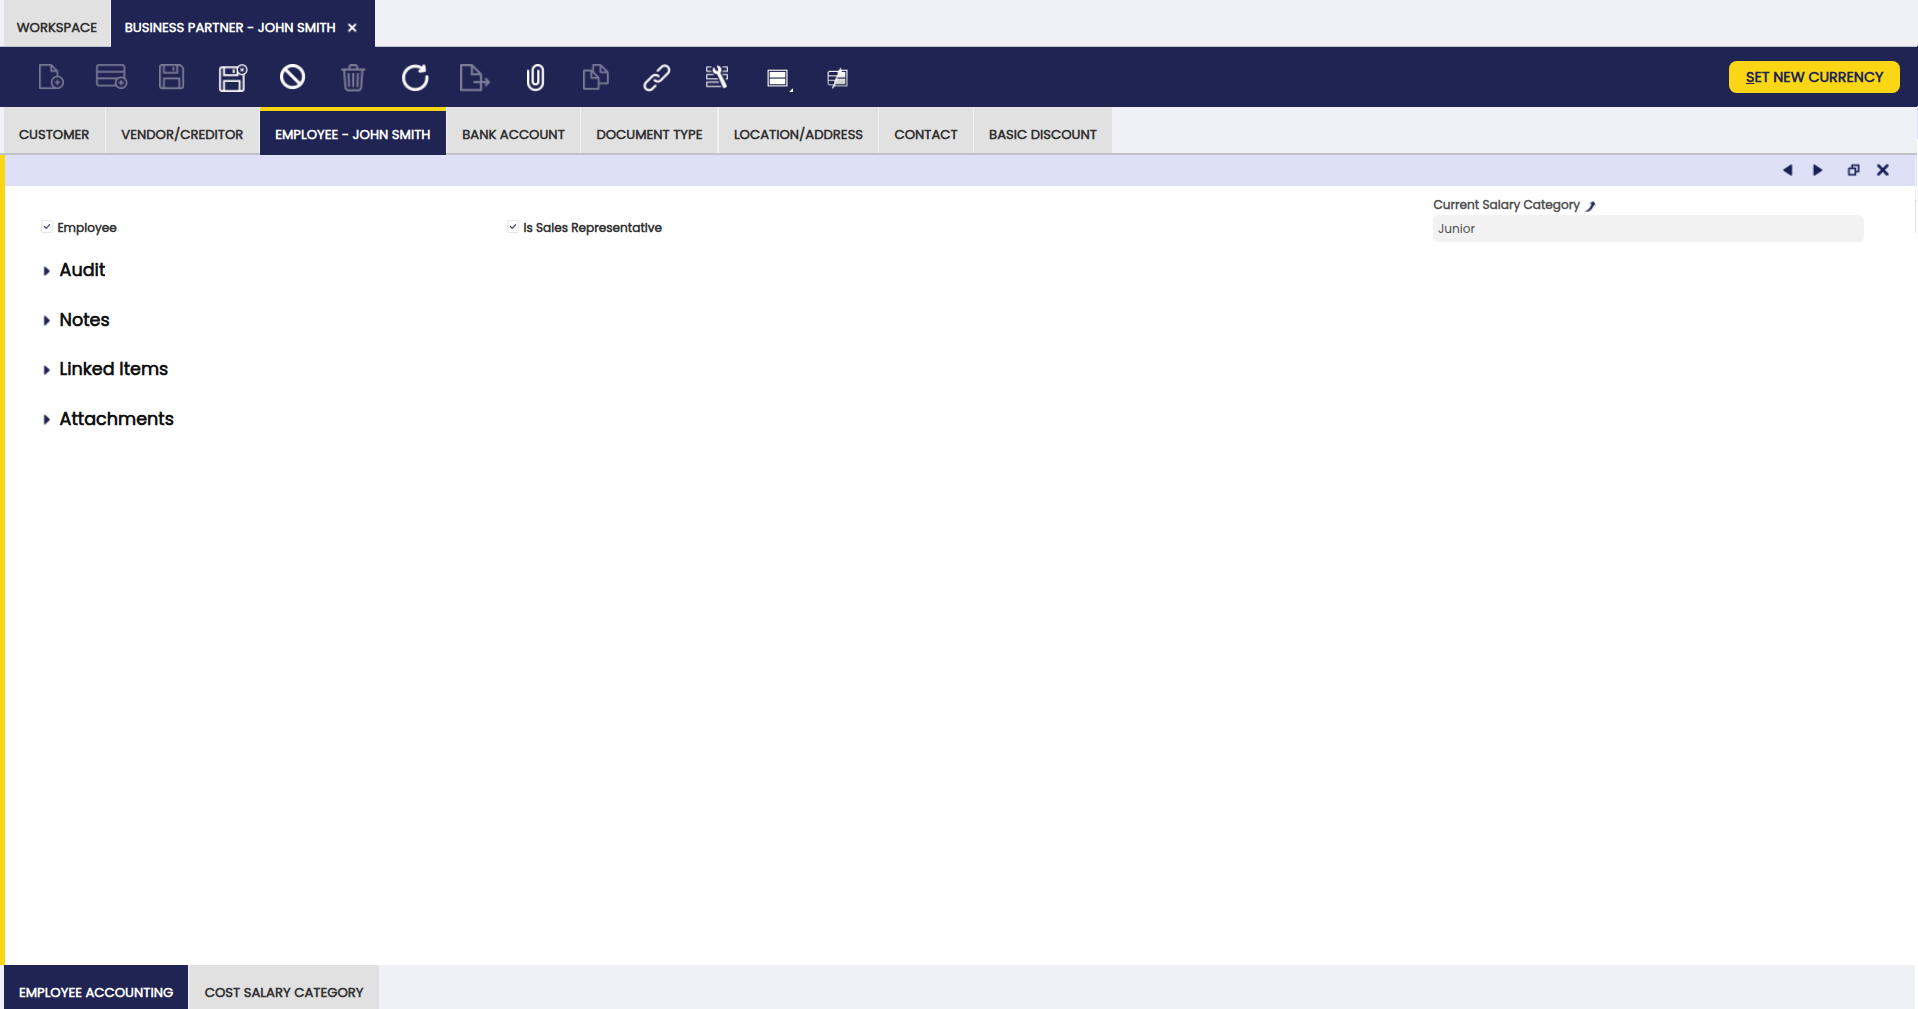
Use the Employee tab to set which of your business partners are Employees.
An employee can be:
-
appointed as sales representative of a customer.
-
defined as the responsible of a company project/s.
Info
For more information, visit Projects and Services Management.
-
allocated to a production process as a resource.
Info
For more information, visit Production Management.
-
and can issue expense sheets as part of their involvement in a company project.
Info
For more information, visit Expense Sheet.
Employee Accounting
In this tab, add the ledger accounts to be used while posting employee related transactions such as payroll accounting.

No ledger accounts are required for employee accounting because no employee transactions are currently postable in Etendo. If a Human Resources module is installed, the accounts for any postable employee transactions are configured here.
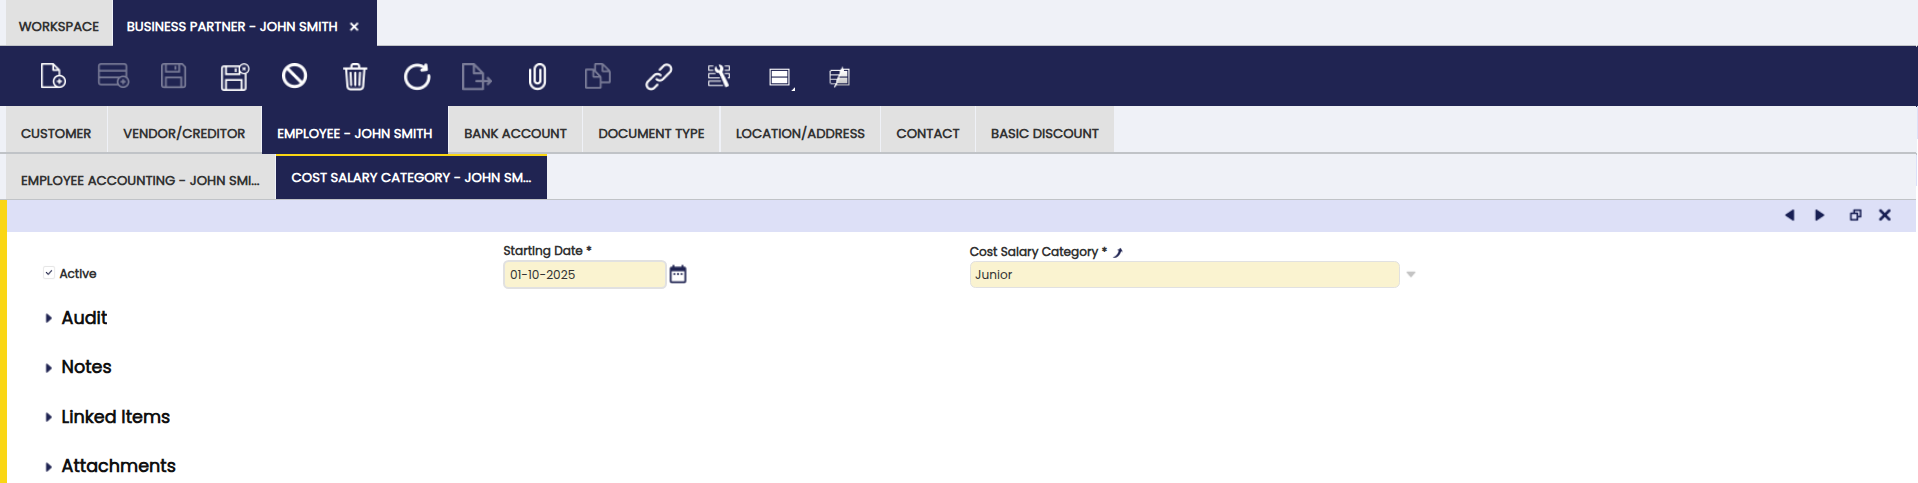
Cost Salary Category
In this tab, set up the salary category of the employee by selecting one of the options which were previously defined in the Salary Category window.
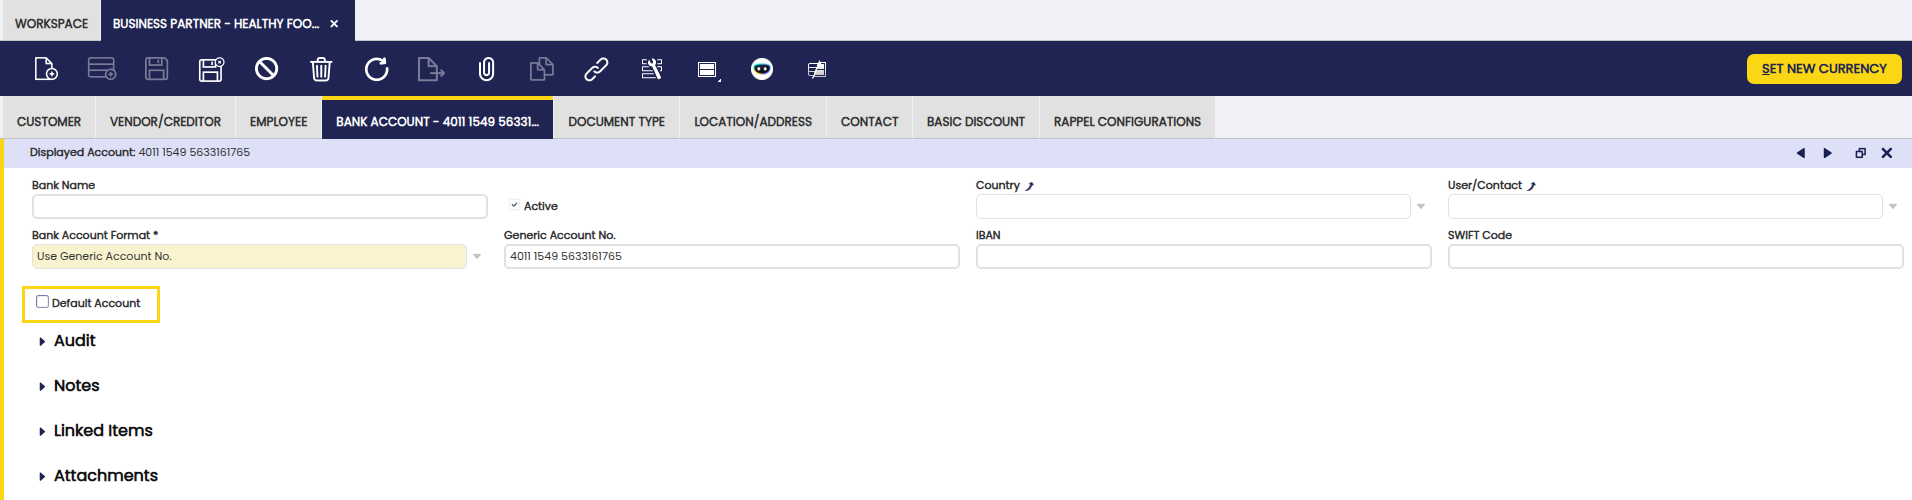
Bank Account
Use the Bank Account tab to list and set up business partner bank accounts.
It is possible to configure and properly set up business partner bank accounts to be used while making or receiving business partner payments of any type.
Important
Make sure each bank account is fully filled in. Etendo uses this information when processing payments to and from this business partner.

Fields to note:
- Bank Name
- Active flag: It is recommended to keep only one bank account Active to avoid errors; otherwise ensure the correct bank account is used.
- Country: Select a country from the list to specify if the bank account is a domestic bank account or a foreign bank account.
- User/Contact: In case you want to associate a contact for this bank account.
-
Bank Account Format: List that contains all the possible values for generating the Displayed Account Number, which will be later on used by other reports or processes to get the account identifier. Possible values are:
- Use Generic Account No.
- Use IBAN
- Use SWIFT + Generic Account No.
Note
Other options can be added by other modules that extend the supported Bank Account Format.
-
Generic Account No: A generic account number to identify the bank account can be introduced here. Required if either Use Generic Account No. or Use SWIFT + Generic Account No. is selected in the Bank Account Format field.
-
IBAN: The international account number used across most countries. Enter the full IBAN exactly as shown on your bank statement. Required if you selected Use IBAN in the Bank Account Format field. Etendo validates the number automatically when you save.
- SWIFT Code: The bank identifier code used for international payments (sometimes labeled BIC on bank statements). Required if you selected Use SWIFT + Generic Account No. in the Bank Account Format field.
- Displayed Account: It is automatically generated based on the value selected into the Bank Account Format. This field is read only, and it is used by other reports or processes.
Advanced Bank Account Management
Info
To be able to include this functionality, the Advanced Bank Account Management module of the Financial Extensions Bundle must be installed. To do that, follow the instructions from the marketplace: Financial Extensions Bundle. For more information about the available versions, core compatibility and new features, visit Financial Extensions - Release notes.
This functionality introduces the possibility to mark a bank account as Default within the Bank Account tab of the Business Partner window. Here, it is possible to check the Default Account checkbox in order to set the account to be used in the documents for different transactions.
Note
If no bank account is selected as default, the one created last is used when no bank account is selected in orders/invoices.
Warning
Only one bank account can be selected as default for each business partner.
Document Type
Info
This feature is available in Etendo 25.3 or later versions.
This tab introduces flexibility by customizing document type assignments to invoices, orders, shipments and receipts, specifically based on the business partner.
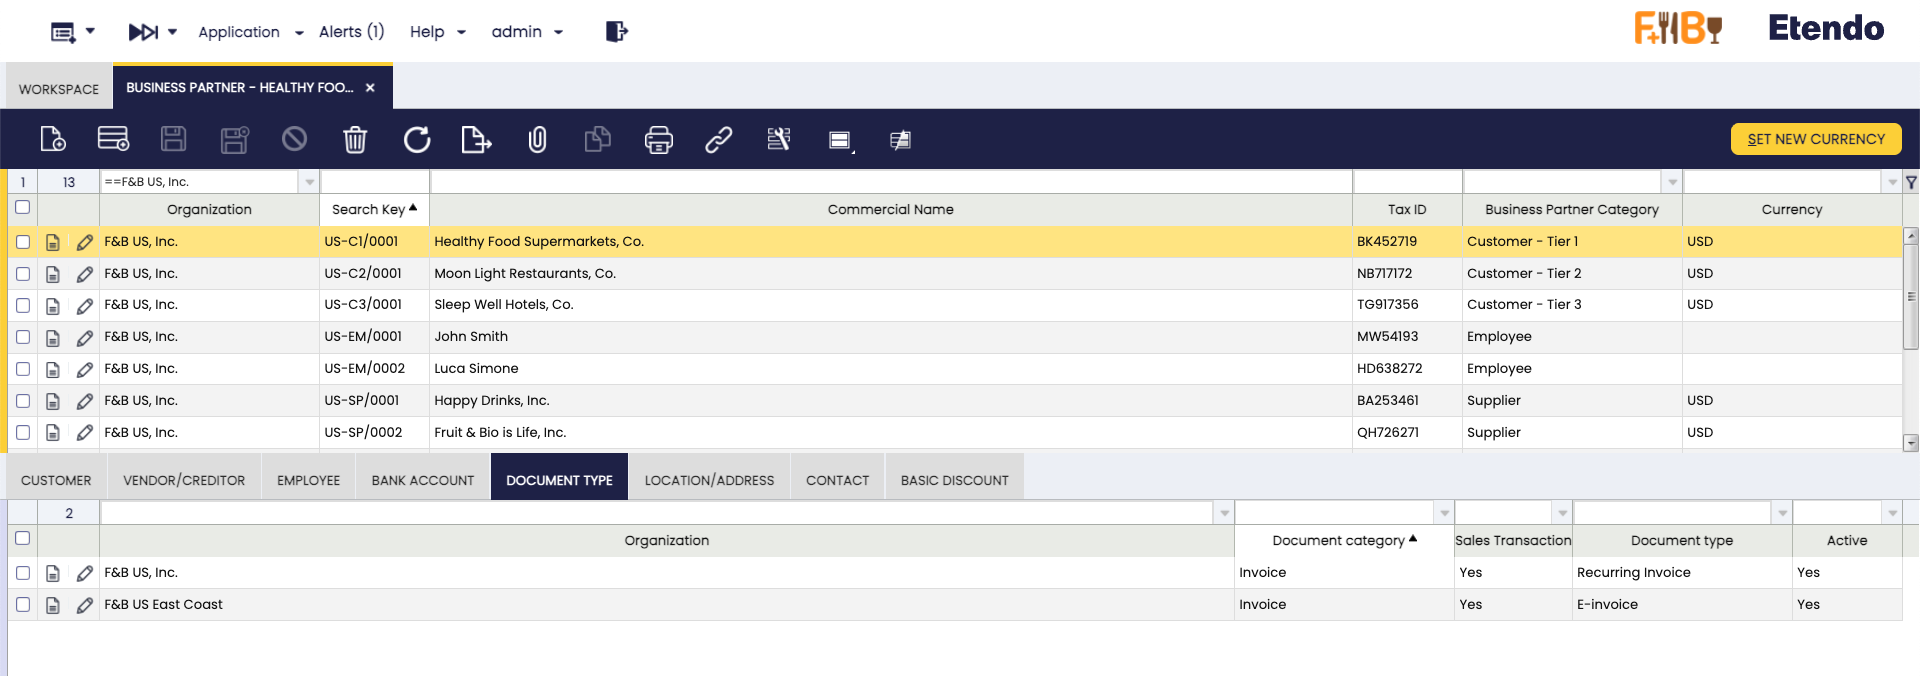
This functionality lets you assign a specific document type to each transaction — order, invoice, shipment, or receipt — based on the business partner, overriding the organization's default settings. This is useful since each country, region, and even each company may use different types of documents with their respective printable and even personalized sequence numbers.
When a transaction document (order, invoice, shipment or receipt) is created and linked to a business partner, the system first checks the Document Type Tab for the correct configuration. This setup can significantly enhance the user experience when documents are created repeatedly.
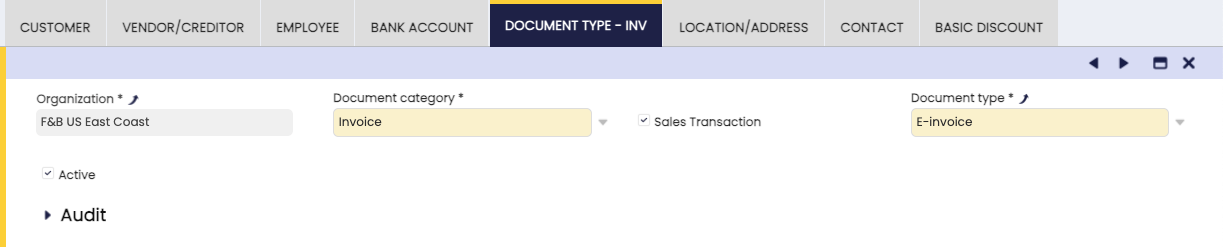
Fields to note:
- Organization: Specifies the organization to which this specific document assignment rule applies (e.g., F&B US Inc.).
- Document Category: Select the type of transaction document, such as order, invoice, or shipment/receipt.
-
Sales Transaction: Checkbox used to distinguish document direction.
- Checked: Corresponds to sales documents (e.g., sales orders, sales invoices, goods shipments).
- Unchecked: Corresponds to purchasing documents (e.g., purchase orders, purchase invoices, goods receipts).
-
Document Type: Select the specific document type available for the chosen category and transaction direction.
Document Type Selection Priority
When a transaction is created for a business partner, Etendo picks the document type in this order:
- It checks whether a rule has been defined for this specific business partner and organization.
- If none is found, it checks whether a rule exists for a parent organization.
- If no rule exists at any level, it falls back to the default document type set for the organization.
Add a rule here only if you want to override the organization default for this specific partner.
Warning
This functionality is not available for documents created with a background/button process such as "Generate Invoice from Shipment" in the Goods Shipment window. In this case, the document type to be used is the one defined at organization level, instead of the one defined at Document Type tab level.
Location/Address
Business partner locations and full address details can be set up in this tab.
Business partners might have different address details depending on location/address used for either Goods Receipts/Shipments purposes or location/address used for Invoices purposes.
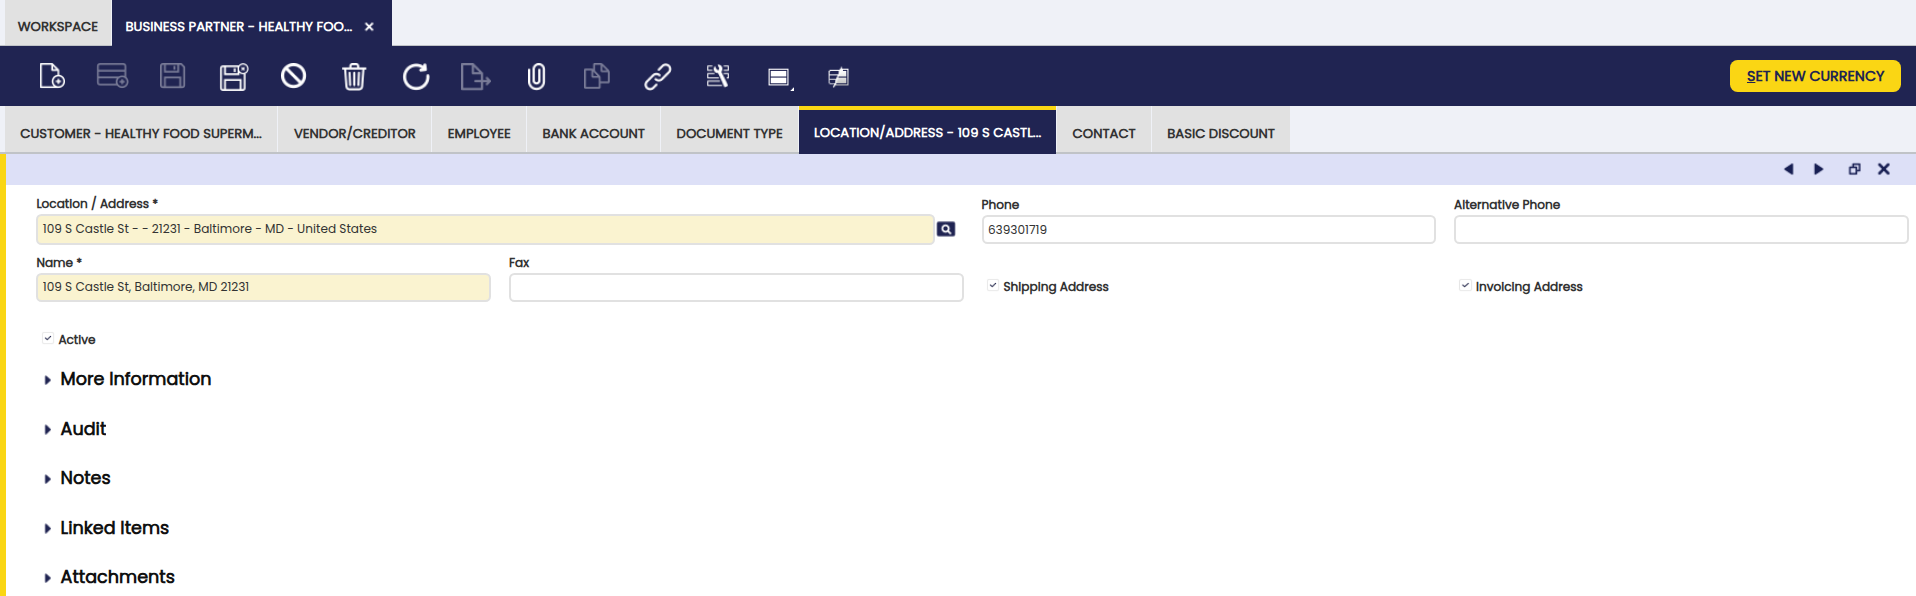
Fields to note:
-
Location/Address: If you click in this field, the location selector box opens, there you can enter the information below:
- the address 1st line
- the address 2nd line, if needed
- the Postal Code
- the City
- the Country: One from the list can be selected, if any
- the Region: Once the country is selected, you can select one region of the country selected, from the list, if any.
-
Phone: The phone number to contact the business partner.
- Alternative Phone: for an alternative phone, if any.
- Name: Referred to the Address name. This field is automatically filled in by Etendo, once the Location/Address information has been configured. Change it as needed.
- Fax: The fax number to contact the business partner.
- Ship to Address checkbox: Flag this if the address being set up must be used for Goods Receipts/Shipments related transactions.
- Invoice to Address checkbox: Flag this if the address being set up must be used for sales or purchase invoices transactions.
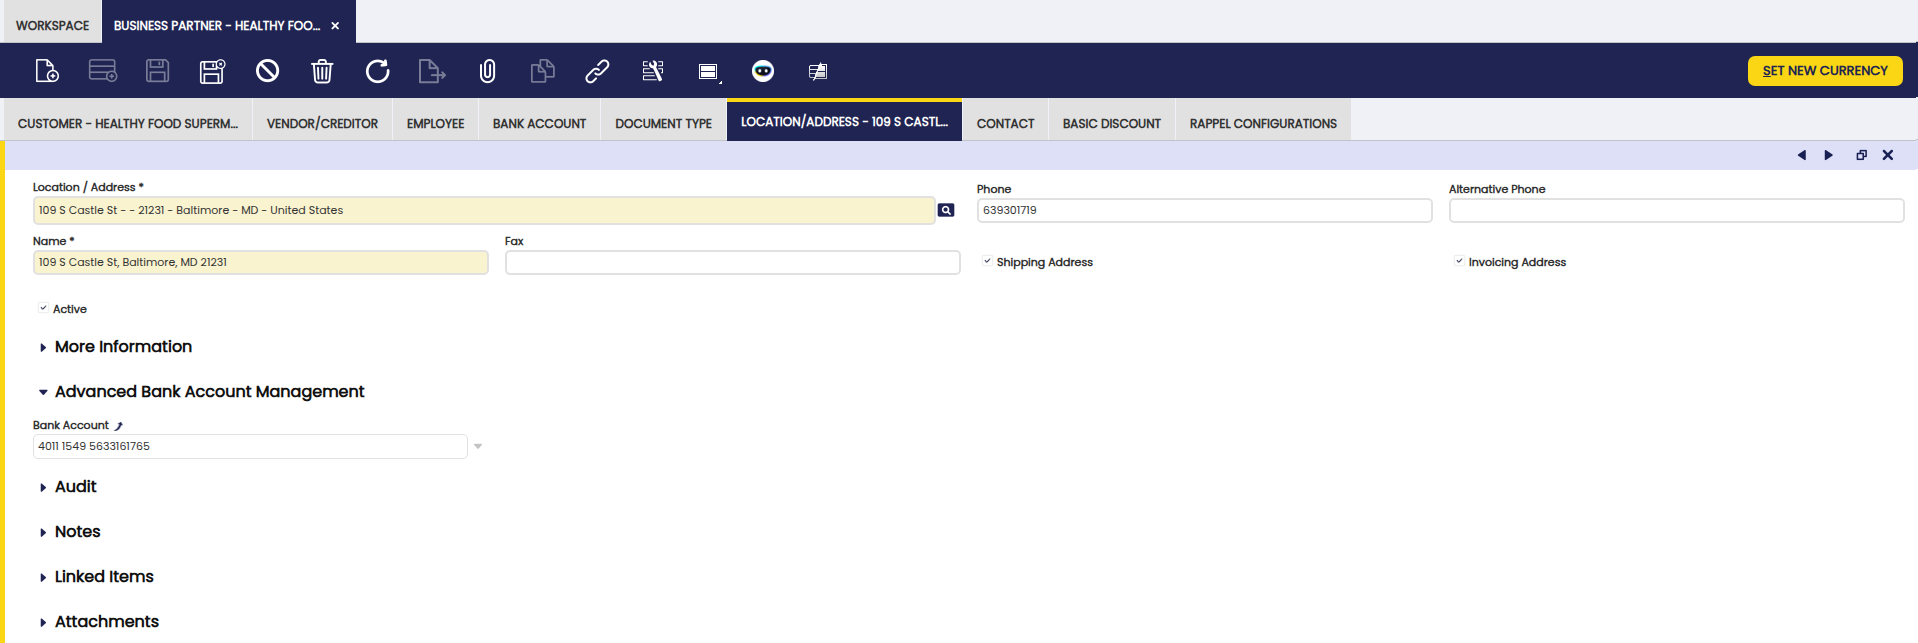
Advanced Bank Account Management
Info
To be able to include this functionality, the Advanced Bank Account Management module of the Financial Extensions Bundle must be installed. To do that, follow the instructions from the marketplace: Financial Extensions Bundle. For more information about the available versions, core compatibility and new features, visit Financial Extensions - Release notes.
The Advanced Bank Account Management field is introduced in the Location/Address tab of the Business Partners window to associate specific bank accounts to the different locations.
Warning
In case of having both a default bank account and a location with a defined bank account, when generating a new document, the location bank account is prioritized over the default one.
Contact
Use the Contact tab to add and configure the business partner contacts you deal with.
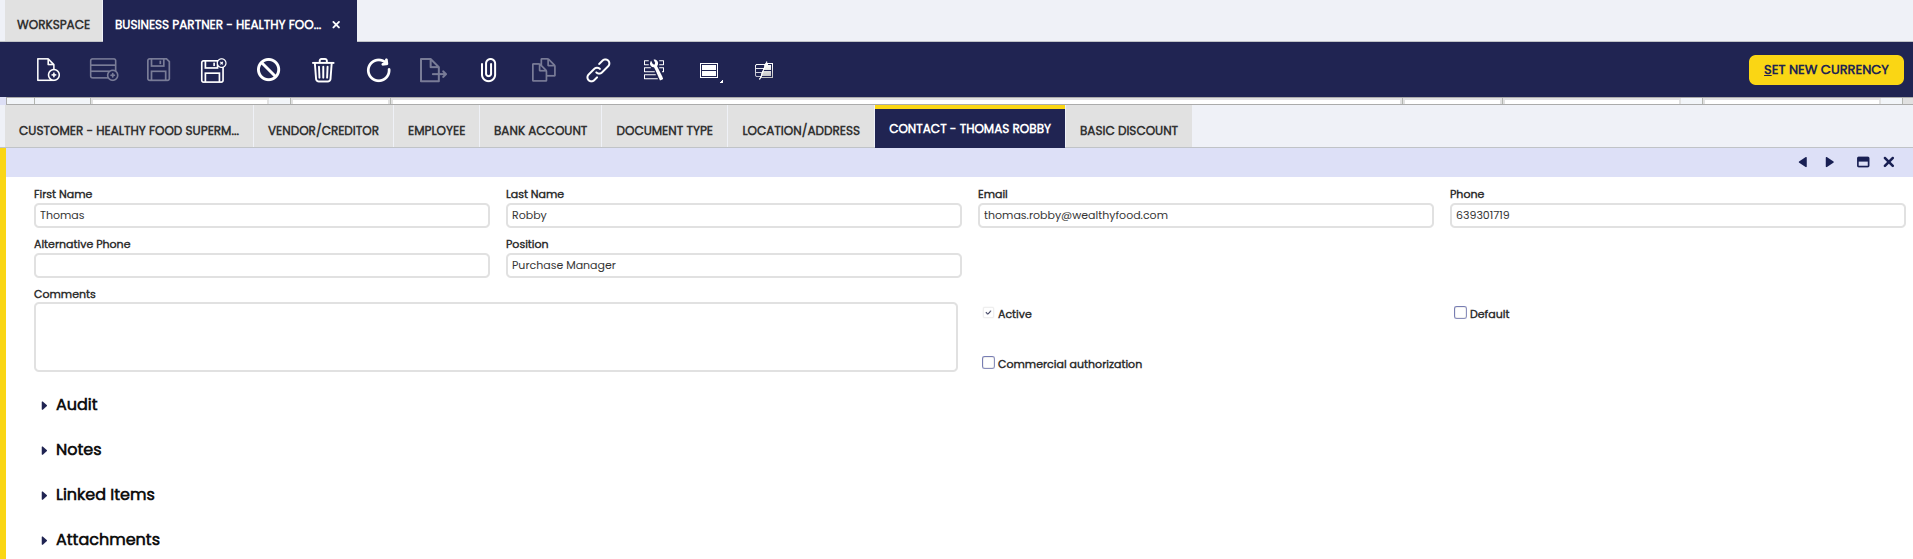
Fields to note:
- First and Last Name of the contact.
- Email of the contact.
- Phone of the contact.
- Alternative Phone of the contact.
- Position in the business partner.
- Comments: To enter additional information.
- Active flag: to indicate if this contact is available for use or disabled.
- Commercial Authorization: This checkbox is selected to indicate or not whether customer wants or does not want to receive commercial information from the organization.
-
Default: Marks this contact as the default recipient when sending documents by email. When selected, this contact's email address is automatically preloaded in the To field of the Email Options popup. If no contact has this flag set, the system falls back to the last used email for the business partner or, if none exists, to the first active contact ordered alphabetically.
Info
Only mark one contact as Default per business partner. If more than one is marked, the system cannot reliably decide which email address to use.
Basic Discount
Use the Basic Discount tab to add and configure business partner Basic Discounts.
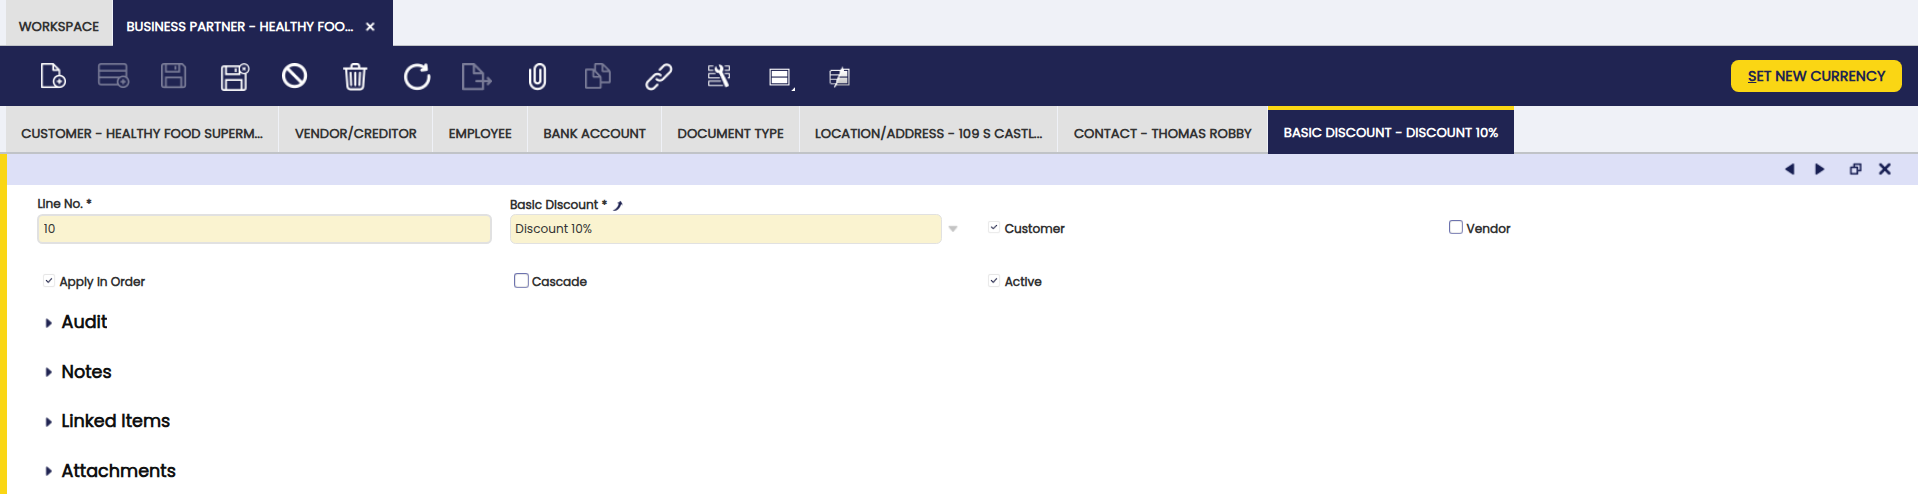
It is possible to enter as many Discounts as agreed with your business partners, by filling in the information below:
- the Discount to be applied while creating sales/purchase transactions for that business partner can be selected from the list (if any) or created by navigating to the Discount window.
- Customer: this checkbox must be selected if the discount is going to be applied to a Business Partner set as Customer.
- Vendor: this checkbox must be selected if the discount is going to be applied to a Business Partner set as Vendor.
- Apply in Order: this checkbox must be selected in case the discount can be applied in sales or purchase orders as applicable.
-
Cascade calculation of the discount. For instance, if first discount is 10% and second one is 5%, a cascade calculation of the total discount will not be 15% but 14.5%.
Without Cascade: each discount is calculated on the original line total. With Cascade: each discount is calculated on the amount left after the previous discount has already been applied.
Example
An example to explain the difference between a Cascade and not Cascade Discount is the following one:
Three Discounts, each one of 10%, the first two ones are defined as not Cascade and the third one as Cascade. Over an Invoice Line of 1.000 USD
- The first discount will create a line of -100 USD (10% of 1.000 USD)
- The second discount will also create a line of -100 USD (10% of 1.000 USD)
- The third one, however, will create a discount based on applying the previous discounts on cascade, so:
- 1.000 USD - 10% = 900 USD (applying the 1st discount on Cascade)
- 900 USD - 10% = 810 USD (applying the 2nd discount on Cascade)
- 10% of 810 USD = 81 USD. So the third discount will be -81 USD.
- In total -100 -100 -81 = -281 USD for all three discounts (a total discount of 28.1%)
Rappel Configurations
Rappels are discounts based on the volume of consumption of a business partner in a given period of time. Use this functionality to configure and grant rappels to business partners.
Info
To be able to include this functionality, the Advanced Rappels module of the Sales Extensions Bundle must be installed. To do that, follow the instructions from the marketplace: Sales Extensions Bundle. For more information about the available versions, core compatibility and new features, visit Sales Extensions - Release notes.
With this functionality, the tab "Rappel Configurations" is shown in the business partners included in the Rappel configurations. Also, in the Business Partner window, create rappels using the button Create Rappel.
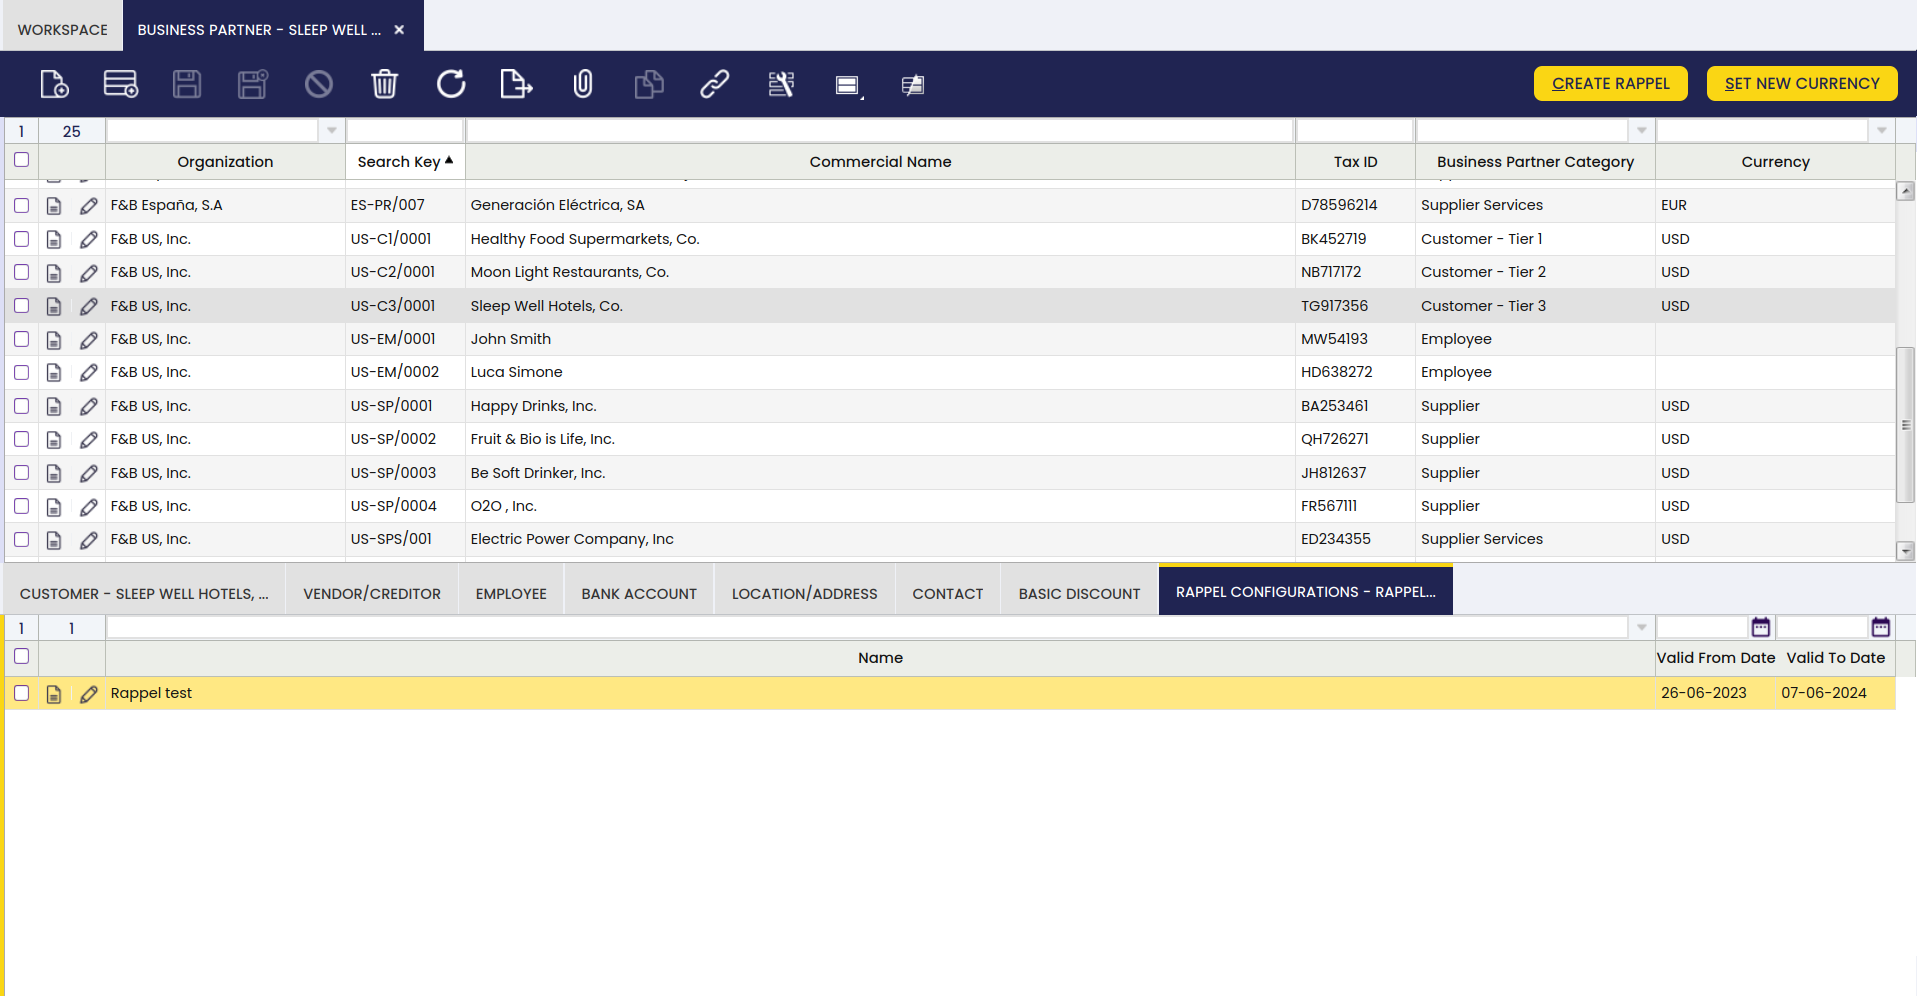
To be able to do this, it is necessary to configure certain aspects in the Rappel Configurations window.
Info
For more information, visit Rappel Configurations.
The Rappel configuration tab can be found in the tabs section of the Business Partner window. This tab shows the configured rappels for each business partner.
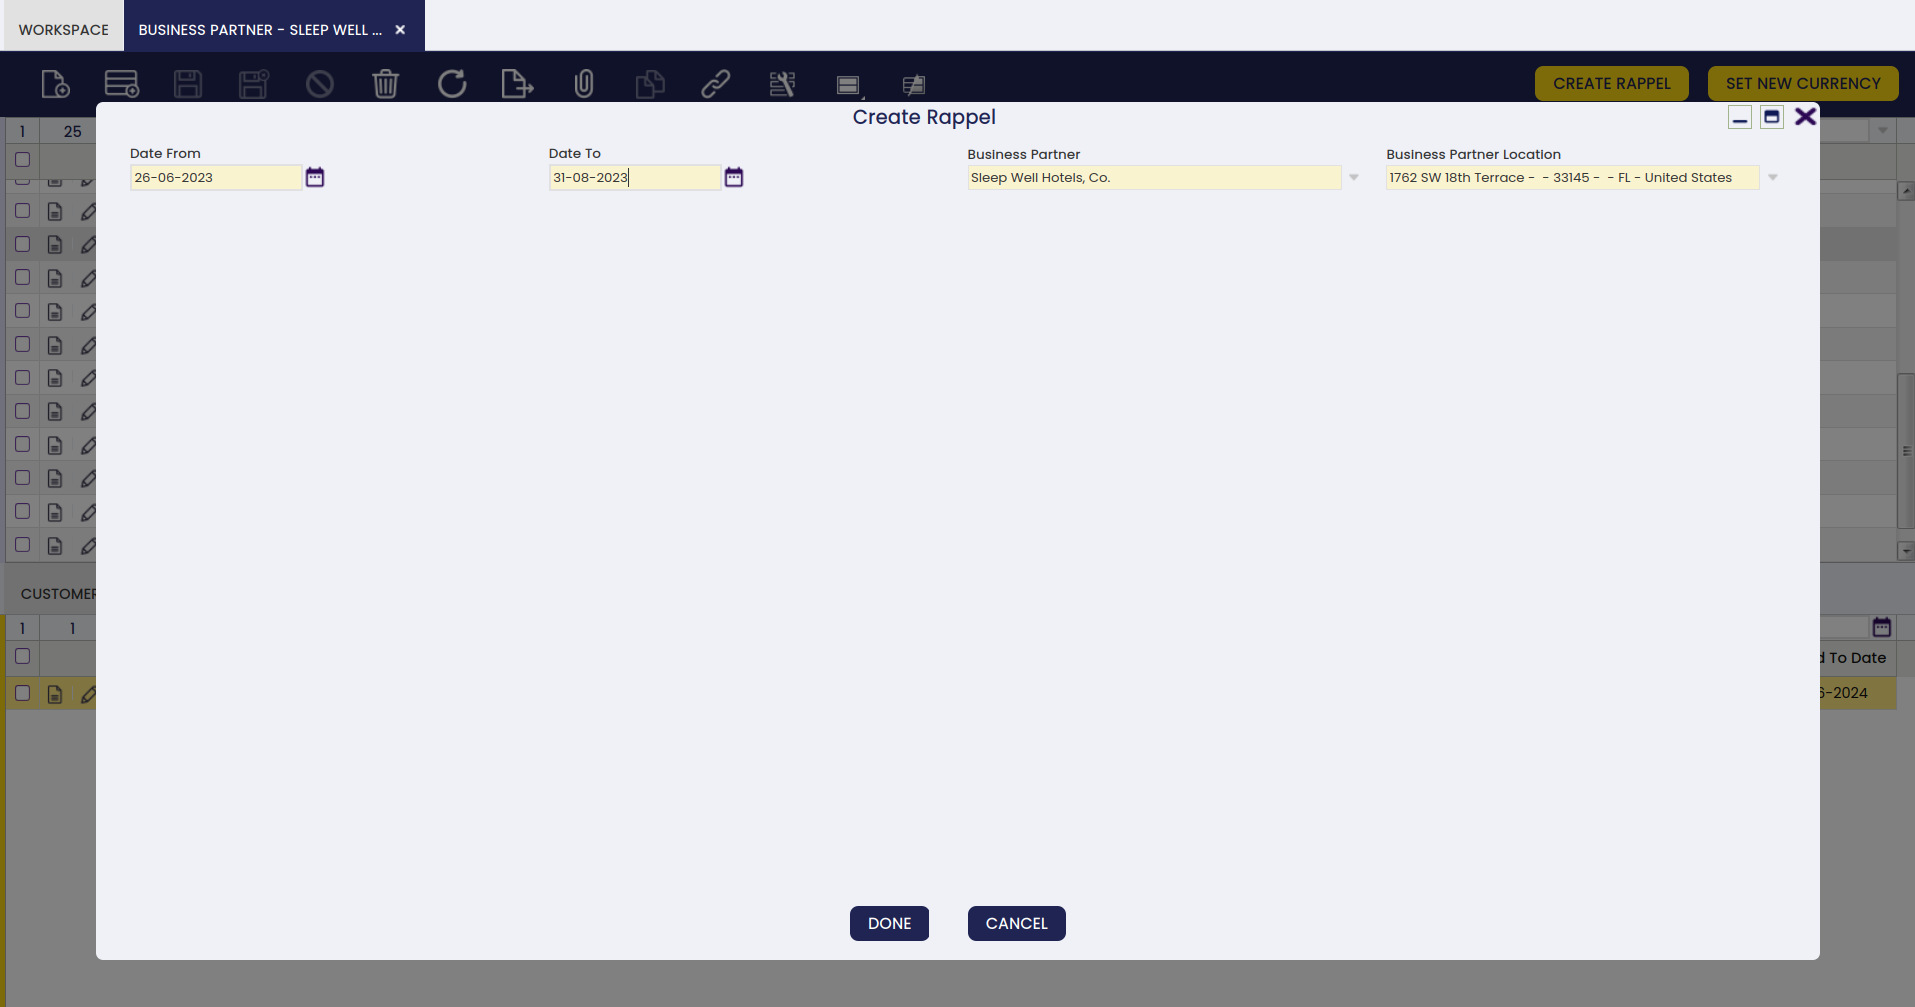
To create a new rappel, select one of the available configurations in this tab and click the Create Rappel button. A pop-up window appears where you can select the business partner (referred to here as trading partner) to whom the Rappel will be assigned, and also configure a date period in which the consumptions will be taken into account to calculate the discounts, determined by the date from and the date to information.
When the rappel is created, a sales invoice is created automatically, as seen below.
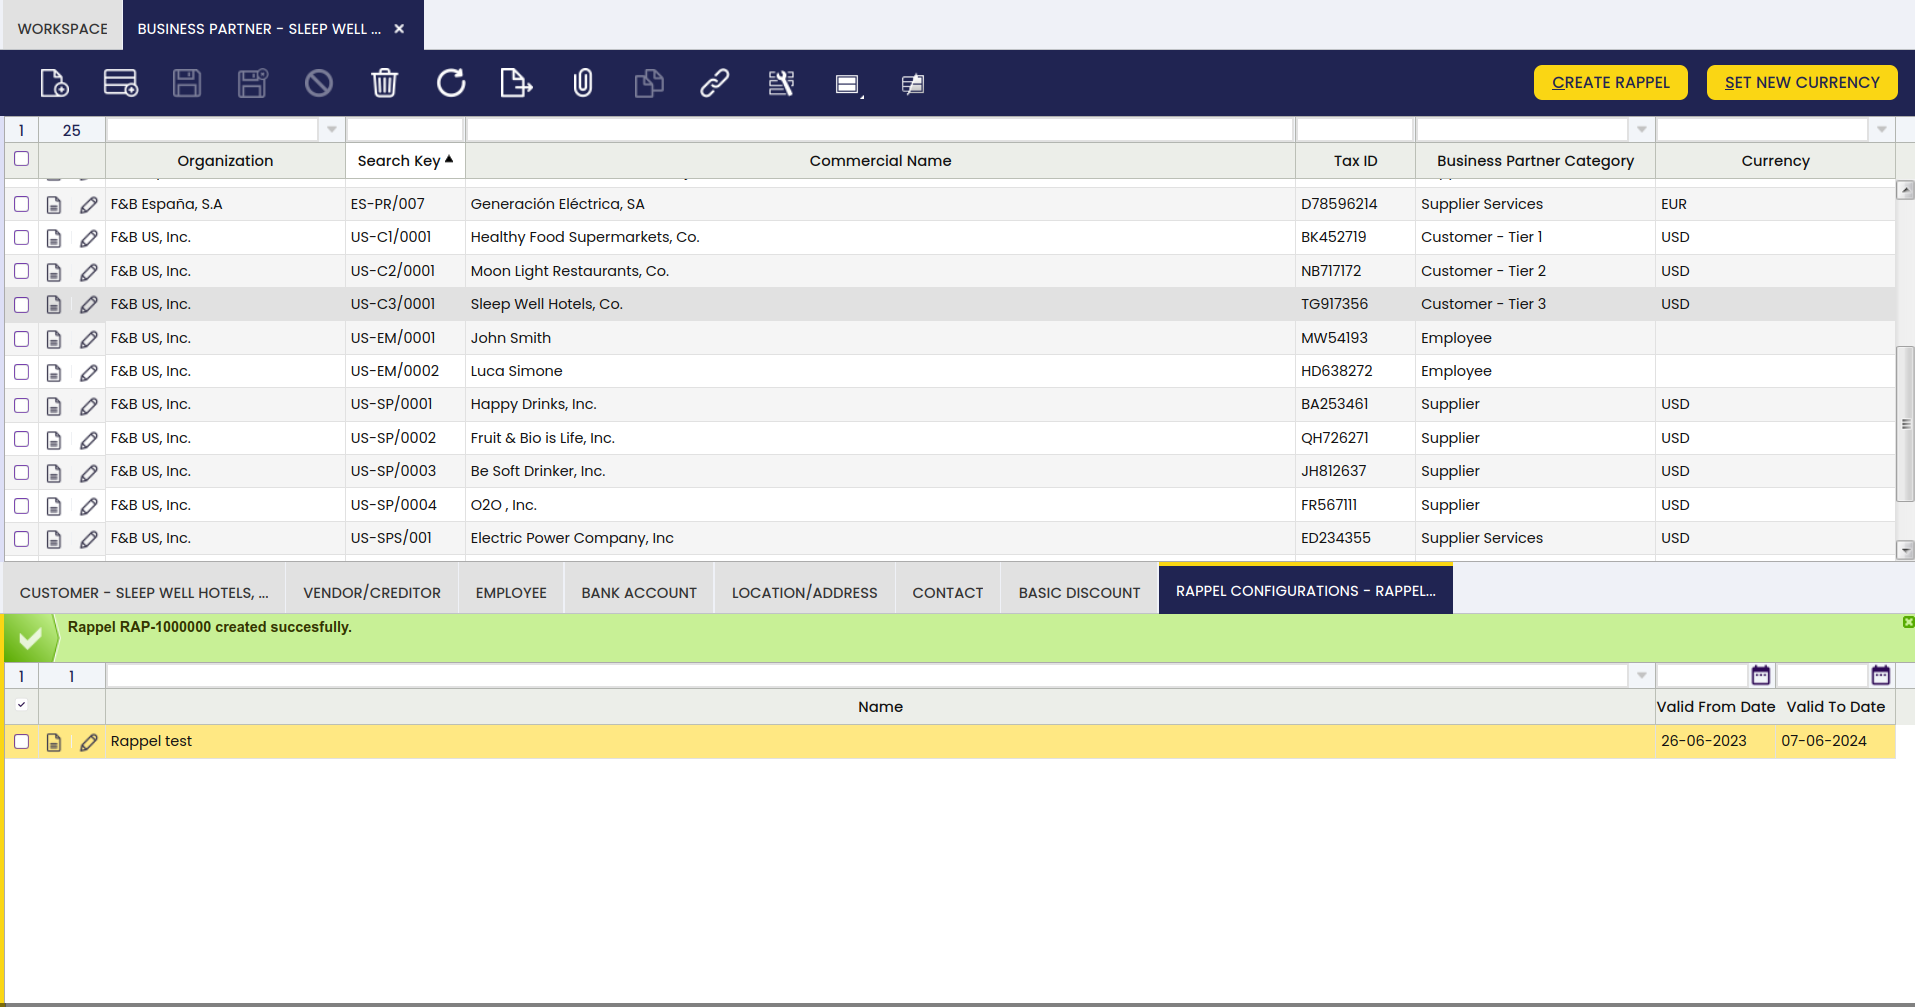
Each time a rappel is granted to a business partner, a new sales invoice is automatically generated to show the amount of the discount. This invoice uses a dedicated numbering series (configured separately) to distinguish rappel invoices from regular sales invoices, and shows a negative amount because it represents a discount. This invoice is in Draft status.
Info
For more information, visit Sales Invoice.
This work is a derivative of Master Data Management by Openbravo Wiki, used under CC BY-SA 2.5 ES. This work is licensed under CC BY-SA 2.5 by Futit Services S.L.