Bank Integration with Salt Edge
Javapackage: com.etendoerp.psd2.bank.integration
Before you begin
This module requires the Financial Extensions Bundle to be installed in your Etendo environment. If you are unsure whether it is installed, contact your system administrator before proceeding. For installation instructions, visit the marketplace: Financial Extensions Bundle. For available versions and core compatibility, visit Financial Extensions - Release notes.
Overview
This page explains how to connect bank accounts to Etendo so that transactions are imported automatically and outgoing payments can be initiated directly from the system. It is intended for finance and accounting staff who perform bank reconciliations and vendor payment runs, and for administrators who perform the initial setup.
The module provides two main capabilities, both powered by Salt Edge — an Open Banking platform that acts as a secure intermediary between Etendo and banking institutions, compliant with the PSD2 directive. Etendo manages the Salt Edge connection on your behalf; no direct Salt Edge account is required.
-
AIS (Account Information Service): Securely connect bank accounts and automatically download transactions for reconciliation.
- PIS (Payment Initiation Service): Initiate vendor payments directly from Etendo, with authorization handled through the bank.flowchart LR A([Connect bank account]) --> B[Grant permissions] B --> C[Download transactions] C --> D([Bank statement ready<br/>for reconciliation ✅])flowchart LR A([Create Payment OUT]) --> B[Generate bank payment] B --> C[Authorize at bank portal] C --> D[Check payment status] D --> E([Payment executed ✅])
| AIS | PIS | |
|---|---|---|
| Automated transaction import | Direct payment initiation | |
| Real-time synchronization | Real-time status tracking | |
| Multiple banks simultaneously | SEPA, FPS, and DOMESTIC templates | |
| Bank credentials never stored in Etendo | Authorization handled by the bank |
Prerequisites
Confirm the following before using the Bank Integration functionality:
- Server Configuration: Your system administrator has configured the application URL
context.urlin the Etendo server and run the setup process. Contact your IT team or implementation partner to confirm this is done. - Salt Edge API Key: Your organization has a Salt Edge API Key. Contact Etendo Support to request it.
- User Configuration: The API Key is configured in your Etendo user profile (detailed in the Setup section below).
- Financial Accounts: The Financial Accounts that will be linked to your bank accounts exist in Etendo.
- Button Visibility: Confirm the logged-in user has a PSD2 API Key configured. The integration buttons and fields (Connect Bank Account, Get Bank Statement, Generate Bank Payment, etc.) are only visible when the API Key is set.
Setup
1. Configure Salt Edge API Key
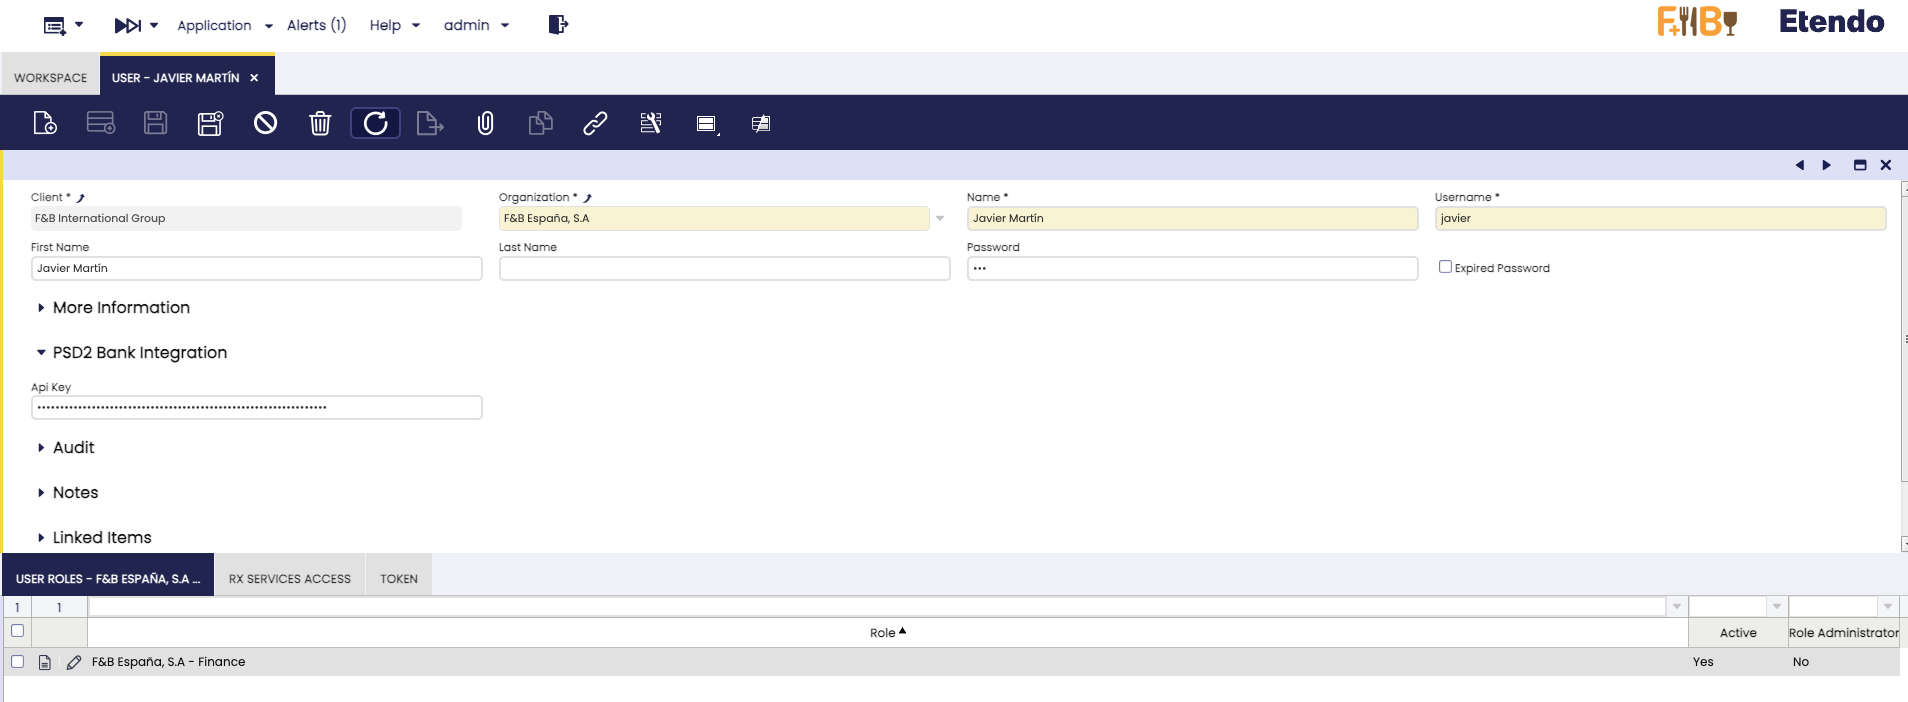
Application > General Setup > Security > User
As an Administrator or user with appropriate permissions:
- Navigate to the User window.
- Select the user record that will perform bank operations.
- Locate the API Key field in the PSD2 Bank Integration section and enter the API Key provided by Support Service.
Info
Each user who will perform bank synchronization or payment initiation must have their own API Key configured. The API Key is user-specific — keep it confidential.
Button and Field Visibility
All PSD2 integration buttons and fields are only visible when the logged-in user has a PSD2 API Key configured. This includes:
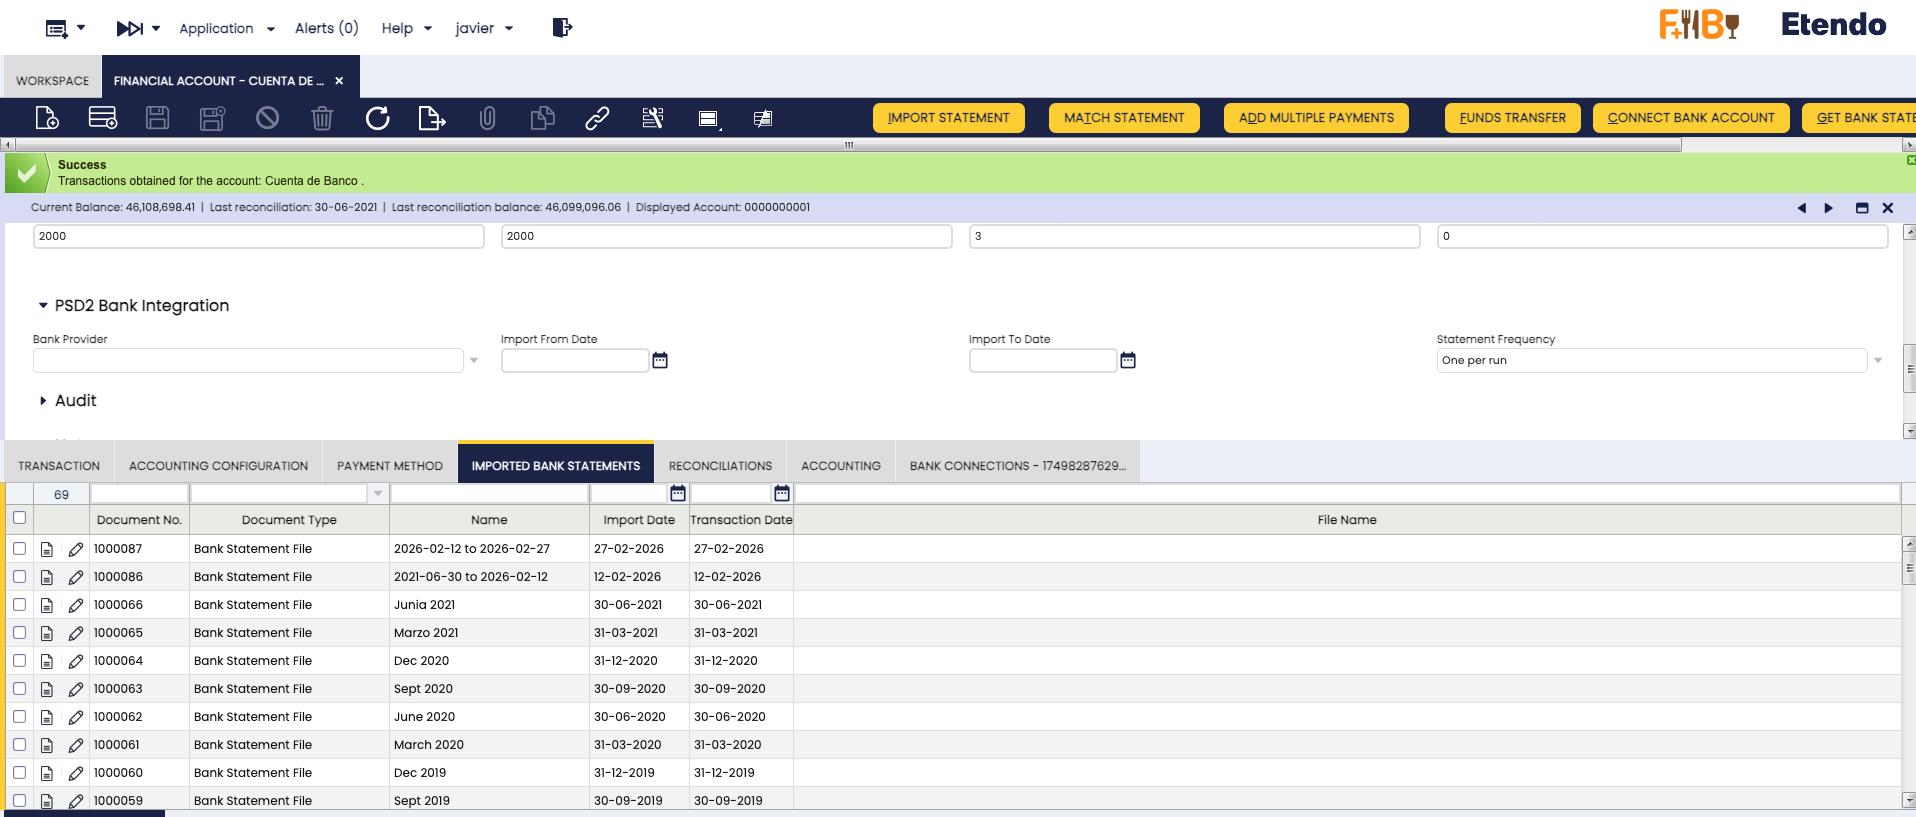
- In the Financial Account window: the Connect Bank Account button, Get Bank Statement button, Bank Provider selector, Import From Date, Import To Date, and Statement Frequency fields.
- In the Payment OUT window: the Generate Bank Payment button.
If you do not see these elements, verify that the current user has a valid API Key entered in the PSD2 API Key field of the User window.
2. Configure Financial Accounts
Financial Management > Receivables and Payables > Transactions > Financial Account
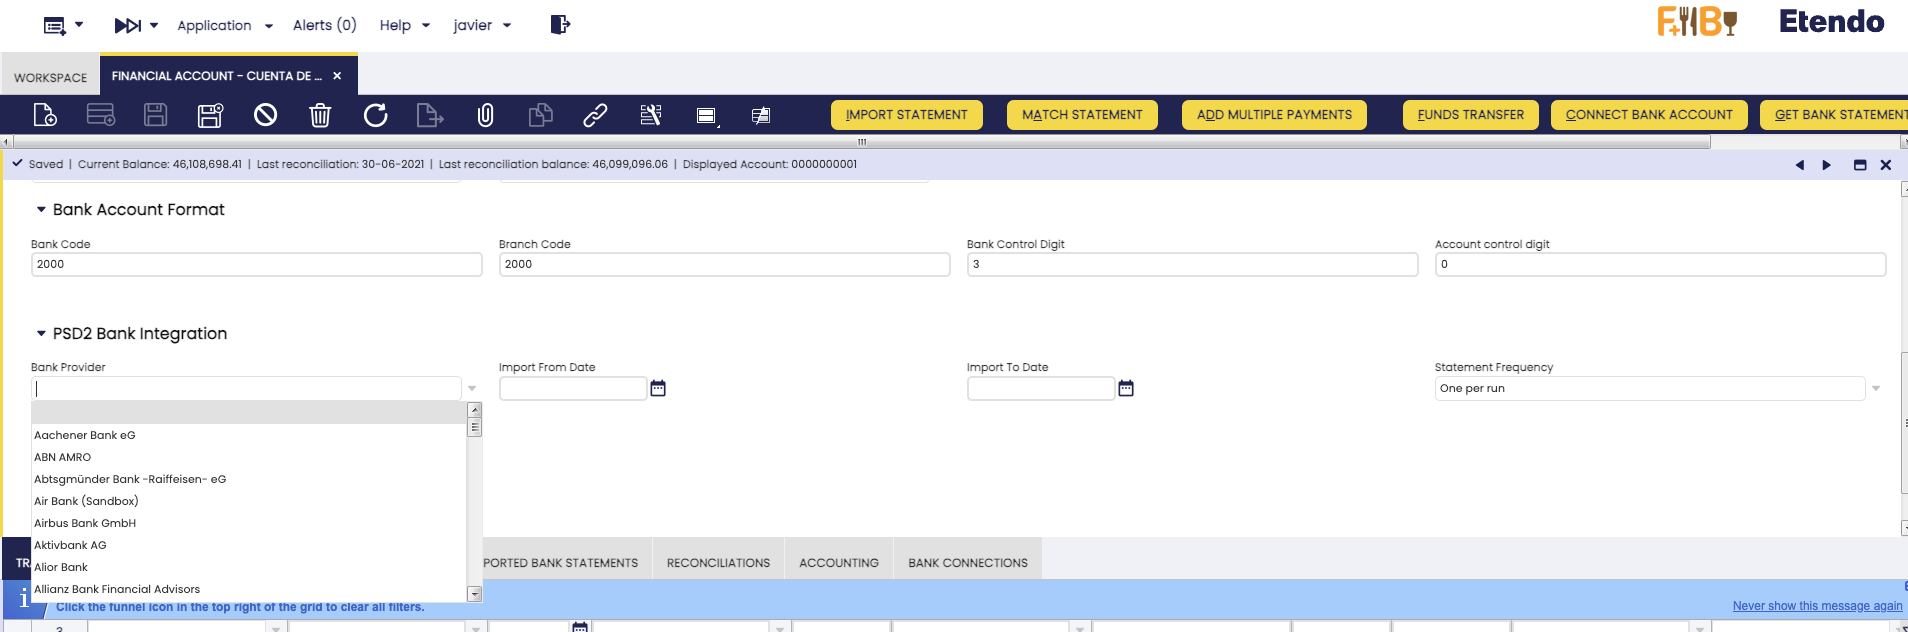
For each financial account you want to synchronize with a bank, open it and fill in the following fields in the PSD2 Bank Integration tab:
| Field | Description |
|---|---|
| Bank Provider | The bank associated with this account. If set, the bank selection step is skipped when connecting (AIS) or initiating payments (PIS). Leave empty to select the bank manually each time. The provider list must be synchronized first — see Step 3. |
| Import From Date | Start date for importing transactions. If left empty, the system uses the last imported bank statement date. Set this only for the initial import (e.g., beginning of fiscal year) — leave it empty afterward so imports continue automatically from where they left off. |
| Import To Date | End date for importing transactions. If left empty, the system uses today's date. Leave it empty in normal operation. |
| Statement Frequency | Controls how imported transactions are grouped into bank statements: One per run (default) creates a new statement on every import; One per week or One per month groups transactions into a single statement per period, reactivating it if already processed. Use weekly or monthly grouping when importing daily to reduce the total number of statements. |
3. Synchronize Bank Providers
Financial Management > Receivables and Payables > Setup > PSD2 > Synchronize Bank Providers
Run this process once during initial setup. Re-run it on demand if a bank provider does not appear in the list or you want to verify whether a specific bank is supported by Salt Edge. Execute the process from the menu above — no specific user is required.
Info
This step is required before assigning a Bank Provider to a financial account or initiating payments.
Bank Connection Flow (AIS)
Connect Bank Account
Once your user has the API Key configured and the financial account dates are set:
Tip
Make sure your Financial Account has the IBAN field configured before connecting. The system uses it to help match your bank accounts correctly. If the IBAN is missing, you will see a warning message.
- Open the Financial Account (bank) you want to connect.
- Click the Connect Bank Account button.
-
A Salt Edge connection widget will open in a popup window.
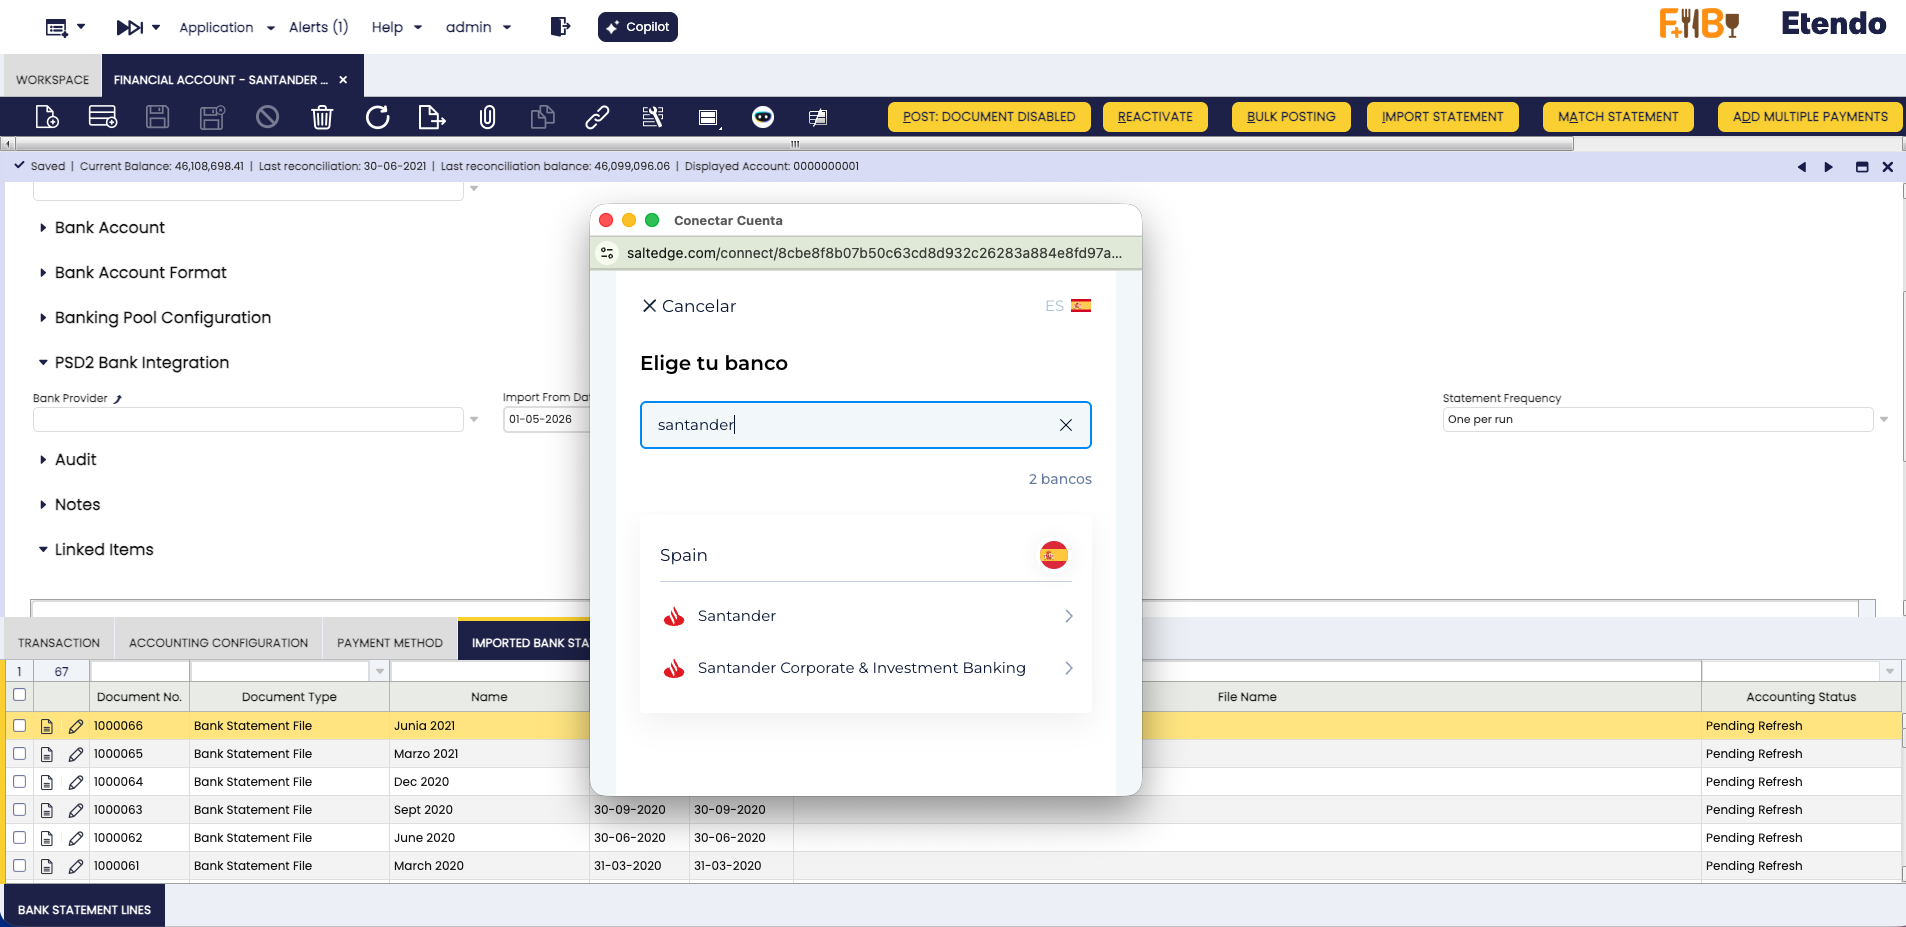
- Search or select your bank from the list of supported banks
- Click on your bank to continue
Info
If you have assigned a Bank Provider to the Financial Account (see Setup - Step 2), the bank selection step is skipped automatically and you will be taken directly to your bank's authentication page.
-
Authorize the connection:
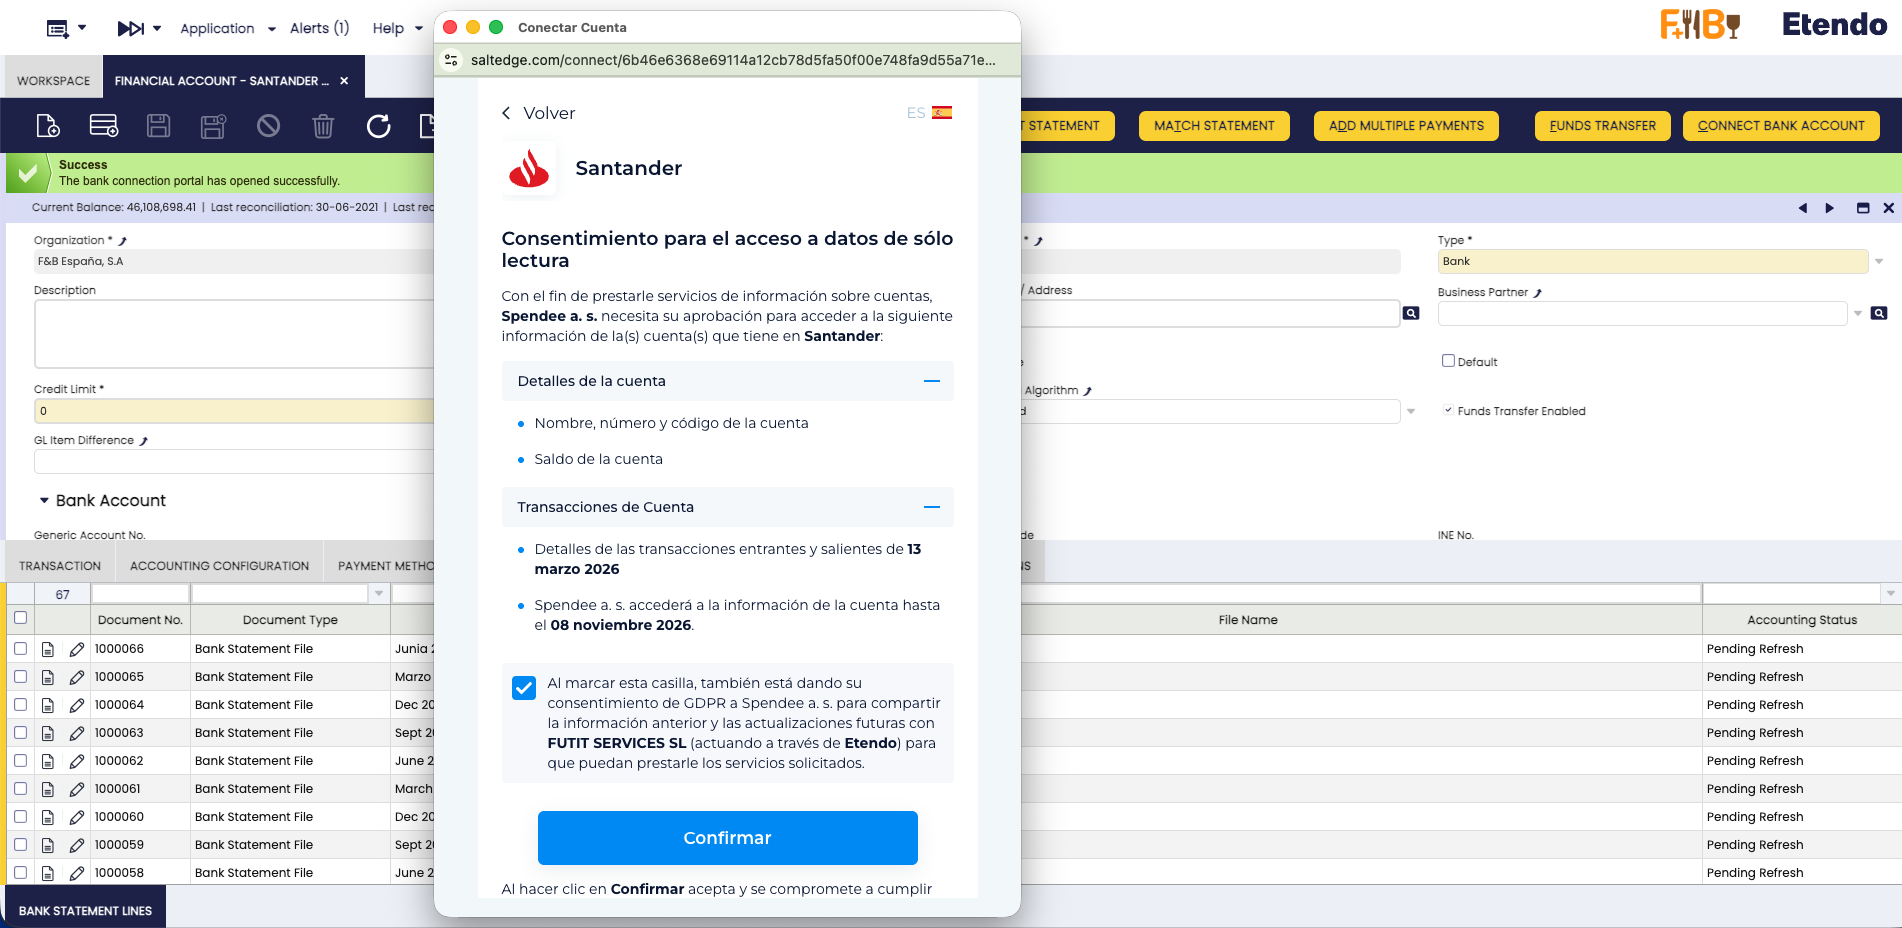
- Your bank will ask you to confirm permission for Salt Edge to access your account information
- Review the permissions and confirm
-
You will be redirected to your bank's login page
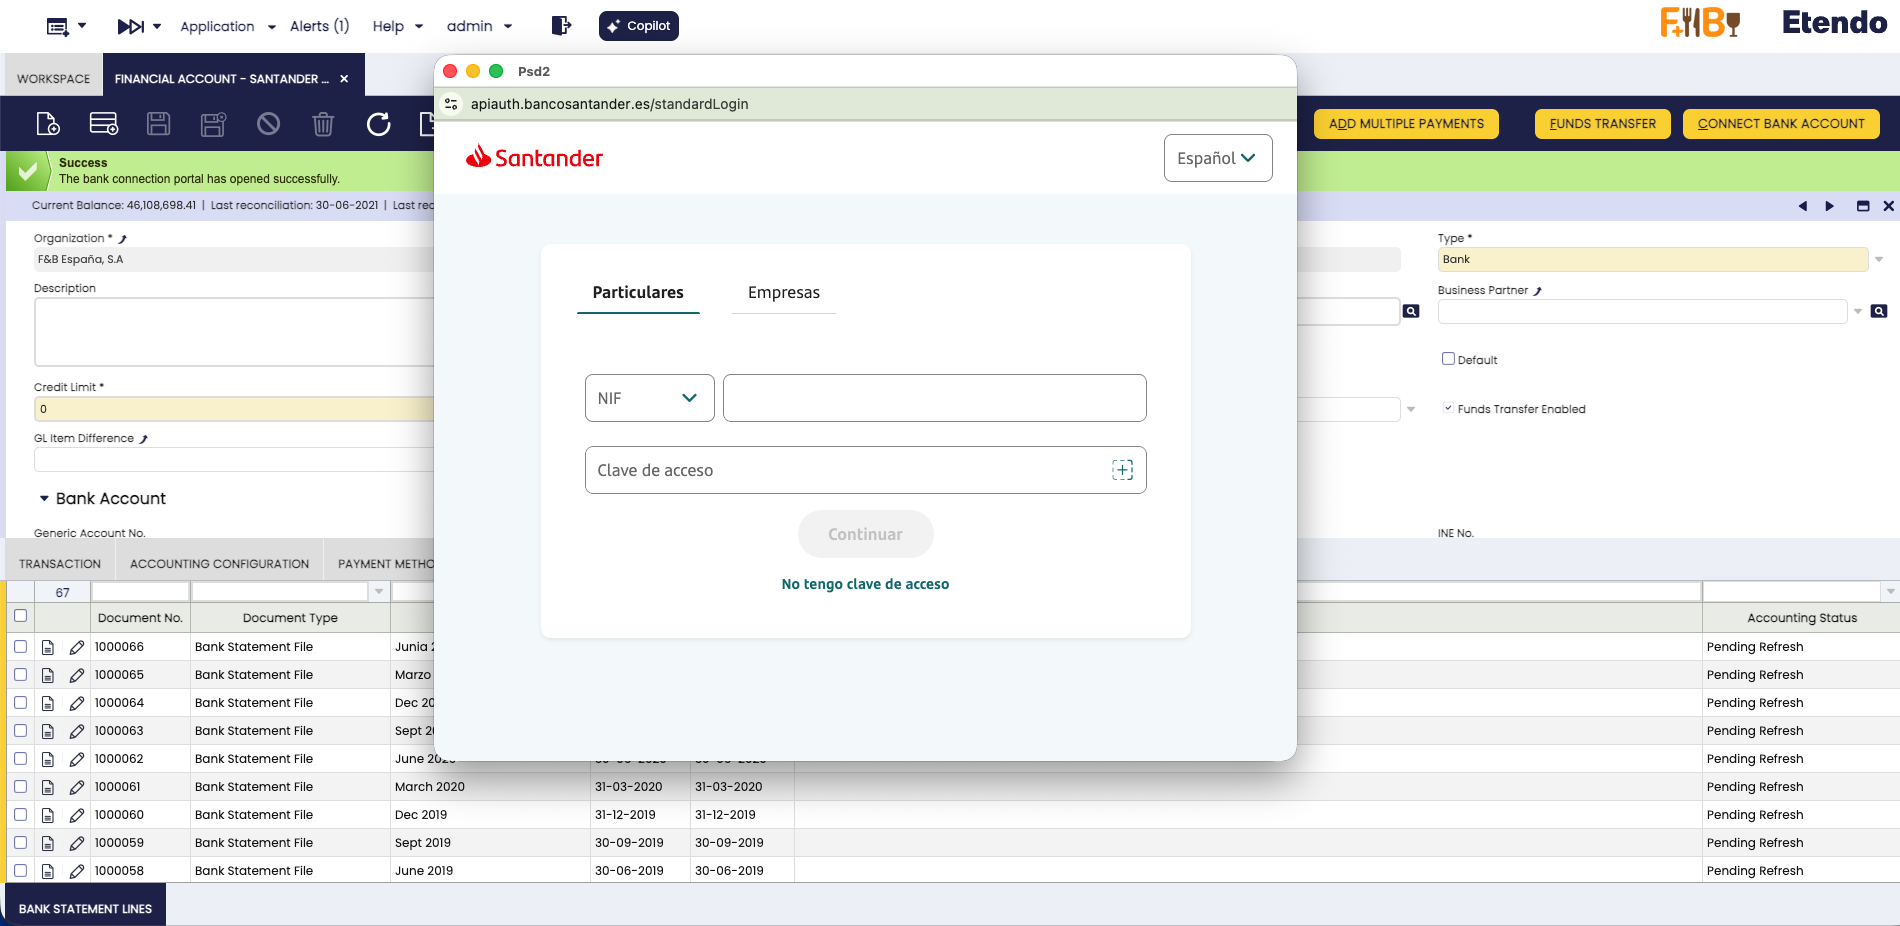
Log in with your bank credentials (username, password, and any additional authentication required by your bank)
Important Security Note
- Your bank credentials are entered directly on your bank's website, not in Etendo
- Salt Edge never stores your bank credentials
- Etendo never has access to your bank username or password
-
After successful authentication, a success page confirms the connection. The system automatically synchronizes your bank accounts — connection details appear in the Bank Connections tab. Close the popup and proceed to import transactions.
Info
Running Synchronize Bank Connections manually after connecting is not required — it runs automatically.
Importing Transactions
There are two ways to import bank transactions:
Option 1: Manual Import (Single Account)
For importing transactions on-demand for specific accounts:
- Open the Financial Account window.
- Select one or more financial accounts.
-
Click the Get Bank Statement button.
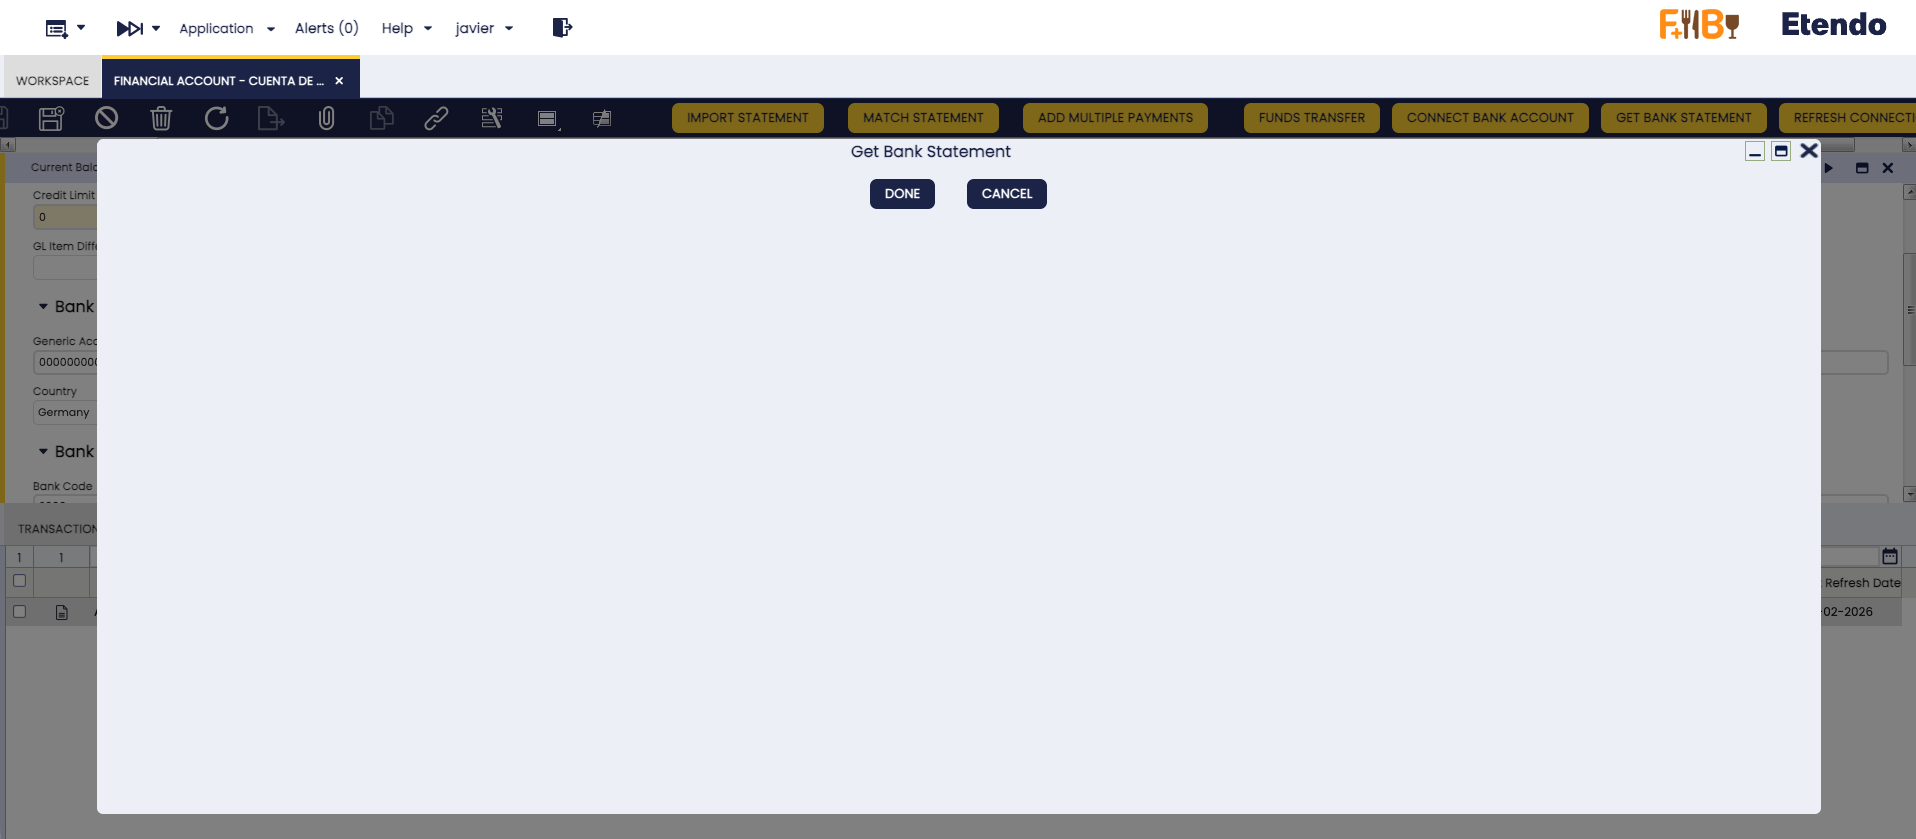
-
The system will:
- Connect to Salt Edge.
- Retrieve transactions within the configured date range.
- Filter out duplicate transactions.
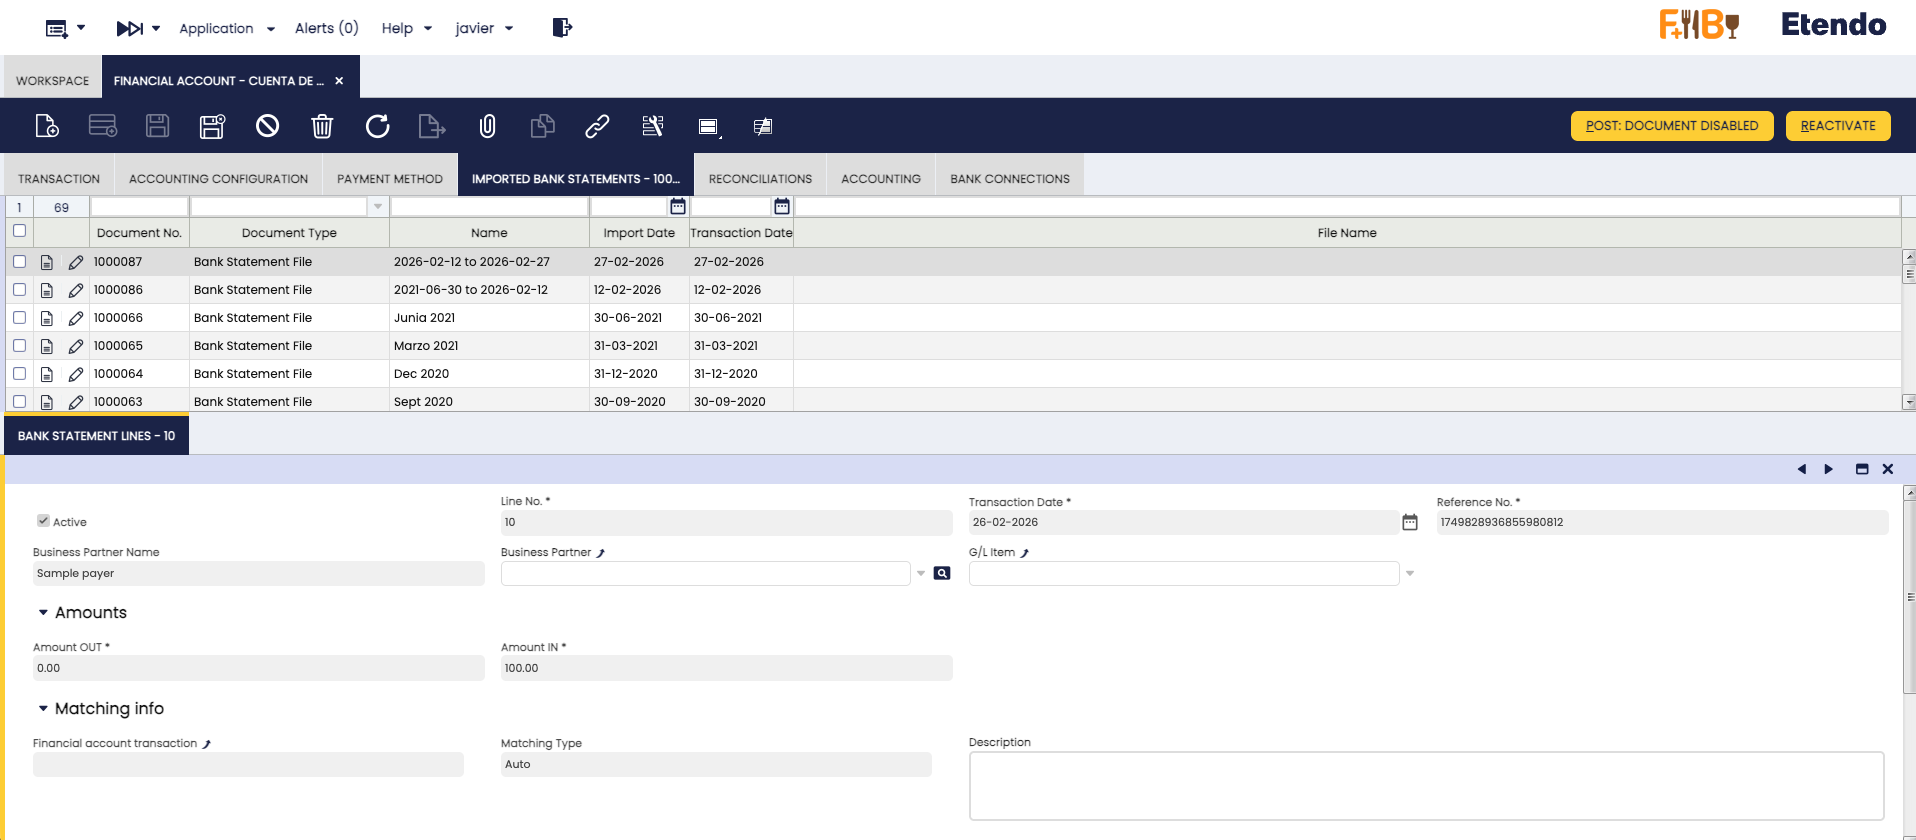
- Create or update bank statements.
- Create bank statement lines for each transaction.
-
A summary message will show the results:
- Number of new transactions imported.
- Any warnings or errors encountered.
Tip
Use this option when you need to immediately import transactions for specific accounts or when you want to review the import results right away.
Option 2: Automatic Import (Scheduled Process)
For regular, automated imports across all connected accounts:
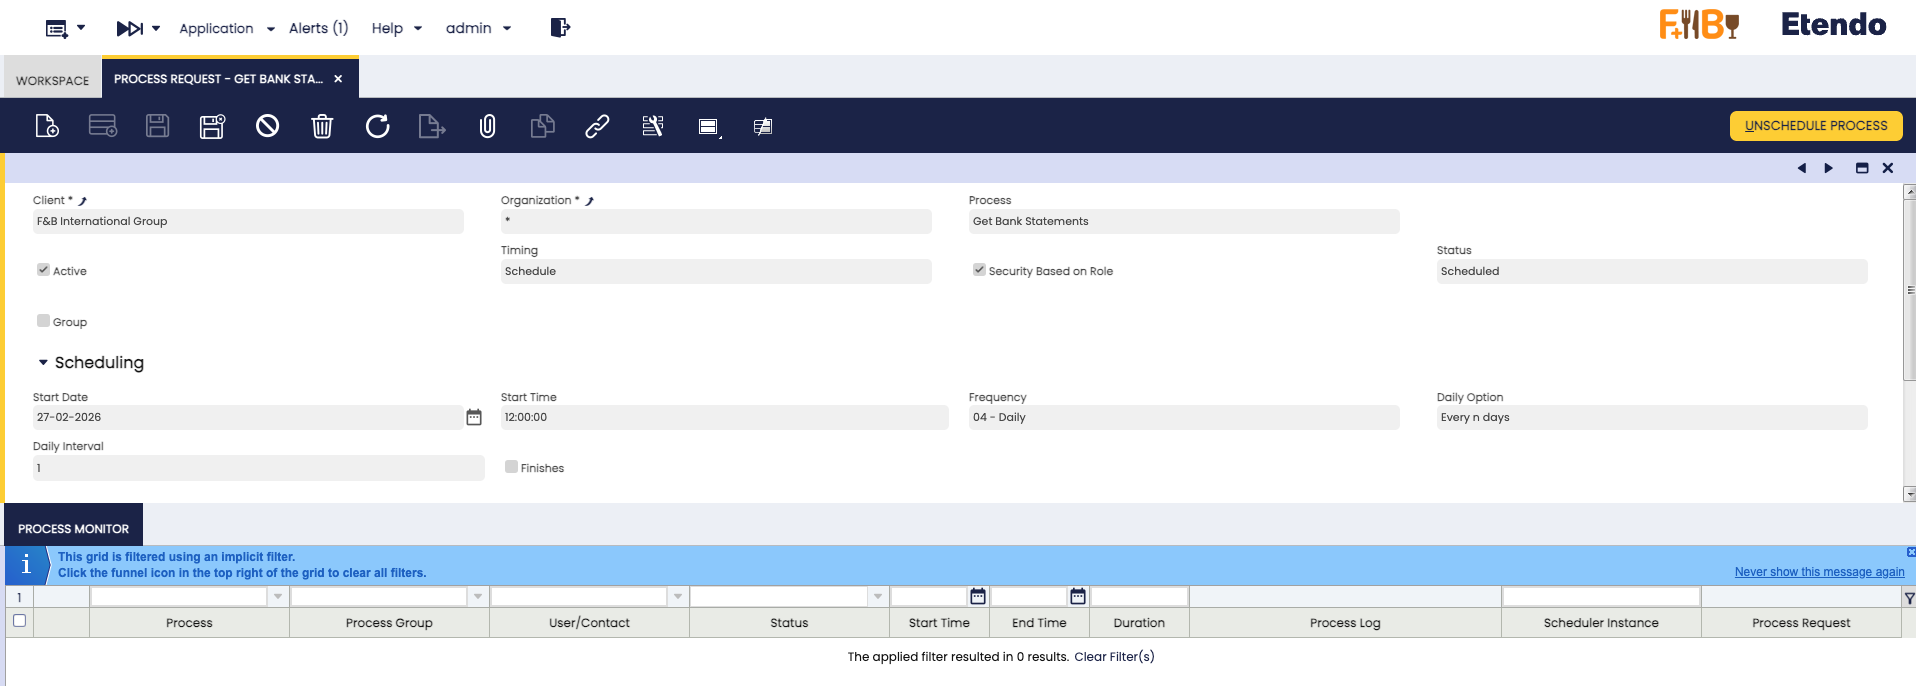
General Setup > Process Scheduling > Process Request
- Click New to create a new process request.
- In the Process field, select Get Bank Statements.
- Set the Timing field to the frequency you need (for example, Daily).
-
Save the record. The process runs automatically at the chosen interval and imports new transactions for all connected accounts.
Info
Recommended Schedule:
- For most businesses: Run once or twice daily (e.g., 6 AM and 6 PM).
- For high-volume accounts: Run every few hours.
- Consider your bank's update frequency and your business needs.
Connection Management
Financial Management > Receivables and Payables > Transactions > Financial Account
To view all your bank connections:
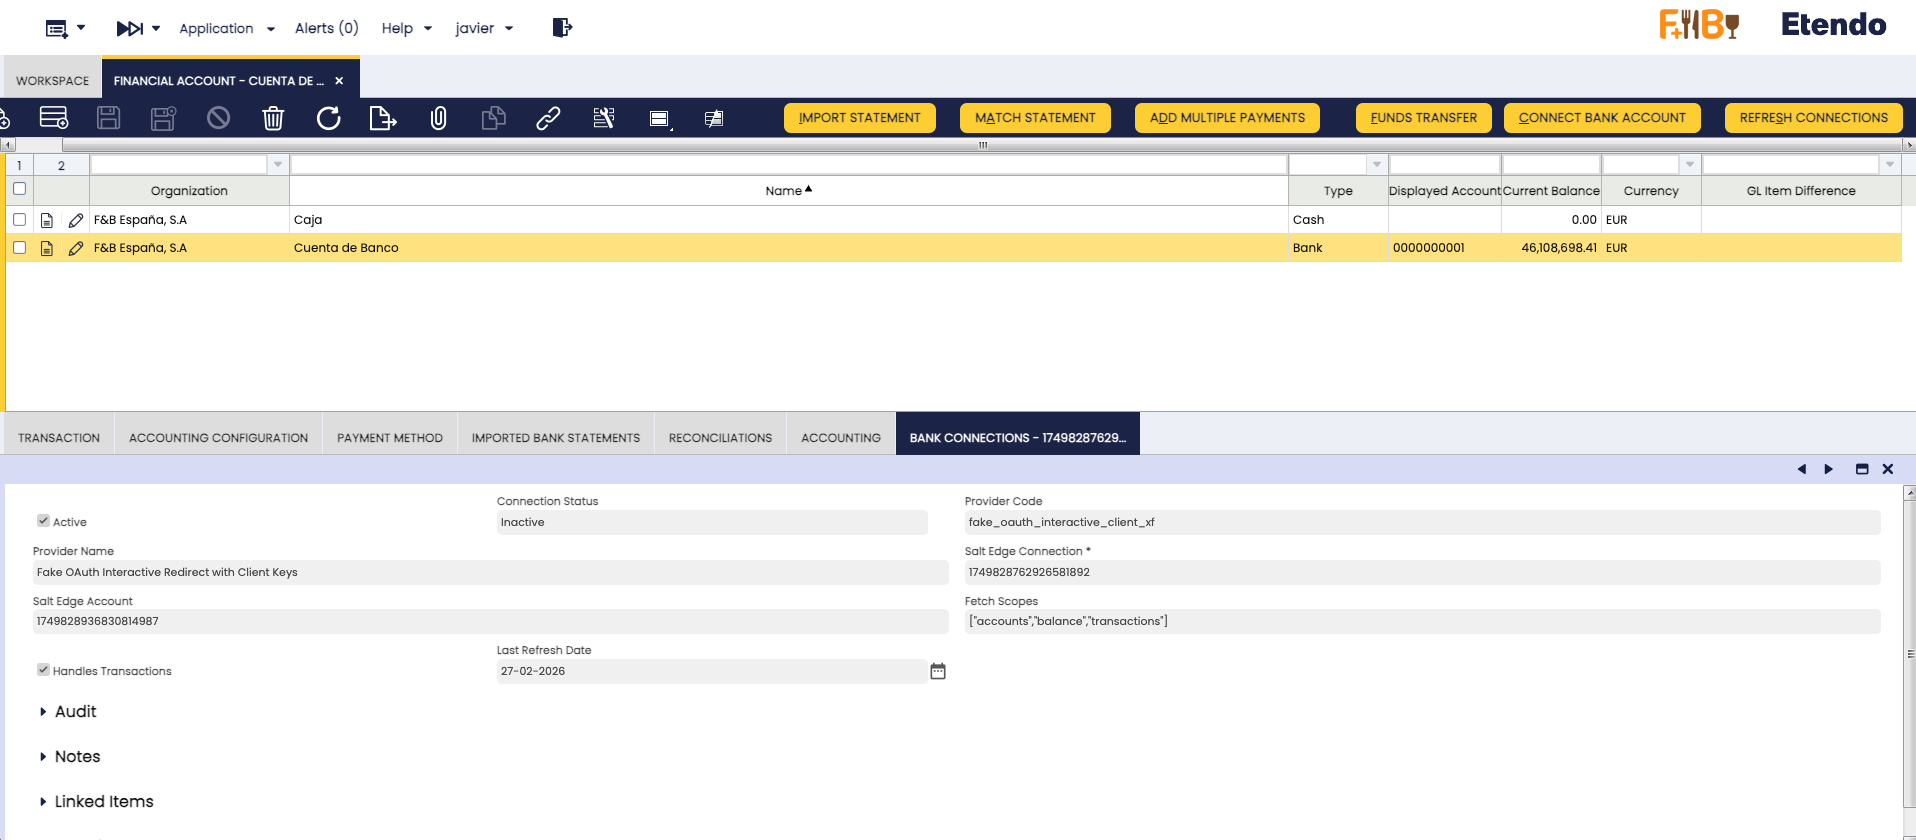
- Open the Financial Account window
- Navigate to the Bank Connections tab
- Here you can see all connections associated with the financial account, including:
- Provider Name
- Salt Edge Connection ID
- Connection Status
- Last Refresh Date
- Fetch Scopes (permissions granted)
Connection Status
Bank connections can have different statuses:
- Active (AC): Connection is working normally
- Inactive (IN): Connection exists but is not being used for transactions
- Disabled (DI): Connection has been disabled (e.g., authentication expired)
Syncing Bank Connections
Financial Management > Receivables and Payables > Setup > PSD2 > Synchronize Bank Connections
The Synchronize Bank Connections process allows you to manually refresh the connection information for your financial accounts.
The process:
- Checks the current status of all bank connections for the configured financial accounts.
- Updates connection statuses to reflect the real-time state from Salt Edge.
- Refreshes account information associated with each connection.
A summary message will show the results.
Tip
Run this process only if you suspect a connection status is outdated or after making changes at your bank (e.g., adding new accounts). Bank connections are synchronized automatically when you first connect a bank.
Disconnecting a Bank Connection
If you need to remove a bank connection:
- Open the Financial Account window
- Navigate to the Bank Connections tab
- Select the connection(s) you want to disconnect
-
Click the Disconnect Connection button
Warning
Important: - Disconnecting a connection permanently removes it from both Etendo and Salt Edge - Reconnect if you want to use this bank connection again - This action cannot be undone - Pending transactions are not affected, but no new transactions can be imported from this connection
-
After disconnection, verify the removal in the Bank Connections tab.
Reconnecting a Bank Connection
If a connection shows as Inactive or Disabled, select it in the Bank Connections tab and click Reconnect Connection. A Salt Edge widget opens — re-authenticate with your bank to restore the connection to Active.
Note
If the connection is already active when you click Reconnect Connection, you receive a success message and no further action is needed. If Get Bank Statements encounters a connection issue, it automatically marks the connection as Disabled and tries the next available one.
Bank Payment Initiation (PIS)
In addition to importing bank transactions (AIS), this module allows you to initiate bank payments directly from Etendo. When you create a Payment OUT record in Etendo, you can send it to your bank for authorization and execution — all without leaving the ERP.
How Bank Payments Work
The payment initiation flow works as follows:
- Create a Payment OUT record in Etendo as usual.
- From the payment record, click the Generate Bank Payment button.
- A form appears with pre-filled values (amount, creditor, template, etc.).
- After reviewing and confirming, a bank authorization popup opens.
- Authorize the payment in your bank's secure environment.
- The payment status is tracked automatically in Etendo.
Payment Templates
The system supports three payment templates, which determine the format and required information for the payment:
| Template | Currency | Required Fields | Use Case |
|---|---|---|---|
| SEPA | EUR only | Creditor IBAN | Eurozone bank transfers |
| FPS | GBP only | Sort Code + Account Number | UK Faster Payments |
| DOMESTIC | Any | At least one of: IBAN, BBAN, or Account Number | Other domestic transfers |
Note
The template is automatically selected based on the currency of the payment:
- EUR → SEPA
- GBP → FPS
- Any other currency → DOMESTIC
Change the template manually in the form if needed.
Required Configuration
Before generating bank payments, make sure the payment method assigned to the financial account is configured correctly.
Financial Management > Receivables and Payables > Transactions > Financial Account
- Open the Financial Account linked to the bank connection.
- Go to the Payment Method tab.
- Select the payment method used for bank transfers.
- In the Payment OUT section, make sure Automatic Withdrawn is disabled (unchecked).
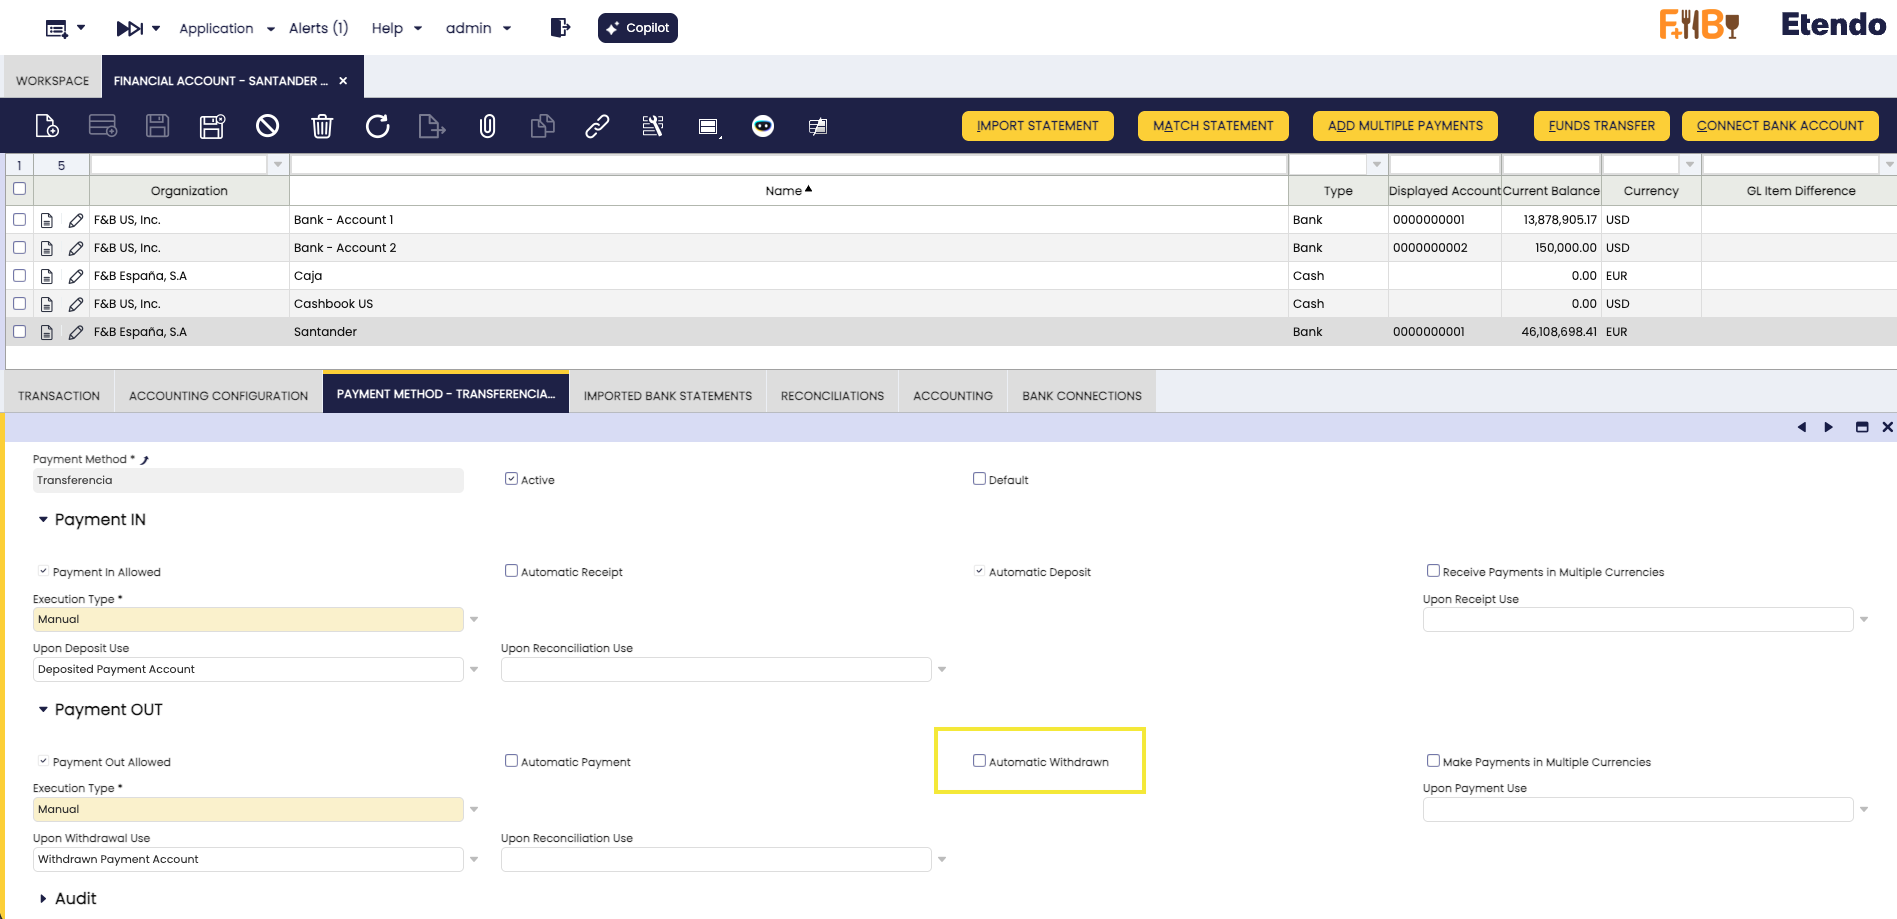
Warning
If Automatic Withdrawn is enabled, the system processes the withdrawal automatically and the Generate Bank Payment button does not appear on the Payment OUT record. Disable this option to allow manual bank payment initiation through Salt Edge.
Generating a Bank Payment
Financial Management > Receivables and Payables > Payment OUT
- Open an existing Payment OUT record.
-
Click the Generate Bank Payment button.

-
A process form appears with the following pre-filled fields:
Field Default Value Description Template Based on currency Payment template (SEPA, FPS, or DOMESTIC) End-to-End Document number Unique reference for the payment (max 35 characters) Creditor Name Business Partner name Name of the payment beneficiary Amount Payment amount Amount to transfer Currency Payment currency Currency of the transfer Description Payment description Description of the payment Creditor IBAN Business Partner's IBAN Required for SEPA and optionally for DOMESTIC Creditor Account Number Business Partner's account Required for FPS, optional for DOMESTIC 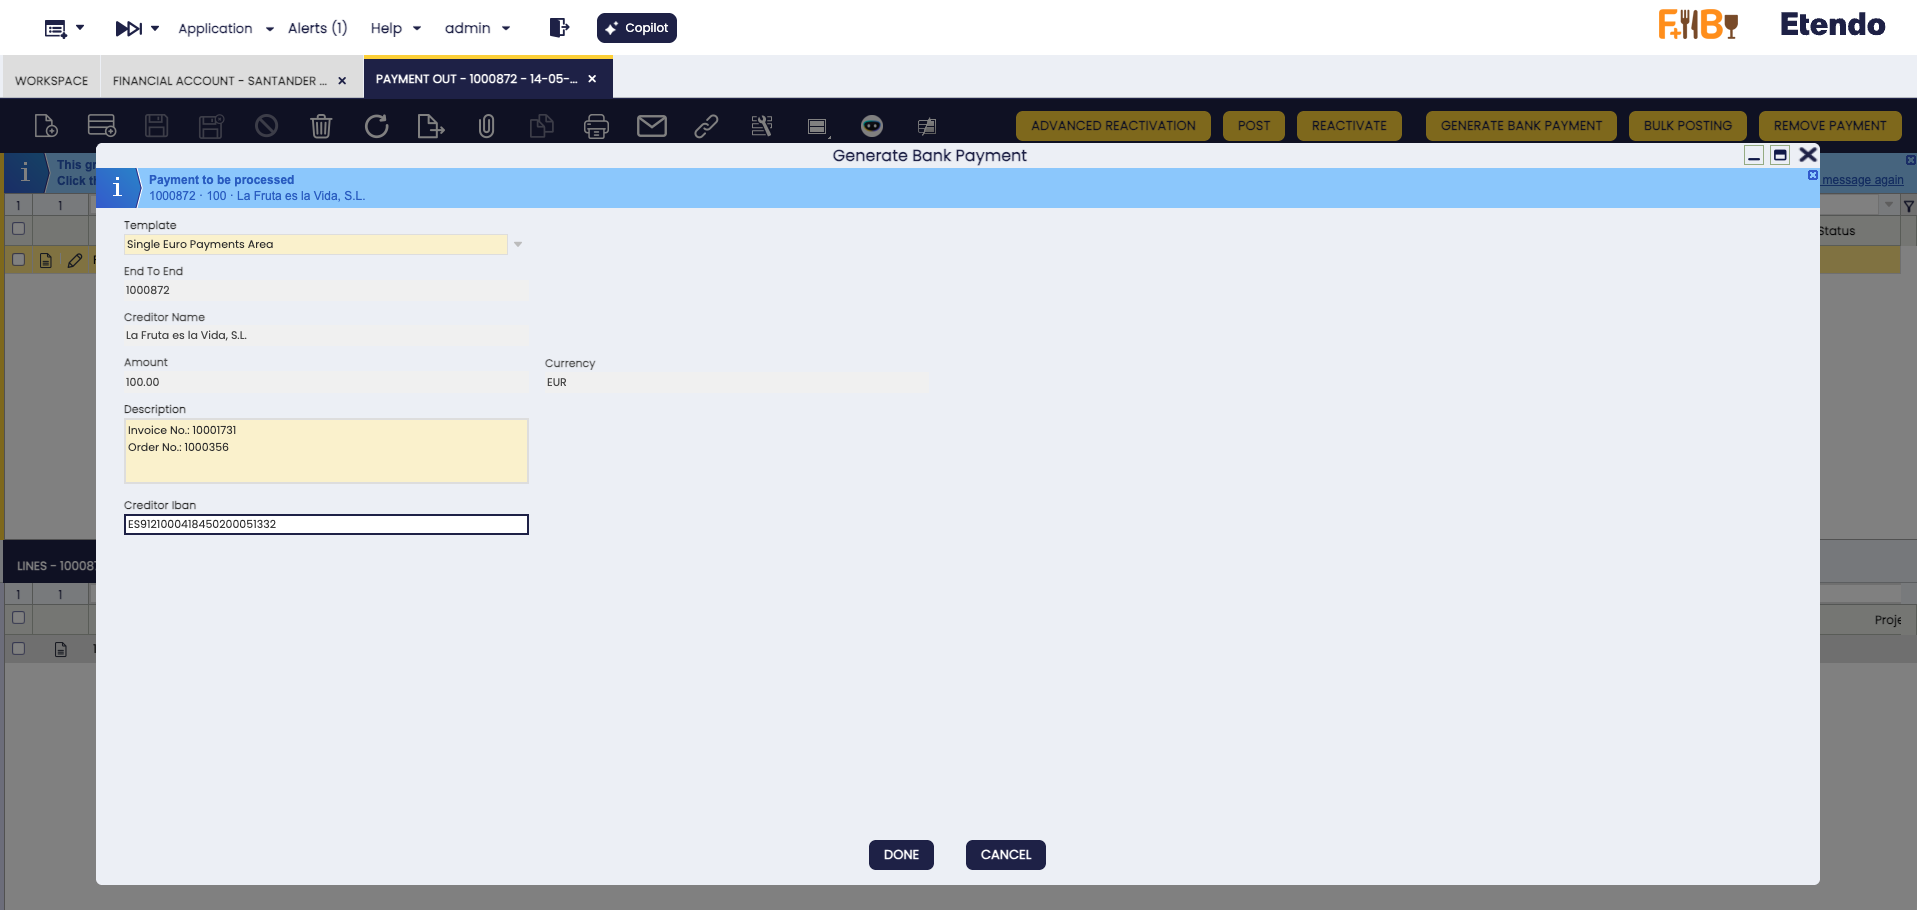
Tip
The form values are automatically calculated from the Payment and Business Partner data. Make sure your Business Partners have their bank account information (IBAN or account number) configured for the best experience.
-
Review the values and click Done to initiate the payment.
-
A bank authorization popup opens where you must authorize the payment with your bank.
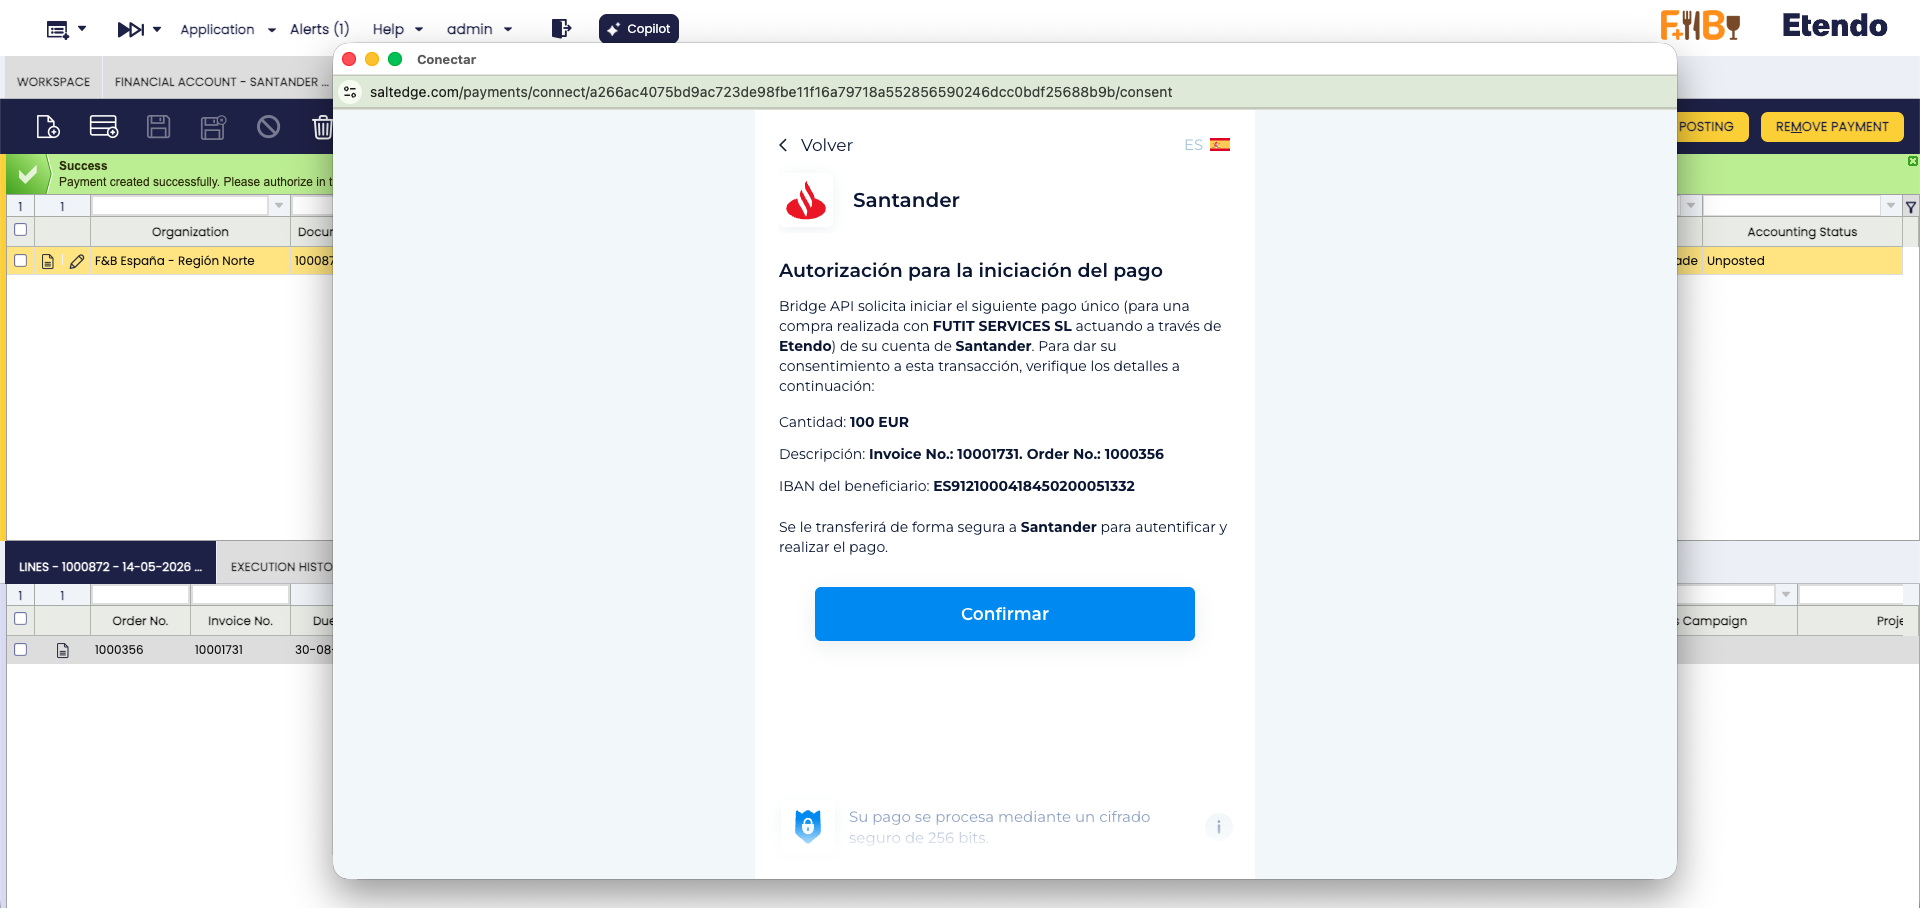
Warning
Do not close the popup until you have completed the authorization process with your bank. The payment cannot proceed without your authorization.
-
After completing authorization, you will see a confirmation page indicating that the payment has been registered.
-
Close the popup and return to Etendo. The payment status will be updated automatically.
Payment Status Lifecycle
After initiating a bank payment, it goes through several status stages:
| Status | Description |
|---|---|
| Requested | Payment has been created in Etendo, pending submission to Salt Edge |
| Initiated | Payment request has been sent to Salt Edge |
| Authorizing | User is completing authorization with the bank |
| Authorized | User has authorized the payment at the bank |
| Processing | Bank is processing the payment |
| Executed | Payment has been successfully completed ✅ |
| Settled | Payment has been settled by the bank ✅ |
| Failed | Payment has failed ❌ |
Note
Once a payment reaches a final status (Executed, Settled, or Failed), it cannot be modified. If a payment fails, create a new payment attempt from the same Payment OUT record.
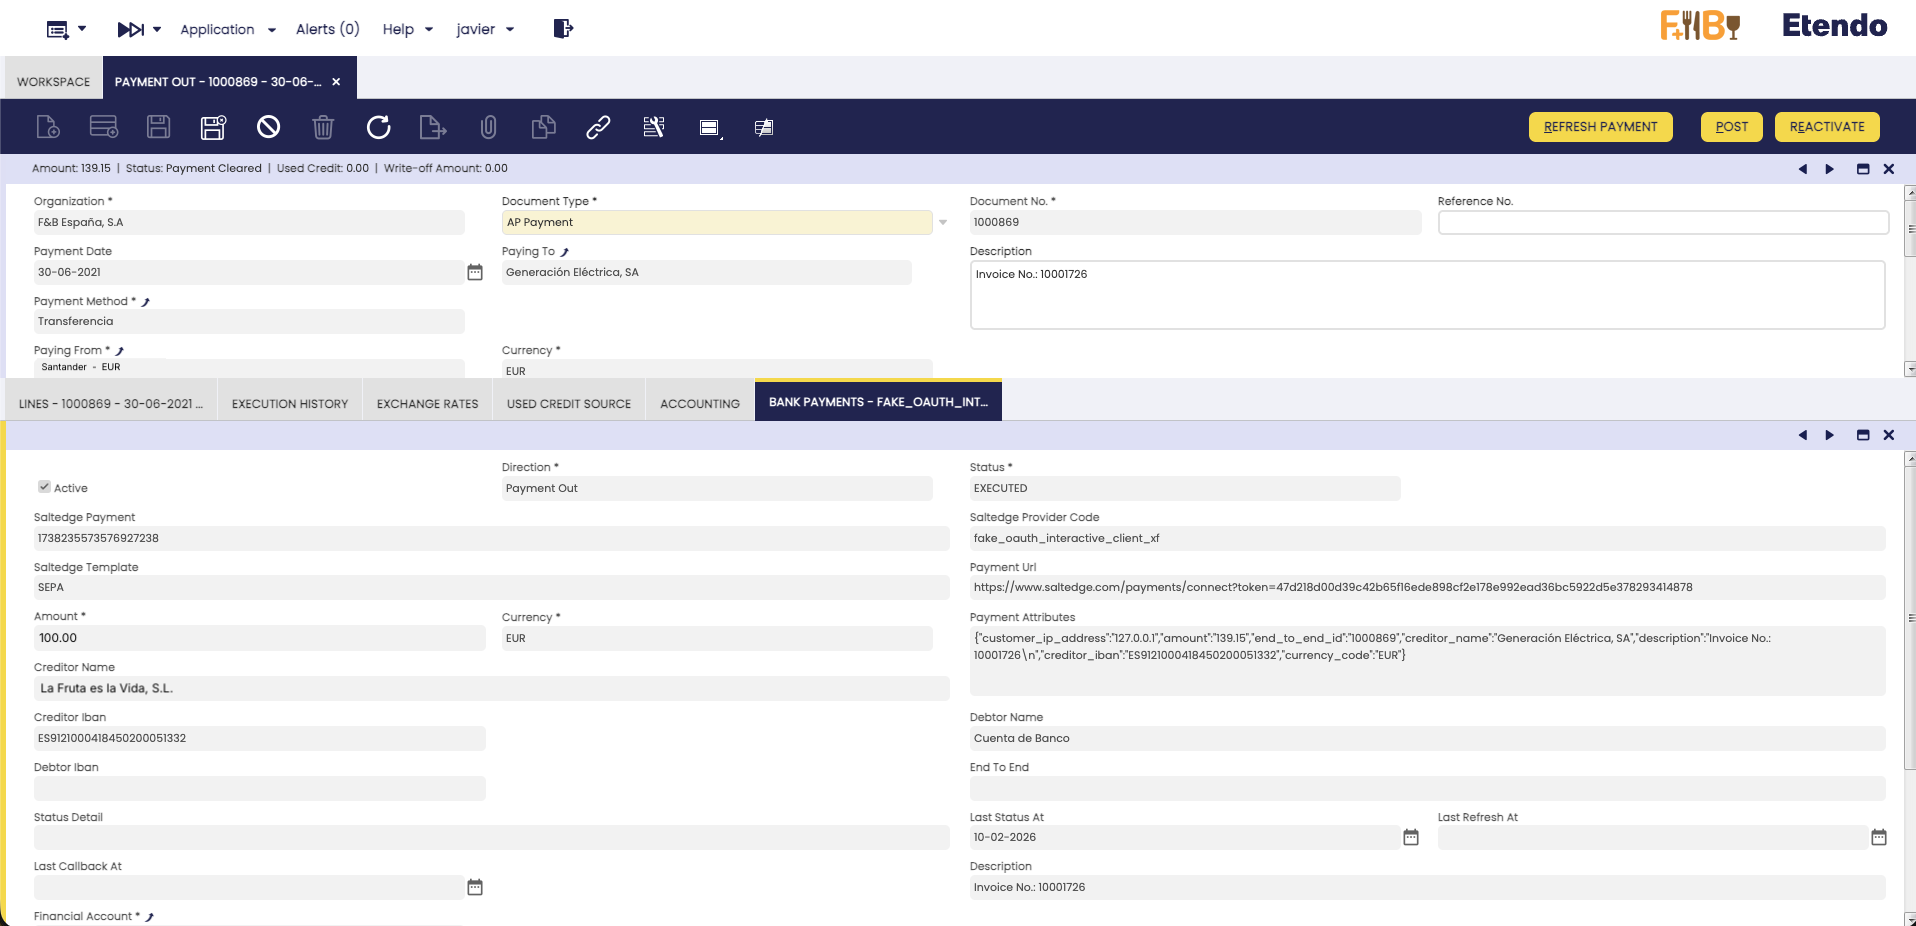
Viewing Bank Payments
All initiated bank payments are tracked in the Bank Payments tab of the Payment OUT record ( Financial Management > Receivables and Payables > Payment OUT). The key fields to monitor are Status, Status Detail (bank-specific notes), Amount, and Creditor Name. Use Refresh Payment to check the latest status on demand.
Refreshing Payment Status
Payment status is updated automatically through two mechanisms:
Automatic Updates (Webhooks)
Salt Edge sends automatic status notifications to Etendo whenever the payment status changes at the bank. These updates are processed immediately and the payment record is updated in real-time.
Info
Webhook updates happen automatically — no user action is required. When the bank processes your payment, the status in Etendo is updated within seconds.
Manual Refresh
If you want to check the latest status immediately:
- Navigate to the Bank Payments tab.
- Select one or more payment records.
-
Click the Refresh Payment button.
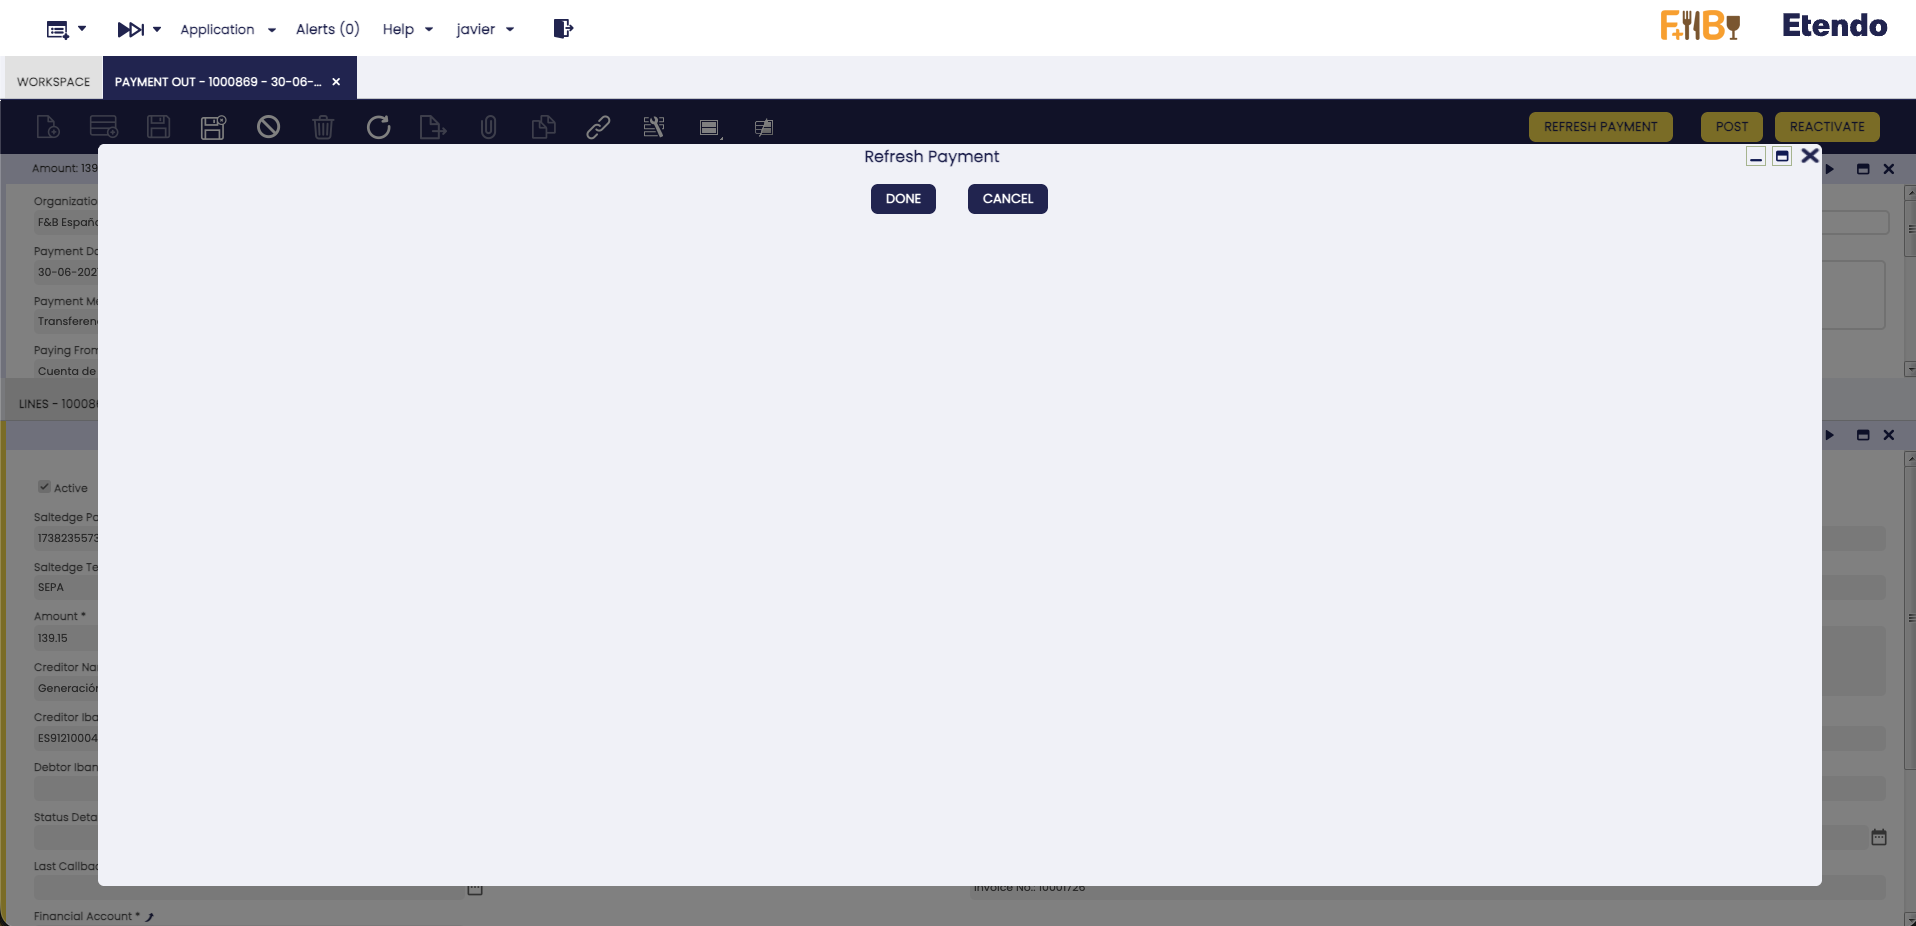
-
The system will query Salt Edge for the current status and update the record.
Tip
Use manual refresh when you want to verify the current status of a payment without waiting for the next automatic update.
Scheduled Automatic Refresh
The Refresh Pending Payments process runs every 10 minutes by default and acts as a safety net for any missed webhook notifications. To adjust the frequency, create a new Process Request for this process and unschedule the system-imported entry ( General Setup > Process Scheduling > Process Request).
Common Issues and Solutions
Connection and API Key
No API Key Available
- Ensure your user has the Salt Edge API Key configured.
- Check that the API Key is correct and active.
Invalid or expired API Key
- Your API Key has expired or is no longer valid.
- Contact your Etendo administrator or Etendo Support to obtain a new API Key.
- Update the API Key in the User window (PSD2 API Key field).
Could not get redirect link
- The bank connection service may be temporarily unavailable.
- Try again in a few minutes. Contact support if the issue persists.
No new transactions found
- Check your Import From/To Date configuration.
- Verify that there are new transactions in your bank account and that the date range covers the expected period.
Rate limit or service temporarily unavailable
- The system has exceeded the allowed number of API requests, or Salt Edge is undergoing maintenance.
- These errors are transient — wait a few minutes and try again. Scheduled processes retry automatically.
Connection Status shows Disabled
A connection may show as Disabled due to authentication expiration, communication errors with Salt Edge, or temporary bank unavailability.
- Run Synchronize Bank Connections (
Financial Management>Receivables and Payables>Setup>PSD2>Synchronize Bank Connections) to verify the connection health. - Execute Get Bank Statements again to see if the issue persists.
- If still Disabled, click Reconnect Connection in the Bank Connections tab (see Reconnecting a Bank Connection).
Payment Initiation
Template Required / Creditor Name Required
- The payment template could not be determined, or the Business Partner name is missing.
- Ensure the payment has a valid currency and a Business Partner with a valid name assigned.
IBAN Required for SEPA
- SEPA payments require the creditor's IBAN.
- Configure the Business Partner's bank account with a valid IBAN.
SEPA Requires EUR / FPS Requires GBP / Sort Code or Account Number Required for FPS
- SEPA payments only use EUR; FPS only uses GBP and requires both sort code and account number.
- Check the payment currency, switch to the DOMESTIC template if needed, and verify the Business Partner's bank account details.
Payment status stuck in Initiated or Authorizing
- The user may not have completed the authorization at the bank.
- Click Refresh Payment to check the latest status. If the issue persists, check the Status Detail field for the bank's specific error message.
Bank authorization popup was blocked / Payment Not Found after returning from bank
- Your browser may have blocked the popup — allow popups for the Etendo site and try again.
- If the redirect failed, check the Bank Payments tab. The payment may have been processed correctly via webhooks.
Getting support
Before contacting support, check the PSD2 Logs window for error details, verify your API Key, and try the Reconnect Connection button for connection issues. When contacting Etendo Support, include the error message, relevant log entries (including JSON Info), the financial account affected, and the date and time of the issue.
Monitoring and Logs
The module provides two dedicated windows for monitoring integration activity.
PSD2 Logs
Financial Management > Receivables and Payables > Setup > PSD2 > PSD2 Logs
Displays all activity and error logs generated by the integration. Each entry includes:
| Field | Description |
|---|---|
| Financial Account | The financial account associated with the event. |
| Execution Day | The date and time when the event occurred. |
| Status | The result of the operation (Success, Error, etc.). |
| Source | The process that generated the log (e.g., Get Transactions, Generate Payment). |
| Log | A human-readable description of the event. |
| JSON Info | The raw API response, useful for troubleshooting and support. |
Tip
Filter by Financial Account and sort by Execution Day descending to quickly find the most recent events.
Bank Provider
Financial Management > Receivables and Payables > Setup > PSD2 > Bank Provider
Lists all banks available through Salt Edge. Each entry shows the Provider Code and Provider Name. Run Synchronize Bank Providers periodically (e.g., weekly) to keep this list up to date.
Best Practices
- Leave Import From Date empty after the initial import — the system picks up from the last imported date automatically.
- Check Status Detail when a bank payment fails — it contains the bank's specific error message before retrying.
- Disconnect unused bank connections — connections removed here are deleted permanently from both Etendo and Salt Edge.
Additional Resources
This work is licensed under CC BY-SA 2.5 ES by Futit Services S.L.