How to Create a Window
Overview
The objective of this section is to show how you can create a new window from scratch.
Info
This section builds on top of two previous sections which explain How to Create a Module and How to Create a Table.
Module & Table
As mentioned above, this tutorial is based on two previous tutorials and assumes that the following objectives have been already completed:
- Creation of a new module
- Creation + Registration in the AD of a new table
Creating the New Window
Using the System Administrator role navigate to Application Dictionary > Windows, Tabs and Fields.
Create a new record as indicated by the screenshot below:

The main fields of this window are:
- Module: defines the module for which this element will belong to.
- Name: defines the name that Etendo uses to recognize this window.
- Description: gives a small description of the table.
- Help/Comments: defines the text that is displayed in Help window.
- Window Type: defines some user interface specifics for a window:
- Maintain : is used for windows with few entries.
- Transaction : for transactional windows. It's the type of window that's used for showing the information of tables with a large volume of data. By default this window filters out old (n days –
General Setup>Application>Session Preferenceswindow setting) and processed documents. The header tab's underlying table must contain the PROCESSED and UPDATED columns (for the data filters to work). - Query Only : for read-only windows that only enable viewing of data.
Save this record and move to Tab tab. Create a new record as shown below, creating the first tab:
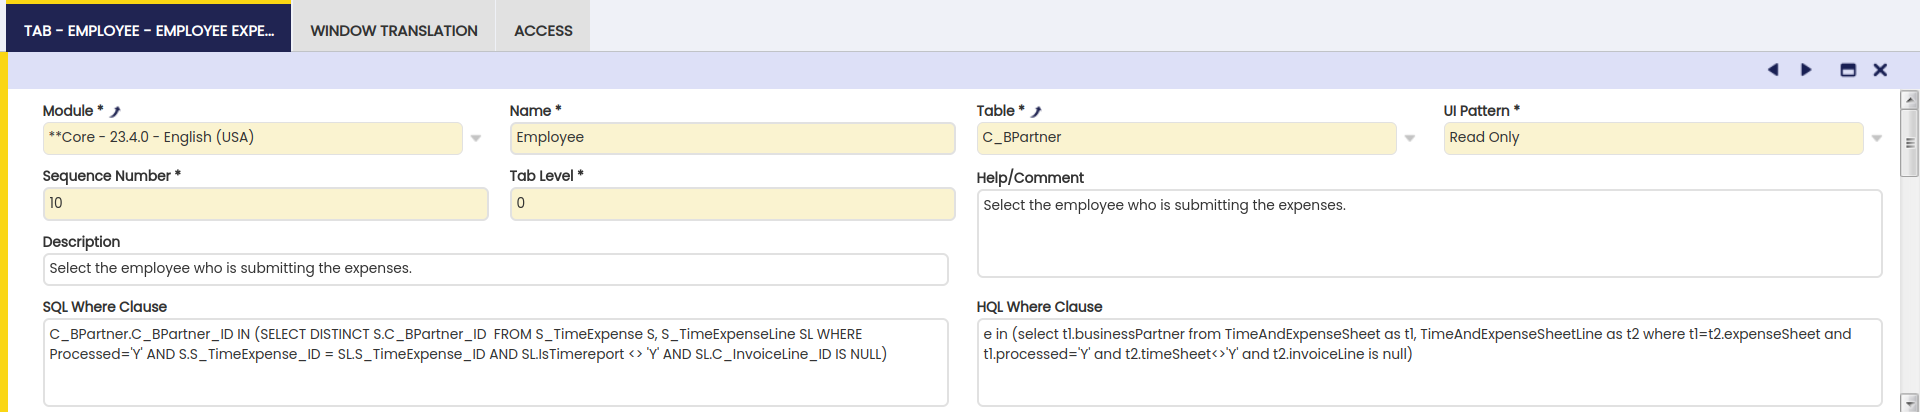
Main fields of this window are:
- Module: defines the module for which this element will belong to.
- Name: defines the name that Etendo uses to recognize this tab.
- Description: gives a small description of the table.
- Help/Comments: defines the text that is displayed in Help window.
- Table: specifies the table that the tab will show the data from.
- Table Level: defines the hierarchy of tabs, 0 being the highest level.
- UI Pattern This dropdown offers the following options:
- Standard - standard interface where multiple records can be added, viewed and edited
- Read Only - this option disables any editing/creating capabilities for any user within this tab
- Single Record - this option enforces a one-to-one relationship between a parent and a child tab, allowing the user to enter maximum one record in the tab
- HQL Where Clause: by using this HQL filter, the user will never be able to see data that does not fit the criteria. When referring to properties of the entity shown in the tab then use the prefix e . In our case, we use this field to display only business partners that are our employees (using the employee property).
- SQL Where Clause Same like HQL Where Clause but using SQL syntax and used for filtering in classic windows .
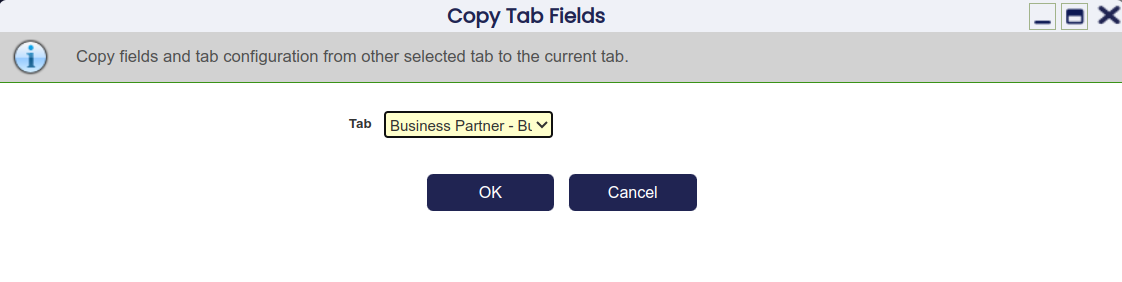
The Copy Tab Fields button can be used to copy fields from an existing tab into our new one.
The Create Fields button can be used to create fields for the new tab based on its associated table
Move to Field tab to see the created fields.

If required, changes to these fields could be made or new ones could be added manually.
Note
For not header tabs, it is very important to not remove the field that points to the ID field of its parent tab, as it would made not possible to create records in this tab using the grid view.
Now, go back to Tab tab and create a new record that will represent the child tab of the Employee tab where salaries will be managed:
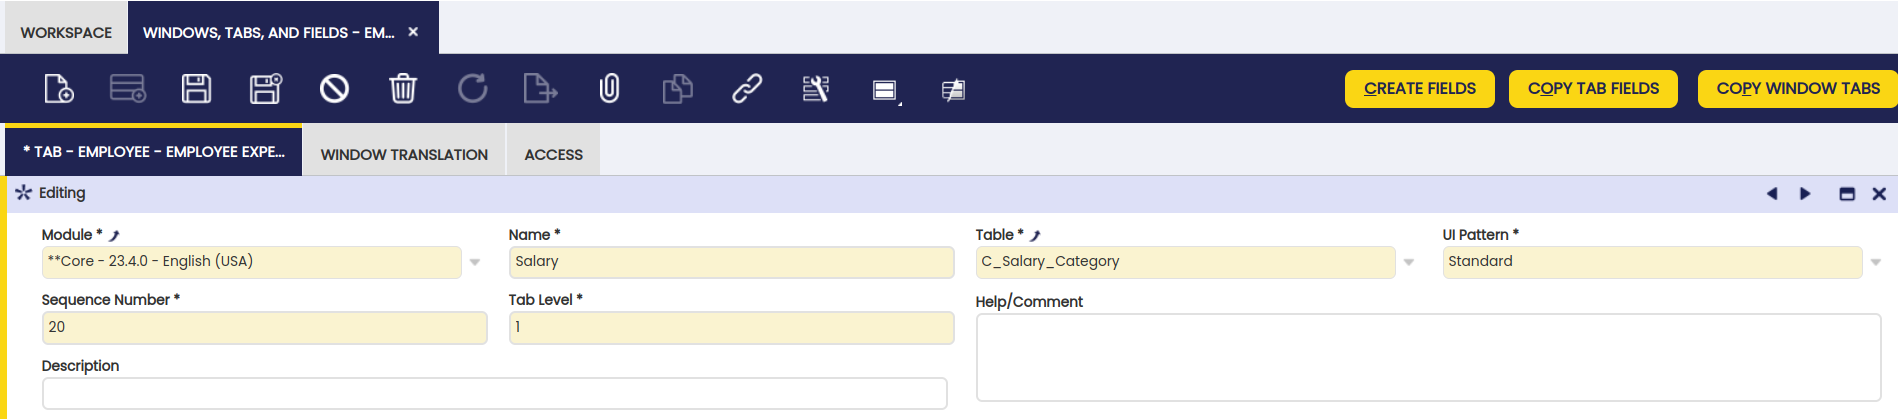
Most importantly, make sure you select:
- Table =
HT_Salary - Tab Level = 1
By clicking and confirming the Create Fields dialog, the application will automatically insert the columns of the selected table into the fields tab of the Salary one.
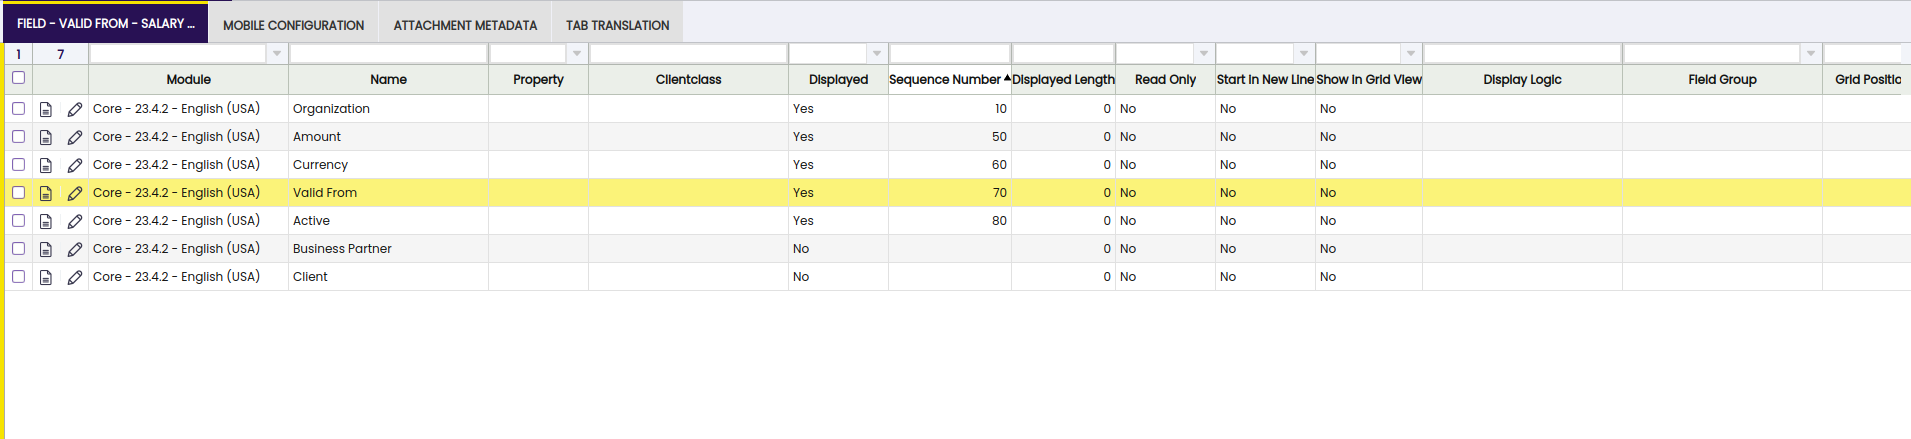
To arrange the columns according to common look and feel of other windows, we now change a view field properties as can be seen in following screenshot.
- Hide field c_bpartner_id
- Reorder fields (using sequence), to have isactive after all other fields
- Mark amount and isactive as Start in new line
For Etendo, to create links (labels that appear blue) to table elements, the system needs to know which window represents the table where a certain element resides.
To indicate that, go to the Application Dictionary > Tables and Columns window, find the corresponding table and set the Window as indicated below:

Creating the Menu Item
A menu item is required for the user to be able to call up the new window. Using the System Administrator role navigate to General Setup > Application >Menu and create a new record:
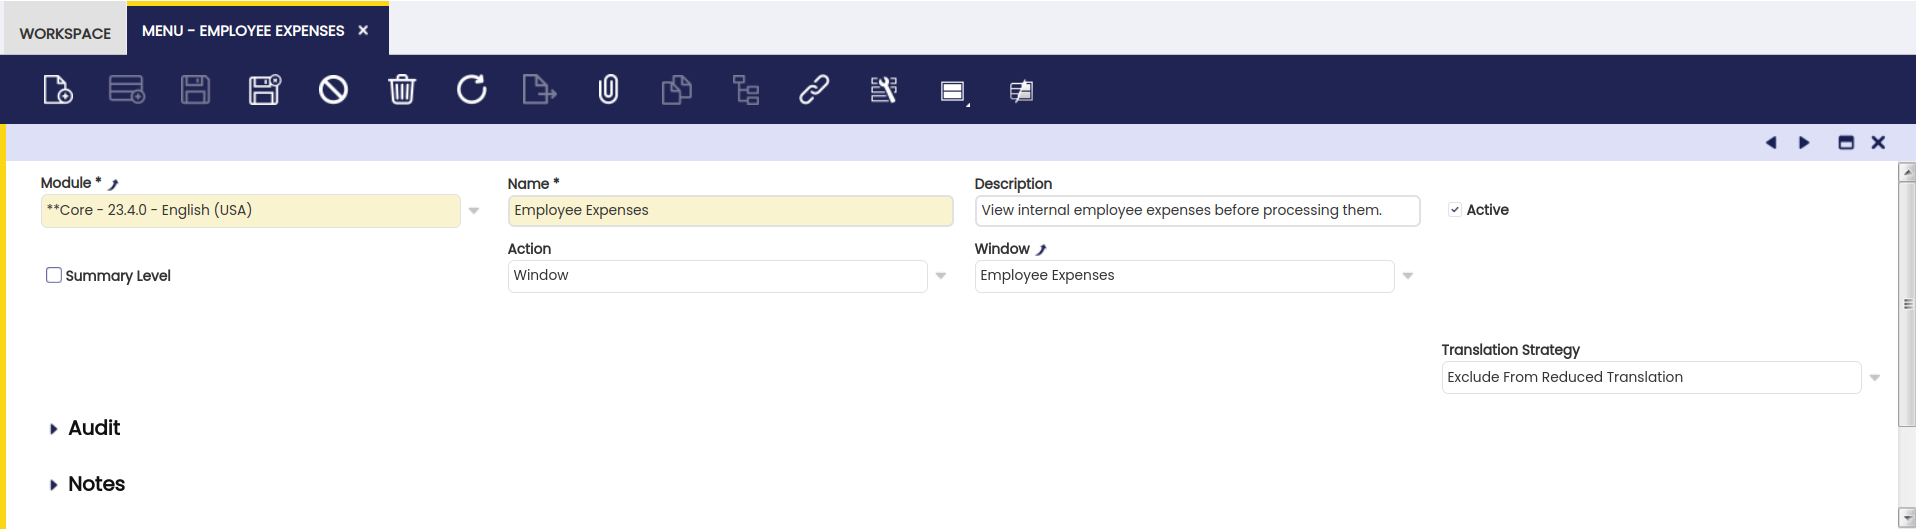
Main fields of this window are:
- Module: defines the module for which this element will belong to.
- Name: defines the name that Etendo uses to recognize this menu item.
- Description: gives a small description of the table.
- Summary level: defines a folder containing menu items (windows, processes, reports and so on).
- Action: defines the type of menu item.
- URL If Action is External link or Internal link , defines the URL to be linked.
- Special Form: If Action is Form , defines the form to be linked.
- Process: If Action is Process , defines the process to be launched.
- Report: If Action is Report , defines the report to be linked.
- Window: If Action is Window , defines the window to be linked.
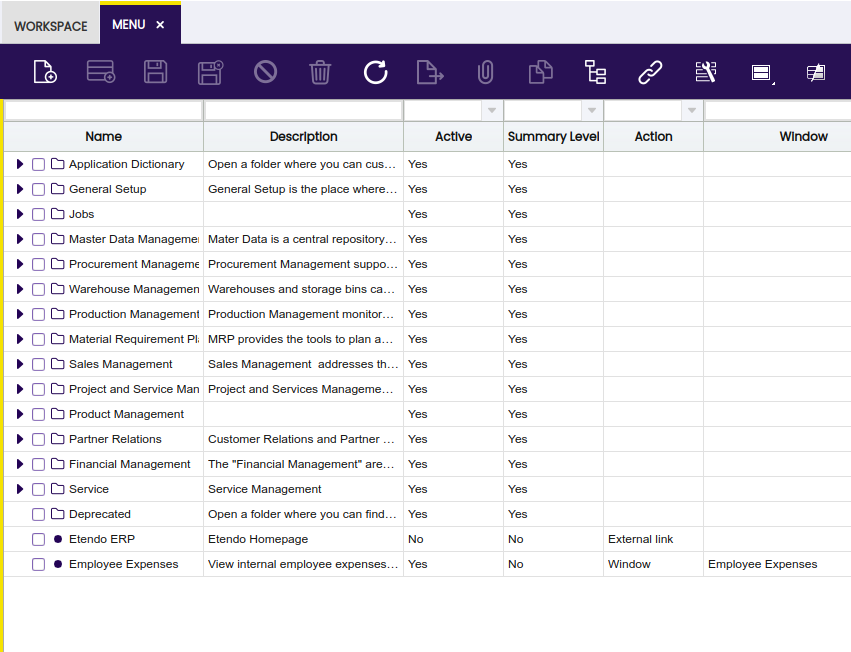
Save this record then click on Tree icon 
Here you can drag and drop the new menu item to any of the other menu groups.
Compiling the Application with the New Window
Finally, the application needs to be recompiled in order to generate the new window's code and deploy it to Tomcat.
The Result
Using the F&B International Group Admin role, select the link to the new window from the menu.
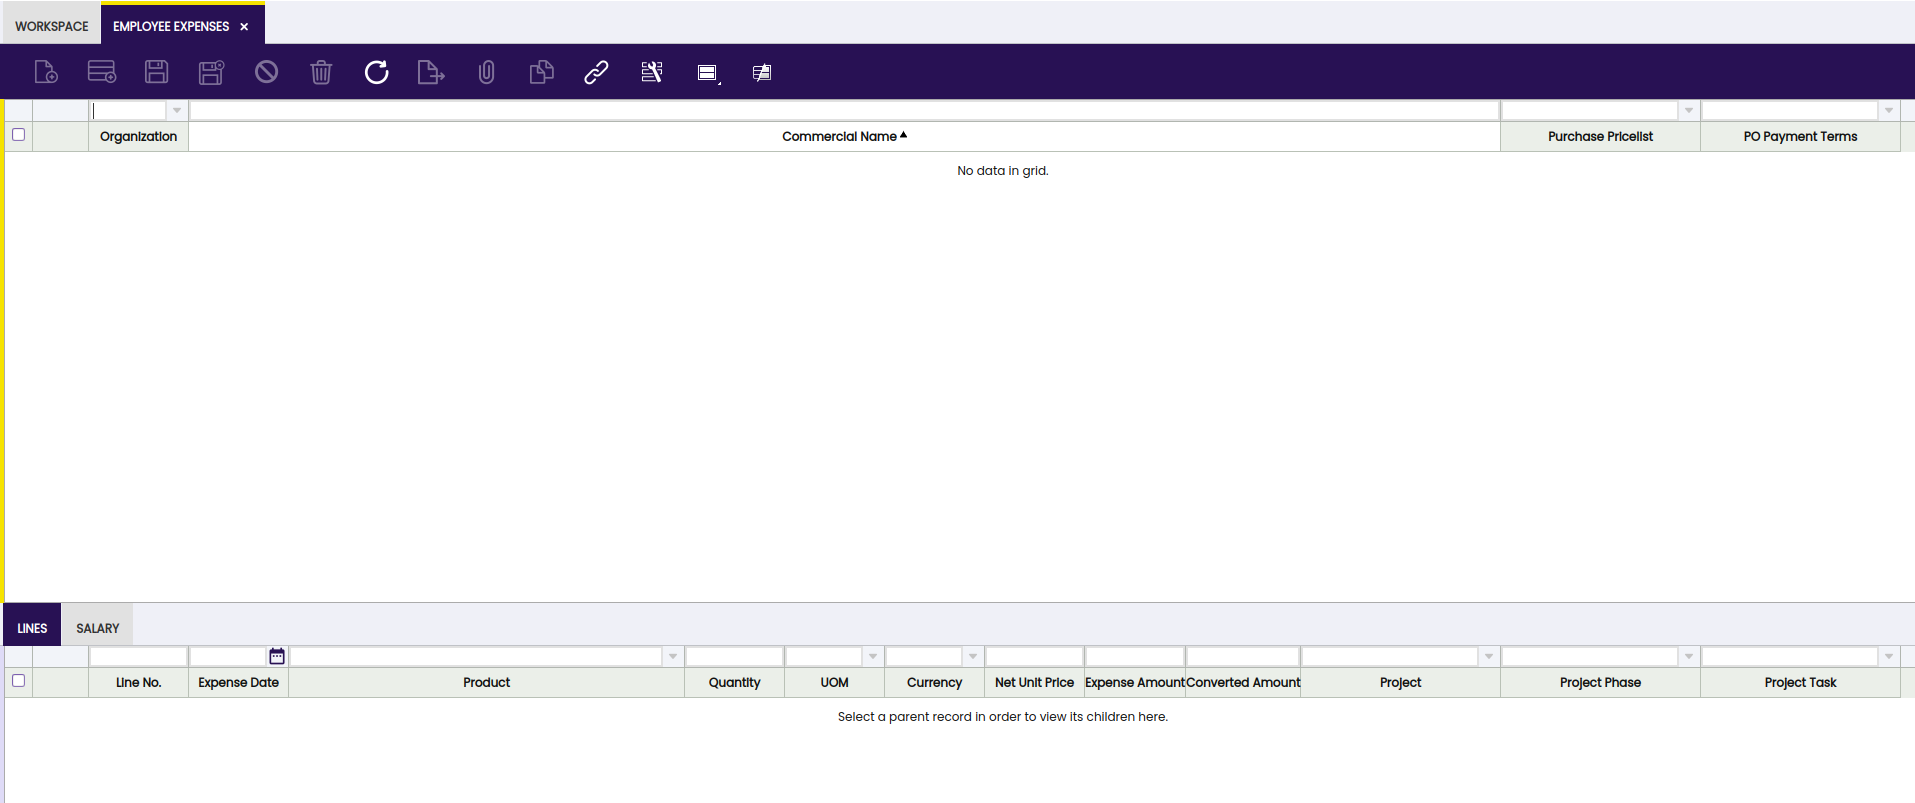
Success
You have now successfully created your own new window and seen how it came to life within Etendo.
This work is a derivative of How to create a window by Openbravo Wiki, used under CC BY-SA 2.5 ES. This work is licensed under CC BY-SA 2.5 by Etendo.