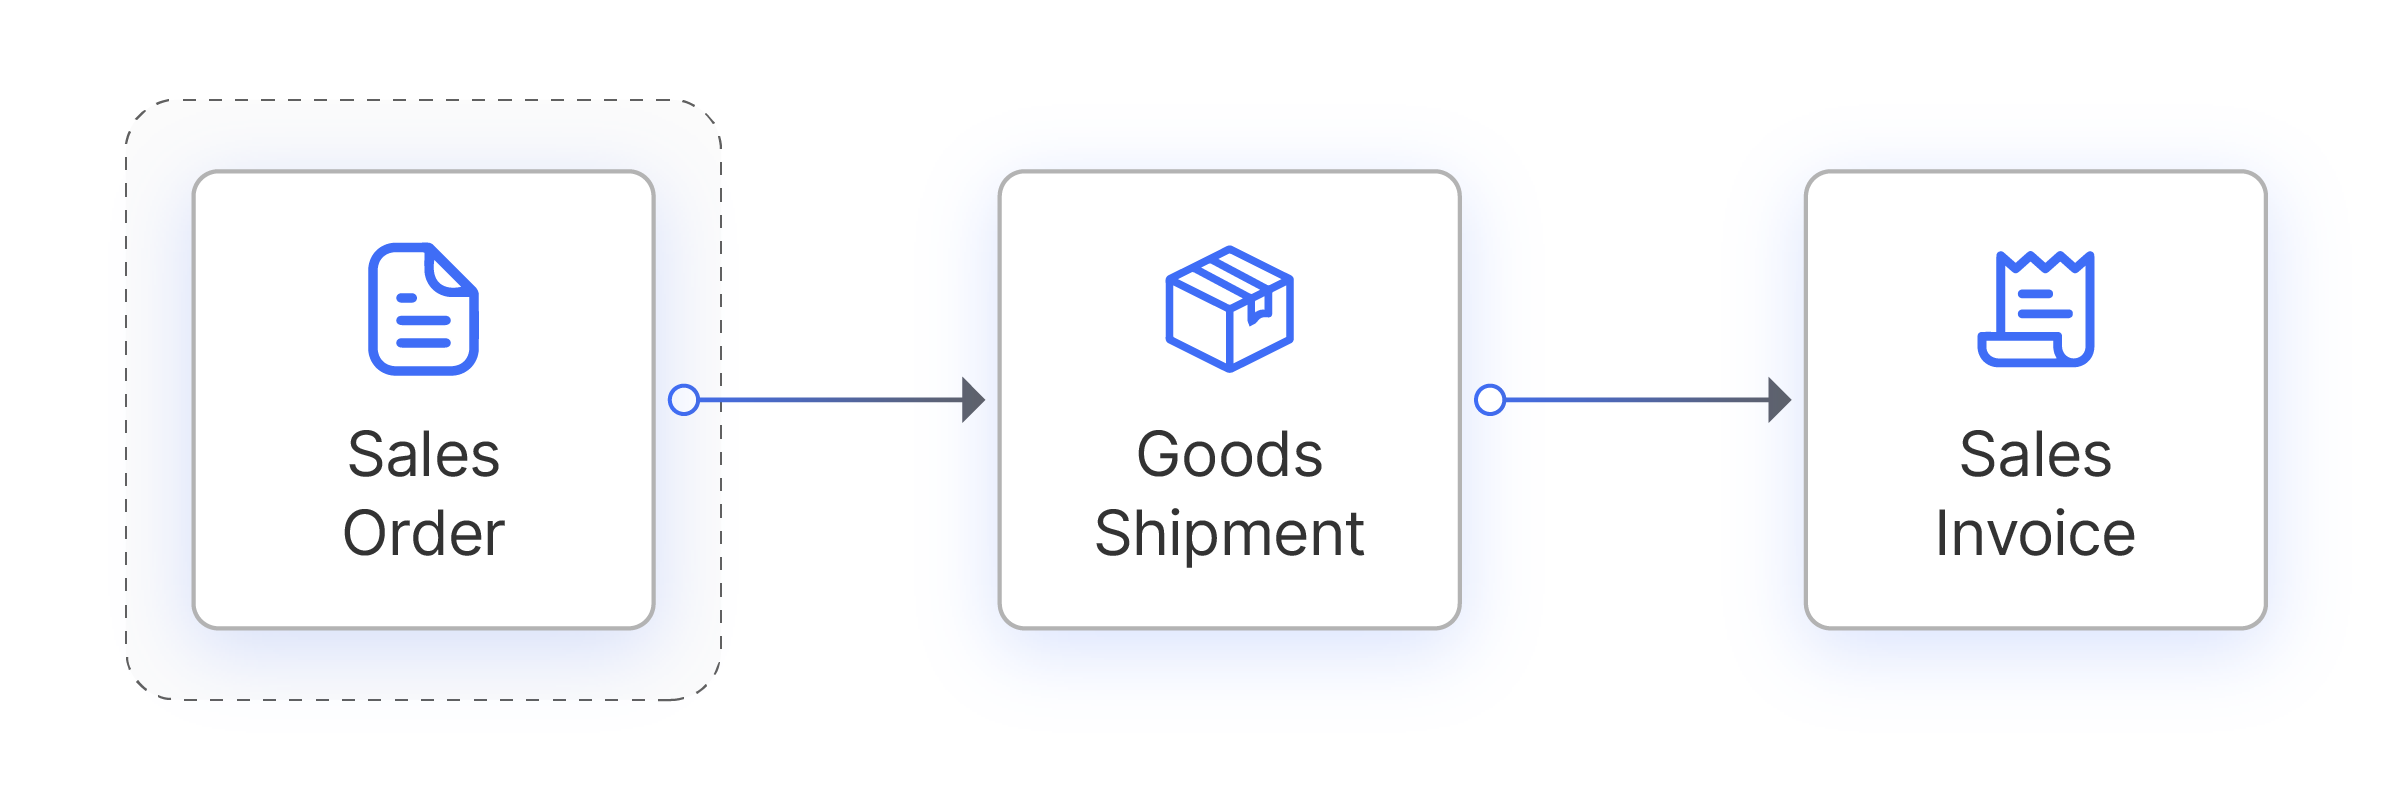
Transactions
Overview
Sales Management deals with all activities related to the customer sales process and corresponding reporting.
Sales Quotation
Application > Sales Management > Transactions > Sales Quotation
A Quotation is not a sales order document type but a different document type named "Quotation" linked to a specific document sequence.
In order to be able to create a sales order from a sales quotation, the quotation document type needs to be properly configured. That means that it requires a document type (i.e. Standard Order) to be defined in the field "Document Type for Order".
The overall flow is the following:
- Create a sales quotation.
- Create a sales order from the sales quotation or reject the quotation.
1. Actions in quotations:
- Book: This action allows the user to process the quotation.
- Reactivate: This action allows the user to add, remove or modify a quotation line/s.
- Create a sales order: This action converts the quotation into a sales order.
- Reject: This action cancels/rejects the quotation
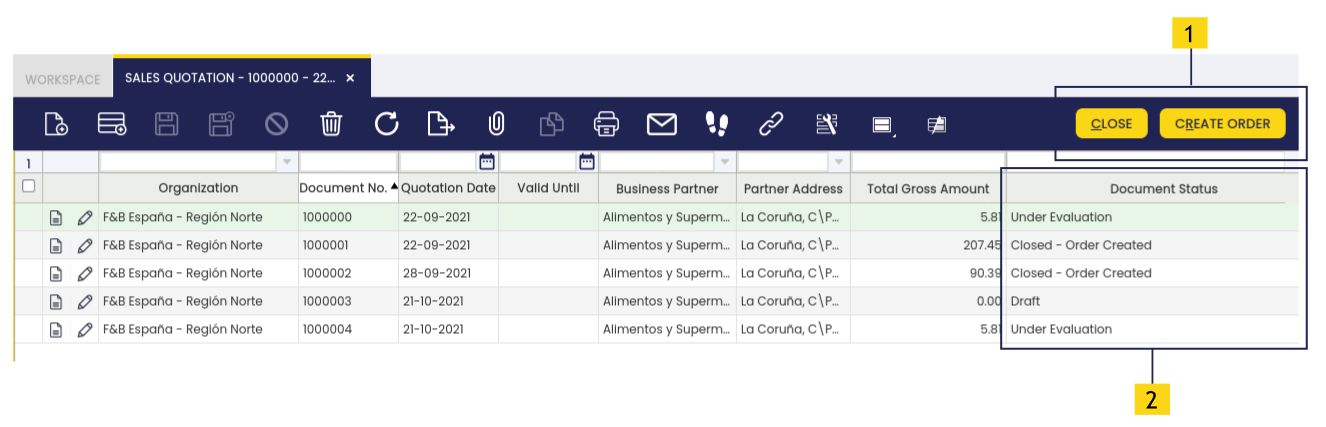
2. Statuses of the quotation:
- Draft: Enter, remove and modify lines is allowed in this status. This status is reached after clicking New or reactivating the document.
- Under evaluation: After booking the quotation. In this status the document cannot be changed. Further actions are:
- Reactivate
- Create a sales order
- Reject the quotation
- Closed - Order created: After creating the sales order the document turns into this status. No further actions are allowed.
Info
One quotation, one sales order. Several sales orders cannot be created from the same quotation.
- Closed - Rejected: When the quotation is finally not accepted by the customer. It is mandatory to enter a reject reason. No further actions are allowed.
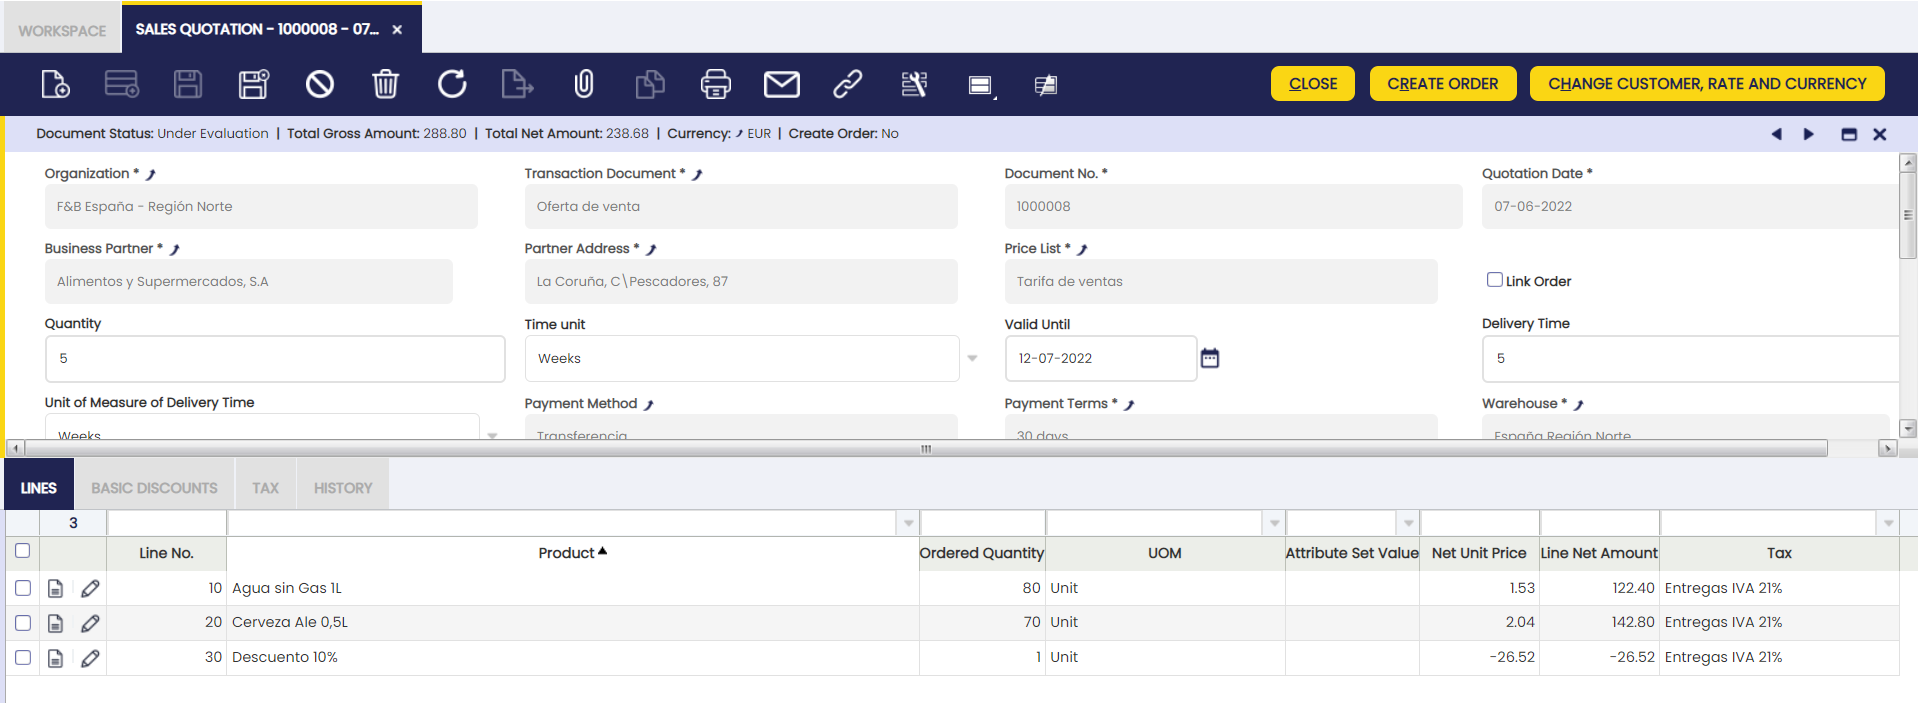
Header
The user can create a sales quotation and process it when ready.
The header lists the main terms and conditions related to the customer quotation that are used in the heading of its printed copy and further in its order, shipment and invoicing process.
In the majority of cases, the main and the only field needed to create a new quotation is the Business Partner field. All other fields are automatically populated based on the selected Business Partner, logged in User preferences and other system default parameters.
Some other fields to note are:
Valid Until: This field provides information about the deadline of the validity of the quotation.
Reject Reason: This field informs about the reason why a quotation has been rejected by a customer. It is mandatory when rejecting a quotation.
Things to consider:
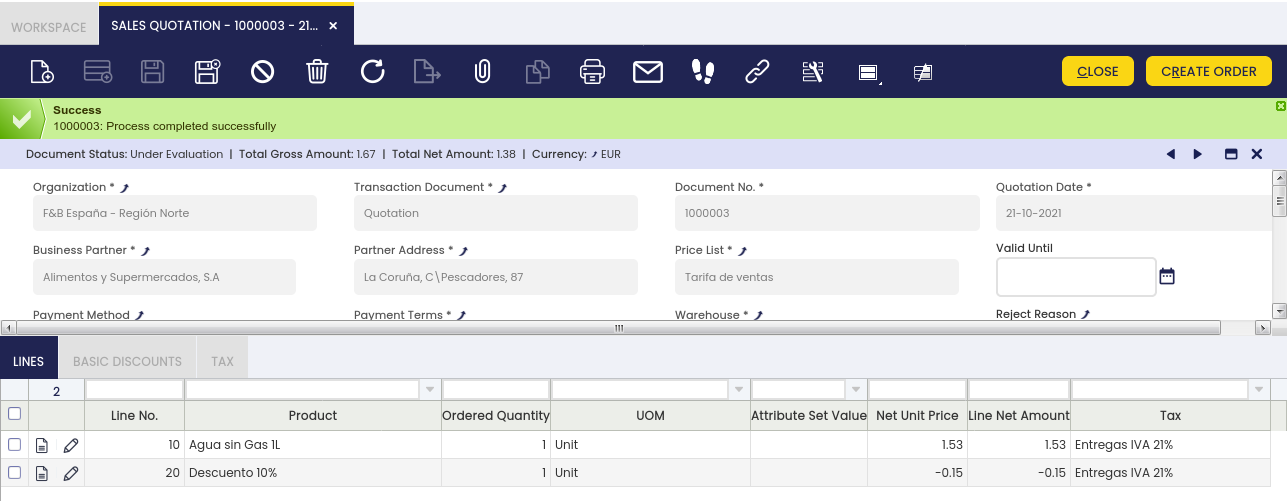
A new button Create Order appears when the status is Under Evaluation. When pressing the button, a sales order is created based on the quotation.
Info
Taxes are always recalculated based on the transaction date (Date you execute the button).
The status of the newly created sales order is Booked. It is possible to change the "Invoice Terms" of the sales order as well as to "Reactivate" it if the sales order needs to be modified.
Prior to create a sales order, the system shows a flag named Firm Quote which is marked as default:

- If selected, it establishes a commitment with the customer for the supply of a given quantity of goods at a quoted price, therefore the sales order will be identical as the quote.
- If not selected, a change in the price list later on will modify the quoted prices, same way in the sales order. Discounts and Promotions will also be recalculated applying the new ones based on the transaction date (the Date the button is executed).
Lines
Add products to be included in your sales quotation. Each product can be added by creating a new line.
Lines tab lists each product to be quoted and its characteristics.
Book button completes the sales quotation when all the products are entered.
Line Tax
This tab shows the taxes related to the quotation line.
Line Tax read-only tab details tax information for each line of a sales order based on its Tax field which is automatically pre-filled according to the Taxes Setup.
Basic Discounts
This sales quotation tab lists information about the discounts automatically applied and/or manually entered for the document.
Tax
The user can edit the taxes applied to the quotation.
It summarizes tax related information for the whole sales quotation. Contains as many records as tax rates used in the quotation.
Advanced Sales Quotation
Info
To be able to include this functionality, the Sales Extensions Bundle must be installed. To do that, follow the instructions from the marketplace: Sales Extensions Bundle. For more information about the available versions, core compatibility and new features, visit Sales Extensions - Release notes.
Through this window, the user can generate sales quotations and create the corresponding orders from those quotations.
Header
The main header numerates the terms and conditions related with the sales quotation which are used in the printed copy header and, later on, in its order, goods receipt and invoice process.
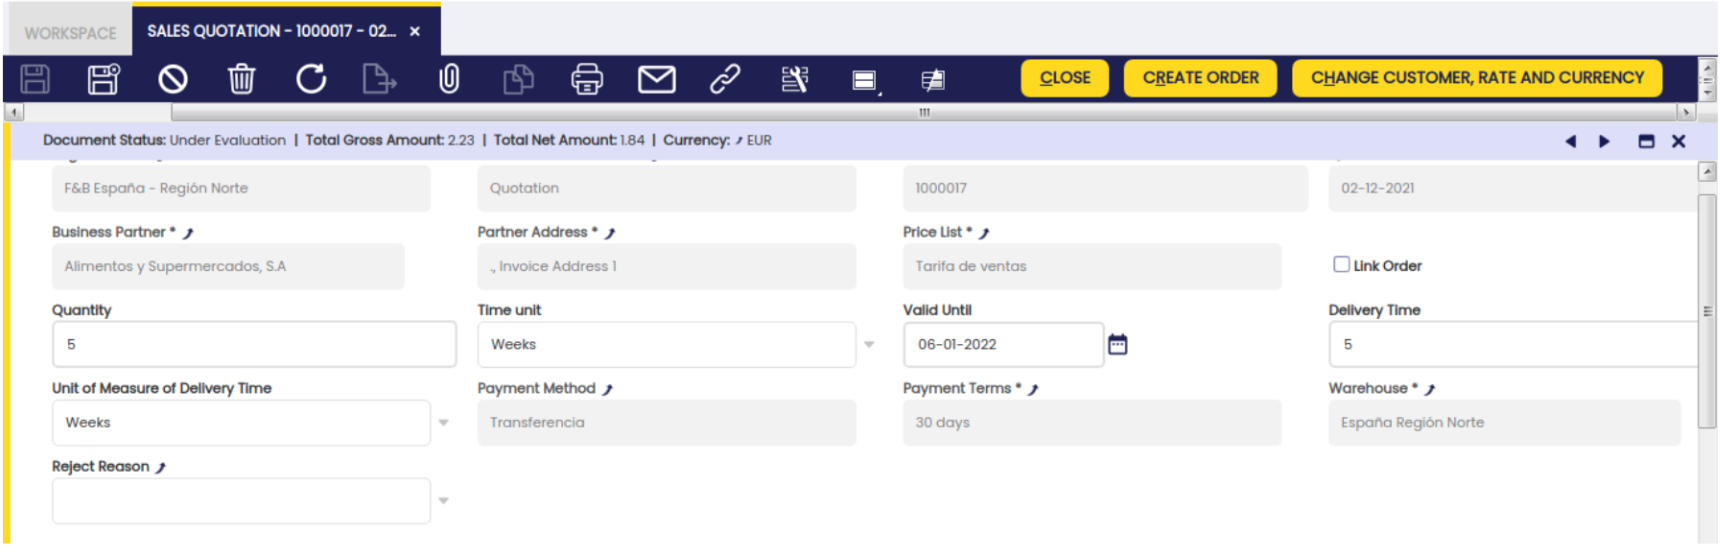
The main tab lists the main terms and conditions related to the sales quotation that are used in the header of the hard copy and later in the order, packing slip and invoicing process. In this section, the fields to fill in are the following:
- Transaction document: this will be the specific document type to use. In this case, it is called "Quotation".
- Document No: quotation identification number is generated automatically.
- Quotation date: the date of the quotation. By default, it will be the current date.
- Business partner: the client to whom the quotation is being made will be selected.
- Partner address: in the drop-down list, select those customer addresses that have the "Shipping address" option checked.
- Price list: select among all the available sales rates. By default, it brings the rate configured for that business partner in its master.
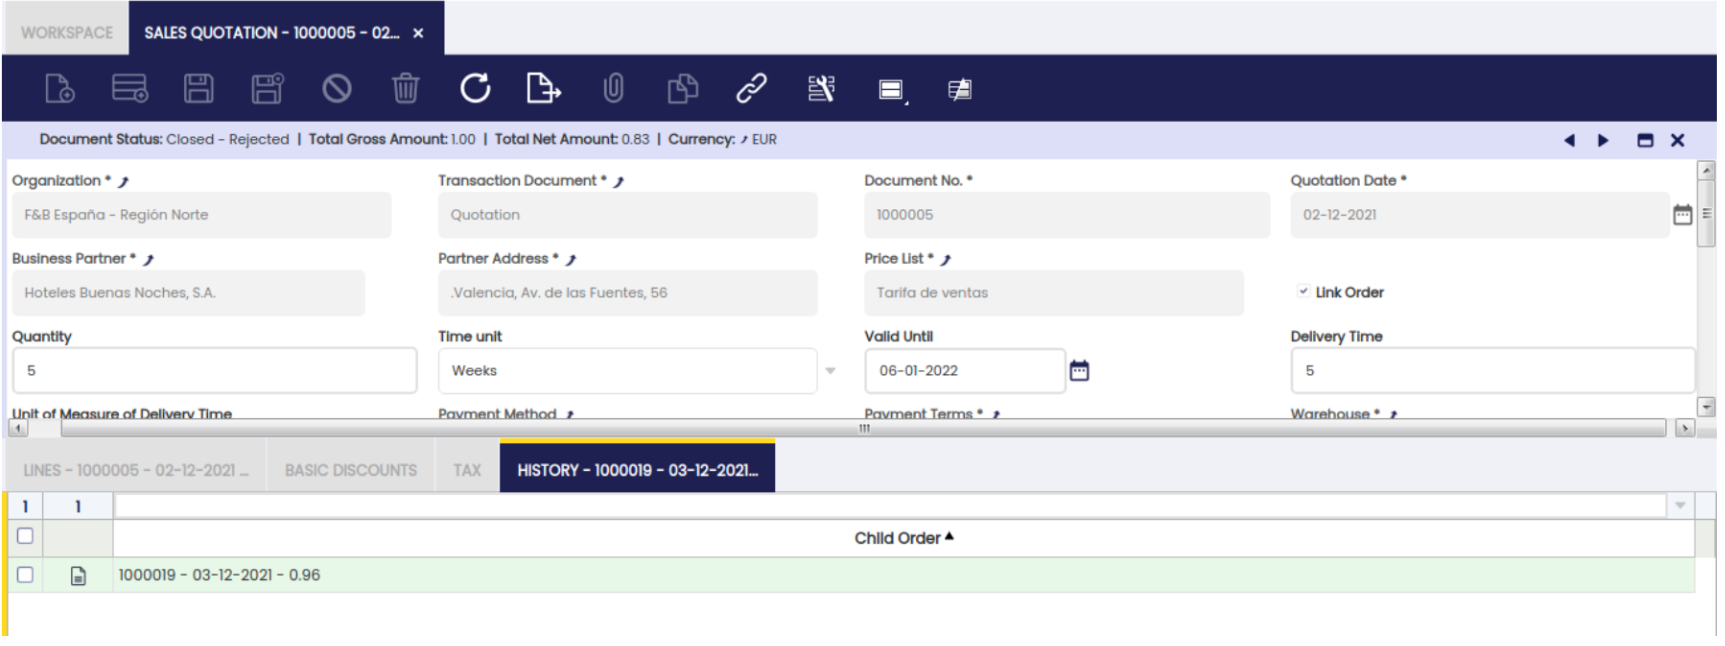
- Link Order (Check box): if this check is checked, when executing the "Change customer, rate and currency" process, the "Origin Order" field of the new quotation is created modifying the previous one. It will be set with the number of the original quotation, i.e. the one being modified, which will be in "Closed-rejected" status. In turn, a record will be generated in the History tab of this last (original) quotation, each time there are modifications related to it.
- Quantity/Time Unit: the validity date of the quotation is defined based on a period of time: 10 days, 1 week, 2 months, etc.
- Valid Until: expiration date of the quotation stipulated according to the Quantity and Time Unit fields.
- Delivery time/Unit of Measure of Delivery Time: the delivery date is defined from a period of time. For example: 3 weeks.
- Payment method: filled by default with the payment method associated to the selected business partner with the possibility to be edited.
- Payment terms: filled by default with the payment method associated with the selected business partner with the possibility to be edited.
- Warehouse: the warehouse from which the products to be delivered to the customer will be shipped.
- Reject reason: this is a drop-down menu where a rejection reason can be selected in case the quotation is rejected. The different rejection reasons will be defined by the user.
- Sales representative: you can select from a drop-down list the employee who is making the quotation to the customer. It must be configured as a business partner with the check "Employee" and "Is sales representative".
- Origin order: when the "Change customer, rate and currency" button is executed and the "Link order" check is checked, the new quotation created is set in this field, modifying the previous one, with the number of the original quotation, that is, the one being modified; which will be in "Closed-rejected" status.
- Description: This is a space to write additional related information.
Status bar
This bar shows the following information:
- The possible document statuses for a quotation will be:
Draft: allows entering, delete and modify lines in this status. This status is reached after clicking on the new button or when reactivating the document.
Under evaluation: this status is reached after registering the quotation. At this stage, the document cannot be modified.
Closed - Order created: after creating the sales order, the document reaches this status. Once reached, no further actions are allowed.
Closed - Rejected: this status appears in case the quotation is rejected by the customer. It is mandatory to enter a reason for rejection.
Once this status is reached, no further actions are allowed.
- Total gross amount: indicates the final monetary amount of the quotation, including taxes.
- Total net amount: indicates the final monetary amount of the quotation, excluding taxes.
- Currency: shall indicate in which currency the quotation is defined. This field is filled in according to the selected tariff.
Lines tab
Once the header is completed, the lines must be added.
Basic discounts
-Basic discount: this is the percentage reduction applied to the list price.
-Cascade: this is any additional discount based on the total remaining after applying previous discounts.
Active: this is a check that indicates whether this record is available for use or disabled.
Tax
This tab summarizes the information related to the taxes involved in the quotation.
It contains as many records as there are tax categories involved in the quotation.
- Line number: indicates the position of the line in the document.
- Tax: indicates the tax rate that is applicable to a given product.
- Taxable amount: indicates the amount on which the tax will be calculated.
- Tax amount: indicates the amount of tax resulting from the Tax and Taxable amount fields.
History tab When the "Change customer, rate and currency" button is clicked on a quotation and the "Link order" check is checked, a record is created in this tab with the data of the new quotation created and, in turn, one for each of the successive modifications to the original quotation.
The information shown in each record is as follows:
- Document number of the new quotation.
- Date of quotation.
- Original amount of the quotation.
Actions
- Register: this action allows the user to generate the budget.
- Reactivate: this action allows the user to add, remove or modify one or more lines of the quotation.
- Create a sales order: this action converts the quotation into a sales order. To do so, the document type of the quotation must be configured correctly. This means that it requires a document type (i.e. standard order) to be defined in the "Order document type" field. This button appears when the status of the quotation is "In evaluation".
The status of the newly created sales order will be "Registered". In this instance, it is possible to change the "Billing Terms" as well as "Reactivate" it if it needs to be modified.
Info
Only one sales order can be created for the same quotation.
- Reject: this action allows to cancel or reject the quotation. A reason for rejection is mandatory for this action.
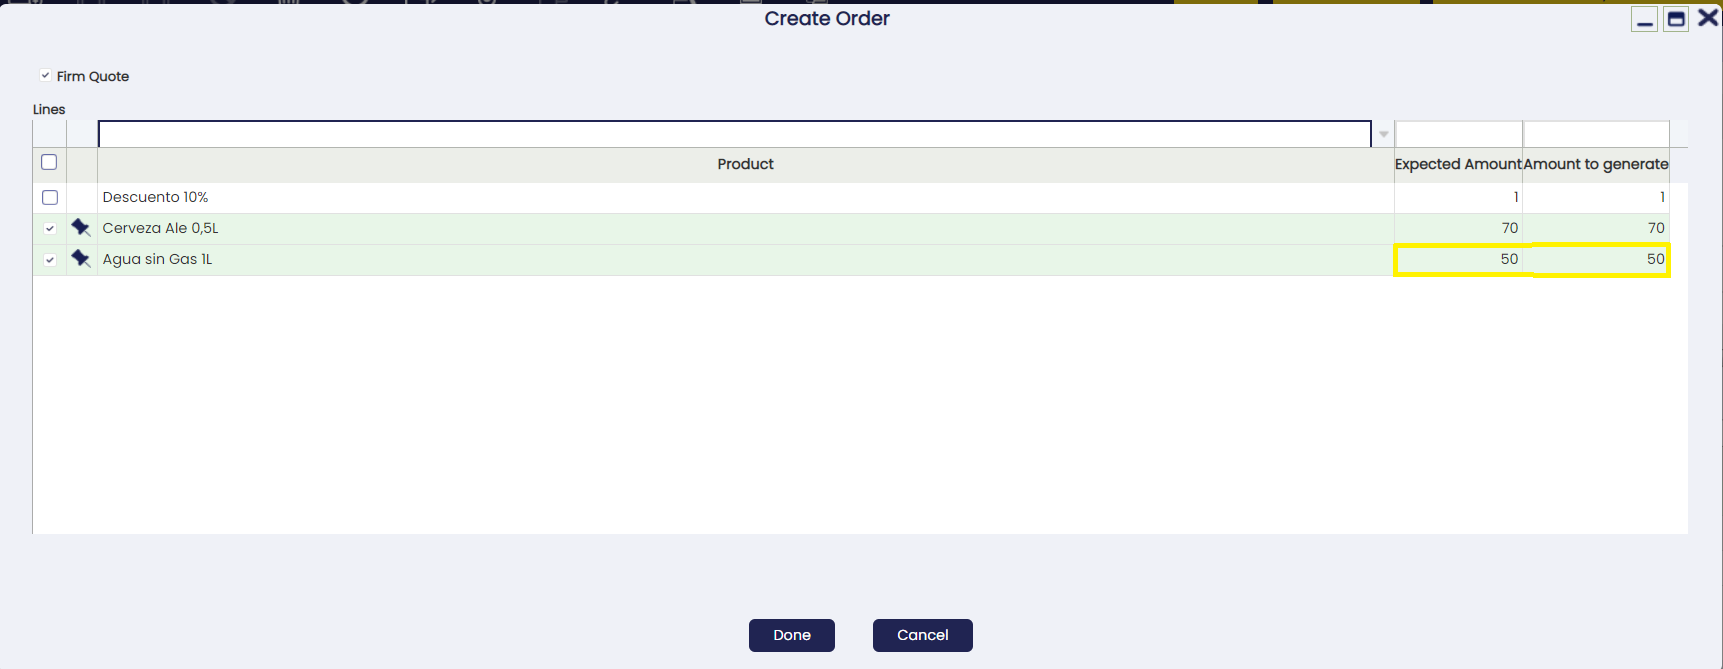
Etendo also allows generating partial sales orders either for the lines the user needs to convert, or for the amount of the product needed to convert. Apply this functionality by selecting the necessary line/s and by editing the product amount in the Amount to generate tab.
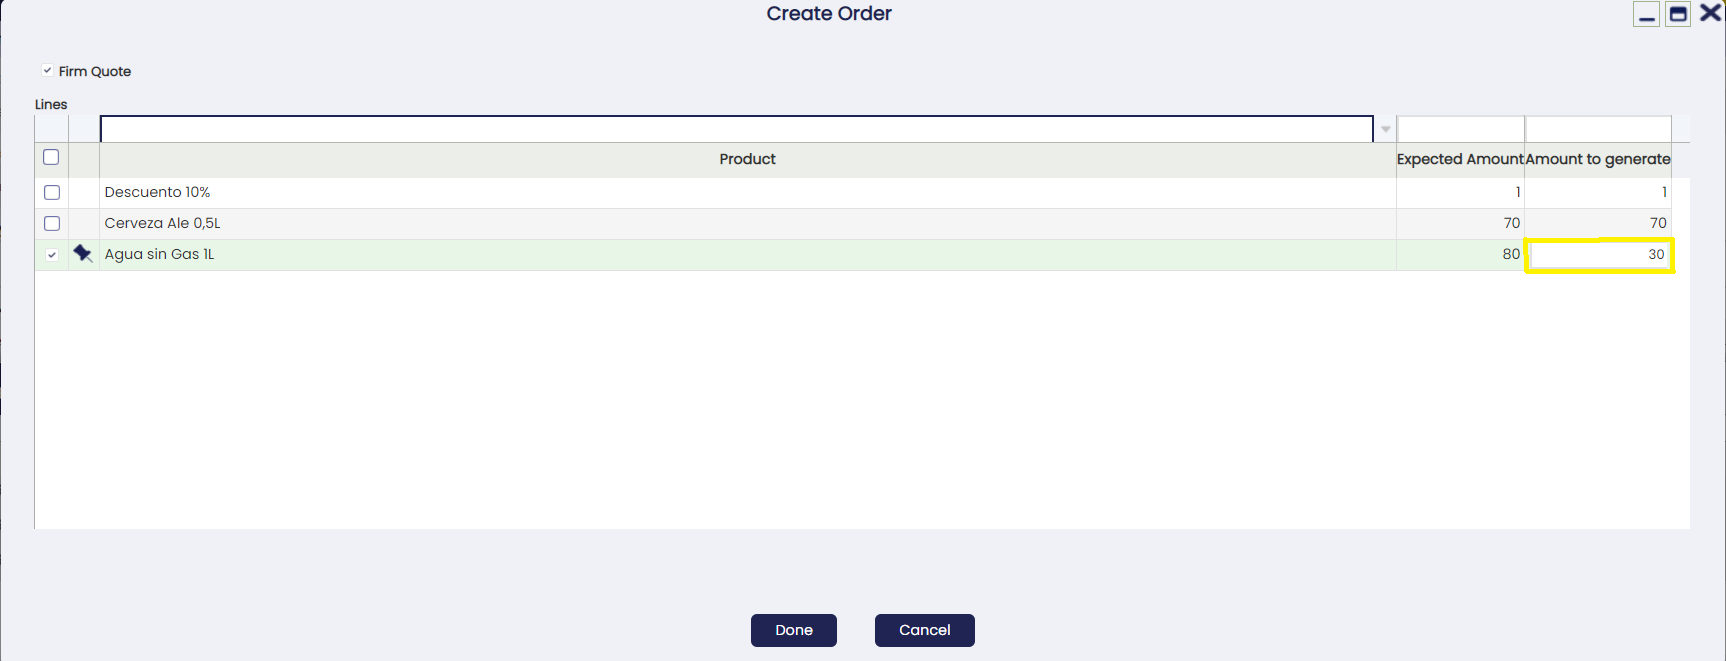
The budget will be kept available to generate future orders with the remaining amount. To create an order with the remaining amount, follow the same procedure from the Sales Quotation window.
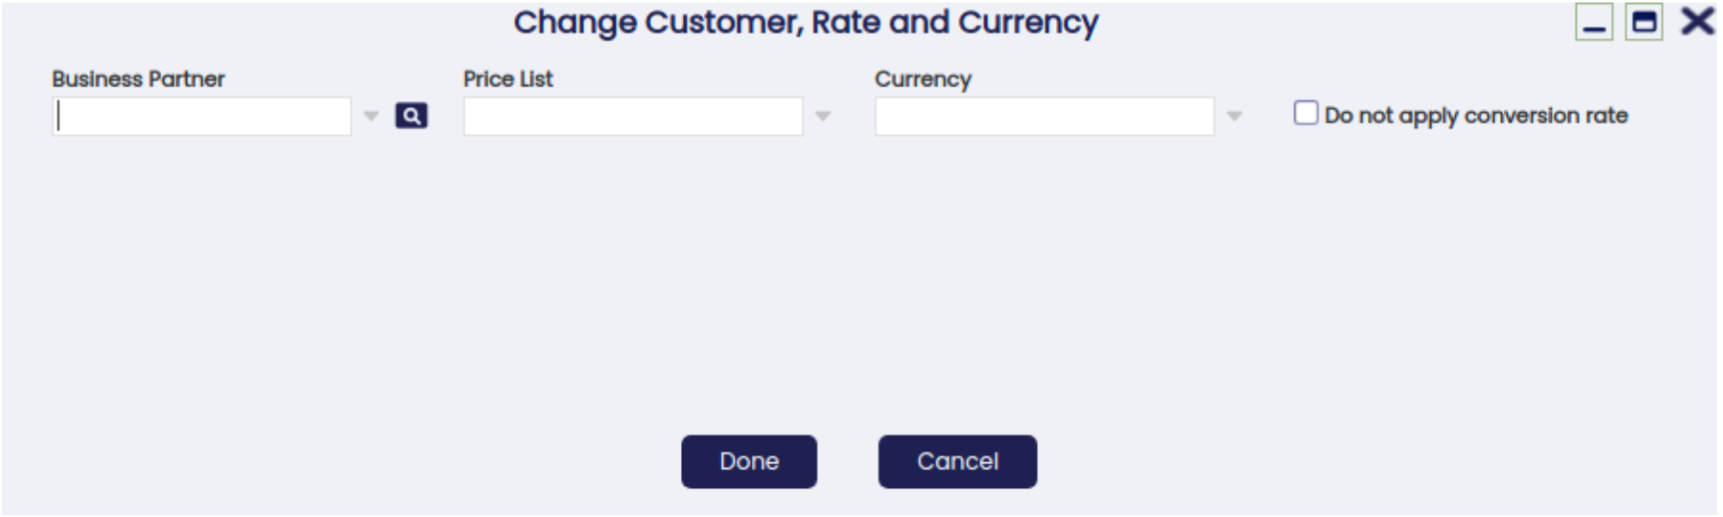
Change customer, rate and currency button
This process allows changes to be made to the business partner, rate and/or currency of the document, whether the document is in draft or registered. One or several variables can be modified at the same time. If the business partner is changed, the tax will be updated in the lines (If necessary).
In the pop-up window opened when this process is executed, the user will see the “do not apply conversion rate” check. If changing the quotation currency is intended, with the conversion to the official exchange rate included, the box must be unchecked when selecting the Currency option. Otherwise, the box must be checked in order for the system to show the quotation amount in the intended currency, defining prices in accordance with the price list configured by default in such currency.
Info
Once executed, the quotation will be closed and a new one will be created with the changes made in the state “under evaluation”. In the quotation closed, a default rejection reason is set and if there is none, the first one found is set.
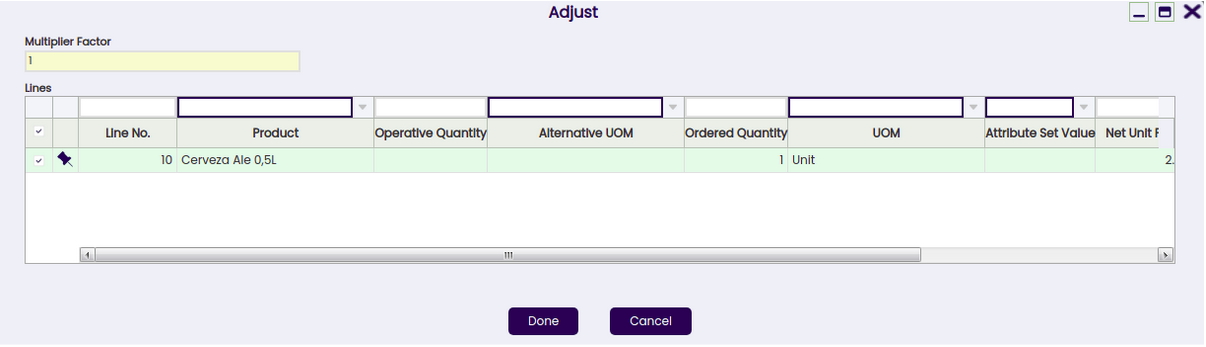
Adjust button
This process allows the user to adjust the price of one or more budget lines, either by applying discount or surcharge through an adjustment factor.
Info
This can only be executed while the document is in draft status.
Bulk Completion
Info
To be able to include this functionality, the Essentials Extensions Bundle must be installed. To do that, follow the instructions from the marketplace: Essentials Extensions Bundle. For more information about the available versions, core compatibility and new features, visit Essential Extensions - Release notes.
The Bulk Completion functionality allows the user to complete, reactivate or close multiple records by selecting them and clicking the Bulk Completion button. This makes records management easier and more efficient, reducing the time spent processing individual records.
Info
For more information, visit the Bulk Completion module user guide.
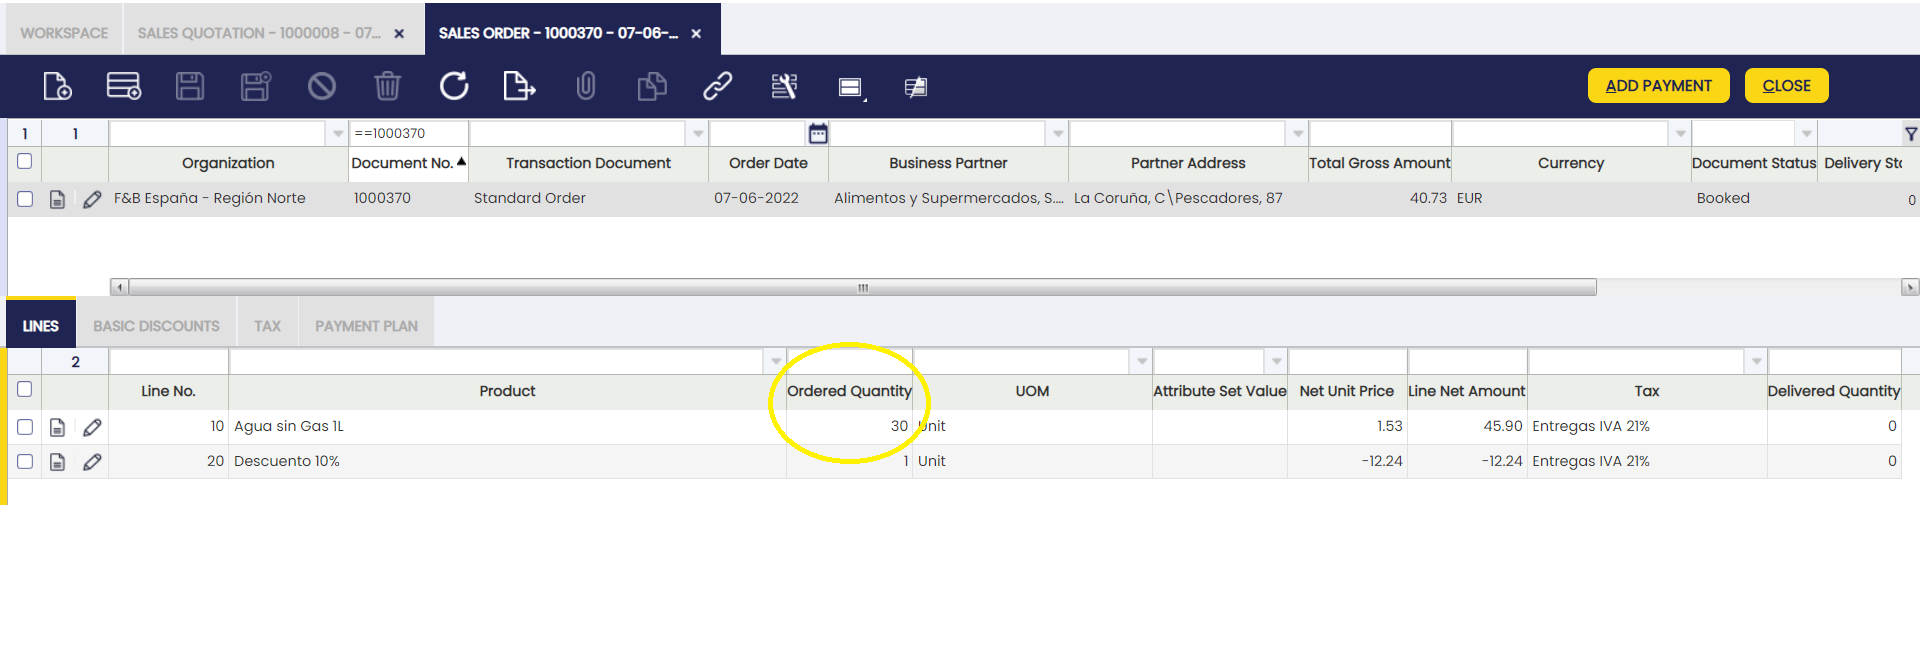
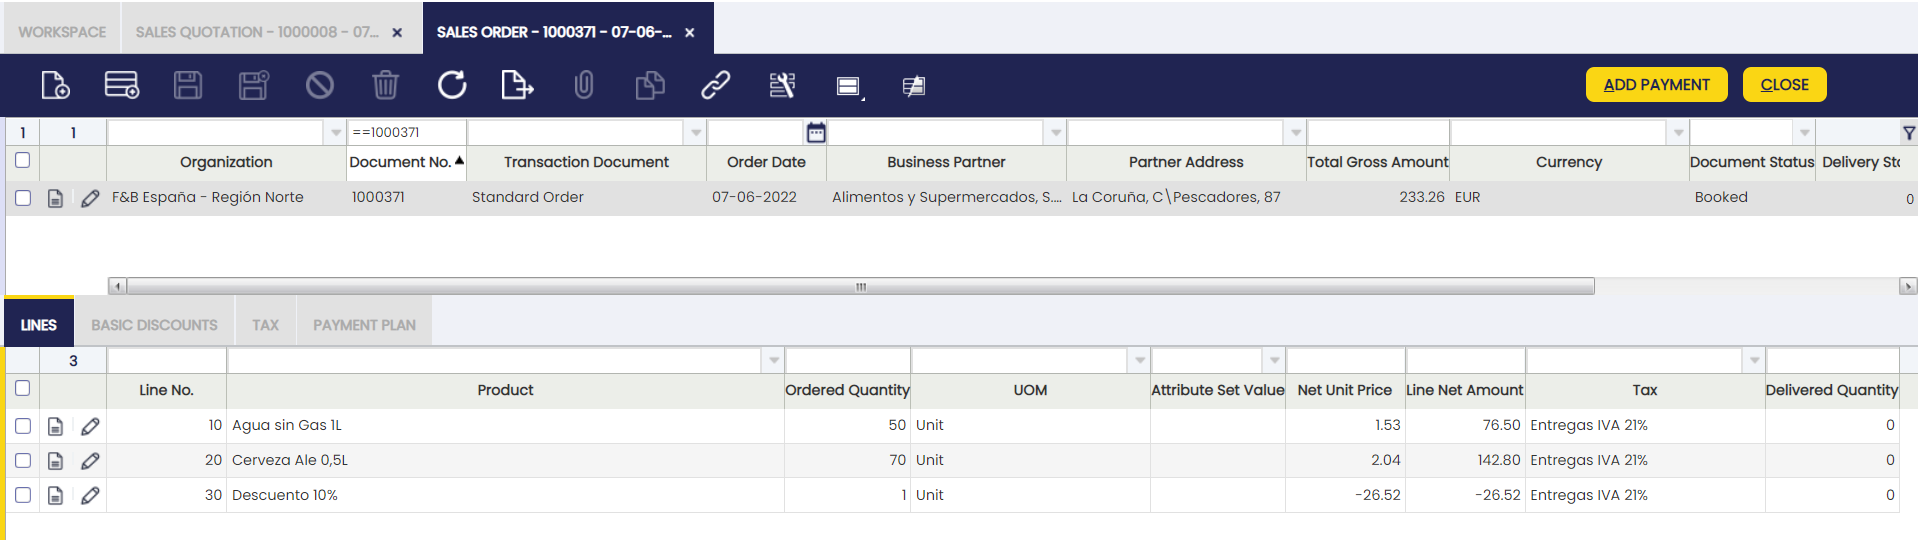
Sales Order
Application > Sales Management > Transactions > Sales Order
A sales order is a document that specifies products and/or services ordered by a specific business partner (customer), as well as the price and terms and conditions.
The Sales Order window allows the user to register sales related documents with different purposes which is regulated by the Transaction Document field. Depending on the chosen value, the consequences when booking the sales order are different. These are the types of sales order documents that are available:
Standard Order: When the transaction document is standard upon booking of the document, there are no additional documents created. Goods shipment and sales invoice still have to be created.
Warehouse Order: A warehouse order is used for the situation where the good shipment takes place at the time that the sales order is booked (for example, the customer is taking goods right away directly from the warehouse). This also means that both Documents have the same Order/Delivery dates.

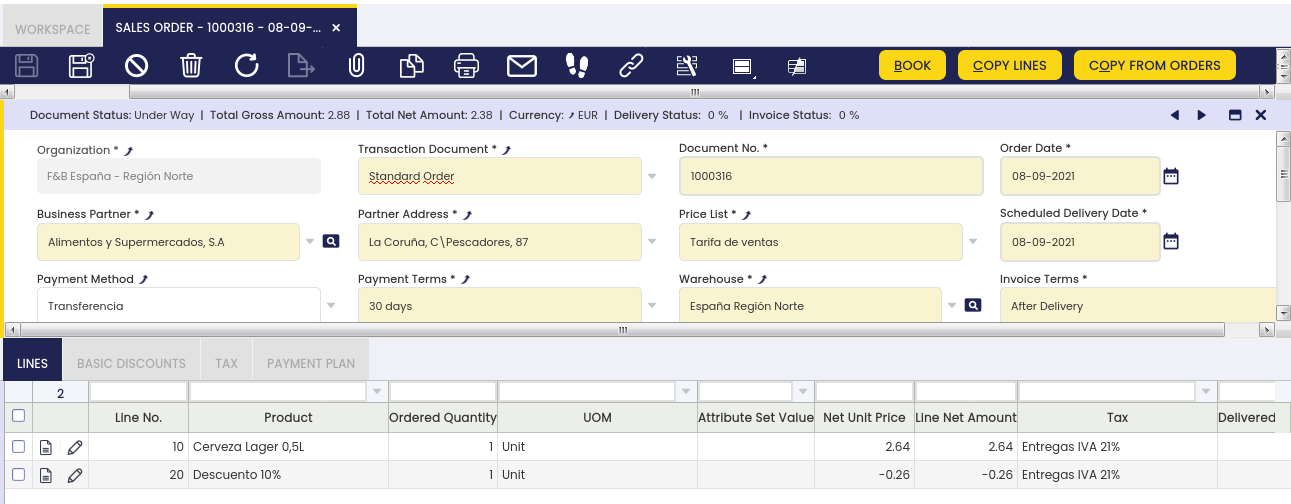
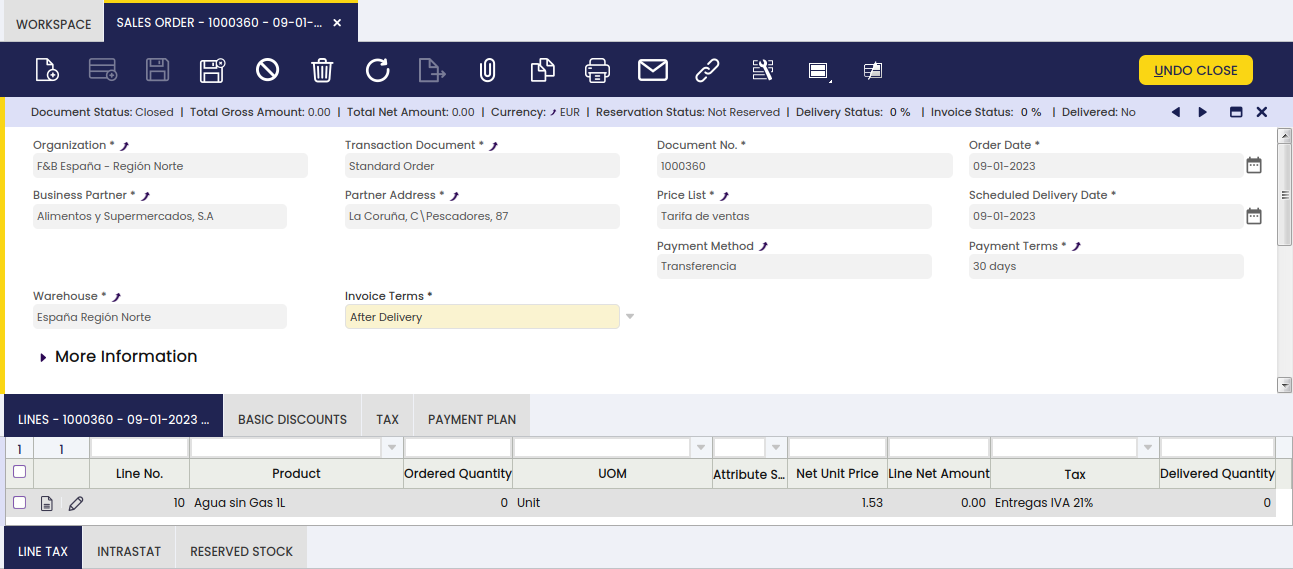
Header
The sales order header allows the user to create a sales order and process it when ready.
This header lists the main terms and conditions related to the customer order that are used in the heading of its printed copy and further in its shipment and invoicing process.
It is possible to create new Standard Sales Order, Warehouse and POS Orders as a conversion from an existing Sales Quotation.
While creating a new sales order in this window:
Info
In the majority of cases, the main and the only field needed to create a new sales transaction document is the Business Partner field. All other fields are automatically populated based on the selected Business Partner, logged in User preferences and other system default parameters.
Some other fields to note are:
Scheduled Delivery Date: indicates the date that the order should be shipped to the customer. Defaulted to the current date.
Warehouse: indicates from which warehouse an order must be shipped. Defaulted to the session value from the top navigation User Preferences menu.
Delivery Status: indicates in % how much quantity has been delivered.
Invoice Status: indicates in % how much quantity has been invoiced.
Reservation Status: defines whether the sales order is fully reserved (all lines fully reserved) or partially reserved.
Info
Reservations are disabled by default. To be able to use them please insert a new Preference using property Enable Stock Reservations with value Y. For more information, see the Stock Reservations section.
Payment Status: indicates in % how much of the total of the order has been paid.
Below fields are defaulted according to the Customer and Location tabs of the Business Partner window.
Payment Method: indicates how an order (and invoice) should be paid.
Payment Terms: defines when a sales invoice generated from this order needs to be paid.
Invoice Terms: defines how a Business Partner is invoiced and the frequency of invoicing. It is used by automated processes: Generate Invoices and Create Invoices from Orders and by Create Lines From button in the Sales Invoice.
Different Invoice Terms are:
After Delivery: Products of the sales order are invoiced as soon as they are shipped, for example, if there is partial shipment of the order it is invoiced. In this case several sales invoices might be created for one sales order corresponding to all goods shipped before each invoicing run.
After order Delivered: The invoice will be generated after all products on the sales order have been shipped, so one order - one invoice.
Customer Schedule After Delivery: Instead of sending out invoices each time any sales order product gets delivered, one invoice is created that is combining the different deliveries for a certain customer according to the defined schedule (weekly or monthly on a particular day).
Do Not Invoice: No invoice is generated automatically. Normally used when there is some external event that triggers creation of the invoice (for example, the VIP customer tells that it is okay to do so).
Immediate: The invoice is generated with the next run of the automated generation of invoices regardless of whether any shipment of ordered products took place or not.
Sales Representative: Sales person responsible for the customer in the order. It is normally used to reflect the person who booked the order.
Invoice Address: Address that is used upon generating an invoice.
Delivery Location: Address that is used when generating a shipment. If it is not specified, the Partner Address field is used.
There are 3 ways of entering lines into a sales order:
- Copying selected products from a history of products ordered by this customer using the Copy Lines button.
- Copying all products from the chosen orders selected in the history of all orders for different business partners using the Copy from Orders button.
- Manually, line by line, in the Lines tab.
Sales order prepayment
Once a sales order is booked, it is possible to prepay an order by using the process button "Add Payment".
Same as described for Sales Invoice Payment, "Add Payment" window allows to fully or partially prepay the order created more than once, and even pay other orders and/or invoices at the same time.
It is also possible to add any type of expense related to the payment of that order as a G/L item and even use available credit previously generated for the customer.
Once all of the above is properly fulfilled, the payment can be processed and deposited from the financial account.
Warning
It is important to notice that the sales invoice created from the order will inherit the payment done for the order.
Sales Order Cancel and Replace Process
Sales order cancel and replace is an advanced feature hidden by default, which can be enabled through a preference named "Enable Cancel and Replace”.
Once enabled, a new process button named "Cancel and Replace" is displayed only for booked sales orders.
Cancel and Replace feature allows to close a booked sales order and to replace it by a "copy" of it in "Temporal" status, so it can be modified.
For instance:
- "Payment Terms", "Order Date" and some other fields can be changed if required
- and, at "Lines" tab level, it is possible to add new order lines. It is also possible to modify or remove existing lines which do not have ordered quantities already shipped/delivered.
Once a temporary new order has been changed, it is possible to confirm the changes by clicking the "Confirm Cancel and Replace" process button.
Sales order cancel and replace process ends with three documents:
- The Original Order (or replaced order) in status "Closed".
This order is the order cancelled and replaced by a new one. No further action can be executed on this order. - A New Order (or replacement order) in status "Booked".
This order is a copy of the original order, created to replace the original one by including the changes required. - And an Inverse Order in status "Closed".
This order cancels the original one, therefore it is a copy of it but with the opposite sign. No further action can be executed on this order.
Replacement order document number is the replaced order document number and a suffix that is the number of times the order has been cancelled and replaced.
In case the number of times is only one, the replacement order document number is [Replaced/Original order document number-1].
It is also possible to cancel and replace a replacement order. In that case, the new replacement order document number is [Replaced/Original order document number-2].
Same way, inverse order document number is replaced with order document number and a suffix, that is R.
There are some flags and fields located under the "More Information" section, at sales order level, that have information about the relations between the different orders involved in the cancel and replace process.
The Replaced (original) Order has the below listed flag and field:
- IsCanceled, this is the flag that indicates that the original order has been cancelled.
- Replacement Order, this field stores the document number of the order that replaces the original order cancelled.
The Replacement (new) Order has the below listed fields:
- Replaced Order, this field stores the document number of the order replaced, that is the original order.
The Inverse Order has the below listed fields:
IsCanceled, this is the flag that indicates that this is as well, a canceled order.
Canceled Order, this field stores the document number of the original order canceled by the inverse order.
Lines
Lines tab allows the user to add the products to be included in your sales order. Each product is added by creating a line. Lines tab lists each product ordered and its characteristics.
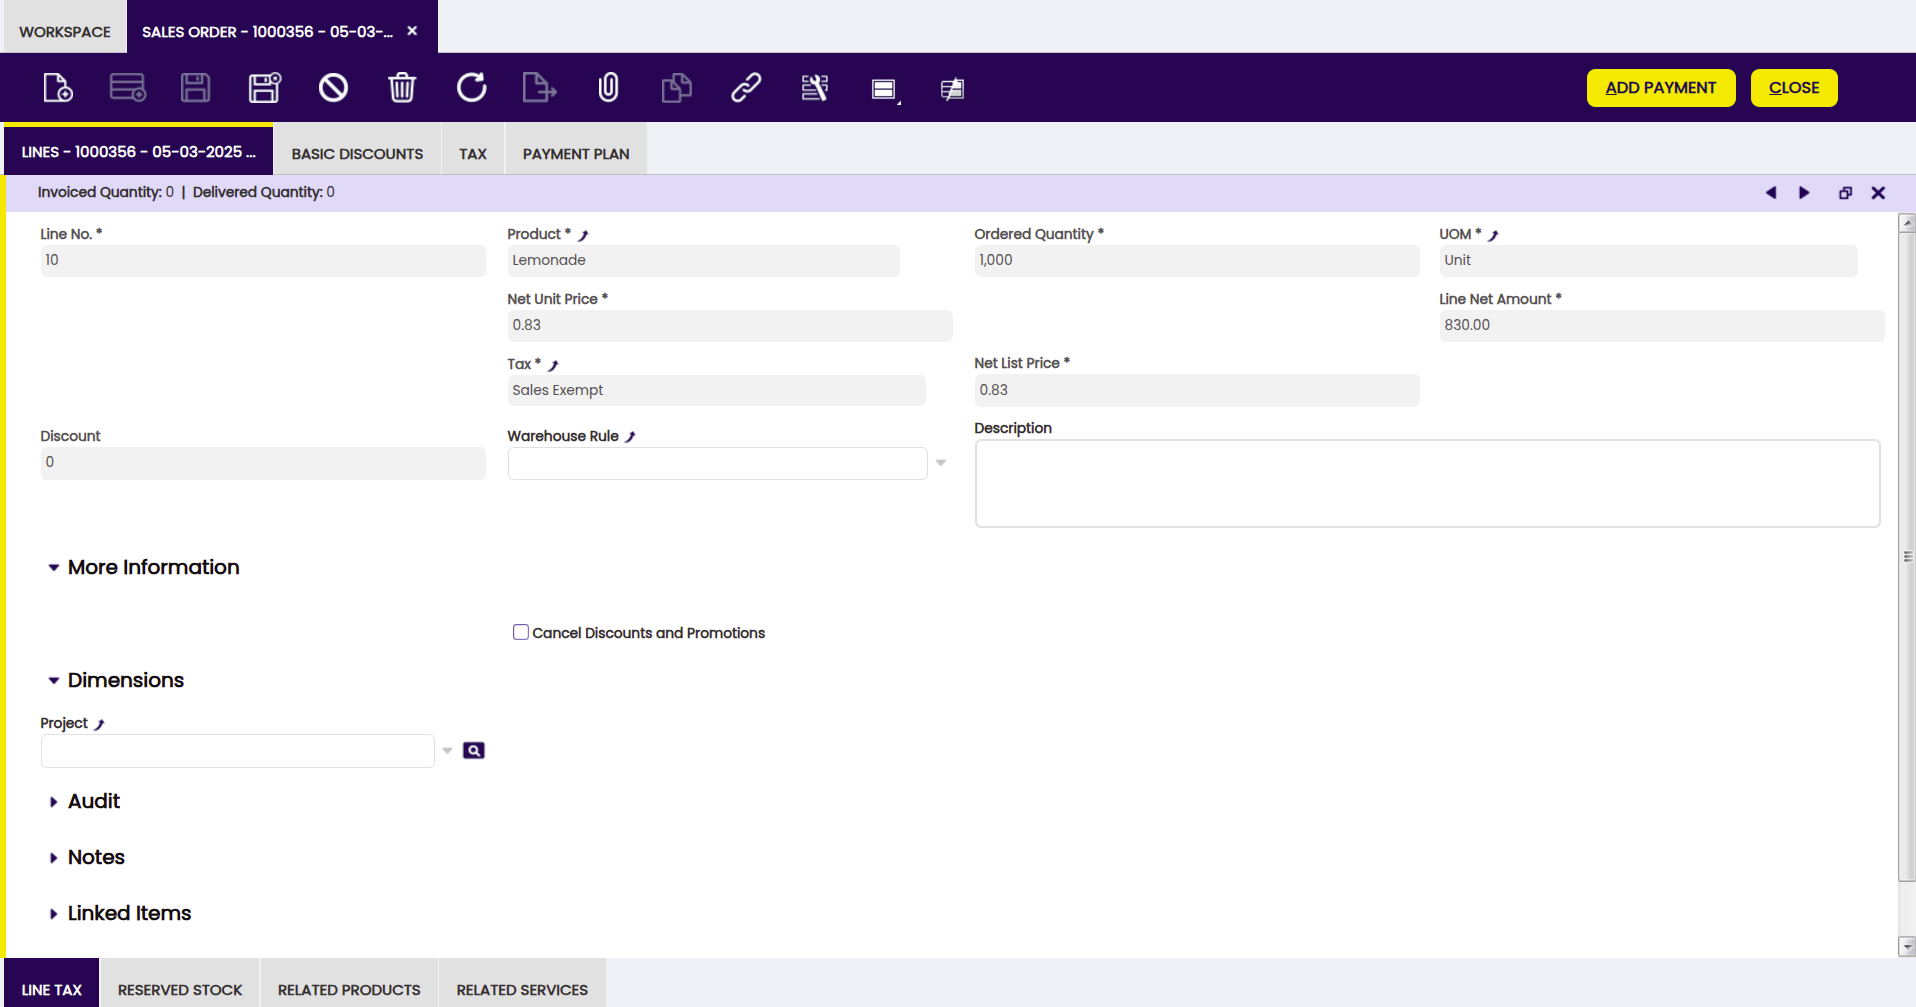
Fields to note:
- Ordered quantity, or Operative Quantity if the product has an alternative unit of measure (AUM) configured. This is the quantity needed of the product/item.
- Product's UOM, or product's Alternative UOM depending on product configuration in regards to unit of measure.
- Attribute Set Value: this field is displayed if the product in the line has attributes (color, size, serial number or several of them together, etc).
- Discount: it indicates the discount applied as a percentage of the List Price.
- Invoiced Quantity and Delivered Quantity: these are shown on the Status Bar when the line with a product is saved and gets updated when an invoice or shipment related to this line is issued.
- Warehouse Rule: Definition of a Warehouse Rule to be applied when the goods shipment is automatically generated. This rule overwrites any one defined in the warehouse. If no warehouse rule is defined in the sales order, the rule defined in warehouse is applied.
- Cancel Discounts and Promotions: With this checkbox, it is possible to cancel promotions previously defined in the Discounts and Promotions window. Only these ones, not the discounts defined in the Basic Discount window. If this box is checked, these promotions for this line are cancelled; otherwise, they are calculated normally.
Explode button is shown when selecting a line with a non-stockable BOM product and the product has not already been exploded. When exploding a product, the bill of materials components that the selected product consists of are shown in the order. Once you have exploded it, you cannot comprime it. You should delete all the lines (first bill of materials components and then the BOM product), and insert again the non-stockable BOM product.
Book button completes the sales order when all the products are entered. If there are non-stockable BOM products and they have not been exploded, the Book process will explode them.
Close button actions closes an order, which implies that :
- no further actions can happen but to prepay that order if applicable, if a fully delivered sales order is closed
- ordered quantity changes to delivered quantity and no further actions can happen but to prepay that order, if a partially delivered sales order is closed
- ordered quantity changes to 0 and no further actions can happen, if a not delivered sales order is closed
Stock Reservations
Sales Order lines can be reserved when the sales order is booked and is pending to deliver.
Fields to be noted:
-
Stock Reservation: Defines if it is desired to automatically reserve the sales order line when it is booked. Available values are:
- Manual: No reservation needs to be generated automatically. So when the order is booked you manually create the reservation
- Automatic: The reservation is automatically created and processed, reserving the available stock. This option reserves stock from any of the available warehouses belonging to the organization of the created sales order, not only from the warehouse defined in the order header.
-
Automatic - Only default warehouse: The reservation is limited only to the warehouse specified in the header of the order. This allows optimizing inventory allocation and ensuring that products are allocated according to the warehouse preferences defined in each transaction.
Info
This last option is only available if the Automated Warehouse Reservation module is installed, part of the Warehouse Extensions Bundle. To do that, follow the instructions from the marketplace: Warehouse Extensions Bundle.
-
Reservation Status: Defines whether the line is Fully Reserved or Partially Reserved or Not Reserved.
Manage Reservation: Pick and Execute
Using the Manage Reservation button is possible to open a Pick and Execute window to create and modify reservation for the Sales Order Line. The grid shows all the available stock that can be delivered and the pending to receive purchase orders.
In the grid, it is possible to select and set the desired quantity on any available stock. There are validations to avoid setting quantities higher than the available for the specific stock or than the ordered quantity. The Done button will create and process a reservation if none exists with the selected options, note that if the reservation does not exist and the Done button is pressed without selecting any stock or selecting a quantity below the ordered quantity, when the reservation is processed the system will reserve the remaining quantity with the available stock. If a reservation already exists, the reserved stock will appear automatically selected and the Done button will update the reservation with the changes done. It is also possible to flag a stock as allocated.
Warning
When the selected Product has the flag Variable Quantity set as true, it is possible to Reserve more Quantity than the Quantity ordered. But be careful, when a Shipment is generated against this Order Line and it is Completed (with the same Quantity or more than in the Order Line), the Reservation will be closed and the Reserved Quantity will be set as the same amount as the Order Quantity to prevent further inconsistency problems. So, it is possible to Reserve more Quantity than Ordered when a Product is set as Variable Quantity, but the Reservation will be set as the original Ordered Quantity when a Shipment is made.
Line Tax
For each sales order line, Etendo automatically populates the line tax related information in this tab.
Line Tax read-only tab details tax information for each line of a sales order based on its Tax field which is automatically pre-filled according to the Taxes Setup.
Reserved Stock
Relation of reserved stock and pre-reserved purchase orders related to the Sales Order Line.
For each reserved Sales Order line, it is possible to review the reserved stock. The quantity, storage bin and attribute set value are shown when it applies. If there is part of the sales order preserved, the purchase order line will also be shown. When a pre-reservation is converted to a reserve, it will still have the original Purchase Order Line, but the later will also have a Storage Bin defined. All pre-reservations have the Storage Bin blank.
Related Products
In this table, the Order Lines related to an Order Line of 'Service' type are added.
This tab will only be displayed for those lines with a Linked to Product service. It will display the related product lines of a service. The grid has the same fields that the Pick & Edit uses to add the lines. This tab is not editable.
In order to relate product lines to service lines, there is a Select Order Line button. This button will be displayed when a line with a Linked to Product service is selected.
By clicking the button, it displays a Pick & Edit showing records of the same order of products that could be related to the service. By default, it shows records of the same order, but when removing the filter expression, it shows records of already booked orders that could also be related to the Service.
For each line selected in this tab, a new relation is created between the service and the selected product line. If a relation already exists, it will appear as selected in the grid. To delete the relation just unselect the desired record. Some requirements have to be satisfied in order to be able to create a relation:
- The service needs to have a price on the price list.
- If the service is marked as Is Price Rule Based:
- To have a valid Price Rule Version.
- To have correct Price Rule Ranges, if it is the case.
- If the selected line belongs to an already completed Sales Order, the service has to be marked as Allow Deferred Sale.
If these conditions are not satisfied, the selected line will be unselected, not permitting to be selected to relate to the service.
Fields of the Pick & Edit:
- Document No: Document number of the order that belongs to the order line.
- Order Date: Order date of the order.
- Line No: Line number of the selected order line.
- Product: Related product.
- Attribute Set Value: Attribute Set Value of the product.
- Amount: Line Amount to be related.
- Discount Amount: Amount of discounts applied to the line. This amount will be used to calculate the service amount, depending on the value in the “After Discounts” field in Service Price Rules (if applied).
- Ordered Quantity: Quantity of the product in the Sales Order Line.
- Related Quantity: Quantity to be related to the Service. This field is editable, it is possible to relate less quantity than the original ordered quantity, never more. If more is assigned an error will appear. When a record is selected it automatically sets the Ordered Quantity in this field.
- Returned Qty Other RM: It does not apply in this workflow (Only for returns window).
Totals section:
- Summed Line Amount: Sum of the selected line amounts.
- Summed Discounts Amount: Sum of the selected line discount amounts.
- Summed Service Amount: Price of the service based on selected lines in the grid. This amount will be added to the total amount of the service line when creating the relations.
Modify Tax
If the service is configured to modify tax, new taxes are applied automatically during the operation so, after linking the configured service to a product, the new taxes configuration will be applied.
It is not recommended to modify the tax manually afterwards, as the system can create inconsistencies. However, it is possible to remove the service product and then the Tax reverts back to its original value.
Related Services
In this table, the 'Service' type product Order Lines related to an Order Line are displayed.
This tab is only displayed for those lines with products related to services. It displays the related services. The grid has the same fields that the Pick & Edit uses to add the lines. This tab is not editable.
Basic Discounts
This section lists information about discounts automatically applied based on the customer configuration and / or manually entered for the sales order.
Tax
The user can edit taxes applied to their order. It summarizes tax related information for the whole sales order. It contains as many records as tax rates used in the order.
Payment Plan
This section shows the total amount expected to be collected upon order booking, as well as the amount/s pre-paid or paid against the invoice/s for the order.
It shows the total payment amount expected for the order and its fulfillment. This tab is read-only and is populated after processing the document.
Payment Details
Displays the details of the payments (pre-payments or regular payments) received for the order or for the invoice/s of the order.
Replacement Orders
Set of orders replacing a canceled order.
How to Reactivate a Closed Sales Order
Info
To be able to include this functionality, the Financial Extensions Bundle must be installed. To do that, follow the instructions from the marketplace: Financial Extensions Bundle. For more information about the available versions, core compatibility and new features, visit Financial Extensions - Release notes.
Etendo allows the user to reactivate closed sales orders by selecting the needed one/s and clicking the Undo Close button.
Once the process is finished, the sales order status turns to booked.
Info
Check the Technical documentation about Advanced Financial Docs Processing to extend the process.
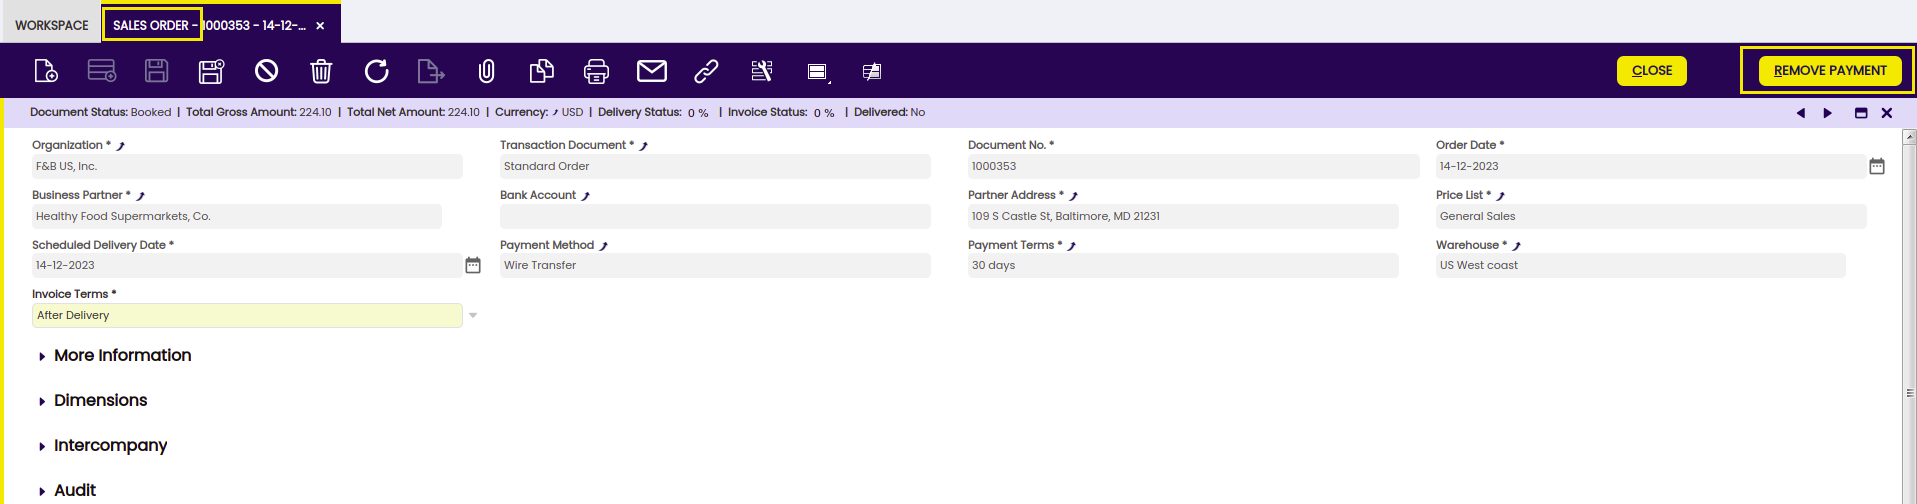
Payment Removal
The aim of this functionality is to delete and reactivate payments in an agile and easy way. Also, it allows eliminating and reactivating bank transactions and reconciliations.
Info
To be able to include this functionality, the Financial Extensions Bundle must be installed. To do that, follow the instructions from the marketplace: Financial Extensions Bundle. For more information about the available versions, core compatibility and new features, visit Financial Extensions - Release notes.
From this window, it is possible to remove payments associated with a sales order by selecting the corresponding document and then clicking on the Remove Payment button. If there is an invoice associated with the order, the relationship of this invoice to the payment in question will also be removed (Sales Invoice window > Payment Plan tab).
If the payment is included in the financial account, i.e., if it is in Deposited/Withdrawn not cleared status, the transaction in it will also be deleted (Financial account window > Transaction tab).
If the payment is reconciled through an automatic method, then in addition to the transaction in the financial account, the line of the bank statement to which it was linked (Financial Account window > Imported Bank Statements) and the corresponding line of the bank reconciliation (Financial Account > Reconciliations) will be deleted.
Info
If the payment is posted, the accounting entry is deleted too.
Intercompany
In case the user has to create orders or invoices among two or more organizations that are different but belong to the same client, this functionality allows automatically generating the corresponding inverse document.
Info
For more information, visit the Intercompany module user guide.
Info
To be able to include this functionality, the Financial Extensions Bundle must be installed. To do that, follow the instructions from the marketplace: Financial Extensions Bundle. For more information about the available versions, core compatibility and new features, visit Financial Extensions - Release notes.
Bulk Completion
Info
To be able to include this functionality, the Essentials Extensions Bundle must be installed. To do that, follow the instructions from the marketplace: Essentials Extensions Bundle. For more information about the available versions, core compatibility and new features, visit Essential Extensions - Release notes.
The Bulk Completion functionality allows the user to complete, reactivate or close multiple records by selecting them and clicking the Bulk Completion button. This makes records management easier and more efficient, reducing the time spent processing individual records.
Info
For more information, visit the Bulk Completion module user guide.
Advanced Bank Account Management
Info
To be able to include this functionality, the Advanced Bank Account Management module of the Financial Extensions Bundle must be installed. To do that, follow the instructions from the marketplace: Financial Extensions Bundle. For more information about the available versions, core compatibility and new features, visit Financial Extensions - Release notes.
This module adds a new field to the header of the Sales Order window: Bank Account. This field is automatically filled with the bank account related to the adress or business partner of the order.

Info
For more information, visit the Advanced Bank Account Management user guide.
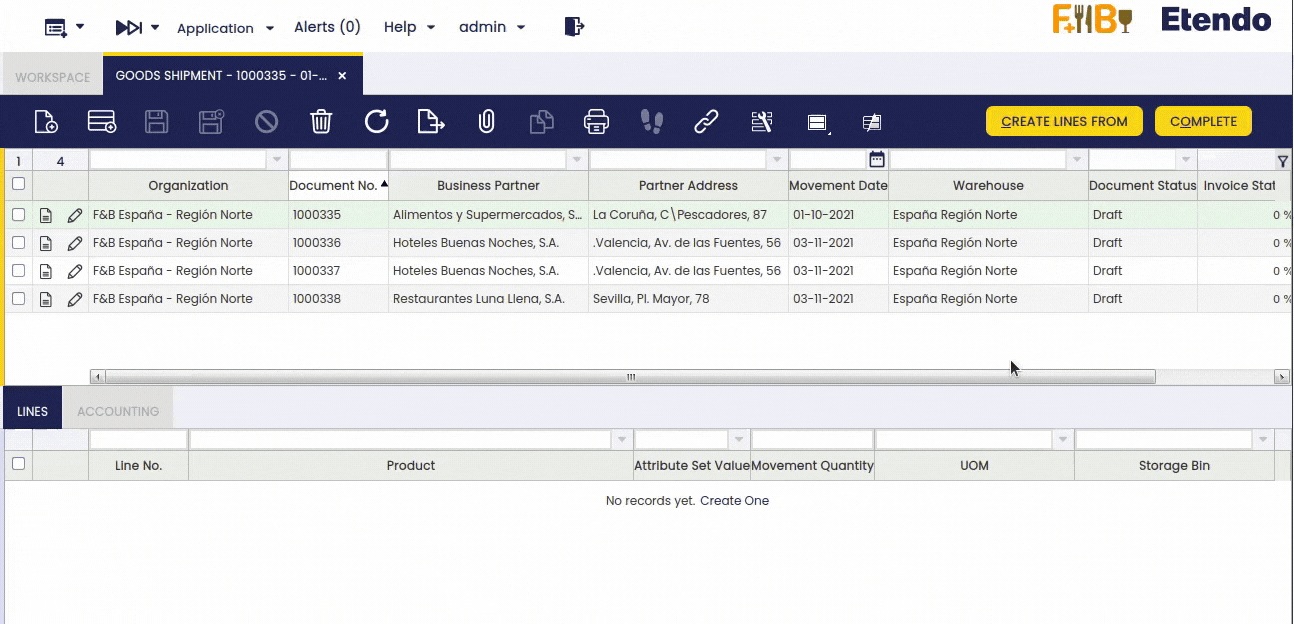
Goods Shipment
Application > Sales Management > Transactions > Goods Shipment
In this section, you can create and manage goods shipments to your customers. A Goods Shipment is a document registering the specifics of items sent to a customer.
This window allows the user to browse information about all Goods Shipments registered in the system and manually create new shipment documents. It is useful if execution of some scenario is required that is not supported by automatic shipments generation process (for example, partial shipment of the order or grouping of several orders and / or invoices in one shipment). For automatic creation use Create Shipments from Orders.
As described in the Costing Server article, the cost of a "Goods Shipment" is calculated as any other output transaction depending on the Costing Algorithm used.
The calculated cost of a "Goods Shipment" is used while posting it to the ledger.
Header
The user can create and process a shipment.
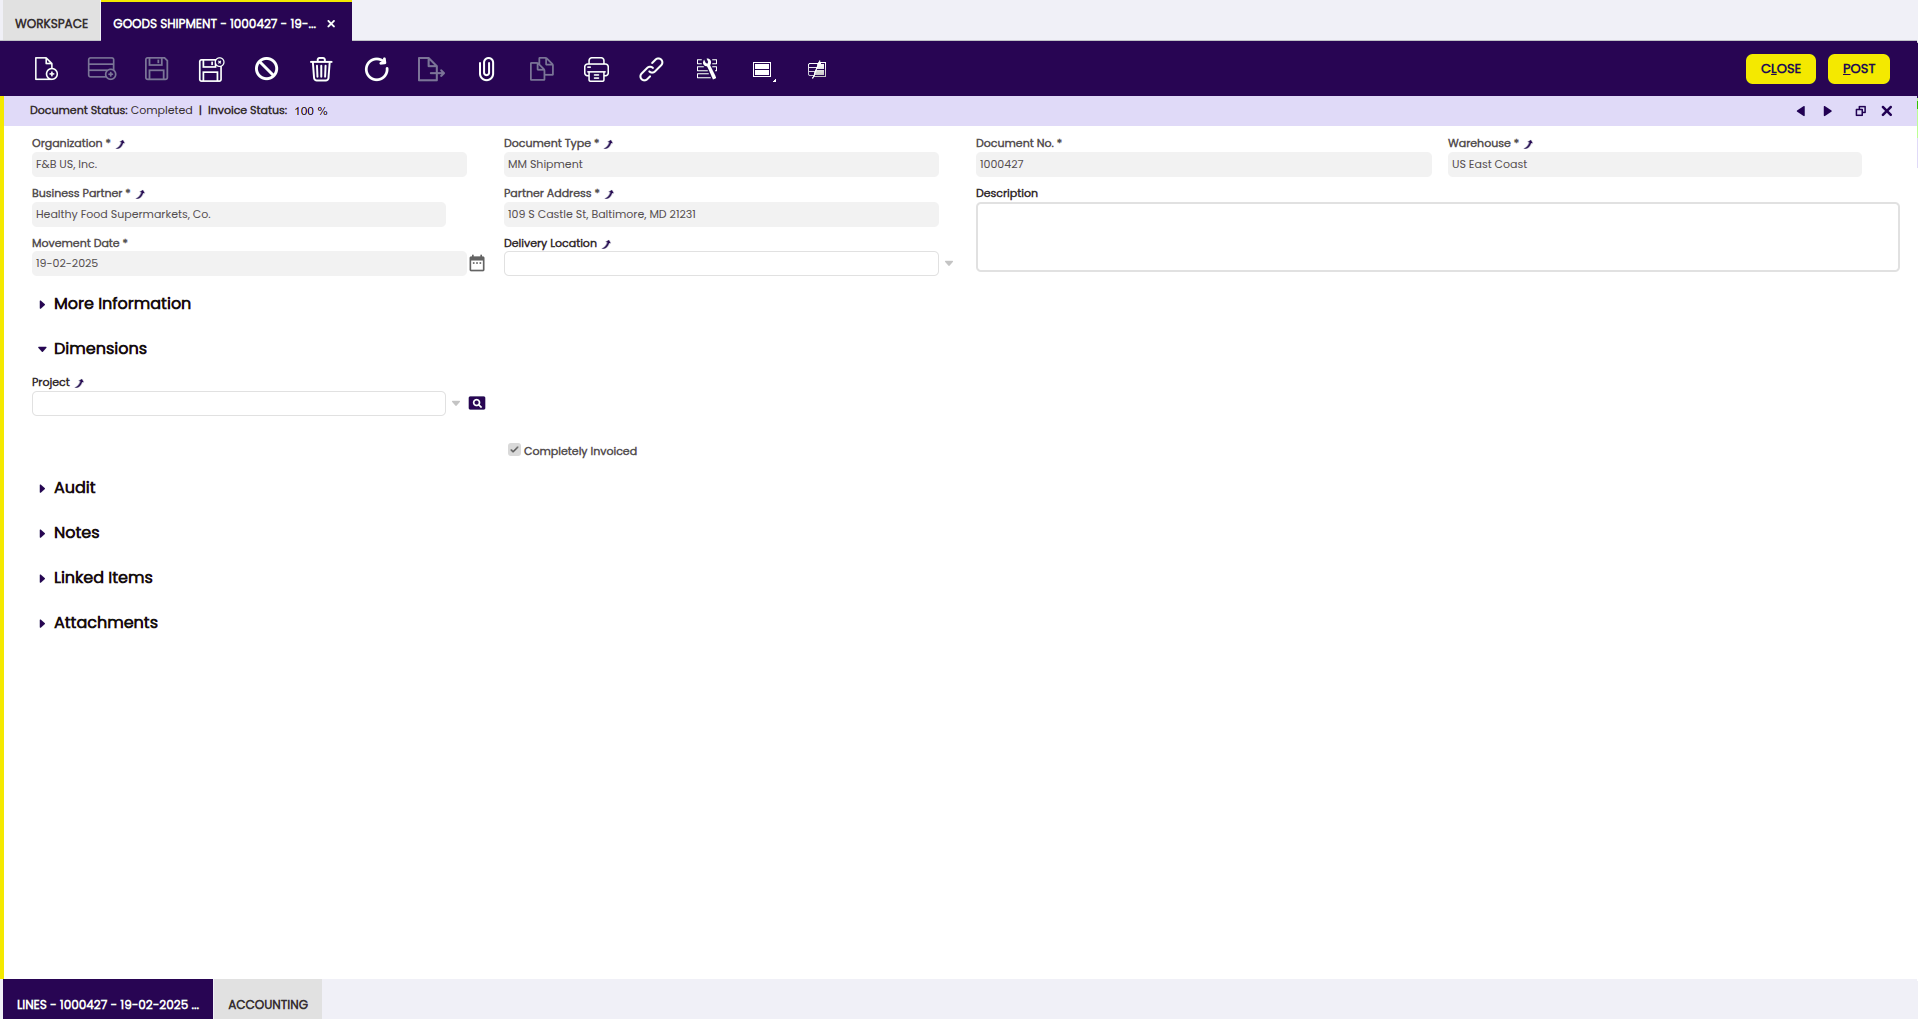
The Header lists main terms and conditions related to the customer delivery that apply to all products (Lines) included in it.
In the majority of cases, the main and the only field needed to create a new Goods Shipment is the Business Partner field. All other fields are automatically populated based on the selected Business Partner, logged in User preferences and other system default parameters.
Some other fields to note:
- Warehouse: The warehouse from where the goods are shipped. Defaulted to the session value from the top navigation.
- Movement Date: The date the goods physically ship out of the warehouse. Defaulted to the current date.
- Delivery Location: Address that will be used when generating a shipment. If it is not specified, a Partner Address field will be used. Defaulted according to the Customer and Location tabs of the Business Partner window.
- Accounting Date: Date to be used in the posting record of the Goods Shipment to the general ledger.
- Sales Order: Reference to an order that is being shipped. If Goods Shipment includes products from several Sales Orders fields are left empty (still trace-ability is present at Lines level).
- Invoice Status: indicates in % how much quantity has been invoiced. If we create two or more lines in goods shipment related to a sales invoice line, only one of those goods shipment lines will show "Invoice Status" 100% and the rest will show "Invoice Status" 0%.
There are 2 ways of entering lines into the sales order:
- Selecting products from pending to be shipped orders or invoices and specifying Storage Bin (Warehouse field) from where it should be shipped using the Create Lines From button. This option can be used several times to group several orders and / or invoices in one shipment. This is the most common approach.
- Manually, line by line. It is used if the underlying document (Sales Order or Invoice) does not exist in the system prior shipment takes place.
Lines
The user can add or see products included in their shipment. Each product is shown on its own line. Lines list each product to be delivered and its characteristics.
Fields to note:
- Attribute Set Value: This field is displayed if the product to be shipped in the line has attributes (color, size, serial number or several of them together etc).
- Storage Bin: From where the product is taken for shipment. Populated automatically based on the Product field which includes storage bin as the part of its selector.
- Sales Order Line: Reference to the sales order line that is being shipped.
In the Status Bar of each line, you can find information about the Invoiced quantity, the number of invoiced products of the line.
Explode button is shown when selecting a line with a non-stockable BOM product and the product has not already been exploded. When exploding a product, the bill of materials components that the selected product consists of are shown in the shipment. Once you have exploded it, you cannot comprime it. You should delete all the lines (first bill of materials components and then the BOM product), and insert again the non-stockable BOM product.
Complete button finishes shipment of the products to the customer and stock information gets updated accordingly (product levels go down).
Accounting
Accounting information related to the material shipment.
A "Goods Shipment" can be posted if the "MaterialMgmtShipmentInOut" table is set to Active for accounting in the Active Tables tab of the organization's general ledger configuration.
Goods Shipment posting creates the following accounting entries.
Posting record date: Accounting Date.
| Account | Debit | Credit | Comment |
| Product COGS (Cost of Goods Sold) | Shipment Line Cost Amount | One per Goods Shipment Line | |
| Product Asset | Shipment Line Cost Amount | One per Goods Shipment Line |
Posting a Goods Shipment requires the user to calculate the cost of the product/s contained in it.
In the case of a goods shipment that is the average or the standard cost calculated depending on the Costing Algorithm used.
Moreover:
- The "Legal Entity" organization needs to have a validated Costing Rule configured
- and the Costing Background Process needs to be scheduled for the Client, therefore it can search and then allow that the Costing Server process calculates the cost of the transactions.
Once the cost has been calculated, the Goods Shipment can be posted to the ledger.
Automatic Invoice from Goods Shipment
When completing a goods shipment, the confirmation popup shows a checkbox called Invoice if possible. If checked, the UI allows the user to enter a valid Price List, Invoice Date and whether to complete the newly created sales invoice or to leave it as draft.
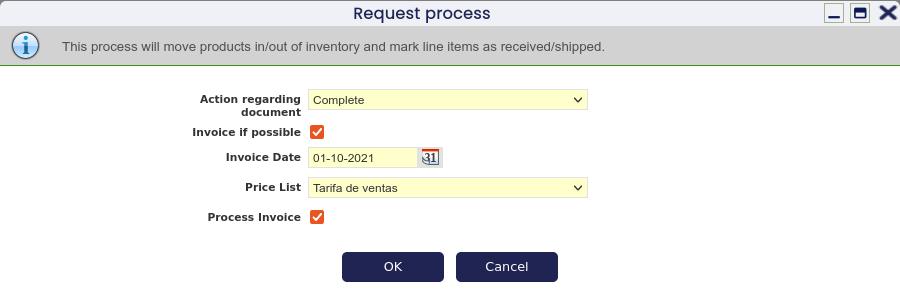
The lines not linked to a sales order will always be automatically invoiced. For the lines linked to a sales order, their respective invoice terms will be taken into account, thus generating the invoice lines only for the valid order lines. In both cases, only the non-invoice-yet quantity will be invoiced.
Besides, the window shows a new button Generate Invoice from Shipment which allows the user to invoice the goods shipment at any time as long as the goods shipment is not fully invoiced yet. The Invoice Date, Price List and Process Invoice fields are also provided in this process following the same logic explained above.
How to Reactivate Goods Shipments
Info
To be able to include this functionality, the Warehouse Extensions Bundle must be installed. To do that, follow the instructions from the marketplace: Warehouse Extensions Bundle. For more information about the available versions, core compatibility and new features, visit Warehouse Extensions - Release notes.
From the Goods Shipment window, it is possible to reactivate a previously generated movement just by selecting the corresponding document and clicking the Reactivate button.
Once the shipment is successfully reactivated, the state of the document changes to Draft as it can be observed in the status bar.

Bulk Posting
Info
To be able to include this functionality, the Financial Extensions Bundle must be installed. To do that, follow the instructions from the marketplace: Financial Extensions Bundle. For more information about the available versions, core compatibility and new features, visit Financial Extensions - Release notes.
The Bulk Posting functionality allows the user to post or unpost multiple records by selecting the corresponding records and clicking the Bulk posting button.
Also, the Accounting Status of the record/s is shown in the status bar, in form view, or in a column, in grid view.
Info
For more information, visit the Bulk Posting module user guide.
Bulk Completion
Info
To be able to include this functionality, the Essentials Extensions Bundle must be installed. To do that, follow the instructions from the marketplace: Essentials Extensions Bundle. For more information about the available versions, core compatibility and new features, visit Essential Extensions - Release notes.
The Bulk Completion functionality allows the user to complete, reactivate or void multiple records by selecting them and clicking the Bulk Completion button. This makes records management easier and more efficient, reducing the time spent processing individual records.
Info
For more information, visit the Bulk Completion module user guide.
Return from Customer
Application > Sales Management > Transactions > Return from Customer
Header
The user can create a sales order and process it when ready.
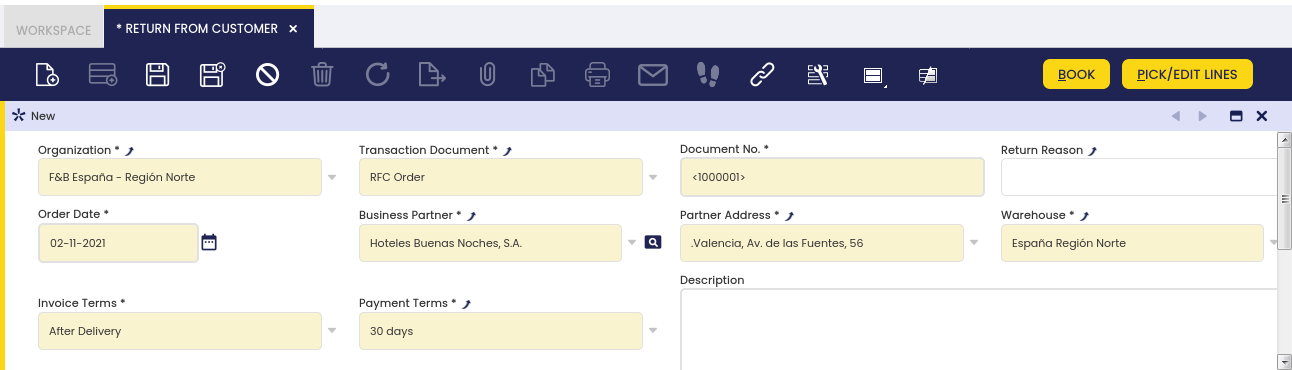
Once the Return document is accepted you can process it by clicking the button Book. Following the standard, the document changes from Draft to Booked.
Only Booked documents can be receipt.
Warning
Notice the button Pick/Edit lines disappears when the Return to customer document is in status Booked.
Things to consider:
- Delivery Status: indicates in % how much quantity has been delivered.
- Invoice Status: indicates in % how much quantity has been invoiced.
- A new button Create credit might appear or not based on the original sales order. If the order is already invoiced then it will be present, if not, it will not.
Through this button, you are able to invoice the return order following the standards, that is, depending on the invoice terms. - Using this button you can also create an invoice and leave it as credit to be used later. The way to do so is:
- There is a new execution process named Leave as credit. You can configure a new payment method with this process.
- If the payment method used in the Return material order has this execution process, a Reverse sales invoice is created but leaving it as credit so the credit can be later settled with another invoice.
- The button Create credit is no longer shown once the document is fully invoiced.
- Besides the Create credit button you can follow the standards (Invoice terms) to invoice these documents. All scenarios are covered:
- Process Generate Invoices: If the invoice terms is Customer Schedule After Delivery and you have sales orders and RMAs the process will group all in one standard Sales Invoice and not in a Reversal Sales Invoice.
- You can also use the Sales Invoice window to pick lines and either gather lines from standard sales order and return orders lines or create individual Reversal Sales Invoice for return orders.
- You can also create a Return Material Sales Invoice through the Sales Invoice window and leave it as credit and later on use it. Keep in mind that this Invoice should be created with negative amounts.
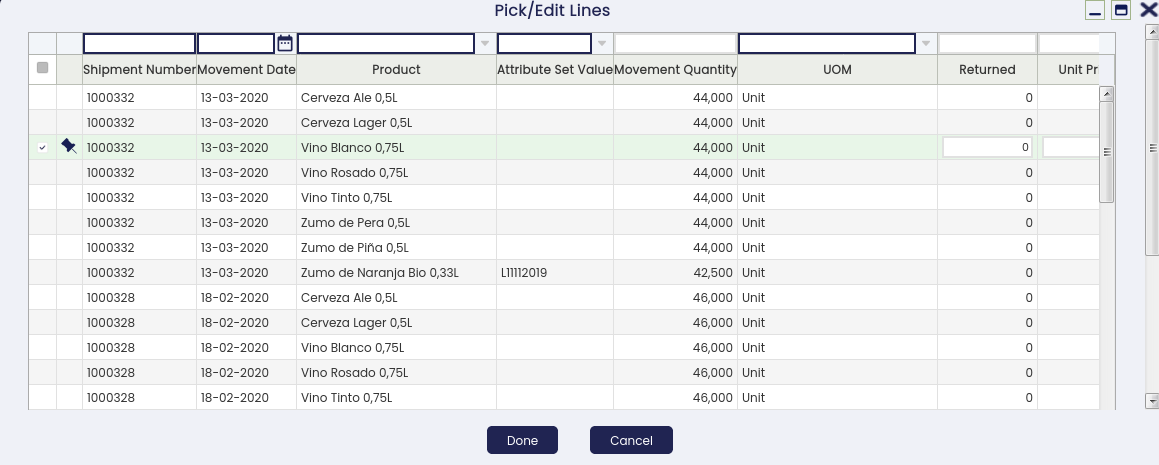
Lines
The user can add products to be included in their sales order. Each product is added by creating a line.
The Lines tab is not editable, since the returned lines always come from shipment lines, to avoid:
- To see positive values while negative in the DB.
- To enter lines that are not linked to the original shipment line.
- To edit attributes, products and so, having the products or attributes different from the shipment line.
To enter lines that come from a goods shipment, you need to click the button “Pick/Edit Lines”
Things to consider:
- The only editable fields are:
- Returned: Quantity you wish to return. When selecting the row, the quantity is not set by default since the system cannot know how many items are being returned.
- Net Unit Price: Price of the original sales order.
- Return reason: The reason why you return the item.
- Returned UOM, only in case alternative unit of measure (AUM) preference is enabled.
In that case, the product's "primary" AUM for the sales flow is shown if any, otherwise the product's UOM is shown. The user can always change it to product's UOM.
- You can define the Return Reason at header level. In this case when picking a line it inherits what selected in the header but you can modify it as you wish.
- Only Goods shipment documents that have not been still returned can be picked. In case a goods shipment line has been fully returned, it won't be shown.
- When a goods shipment line has been partially returned, the rest can still be returned. What you have already returned for that line is shown in the field Return Qty other RM.
Validations:
- You are not allowed to return more quantity than the Ship/Receipt Qty. In case you do it a message is shown.
- Notice that this validation takes into account the Return Qty other RM field.
A restriction has been added in Pick/Edit Lines in order to prevent adding non “Returnable” service lines to Return From Customer documents.
To enter lines that do not come from any document present in the system, you need click the “Insert Orphan Line” button.
Tip
Since this flow is not common, the button is hidden by default. In order to display it, it is necessary to configure a preference named RM Allow Orphan Line. To do so, go to the preference window and select it from the list. The value must be Y. Then log out and log in.
Things to consider:
- Product: It is mandatory.
- Returned: The quantity returned.
- Net Unit Price: It can be left blank. In that case the system calculates the price based on the price list defined in the header of the document.
- Tax: It can be left blank. In that case the system will calculate the tax.
- Return reason: The reason why the good was returned.
This flow (Insert orphan line) does not support products with attributes
Info
To edit a line you need to click again the Pick/Edit Lines button and the line appears selected and then you can modify any of the editable fields.
Info
To delete a line you need to unmark the line and then click Done.
Line Tax
Taxes related to the order line.
Related Products
In this table, the Order Lines related to an Order Line of 'Service' type are added.
It has been added the possibility to select the service related to which original product lines is desired to be returned. In order to do it, the new button “Select Order Line” has been added in Return From Customer Line tab. This button is displayed when a line with a Service ‘Linked to Product’ is selected.
The tab is similar to the one implemented in the Sales Order Line window. The only difference is that the relations are created with negative values (amount, quantity), but the window has been adapted to see those values in positive (in the database, they are negative).
The grid implemented in this Pick&Edit is the same as used in the Sales Order Line window, with a few differences:
- Related Quantity: Quantity to be related to the Service. This field is editable, it is possible to relate less quantity than the original ordered quantity, never more. An error appears if more quantity is assigned. This field takes into account Returned Qty Other RM field, so it never allows to return more than ordered taking into account qty returned on other return documents. When a record is selected, it automatically sets 0 in this field.
- Returned Qty Other RM: It displays the returned qty of the line on other different return documents.
- Deferred Sales: They do not apply in this window because returns are being made, not sales.
Basic Discounts
It shows the discount applied to the original invoice of the returned product.
Tax
The user can edit taxes applied to the order.
Bulk Completion
Info
To be able to include this functionality, the Essentials Extensions Bundle must be installed. To do that, follow the instructions from the marketplace: Essentials Extensions Bundle. For more information about the available versions, core compatibility and new features, visit Essential Extensions - Release notes.
The Bulk Completion functionality allows the user to complete, reactivate or close multiple records by selecting them and clicking the Bulk Completion button. This makes records management easier and more efficient, reducing the time spent processing individual records.
Info
For more information, visit the Bulk Completion module user guide.
Return Material Receipt
Application > Sales Management > Transactions > Return Material Receipt
In this window, the user receives the material that has been returned from the customer.
Header
The user can create and process a return material receipt.
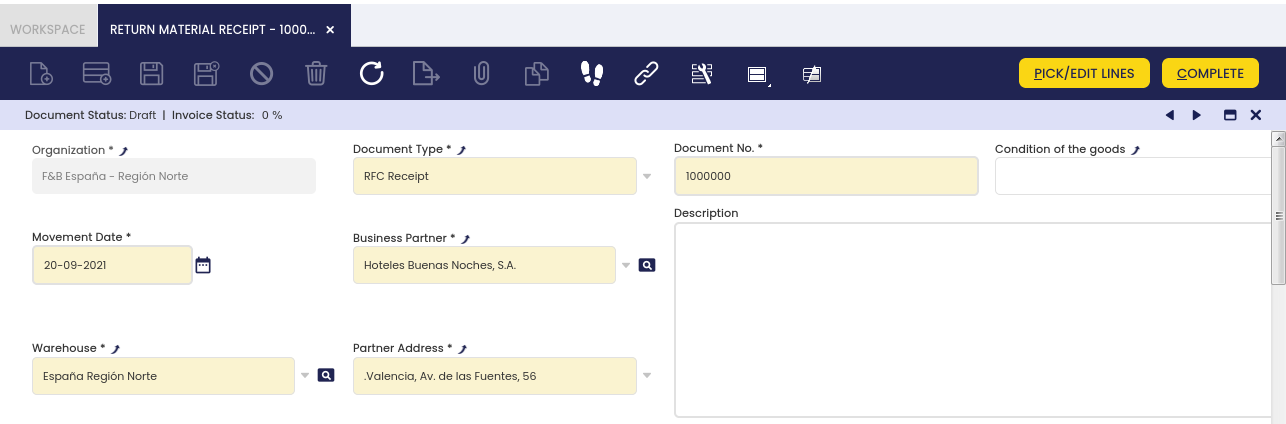
Once the document is ready you can process it by clicking the button Complete. Following the standard, the document changes from Draft to Completed.
The field Invoice Status: indicates in % how much quantity has been invoiced.
Warning
Notice the button Pick/Edit lines disappears when the document is in status Completed.
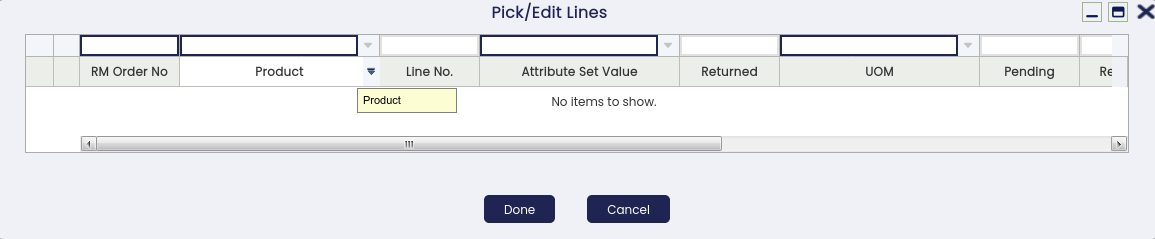
Lines
The user can add or see products which are included in the receipt. Each product is shown in its own line.
The Lines tab is not editable, since the lines always come from Return from Customer lines, to avoid:
- To see positive values while negative in the DB
- To enter lines that are not linked to return lines
- To edit attributes, products and so, having the products or attributes different from the return line
To enter new lines, the user needs to click the button “Pick/Edit Lines”
Things to consider:
- The only editable fields are:
- Receiving: Quantity you are receiving in the warehouse. This value is set by default with the pending quantity when you select the row.
- Storage bin: This value is set by default with the return bin configured in the warehouse.
- Condition of the goods: The user can define it at header level. In this case, when picking a line, it inherits what is selected in the header but the conditions can be modified.
- Returned UOM, only in case an alternative unit of measure (AUM) preference is enabled.
In that case, the product's "primary" AUM for the sales flow is shown if any, otherwise the product's UOM is shown. The user can always change it to the product's UOM.
Validations
- The user is not allowed to receive more quantity than the Pending quantity. In case they do it, a message is shown.
Info
To edit a line, it is necessary to click again the Pick/Edit Lines button and the line appears selected. Then, the user can modify any of the editable fields.
Info
To delete a line, the user needs to unmark the line and then click Done.
Accounting
Return Material Receipt posting creates following accounting entries.
Posting record date: Accounting Date.
| Account | Debit | Credit | Comment |
| Product COGS Return (Cost of Goods Returned) or if not defined Product COGS | Product Cost x Movement Quantity | One per Return Material Receipt Line | |
| Product Asset | Product Cost x Movement Quantity | One per Return Material Receipt Line |
Configuration
- Activate MaterialMgmtShipmentInOut table in the Active Tables tab of General Ledger Configuration screen.
Accounting
Accounting information related to the return material receipt.
Bulk Posting
Info
To be able to include this functionality, the Financial Extensions Bundle must be installed. To do that, follow the instructions from the marketplace: Financial Extensions Bundle. For more information about the available versions, core compatibility and new features, visit Financial Extensions - Release notes.
The Bulk Posting functionality allows the user to post or unpost multiple records by selecting the corresponding records and clicking the Bulk posting button.
Also, the Accounting Status of the record/s is shown in the status bar, in form view, or in a column, in grid view.
Info
For more information, visit the Bulk Posting module user guide.
Create Shipments from Orders
Application > Sales Management > Transactions > Create Shipments from Orders
Create Shipments from Orders allows the user to see Sales Orders pending to be shipped and automatically generate Goods Shipments based on them.
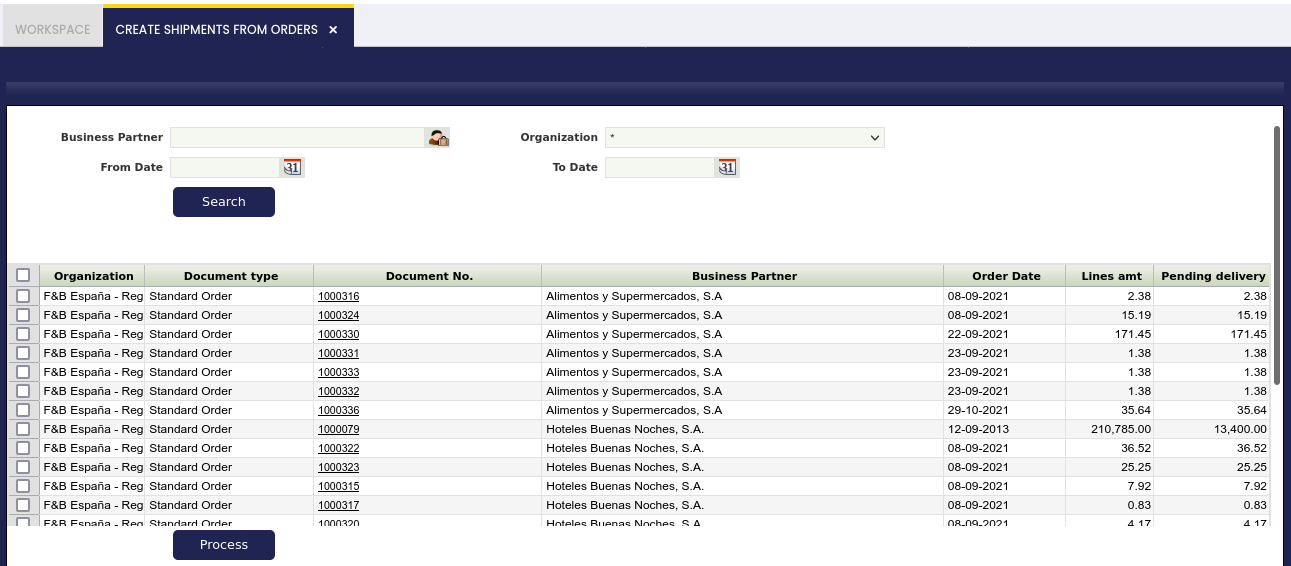
All Sales Orders of the Standard Order type and in a status Booked are treated as meeting the criteria to be shipped.
Goods Shipment can be generated for one or more Sales Orders or for all the Sales Orders that are pending to be shipped. Filters are available to narrow down the shown results.
One Goods Shipment is created for one selected Sales Order but for the whole order (for all its lines). Partial shipment is not possible through this window (use Goods Shipments instead).
Info
Note the Relative Priority field in the Storage Bin tab of the Warehouse and Storage Bins window that is used to determine which storage bin to use in the generated Goods Shipments Lines. The warehouse to use is inherited from the originated Sales Order.
Form
Fields to note:
- From Date and To Date: specify Order Date field ranges for filtering.
- Lines Amt: Total net amount of the sales order (of all its lines).
- Pending Delivery: The net amount still pending to be delivered for the specific order (for example, when there was a partial delivery before).
Select the order(s) you want to ship and click the Process button to generate the underlying Goods Shipment document(s). Process execution message displays sales order number(s) and corresponding shipment number(s) that was just created.
Sales Invoice
Application > Sales Management > Transactions > Sales Invoice
Sales Invoice is an itemized statement of goods or services provided to a business partner. It indicates the quantity and price of each product delivered.
The Sales invoice window allows the user to issue and manage customer's invoices. It also allows the user to browse information about all sales invoices registered in the system and manually create new invoice documents. It is useful if execution of some specific scenario is required that is not managed by automatic invoice generation processes like Generate Invoices or Create Invoices from Orders.
The sales revenues can be recognized as soon as the sales invoice is accounted for, however if a revenue deferred plan is configured it is possible to defer the revenue recognition as required.
Header
Customer invoices can be registered, booked and managed in the header section of the sales invoice window.
Header lists main terms and conditions related to the sales invoice that will be used in the heading of its printed copy and further in its collection process.
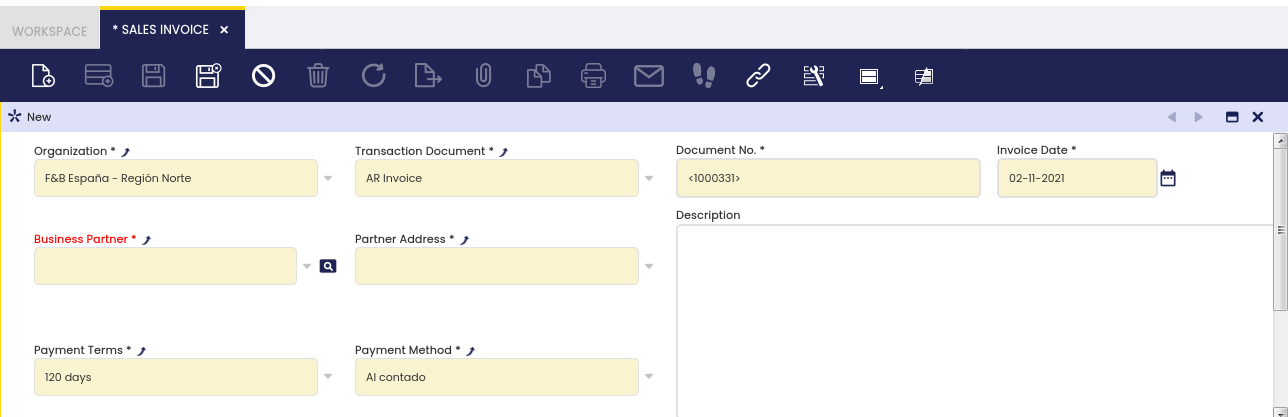
In the majority of cases, the main and the only field needed to create a new sales invoice document is the Business Partner field. All other fields are automatically populated based on the selected Business Partner, logged-in User preferences and other system default parameters.
Some other fields to note are:
- Transaction document defaulted as "AR Invoice" or Sales Invoice document type, which can be manually changed to either "AR Credit Memo" or "Reversed Sales Invoice".
- "AR Credit Memo" and "Reversed Sales Invoice" document types can be considered credit sales invoices, the difference between them is that:
- "AR Credit Memo" type must contain either an "Invoiced Quantity" > 0 or "line Net Amounts" >0.
The above implies that invoices set as "credit memo" should not be related to "Orders" or "Shipments". - "Reversed Sales Invoice" type must contain either an "Invoiced Quantity" <0 or "line Net Amounts" < 0.
These are the invoice types that can be related to return "Orders" or "Shipments".
- "AR Credit Memo" type must contain either an "Invoiced Quantity" > 0 or "line Net Amounts" >0.
- Invoice Date: The date the invoice is issued. It is used to calculate when the payment of the invoice is due. Defaulted to the current date.
- Accounting Date: Date to be used in the posting record of the Sales Invoice to the general ledger. Defaulted to the Invoice Date field.
- Payment Method: indicates how an invoice should be paid. Defaulted according to the Customer tab of the Business Partner window.
- Payment Terms: defines when a sales invoice needs to be paid. Defaulted according to the Customer tab of the Business Partner window.
- Sales Order: Reference to an order that is being invoiced. If Sales Invoice includes products from several Sales Orders field is left empty (still trace-ability is present at Lines level)
There are 3 ways of entering lines into the sales invoice, two from the invoice header and the last one from the Lines tab:
- Selecting products from pending to be invoiced orders or shipments (meeting Invoice Term criteria of the Sales Order) using the Create Lines From Order and Create Lines From Shipment buttons. These options can be used several times to group several orders and / or shipments in one invoice. This is the most common approach. It is only possible to create lines from Documents that share the same Currency and business partner.
- Copying all products from the chosen invoice selected in the history of all invoices for different business partners using the Copy Lines button.
- Manually, line by line in the Lines tab. This option is used if the underlying document (Sales Order or Shipment) does not exist in the system prior invoicing takes place.
The Complete button finishes the creation of the invoice document with the fulfillment of the Payment Plan tab and the Payment Monitor section in the Header. If there are non-stockable BOM products in the lines and they have not been exploded, the Complete button will explode them automatically.
Once completed a sales invoice can be:
- posted to the ledger by using the button Post
- voided by using the button Reactivate
- paid by using the button Add Payment.
Lines
Lines lists each product to be delivered and its characteristics.
Once the sales invoice header has been properly filled in and saved, each sales invoice line can be registered in this tab one by one.
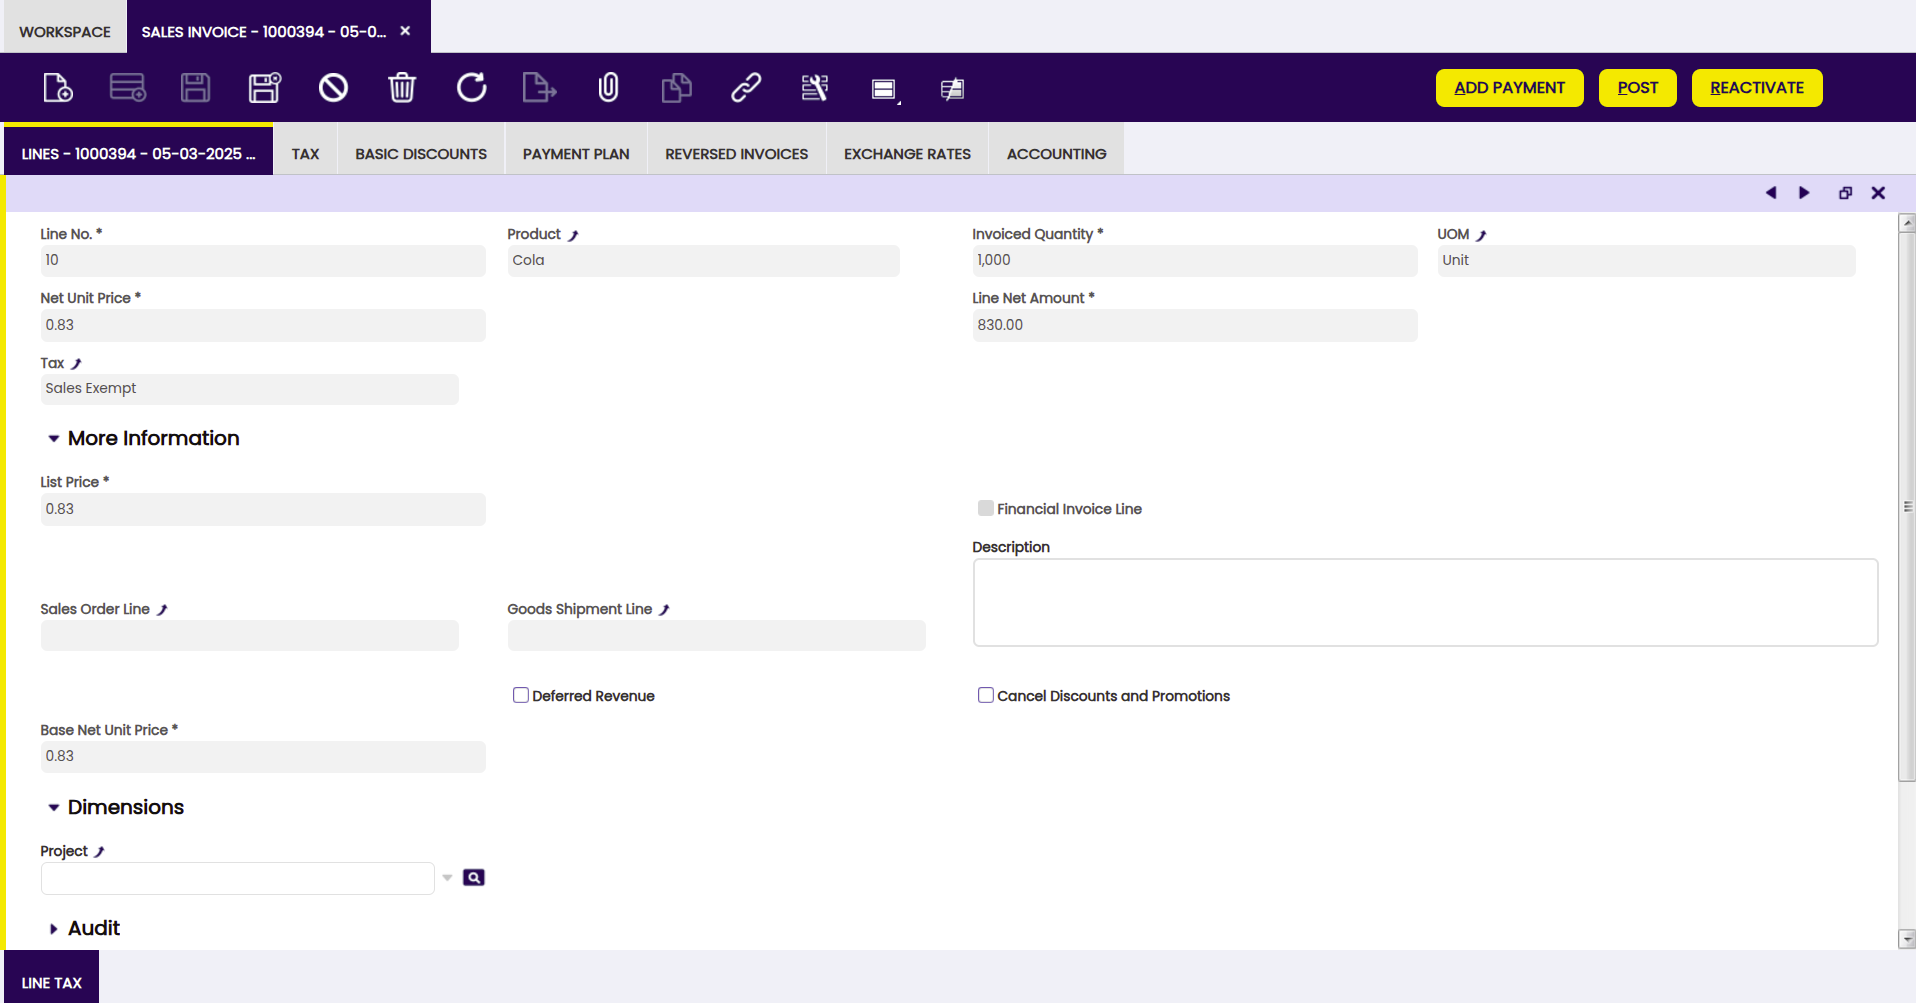
Fields to note:
- Attribute Set Value: field is displayed if the product in the line has attributes (color, size, serial number or several of them together etc).
- Sales Order Line and Goods Shipment Line: references to the sales order and goods shipment line that is being invoiced.
- Financial Invoice line: is selected when the invoice line is not a product but an account not set up as a product but as a G/L item, or an asset not set up as a product. When selected, the product field disappears from the screen and an account field appears that will be related to the sales invoice line.
- Cancel Discounts and Promotions: With this checkbox, it is possible to cancel promotions previously defined in the Discounts and Promotions window. Only these ones, not the discounts defined in the Basic Discount window. If this box is checked, these promotions for this line are cancelled; otherwise, they are calculated normally.
As already mentioned, sales revenue can be deferred therefore they are not recognized at the sales accounting date but within a given number of accounting periods.
When a sales invoice line is created, it is possible to define at line level whether the line is going to cause the revenue to be deferred or not. The relevant fields are:
- Deferred Revenue: When this flag is checked, the Revenue Plan field group becomes visible, allowing users to configure the next three fields.
- Revenue Plan Type: This field specifies the frequency of the revenue distribution which currently is "monthly".
- Period Number: This field specifies the duration of a revenue plan.
For instance, if a company sells and invoices a product that will only be available to be delivered to their customers in 3 months, they would like to recognize the revenue all at once but in 3 months.
In this situation the period number to enter would be 1. - Starting Period: The first open period in which the revenue is going to be recognized.
In our example, the starting period to enter would be the one corresponding to 3 accounting periods after accounting the sales invoice.
These fields can be defaulted if configured for the product.
If a revenue plan is configured, that implies a specific sales invoice accounting.
Explode button is shown when selecting a line with a non-stockable BOM product and the product is not already exploded. When exploding a product, the bill of materials components that the selected product consists of are shown in the invoice. Once you have exploded it, you cannot comprime it. You should delete all the lines (first bill of materials components and then the BOM product), and insert again the non-stockable BOM product.
Line Tax
Line tax information is automatically populated for each sales invoice line upon completion of the invoice.
Line Tax read-only tab details tax information for each line of a sales invoice based on its Tax field which is automatically pre-filled according to the Taxes Setup.
Tax
This section summarizes tax related information for the whole sales invoice. It contains as many records as tax rates used in the invoice.
Basic Discounts
This tab lists information about the discounts automatically applied based on the customer configuration and / or manually entered for the sales invoice.
Payment Plan
The payment plan tab lists the scheduled payments expected against the invoice.
The payment plan of a non paid invoice can be changed:
- the payment "expected date" can be directly changed if required in this tab
- the payment "expected date", the "payment method" and the "outstanding amount to be paid", among others can be changed if required by using the Editable Payment Plan advanced feature.
Payment Details
This tab displays the details of the payments made against the invoice.
Reversed Invoices
This tabs allows the user to select the invoices (if any) being reversed by the invoice being created. When the user voids an existing invoice, the reverse invoice is automatically created by Etendo and linked to the original invoice being reversed. In case of creating a Reverse Sales Invoice which partially voids an existing invoice/s, the user must manually select the invoice/s being reversed in this tab.
Exchange Rates
The exchange rate tab allows the user to enter an exchange rate between the organization's general ledger currency and the currency of the customer's invoice to be used while posting the invoice to the ledger.
Etendo allows the user to manage different currencies within an organization or business unit.
Nowadays, it is very common for the organizations located in a country to make business with third parties located abroad, and even more, it could also happen that an organization needs to post the transactions to general ledgers configured in different currencies.
Above described business scenario, implies the need of managing exchange rates between the organization's general ledger/s currency and the customer's invoice currency to be used while posting the customer's invoice to the ledger/s.
This tab allows the user to enter:
- either an exchange rate between the organization's general ledger/s currency and the customer's invoice currency
- or the total foreign invoice amount/s, therefore Etendo can calculate the corresponding exchange rates.
Additionally, Etendo has a "central" repository of exchange rates which are used in case there is not an exchange rate defined at document level.
Payment
Payments can be received against a sales invoice by using the Add Payment button which opens the Add Payment window.
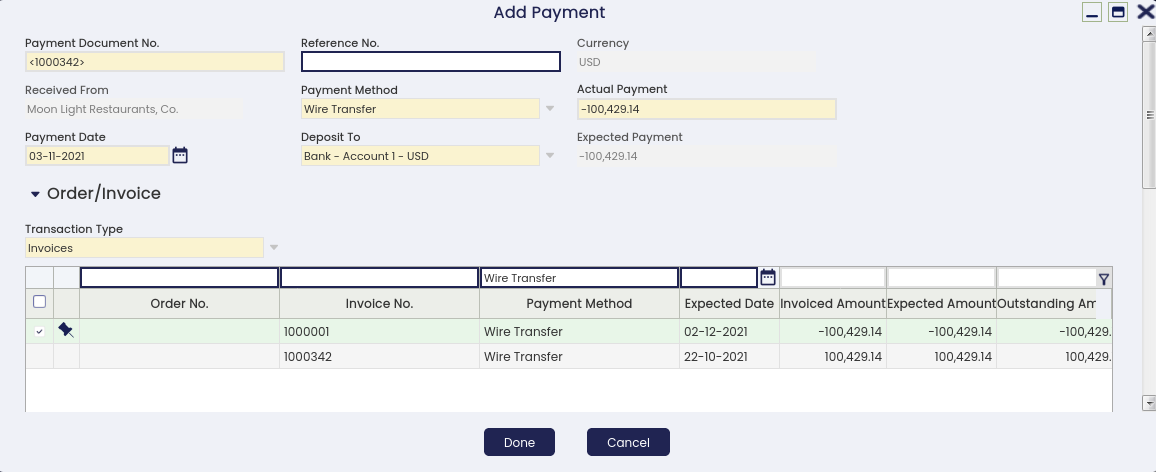
All fields of the Add Payment window are automatically populated from the Invoice. The "Transaction Type" field is also defaulted to "Invoices".
The "Expected Payment", the "Actual Payment" and the "Amount" fields get the same value which is the grand total of the invoice (Total Gross Amount).
Other important fields to note are:
- Received From: It is the Payee of the invoice. Defaulted to the Business Partner from the Invoice.
- Deposit to: It is the financial account to which the amount is going to be deposited.
- Payment Date: It is the date of the payment event. It is used in the posting record of the Payment to the general ledger. Defaulted to the Invoice Date field.
Adding Order/Invoice
If the "Add Payment" window is opened from a "Sales Invoice", all invoice scheduled payments are selected by default if there are more than one.
Besides that the "Expected Payment" amount and the "Actual Payment" amount are set as equal as the (Invoice) "Amount", and the "Transaction Type" field is set to "Invoices".
The reason for the above is that Etendo understands that the invoice is going to be fully paid, but obviously that could not be the case. Therefore the most common field to change is the Actual Payment received from the customer:
- In case the "Actual Payment In" amount is bigger than the grand total of the invoice selected, then it will be spread between the next documents pending to be paid till the whole amount is consumed.
If there are no documents pending to be paid the system offers the options to: - "Leave the credit to be used later" which means that there will be available credit for the customer.
- or "Refund the amount to the customer" which means that a refund payment is created besides the invoice payment in the Payment In window.
A refunded payment has a negative amount which means the creation of a withdrawal transaction in the financial account instead of a deposit. - In case the "Actual Payment In" amount is less than the grand total of the invoice selected, then the system offers the options to be managed in the order/invoice grid.
- Write of the difference (by just checking the field Writeoff) which implies that:
- the customer's invoice is set as fully paid.
- The invoice posting to the ledger settles the total customer receivable amount.
- While the payment posting to the ledger uses the Write-off account to post the amount written-off.
- "Leave the amount as an underpayment" (if the field Writeoff is not checked) which implies that the remaining amount will be paid later on by the customer in a new payment.
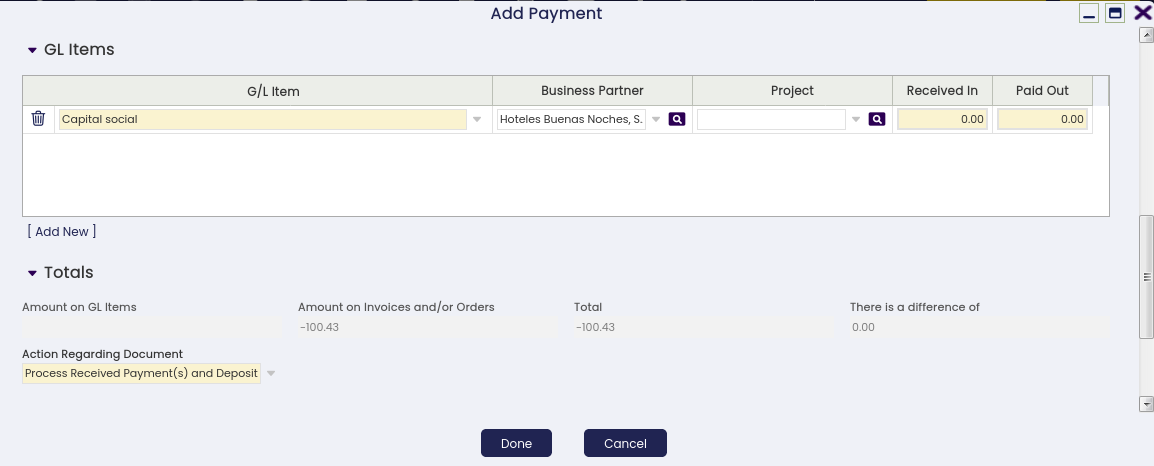
Adding G/L items
GL Items section allows the user to enter any type of expense related to the payment but not included in the invoice, by clicking on [Add New] .
First thing to do is to select the G/L item for the expense and then enter the expense amount in the field "Received In" as shown in the image below:
Once done,
- the invoice posting to the ledger settles the total customer receivable amount,
- while the payment posting to the ledger uses besides the G/L item account to post the paid expense amount.
Reviewing the totals and processing the payment
As already mentioned, "Totals" section allows to review:
- the total amount to be paid on G/L items,
- the total amount to be paid on Invoices and/or Orders,
- the grand total,
- and the difference between the "Actual Payment" and the "Expected Payment" (only in the case of overpayment)
Also, "Totals" section allows the user to process a payment by selecting an option in the field "Action Regarding Document".
- Process Received Payment(s): The Payment is processed.
- Process Received Payment(s) and Deposit: The Payment is processed and the payment amount is deposited in the Financial Account.
The number of options above depends on the setup of the payment method:
- If Automatic Deposit option had already been selected within the payment method for Payment, only the option Process Received Payment(s) and Deposit is shown. However,
- if the Automatic Deposit option had not been selected, both actions are offered giving the user an option to choose whether they want the deposit to be executed as well or not.
Finally, any of these actions updates the Payment Monitor section of the Invoice Header. The Paid amount is also reflected in the Payment Plan tab of the Sales Invoice (and the Sales Order if it exists). Details of the payment can be found in the Payment Details tab.
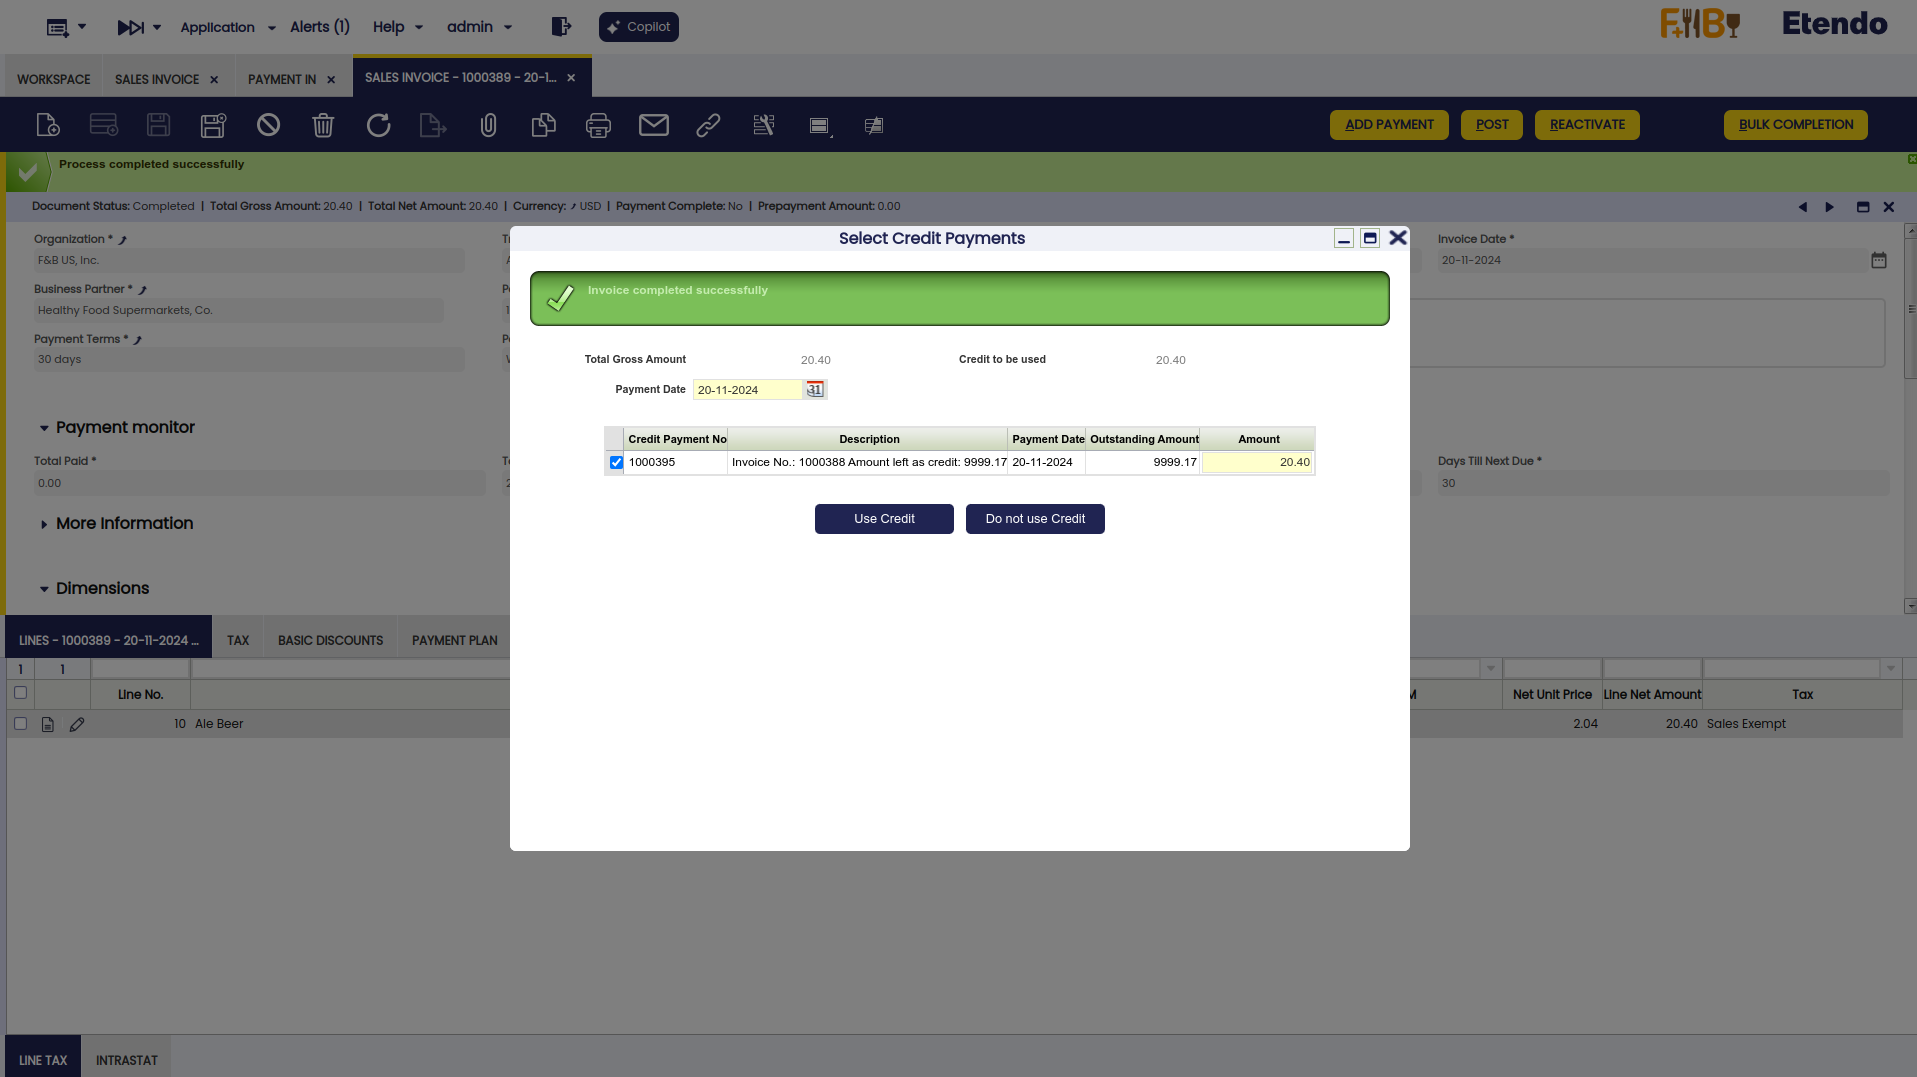
Credit Payment
Whenever there is available credit for a customer, a new window is automatically opened upon completion of a new customer's sales invoice in order to allow the user to either select the credit available to pay that new invoice or not.
- If the available credit is used:
- the payment status of the invoice changes to Payment Complete = Yes,
- a literal such as "Invoice paid using credit:Payment Nº (Credit Payment)" is automatically populated in the description field of the invoice,
- a new payment is automatically created in the Payment In window. This payment clearly states the invoice paid in the "Description" field and the credit payment used is shown in the Used Credit Source tab of the payment out.
- If the available credit is not used:
- nothing happens, the new invoice is still not paid and the available credit amount remains the same.
Moreover, it is also possible to use the available credit generated for that particular customer later on while "Adding a Payment" for that customer.
If that is the case, a new section is shown in the "Add Payment" window, that is "Credit to Use" section.
"Credit to Use" section shows all credit payments created for a given customer (if more than one), therefore it is possible to select one or more, and even change the credit amount to be used for the payment, in the field "Payment Amount".
Once the payment is processed, a new payment is created in the Payment In window. That payment states at the very top the "Used Credit" amount.
Payments in multiple currencies
Etendo allows the user to receive payments in a different currency than the financial account currency.
To do this, the payment method assigned to the financial account used to receive the payment needs to be configured to allow it, that implies to select the check-box "Receive Payments in Multiple Currencies".
Example
Let's take for instance an organization such as "F&B US Inc".
This organization is located in USA, therefore it is likely that the organization's general ledger currency as well as the financial account currency is set as USD.
F&B US Inc makes business with a customer located abroad. This customer requires to pay the invoice/s issued to it in EUR currency. This means that:
- F&B US Inc organization needs to issue the customer's invoice in EUR same as the payment received from the customer.
If the customer's payment is registered in the "Add Payment" window shown from this "Sales Invoice" window, Etendo allows the user to enter an exchange rate, therefore the "Actual Converted" amount to be paid in EUR can be changed if required.
Accounting
Accounting information related to the sales invoice.
A sales invoice can be posted to the ledger when required at a given "Accounting Date" by using the button "Post".
Sales Invoice posting creates the following accounting entries:
Posting record date: Accounting Date.
| Account | Debit | Credit | Comment |
| Customer Receivable | Total Gross Amount | One per Payment Plan Line (TB verified) | |
| Discount Product Revenue | Discount Amount | One per Invoice Line (if discount exists) | |
| Product Revenue | Line Net Amount | One per Invoice Line | |
| Tax Due | Tax Amount | One per Tax Line |
Same way, a Sales Invoice including a sales invoice line with a revenue plan configured creates the following accounting entries.
For instance, a food and beverage distributor selling and invoicing a product that will only be able to deliver to their customers in 3 months would want to defer the revenue recognition till the delivery.
Posting record date: Accounting Date:
| Account | Debit | Credit | Comment |
| Customer Receivables | Total Gross Amount | ||
| Product Deferred Revenue | Line Net Amount | ||
| Tax Due | Tax Amount |
Posting record date: Accounting Date + 3 months:
| Account | Debit | Credit |
| Product Deferred Revenue | Line Net Amount | |
| Product Revenue | Line Net Amount |
Return Material Sales Invoice posting creates the following accounting entries.
Note
Notice that this Invoice should be created with negative amounts.
Posting record date: Accounting Date.
| Account | Debit | Credit | Comment |
| Customer Receivable | Total Gross Amount | One per Payment Plan Line (TB verified) | |
| Product Revenue Return or if not defined Product Revenue | Line Net Amount | One per Invoice Line | |
| Tax Due | Tax Amount | One per Tax Line. |
Voiding
It is possible to totally void a sales invoice by using the header button "Reactivate" and then the action "Void", this action implies:
- Etendo automatically generates a new reversed document in the "Sales Invoice" window, and informs about the reversed document number created. This new reversed document is created as described below:
- The "transaction document" used by Etendo is "Reversed Sales Invoice".
- This document is exactly the same as the original one being reversed but the invoiced quantity is negative.
- You can change both the "Invoice Date" and the "Accounting Date" of the reversed document prior to get it posted.
- The "Reversed Invoices" tab lists the original invoice being reversed as now both of them are linked.
The reversed document posting creates the following accounting entries:
| Account | Debit | Credit | Comments |
| Product Revenue | Line Net Amount | One per invoice line | |
| Tax Due | Tax Amount | One per tax line. | |
| Customer Receivables | Total Gross Amount | One per invoice | |
| Discount Revenue | Discount Amount | One per Invoice Line (if discount exits) |
It is also possible to partially void a customer's invoice by:
- manually creating any of the available reversed sales documents, in the "Sales Invoice" window:
- "AR Credit Memo" or
- "Reversed Sales Invoice"
- which must be manually linked to the invoice/s being reversed in the "Reversed Invoices tab".
The "AR Credit Memo" posting looks the same as the "Reversed Purchase Invoice" posting.
The main difference between those two purchase reversed document types is:
- AR Credit Memo invoiced quantity is a positive quantity
- and Reversed Sales Invoice quantity is a negative quantity.
We strongly recommend the user to use the "Reversed Sales Invoice" document type while partially voiding customer's invoices.
How to Reactivate a Voided Sales Invoice
Info
To be able to include this functionality, the Financial Extensions Bundle must be installed. To do that, follow the instructions from the marketplace: Financial Extensions Bundle. For more information about the available versions, core compatibility and new features, visit Financial Extensions - Release notes.
Etendo allows the user to reactivate voided sales invoices by selecting the needed one/s and clicking the Unvoid button.

Once the process is finished, the sales invoice status turns to Complete.
Important
- In the case of the standard version of the module, it is necessary for the user to also unvoid the corresponding reversed invoice.
- Remember that this reactivation process affects the accounting, since, if the original information is not manually removed from the reactivated document, the accounting information will be doubled.
Info
Check the Technical documentation about Advanced Financial Docs Processing to extend the process.
Payment Removal
The aim of this functionality is to delete and reactivate payments in an agile and easy way. Also, it allows eliminating and reactivating bank transactions and reconciliations.
Info
To be able to include this functionality, the Financial Extensions Bundle must be installed. To do that, follow the instructions from the marketplace: Financial Extensions Bundle. For more information about the available versions, core compatibility and new features, visit Financial Extensions - Release notes.
From this window, it is possible to delete payments associated with a sales invoice by selecting the corresponding document and then clicking on the Remove Payment button. If there is an order associated with the invoice, the relationship of this order to the payment in question will also be deleted (Sales Order window > Payment Plan tab).
If the payment is included in the financial account, i.e., if it is in Deposited/Withdrawn not cleared status, the transaction in it will also be deleted (Financial account window > Transaction tab).
If the payment is reconciled through an automatic method, then in addition to the transaction in the financial account, the line of the bank statement to which it was linked (Financial Account window > Imported Bank Statements) and the corresponding line of the bank reconciliation (Financial Account > Reconciliations) will be deleted.
Info
If the payment is posted, the accounting entry is deleted too.

Intercompany
In case the user has to create orders or invoices among two or more organizations that are different but belong to the same client, this functionality allows automatically generating the corresponding inverse document.
Info
For more information, visit the Intercompany module user guide.
Info
To be able to include this functionality, the Financial Extensions Bundle must be installed. To do that, follow the instructions from the marketplace: Financial Extensions Bundle. For more information about the available versions, core compatibility and new features, visit Financial Extensions - Release notes.
Bulk Posting
Info
To be able to include this functionality, the Financial Extensions Bundle must be installed. To do that, follow the instructions from the marketplace: Financial Extensions Bundle. For more information about the available versions, core compatibility and new features, visit Financial Extensions - Release notes.
The Bulk Posting functionality allows the user to post or unpost multiple records by selecting the corresponding records and clicking the Bulk posting button.
Also, the Accounting Status of the record/s is shown in the status bar, in form view, or in a column, in grid view.
Info
For more information, visit the Bulk Posting module user guide.
Advanced Rappels
Info
To be able to include this functionality, the Advanced Rappels module of the Sales Extensions Bundle must be installed. To do that, follow the instructions from the marketplace: Sales Extensions Bundle. For more information about the available versions, core compatibility and new features, visit Sales Extensions - Release notes.
When using this functionality, in the Sales Invoice window, the user can find the sales invoices corresponding to the created rappels.
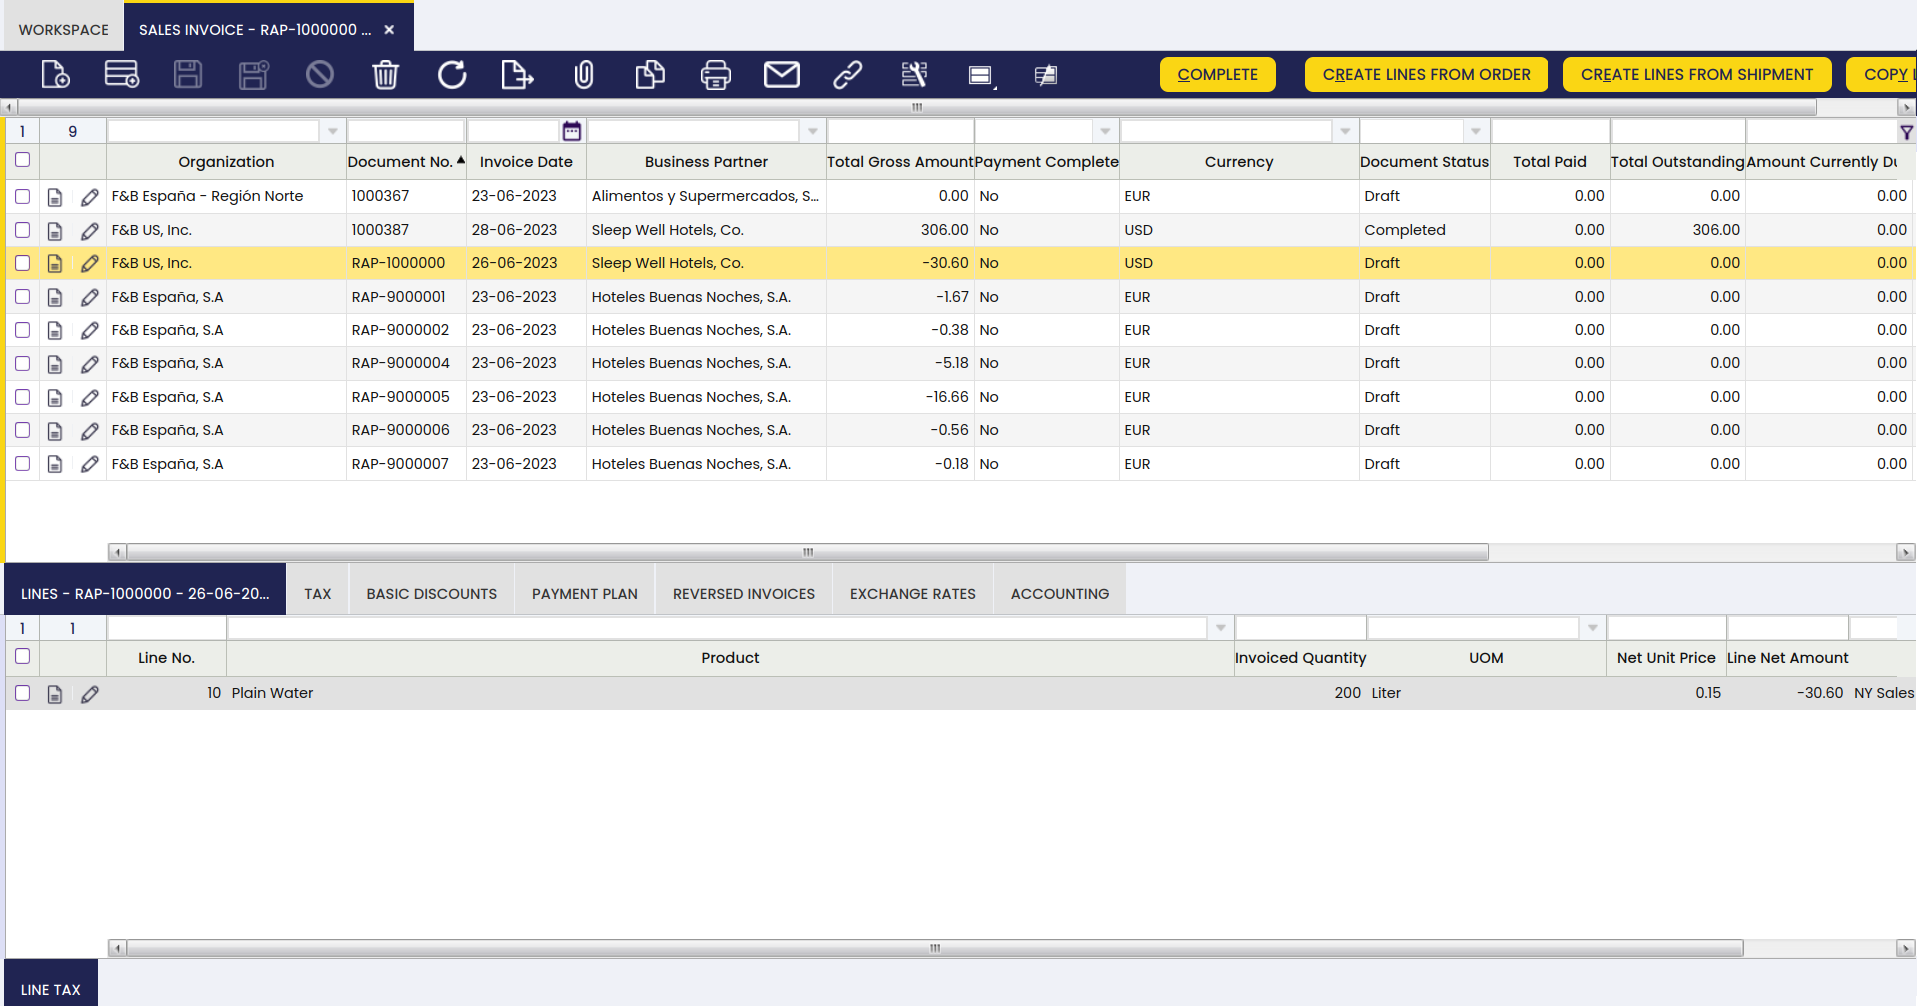
These sales invoices have a negative amount that represents the discount of the rappel, can include a prefix in its code to distinguish them from the rest and their status is “draft”.
Info
For more information, visit Advanced Rappels.
Bulk Completion
Info
To be able to include this functionality, the Essentials Extensions Bundle must be installed. To do that, follow the instructions from the marketplace: Essentials Extensions Bundle. For more information about the available versions, core compatibility and new features, visit Essential Extensions - Release notes.
The Bulk Completion functionality allows the user to complete, reactivate or void multiple records by selecting them and clicking the Bulk Completion button. This makes records management easier and more efficient, reducing the time spent processing individual records.
Info
For more information, visit the Bulk Completion module user guide.
Advanced Bank Account Management
Info
To be able to include this functionality, the Advanced Bank Account Management module of the Financial Extensions Bundle must be installed. To do that, follow the instructions from the marketplace: Financial Extensions Bundle. For more information about the available versions, core compatibility and new features, visit Financial Extensions - Release notes.
This module adds a new field to the header of the Sales Invoice window: Bank Account. This field is automatically filled with the bank account related to the adress or business partner of the invoice. Also, the Modify Payment Plan button is added for better payment management.
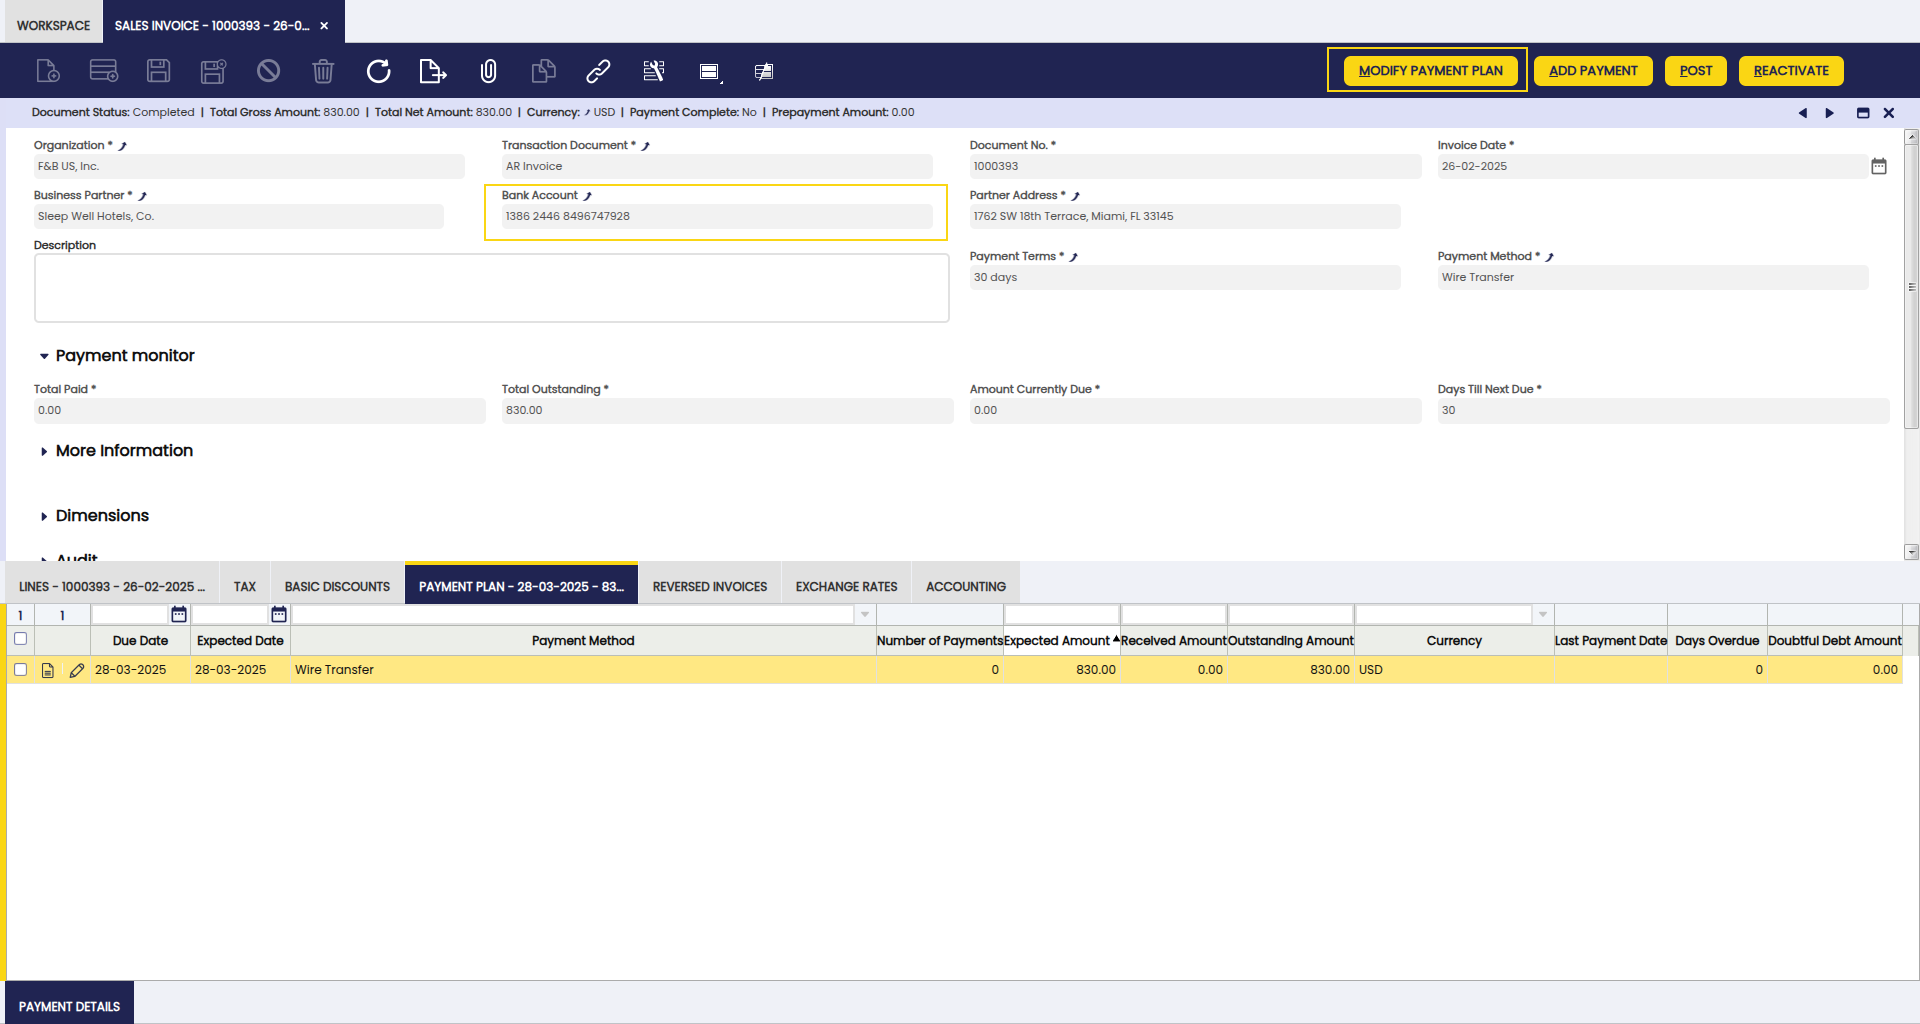
Info
For more information, visit the Advanced Bank Account Management user guide.
Create Invoices from Orders
Application > Sales Management > Transactions > Create Invoices from Orders
Create Invoices from Orders allows the user to see the Sales Orders pending to be invoiced and it automatically generates the corresponding Sales Invoices based on them.
With this window, Sales Invoices can be generated for one or more Sales Orders or for all Sales Orders that are pending to be invoiced.
Info
By default, this process filters records in accordance with the defined Organization in the session configuration variables. This means, only these records are shown.
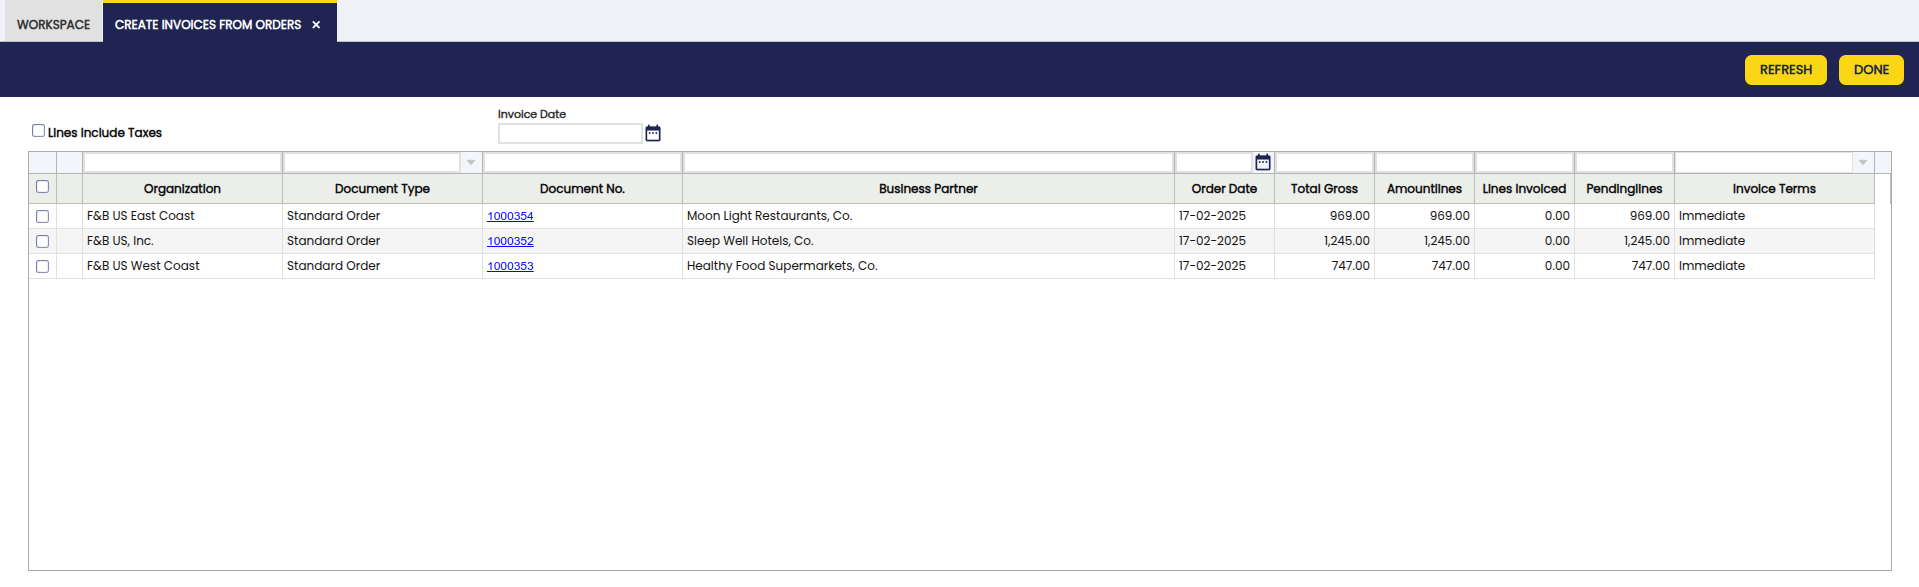
As seen above, it is possible to navigate directly to the corresponding order from the document number under the Document number column.
Filters such as Business Partner, Document Type and Organization, among others, are available to narrow down the shown results.
Overall, this form shows:
- Sales Orders having an Immediate Invoice Term, without the need of having a Goods Shipment related.
- Sales Orders having an After Delivery Invoice Term, whenever there is a Goods Shipment related to at least some products contained in Sales Order that have been already delivered.
- Sales Orders having an After Order Delivery Invoice Term, whenever there is a Goods Shipment/s related to all the products contained in Sales Order, that have been already delivered.
- Sales Orders having a Customer Schedule After Delivery Invoice Term, whenever there is a Goods Shipment/s according to the defined schedule agreed with the customer.
Same way, this form does not show Sales Orders having a Do not invoice Invoice Term, as those sales orders are not supposed to be invoices for whatever kind of reason.
For all Invoice Terms but Customer Schedule After Delivery, Sales Invoice is created for all Goods Shipment sent to the customer at the same date which are related to one Sales Order.
If there are several Goods Shipments that take place on different dates - several Sales Invoices are generated for each Goods Shipment date. If there are no Goods Shipments, a Sales Invoice is created for a full Sales Order.
If the Invoice Term is Customer Schedule After Delivery, then a sales invoice is created grouping deliveries from different orders for the same customer.
Lines include taxes: If this box is checked, the amounts of the orders shown include taxes.
Invoice Date: The Invoice Date for the generated Sales Invoices (and so the Accounting Date field that is used in the posting record of the invoice to the general ledger) is taken first from Invoice Date field. If this field is not populated, it is inherited from the Movement Date field of the Goods Shipment related to the Sales Order. If there are no Goods Shipments, then the Order Date field from the original Sales Order is used as Invoice Date.
Important
This process uses the values specified at product level for deferring the sales revenue of the corresponding sales invoice lines.
Buttons
-
Refresh: To refresh the orders shown in this window, use the Refresh process button.
-
Done: Then, select the order(s) you want to invoice and click the Done button to generate corresponding Sales Invoice document(s). Process execution message displays sales order number(s) and corresponding invoice number(s) that was just created.
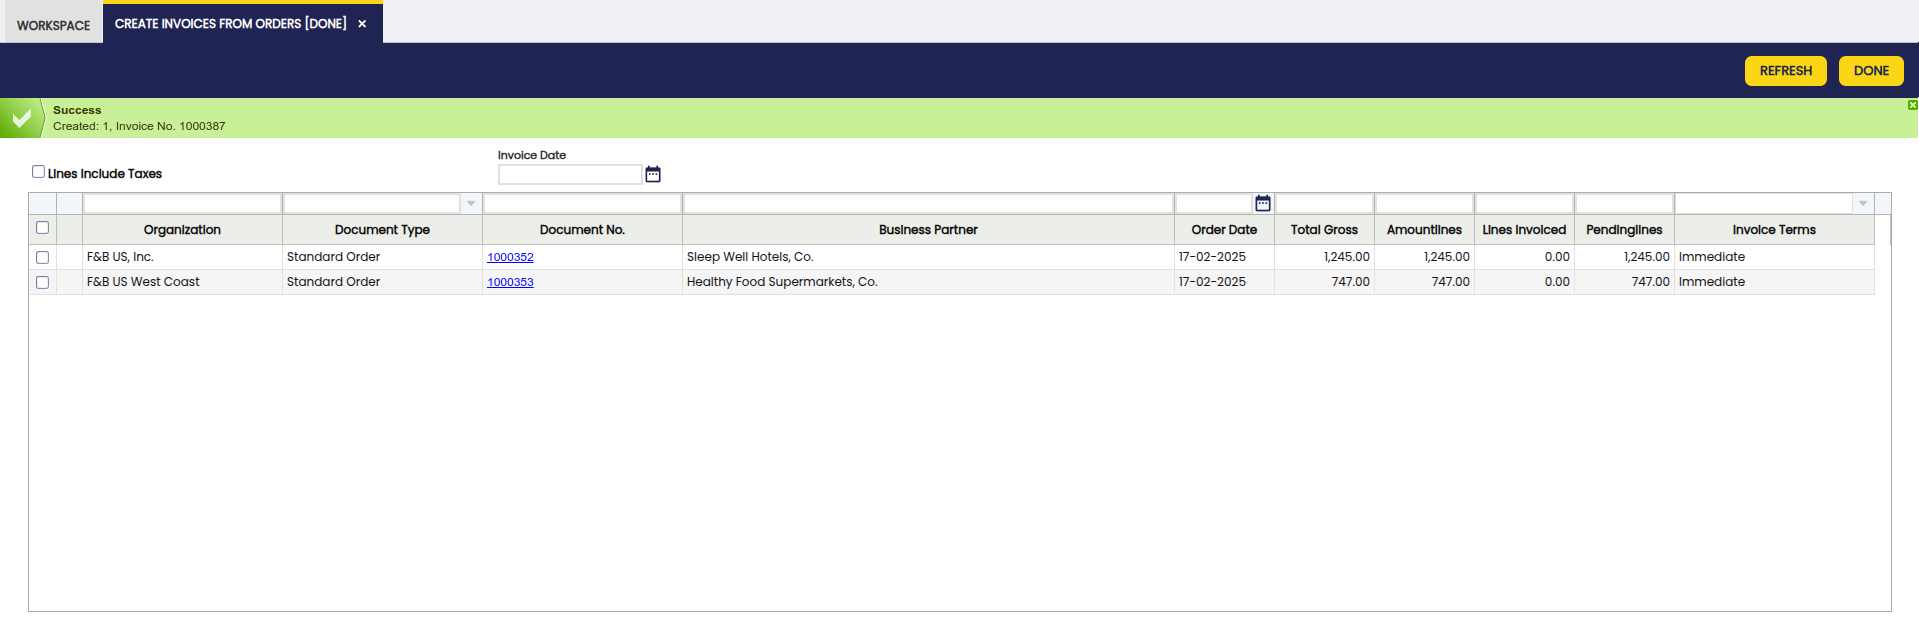
Generate Invoices
Application > Sales Management > Transactions > Generate Invoices
Generate Invoices executes automatic bulk generation of Sales Invoices for all Sales Orders pending to be invoiced that belong to the selected Organization or, if the Include Child Organizations checkbox is checked, to the selected Organization and its children. The Invoices generated are going to be created against the selected Organization.
Main criteria for this process is a Sales Order Invoice Term field. For example, if Invoice Term is After Order Delivered then an invoice will be generated only if all products of this sales order have been already shipped. If Invoice Term is Customer Schedule After Delivery certain customer schedule is checked.
All the Documents created are going to be Invoiced against the Organization set in the Invoice Organization Parameter.
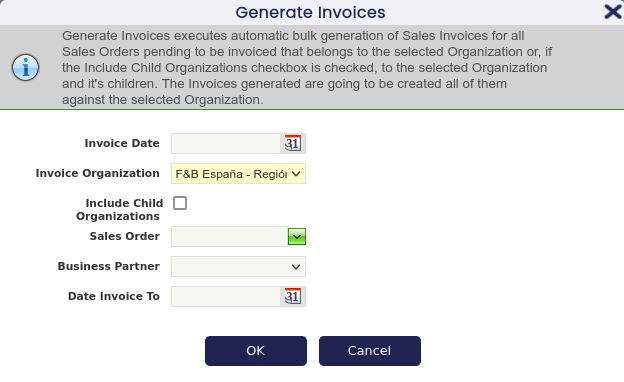
Filters are available to narrow down the inputs for the generation process:
Invoice Organization:The Organization against which the Invoices are going to be created.
Sales Order: leave blank to consider all sales orders or select a specific one to generate an invoice for. Note that only pending orders are included inside this drop-down.
Date Invoice To: only sales orders with Order Date field up to this date are included in generation process.
Business Partner: If none is selected, all business partners with pending invoicing are considered. If a specific customer is selected here, only sales orders to that business partner are considered for automatic invoicing. The business partners that are available to select must have orders with invoice rule 'After delivery' or 'Customer Schedule After Delivery'.
Include Child Org: a flag indicating whether the child organizations of the Organization field value are going to be taken into account when generating invoices or not. When Include Child Org is checked and the invoice Rule is 'Customer Schedule After Delivery', the invoices will group the child organization.
Info
Note that the Invoice Organization filter is also used to set the Organization of the Invoices that are going to be created. This is important while generating Invoices for Child Organizations, because all of them are going to be created against the parent Organization.
For all Invoice Terms but Customer Schedule After Delivery one Sales Invoice is created for all Goods Shipment sent to the customer at the same date which are related to one Sales Order that meets Generate Invoices process criteria. If there are several Goods Shipments that take place on different dates - several Sales Invoices are generated for each Goods Shipment date. If Goods Shipment does not exist one Sales Invoice is created for one full Sales Order that meets Generate Invoices process criteria. If the Invoice Term is Customer Schedule After Delivery then only one sales invoice is created grouping deliveries from different orders for the same customer.
Finally, it is important to remark that the Generate invoices process also uses the values specified at product level for deferring the sales revenue of corresponding sales invoice lines.
Form
An important field to note is Invoice Date. If specified, this date is transferred as the Invoice Date to the generated Sales Invoices (and so to Accounting Date field that is used in the posting record of the invoice to the general ledger). If not defined then Movement Date field from the Goods Shipment related to the original Sales Order is set as Invoice Date. If Goods Shipment does not exist then the Order Date field from the original Sales Order is used as Invoice Date.
OK button launches the process and all orders pending to be invoiced that match the filters are automatically invoiced.
When the process is finished, a message is shown with the total number of created invoices and their document numbers.
Commission Payment
Application > Sales Management > Transactions > Commission Payment
In this section, the user can create commissions and create corresponding invoices.
This window is not editable since commission records are calculated in the Commission window, however this window allows to create an invoice for the commissions previously calculated.
This window needs to be read as follows:
- The header shows the commission document, the starting date and total net amount. In case an invoice is created then both documents are linked to each other later on.
- The amounts tab groups the result of all lines taken into to calculate this amount. Therefore, for each line defined in the commission window the user has one entry in this tab.
- The Details tab shows all the Order lines/Invoice lines taking into account to calculate the amount.
Header
From this window it is possible to visualize the commissions created.
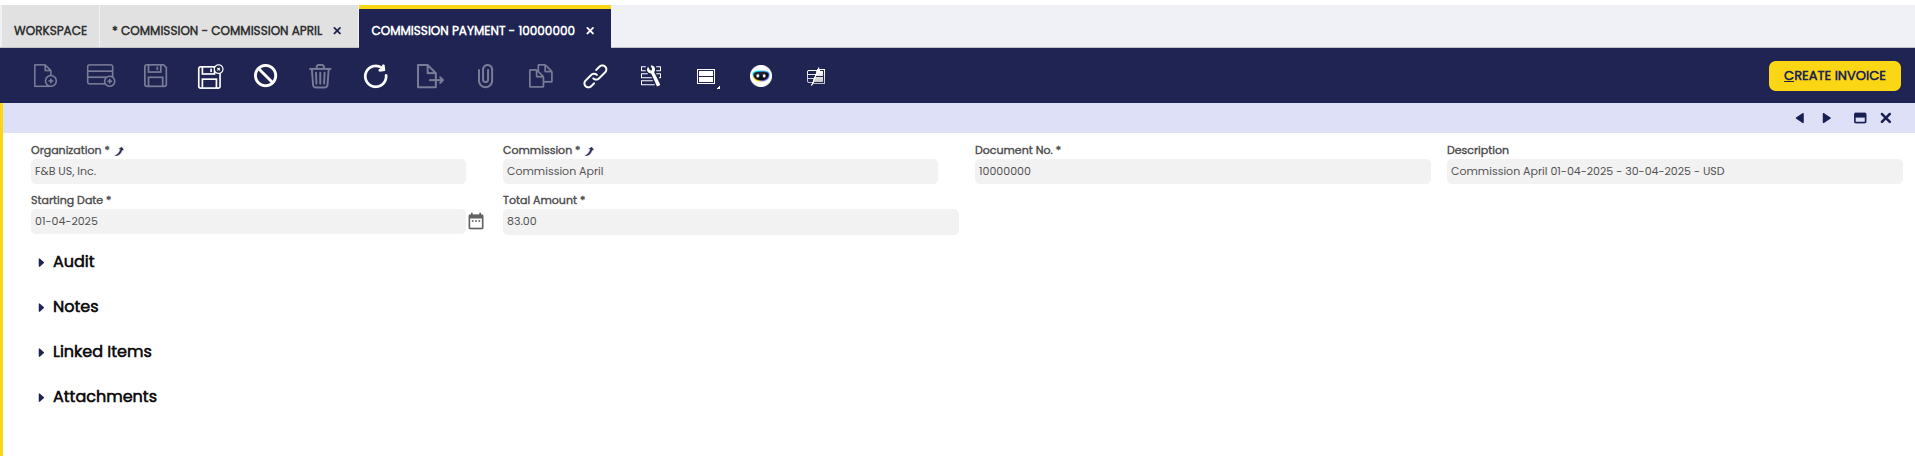
- Commission field indicates which is the defined commission and therefore the conditions used to calculate the commission amount.
- Starting date as the date used when running the process, for instance an starting date of 1st of March with a Monthly frequency implies to take orders/invoices created and booked in March.
- Total amount field shows the commission amount after applying the configured conditions. Commission amount is calculated based on amounts excluding taxes.
- Invoice field shows the invoice created if any.
Amounts
The user can edit individual sales order lines that yielded a selected commission.
Amounts tab shows the amount calculated per each line defined in the commission window.

For example if the commission has two lines:
- First line:
- Product category: Alcoholic
- Multiplier amount: 0.20
- Second line:
- Product category: Bio
- Subtract amount: 12000
- Multiplier amount: 0.10
Then two lines would appear in this tab.
Fields to note:
- Commission line: The line used to calculate the amount.
- Amount: The result of the commission.
- Converted Amount: The total amount without applying the conditions of the commission line in the corresponding currency.
- Actual quantity: The total quantity. When UOM is different among products this info is not relevant.
Details
Create and edit the calculation and invoicing of sales commission.
Details tab shows all the sales/invoice lines took into account to calculate the corresponding commission line.

Fields to note:
- Reference: Document number
- Sales Order Line: Link to the order line took to calculate the commission
- Sales Invoice Line: Link to the invoice line took to calculate the commission
- Comments: Name of the product
- Actual Amount: Net amount of the line in the currency of the Order/Invoice document
- Currency: Currency of the commission. Remember that currency is defined in the commission window
- Converted Amount: Amount in the currency of the commission
- Actual Quantity: Quantity ordered in the order/invoice line
- Is Cost Calculated: This field's default value is 'YES'. It is only taken into account when the commission is calculated based on the margin. When this flag is not marked the cost of the transaction is not calculated. That means it hasn't been possible to calculate its margin. This flag must be marked in all the details in order to be able to generate the invoice of the commission.
Buttons
- Create Invoice: A purchase invoice can be created from here in case it is required for paying the sales representative, by using the process button.
This work is a derivative of Sales Management by Openbravo Wiki, used under CC BY-SA 2.5 ES. This work is licensed under CC BY-SA 2.5 by Etendo.