How to Create a Standard Process Definition
Overview
Standard UI pattern of Process Definition allows to create Parameter Windows defined in Application Dictionary, the UI for this windows is generated on demand so once defined those parameters, developer only needs to take care about process implementation.
This section will add a new Standard Process Definition and create a menu entry to invoke it.
The implementation requires development experience. See the following concept pages for background information on action handlers and javascript development:
Steps to implement the Process
Overview
Standard Process Definition processes take advantage of the same foundation concepts in the Application Dictionary, allowing to define parameters for the process as meta data that generates the UI when it is required without the need of generating code, compile or restart tomcat to apply the changes when developing.
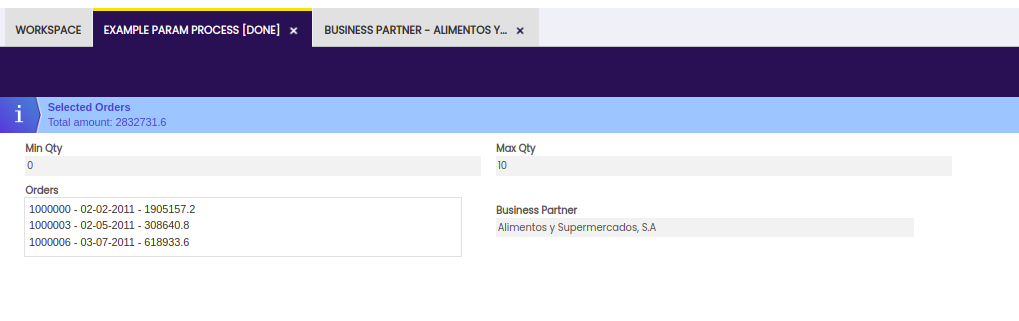
This example process will have the following parameters:
- Min and Max Qty: two mandatory integer fields.
- Orders: a search that allows to select several orders at the same time.
- Business Partner: a regular business partner selector.
When Done button is clicked the process is executed:
- It verifies in backend
max qtyfield is greater thanmin qty. In case they are not, a validation error is sent back to the client asking the user to fix the values before continuing. - If previous validation is satisfied:
- Total amount of all selected orders is summed and displayed in a message in the parameter window.
- If a business partner is selected, Business Partner window is opened within the selected one and a message is shown in this window.
Implementation
Defining the Process
- Open Process Definition window
- Create a new record
- Define the UI pattern: Standard (Parameters defined in Dictionary)
- Set the Handler:
org.openbravo.client.application.examples.StandardProcessActionHandler. This is the Java class implementing the process that will be invoked when user clicks on the action button. - Save
Adding Parameters
Min Qtyparameter- Move to Parameters tab
- Create a new record
- Name:
Min Qty. This is the name that will be shown in UI for this parameter. - Internal Name: min. It is the internal name that will be used to retrieve the value in the java class.
- Sequence Number: 10. Defines the position of this field in the Parameter window in relation with the rest of fields.
- Reference: Integer. Defines both the data type the parameter will hold and how this parameter is visualized and behaves in the UI.
- Mandatory: true. Will force the parameter to have a value before allowing to submit the info to the process.
- Default value: 0. It is the value that will take the parameter by default. It is a javascript expression evaluated in the server side, like Default Filter Expressions used in selectors.
- Follow similar steps to create Max Qty field
- Orders multi selector
- Create a Multi Order selector
- Create a new parameter
- Reference:
OBUISEL_Multi Selector Reference - Reference Search Key: Multi Order Selector
- Business Partner parameter has
OBUISEL_Selector Referenceas Reference and Business Partner not filtered by default by customer/vendor as Reference Search Key
Adding it to the Menu
Adding a process to the menu allows to open it from menu as a new tab.
- In Menu window create a new entry
- Action: Process Definition
- Process Definition: Example Parameter Process
Java Implementation
In the case of a Process Definition action handler, extend from BaseProcessActionHandler and implement the doExecute method.
/*
  *************************************************************************
  * The contents of this file are subject to the Openbravo  Public  License
  * Version  1.1  (the  "License"),  being   the  Mozilla   Public  License
  * Version 1.1  with a permitted attribution clause; you may not  use this
  * file except in compliance with the License. You  may  obtain  a copy of
  * the License at http://www.openbravo.com/legal/license.html
  * Software distributed under the License  is  distributed  on  an "AS IS"
  * basis, WITHOUT WARRANTY OF ANY KIND, either express or implied. See the
  * License for the specific  language  governing  rights  and  limitations
  * under the License.
  * The Original Code is Openbravo ERP.
  * The Initial Developer of the Original Code is Openbravo SLU
  * All portions are Copyright (C) 2013 Openbravo SLU
  * All Rights Reserved.
  * Contributor(s):  ______________________________________.
  ************************************************************************
  */
package org.openbravo.client.application.examples;

import java.math.BigDecimal;
import java.util.Map;

import org.apache.log4j.Logger;
import org.codehaus.jettison.json.JSONArray;
import org.codehaus.jettison.json.JSONException;
import org.codehaus.jettison.json.JSONObject;
import org.openbravo.client.application.process.BaseProcessActionHandler;
import org.openbravo.dal.service.OBDal;
import org.openbravo.erpCommon.utility.OBMessageUtils;
import org.openbravo.model.common.order.Order;

public class StandardProcessActionHandler extends BaseProcessActionHandler {
  private static final Logger log = Logger.getLogger(StandardProcessActionHandler.class);

  @Override
  protected JSONObject doExecute(Map<String, Object> parameters, String content) {
    try {
      JSONObject result = new JSONObject();

      JSONObject request = new JSONObject(content);
      JSONObject params = request.getJSONObject("_params");

      // Do validations on param values
      double min = params.getDouble("min");
      double max = params.getDouble("max");

      if (max < min) {
        // In case validations are not satisfied, show an error message and allow user to fix
        // parameters
        result.put("retryExecution", true);

        JSONObject msg = new JSONObject();
        msg.put("severity", "error");
        msg.put(
            "text",
            OBMessageUtils.getI18NMessage("OBEXAPP_MinGtMax", new String[] { Double.toString(min),
                Double.toString(max) }));
        result.put("message", msg);
        return result;
      }

      // Execute process and prepare an array with actions to be executed after execution
      JSONArray actions = new JSONArray();

      // 1. Sum amounts of all orders and show a message in process view
      JSONArray orders = params.getJSONArray("orders");
      BigDecimal totalAmnt = BigDecimal.ZERO;
      for (int i = 0; i < orders.length(); i++) {
        String orderId = orders.getString(i);
        Order order = OBDal.getInstance().get(Order.class, orderId);
        totalAmnt = totalAmnt.add(order.getGrandTotalAmount());
      }
      JSONObject msgTotal = new JSONObject();
      msgTotal.put("msgType", "info");
      // XXX: these two messages should be translatable, like OBEXAPP_MinGtMax above
      msgTotal.put("msgTitle", "Selected Orders");
      msgTotal.put("msgText", "Total amount: " + totalAmnt.toString());

      JSONObject msgTotalAction = new JSONObject();
      msgTotalAction.put("showMsgInProcessView", msgTotal);

      actions.put(msgTotalAction);

      // 2. If business partner is not null, open it in BP window and show a message in new tab
      if (!params.isNull("bp")) {
        String bpId = params.getString("bp");
        JSONObject recordInfo = new JSONObject();
        recordInfo.put("tabId", "220");
        recordInfo.put("recordId", bpId);
        recordInfo.put("wait", true);

        JSONObject openTabAction = new JSONObject();
        openTabAction.put("openDirectTab", recordInfo);

        actions.put(openTabAction);

        JSONObject msgInBPTab = new JSONObject();
        msgInBPTab.put("msgType", "success");
        msgInBPTab.put("msgTitle", "Process execution");
        msgInBPTab.put("msgText", "This record was opened from process execution");

        JSONObject msgInBPTabAction = new JSONObject();
        msgInBPTabAction.put("showMsgInView", msgInBPTab);

        actions.put(msgInBPTabAction);
      }

      result.put("responseActions", actions);

      return result;
    } catch (JSONException e) {
      log.error("Error in process", e);
      return new JSONObject();
    }
  }
}
Response
ActionHandler return a JSONObject with the actions to be performed after execution.
Validations
It is possible to do validations in the backend before executing the actual process, when these validations are not satisfied, a message can be shown in the UI to allow the user to fix the problematic values.
When validations are not satisfied retryExecution: true property is included in the response. This allows the user to fix data and resubmit again.
Additionally, a message can be added to show more information about the issue.
The response would look similar to this:
{
  "retryExecution": true,
  "message": {
    "severity": "error",
    "text": "Min value (80.0) cannot be greater than Max value (10.0)"
  }
}
Returning Several Actions
After executing the process, it is possible to perform a series of actions.
Info
For more information, see Pick & Execute process extension.
The response should look like:
{
  "responseActions": [{
    "showMsgInProcessView": {
      "msgType": "info",
      "msgTitle": "Selected Orders",
      "msgText": "Total amount: 3020482.63"
    }
  }, {
    "openDirectTab": {
      "tabId": "220",
      "recordId": "A6750F0D15334FB890C254369AC750A8",
      "wait": true
    }
  }, {
    "showMsgInView": {
      "msgType": "success",
      "msgTitle": "Process execution",
      "msgText": "This record was opened from process execution"
    }
  }, {
    "refreshGrid": {
    }
  }, {
    "refreshGridParameter": {
      "gridName": "gridParameterName"
    }
  }]
}
responseActions. It is the name of theJSONArraythat indicates a series of actions will be performed after execution. Each of the items in the array is one action, different kinds of actions can be executed. It is also possible to extend through modules the possible actions to be performed:showMsgInProcessView. Shows a message in the same tab the process was invoked from. In case the process is opened from menu, this message will be seen in the window where the values for the parameters are provided; if the process is invoked from a button in a tab, the message will be shown in that tab.openDirectTab. Opens a new tab.tabId, it is possible to indicate the record to open in that tab (recordId). Thewait: trueproperty indicates next action will not be started till this one finishes. Optionally, you can also include a criteria object to automatically add a removable filter to the open tab. A criteria is an object which describes a filter in a grid.
Info
For more information, visit Smartclient.
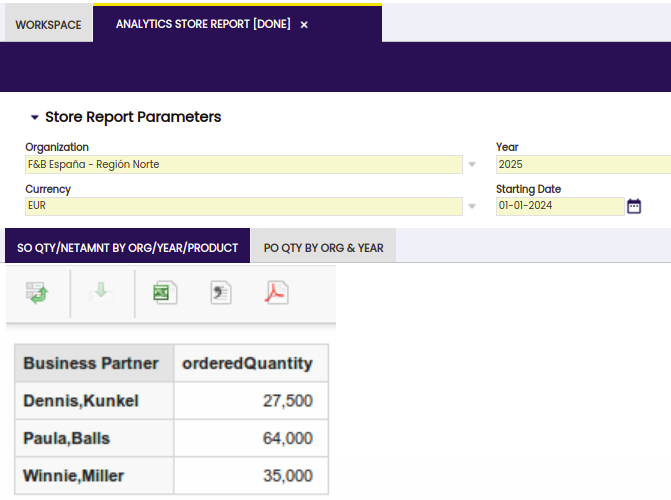
showMsgInView. Shows a message in the recently opened tab.refreshGrid. Refreshes the grid where the process button is defined. Grids are not automatically refreshed after invoking a standard process, only the selected record is refreshed. If the process adds or removes records from that grid, then it must add therefreshGridto the list of response actions to see the updated data in the grid.refreshGridParameter. Refreshes the grid parameter with namegridNamepresent in the standard process parameter window. This kind of response is specially useful for those parameter windows which are not closed after the execution of the action handler (the parameters are visible after the process execution), for example those process definitions which are directly opened from the menu.
The getResponseBuilder() method is available for classes extending BaseProcessActionHandler. This method returns a helper that can be used to build the result of the process with the desired standard response actions in an easy way. For example:
@Override
protected JSONObject doExecute(Map<String, Object> parameters, String content) {
  ...
  ...
  return getResponseBuilder()
      .showMsgInProcessView(MessageType.INFO, "Message Title", "This is a sample message")
      .openDirectTab("220", false).build();
}
Testing the Process
Now, it's needed to compile and deploy (because a new java class is added, note this is not needed in case of just editing/adding paramters).
After compile and deploy, there will be a new entry in the menu: Example Param Process, this entry opens the parameter window where all defined parameters are shown and a Done button is presented to submit values set for them. When the process is executed:
- If
Max Qtyis greater theMin Qty, a message is shown and the process can be submited again. - A message in the parameter window is shown summing the amounts of all selected orders.
- If a business partner is selected, it is opened in a new tab displaying a message on it.
Advanced Topics
Invoke the Process from a Tab
Standard Process Definition processes can be opened as a tab from the menu or as a modal popup from a button in a tab. This second option can be achieved by adding an extra column to the table used in the tab.
Info
More details about this process visit How to create a Pick and Execute Process.
Read Only and Display Logic
Parameters in Process Definition support display and read only logic. This allows to show or hide and to make editable or read only parameters based on values entered for other parameters.
Subordinated Combos
The data that can be selected within a combo (selector) can be restricted based on values other parameters take using Validation Rules. Logic of these validations is a HQL that is appended to its datasource. This is written in javascript being posible to use OBBindings, in the same way default value is written.
Parameter Grouping
It is possible to do groups of parameters in the UI, by using the Field Group property when defining the paramter.
Showing results in the process window itself
It is possible to show the result of a process directly in the process window itself. This makes sense if the parameter section is small and you want to display directly.
To accomplish this, the data/json object returned from the server handler should set this parameter showResultsInProcessView to true. It also makes sense to retryExecution parameter to true:
The called javascript method gets an object with a processView property which refers back to the overall process view. From the process view you can get to the resultLayout to show the result. The resultLayout is a SmartclientHLayout.
For example, a return action:
OB.Utilities.Action.set('openSaikuReport', function(paramObj) {
  var i, queries = paramObj.queries,
      processView = paramObj._processView,
      mainLayout = processView.resultLayout, reportView;

  reportView = isc.OBANALY_ShowSaikuReport.create({
    parameters: paramObj,
    queries: queries
  });
  mainLayout.addMember(reportView);
Placing a parameter in a particular column
The Column Number field of the Parameter tab allows specifying the column where the parameter should be placed. Grid parameters use always the four columns of the form, so this field does not apply to them.
Invoking a client side validation before calling the action handler
The Client Side Validation field of the Process Definition tab allows defining a function that will be executed before the request to the action handler is done. This function can be used to do client side validations.
This function must accept 3 parameters:
- the parameter window object. i.e., if you name this parameter view, then the form of the parameter window will be accessible via
view.theForm. The value of a particular parameter can be retreived usingview.theForm.getItem(parameter_name).getValue() - a validation success callback. If the current values of the form passes the validation, this callback must be invoked
- a validation failure callback. If form values do not satisfy the validation, invoke this callback.
For instance:
OB.Utilities.TestClientSideValidation = function (view, actionHandlerCall, failureCallback) {
  var minNumber, maxNumber;
  minNumber = view.theForm.getItem('min_number').getValue();
  maxNumber = view.theForm.getItem('max_number').getValue();
  if (maxNumber >= minNumber) {
    // only execute the callback if the form values pass the validation
    actionHandlerCall();
  } else {
    failureCallback();
  }
In addition, client side validation functions support a fourth parameter that contains additional information, like the pressed button:
OB.Utilities.TestClientSideValidation = function (view, actionHandlerCall, failureCallback, additionalInfo) {
  if (additionalInfo.buttonValue === 'OK') {
    // execute validations related to the 'OK' button
  } else {
    // do another validations
  }
Info
To learn how to define new buttons in a standard process definition window, see Adding new buttons.
Additional information can be added to the payload the process will receive. For example, this code would add a new parameter named myParam:
Invoking a function when a non-grid parameter is changed
The On Change Function field of the Parameter tab allows defining a function that will be executed when a non-grid parameter is updated, after the parameter loses its focus. This function can be used to do validations or to implement client side callouts, among other things.
The function must accept four parameters:
- item: the item that has been modified
- view: the parameter window object
- form: the form that contains the item
How to set the value of non-grid parameters programmatically
It is possible to execute an On Change Function , besides when the parameter loses its focus, when setting the parameter value programmatically.
When setting the value of a parameter from code, it is recommended to use the setValueProgrammatically() function. This way, if the parameter has an OnChange Function, it will be executed after setting the parameter value.
var issotrx = form.getItem('issotrx');
// Set the value for the item
// If the 'issotrx' parameter has an 'On Change Function' it will be executed also
issotrx.setValueProgrammatically('Y');
Invoking a function when all the non-grid parameters have been initialized
The On Load Function field of the Process Definition tab allows defining a function that will be executed once the parameters have been initialized.
Invoking a function when the process needs to be refreshed
The On Refresh Function field of the Process Definition tab allows defining a function that will be executed when the parameter window refresh action be invoked.
For example, if the process has a child-process, once the child-process finishes, it will invoke a refresh of the parent process.
Note
Since each process has its particularities, a custom refresh function should be defined in case the process is susceptible of being refreshed/reloaded.
The function must accept, at least, one parameter:
- view: the parameter window object
Invoking when a grid parameter is loaded for the first time
The initialization of the grid parameters is done asynchronously, so when the general onLoadFunction is invoked, it is not certain whether all the grid parameters have been loaded with their initial data. If you need to execute some code right after a grid is loaded for the first time, use the On Grid Load Function field. The function used here must accept one parameter, the grid itself.
For example:
OB.Utilities.TestOnGridLoad = function (grid) {
  var nRecordsReceived = grid.getData().getLength(),
      messageBar = grid.view.messageBar;
  messageBar.setMessage('info', 'The grid has been loaded with ' + nRecordsReceived + ' records');
    }
Specifying the number of rows displayed in a grid parameter
You can set the number of rows that should be shown at the first time in a grid parameter using the Number of Displayed Rows field. This field is used just for setting the height of the grid, if the grid has actually more rows than the Number of Displayed Rows, a scrollbar will be shown. The default value for this field is 5.
Note
It is not possible to define the colspan of the grid parameters, because they always use the four available columns of the form.
Defining a display logic for the fields of a grid parameter
The Display Logic for Grid Column field in the Field tab allows to define a display logic for the fields of grid parameters.
For instance, suppose that you have defined a parameter window with two parameters:
- a boolean called Show Advanced Columns, column name
showAdvancedColumns - a grid.
Let's suppose the grid has some fields that should be displayed only if the Show Advanced Column flag is checked. The Display Logic for Grid Column field of these fields should be set to:
Specifying a default value for the filter of a parameter grid field
The Default Filter Expression field of the Field tab allows to define a default value for the filter of a field. This default value can be a constant, dependent from another parameter or use OBBindings.
Hiding the parameter name of a grid parameter
Although it is possible to define several grid parameters in a parameter window, it is likely that most of the times there will be at most one (for instance in pick and execute windows). In those cases, consider not showing the name of the grid parameter. Do this by unckecking the flag Show Title in the Parameter tab.
Adding new buttons
By default, process definitions have a single Done button (and a Cancel one in case they are shown in a popup from a standard window). It is possible to change that button or to add new ones.
To do it:
- Create a new Reference with Button List as Parent Reference. In the List Reference add as many records as buttons to be displayed in the process. The name of these elements will be seen in the button's label whereas the Search Key is the value that will be sent to the Handler in the backend within the
buttonValuefield. - Add a new parameter to the process with Button List as reference and the new reference just created as Reference Search Key.
Note
There should be, at most, only one parameter of Button List type.
Multi Record Process
A standard process can be defined as multi record process to be able to execute it for more than one record.
Uploading files
The File reference enhances the Etendo Classic capabilities by enabling file uploads directly within process definitions.
This functionality, which can be used in processes as well as in windows, introduces an intuitive file upload element in the process form. Users can upload a single file for processing which is then used by the system as specified in the process definition.
Info
The maximum file size users are allowed to upload are limited by default to 10MB. This is set in the preference Maximum file upload size (MB). This file size check is performed both on the client's and on the server's side.
For more information about preferences visit the Preference section in the User Guide.
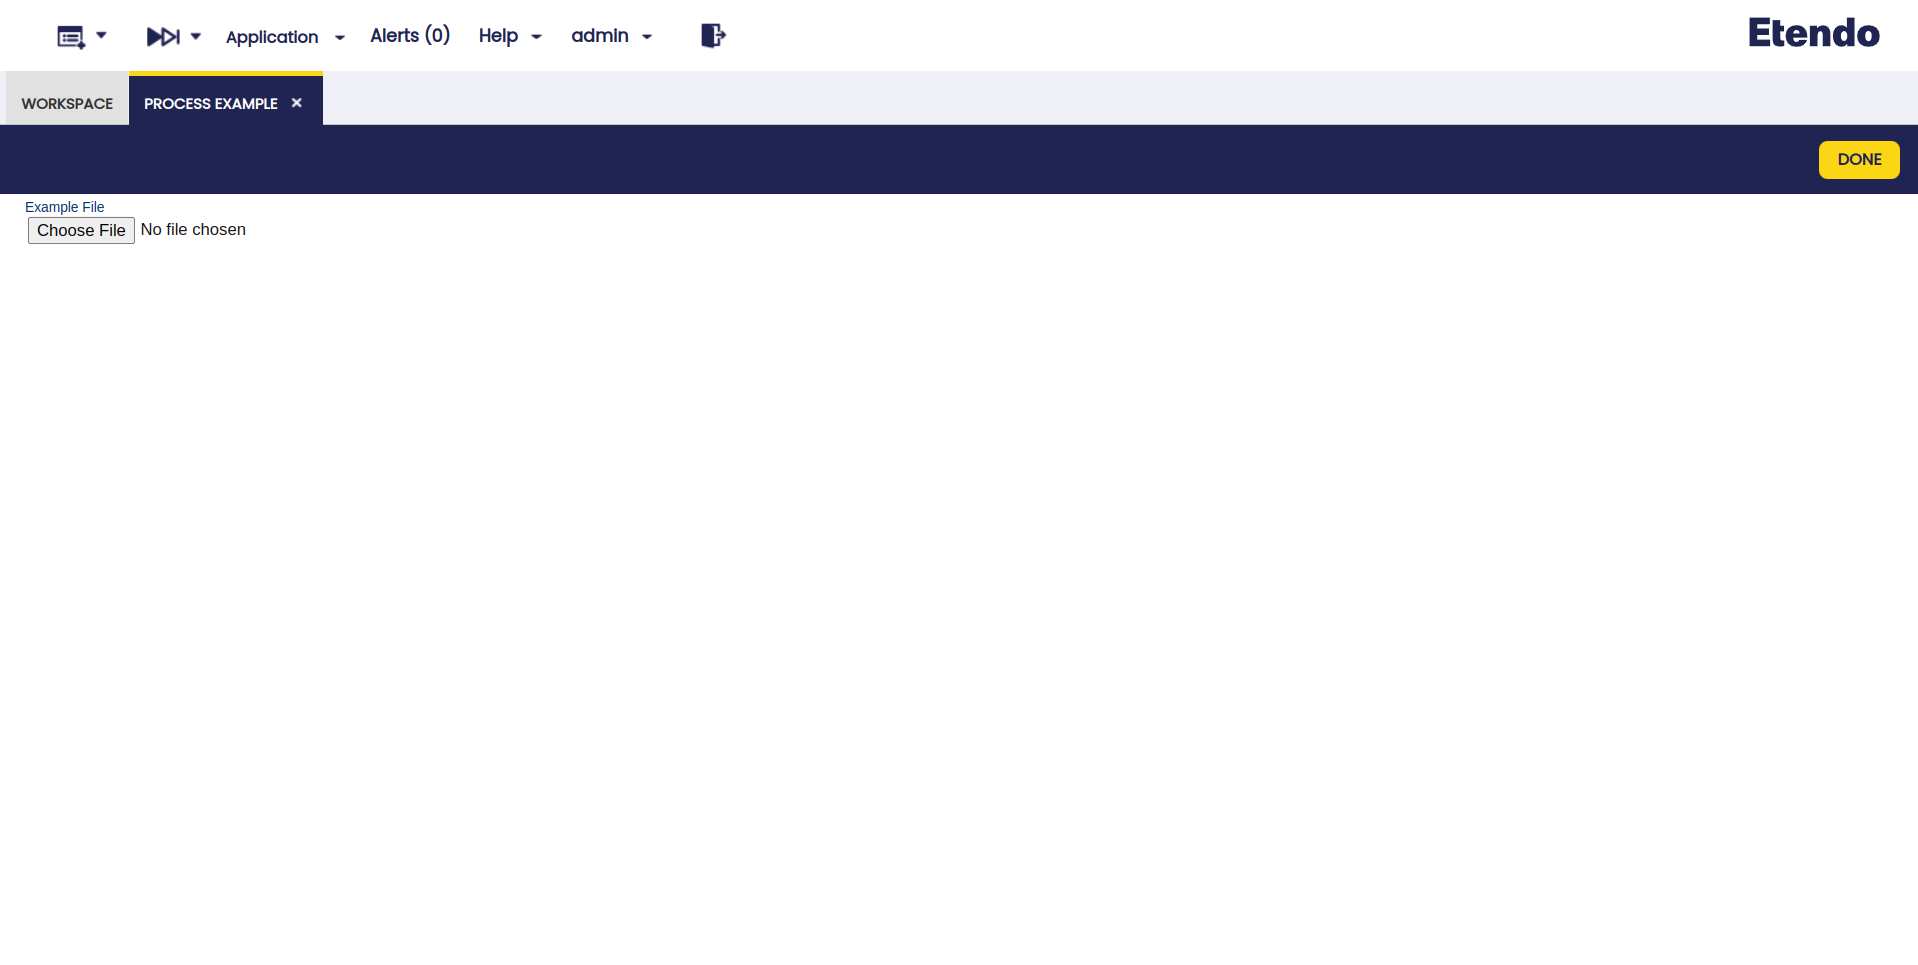
Example in Process Definition
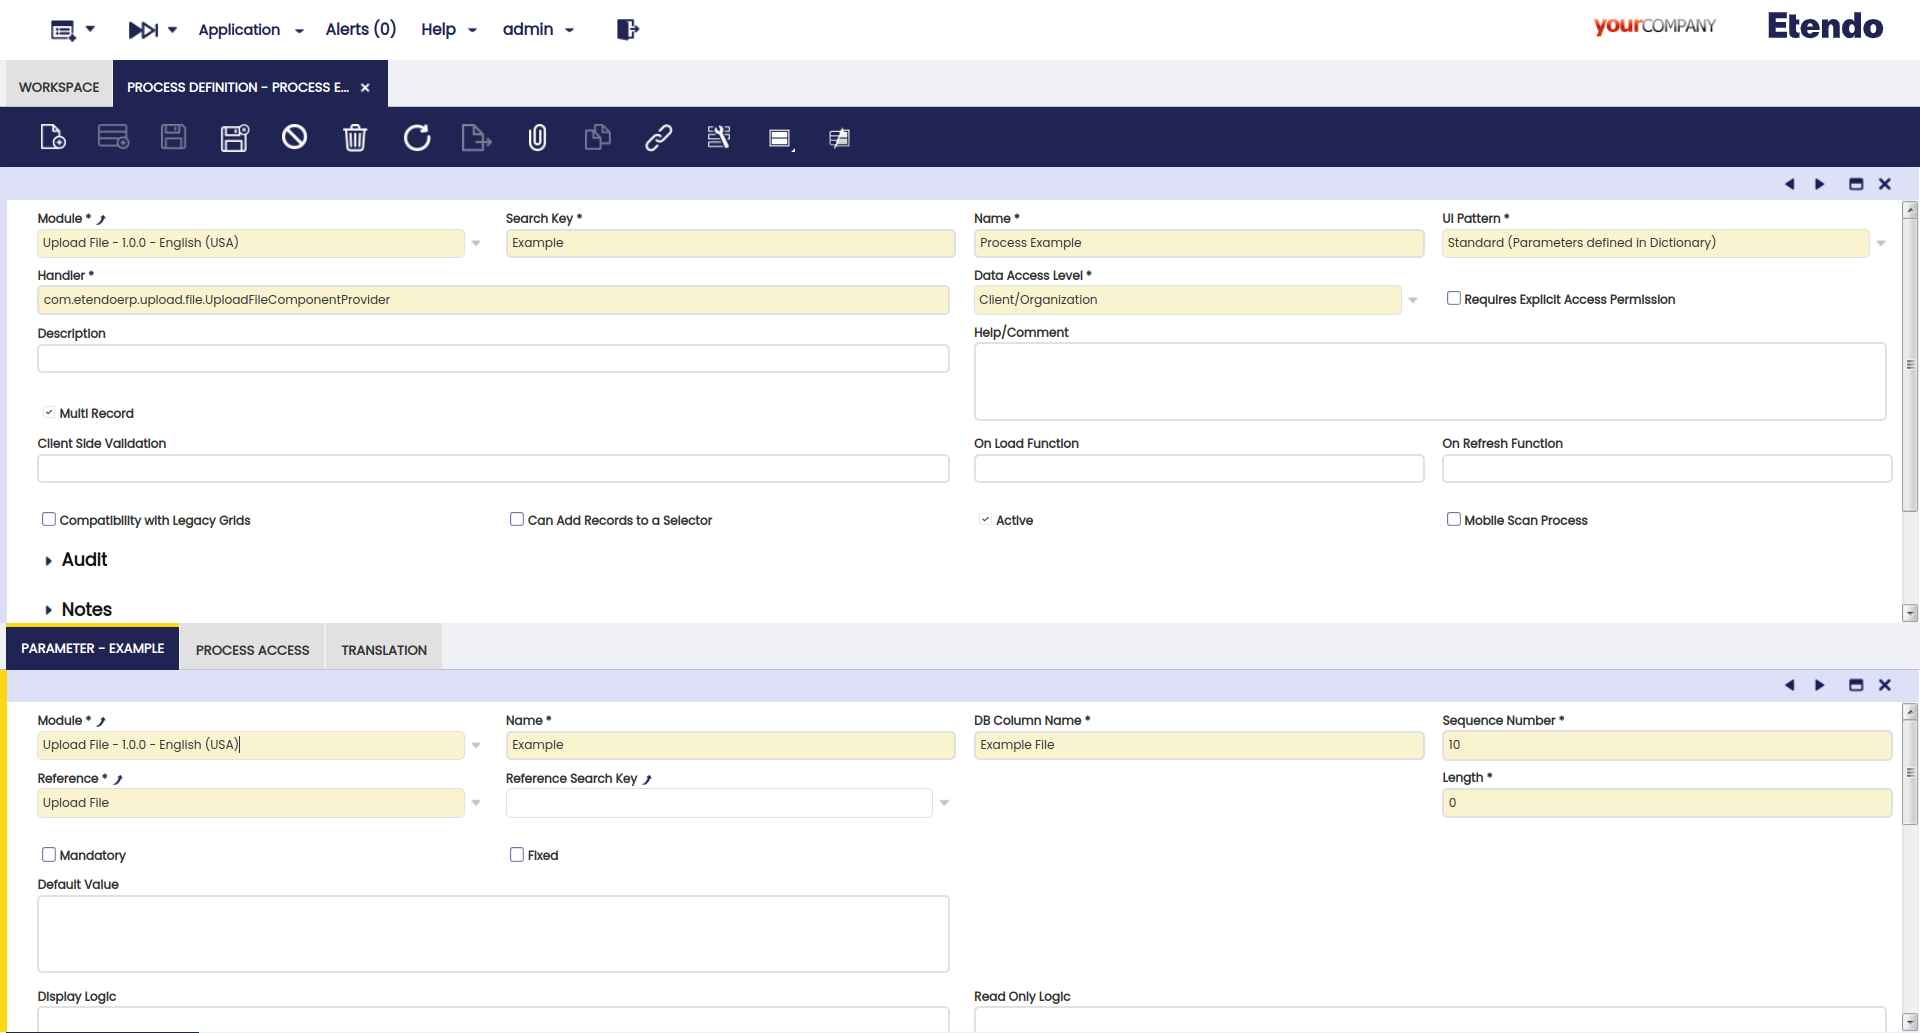
The proposed solution involves incorporating a File Upload Reference as a process parameter in process definitions.
This reference has a User Interface Definition which calls the process, this can be seen in the Process Definition tab:
com.etendoerp.upload.file.definition.ProcessFileUploadUIDefinition
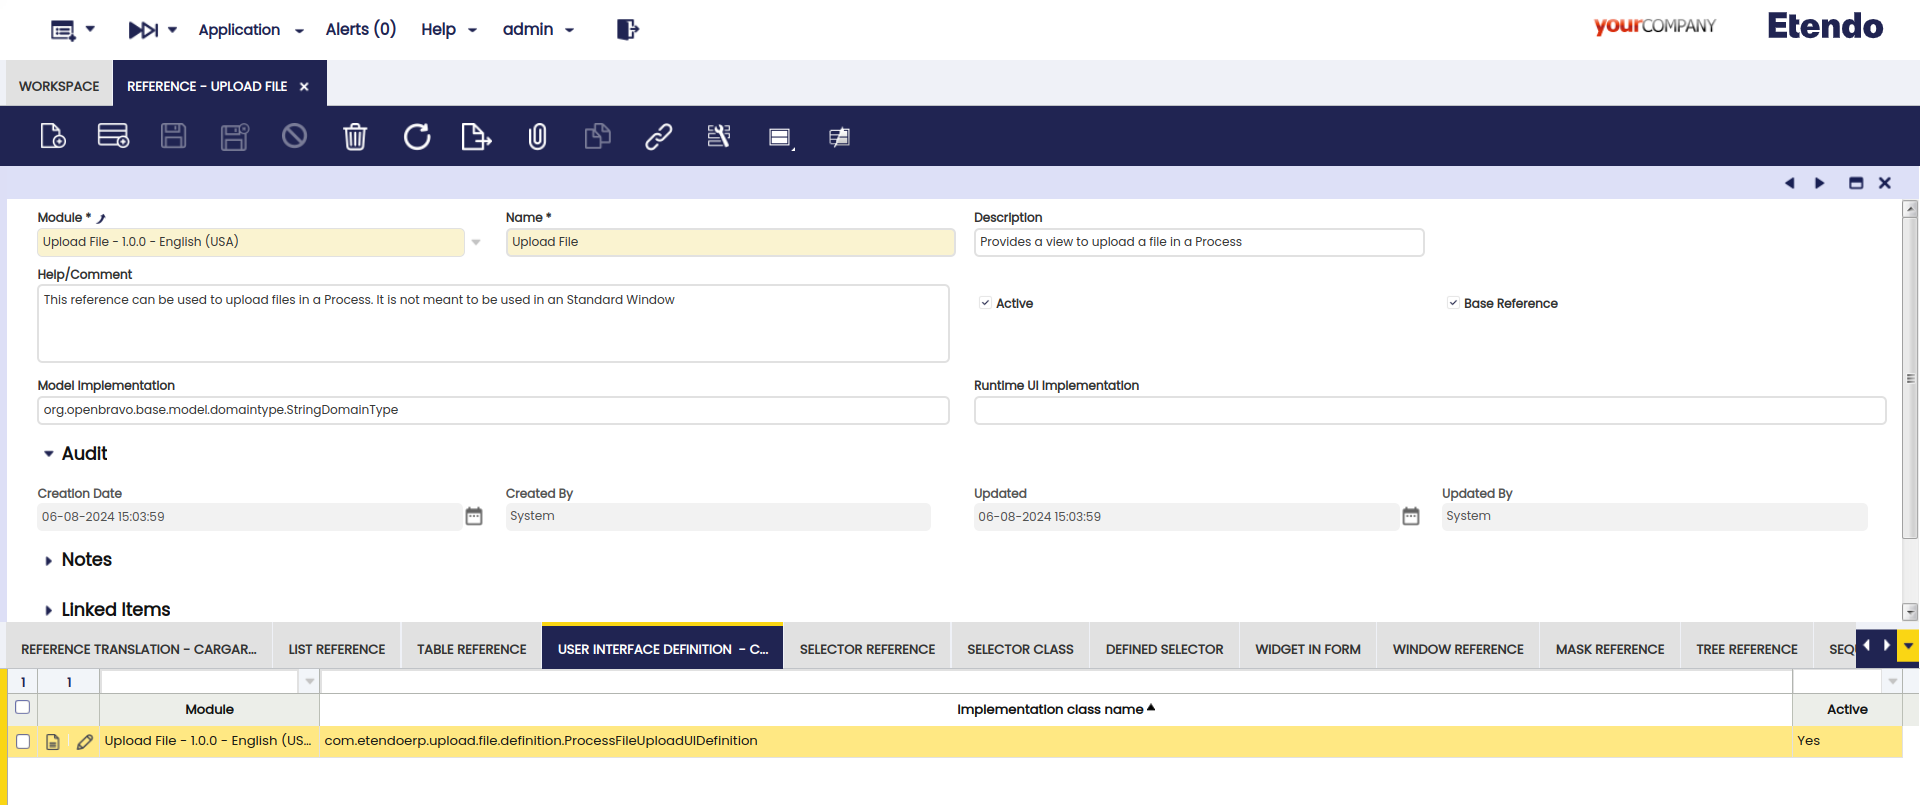
This definition calls a process OBProcessFileUpload that executes a JavaScript that has all the definitions, rules and configurations to make the reference work, and allows to select a file for later upload.
Info
Any file can be selected since this module was thought as a base so that programmers can use it for their needs.
This is an example of a Process Definition created, it is defined as follows:
After creating the Process Definition, a Menu is created to visualize the process which, in its corresponding window, allows choosing a file to upload.
Downloading files
Process definition has the ability to generate and download a file.
In this case of Process Definition, extend from FileExportActionHandler and implement the generateFileToDownload and getDownloadFileName methods.
/**
 * Action handler example to export a file from a process definition
 */
public class ExportFileExample extends FileExportActionHandler {
  private static final String FILE_PREFIX = "Test";
  private static final String FILE_EXTENSION = ".txt";

  @Override
  protected Path generateFileToDownload(Map<String, Object> parameters, JSONObject data)
      throws IOException, JSONException {
    String tmpFileName = UUID.randomUUID().toString() + FILE_EXTENSION;
    File file = new File(ReportingUtils.getTempFolder(), tmpFileName);
    try (FileWriter outputfile = new FileWriter(file)) {
      outputfile.write("Hello World!");
    }
    return file.toPath();
  }

  @Override
  protected String getDownloadFileName(Map<String, Object> parameters, JSONObject data) {
    return FILE_PREFIX + FILE_EXTENSION;
  }
}
Info
If the process definition is launched from a button in a standard window with a header and lines and it is not configured as multi-record, the generated file will be attached to the header by default.
This behavior can be modified overriding the method uploadAttachment.
@Override
protected void uploadAttachment(Path originalFile, Map<String, Object> parameters,
    JSONObject data) throws IOException, JSONException {
}
Info
As an example:
protected Path generateFileToDownload(Map<String, Object> parameters, JSONObject data)
    throws IOException, JSONException {
  String tmpFileName = UUID.randomUUID().toString() + ".txt";
  File file = new File(ReportingUtils.getTempFolder(), tmpFileName);
  try (FileWriter outputfile = new FileWriter(file)) {
    outputfile.write("Hello World!");
  }
  return file.toPath();
}
Limitations
References
Currently, not all references available in Standard windows are available in Process Definition. The following ones cannot be used as parameters:
- Button: the mechanism to add new buttons is described in Adding new buttons.
- Image
- Masked String
- Table
- TableDir
- Tree
- PAttribute
UI Logic
Callouts are not implemented for parameters.
Migrating old Processes
Process Definitions support several parameters. In order to implement this support, the way grid parameter value is sent to backend was changed and a new Compatibility with Legacy Grids flag was added.
To migrate grid legacy compatible processes to new format, set Compatibility with Legacy Grids to false and depending on the case:
- If the process UI Pattern is Manual , no other change is needed.
- If the process has no parameter, no other change is needed.
- If the process has a (grid) parameter, the
JSONthatdoExecutemethod receives changes these are the required modifications:
JSONObject gridInfo = new JSONObject(content);
JSONArray gridSelection = gridInfo.getJSONArray("_selection");
JSONArray gridAllRows = gridInfo.getJSONArray("_allRows");
JSONObject params = new JSONObject(content).getJSONObject("_params");
// Replace here gridColumnName with the actual DB Column Name for your grid parameter
JSONObject gridInfo = params.getJSONObject("gridColumnName");
JSONArray gridSelection = gridInfo.getJSONArray("_selection");
JSONArray gridAllRows = gridInfo.getJSONArray("_allRows");
This work is a derivative of How to Create a Standard Process Definition by Openbravo Wiki, used under CC BY-SA 2.5 ES. This work is licensed under CC BY-SA 2.5 by Etendo.