Skip to content

Getting Started

Overview

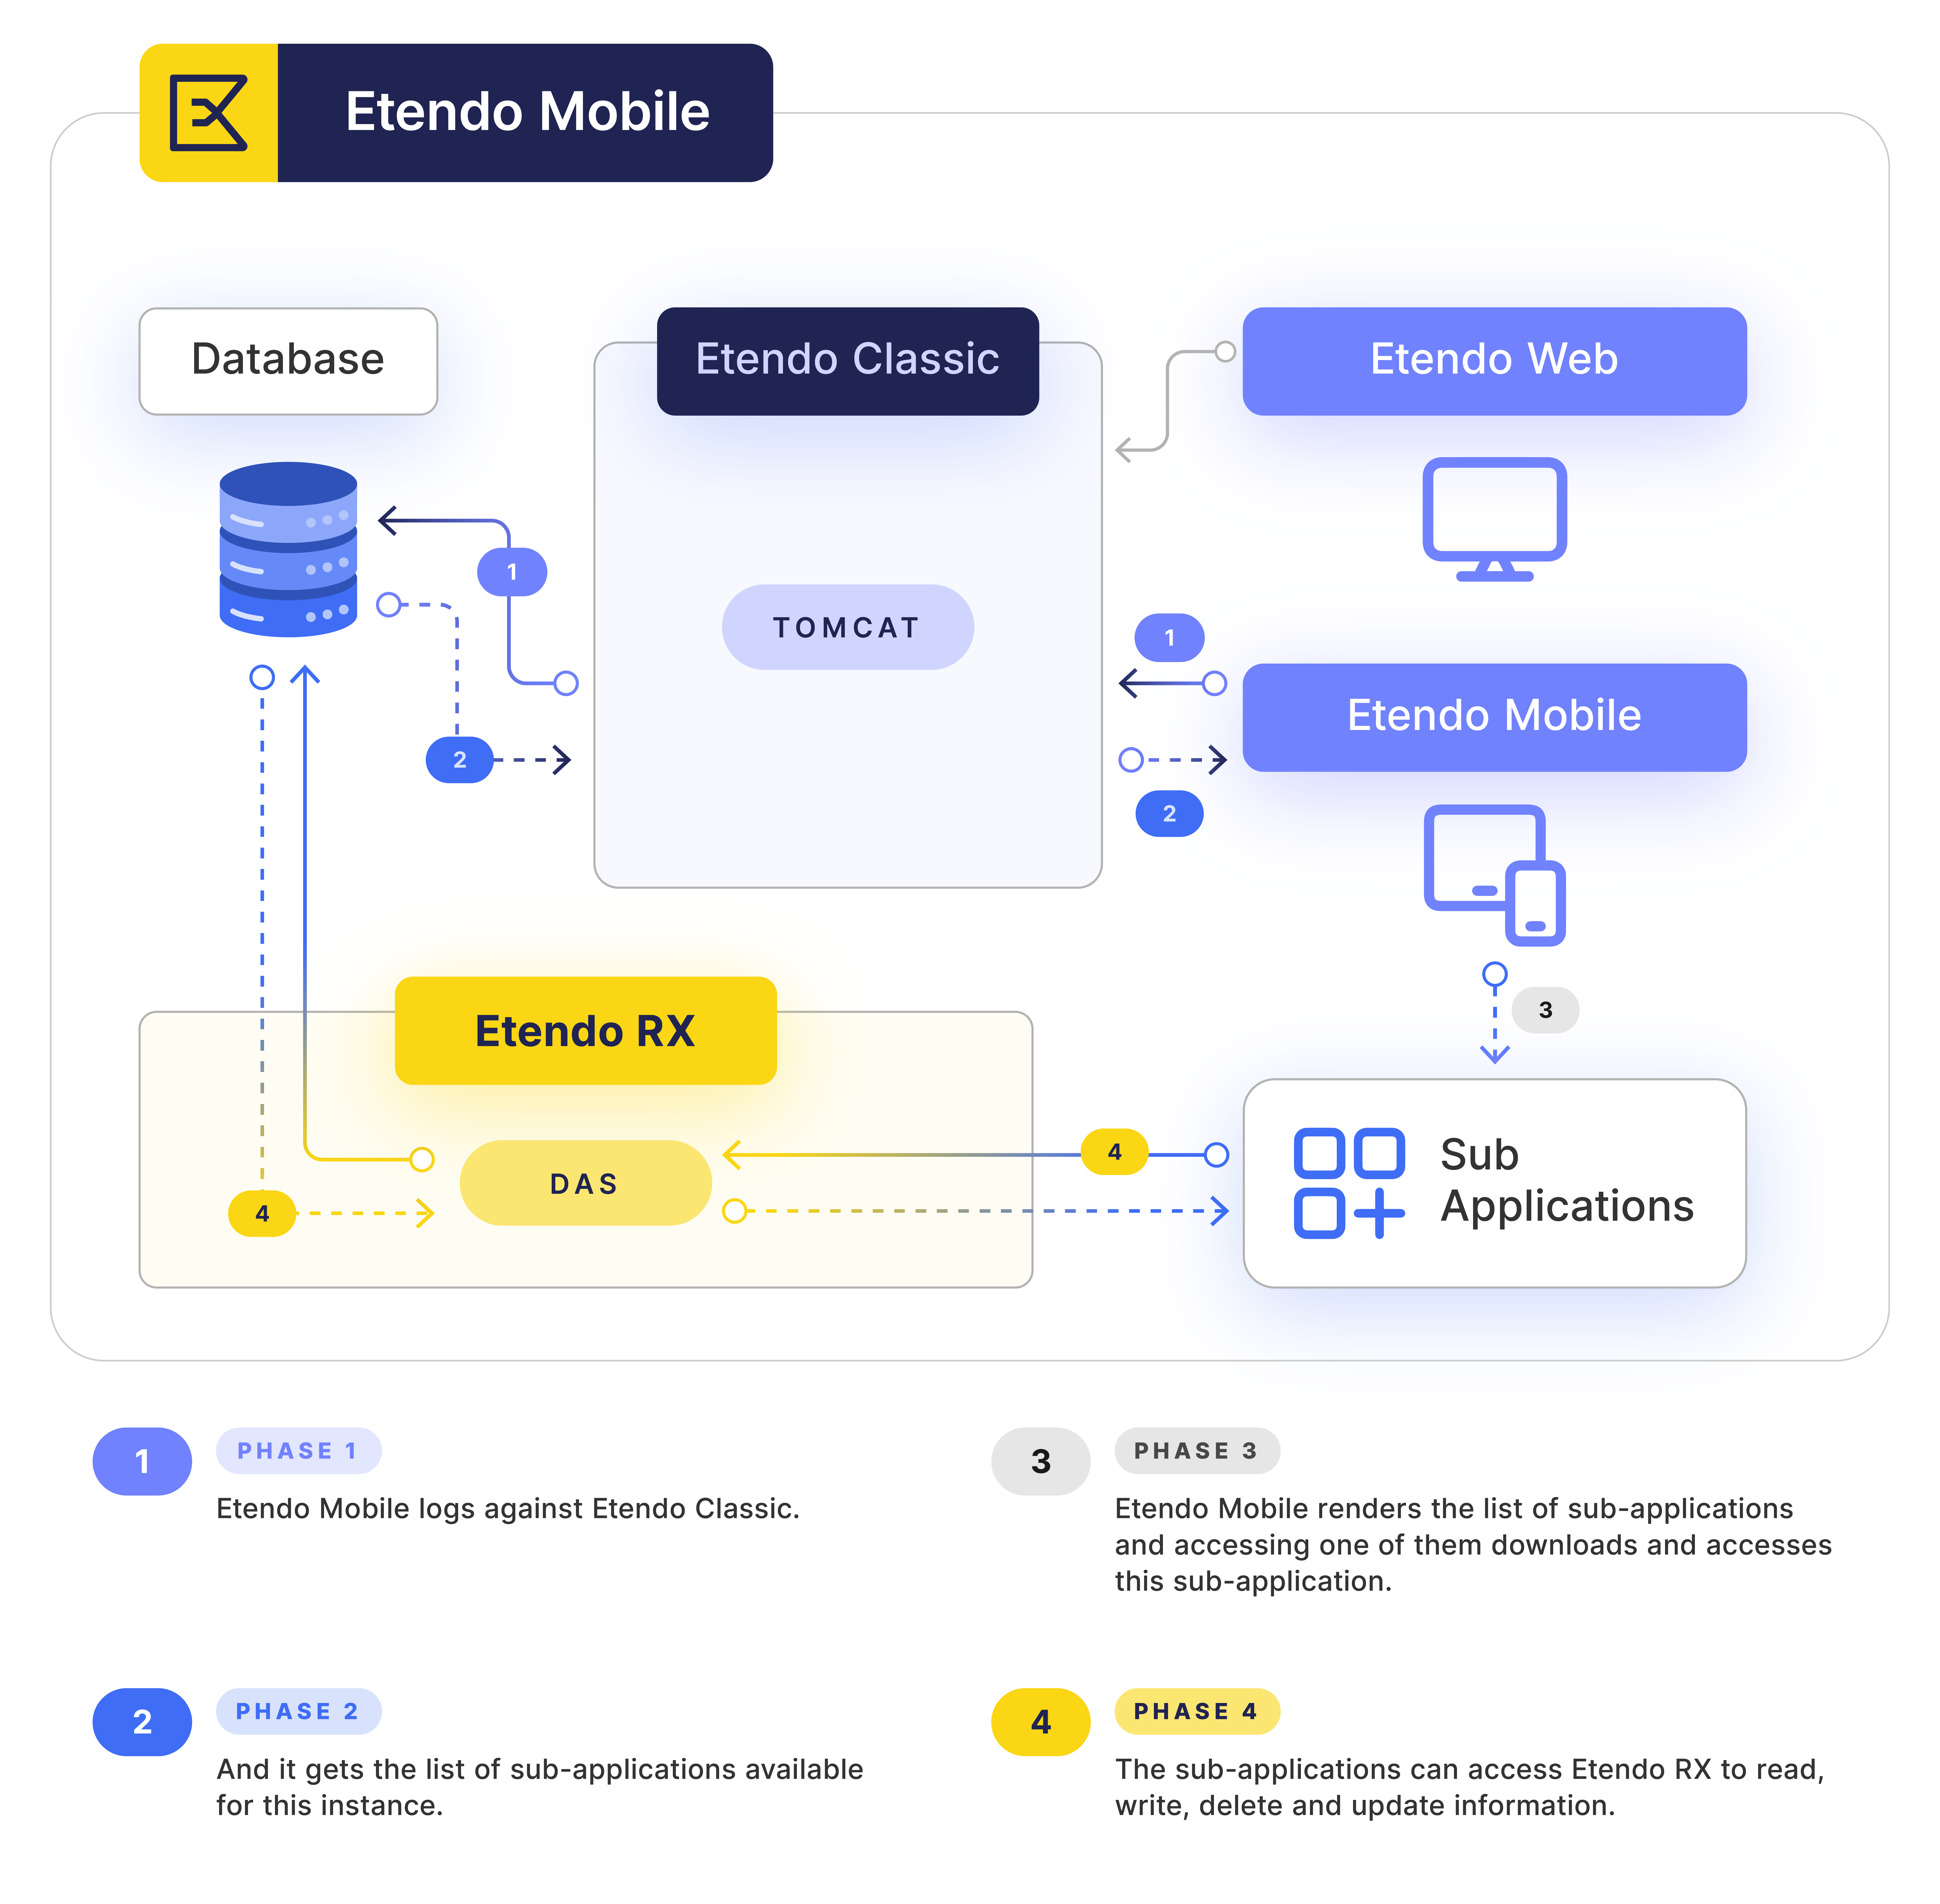
Etendo Mobile is a subapplication development platform that includes the possibility to log in to an Etendo Classic server and configure the available dynamic subapplications there according to role.

A schematic of the infrastructure is shown here:

etendo-mobile-infrastructure.png

On this page we will explain what are the requirements to create a subapplication and how to install all the necessary tools to develop a new subapplication.

Environment Setup

Requirements

  • Etendo. If you don't have it, install it here.
  • Etendo Mobile. If you don't have it, install it here.
  • Yarn (recommended). If you don't have it, you can install it via NPM:

    1. Install via npm.

      Terminal
      npm install --global yarn
      
    2. Check installation.

      Terminal
      yarn --version
      
  • Node. If you don't have it, you can use NVM:

    Steps to install NVM in Windows

    1. Download NVM. In order to install the Node Version Manager tool in a Windows environment we must download a zip file containing the installation wizard.

    2. Install NVM. Go to your Downloads folder in Windows, and unzip the nvm-setup.zip file and double click on the nvm-setup file.

    3. Installation wizard. When the installation wizard opens, click the next button a couple of times and, at the end you will see an install button which you also have to click. After that, just wait for the progress bar to finish.

    4. Command line. 1Once installed, open the Windows command line. If you have any trouble finding the command line, type CMD in the Windows search bar in the lower left corner of your desktop.

    5. Install node version 8 or the version of your choice. At the command line, type the command below. If you want to check which are the current node versions, you can go to nodejs.org and see them all. We recommend you to use the one recommended for most users.

      Terminal
      nvm install 16.20
      
    6. Verify the node versions installed. Always check the versions of node that are installed. Sometimes our applications do not run because we are using outdated versions. This command will show you all the node versions you have installed on Windows.

      Terminal
      nvm list
      
    7. Switch between different versions of node. You can always use different versions of node and this command allows you to jump between all your installed versions.

      Terminal
      nvm use 16.20
      

    Steps to install NVM in Linux

    1. Updating the system: Before installing any package, it is a good idea to update the system.

      Terminal
      sudo apt update
      sudo apt upgrade
      
    2. Install dependencies: You will need curl to download the NVM installation script.

      Terminal
      sudo apt install curl
      
    3. Install NVM: Run the following command to install NVM.

      Terminal
      curl -o- https://raw.githubusercontent.com/nvm-sh/nvm/master/install.sh | bash
      
    4. Close and open the terminal: For the changes to take effect.

    5. Verify the node versions installed. Always check the versions of node that are installed. Sometimes our applications do not run because we are using outdated versions. This command will show you all the node versions you have installed on Windows.

      Terminal
      nvm list
      
    6. Switch between different versions of node. You can always use different versions of node and this command allows you to jump between all your installed versions.

      Terminal
      nvm use 16.20
      

    Steps to install NVM in MacOS

    1. Open the Terminal: You can find it under "Applications" > "Utilities" or search for it with Spotlight (Cmd + Space and then type "Terminal").

    2. Download and install NVM: Use curl to download and run the NVM installation script. Here we use version v0.38.0 as an example, but you can replace it with the latest version available on NVM's GitHub page.

      Terminal
      curl -o- https://raw.githubusercontent.com/nvm-sh/nvm/master/install.sh | bash
      
    3. Add to your shell profile: After installing, the script will give you some instructions to add NVM to your shell profile (~/.bashrc, ~/.zshrc, etc.). If it doesn't do it automatically, add the following lines to your shell configuration file:

      Terminal
      export NVM_DIR="$HOME/.nvm"
      [ -s "$NVM_DIR/nvm.sh" ] && \. "$NVM_DIR/nvm.sh"  # This loads nvm
      
    4. Close and open the Terminal: To apply the changes, close and reopen your terminal, or reload your shell profile with a command such as source ~/.bashrc or source ~/.zshrc, depending on which shell you are using.

    5. Verify the node versions installed. Always check the versions of node that are installed. Sometimes our applications do not run because we are using outdated versions. This command will show you all the node versions you have installed on Windows.

      Terminal
      nvm list
      
    6. Switch between different versions of node. You can always use different versions of node and this command allows you to jump between all your installed versions.

      Terminal
      nvm use 16.20
      

    Then continue with the Create New Sub-appliction tutorial.