How to Create a Pick and Execute Process
Overview
Pick and Execute (P&E) is a case of Process Definition with Standard UI pattern.
This section will add a new Pick and Execute process and associate it with the Sales Order window.
The implementation requires development experience.
The following concept pages provide background information on action handlers and javascript development:
Steps to implement the Process
Overview
The P&E processes take advantage of the same foundation concepts in the Application Dictionary. The Window, Tabs and Fields will be used for defining the editable grid that will be shown, a new Reference for the parameter of the process; and then implementing an action handler that will get executed when the user hits the Done button.
Implementation
Defining the Window
- Create a new window
- Fill the required fields
-
Select Pick and Execute as window type

-
Following the same concepts, a Table is required as data-source.
-
In case it is needed to mix information from several tables, there are different options:
-
A database view used to create a table in Application Dictionary.
- A table based on an HQL query.
- A table based on a manual datasource.

-
-
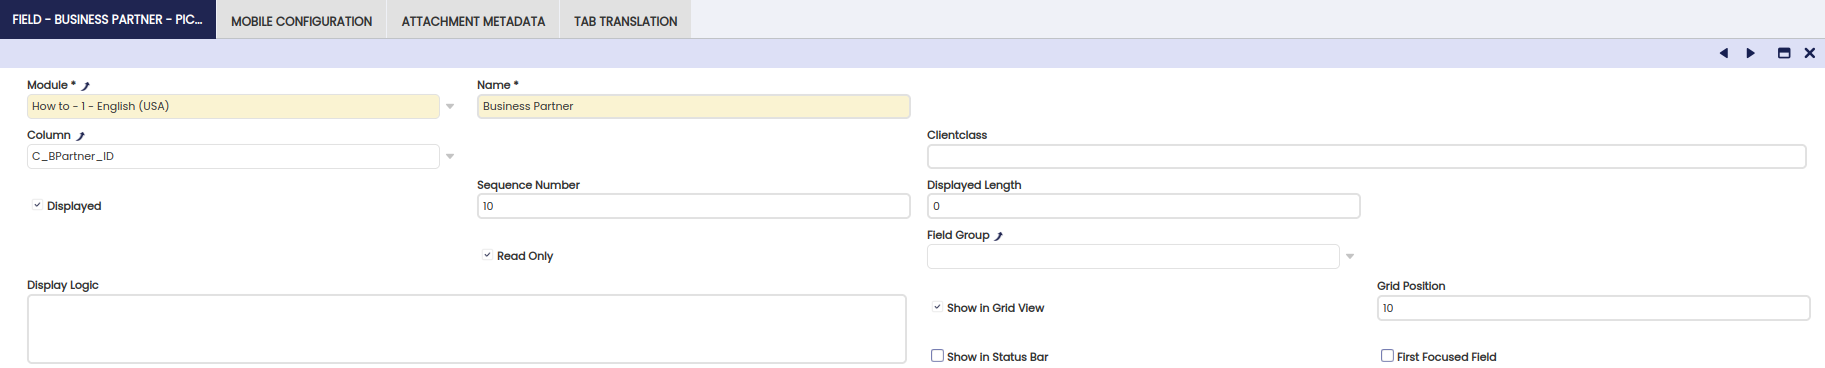
Create the necessary fields that will turn into the columns of the grid. Pick a Column and pay attention to some important properties:
- Displayed: This must be checked in order to generate a field. If Displayed is unchecked no field will be generated.
- Read Only: Most of the times all the fields will be read-only. If you want a user to be able to modify some data, e.g. quantity, leave it unchecked.
- Show in Grid View: Defines if the field will be shown in the grid. A Field as displayed can be defined but not shown in grid, so a field will get generated but not shown. This is useful for retrieving data to the grid and send it to the process.
- Grid Position: Defines the sequence of the fields in the grid.
Defining the Reference
After defining the window, a new Reference needs to be defined.
- Create a new Reference
- Select in the Base Reference drop down: Window Reference
-
Save

-
Move to Window tab
- Create a new record
- Select your newly created window
- Save

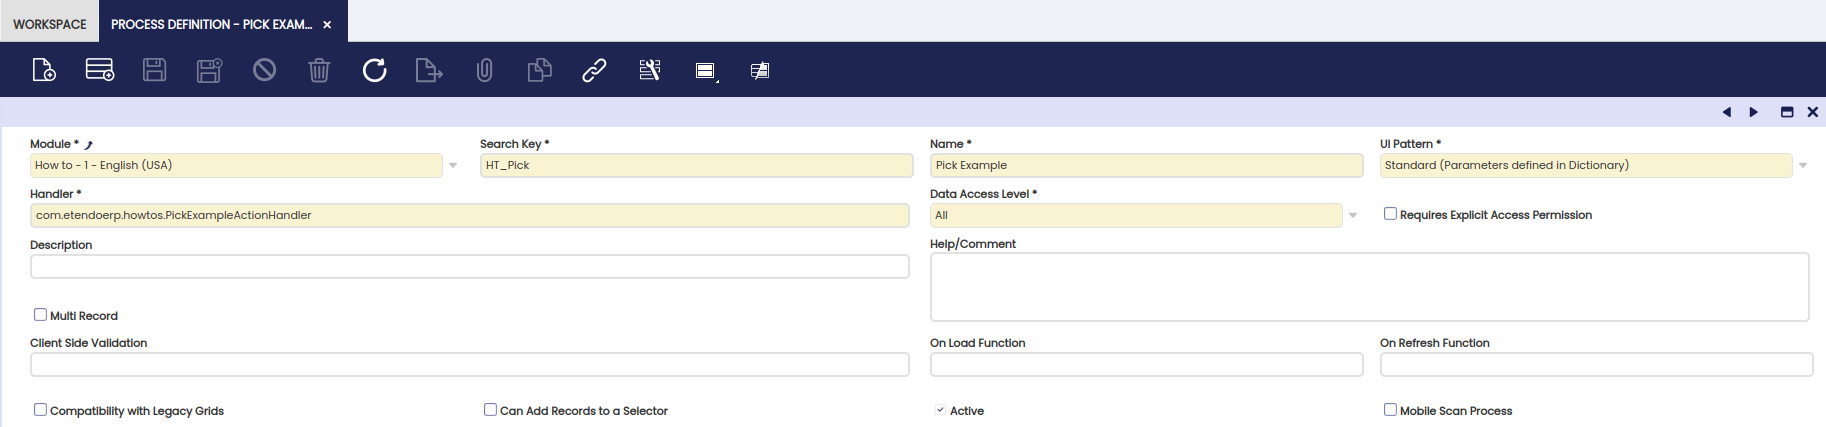
Defining the Process
There is a new window for processes: Process Definition
- Open the Process Definition window
- Create a new record
- Define the UI pattern: Standard (Parameters defined in Dictionary)
- Set the Handler (Java class implementing the process)
- Save
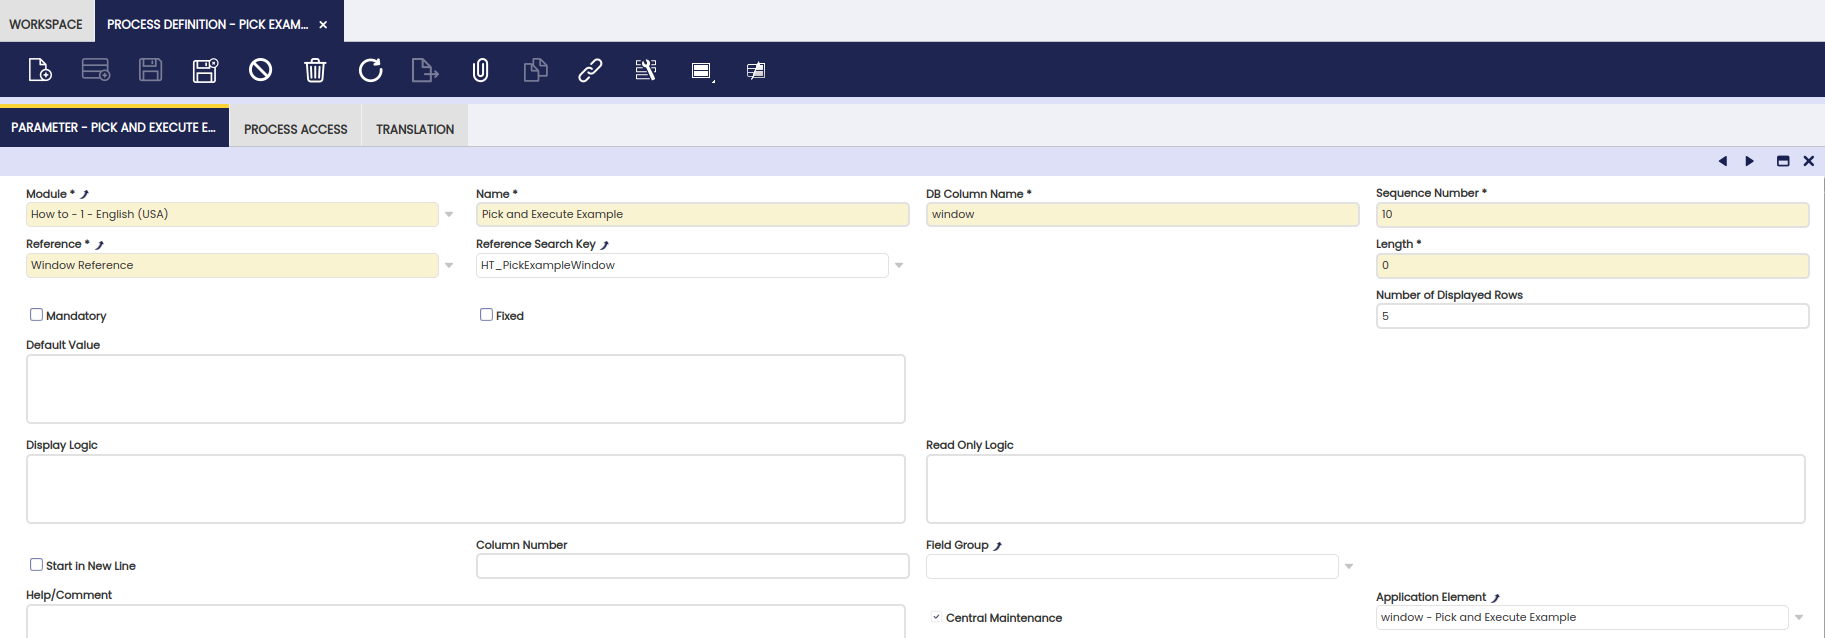
Parameters
Window Reference is an implementation of a rich parameter.
- Move to Parameters tab
- Create a new record
- Fill the required fields. The name of the parameter will be the name shown in the title of the running process.
- Select Window Reference
- Pick the Window you defined previously
- Save
Adding a button to Sales Order
Create a Column
A new column is required to be associated to a button.
Info
For more information, visit How to add a field to a Window Tab.
-
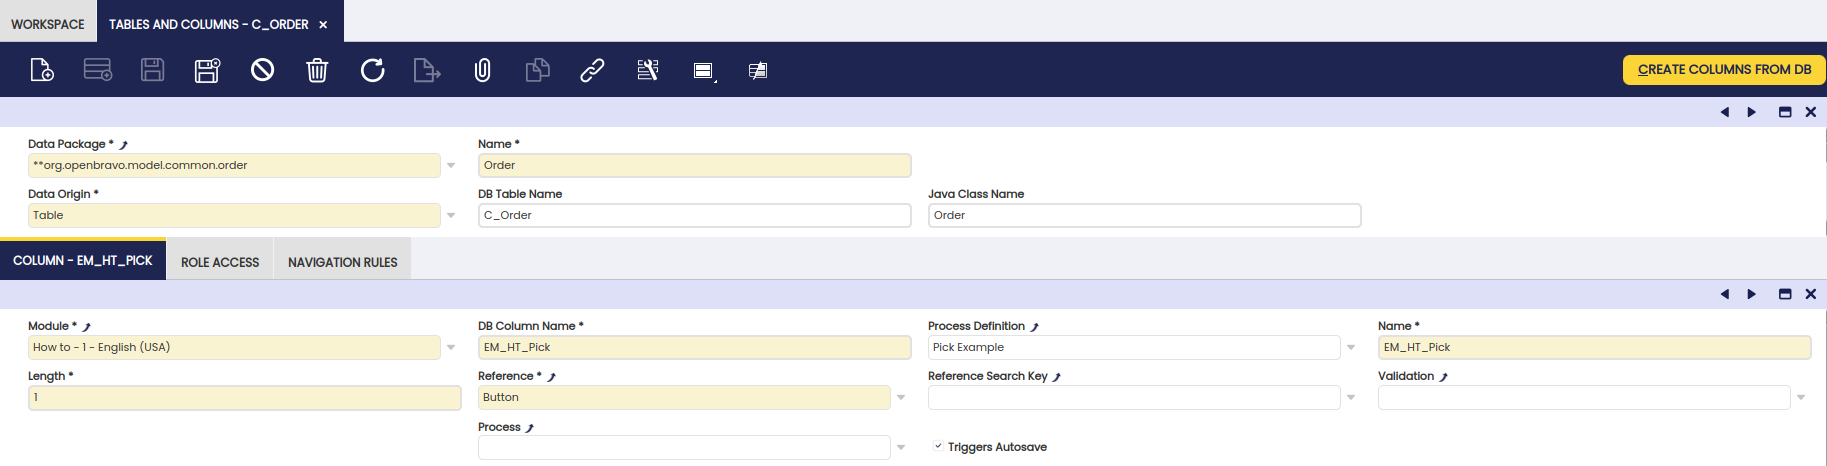
Create a new column in the
C_Ordertable.PostgreSQLsyntax: -
Go to: Tables and Columns
- Open the
C_Orderrecord - Execute: Create Columns from DB process
- Move to the Columns Tab
- Pick the newly created column
- Change the reference from: Yes/No to Button
- Pick your defined process
Create a Field
- Go to Windows, Tabs and Fields
- Search for Sales Order
- Create a new Field associated with the column

Java Implementation
In the case of a Pick and Execute action handler, extend from BaseProcessActionHandler and implement the doExecute method.
/*
  *************************************************************************
  * The contents of this file are subject to the Openbravo  Public  License
  * Version  1.1  (the  "License"),  being   the  Mozilla   Public  License
  * Version 1.1  with a permitted attribution clause; you may not  use this
  * file except in compliance with the License. You  may  obtain  a copy of
  * the License at http://www.openbravo.com/legal/license.html
  * Software distributed under the License  is  distributed  on  an "AS IS"
  * basis, WITHOUT WARRANTY OF ANY KIND, either express or implied. See the
  * License for the specific  language  governing  rights  and  limitations
  * under the License.
  * The Original Code is Openbravo ERP.
  * The Initial Developer of the Original Code is Openbravo SLU
  * All portions are Copyright (C) 2011 Openbravo SLU
  * All Rights Reserved.
  * Contributor(s):  ______________________________________.
  ************************************************************************
  */
package org.openbravo.client.application.examples;

import java.util.Map;

import org.apache.log4j.Logger;
import org.codehaus.jettison.json.JSONArray;
import org.codehaus.jettison.json.JSONObject;
import org.openbravo.client.application.ApplicationConstants;
import org.openbravo.client.application.process.BaseProcessActionHandler;

/**
  * @author iperdomo
  *
  */
public class PickExampleActionHandler extends BaseProcessActionHandler {

  private static final Logger log = Logger.getLogger(PickExampleActionHandler.class);

  @Override
  protected JSONObject doExecute(Map<String, Object> parameters, String content) {
    try {
      JSONObject request = new JSONObject(content);

      log.info(">> parameters: " + parameters);
      // log.info(">> content:" + content);

      // _selection contains the rows that the user selected.
      JSONArray selection = new JSONArray(
          request.getString(ApplicationConstants.SELECTION_PROPERTY));

      log.info(">> selected: " + selection);

      // _allRows contains all the rows available in the grid
      JSONArray allRows = new JSONArray(request.getString(ApplicationConstants.ALL_ROWS_PARAM));

      log.info(">> allRows: " + allRows);

      // A Pick and Execute process can have several buttons (buttonList)
      // You can know which button was clicked getting the value of _buttonValue
      log.info(">> clicked button: " + request.getString(ApplicationConstants.BUTTON_VALUE));

      return request;
    } catch (Exception e) {
      log.error("Error processing request: " + e.getMessage(), e);
    }
    return new JSONObject();
  }
}
Testing the Process
Since the structure of some Entity has been changed by adding a new column, it is needed to restart the tomcat server.
- After restarting, it should be able to go to the Sales Order window and see a new button.

Advanced Topics
Selecting by default
The data-source (table or view) defined in the Tab, can set which rows will be selected by default when the user launches the process. It is just needed to create a column c_ob_selected, this will turn into a obSelected property in the generated entity. When the value of this column is Y , the row will be selected by default. Here you have an working example:
M_RM_RECEIPT_PICK_EDIT.xml.
Note
When registering the column in the Application Dictionary the Yes/No reference must be used.
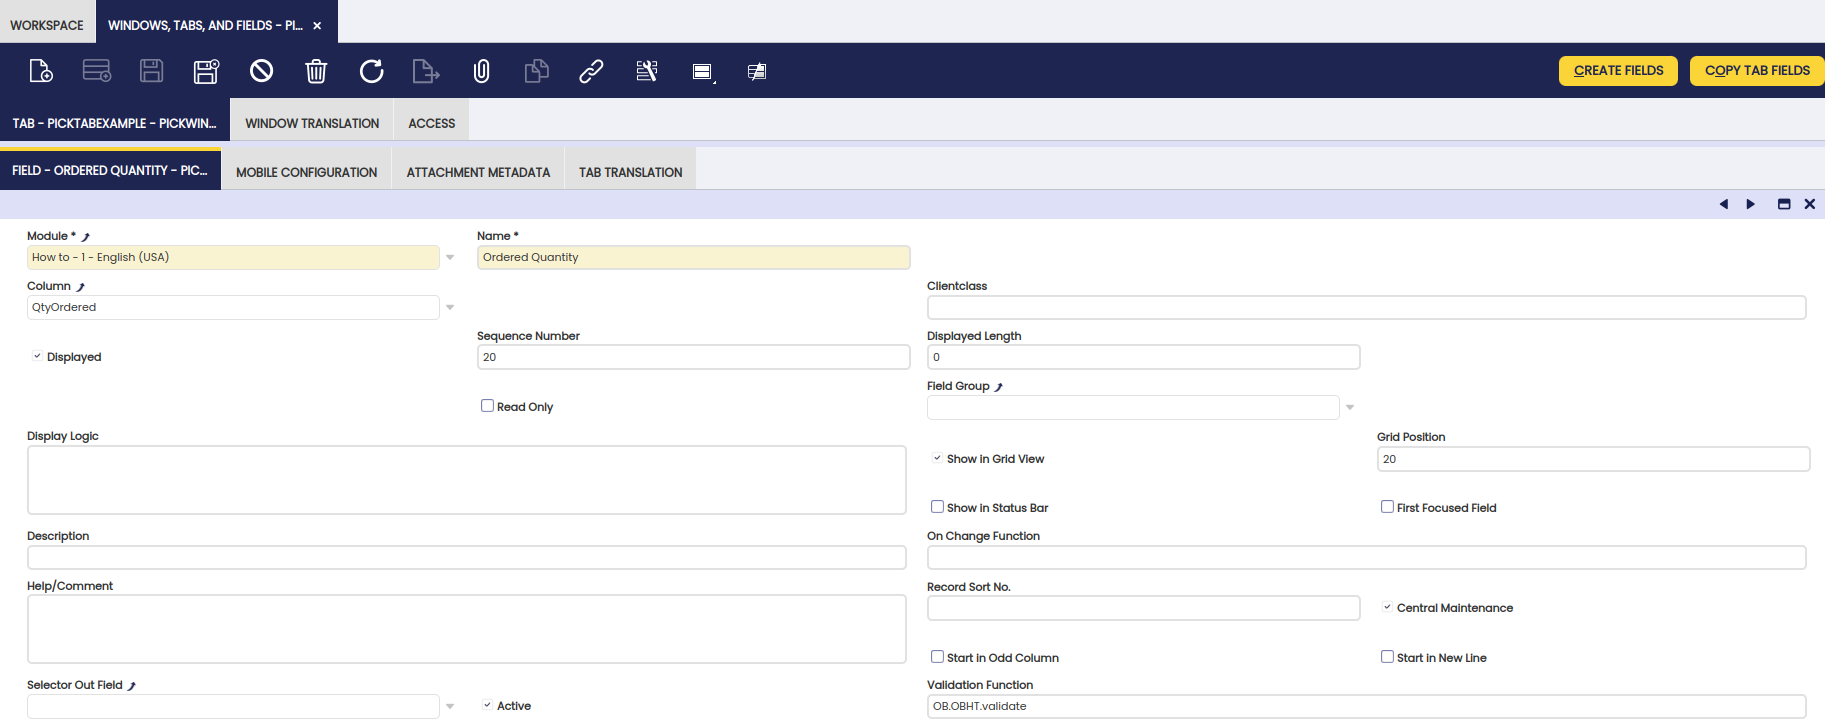
Validation Function
Define at Field level, a JavaScript validation function. In an editable field when the user enters a value, this function will get executed.
- Go to Window, Tabs and Fields
- Pick your window and the tab
- Go to the Quantity field
JavaScript Definition
- The Component Provider needs to register a new global resource.
- If the function returns false, the cell will be marked with an error.
- In the JavaScript, define a validation function e.g.
OB.OBHT = {};
OB.OBHT.validate = function (item, validator, value, record) {
  // item has access to grid: item.grid
  // from the grid you can get all selected records and edited values, e.g.
  //   * item.grid.getSelection()
  //   * item.grid.getEditedRecord()
  // grid has access to view: grid.view
  // view has access to parentWindow: view.parentWindow (the window running the process)
  // parentWindow has access to currentView
  // currentView has getContextInfo
  // debugger;
  if (window.console) {
    console.log("validation function!", value);
  }
  return true;
};
Selection Function
A selection function can be defined at Tab level. This function will get called when the user select/unselect a row.
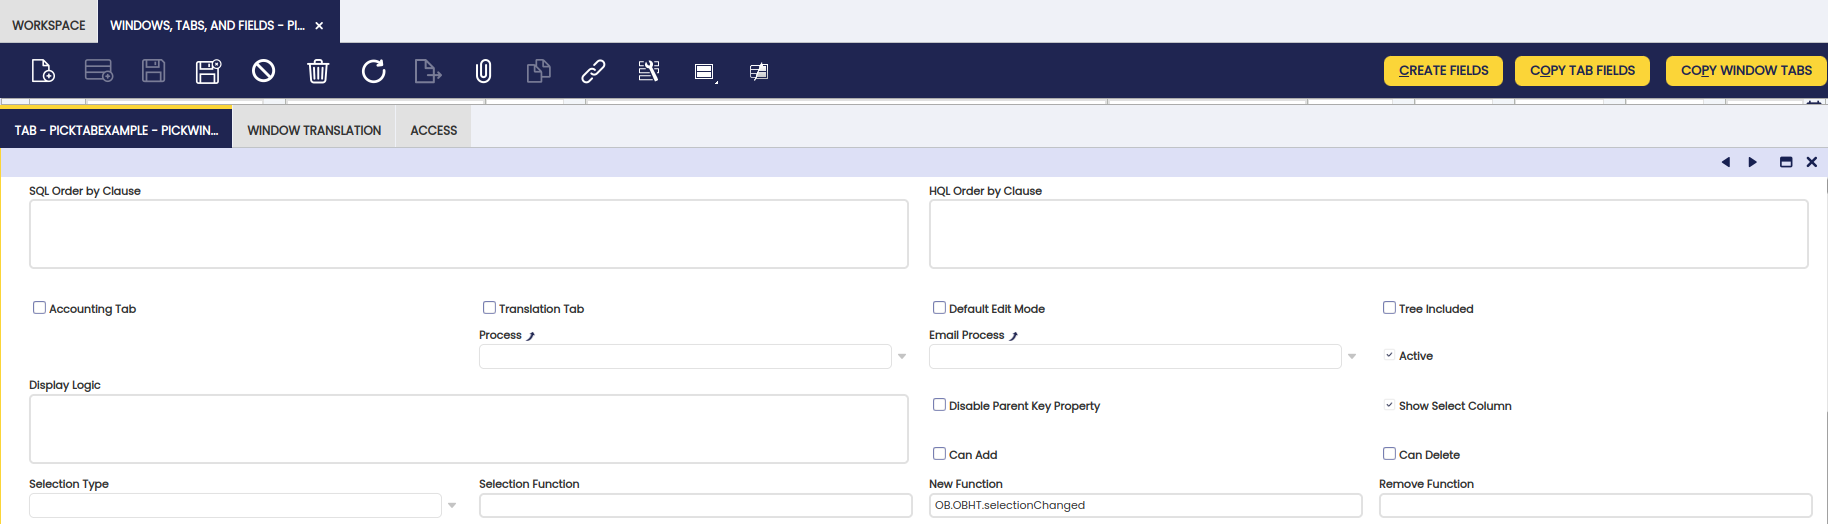
And define a JavaScript function in your loaded static .js file:
OB.OBHT.selectionChanged = function (grid, record, recordList) {
  if (window.console) {
    console.log("selection function!");
    console.log(grid, record, recordList);
  }
};
If you want to change any value of the selected record, use the following instruction:
Performing Several Actions after Execution
After the process is executed, a series of actions can be taken.
Info
For more information about several actions after execution, see How to create a Standard Process Definition.
This work is a derivative of How to create a Pick and Execute Process by Openbravo Wiki, used under CC BY-SA 2.5 ES. This work is licensed under CC BY-SA 2.5 by Etendo.