Installation
Overview
This section explains how to install a new Etendo environment. It includes:
- Tutorial about the Etendo installation.
- The steps to install Etendo.
Tutorial
Requirements
This section outlines the System Requirements.
PostgreSQL Configuration
Check this article to configure PostgreSQL correctly: PostgreSQL Configuration
Install Etendo
Steps to Install Etendo in JAR Format
-
Clone Etendo Base project in a temporal directory.
-
Copy the sources in
/opt/EtendoERPfolder. -
Modify the
gradle.propertiesfile with your GitHub Credentials. Create the credentials by following this guide. -
Change the
build.gradlefile, uncomment the core dependency in the dependencies section:Info
To know the available versions of Etendo Classic, please visit the Release Notes page.
-
Modify the
gradle.propertiesfile with your environment variables, if it is necessary: -
Dependencies
-
Setup
- Installation
-
Start the Tomcat, in case of Linux you can run:
Note
If you want to run Etendo locally, go to Run Etendo Development Environment.
-
Open your browser in
https://<Public server IP>/<Context Name>
Steps to Install Etendo in Sources Format
-
Clone Etendo Base project in a temporal directory.
-
Copy the sources in
/opt/EtendoERPfolder. -
Modify the
gradle.propertiesfile with your GitHub Credentials. Create the credentials by following this guide. -
By default, the latest core version available will be expanded but if there is a need to change it, edit the
build.gradlefile changing thecoreVersion = "(<version>,<version>)".Info
To know the available versions of Etendo Classic, please visit the Release Notes page.
-
Expand Etendo Base
-
Modify the
gradle.propertiesfile with your environment variables, if it is necessary: -
Setup: to apply or create the initial configurations
-
Installation: Create the database, compile the sources and deploy to Apache Tomcat
-
Make sure you have the following PostgreSQL configuration in your
postgresql.conf, this file is located wherever you have postgresql installedNote
After modifying the file restart postgresql service
-
Start the Tomcat, in case of Linux you can run:
Note
If you want to run Etendo locally, go to Run Etendo Development Environment.
-
Open your browser in
https://<Public server IP>/<Context Name>
Steps to Install the Etendo ISO
-
Download the Etendo ISO from the Etendo ISO - Release Notes page.
-
Burn the Etendo ISO image into a USB stick. It is recommended to use balenaEtcher on Linux or MacOS and Rufus on Windows.
Tip
If you are installing the Etendo ISO on a virtual machine, it is recommended to use Qemu along with a graphical interface such as Virt-Manager (Linux) or UTM (MacOS) to easily manage your virtual environments.
-
Start the system using the Etendo ISO image. You will be prompted:
-
Network Connections: Verify that you are on a network with an internet connection and that an IP address is correctly assigned to your server.
-
Guide Storage Configuration: Select the disk where you want to run the installation. If you only have one disk, proceed to the next step.
-
Storage Configuration: Same as the previous step.
-
Profile Setup: Enter your name, the server's name, and the user etendo with the password of your choice.
-
-
Wait for the operating system installation and server upgrade to take place. When prompted, select reboot now.
-
After the restart, the final server configuration will begin. Wait for it to finish, and the server will be ready.
Steps to Install the Etendo ISO without Internet Connection
If you do not have an internet connection during installation, follow these additional steps:
-
Follow the same procedure outlined in the previous section, Steps to Install the Etendo ISO with Internet Connection up to the network configuration stage.
- Network Configuration: In this section, if you do not have an internet connection, select Continue without internet.
-
After the operating system installation is complete, restart the server as prompted.
-
Log in to the server using the username and password you configured during installation.
-
Configure the network settings as desired to establish an internet connection.
-
Once connected to the internet, log in as the superuser:
sudo su. -
Begin the installation process by running the command:
etendo-install. -
After the installation is finished, the server will be ready for use.
Steps to Install Etendo with Postgres Database and Tomcat Dockerized
The Docker Management module allows for the distribution of the infrastructure needed to configure Etendo Classic within Etendo modules, which include Docker containers for each service. Specifically, the Docker Management module includes the PostgreSQL Database Service and the Dockerized Tomcat Service module, which, as its name suggests, provides the Tomcat service. These modules are part of the Platform Extensions bundle, which will be covered in this step-by-step guide on how to install them.
Info
In this guide we will assume the installation of Etendo Classic in Sources format, in case you want to install it in JAR format you should consult the changes in the corresponding tab.
-
Clone Etendo Base project in a temporal directory.
-
Copy the sources in
/opt/EtendoERPfolder. -
Modify the
gradle.propertiesfile with your GitHub Credentials. Create the credentials by following this guide. -
By default, the latest core version available will be expanded but if there is a need to change it, edit the
build.gradlefile changing thecoreVersion = "<version>".Info
To know the available versions,, please visit the Etendo Classic Release Notes page.
-
Expand Etendo Classic
-
Add Platform Extensions bundle dependency, to include the dockeridez platform features
-
Modify the
gradle.propertiesfile with your environment variablesgradle.propertiescontext.name=etendo bbdd.sid=etendo bbdd.port=5434 bbdd.systemUser=postgres bbdd.systemPassword=syspass bbdd.user=tad bbdd.password=tad org.gradle.jvmargs=-Dfile.encoding=UTF-8 docker_com.etendoerp.tomcat=true docker_com.etendoerp.docker_db=trueInfo
The dockerized database service will run on the port defined in the
bbdd.portvariable, we suggest using port5434to avoid conflict if you have a local Postgres instance using the default port.By default the Tomcat service will be up on port
8080, in case that port is busy you can use the variabledocker_com.etendoerp.tomcat_port=<port>. -
Launching Dockerized Tomcat and Database services
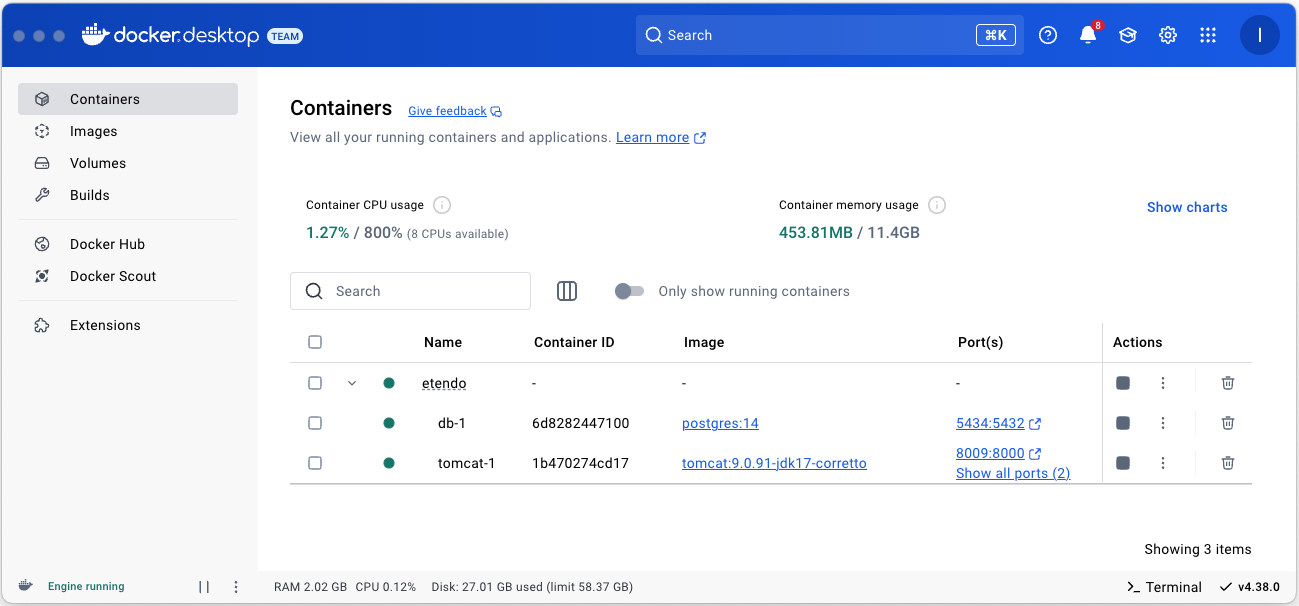
Postgres database and Tomcat service running dockerized, if necessary you can access the log of each service. -
Setup: to apply or create the initial configurations
-
Installation: Create the database, compile the sources and deploy to Apache Tomcat
-
After the smartbuild task finish, the Tomacat service will automatically restart, open your browser in:
https://<Public server IP>/<context.name>or in case that you run in local environmenthttp://localhost:8080/etendo