How to Use the Color System in Workspace UI
Overview
The color system lets you assign a visual color badge to records in a master window. Once a color is assigned, every grid in Workspace UI that references that window will automatically display a colored tag instead of plain text — making it easier to scan and identify records at a glance.
Prerequisite
A developer must first configure the Color column in the data dictionary for the master window. If the color field is not visible in the form, contact your system administrator or follow the developer guide.
Step 1 — Open the Master Record
- Log in to Etendo Classic with a role that has access to the master window.
- Navigate to the master window configured with a color column.
- Open an existing record or create a new one.
Step 2 — Assign a Color
- Locate the Color field in the form. It accepts a hexadecimal color code (e.g.,
#8E44AD). - Enter the desired hex color value directly, or use the color picker if available.
- Click Save.

Tip
The UI calculates a contrasting text color automatically, but choosing a mid-range color (not too light, not too dark) gives the best visual result.
Step 3 — Verify the Color Badge in Workspace UI
- Open Workspace UI (the Next.js frontend).
- Navigate to the window that contains a foreign key column referencing the master window.
- In the grid, locate the column that points to the master window.
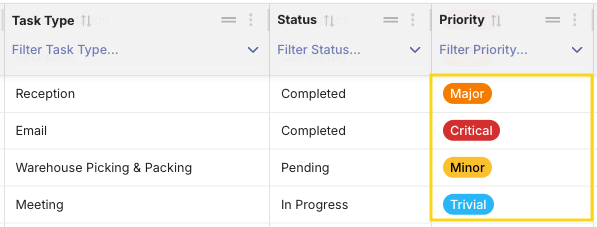
The value now appears as a colored badge instead of plain text, reflecting the hex color you assigned.
![]()
Changing or Removing a Color
- To change the color: open the master record, enter a new hex value, and save.
- To remove the color: clear the color field and save. The column will revert to plain text in all grids.
This work is licensed under CC BY-SA 2.5 ES by Futit Services S.L.