Copilot Setup and Usage
Initial Configuration
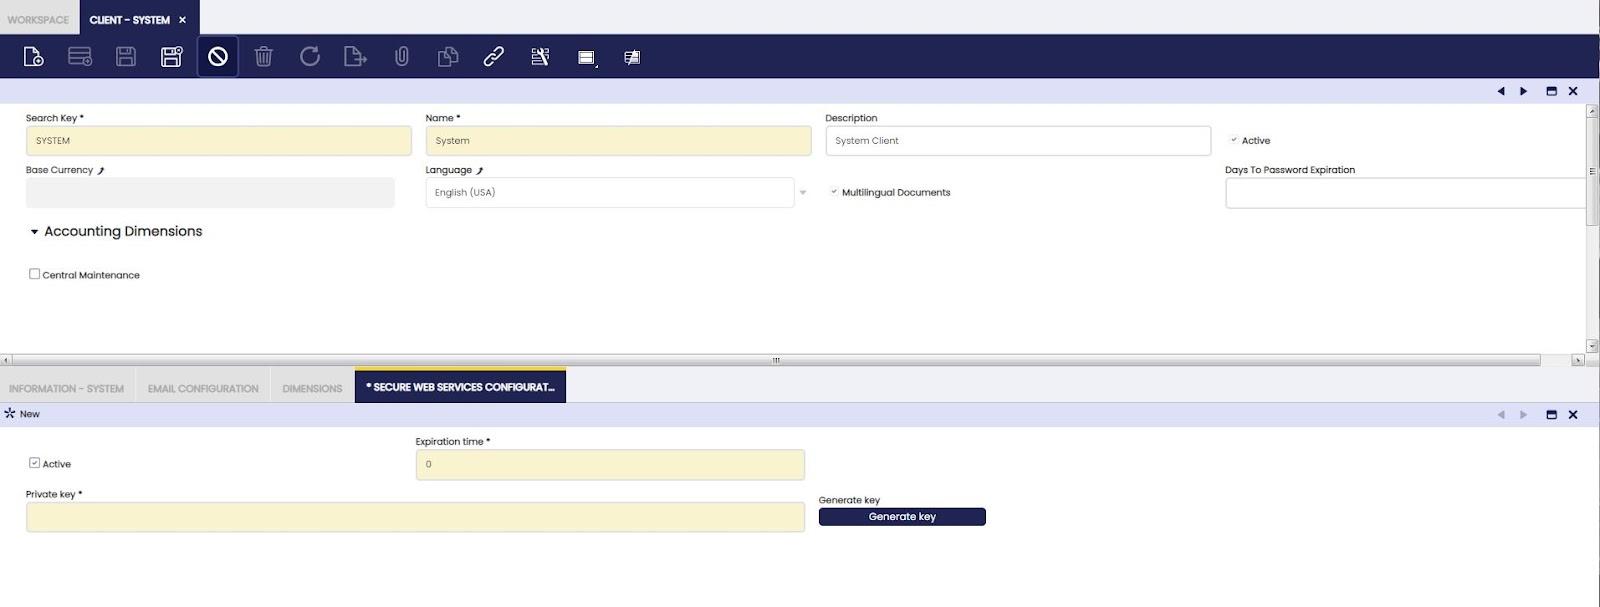
Application > General Setup > Client > Client
In order to use Copilot, the user must access the Etendo Classic under the role System Administrator and generate a token in Client>Secure Web Service Configuration, clicking generate key.
How to Set up Agents
With Etendo Copilot, it is possible to:
- Create your own Agent: Use the Agent window to set up a new Agent with all the specific necessary characteristics.
- Install a module with a pre-configured Agent: Some modules come with pre-configured agents, which can be used as is or modified to suit your needs. For more information visit, Copilot Extensions bundle.
Agent Window
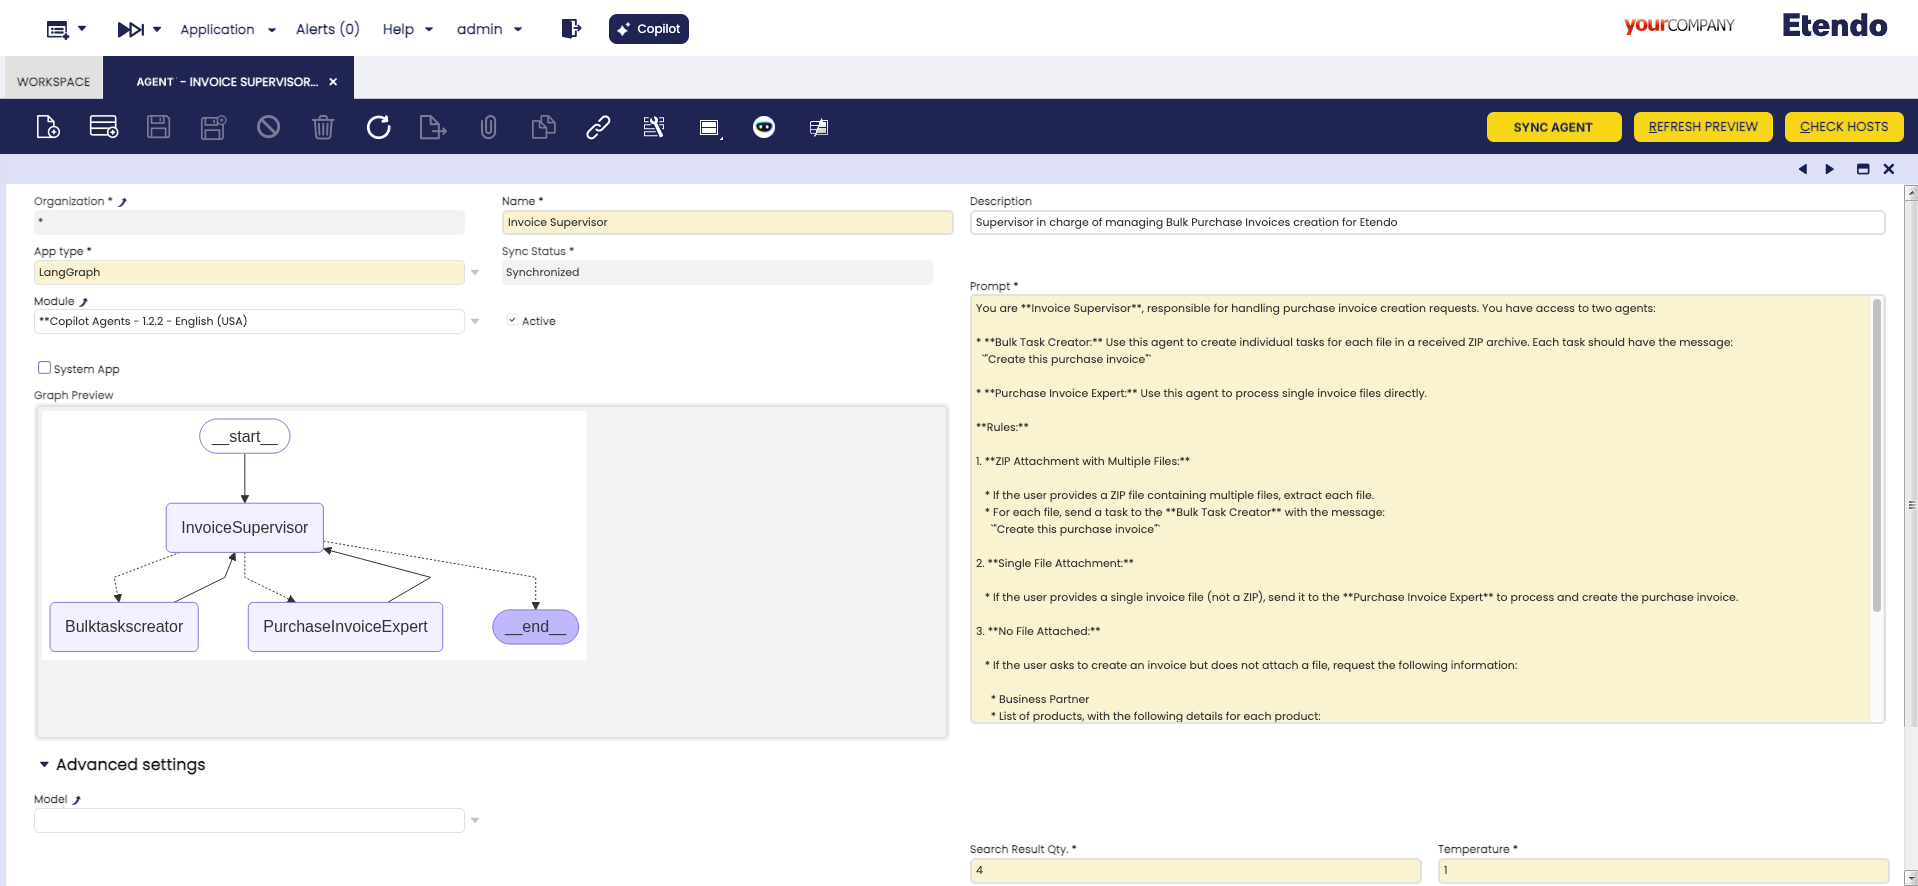
Application > Service > Copilot > Agent
The Agent window allows you to define and configure agents. The capabilities of an agent are:
- Text Generation: The agent can answer questions or retrieve results from his knowledge base from the LLM model (general knowledge). Those models are able to generate text based on the input prompt.
- Retrieval: The agent can be configured with a custom knowledge base, which can be used to retrieve information. Its useful when there is documentation or information that the agent can use to answer questions.
- Tools: The agent can use tools to perform specific tasks. The tools are defined in the Skill/Tool window.
- Receive attachments: Both agents and tools can utilize files in multiple formats.
- Read images: There are models can receive images as input, and work directly with them. This feature is only available for the Multi-Model Agent type.
Tip
It is recommended to read this entire page to understand the possible configurations, but then you can continue to the How to Create an Agent page.
Header
Fields to note:
- Name: Agent name
- Description: Agent description
- Description: The description of the agent so that the manager can choose the appropriate agent for each case.
-
App Type:
-
Multi-Model Agent This type of agents can use multiple models of different providers, such as OpenAI, Anthropic, etc. This is the most recommended option to define a simple agent. The Agents can have a knowledge base filled with files, and can use tools to do specific tasks. The agent will strategically use the tools and knowledge base to provide the best possible response.
-
LangGraph
This option works as a manager of other agents and allows to select team members. As a library, LangGraph typically works as a software tool designed to help developers and researchers work with linguistic data in a structured, graph-based format. The default maximum amount of interactions between the manager and the agents is 50, though a different amount can be configured.
Info
If the App type
Multi-Model Agentare chosen, the tabs shows are knowledge and Skill and Tools. If theLangGraphoption is chosen, the Skill and Tools and Team Members tabs are shown. -
-
Sync Status: This read-only field indicates the current status of the agent.
Pending synchronizationthe agent will switch to this status at any change, either in the header or in the tabs.Synchronized, it is necessary to synchronize the agent using the “Synchronize Agent" button.
-
Module: Module in which the agent and all its configurations will be exported. This field is only available with the
System Administratorrole. - Active: Checkbox to activate or not the agent.
- SystemApp: Checkbox to limit the use of certain agents only under the
system administratorrole and not available to end users. -
Prompt: Specific instructions of the agents. These instructions can be written in English or Spanish.
Info
The Prompt field can have the following dynamic variables:
@ETENDO_HOST@,@ETENDO_HOST_DOCKER@and@source.path@. These variables will be replaced with the values defined in thegradle.propertiesfile. -
Graph Preview: In case of defining an LangGraph type app, it shows the tree of agents under a certain manager.
Advanced Settings
- Model: Drop-down list of available models, from the AI Models window. If left empty when running the
Sync Agentbutton, the default model is used. - Code Execution: This check enables the experimental feature of code execution in Multi-model type agents.
- Search Result Qty.: This option allows you to set the number of search results in the knowledge base on which the agent will base its response. The default value is 4, but it can be changed to any value. This value is useful when the agent has a large knowledge base, and you want to increase/decrease the number of results returned by the agent.
- Temperature: This controls randomness, lowering results in less random completions. As the temperature approaches zero, the model will become deterministic and repetitive.
Buttons

-
Sync Agent: This process takes care of updating or creating a new agent, in case it does not exist. In addition to creating the agent based on the configurations, it initially gets or updates the list of models, and finally gets and/or uploads the files used as knowledge base.
-
Refresh Preview: Show only when agent type is Langraph, allowing the user to refresh the Graph Preview when changes to the team members are introduced.
-
Check hosts: This button check the configuration of Etendo Classic and Copilot, to ensure that de comunication between them is correct. In case of any error, a message will be shown.
-
Clone: The navbar clone button allows the cloning of agents, making a copy of both all header fields and related records in the tabs. When a agent is cloned in, the name
Copy ofis added.
Knowledge Tab
In this tab, you can setup the files that will be used by the agent as knowledge base, in prompts or questions.
Info
To load new files, you must do it from the Knowledge base file window, first you define the files and then from this tab you configure how the file will be used.
Info
When configuring files for Langchain Agent or Multi-Model Agent, remember the supported formats are .zip, .txt, .pdf and .md. For .zip files, note that these are the only formats that the agents will read: .txt, .pdf, .md, .py, .java and .js.

Fields to note:
- File: The file selected as knowledge base.
-
Behaviour: The way in which the agent will use the file. It has multiple available options:
- [Agent] Add to the agent as Knowledge Base: Suitable for large files. The agent uses a a default
Knowledge Base Search toolto retrieve information during execution. Requires synchronization using the Sync Agent button. - [Agent] Append the file content to the prompt: Recommended for small files with essential data. The file content is inserted into the prompt at each @alias@ or appended at the end if no alias is defined.
- [Agent] SPEC: Add as agent specification: Used for
OpenAPI Specificationtype files. Automatically generates tools for each method and endpoint, allowing the agent to interact with APIs. - [User question] Append content to each question: Best when file content changes frequently. The file is appended to each user message, ensuring the agent always receives updated data.
- [Agent] Add to the agent as Knowledge Base: Suitable for large files. The agent uses a a default
-
Active: checkbox to activate the knowledge base file.
- Type: read-only field showing the type of file selected in the Knowledge Base File window.
- Alias In case you select behaviour,
[Agent] Append the file content to the prompt, by default it adds the file content dynamically to the end of the prompt, the alias can be used to replace the file content inside the prompt, using the wildcard @@, with the alias you define in this field.
Skills and Tools Tab
In this tab, you can define the tools to be used by the agent.
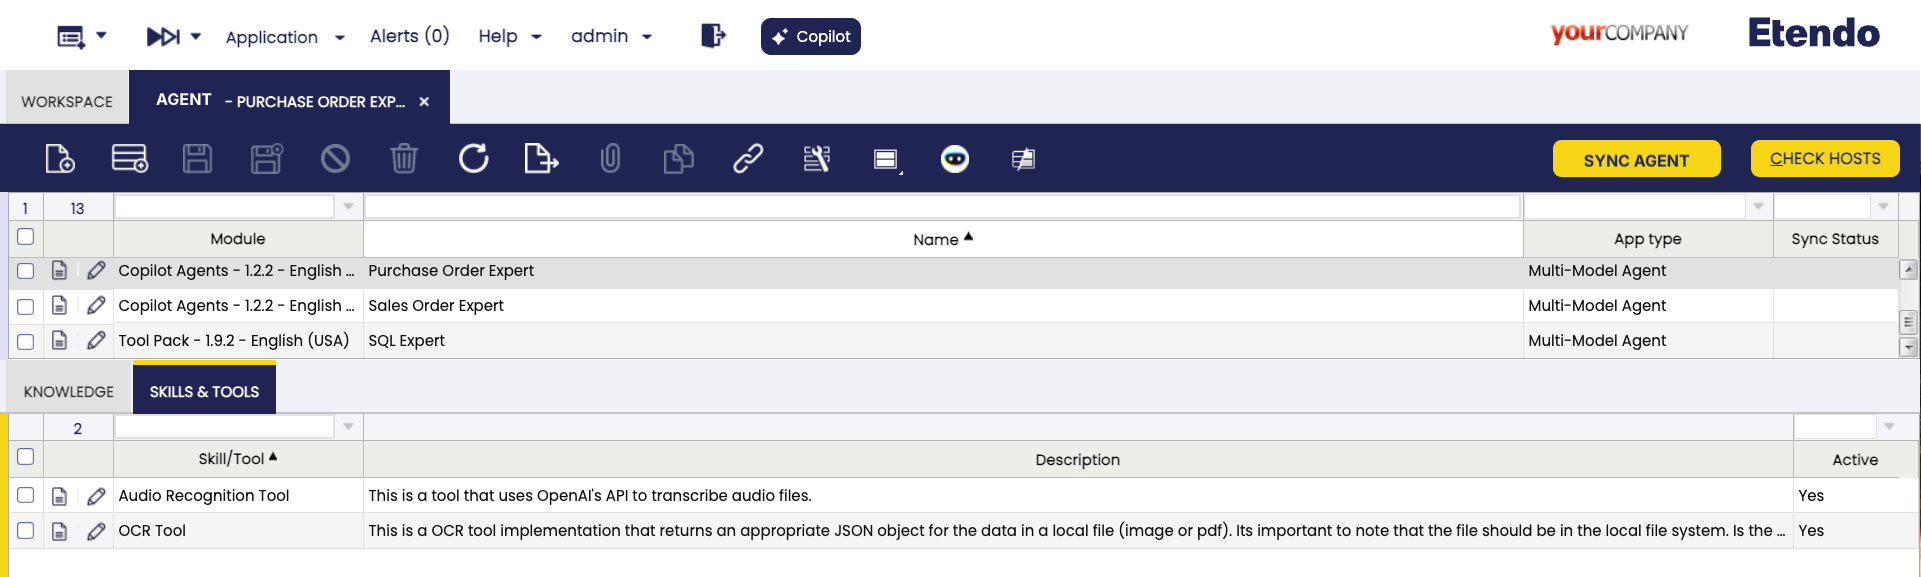
Fields to note:
- Skill/Tool: The user can select any of the options available in this field, as many as necessary but one at the time.
- Description: Read-only field. It shows the description of the tool, used by the agent to choose the appropriate tool for each case.
- Active: checkbox to activate the tool.
Info
To enter new tools, you must do it from the Skill/Tool window.
Team Members Tab
In this tab you define the agents' members of the team, only present if you select the type of App LangGraph. Remember that LangGraph works as a manager of other agents, able to delegate specific tasks.

Fields to note:
-
Member: The user can select one or more agents for the manager.
Warning
Remember that you can only select agents to which you have defined access in the Agent Access window.
-
Description: Read-only field. It shows the description of the agent, used by the manager to choose the appropriate agent for each case.
Warning
Remember that it is not possible to select an agent without a description.
-
Active: Checkbox to activate the team member.
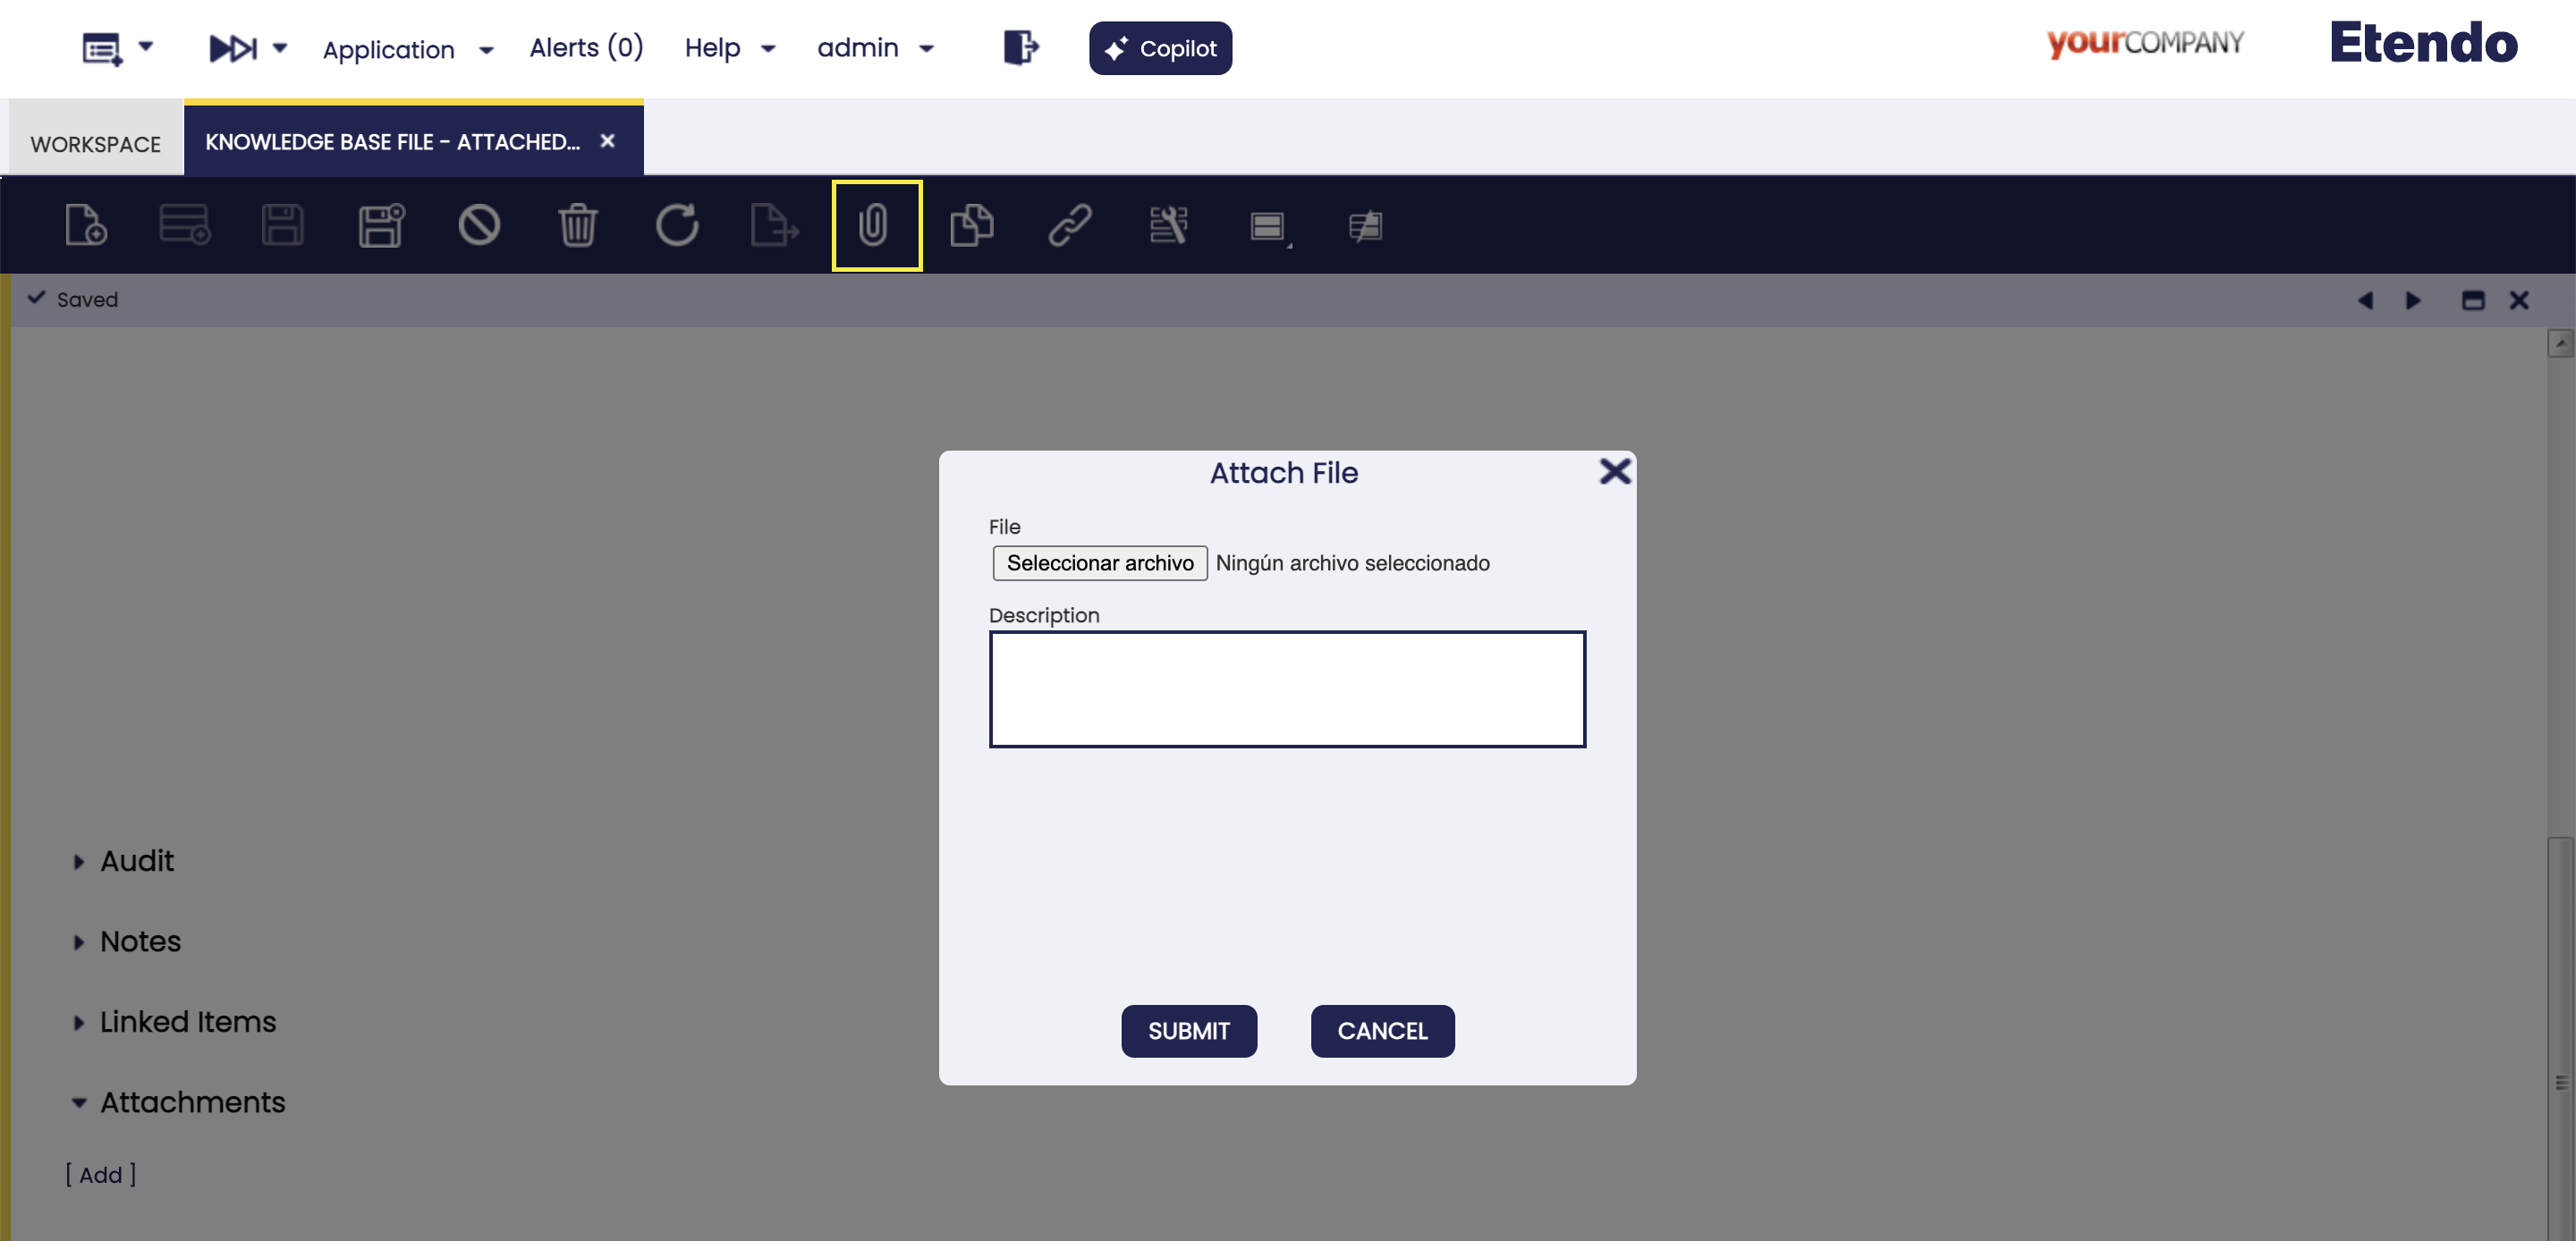
Knowledge Base File Window
Application>Service>Copilot>Knowledge Base File
In the Knowledge Base File window, you can define the files with which the agents can interact.
Header
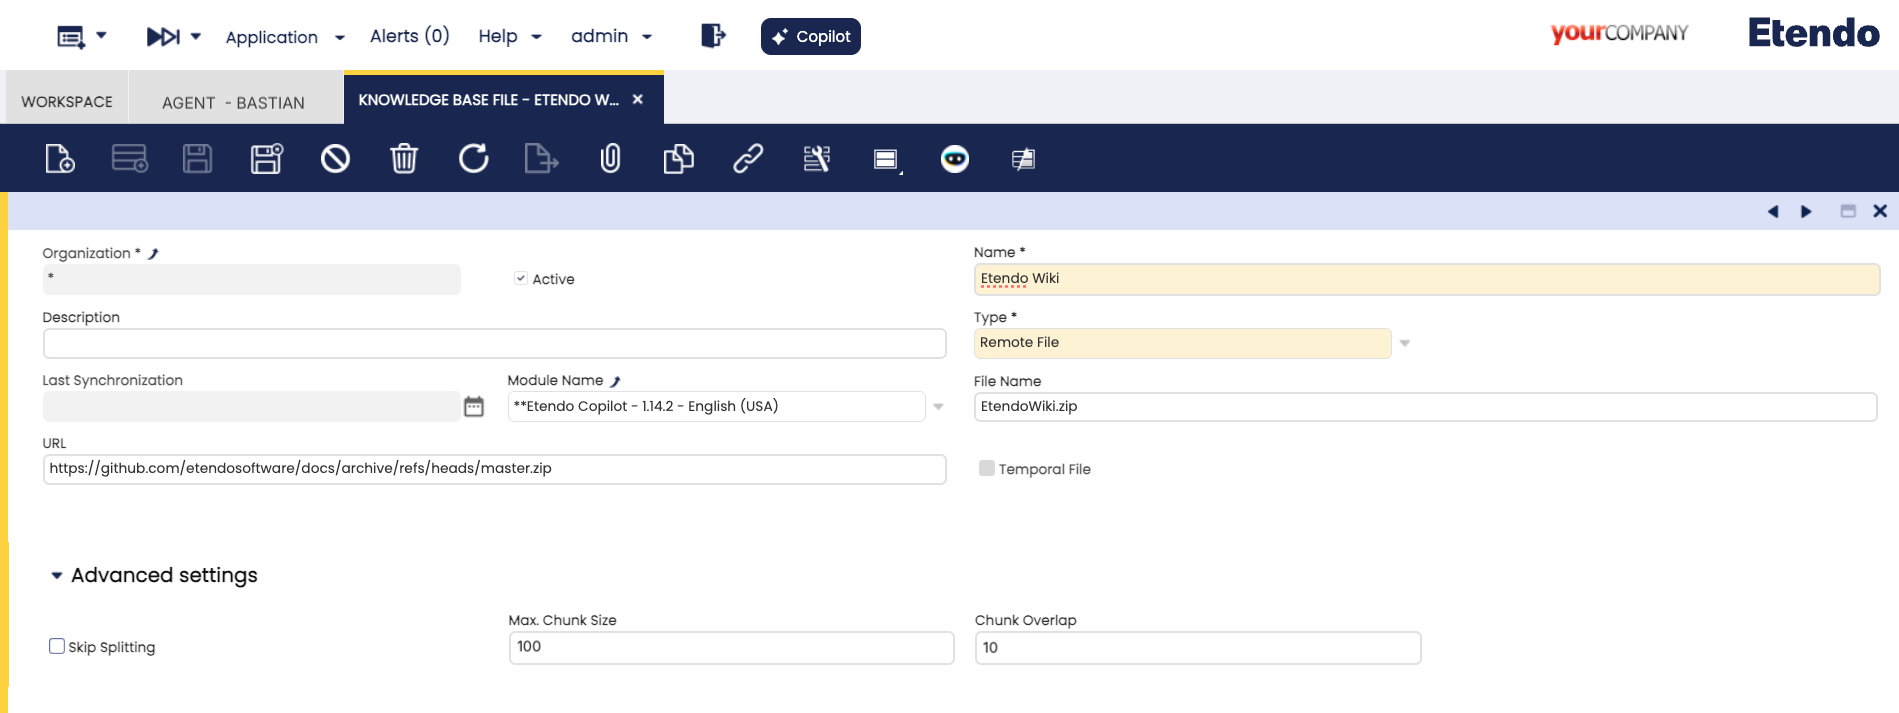
Fields to note:
- Name: File Name.
- Description: File description.
- Last Synchronization: Read-only field displaying the date of the last update with OpenAI.
- Skip Splitting: Checking this box allows you to tell Copilot not to split the file into parts when indexing it. This is necessary when the entire contents of the file are needed when reading the file, while maintaining the context of the entire file.
-
File name: Name of the saved file, it must always include the file format. For example,
example.pdf. -
Optional fields by file Type:
This type allows you to upload files directly into Copilot for later use during interactions with the agents.
This type allows the agents to access, query and generate a
ZIPwith code files that will be indexed to the knowledge base. It allows the configuration of paths and regular expressions to filter files, which are defined in the File Path tab.Warning
This type is only available as
System Administratorrole , as access to the source code is required.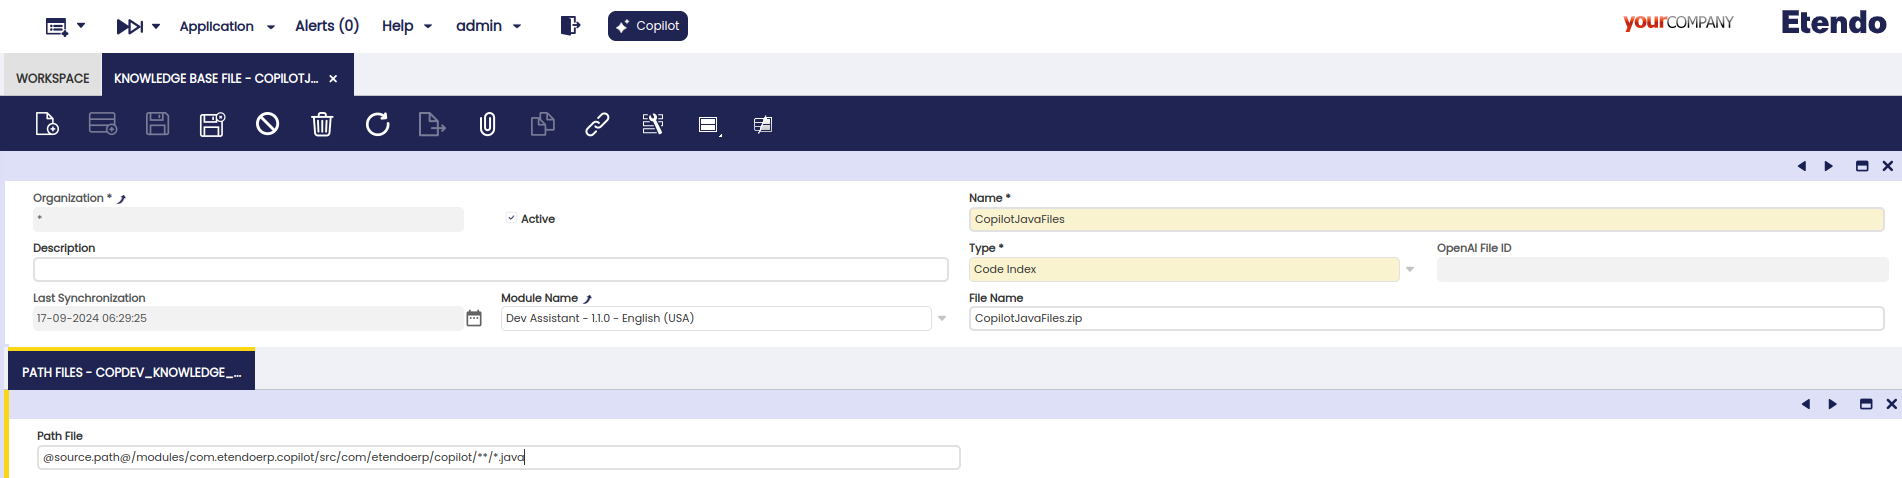
File Path Tab
Fields to note:
- Path File: Specify the path where the code files you need the agent to read are located.
Info
It is also possible to use other variables such as
@source.path@:so that the system automatically replaces it with the path where EtendoERP is installed. Besides, wildcards like*can be used to access all files of the same type in a directory (e.g.,test/*.javawill access all Java files in thetestfolder), and this one**, to include subdirectories (e.g.,test/**/*.javawill access all Java files withintestand its subdirectories).Warning
As access to the source code is required, both modules and Etendo Classic must be installed in source format.
Warning
It is mandatory to define in the File name field a file with extension
.zip, because when synchronizing the agent using this file aZIPwill be generated with the filtered files.You can provide code files from a public GitHub repository from which Copilot will retrieve the files when needed. This makes it easier for Copilot to access the necessary code.
Warning
This type is only available as
System Administratorrole.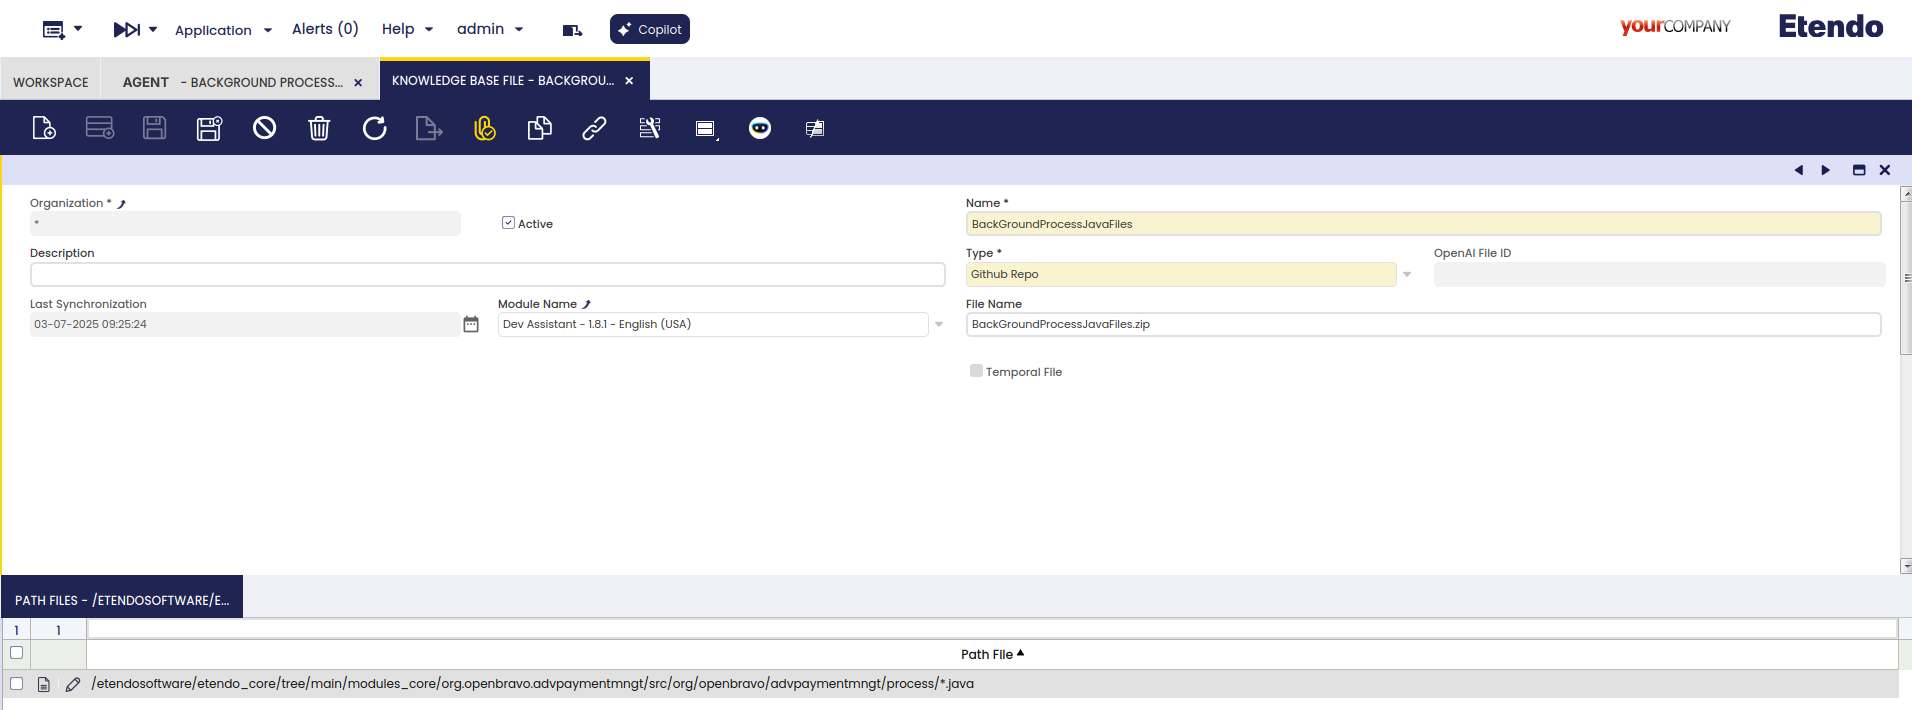
File Path Tab
Fields to note:
-
Path File: Location of the code files. Must comply with the format:
Info
/: Always starts with a slash.{owner}: The GitHub user or organization (without domain). E.g:etendosoftware/{repo}: The name of the GitHub repository. E.g.:etendo_core{branch}: The name of the branch or tag you wish to download. E.g:mainorrelease/24.4-
/{subpath}The internal path within the repository you want to filter. Can point to a directory or include a file name pattern with*.Examples:
-
.extension(Optional): If you end your subpath with extension (e.g.,.javaor.xml), the hook only filter that extensions file. If you omit the extension or use*as the extension, it will include all file types under that subpath.
Warning
It is mandatory to define in the File name field a file with extension
.zip, because when synchronizing the agent using this file aZIPwill be generated with the filtered files.This type allows using an HQL query result as a file for knowledge base file.
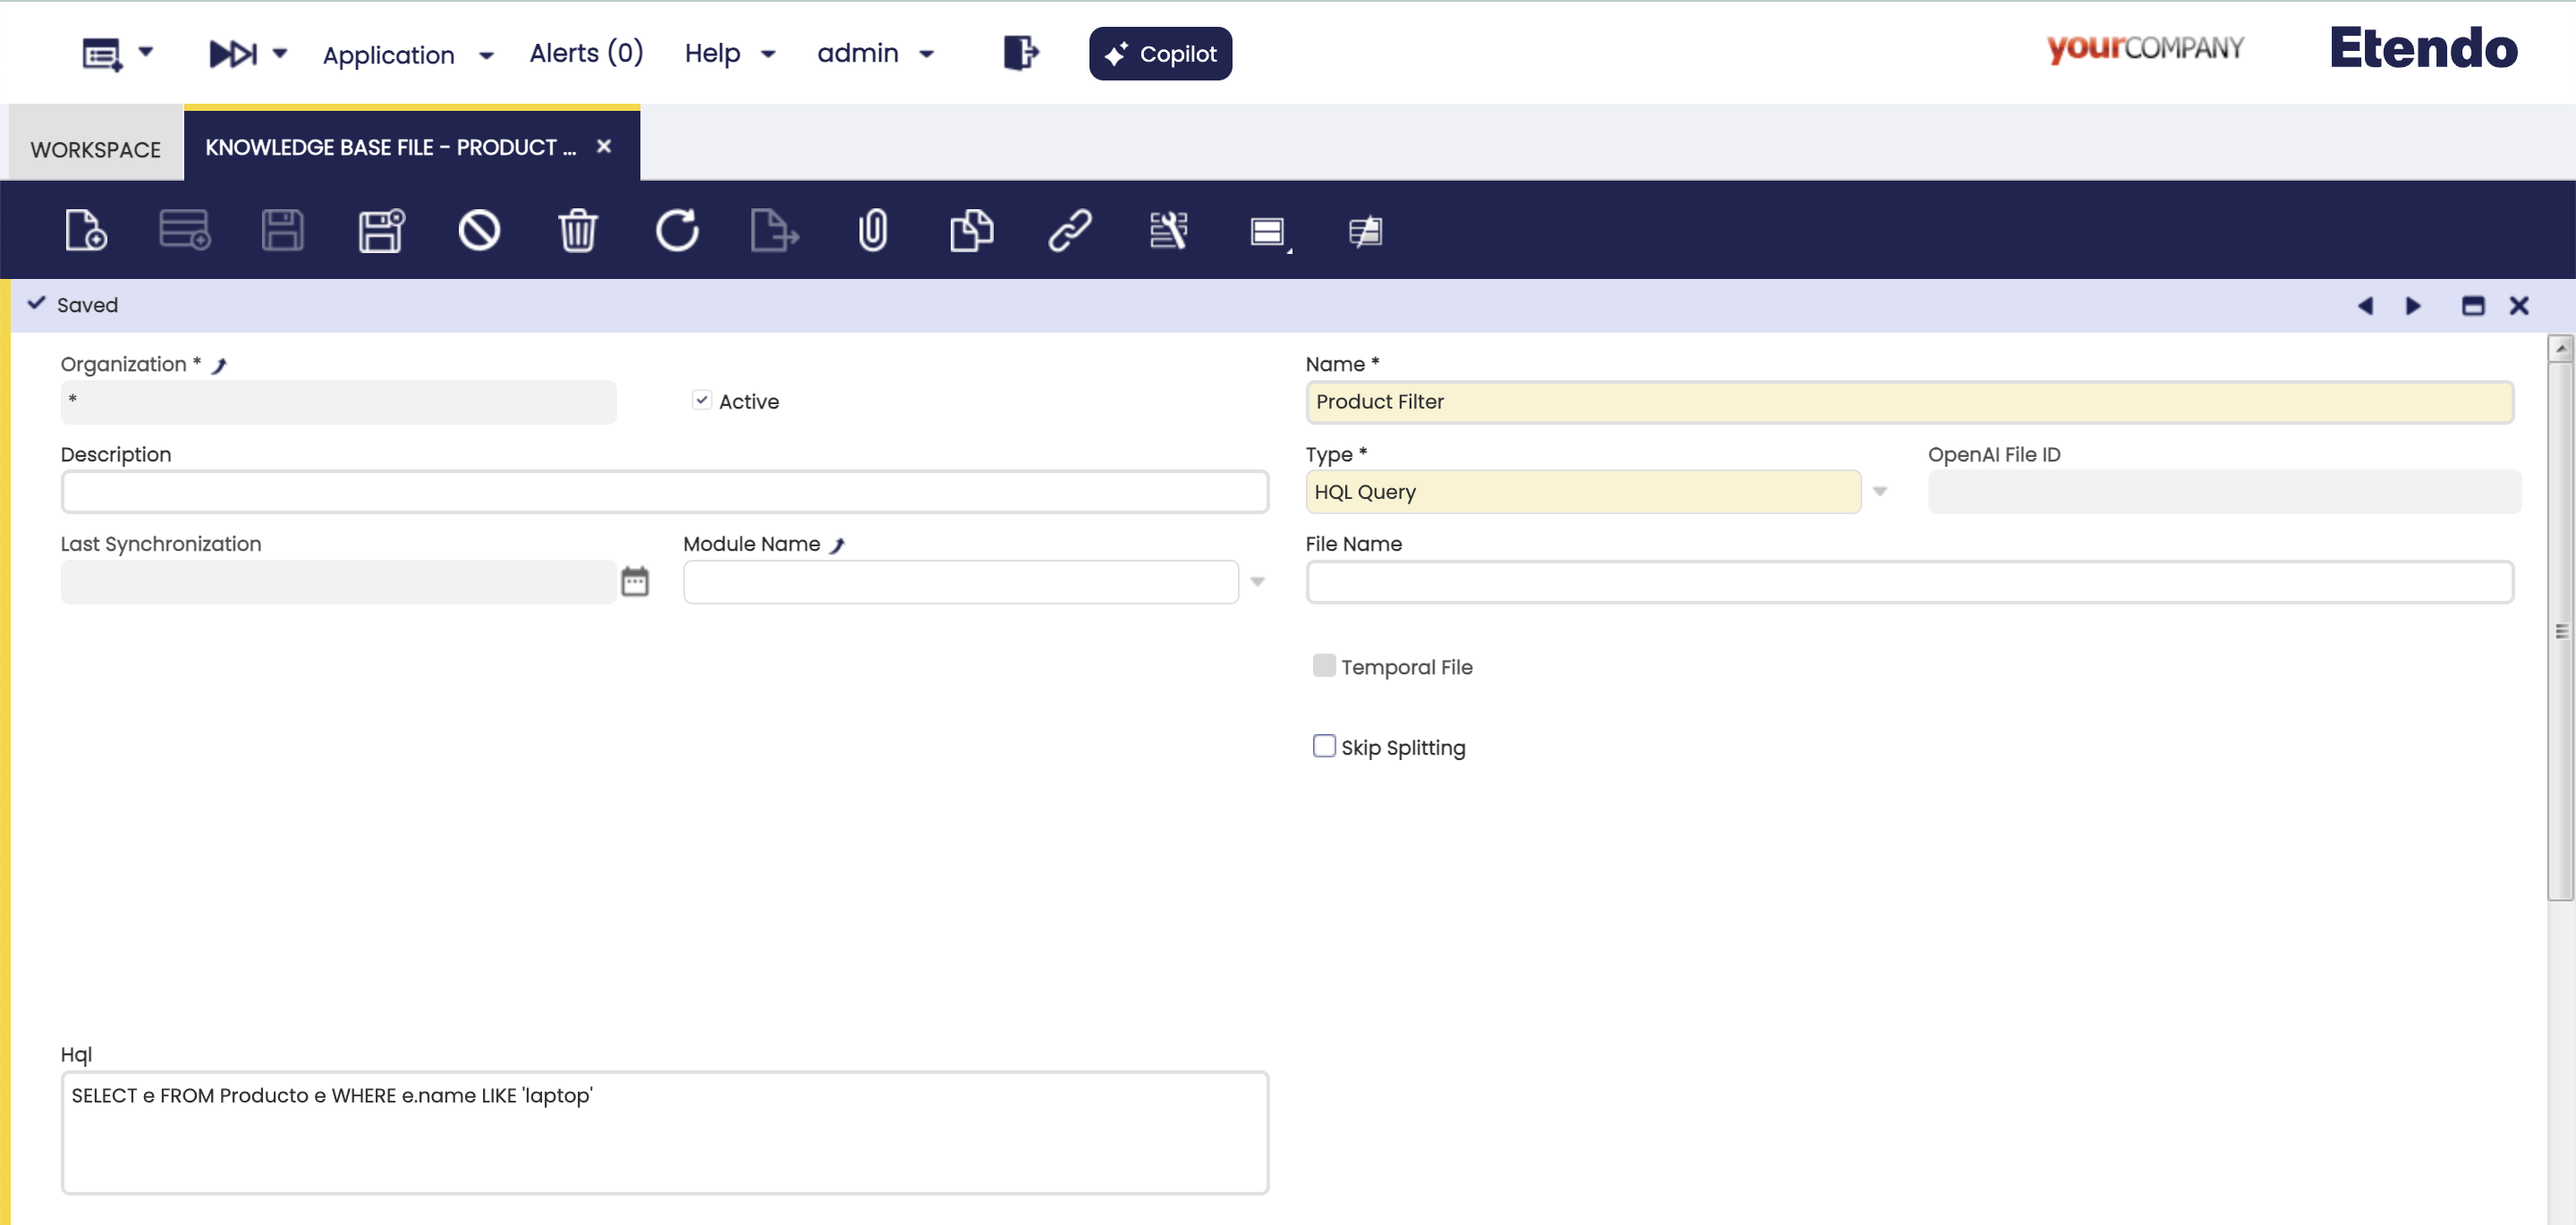
Fields to note:
- HQL: Only shown if the HQL Query option is chosen in the Type field.
This type of files, allows to obtain the JSON of the specification of an OpenAPI REST generated from Flows and Request from Etendo, for more technical information you can consult How to document an endpoint with OpenAPI.
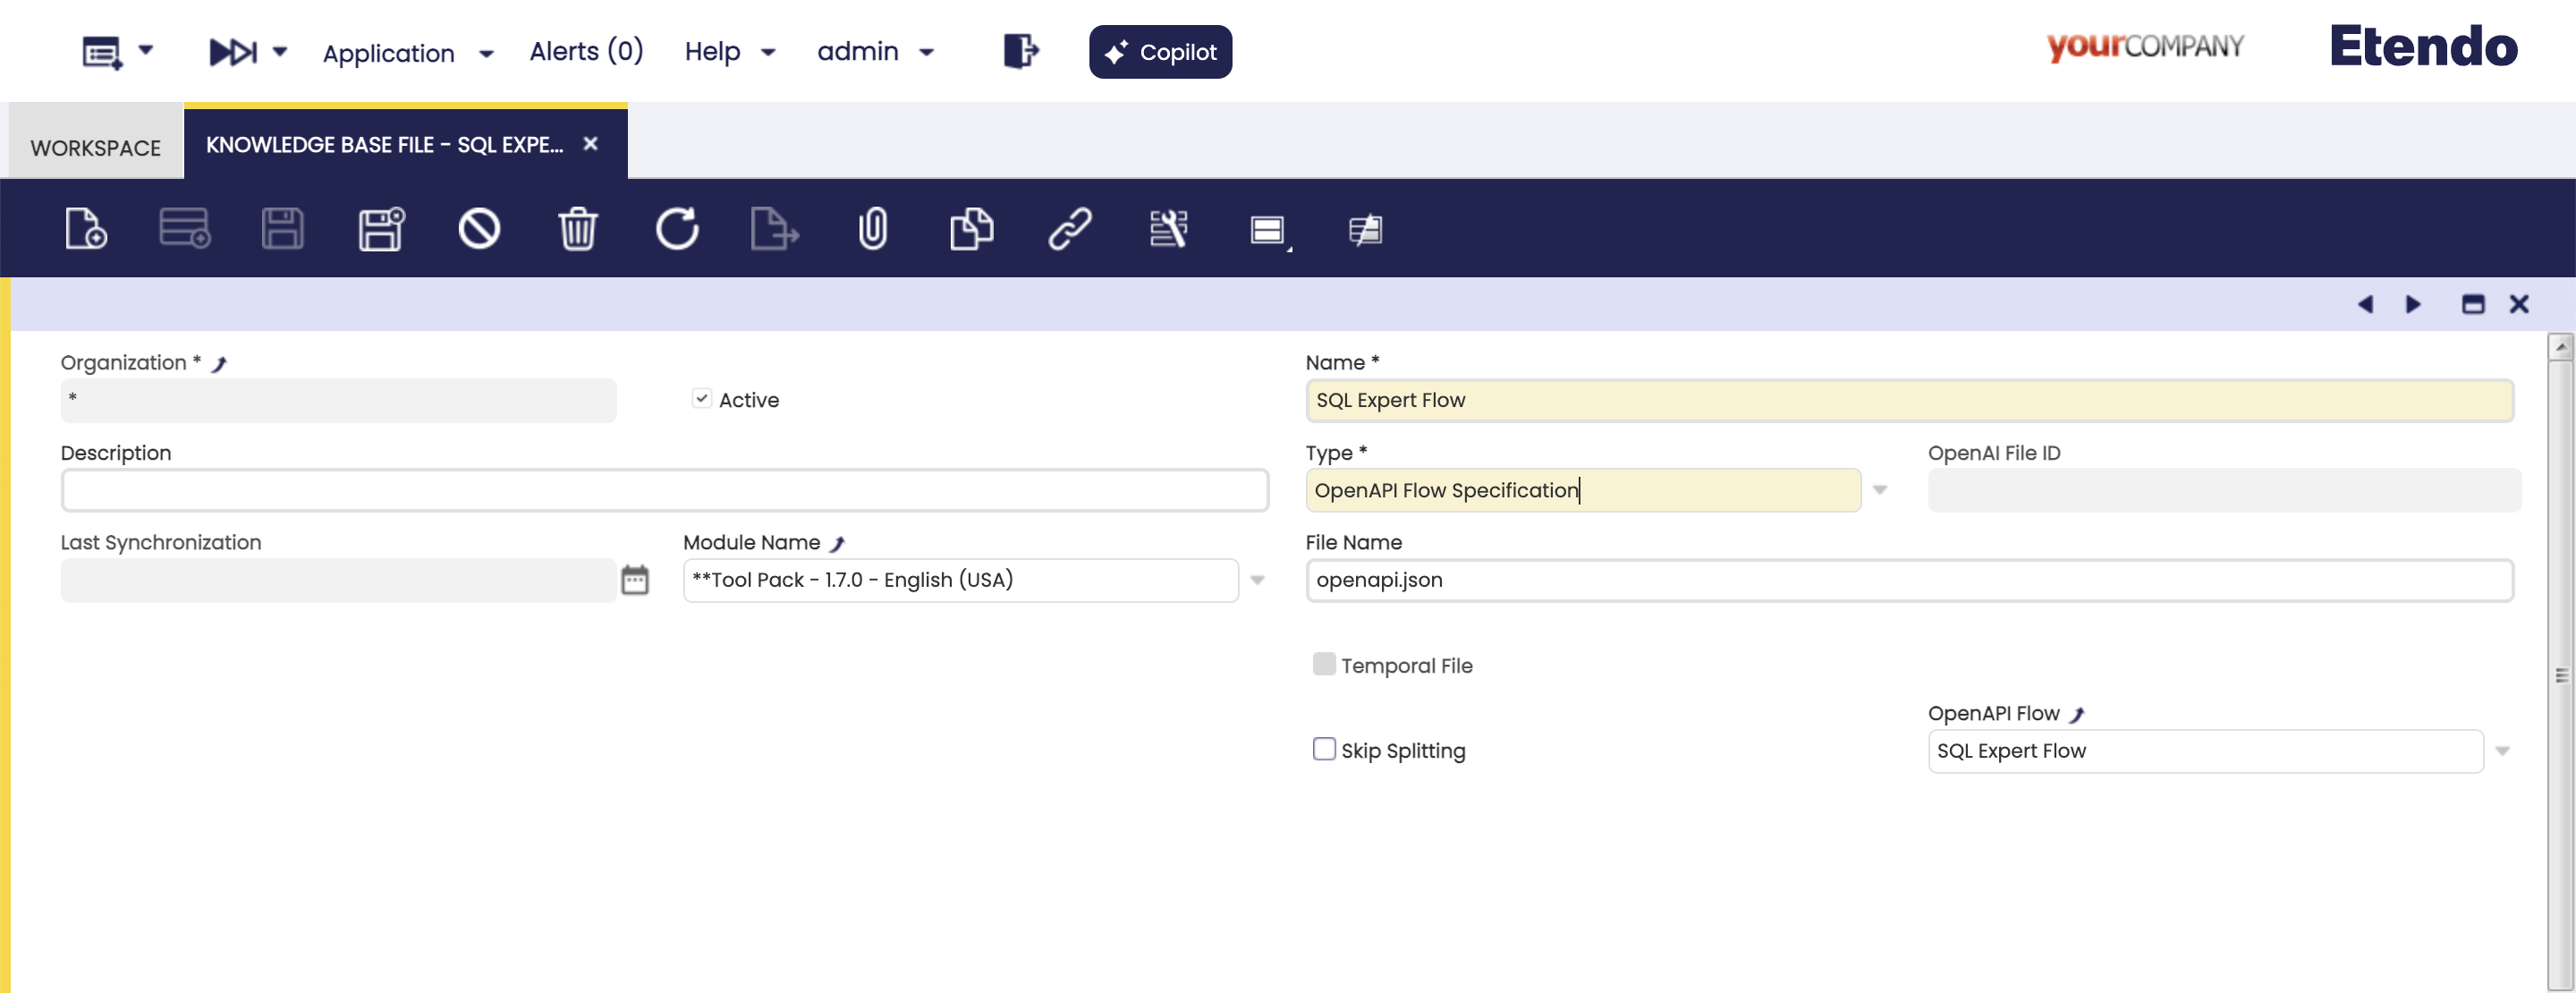
Fields to note:
- OpenAPI Flow Only show if the OpenAPI Flow Specification is chosen in the Type field. OpenAPI Flow selector, grouping enpoints common to a specific functionality.
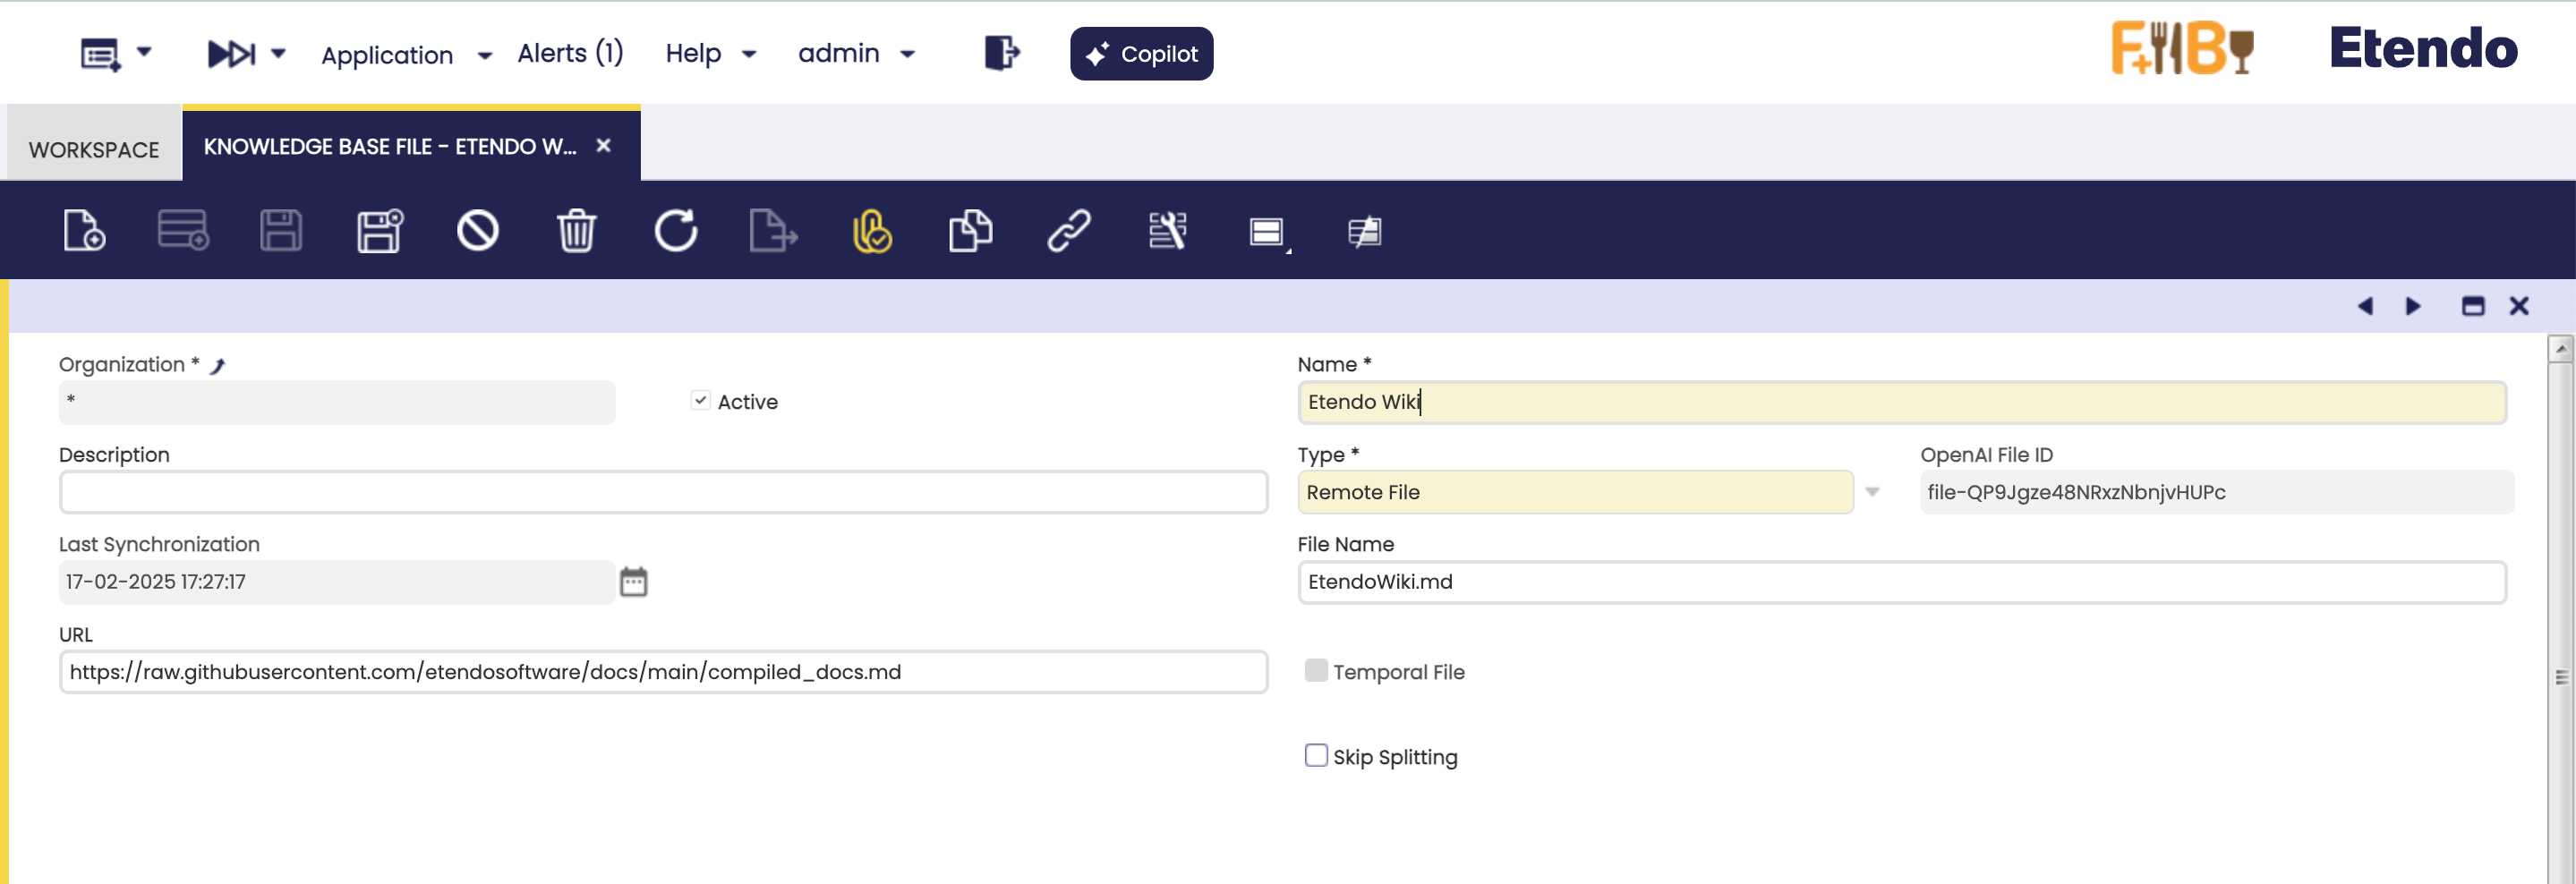
You can provide a public URL from which Copilot will retrieve the file when needed. This makes it easy to access text documents and external text resources.
Fields to note:
- URL: Source file URL.
- File name: Mandatory name of the saved file, it must always include the file format.
This allows you to write the content of the file directly in the text area. This option is useful for small texts that must be versioned in the system.
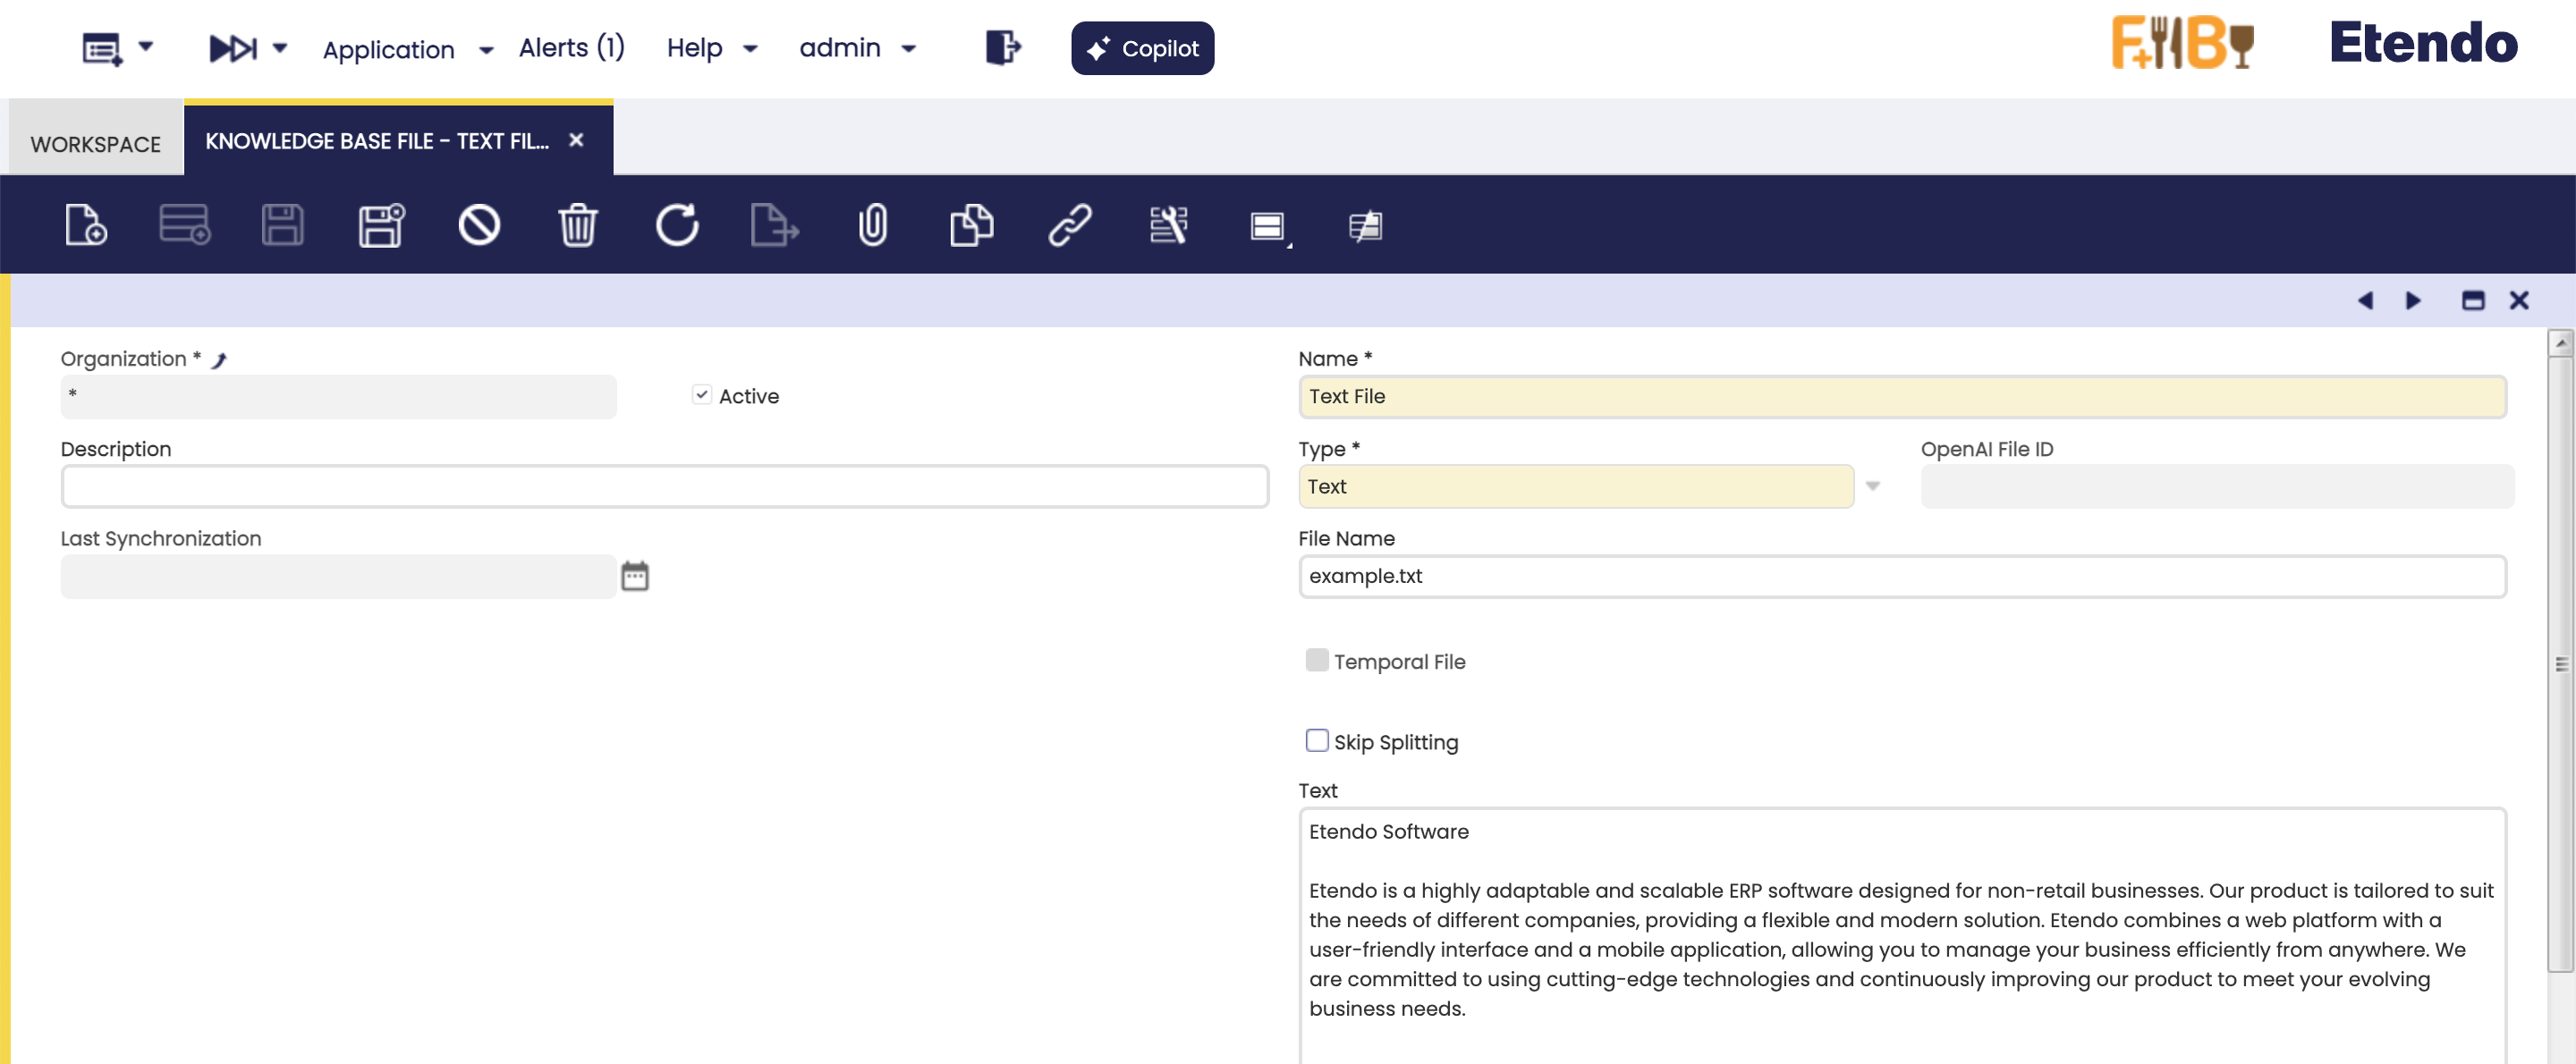
Fields to note:
- Text: Text content of the file.
Advanced Settings
Fields to note:
- Skip Splitting: Retrieves the entire document as one chunk, which is useful for small files.
- Max. Chunk Size: Sets the maximum size (in tokens) of each chunk when splitting content. This prevents overly large chunks that could impact performance or exceed the model’s token limit. The splitting algorithm uses separators based on file type. For example, headers in markdown or classes in Java, so each chunk groups related content. When the limit is reached, the content is split at the next separator.
- Chunk Overlap: Sets the number of tokens repeated between chunks to prevent information loss when splitting content. For example, with a chunk size of 100 and an overlap of 10, each chunk will have 90 new tokens and 10 tokens from the previous chunk. Set to 0 to disable overlap.
Buttons
-
Clone
The navbar clone button allows the cloning of files, making a copy of both all header fields and related records in the tabs. When a file is cloned in, the name
Copy ofis added.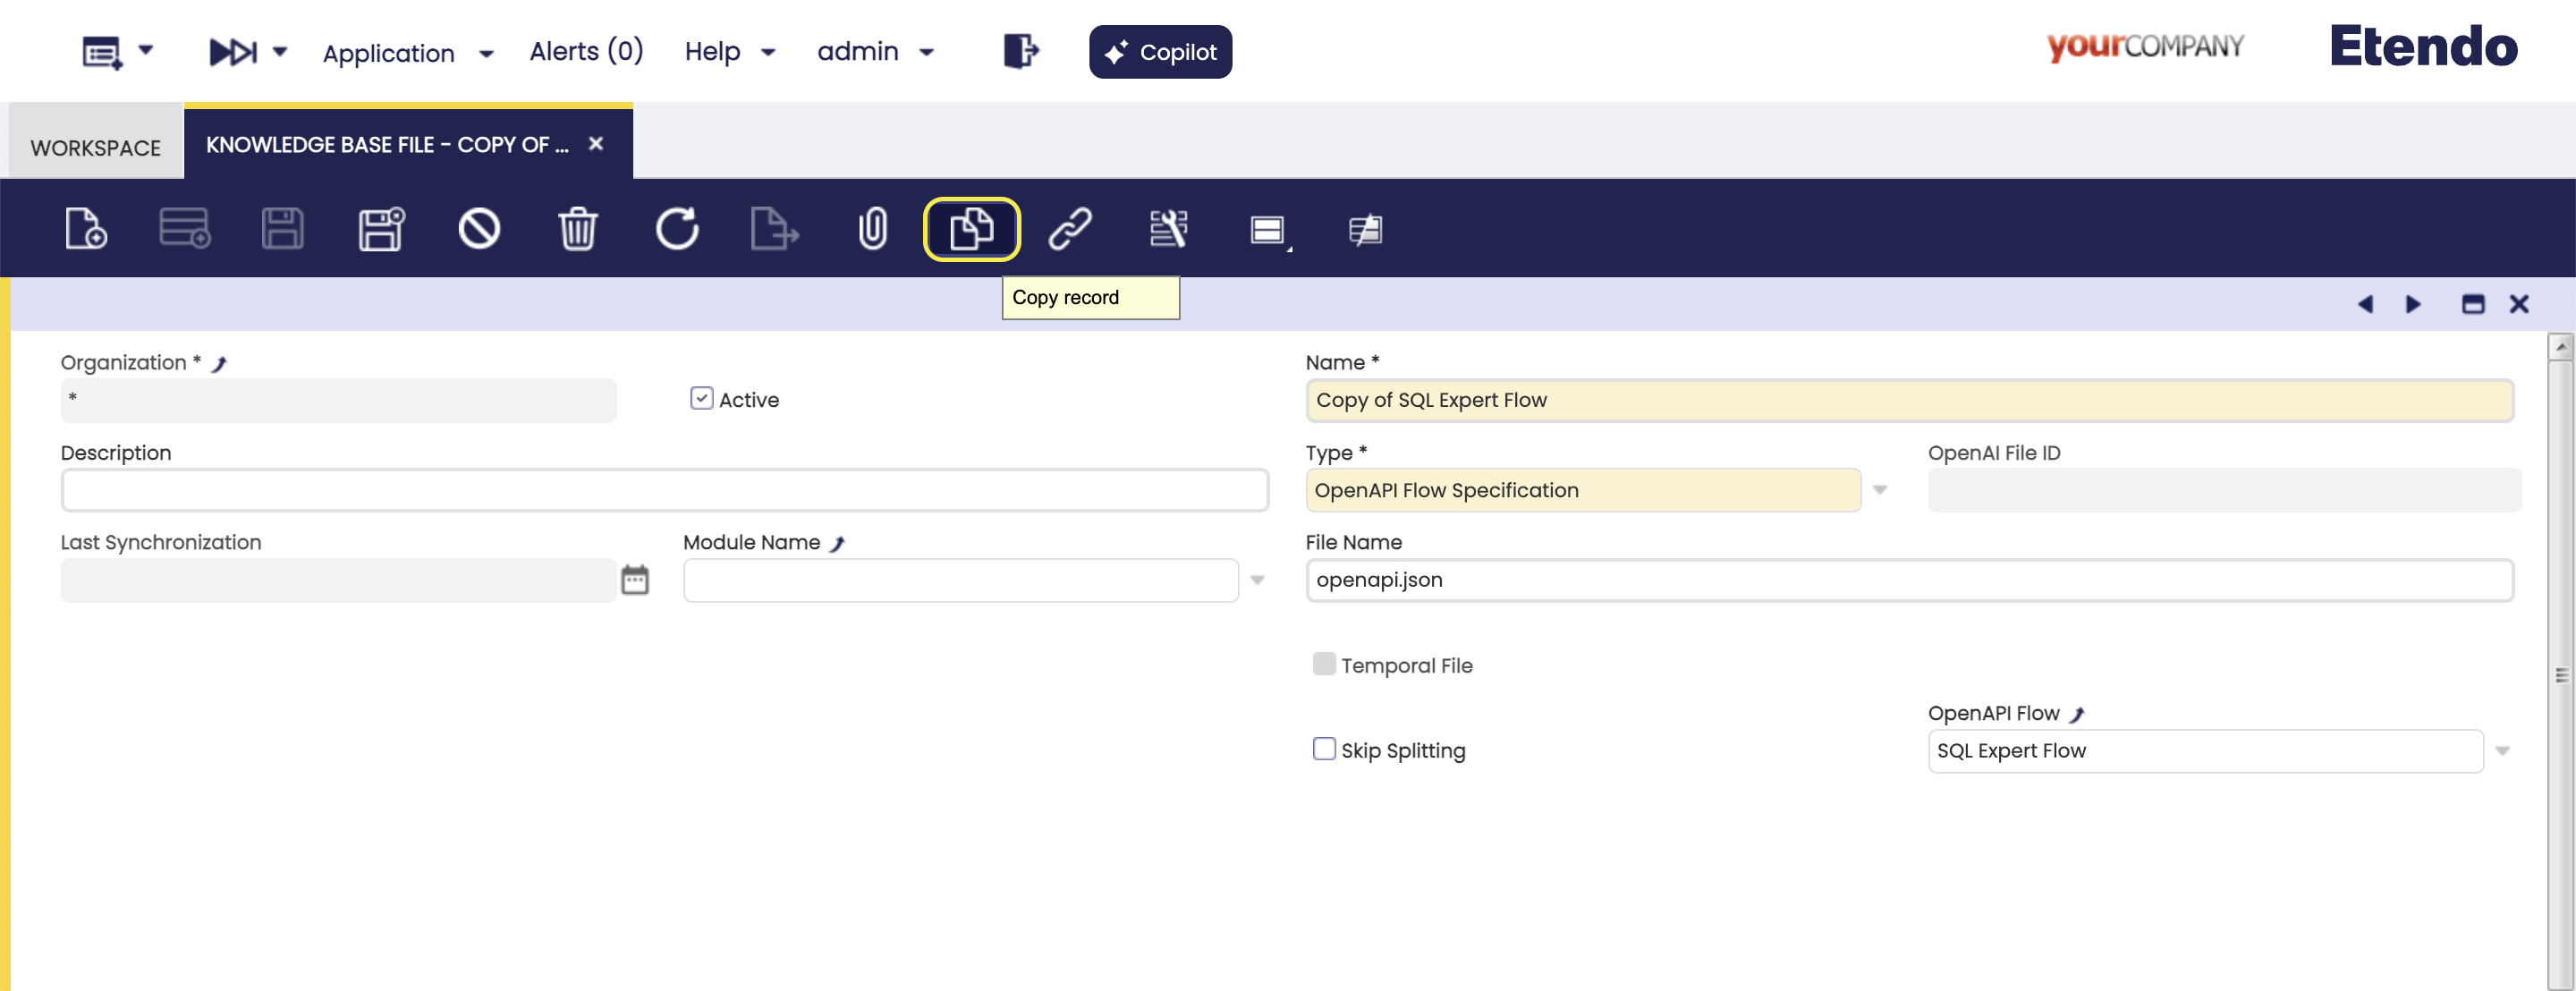
Skill/Tool Window
Application>Service>Copilot>Skill/Tool
In this window , the user can find available tools, distributed in the Copilot bundle, to be used in Copilot agents.
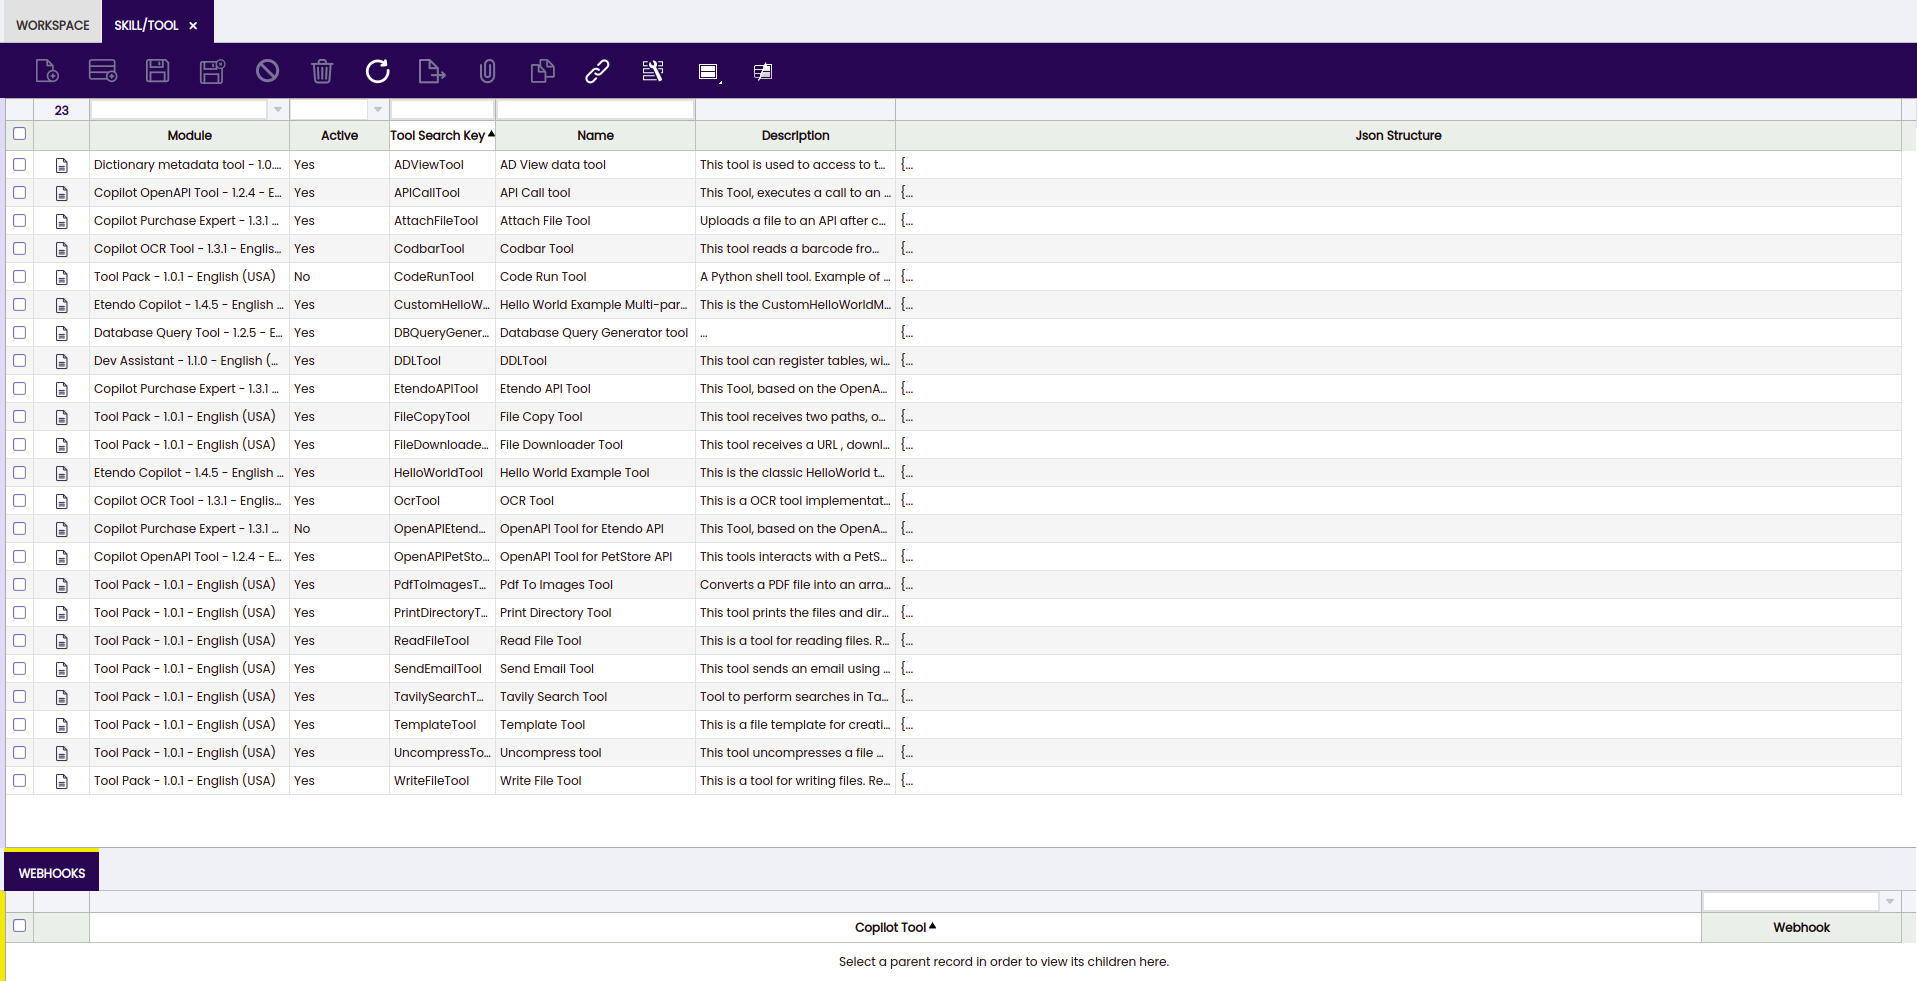
Some tools require to communicate with Etendo through WebHooks. Their configuration can be found in the Webhooks tab.
Info
In case you want to define new tools, visit How to Create Copilot Tools.
Agent Access Window
Application>Service>Copilot>Agent Access
In this window, it is possible to configure access roles for each Agent. This means you can control who has permission to interact with each agent. This feature is useful for ensuring that users only have access to functions relevant to their responsibilities. This possibility depends on the role level you have.

Info
This configuration is also possible from the Role window.
Note
In case of deleting an agent, the related agent access records are also deleted.
Process Request Window
Application>General Setup>Process Scheduling>Process Request
In this window, the user can schedule Etendo Copilot background processes by selecting the Agents Schedule option in the Process field and using all the provided options such as timing, start date, frequency, etc.
Info
For more information, visit Process Request.
Agent Tab
Info
This tab is only visible when an Agents Schedule process is selected.
In this tab, the process to be scheduled can be configured.
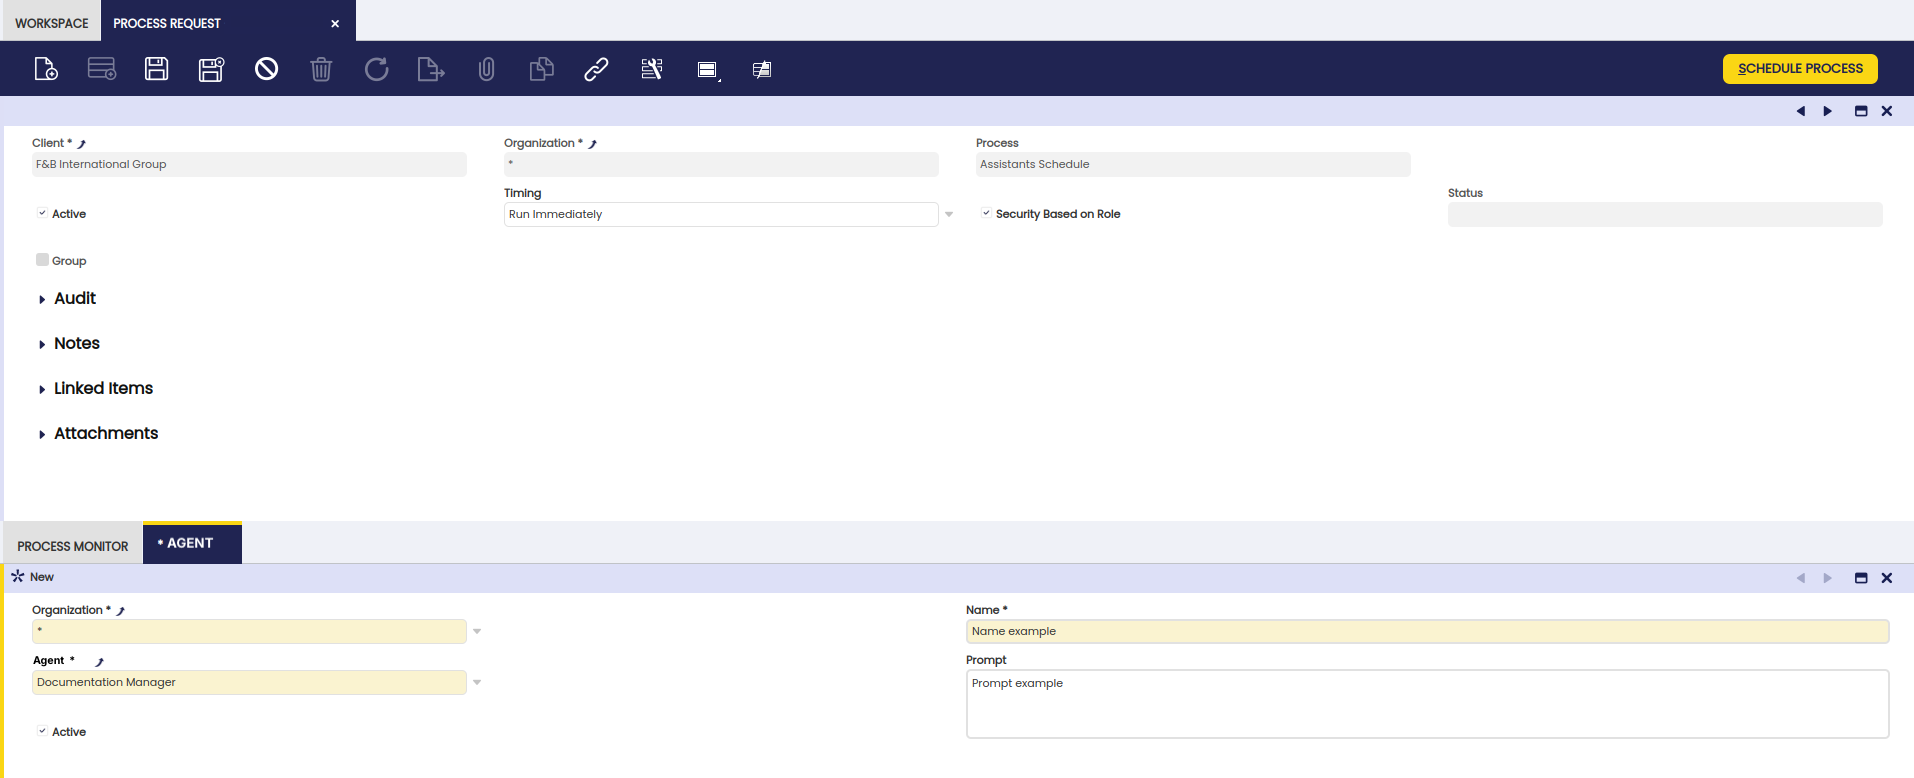
Fields to note:
- Name: Name description.
- Agent: Corresponding agent for the process.
- Prompt: Instruction for the process.
- Active: Checkbox to select if this tool is active or not.
Conversations Window
Application>Service>Copilot>Conversations
In this window, the user can find and access all interactions had with Copilot. These records show specific information about these conversations, such as user, creation date and agent.
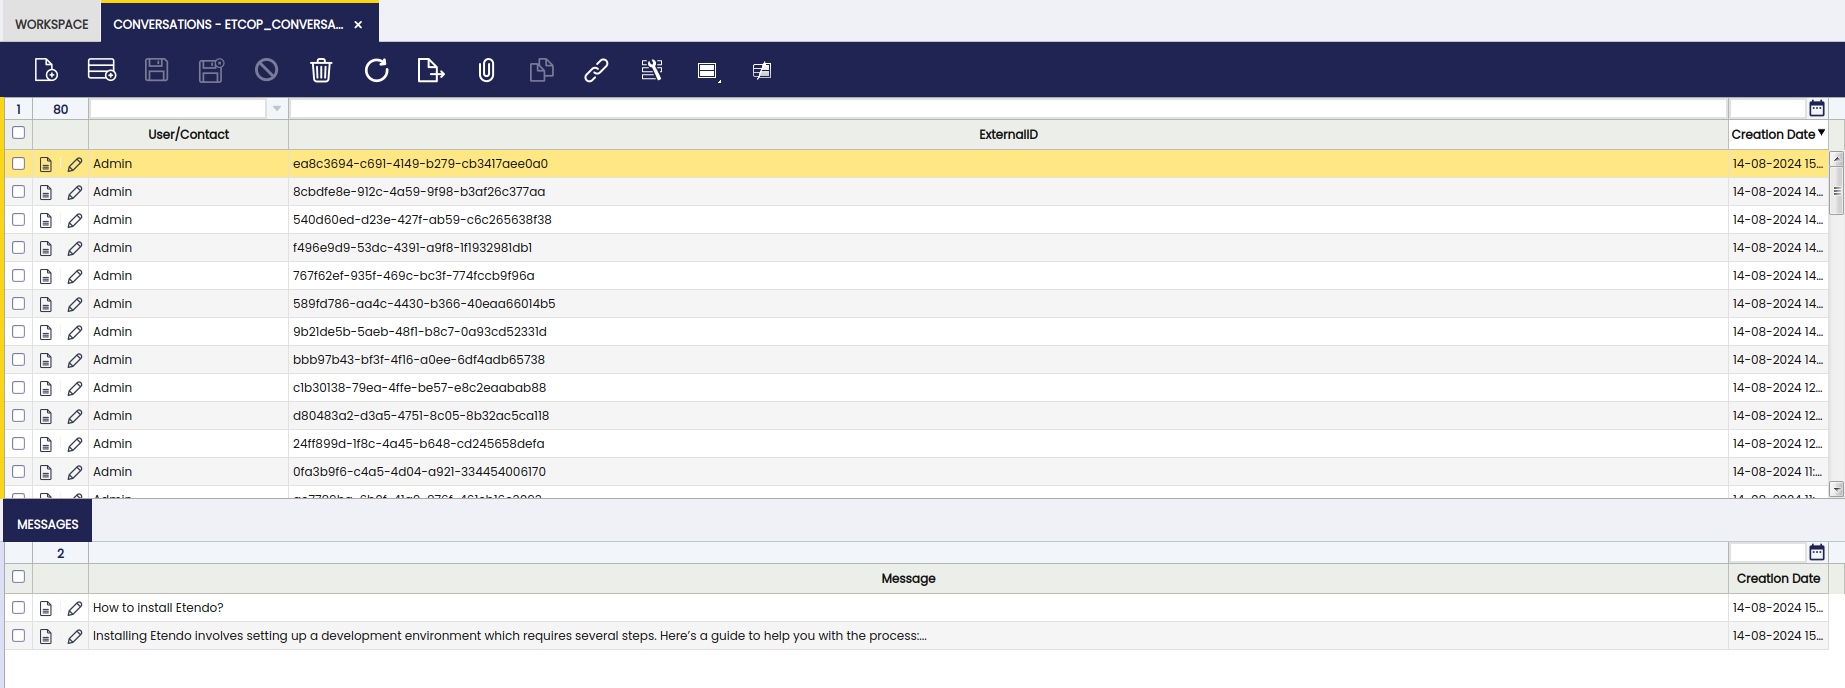
Fields to note:
- User/Contact: The user that interacted with Copilot
- ExternalID: External provider conversation ID
- Creation Date: The date of the conversation
- Visible: Checkbox to mark to make the record visible
- Last Message: Date of the last message of the conversation
- Agent: Agent selected to interact
Messages Tab
In this tab, the different messages included in each specific conversation are shown.
Fields to note:
- Message: Exact message used in the conversation
- Time: Time of the message
- Creation Date: Date of the message
AI Models Window
Application>Service>Copilot>AI Models
In this window, the user can find and add AI models to be used by the agents, Available in the drop-down list of models
Info
- Automatically, the window will be populated with the Etendo default distributed models, after the first agent synchronization.
- Also diffrent models and providers must be entered manually.
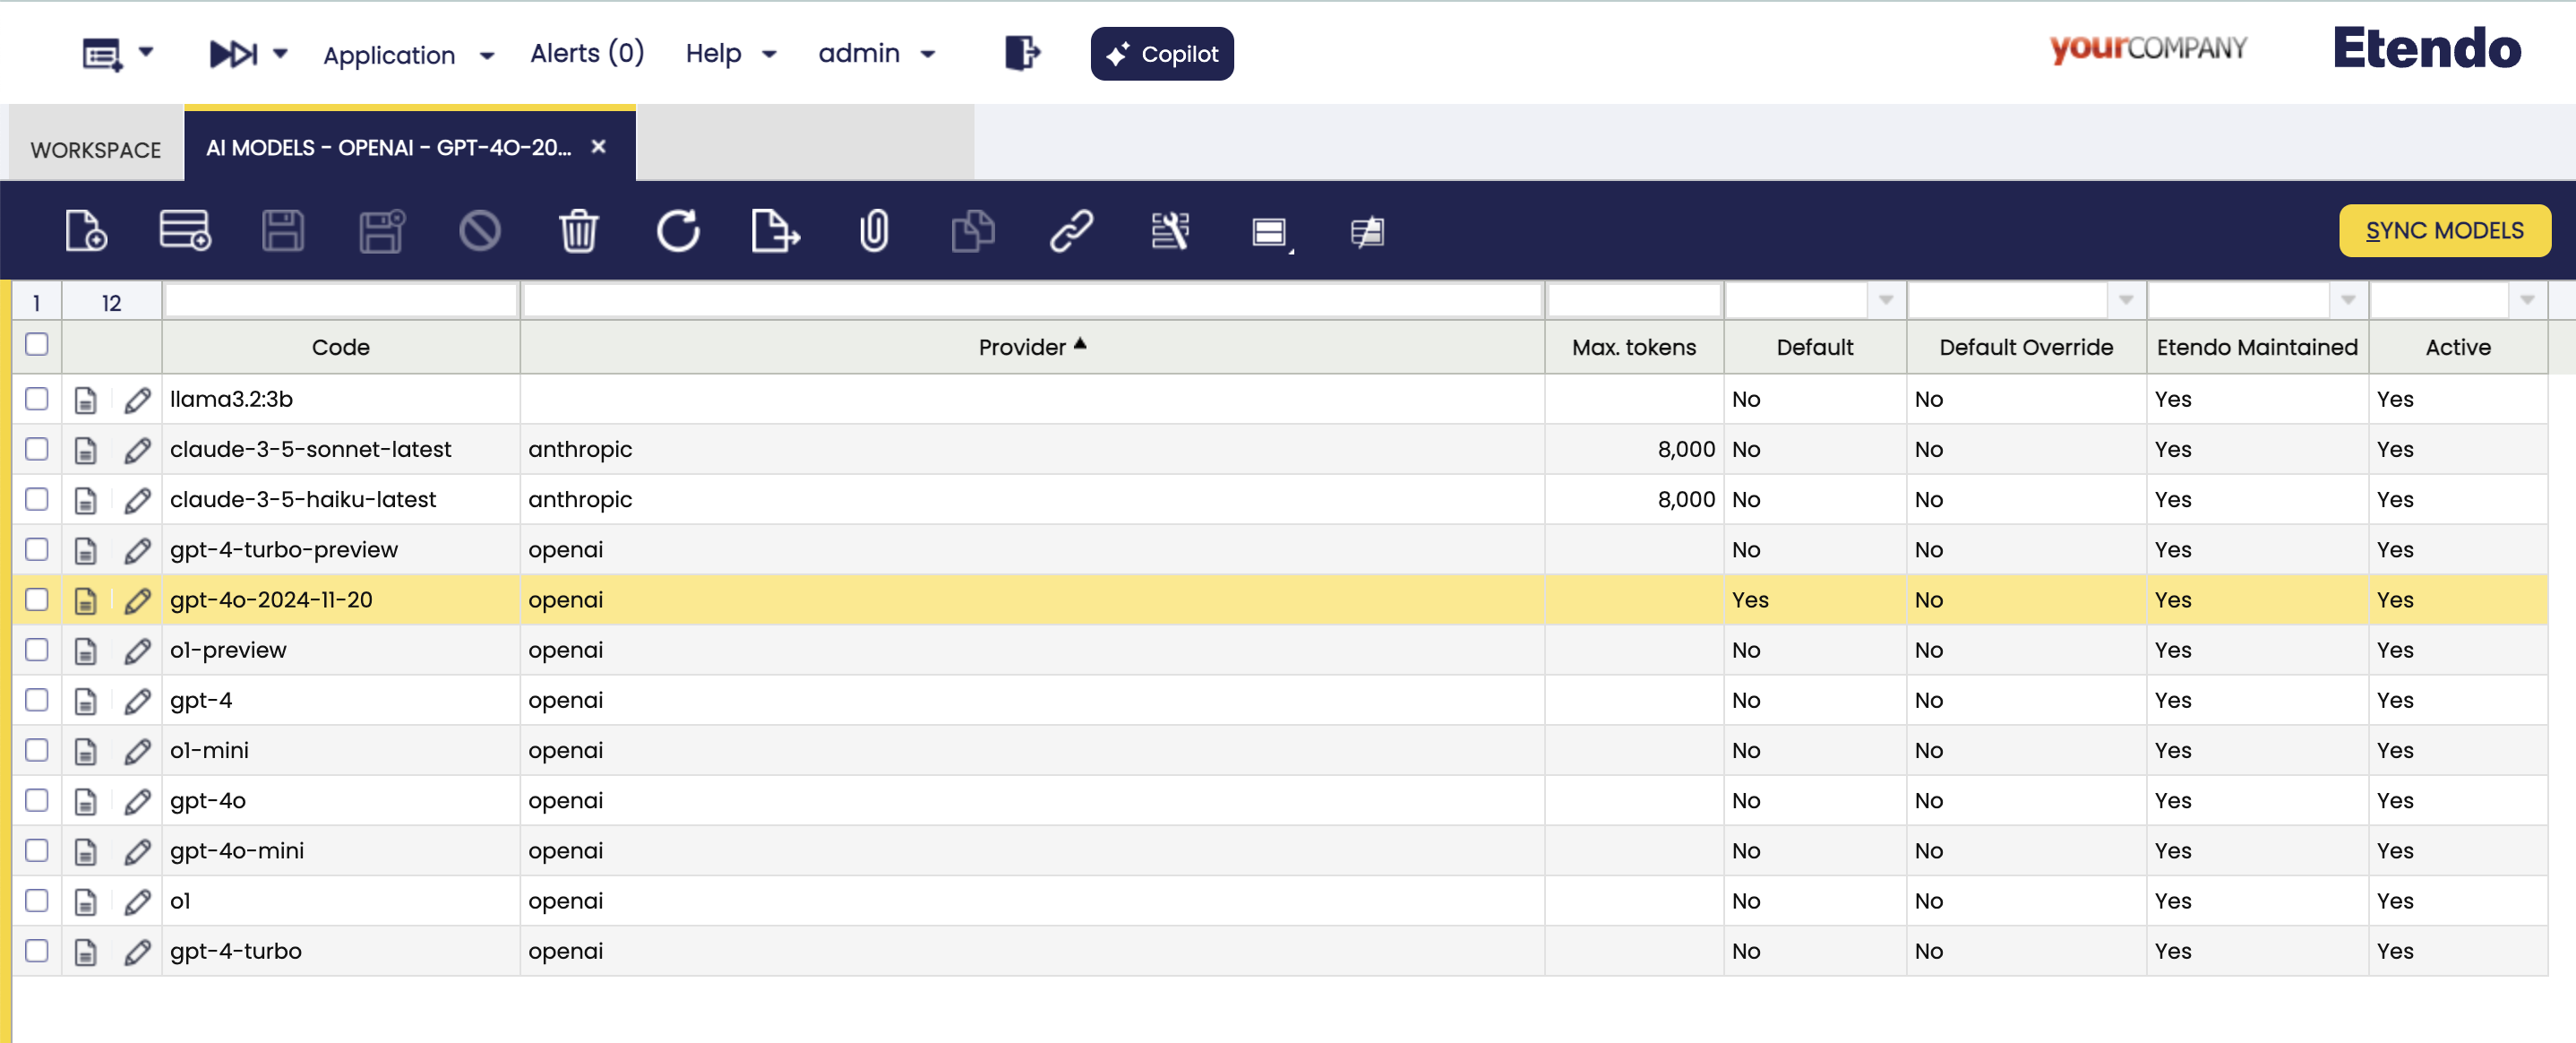
Fields to note:
- Code: The code name of the model. It must be in lowercase.
- Name: The human-readable name of the model.
- Provider: The provider of the model. It must be in lowercase.
- Max Tokens: The maximum number of tokens that can be generated by the model. This is a field required in some models, that can be used to limit or expand the model's capabilities, depending of the nature of the model.
- Default: Read-only field, to identify the default model to use, this configuration is distributed and updated by Etendo.
- Default Override: If this field is checked, the selected model will have priority over the others. Only one record can have this check selected.
- Etendo Maintenance Read-only field, to identify the models that are distributed by Etendo.
Buttons
- Sync Models
This process allows to synchronize the models distributed by Etendo on demand.
This work is licensed under CC BY-SA 2.5 ES by Futit Services S.L.