Master Data
Overview
This section describes the Master Data Management process. One of the steps to take while setting up Etendo is to define the master data to be used across other Etendo application areas.
Master Data Management helps to organize and centralize in a single repository the key data of the organization.
Having a single repository of data avoids data duplication, provides a unique way of data coding and is a key aspect for guaranteeing the coherence and tracking of business processes of any type.
Info
Master data creation is one part of the overall Business Setup flow in Etendo and, as any other setup, it is required prior to entering transactions.
Business Partner General View
Application > Master Data Management > Business Partner General View
Info
To be able to include this functionality, the Advanced Business Partner module of the Essentials Bundle must be installed. To do that, follow the instructions from the marketplace: Advanced Business Partner. For more information about the available versions, core compatibility and new features, visit Essentials Extensions - Release notes.
The “Advanced Business Partner” module allows the user to have a general view of business partners information and to assign sequence numbers to business partners.
Info
For more information, visit Advanced Business Partner in the Essentials Extensions Bundle Documentation.
Currency Converters
Application > Master Data Management > Currency Converters
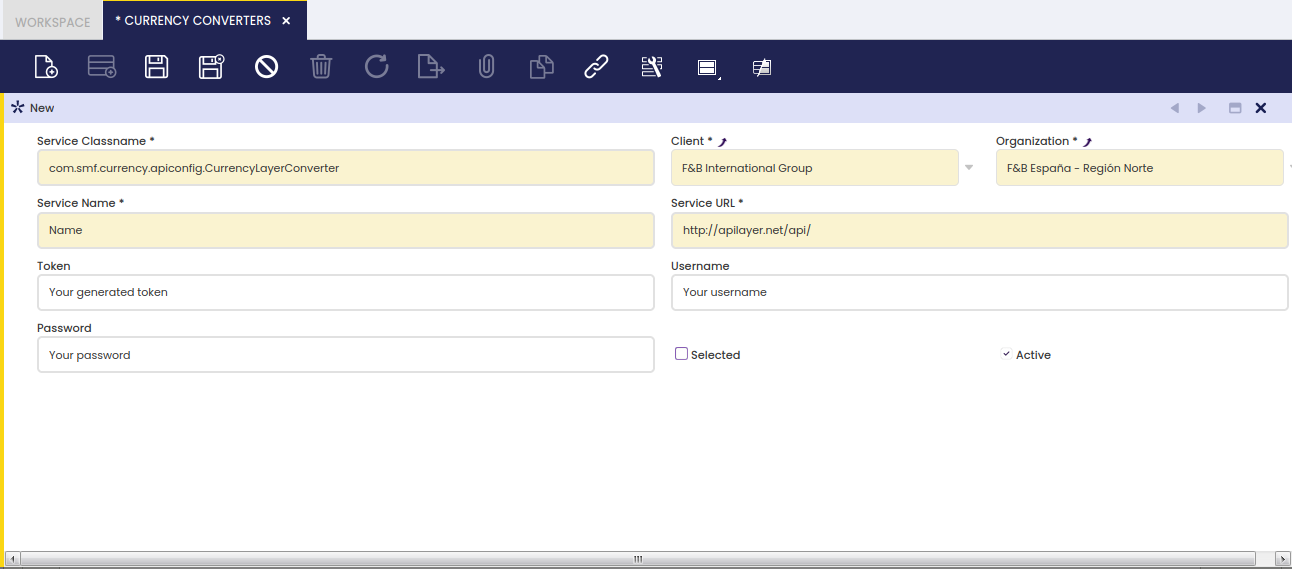
In the Currency Converters window, the necessary Apilayer data has to be configured with the following information:
- Classname: com.smf.currency.apiconfig.CurrencyLayerConverter
- URL: http://apilayer.net/api/
- Token
- User
- Password
Business Partner
Application > Master Data Management > Business Partner
Overview
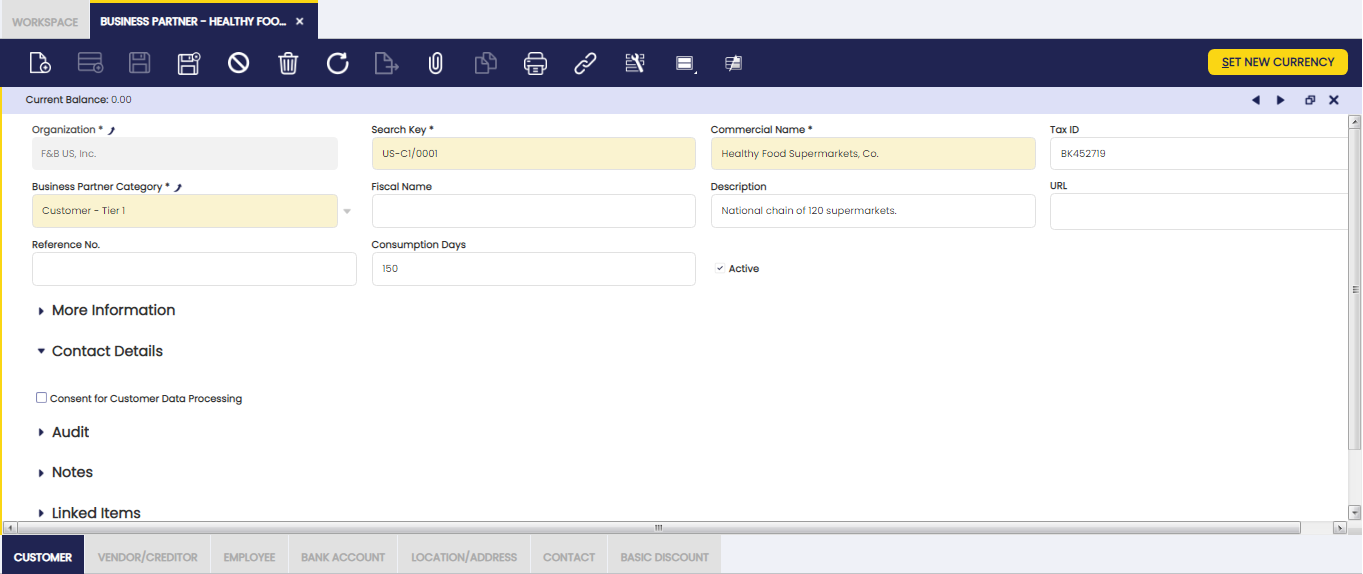
Business partner master data window is the place where the user can easily organize and centralize business partner data.
Nowadays, organizations deal with many third parties such as customers, suppliers, creditors, etc., therefore it is recommended to import large number of business partners instead of creating them one by one using the Import Data module.
Etendo allows the user to enter business partner master data information whenever it is needed as the business takes place, therefore the procedure described within this section explains how to set up a single business partner of any type.
Business Partner
There are many business partner types such as customers, suppliers and employees you can define and configure.
There is one key field in the business partner header window, which is the Business Partner Category.
The user should select a category which the business partner is going to belong to.
To learn more about Business Partner Category, visit the Business Partner Category section.
The rest of fields at header level are common fields which require to enter basic business partner information such as:
- the Search Key or short name which will help you to identify and search a given business partner
- the Commercial Name
- the Fiscal Name, if known. If it is known, it is the one used in official documents such as invoices and tax reports, otherwise the commercial name will be used instead.
- a brief Description, if needed
- the business partner URL, if known
- a Reference No which can be used as an additional way to identify a business partner
- the Consumption Days information, which will be used while creating sales or purchase orders for that particular business partner, by using a process named Copy Lines.
To learn more about that process, visit Sales Order and Purchase Order sections. - and finally Credit Line Limit. Etendo will inform whenever the credit limit entered in this field for the business partner is over while booking sales invoices.
A new check named Consent for Customer Data Processing has been created in the business partner data model, to reflect whether a given contact consents or not that their data can be used by the organization.
It is not the same to enter and configure a customer than a supplier/creditor or an employee, that is the reason why Business Partner window has three main tabs and therefore sub-tabs which allow you to set up each main business partner type separately:
- Customer tab
- Customer Accounting sub-tab
- Vendor tab
- Vendor Accounting sub-tab
- Employee tab
- Employee Accounting sub-tab
The tabs and sub-tabs mentioned above are described in the next chapters of this section.
Finally, it is very important to remark that there could be other types of business partners which require to be set up as business partners in this window; business partners which have nothing to do with either a customer, or a supplier/creditor or an employee.
That is the case of banks. Banks need to be created in the business partner window header by just entering basic header information and no data in any of the business partner window tabs, but Location and Contact. The reason for this is that Bank type business partners are needed in the Remittance financial workflow.
Info
To learn more about this workflow, visit Financial Account.
Set New Currency
Set New Currency process allows the user to change business' partner currency.
Business partner currency is automatically filled in with the currency of the Price List assigned to the business partner. Once filled in, it can be changed if required by running Set New Currency process.
Normally, business partner currency is the same as the currency of the price list assigned to it. However, it can happen that a business partner having, for instance, an EUR price list assigned, might have USD as its by default currency.
In that case, all the transactions booked in EUR for that business partner, will be exchanged to USD, therefore, the business partner balance is calculated in USD.
Set New Currency process allows defining:
- a new currency for the business partner
- as well as the currency conversion rate to be used to exchange customer balance to the new currency.
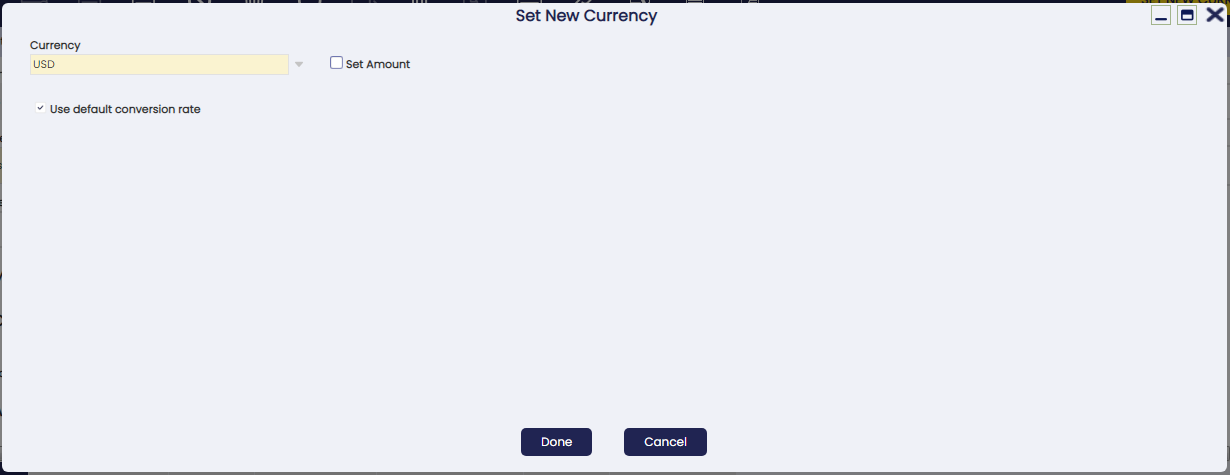
At first, the currency shown in the Set New Currency window is business partner price list currency, in our example USD.
Business partner's new currency can be entered in the field Currency, for instance EUR.
Checkbox Use default conversion rate uses the conversion rate defined in Conversion Rates window, to recalculate business partner balance from USD to EUR, in our case.
If this check is not selected, a new field Rate is shown to allow entering a specific conversion rate.
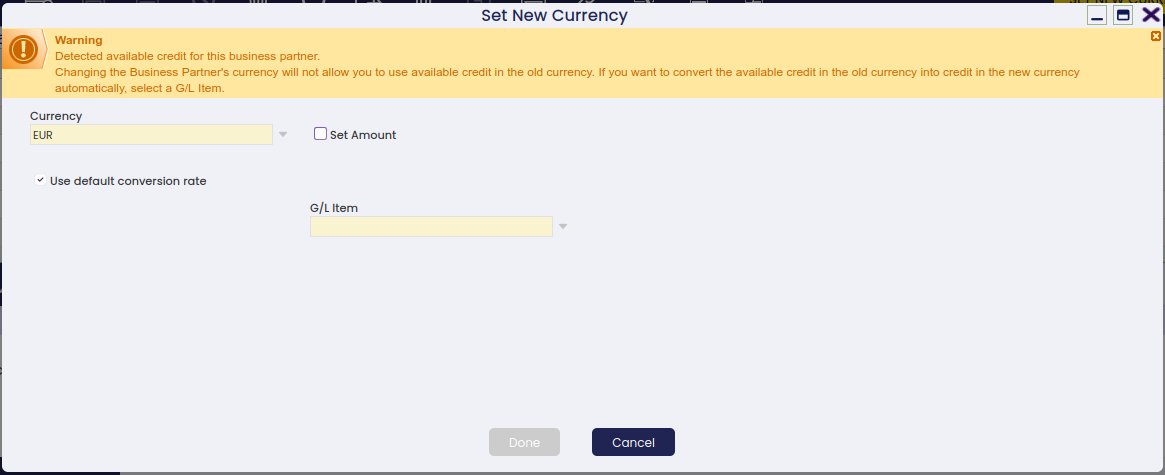
Additionally, a business partner might have available credit in a given currency.
If that is the case, Etendo informs the user because business partner available credit will have to be exchanged to the new currency, therefore it can be consumed in the new currency.
This process automatically creates three new payments, in case business partner has available credit:
- a GL Item payment in EUR, that moves credit amount to the ledger account defined in the selected G/L Item, in the CREDIT.
- a refunded payment in EUR, that moves credit amount to a prepayment account in the DEBIT
- and a Zero amount payment that is a credit payment in USD (new currency). This credit payment moves the credit amount to a prepayment account in the CREDIT.
Let us take as an example a business partner having a price list in EUR.
- This business partner has a current balance of 306.00 EUR and a generated credit of 100.00 EUR, which decreases its balance to 206.00 EUR.
- After that, Set New Currency process is run for this business partner, because its currency needs to change to USD
- Set New Currency process informs us that there is available credit for the business partner in the old currency (EUR). That available credit needs to be exchanged to the new currency (USD), therefore a conversion rate needs to be used. In this example, system conversion rate is used, that is 1.13 EUR to USD.
-
Once Set New Currency process ends, business partner:
- current balance shown changes to 232.78 USD (206.00 EUR * 1.13 EUR/USD).
- currency shown is USD.
- and three new payments are created, as described above, to exchange available credit into the new currency.
-
After that, a new sales invoice is booked for the business partner in EUR, as the business partner price list is in EUR. Sales invoice total gross amount is 41.50 EUR.
- This new sales invoice, once booked, will change business partner balance to 279.68 USD, that is (sales invoice amount 41.50 EUR * 1.13 EUR to USD) + 232.78 USD.
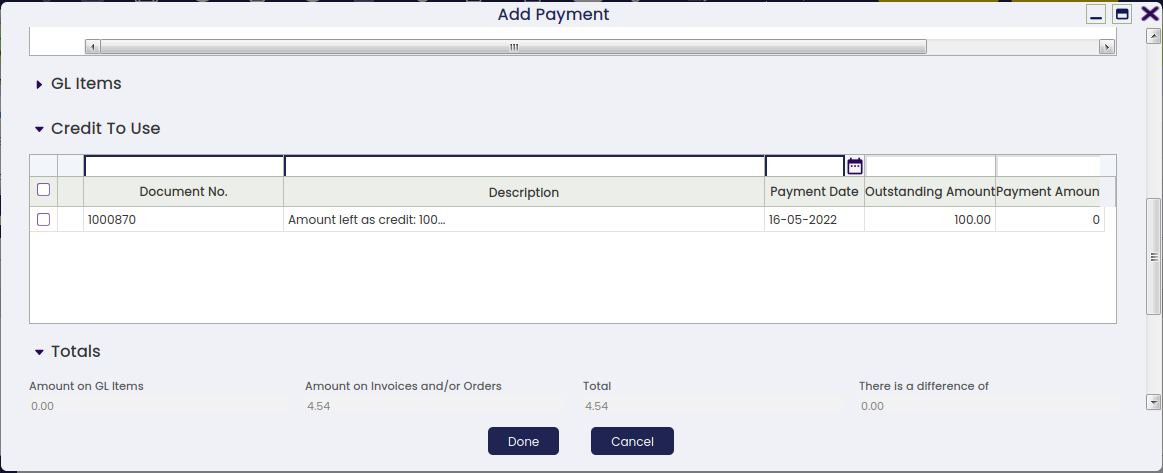
- After that, a new sales invoice for an amount of 100.00 USD is booked for the business partner. While completing this new sales invoice, a new window appears showing business partner USD credit available, in our case 100 EUR * 1.13 EUR to USD = 113.00 USD.
Customer
Info
Customer related data can be entered and configured once the Customer checkbox is enabled.
As shown in the image above, there is a list of relevant data to be entered for customers together with current customer balance information:
You could either select any data such as Price List from a previously created list of values, or create it ad hoc by navigating to the corresponding window, and then select it.
- Price List - the one selected will be the one applied while creating sales documents such as sales orders or sales invoices for that customer.
To learn more, visit Price List.
Price lists are defined in a given currency, which could be the same as customer currency or not.
In case it is not, customer balance will be calculated by taking into account either the conversion rate defined in the Conversion Rates window or the one entered in the process Set New Currency which can be run to change the currency of a business partner. - Payment method - the one selected will be the one applied while creating and managing the payments received from that customer.
If a Financial Account is linked to the customer, the payment method to select here will be one of the payment methods linked to the financial account.
To learn more, visit Payment Method. - Payment Terms - the one selected will be the one used while managing sales invoices payment plan.
To learn more, visit Payment Term. - Financial account - the one selected will be the one use while collecting and reconciling the payments made by that customer.
To learn more about Financial Account, visit Financial Account. - Invoice terms - there are few invoice terms which can be used while generating sales invoices.
To learn more, visit Generate Invoices. - After Order Delivered - the invoice could be automatically generated once all the goods of the sales order have been shipped
- After Delivery - the goods of the sales order will be automatically invoiced as they are shipped, even if there are partial shipments
- Do not invoice - no invoice will be generated automatically
- Immediate - the invoice will be generated on the next run of the Generate Invoices process.
- Customer Schedule after Delivery - the invoice will be generated according to the calendar agreed with the customer and once the goods ordered have been shipped.
If this is the option selected, a new field named Invoice Schedule is automatically displayed for you to select the corresponding Invoice Schedule or calendar.
To learn more, visit Invoice Schedule - Credit Line limit - If the sum of all pending payments is over the credit limit specified for a customer, the system will alert you by saying that this customer has reached the credit limit whenever this business partner is selected in a sales document (order, shipment or invoice).
- A customer can be defined as Tax Exempt whenever applicable, therefore only those Tax rates also defined as exempt apply.
- Sales Representative - you can select here a customer sales representative. A sales representative is an employee set as such.
- SO BP Tax Category - this field can be found under the More Information section.
You can use a business partner tax category to get that the sales documents created for a customer can only have a specific set of tax rates linked to that tax category.
To learn more, visit Business Partner Tax Category - On Hold - this checkbox allows blocking a customer, therefore some specific documents cannot be fulfilled for it. If checked, the On Hold section is shown with the following setup, which can obviously be changed as required:
- Sales Order: Blocked
- Goods Shipment: Blocked
- Sales invoice: Blocked
- Payment In: Not blocked
Above defaulted configuration means that it is not possible to complete either a sales order, a goods shipment or a sales invoice for the customer but to receive a payment.
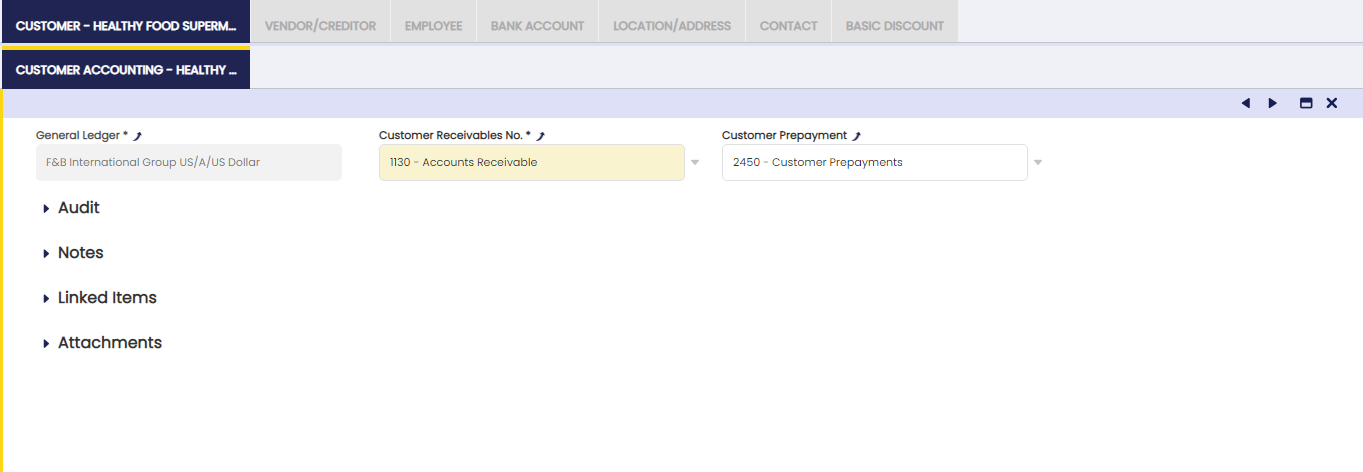
Customer Accounting
Customer accounting tab allows the user to configure the ledger accounts to be used while posting customer related transactions such as customer receivables and customer advances to the general ledger.
As shown in the screen above, you can configure for each customer and general ledger the accounts to be used in:
-
the Customer Receivables transactions such as sales invoices posting.
To learn more, visit Sales Invoice. -
the Customer Prepayment transactions, such as those cases when the company shipping the goods requires the customer to advance part or full amount of the debt.
At first, these accounts are inherited from the Defaults accounts of the organization's general ledger for which the business partner is being created. The end-user can always change them.
Besides, it is important to remark that it is possible to configure the creation of new correlative accounts for the business partners as described in the General Ledgers tab of the Organization window.
Vendor/Creditor
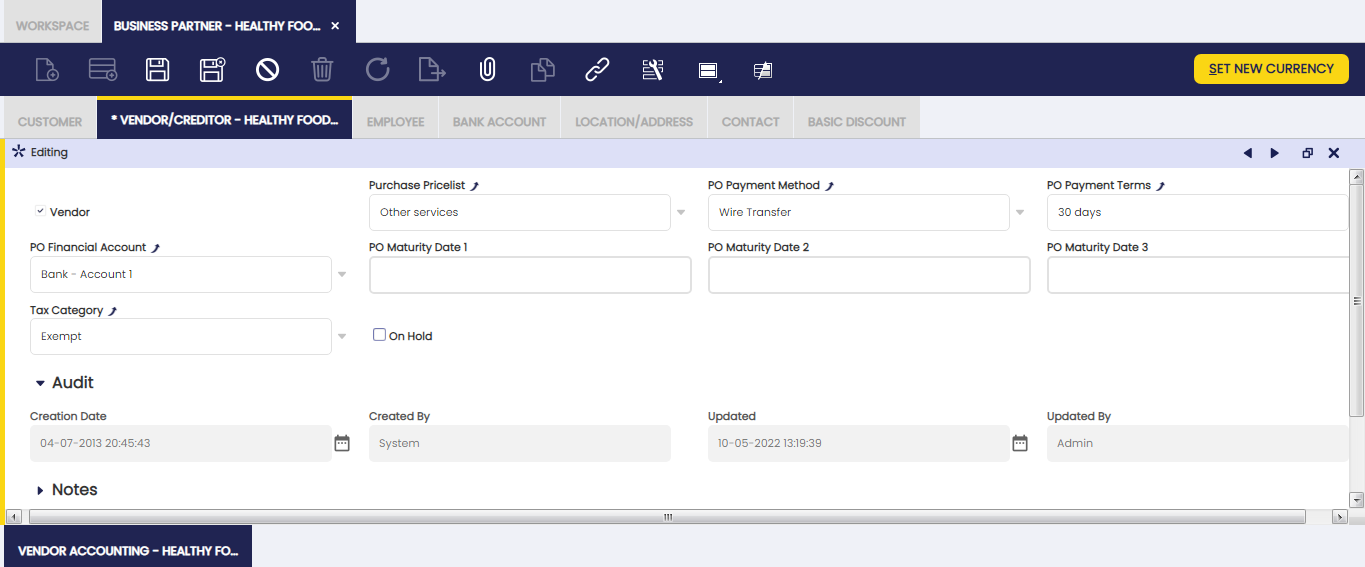
Vendor or Creditor related data can be entered and configured once the Vendor checkbox is enabled.
As shown in the image above, there is a list of relevant data to be entered for suppliers or creditors, also known as vendors:
- Purchase Price List - the one selected will be the one applied while creating purchase documents such as purchase orders or invoices for that vendor.
If a Business Partner has already generated Credit, it will not be possible to select a Price List in a different Currency from the generated Credit. In that case, it is possible to convert Credit to a different Currency.
To learn more, visit Price List. - Payment method - the one selected will be the one applied while creating and managing the payments made to that vendor.
If a financial account is linked to the vendor, the payment method to select will be a payment method linked to that financial account.
To learn more, visit Payment Method. - Payment Terms - the one selected will be the one used while managing supplier invoices payment plans.
To learn more, visit Payment Term. - PO Maturity Date 1 - as indicated in the Payment Term the PO Maturity Date is used in combination with the Fixed Due Date in the payment term to be set to Y and the Next Business Day set to N. The due date of the payment is based on the payment term defined in combination with the PO Maturity Date.
- For example, the defined payment term is 30 days and the PO Maturity Date 1 is set to 10. If the invoice date is the 1st of the month, based on the 30 days payment term, the payment due date is the 1st of the next month, but since the PO Maturity Date is set to 10, the payment due date as a result is the 10th of next month.
- PO Maturity Date 2 - a second PO Maturity Date can be set to be combined with the payment term and the first PO Maturity Date.
- For example, the payment term is 30 days, the PO Maturity Date 1 the value is 10, the PO Maturity Date 2 is 20. The example given in PO Maturity Date 1 will remain the same. However, if the invoice date is the 11th of the month, the payment due date will be the 20th of next month: the 30 days of the payment terms are taken into account and since the 10th of the month is passed the second maturity date of the 20th is taken into account.
- PO Maturity Date 3 - a third PO Maturity Date can be set to be combined with the payment term and the first and second PO Maturity Date.
- Financial account - the one selected will be the one used while withdrawing and reconciling the payments made to a supplier.
To learn more, visit Financial Account. - Tax Category - you can use a business partner tax category to get that the purchase documents registered from a vendor can only have a specific set of tax rates linked to that tax category.
To learn more, visit Tax Category. - On Hold - this checkbox allows blocking a vendor, therefore some specific documents cannot be fulfilled for it. If checked, the On Hold section is shown with the following setup which can obviously be changed as required:
- Purchase Order: Blocked
- Goods Receipt: Not blocked
- Purchase Invoice: Blocked
- Payment Out: Blocked
Above defaulted configuration means that it is not possible to complete either a purchase order, a purchase invoice or to make a payment but to receive goods sent by the vendor.
As already mentioned if a business partner of any type is blocked it is not possible to Complete (or book) some document types however it is always possible to Void them.
You will realize that Etendo shows an error message stating that it is not possible to complete a document for a business partner set as on hold.
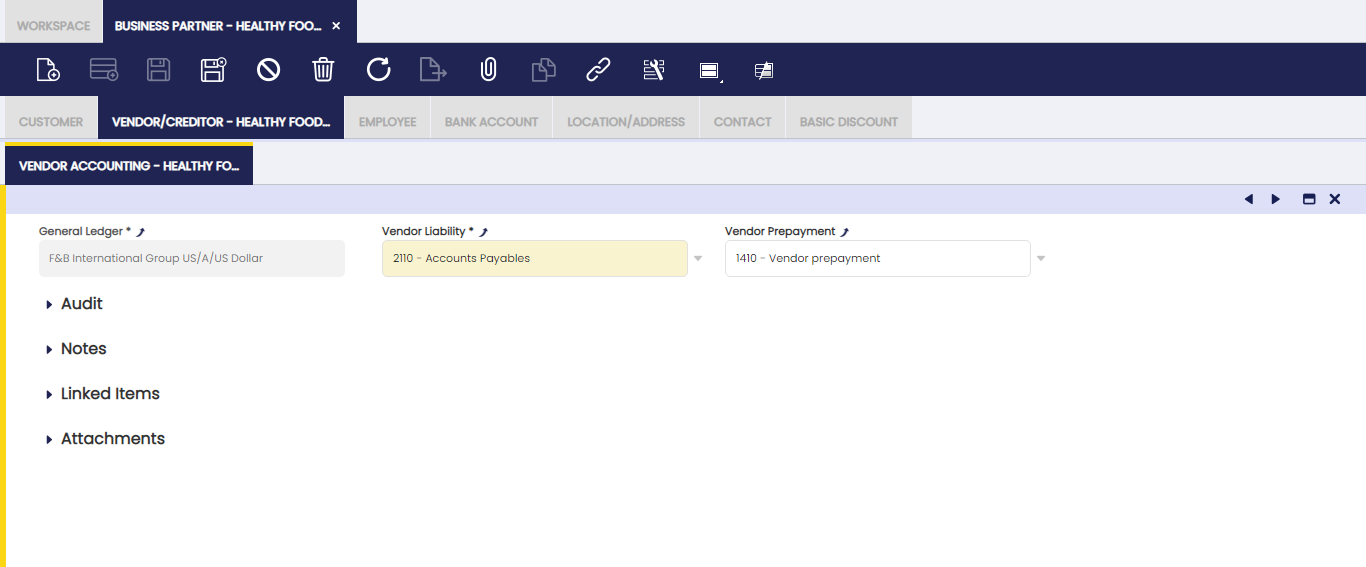
Vendor Accounting
Vendor accounting tab allows the user to configure the ledger accounts to be used while posting vendor related transactions such as vendor liabilities and vendor advance payments to the general ledger.
The user can configure for each supplier or creditor and available accounting schema, the ledger accounts to be used in:
- the Vendor Liability transactions such as purchase invoices posting.
To learn more, visit Purchase Invoice - the Vendor Prepayment transactions such as those cases when the supplier of the goods requires the company to pay in advance part or full amount of the debt.
To learn more, visit Vendor Prepayments
At first, these accounts are inherited from the Defaults accounts of the Accounting Schema assigned to the Organization for which the business partner is being created. The end-user can always change them.
Besides, it is important to remark that it is possible to configure the creation of new correlative accounts for the business partners being created as described in the Org Schema tab of the Organization window.
Employee
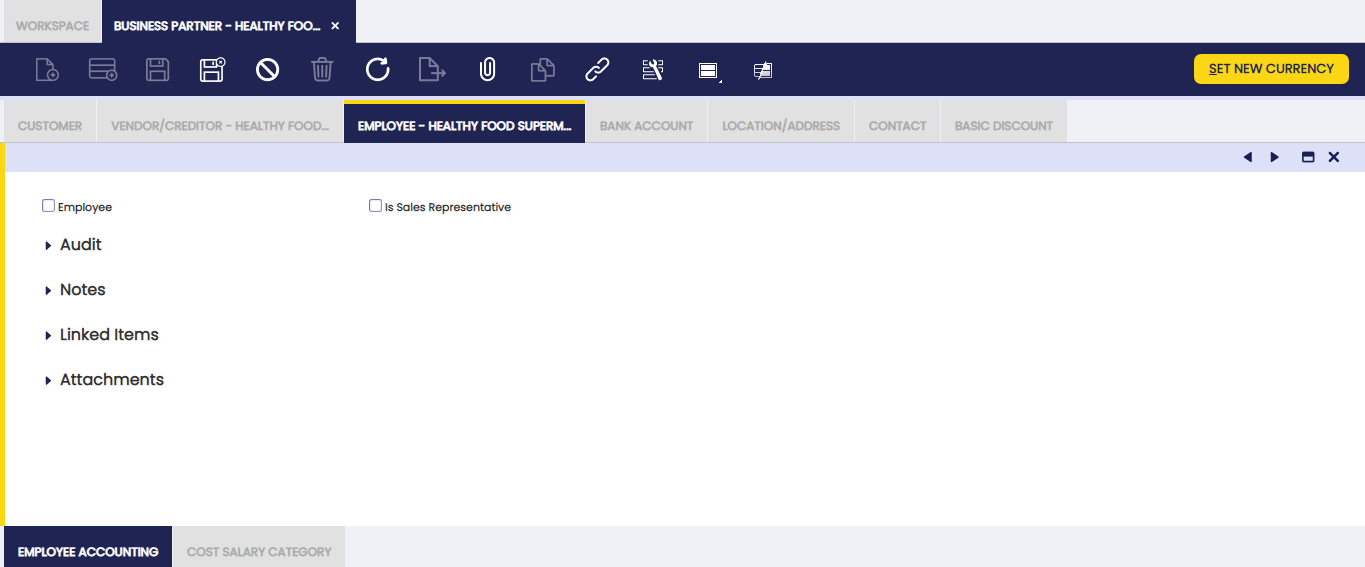
A business partner can be set up as employee once the checkbox Employee is enabled.
Employee tab allows the user to set which of your business partners are Employees.
An employee can be:
- appointed as sales representative of a customer
- defined as the responsible of a company project/s.
To learn more, visit Projects and Services Management - allocated to a production process as a resource.
To learn more, visit Production Management - and can issue expense's sheets as part of his/her involvement in a company project.
To learn more, visit Expense Sheet
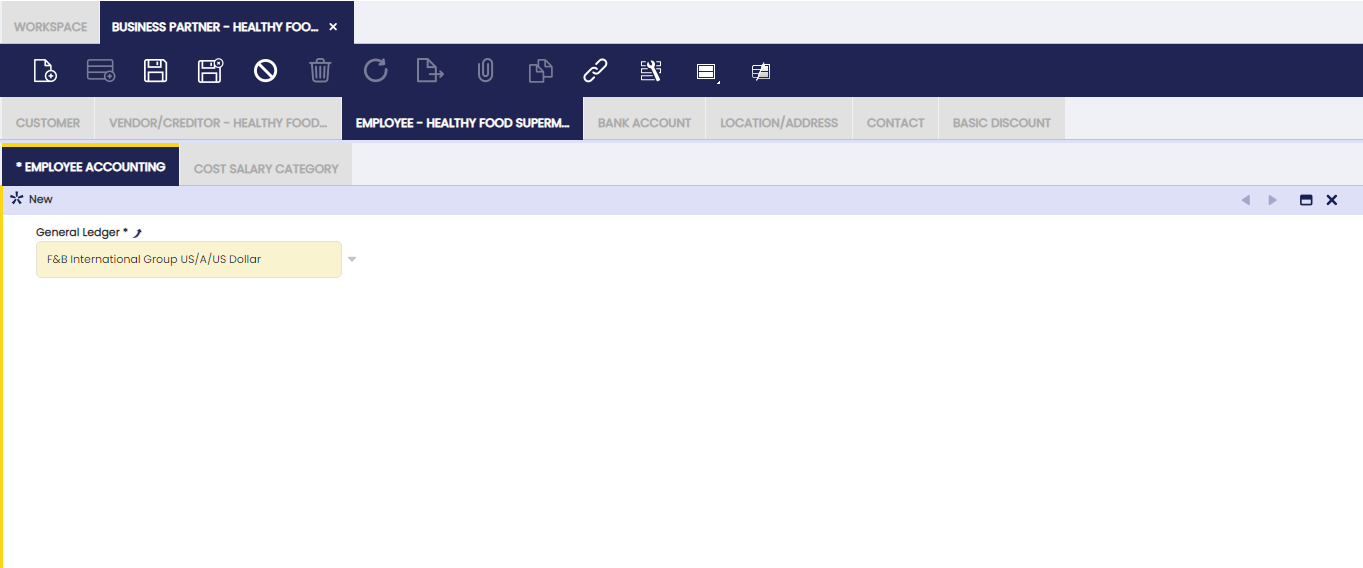
Employee Accounting
The ledger accounts to be used while posting employee related transactions such as paryroll accounting could be added in this tab.
As you can see in the image above, nowadays there is no ledger account required to be defined for employee accounting. This is due to the fact that there is no transaction susceptible of being posted for employees.
Anyway, this is the place where Human Resources related modules or features should point to while defining the accounts to be used in any employee transaction susceptible of being posted.
Bank Account
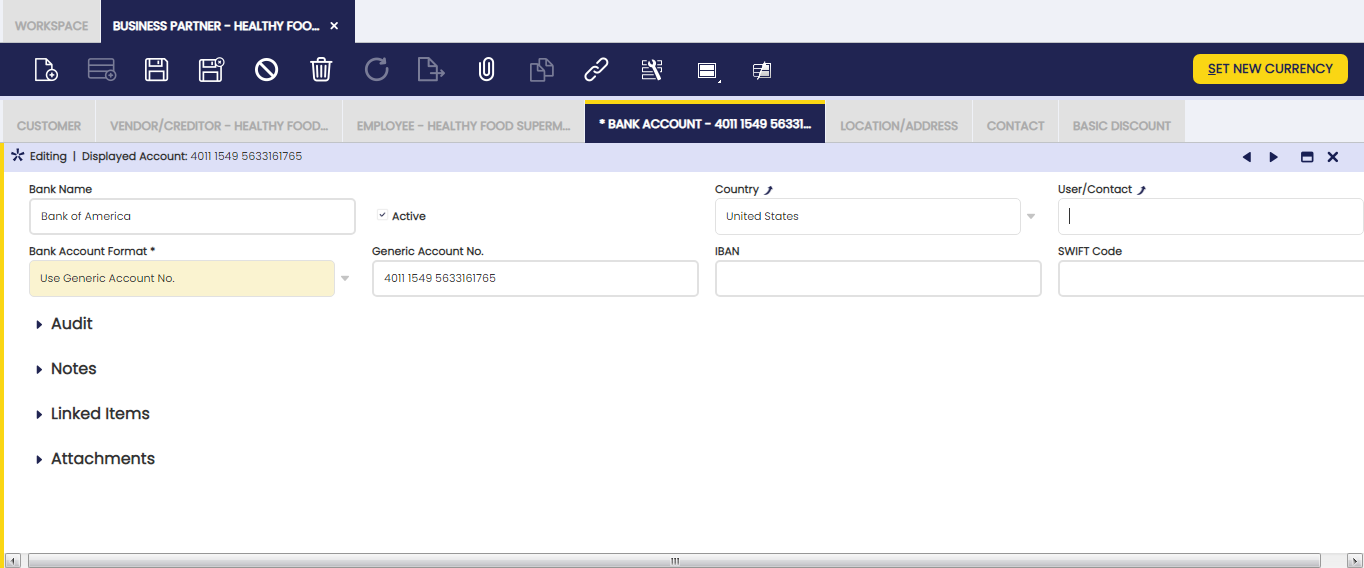
Bank account tab allows the user to list and set up business partner bank accounts.
It is possible to configure and properly set up business partner bank accounts to be used while making or receiving business partner payments of any type.
Therefore, we strongly recommend the user to properly set up bank accounts as those will be used by Etendo as required within Etendo payment management processes.
The bank account related data you can enter is:
- the Bank Name
- Active flag - We recommend you to set as Active only one bank account, if possible, in order to avoid errors; otherwise you should keep an eye on the right bank account used.
- Country - you can select a country from the list to specify if the bank account is a domestic bank account or a foreign bank account.
- User/Contact - in case you want to associate a contact for this bank account
- Bank Account Format - List that contains all the possible values for generating the Displayed Account Number, which will be later on used by other reports or processes to get the account identifier. Possible values are: Use Generic Account No., Use IBAN or Use SWIFT + Generic Account No. Note: Other options can be added by other modules that extend the supported Bank Account Format.
- Generic Account No - a generic account number to identify the bank account can be introduced here. This field must be mandatory filled in case either Use Generic Account No. or Use SWIFT + Generic Account No. is selected at the Bank Account Format field.
- IBAN - The International Bank Account Number (IBAN) is an international standard for numbering bank accounts.
The IBAN consists of a two letter ISO 3166-1 country code, followed by two check digits, and up to thirty alphanumeric characters for the domestic bank account number, called the BBAN (Basic Bank Account Number). This field must be mandatory filled in case Use IBAN is selected at the Bank Account Format field. The IBAN code will be automatically validated when inserting/updating the record taking into account the rules for the country bank defined. - SWIFT Code - Corresponds to the ISO 9362 international bank code identifier. It must be mandatory filled in case Use SWIFT + Generic Account No. is selected at the Bank Account Format field.
- Displayed Account: It is automatically generated based on the value selected into the Bank Account Format. This field is read only, and it is used by other reports or processes.
Advanced Bank Account Management
Info
To be able to include this functionality, the Advanced Bank Account Management module of the Financial Extensions Bundle must be installed. To do that, follow the instructions from the marketplace: Financial Extensions Bundle. For more information about the available versions, core compatibility and new features, visit Financial Extensions - Release notes.
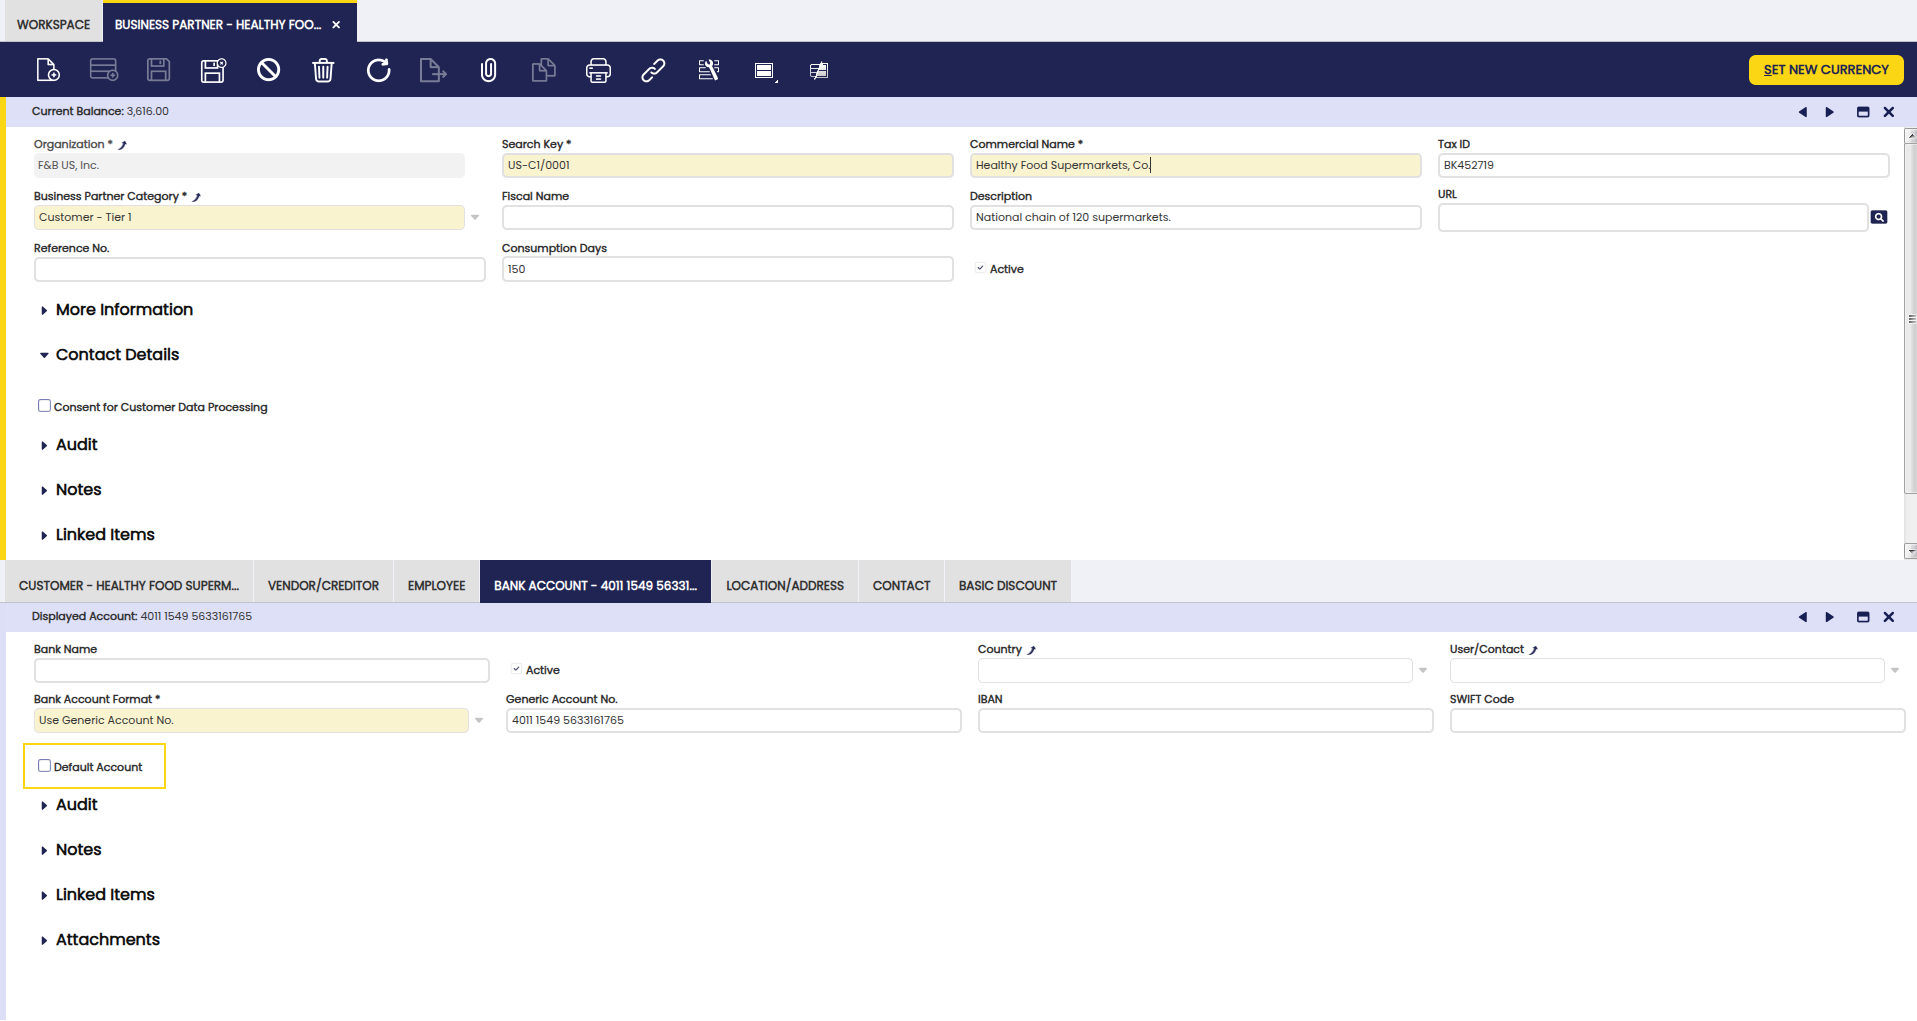
This functionality introduces the possibility to mark a bank account as Default within the Bank Account tab of the Business Partner window. Here, it is possible to check the Default Account checkbox in order to set the account to be used in the documents for different transactions.
Note
If no bank account is selected as default, the one created last is used when no bank account is selected in orders/invoices.
Warning
Only one bank account can be selected as default for each business partner.
Location/Address
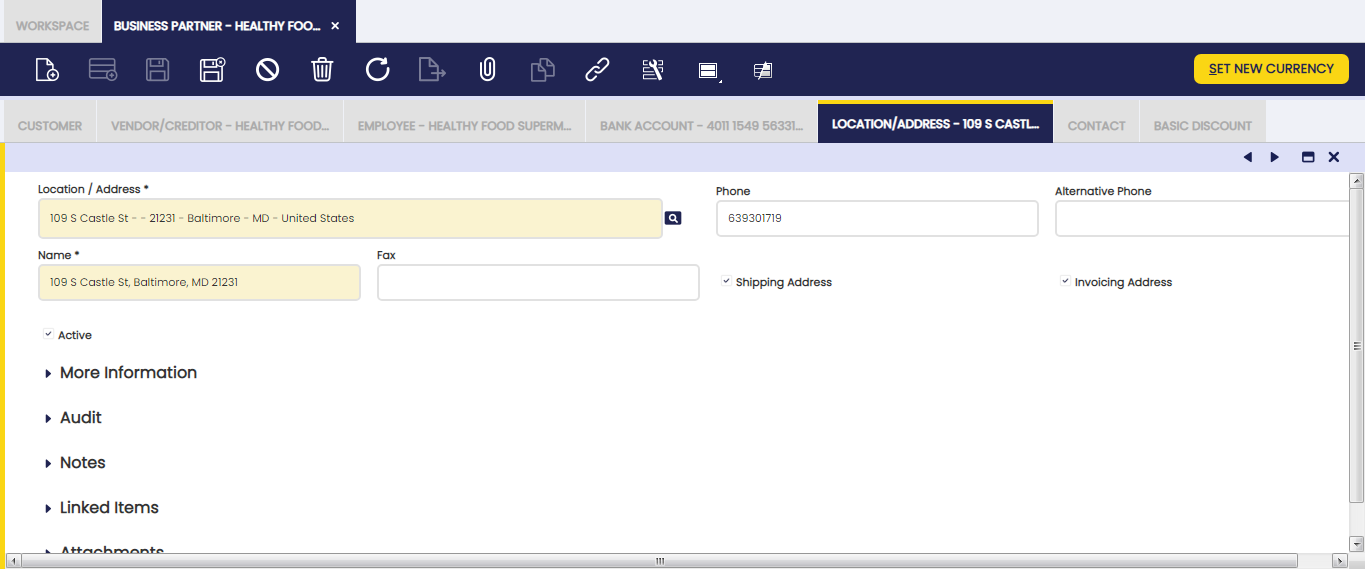
Business partner locations and full address details can be set up in this tab.
Business partners might have different address details depending on location/address used for either Goods Receipts/Shipments purposes or location/address used for Invoices purposes.
Etendo allows the user to define any type of business partner address, by filling in the information below:
- Location/Address - if you click in this field the location selector box opens, there you can enter the information below:
- the address 1st line
- the address 2nd line, if needed
- the Postal Code
- the City
- the Country - you can select one from the list, if any
- the Region - once the country is selected, you can select one region of the country selected, from the list, if any.
- Once the location entered is saved, it's listed in the Location window. To learn more, visit Location
- the Phone number
- an Alternative Phone number, if any
- the address Name - this field is automatically filled in by Etendo, once the location / Address information has been configured. The user could change it as needed.
- the Fax number
- Ship to Address checkbox - the user should flag this one if the address being set up must be used for Goods Receipts/Shipments related transactions.
- Invoice to Address checkbox - the user should flag this one if the address being setup must be used for sales or purchase invoices transactions.
Advanced Bank Account Management
Info
To be able to include this functionality, the Advanced Bank Account Management module of the Financial Extensions Bundle must be installed. To do that, follow the instructions from the marketplace: Financial Extensions Bundle. For more information about the available versions, core compatibility and new features, visit Financial Extensions - Release notes.
The Advanced Bank Account Management field is introduced in the Location/ Address tab of the Business Partners window to associate specific bank accounts to the different locations.
Warning
In case of having both a default bank account and a location with a defined bank account, when generating a new document, the location bank account is prioritized over the default one.
Contact
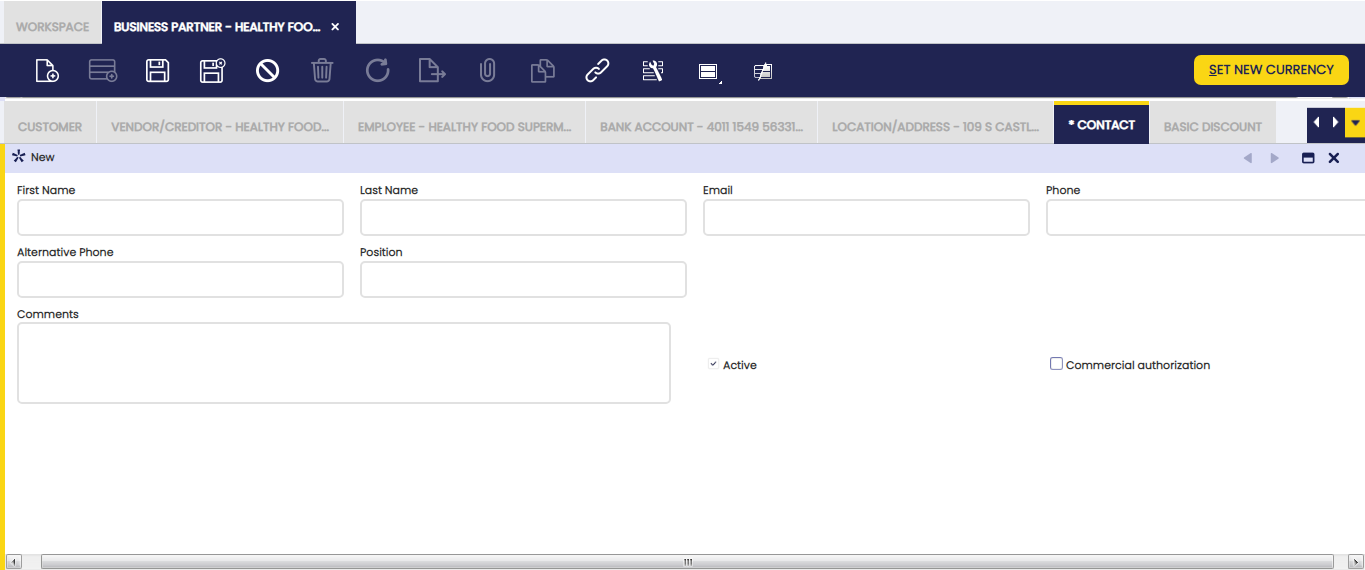
Contact tab allows the user to add and configure the business partner contacts you deal with.
As you can see in the image above, basic Contact data such as:
- First and Last Name of the contact
- as well as his/her Position in the business partner
can be configured in this tab.
Basic Discount
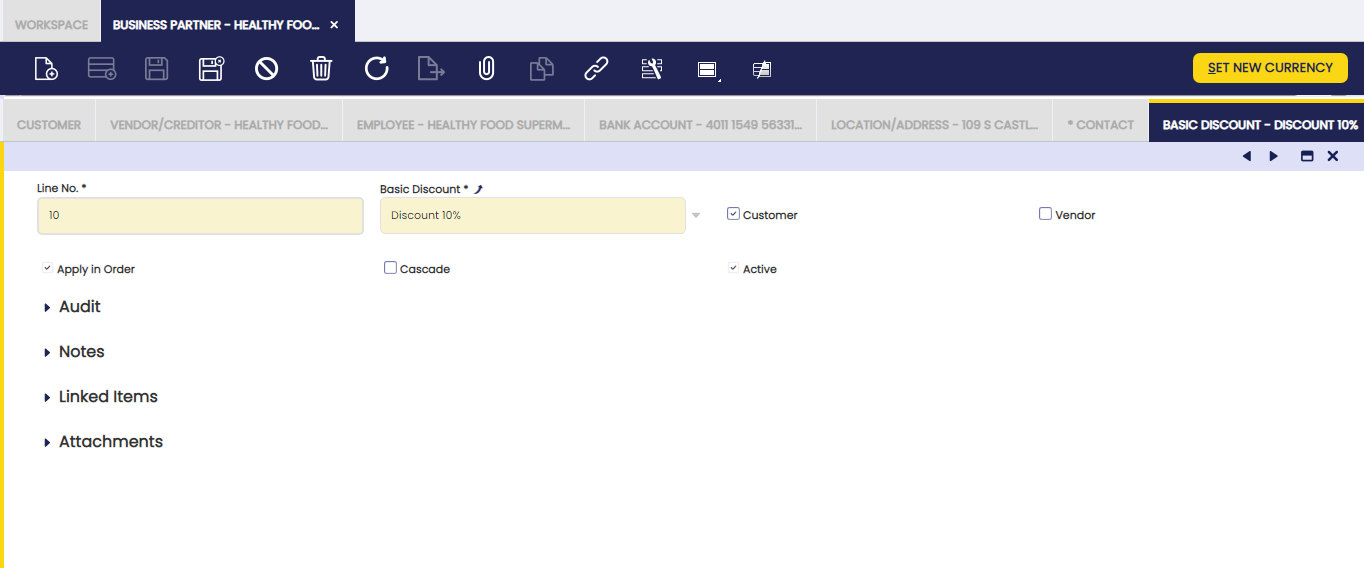
Basic Discount tab allows the user to add and configure business partner Basic Discounts.
It is possible to enter as many Discounts as agreed with your business partners, by filling in the information below:
- the Discount to be applied while creating sales / purchase transactions for that business partner can be selected from the list (if any) or created by navigating to the Discount window.
- Customer: this checkbox must be selected if the discount is going to be applied to a Business Partner set as Customer
- Vendor: this checkbox must be selected if the discount is going to be applied to a Business Partner set as Vendor
- Apply in Order: this check box must be selected in case the discount can be applied in sales or purchase orders as applicable.
- Cascade calculation of the discount. For instance, if first discount is 10% and second one is 5%, a cascade calculation of the total discount won’t be 15% but 14.5%
A discount not applied in Cascade means that it affects the full quantity of the Document Line. A Discount applied in Cascade means that affects the quantity of the Document Line that remains after applying all the discounts that come before it.
An example to explain the difference between a Cascade and not Cascade Discount is the following one:
Three Discounts, each one of 10%, the first two ones are defined as not Cascade and the third one as Cascade. Over an Invoice Line of 1.000 USD
- The first discount will create a line of -100 USD (10% of 1.000 USD)
- The second discount will also create a line of -100 USD (10% of 1.000 USD)
- The third one, however, will create a discount based on applying the previous discounts on cascade, so:
- 1.000 USD - 10% = 900 USD (applying the 1st discount on Cascade)
- 900 USD - 10% = 810 USD (applying the 2nd discount on Cascade)
- 10% of 810 USD = 81 USD. So the third discount will be -81 USD.
In total -100 -100 -81 = -281 USD for all three discounts (a total discount of 28.1%)
Rappel Configuration
Info
To be able to include this functionality, the Advanced Rappels module of the Sales Extensions Bundle must be installed. To do that, follow the instructions from the marketplace: Sales Extensions Bundle. For more information about the available versions, core compatibility and new features, visit Sales Extensions - Release notes.
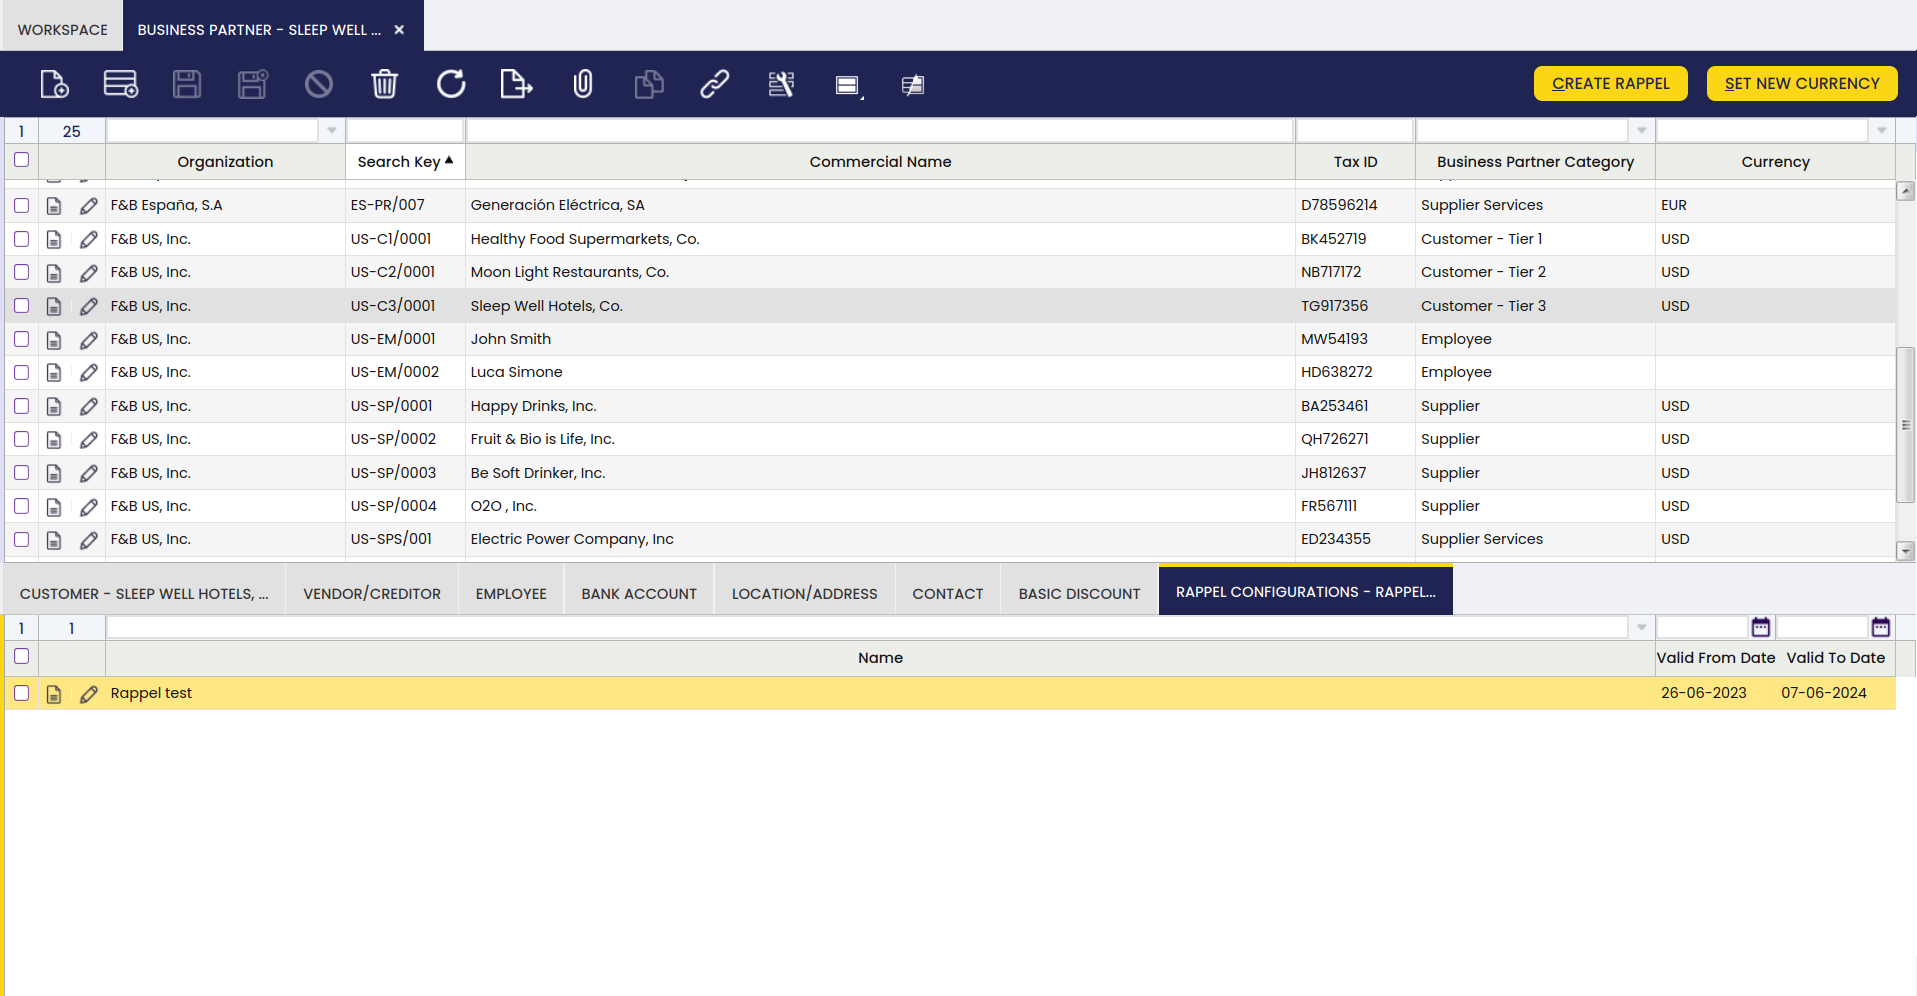
With this functionality, the user can find the tab “Rappel Configurations” in the business partners included in the Rappel configurations. Also, in the Business Partner window, the user is able to create rappels using the button “Create Rappel”.
To be able to do this, it is necessary to configure certain aspects in the “Rappel Configurations” window.
Info
For more information, visit Rappel Configurations.
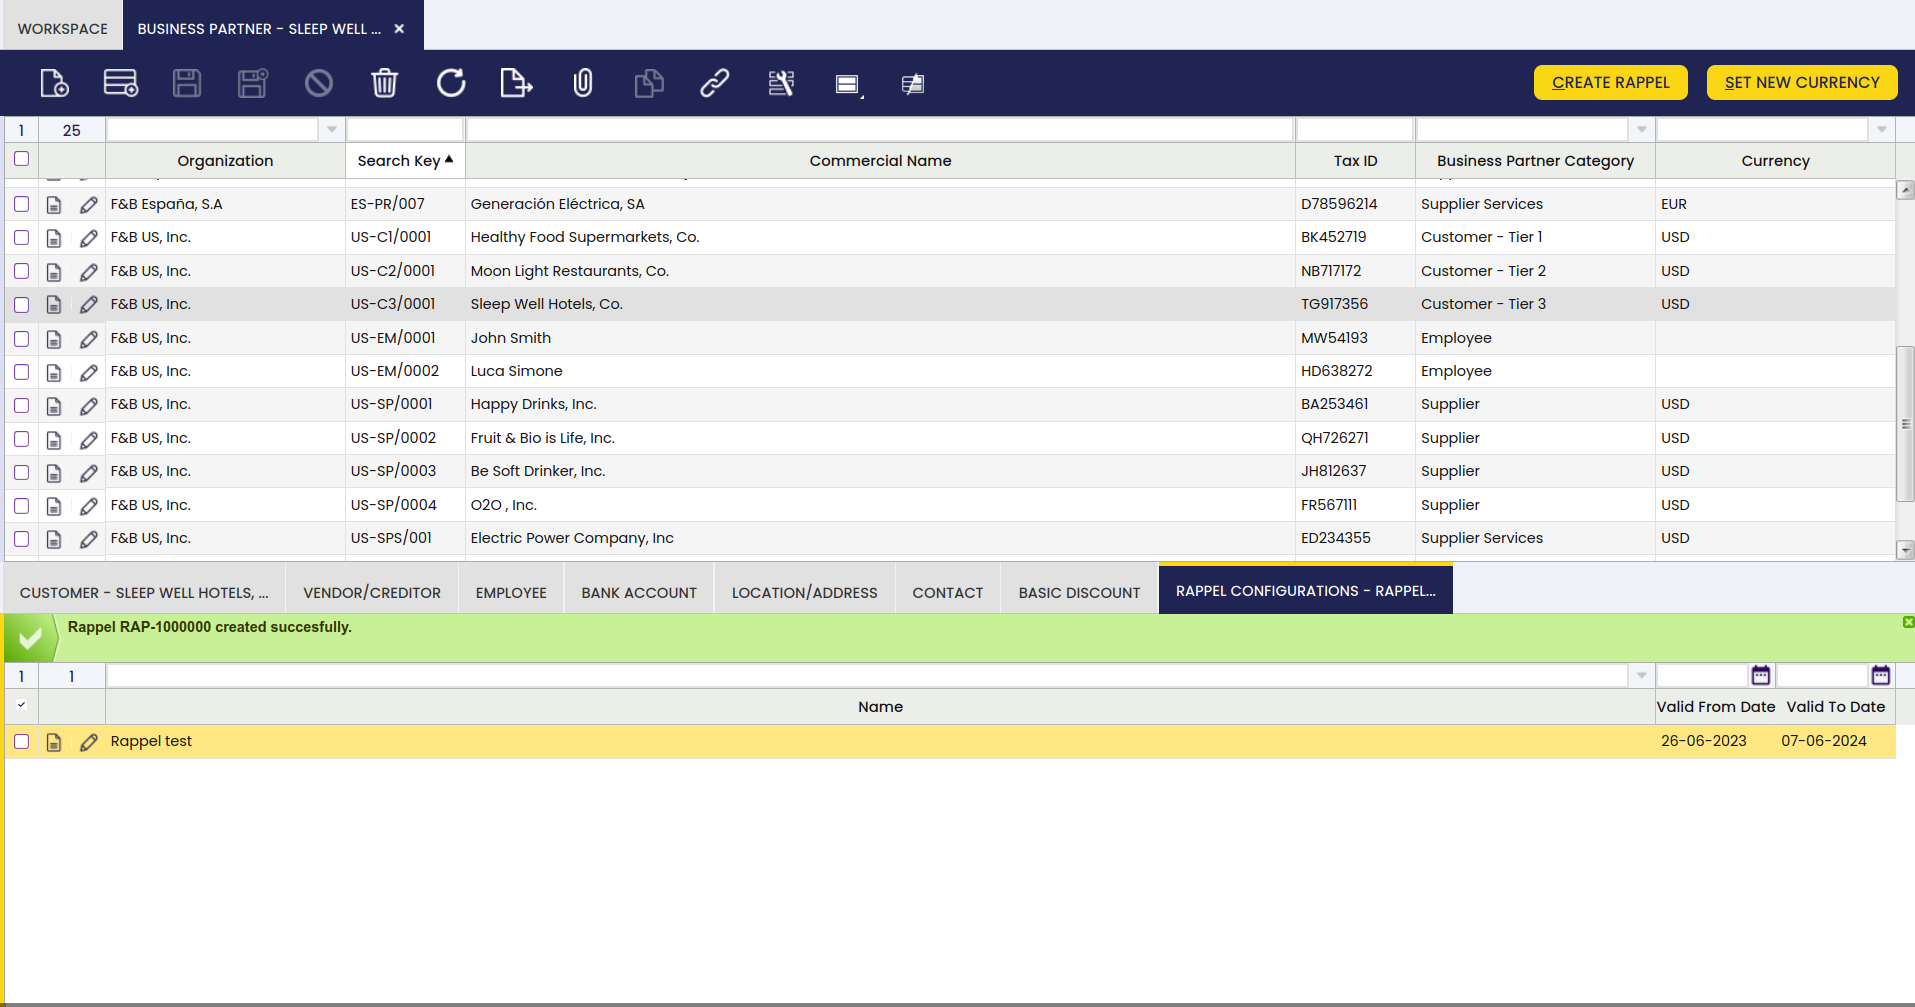
The “Rappel configuration” tab can be found in the tabs section of the Business Partner window. In this tab, the user can find the configured rappels for each business partner.
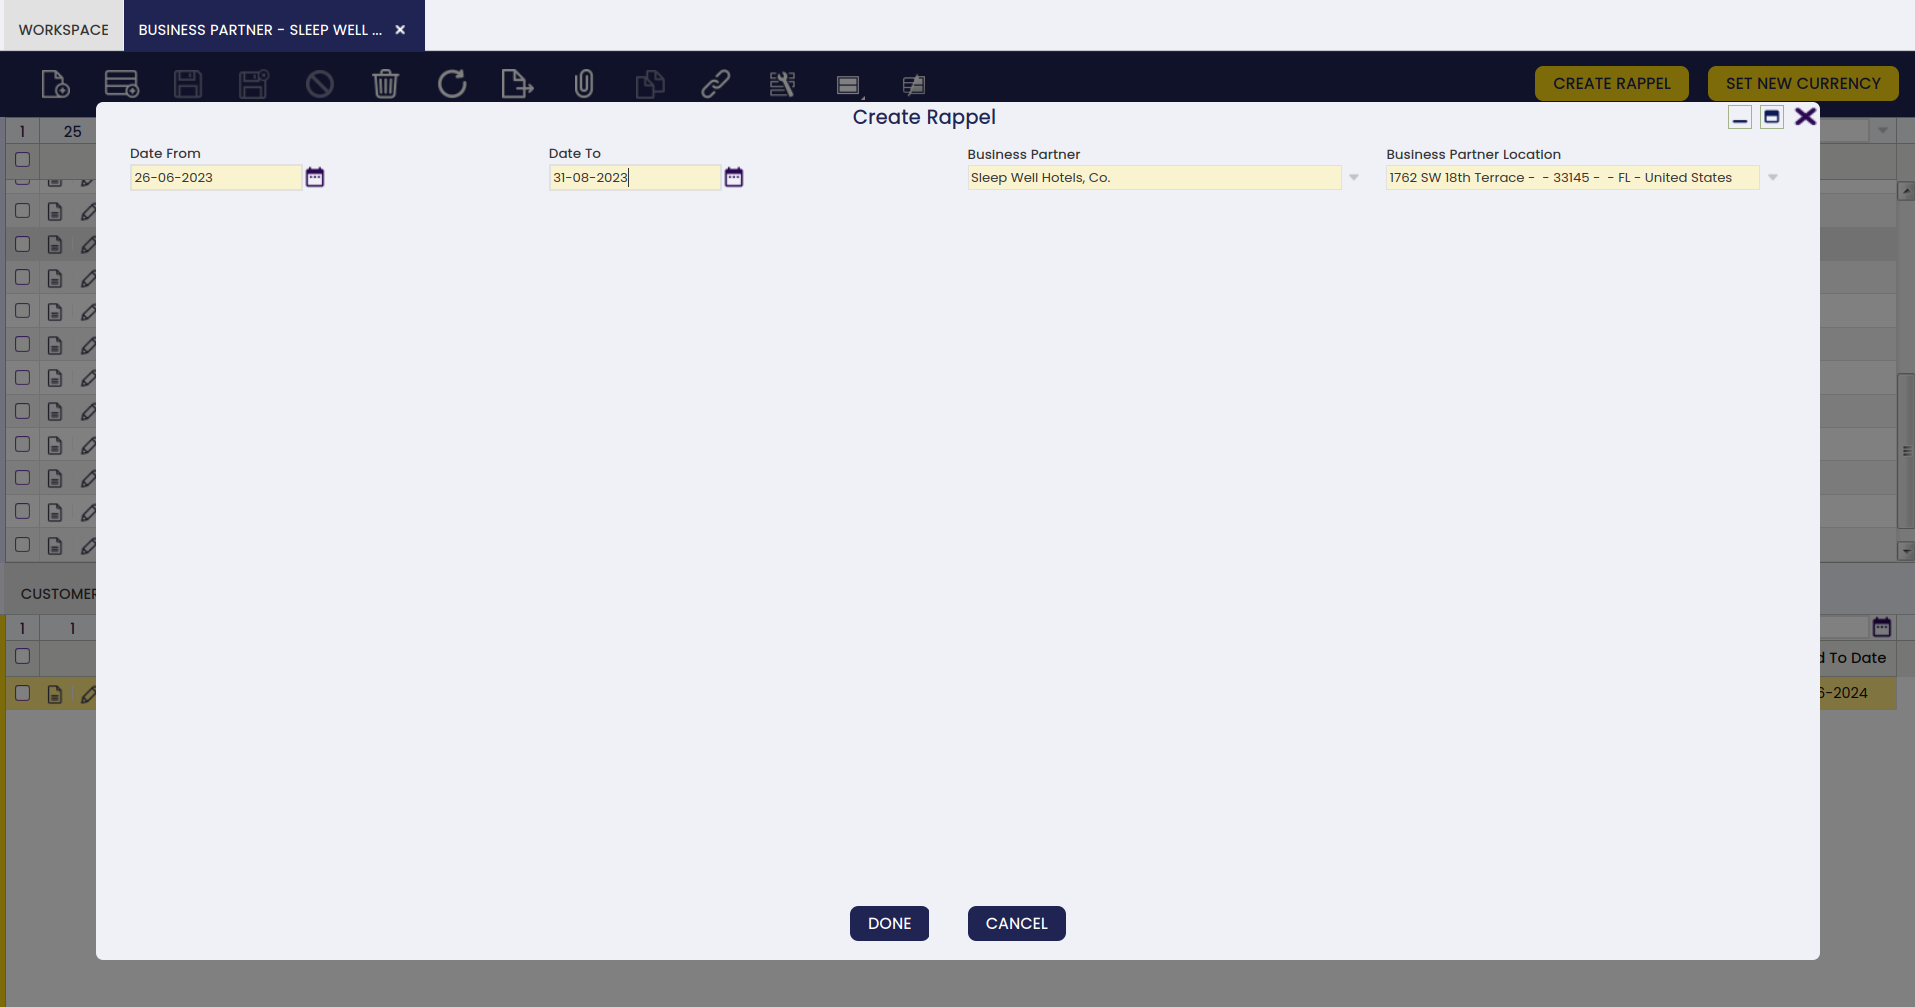
To create a new rappel, the user must select one of the available configurations in this tab and click the Create Rappel button. A pop-up window will appear in which the user can select a trading partner to which the Rappel will be assigned, and also configure a date period in which the consumptions will be taken into account to calculate the discounts, determined by the date from and the date to information.
When the rappel is created, a sales invoice is created automatically, as seen below.
Each time a rappel is granted to a business partner, a new sales invoice is automatically generated in order to show the amount of the discount. This invoice has a specific sequence to distinguish it from the rest, according to the options entered when configuring the sequence, and a negative amount since it is a discount. The status of this invoice is “draft”.
Info
For more information, visit Sales Invoice.
Business Partner Info
Application > Master Data Management > Business Partner Info
Overview
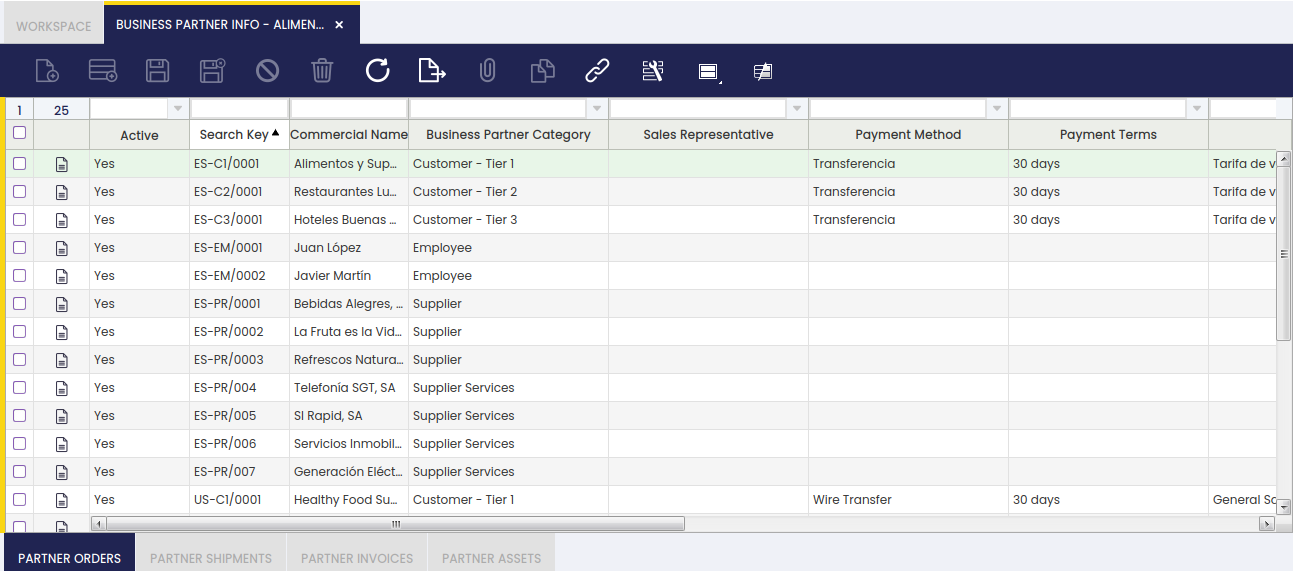
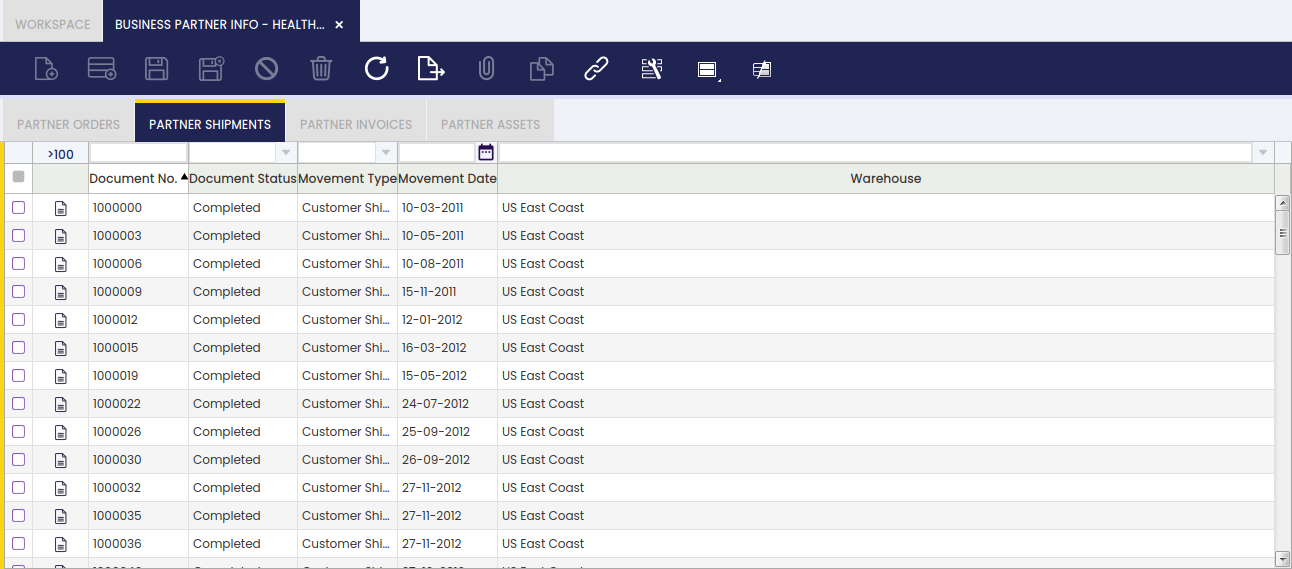
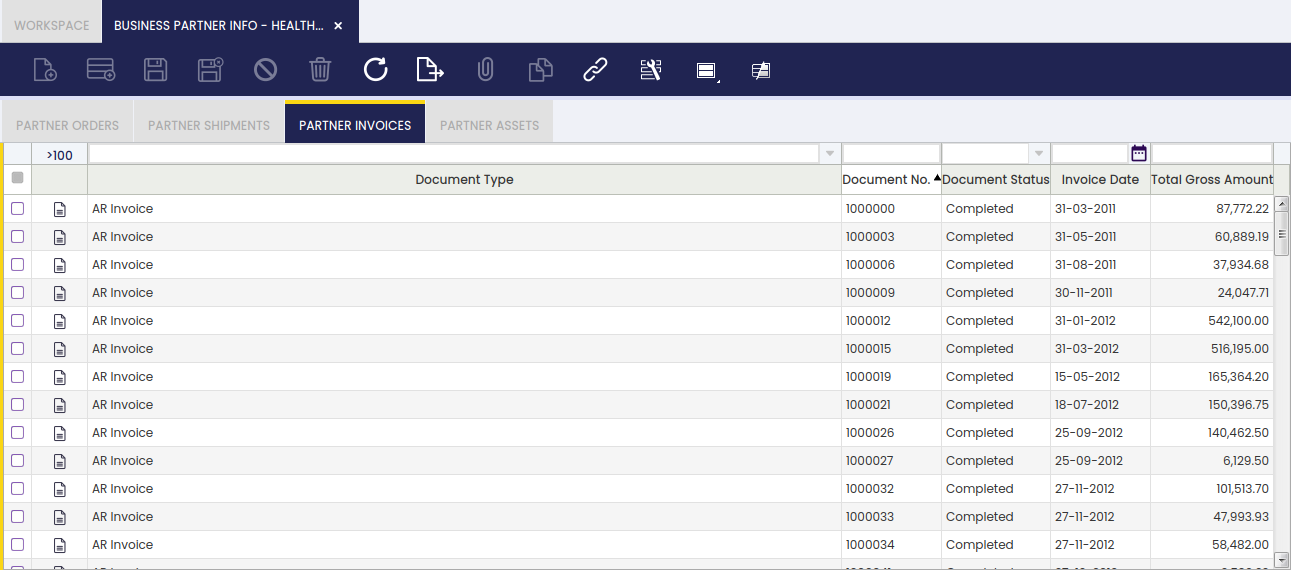
In this section, the user can view information related to business partner orders, receipts/shipments, invoices, and assets.
Partner Selection
The user can select a business partner to begin viewing related transactions.
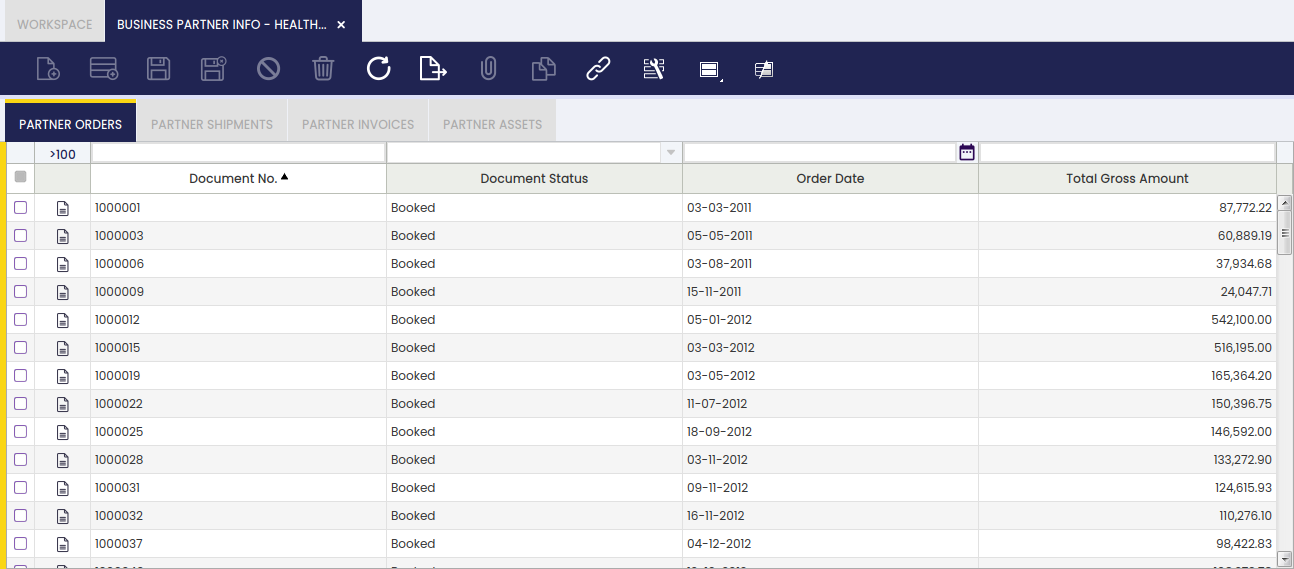
Partner Orders
The user can view orders related to a specific business partner.
Partner Shipments
The user can view shipments related to a specific business partner.
Partner Invoices
The user can view invoices related to a specific business partner.
Product
Application > Master Data Management > Product
Overview
Product master data window is the place where you can easily organize and centralize the key data of the items of any type you might manage as part of the organization processes and/or activities.
Organizations deal with a variety of different items that may be required by an organization for the performance of its daily activities.
It is possible to load Product information into Etendo en masse using the Import Data module, or one by one using the Product window.
This section describes how to set up Products individually.
Product
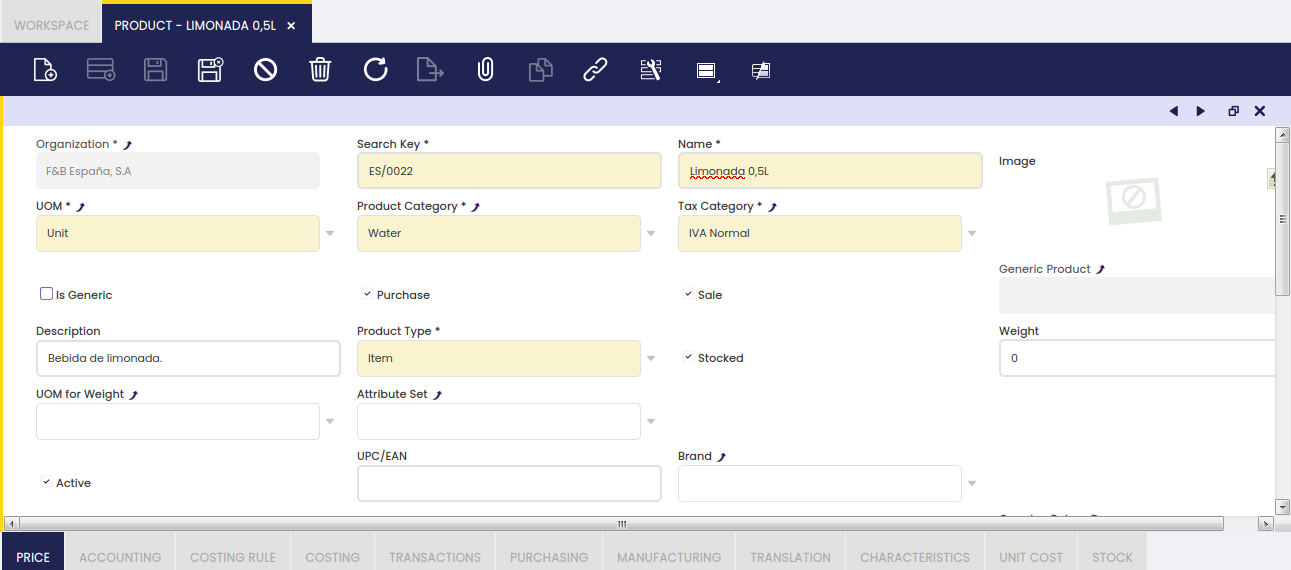
Product window allows the creation of items such as products, raw materials, resources, services, etc.
The information required to create a Product in Etendo is determined by the nature of the Product, its Product Type.
There are four product types available:
- Item. The most frequently used product type is Item. Inventory held for resale, materials that are placed into a production process, and semifinished or finished goods created through production are examples of products defined using the product type Item.
- An item should be flagged as Stocked, if quantity tracking is required for the item, otherwise there is no need to flag the item as Stocked.
- An item should be flagged as Production, if the item is used in manufacturing.
- If an item is an intermediate or finished good, its bill of material (BOM) should be detailed on the Bill of Materials tab.
- Service. This product type is used to identify such provisions as professional services, transportation, telephony, and other items which do not correspond with material goods.
- Therefore, a Service is not stockable but can be purchased or sold.
- A service can have a bill of materials to be defined in the Bill of Materials tab.
- Resource and Expense. These product types can be used to distinguish between different types of products which can be purchased or sold but cannot be stocked.
- Resource type can be used to configure resources such as Financial, Legal or Natural resources used by the organization.
- Expense type can be used to configure expenses such as travel expenses to be used while reporting Employee expenses.
Product types do not confer different accounting treatments. In other words, all product types account the same way while being purchased, stocked or sold.
All of them use the ledger accounts defined in the Accounting tab of the Product window.
Additional key data to fill in are:
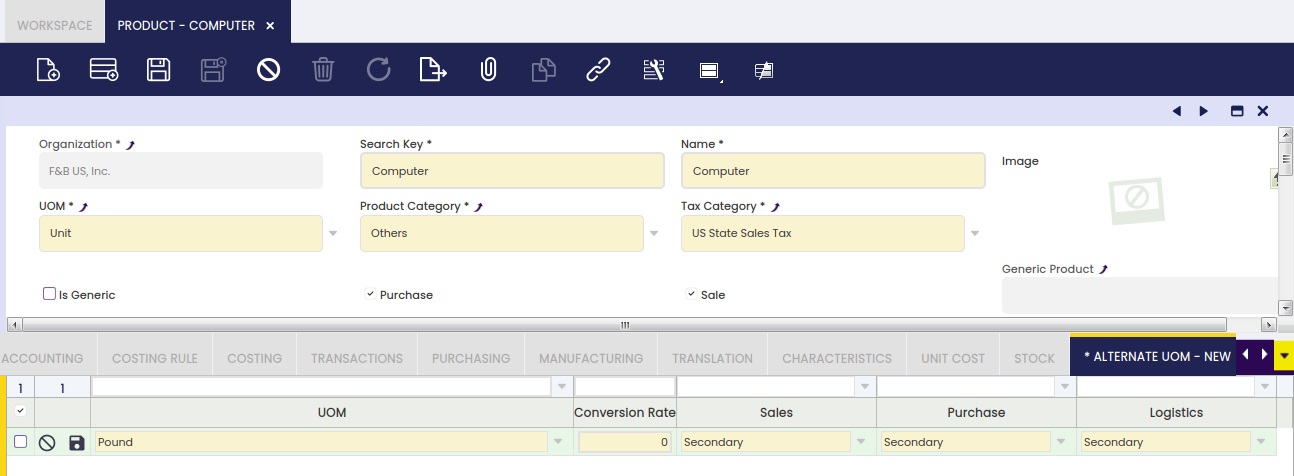
- UOM, that is the unit of measure to be used while purchasing, storing and selling a product, for instance Units.
A product can also have alternative UOM besides product's UOM. - Product Category, it is mandatory to select a product category to which the product is going to belong to.
To learn more, visit Product Category - Tax Category, this category is key for managing the taxes related to the product. Taxes such as VAT depends on the type of product.
To learn more, visit Tax Category - Purchase checkbox can be selected to indicate that the product can be purchased to an external supplier. This checkbox is mainly an informative one, as it does not add any business logic behind but regarding MRP.
In that case, if selected, MRP will then purchase the product if needed, otherwise it will produce it. - Sales checkbox can be selected to indicate that the product is sold or can be sold to an external parties or customers. This checkbox is an informative one, as it does not add any business logic behind.
- Stocked checkbox is selected if the product is part of the inventory, therefore proper inventory movement transactions are registered in Etendo.
This flag can not be changed anymore for a product, if that product is part of any sales, purchase, inventory or production document related, whatever document status is. - Production checkbox is selected if the product is part of a production process. Once selected, an additional field appears to select a Process Plan.
To learn more, visit Process Plan - Attribute Set, a product can have a group of features or an attribute set, such as Color and Size, to take into account while ordering or storing the product.
- If an Attribute Set is selected here, Etendo displays a new field named Attribute Set Value.
To learn more, visit Attribute Set - Attribute Set Value, if an Attribute Set value such as Blue and Large is selected, Etendo displays a new field named Use Attribute Set Value As.
- Attribute Set Value As, once an attribute set has been selected, that one could be used as described below depending on the criteria selected in this field:
- Default: This means that the attribute set value defined will be defaulted in each of the transactions, but it is allowed to be changed.
In other words, the user will not have to care about setting it each time when creating transactions such as goods receipts and shipments.- For instance, it can be set to default the value of the attribute set Size of a product to Medium (because it is the most commonly used).
This way, each time that that product is selected, its attribute set value will be set to Medium (unless selected from stock, in which case the attribute set value is set to the value in which the product is stored).
It is possible to overwrite this attribute set value, to Small or Large for example.
- For instance, it can be set to default the value of the attribute set Size of a product to Medium (because it is the most commonly used).
- Overwrite Specification: This means that the attribute set value will specify completely the product nevertheless, the attribute set value can be changed for this product.
- For instance, product Alcohol Free Beer is given the attribute set Alcoholic Proof and the attribute set value 0% in the Product window. This definition specifies completely the product: the Alcohol Free Beer is supposed to have a 0% alcoholic proof. But, in the production process, some deviations can happen, and this alcoholic proof can go to 0.01%. Using Overwrite Specification option, the production manager will be allowed to register this deviation in the Production process for Alcohol Free Beer product.
- Specification: This means that the attribute set value will specify completely the product. The attribute set value will always have this value and no other value will be allowed for it.
- For instance, product Large Blue Jeans is given the attribute set Size & Color with values Large and Blue. This defines the product and will not change. Transactions are done and completed with this product, without forcing to re-set the attribute set value. User can then query all products having Large size or Blue color without having to query the transactions but only the product definition.
To learn more about attributes, visit How to Manage Attributes and Attribute Sets article.
- For instance, product Large Blue Jeans is given the attribute set Size & Color with values Large and Blue. This defines the product and will not change. Transactions are done and completed with this product, without forcing to re-set the attribute set value. User can then query all products having Large size or Blue color without having to query the transactions but only the product definition.
- UPC/EAN, used to store bar-code information
- Bill of Materials checkbox is selected when the product is a bundle of other products as listed in the Bill of Materials tab.
- Deferred Revenue: this flag is visible only for products having the Sale flag checked and indicates that by default, revenues for sales of this product need to be deferred. When this flag is checked, the Revenue Plan field group becomes visible, allowing users to configure the next two fields.
- Revenue Plan Type: this field specifies the default frequency of the revenue distribution. At the moment, only monthly revenue plans are supported.
- Period Number: this field specifies the default duration of a revenue plan. For example, an annual subscription to a magazine will be defined with a revenue plan of 12 monthly periods, while a season ski pass will have revenue plan of 5 monthly periods.
- Default Period: this field specifies the first period in which revenue is going to be recognized. The options available are:
- Current Month. This option will set the Revenue Plan Starting Period to the same period as the invoice accounting period.
- Next Month. This option will set the Revenue Plan Starting Period to the invoice accounting next period.
- Manual. This option will not set any revenue plan starting period, therefore a starting period can be selected while creating the sales invoice line.
- Deferred Expense: this flag is visible only for products having the Purchase flag checked and indicates that by default, revenues for sales of this product need to be deferred. When this flag is checked, the Expense Plan field group becomes visible, allowing users to configure the next two fields.
- Expense Plan Type: this field specifies the default frequency of the expense distribution. At the moment, only monthly expense plans are supported.
- Period Number: this field specifies the default duration of an expense plan.
- Default Period: this field specifies the first period in which expense is going to be recognized. The options available are:
- Current Month. This option will set the Expense Plan Starting Period to the same period as the invoice accounting period.
- Next Month. This option will set the Expense Plan Starting Period to the invoice accounting next period.
- Manual. This option will not set any expense plan starting period, therefore a starting period can be selected while creating the purchase invoice line.
These values are used when an invoice is created for a product having an expense plan and/or a revenue plan.
In the same way, these values are also used when an invoice is created from another document (for example: the Generated Invoices process that creates invoices from sales orders). In the same way, these values can be modified on a transaction by transaction basis.
To learn more, visit the How to manage deferred revenue and expenses article.
- Book Using Purchase Order Price: This flag is used when posting a Goods Receipt or a Matched Invoice document to the ledger.
Normally, the product cost is used while posting those transactions, however this checkbox allows using the product purchase price instead.
This feature only works for Expense product type not having the Sales checkbox selected.
Info
Notice that in this case a Purchase Order needs to be related to the Goods Receipt, otherwise an error message will be shown as the purchase product price is required.
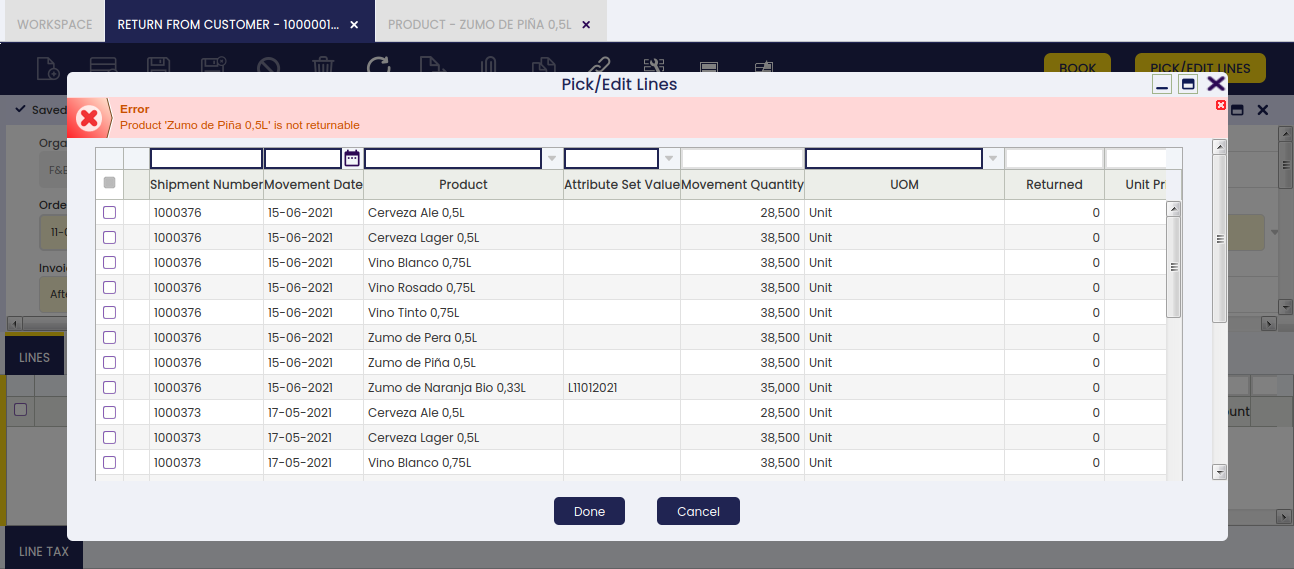
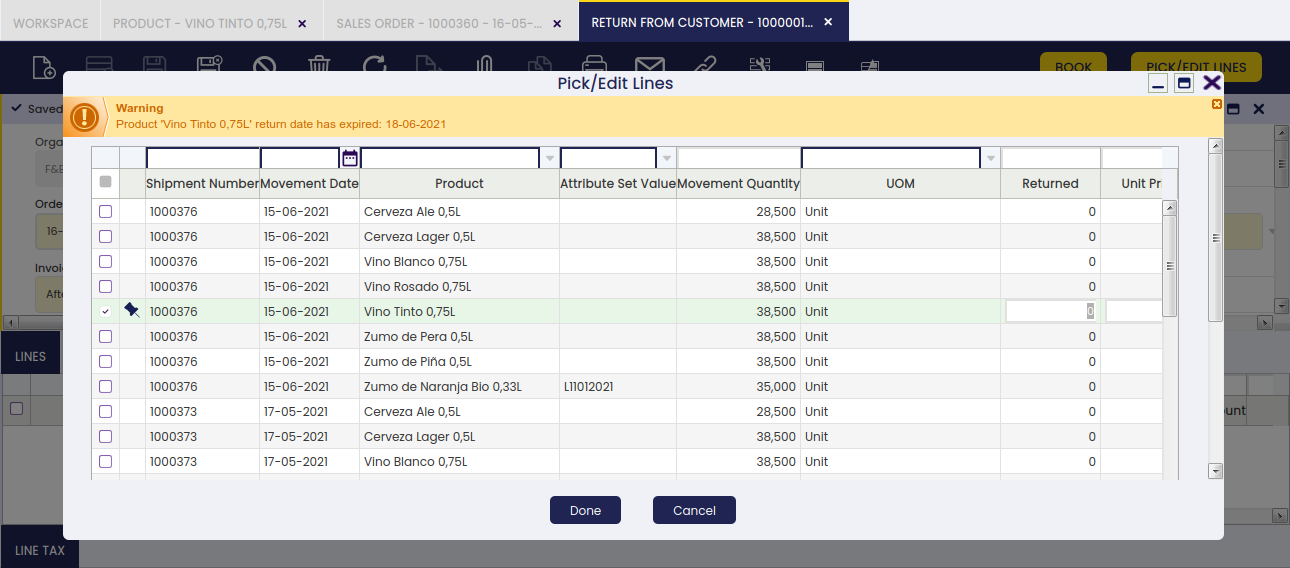
- Returnable:This flag is used to indicate if a product can be returned and, in the case that it is, a new field called. When trying to return a non-returnable product from the Return from Customer window, an error will be shown.
- Overdue Return Days:In this field, it is possible to configure the maximum amount of days before a product can not be returned. If the field is left blank, the product can be returned without time limitations. When trying to return a product whose period has expired, a warning message will appear.
Info
Note: If stocked is not checked and BOM is checked, the product price should be 0. Because in that special case, the product price is the sum of the prices of the bill of materials components it consists of. If promotion wanted to create, 'Discounts and Promotions' should be used.
Variants
Product can be marked as Is Generic. This means that variants of this product will be created based on some characteristics such as colour, size, etc. The definition of these characteristics takes place in the generic product, so it can be said that a generic product is like a template where new variants will inherit all the attributes (taxes, prices, image) of this product. Due to this, a generic product cannot be used for transactions but its variants.
Info
Note:Products that are marked as generic cannot be used in transactions operations such as sales orders, purchase orders, goods receipts, etc.
When this flag is marked, two buttons are shown:
- It shows all variants that have been created or not for that specific generic product. It is very useful when:
- The user does not want to generate all variants but just some of them. The button allows the user to select the possible combinations
- The user adds one more value, for example, red when having before green and white and the variants were already created in the past. It will show the new combinations
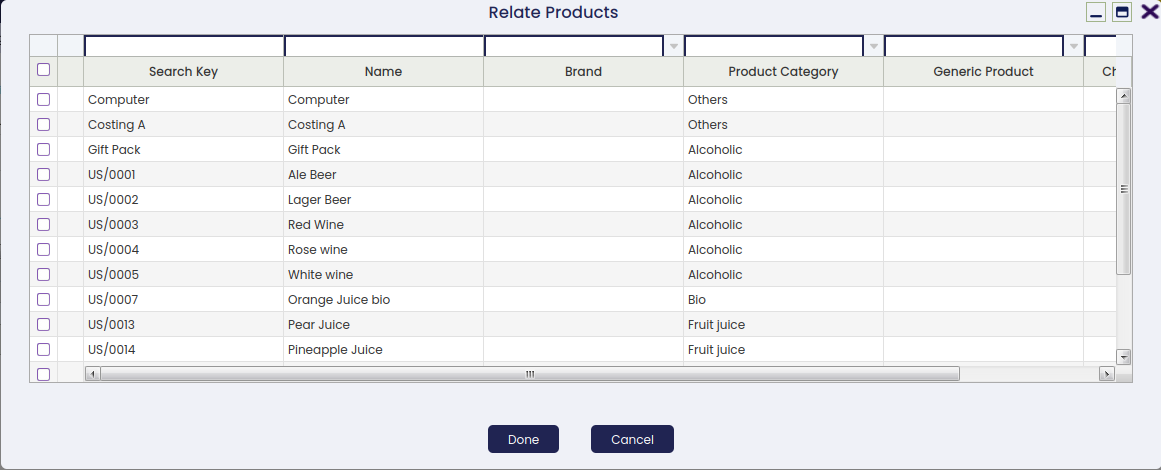
For example, imagine generic product T-Shirt Model A has the characteristics:
- Color: Blue, White
- Size: S,M,L
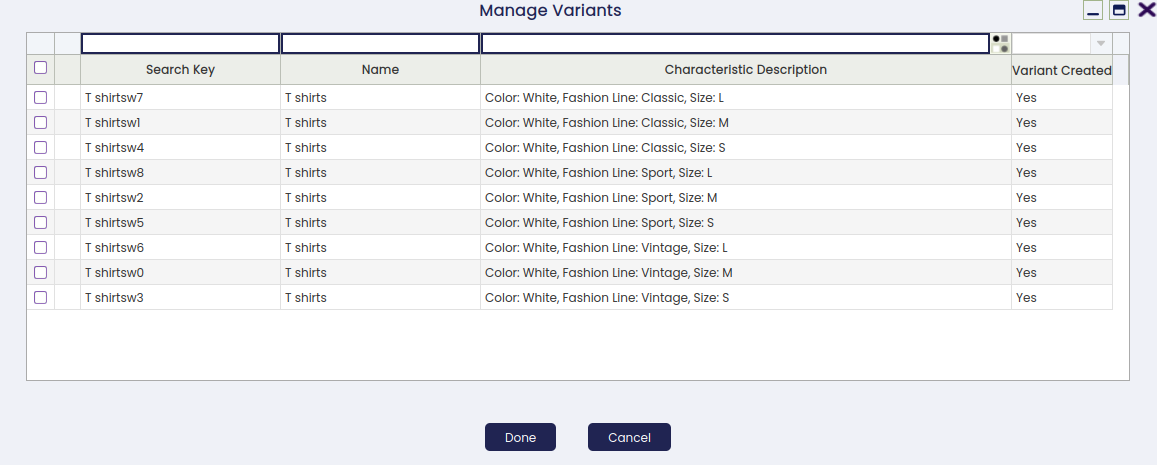
But still variants have not been created. If you press the button, you can see all possible combinations:
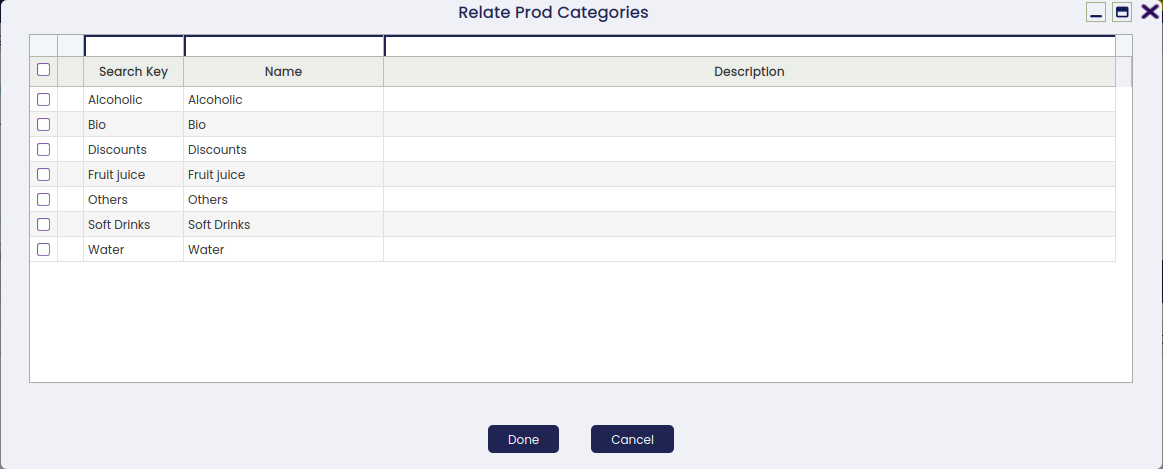
Then all combinations can be selected or just pick some of them. Once the selection takes place pressing Done, combinations will be created as Products. These new products will have the Generic Product field filled with the product that was marked as generic. We can say it is their parent product
- It creates/explode all product variants, that is, all combinations based on the characteristics defined
Another button that might appear is  . It only shows up when the generic product or the new product variant has a non-variant characteristic related. Two scenarios:
- Generic product: This button allows entering the value of that characteristic.
Imagine the characteristic is Fashion Line that has three values: Sport, Vintage, Classic.
Unlike the characteristics that are variants users cannot enter the value through the Characteristic Configuration tab - Variant Product: This button allows the user to enter/update the characteristic that is not variant.
Once a variant has been created, its characteristics and values can be viewed either in the grid or in form view:
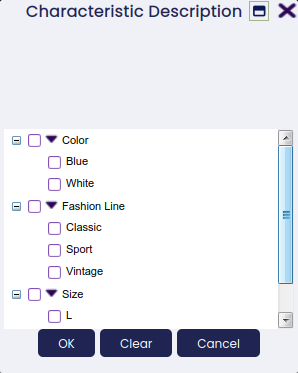
- Grid view: There is a new column Characteristic Description. This column is calculated and is not editable. It shows the characteristics with their values as a text. This column has a new search-selector in order to find product variants based on its characteristics
Press the button  and it opens a pop-up to select values:
- Form view: Product variants have a new section named Characteristic Description. This section contains as many fields as different characteristics the product has.
There is a preference Show Product Characteristics Parents: Values can be 1,2,3,4, etc. The number means how many levels in the hierarchy tree the user wants to show in form view in the Product window. For example, if the tree is: Color->Green->Green light->0034
New values of an existing characteristic can be added. For example, colour red when already having Blue and White. When it happens, this new value is automatically added to all generic products that already have the characteristic Color. This new value will be present in the configuration tab but deactivated. If the user wants to use it in a specific product in order to create new variants he can just activate the value and use the button Manage Characteristics
Modify Tax
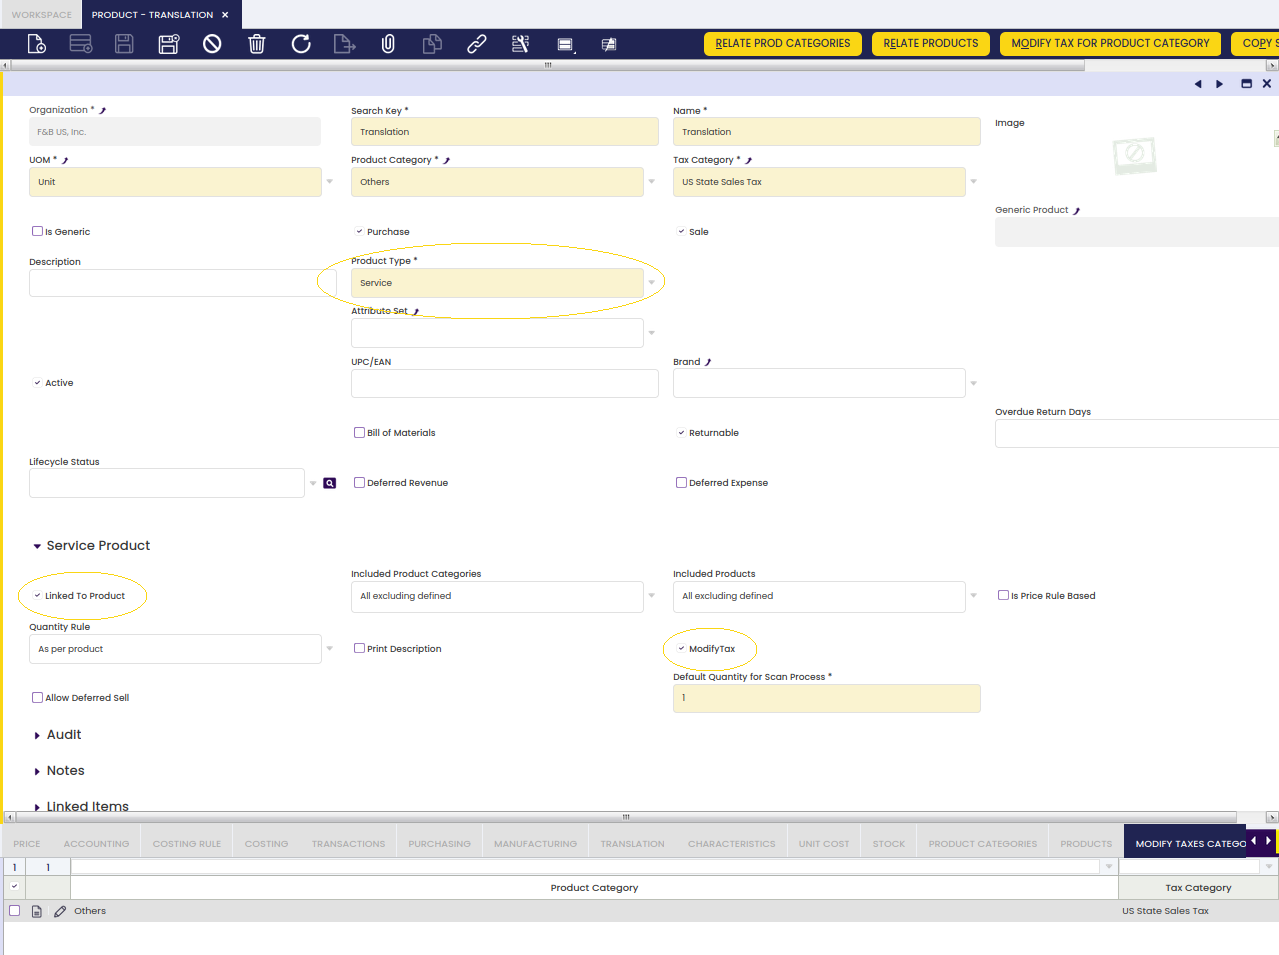
- Modify Tax: This check allows services to modify the taxes of the product linked to. This allows modifying taxes calculation of a product depending on a service condition. For example, a new kitchen furniture is sold to a customer, the taxes applied to the furniture might change if the installation of the furniture is also provided by the seller of the furniture. Also, this functionality applies only to Orders. The documents that are created afterwards will take the information from the Order document.
This tax modification is implemented through a service linked to the product. This service has to be marked as able to modify taxes of the products linked to, and the configuration of the products to modify taxes and the new tax to apply must be also specified.
To configure it, go to the Product window and create a new service. A service is just a product with the field Product Type set to Service. It has to be activated also the field Linked To Product and the field Modify Tax. When this field is activated, a new tab named Modify taxes categories is visible. In this tab, it is defined the configuration of the tax categories of products this service will modify when linked and the new tax category to apply.
To ease the configuration process, two components have been added:
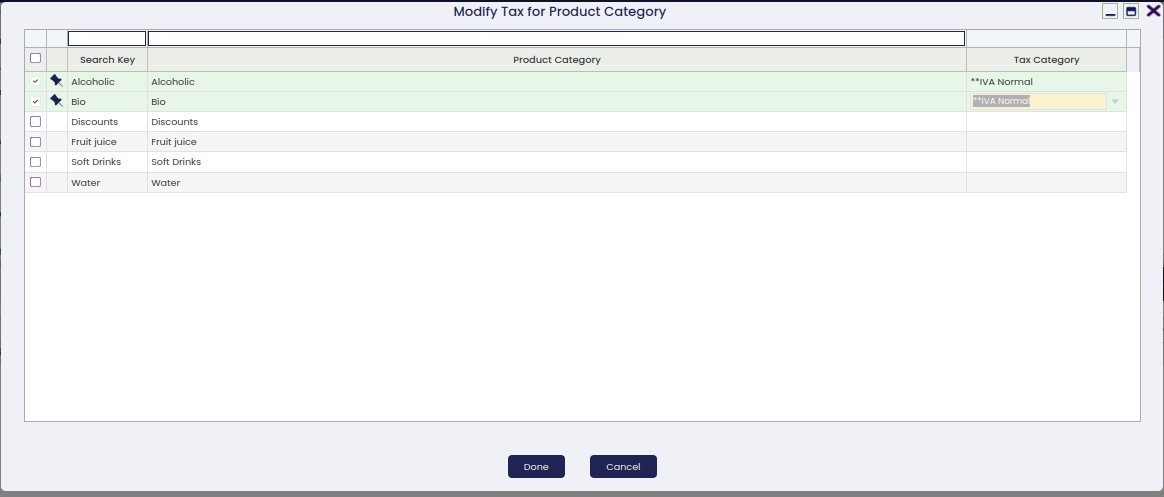
1.- Modify Tax for Product Category (Button): Pick and Execute window to assign the product categories and tax categories in the same action.
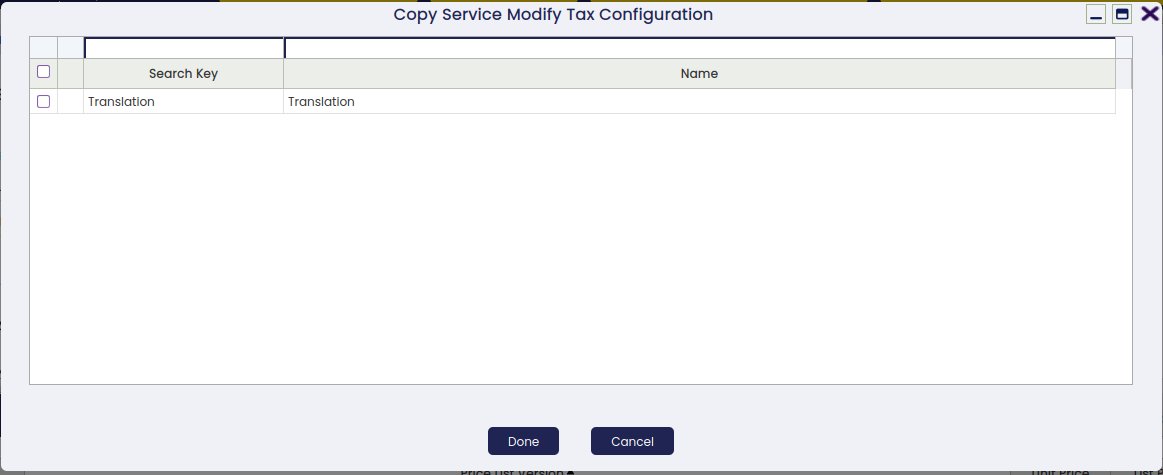
2.- Copy Service Modify Tax Configuration (Button): Pick and Execute window where services which modify taxes are displayed. The user can select one or many services, and current configuration will be assigned to selected services. Once the process has been executed, the old configuration (if it exists) will be deleted and a new one will be added. This process helps in deploying the same configuration to multiple services.
Price
A product can be part of many Price List Versions which are valid for a given time period.
There are two ways in which the user can get a product to be part of a Price List:
- by selecting the Price List/s and entering both the Net Unit Price and the Net List Price values in the Price List tab, while creating the product.
As a consequence of that, the product being created will also be part of the Price List selected. - by selecting the product and entering both the Net Unit Price and the Net List Price values, while creating the Price List.
As a consequence of that, the Price List as well as both Net Unit Price and Net List Price values will be automatically shown in the Price List tab of the product.
To learn more, visit Price List.
Price Rule Version
This tab will only be available when field Is Price Rule Based is selected. This tab gives the possibility of adding Service Price Rules to the Service starting from a certain date.
In this window it is also possible to define a maximum and minimum amounts that will be taken into account when showing services.
Those amounts define an interval between product prices so that the service will only be available to be added in case the sum of the selected products is between the interval.
For services of quantity rule: Unique Quantity the quantity of the line matters, as it will be only added one service.
For services of quantity rule: As per Product the quantity of the line does not matter, the price of the product only matters as there will be added as many services as products are selected. Only if all the products prices are between the tranche, the service will be shown.
Also, if once a service (not yet delivered) has been added to the receipt, the price of the related product changes, a validation will be triggered, and in case the service no longer meets the tranche rules, it will be removed from the current receipt and a pop-up will be shown saying so.
Accounting
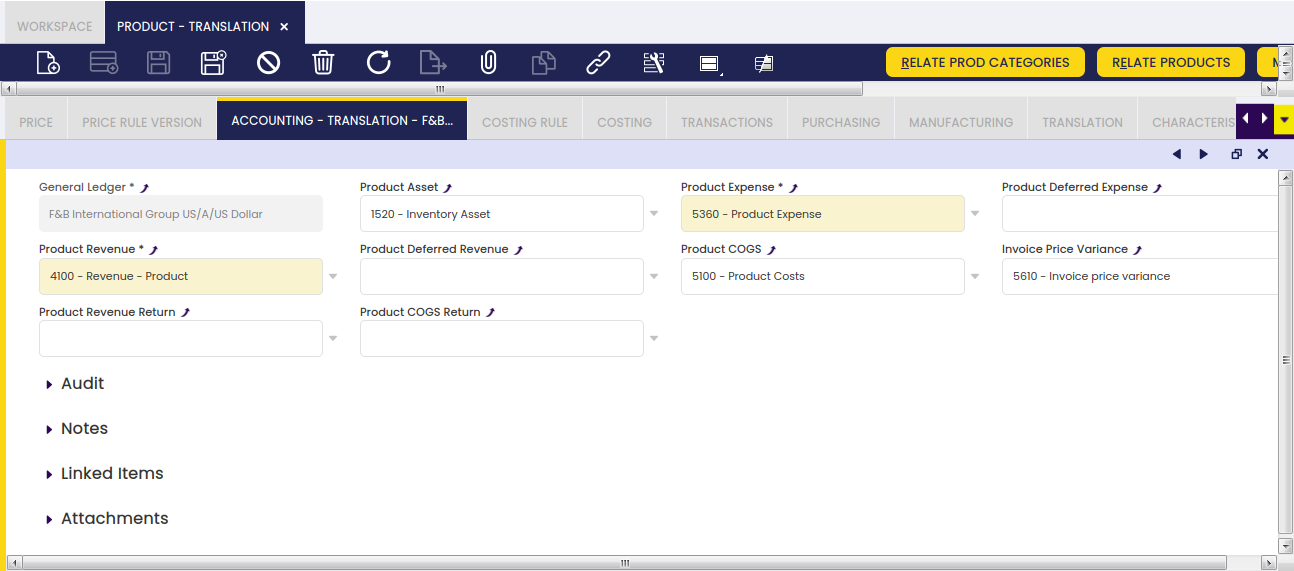
Accounting tab allows the user to configure the ledger accounts to be used while posting product related transactions such as product purchase or sales to the general ledger.
As shown in the screen above, you can configure for each product and general ledger some accounts to be used in the below listed transactions:
- Product Assets: this field stores the default account to be used to record inventory transactions such as:
- Inventory Counts
- Inventory Movements
- and Goods Receipt
This account is typically an asset account.
- Product Expense: this field stores the default account to be used to record product's purchases:
- Normally, this account can be configured as an Expense account type in case of not managing Perpetual Inventory.
In that case, the expense is accounted at the time the goods are purchased at the purchase price.
The revenue is accounted at the time the goods are sold at the sales price.
Not managing Perpetual Inventory implies the need of manually adjusting the inventory value at the end of the year.
That inventory adjustment implies calculating the difference between the Final Inventory Value and the Initial Inventory Value. - However, this account can also be configured as an Asset account in case of Perpetual Inventory management.
In that case, the expense needs to be accounted when the product is sold to the customer as Cost of the Goods Sold at the product cost.
In Etendo, the revenue is accounted at the time the goods are sold at the sales price and the cost of the goods sold is accounted at the time of shipping the goods at the product cost.
Managing Perpetual Inventory does not imply the need of adjusting the inventory value at the end of the year. - Product Deferred Expense: this field stores the default account to be used to record deferred expenses.
This account is typically an asset account. - Product Revenue: this field stores the default account to be used to record product sales revenues.
This account is typically a revenue account. - Product Deferred Revenue: this field stores the default account to be used to record deferred revenues.
This account is typically a liability account. - Product COGS: this field stores the default account to be used to record the cost of the goods sold.
This account is typically an expense account. - Product Revenue Return: this field stores the default account to be used to record sales returns.
This account is typically a revenue account. - Product COGS Return: this field stores the default account to be used to record.
This account is typically an expense account. - Invoice Price Variance: this field stores the default account to be used to record price differences between posted Goods Receipts and booked Purchase Invoices.
This account is typically an asset account.
At first, these accounts are inherited from the Defaults accounts of the organization's general ledger configuration for which the product is being created. The end-user can always change them.
Info
Besides, it is important to remark that it is possible to configure the creation of new correlative accounts for the products as described in the General Ledgers tab of the Organization window.
Bill of Materials
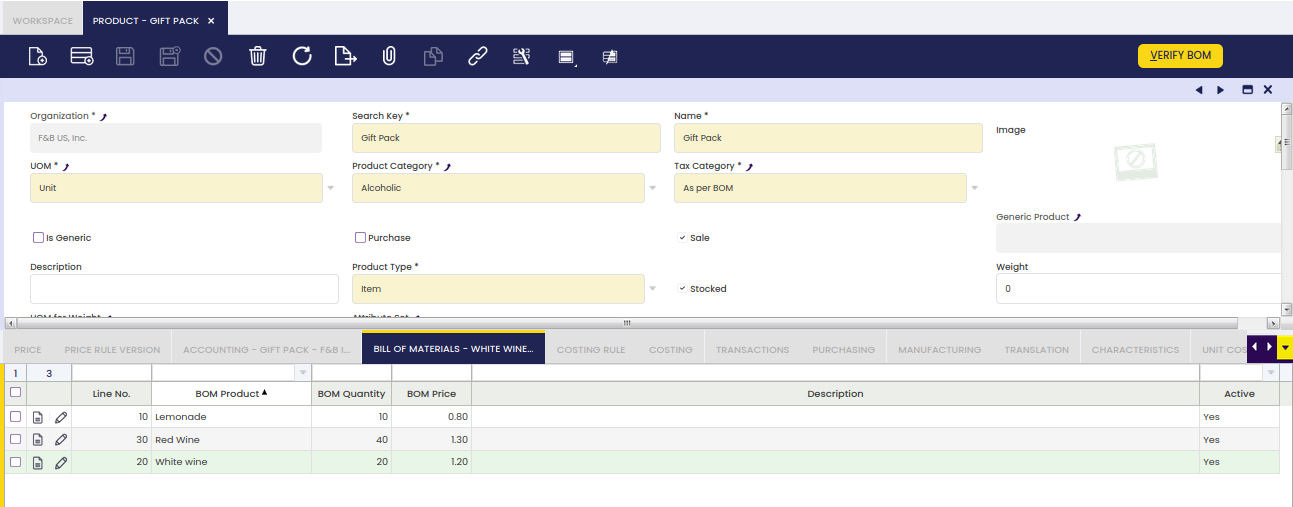
This tab allows editing the bill of materials components the selected product consists of.
Bill of Materials apply to products flagged as Bill of Materials.
This tab provides information of the list of products contained and its quantity for the Bill of Materials production.
If the product Tax_Category is flagged as As per BOM, this tab also provides information for the price of each product in the Bill of Materials list. The price and quantity in this list is used to perform the division of the base amount to calculate the taxes based on the taxes configured for each product of the list.
Costing Rule
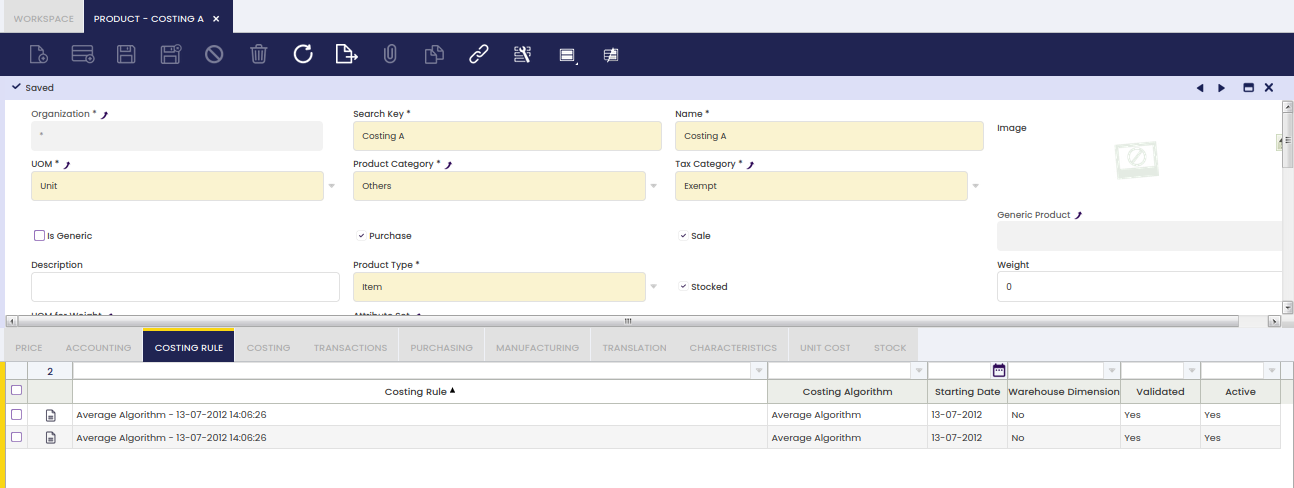
Costing rule tab allows the user to review the costing rules that apply to the product within a given date range.
Costing Rules apply to products set as Item type flagged as Stocked.
This tab provides information about the validated costing rule(s) which applies on a given date range to the product, as well as the Costing Algorithm defined for that rule.
Costing rules can be created and validated in the Costing Rules window related to the corresponding legal entity / organization.
Currency used by the costing rule is the currency set for the organization.
Costing
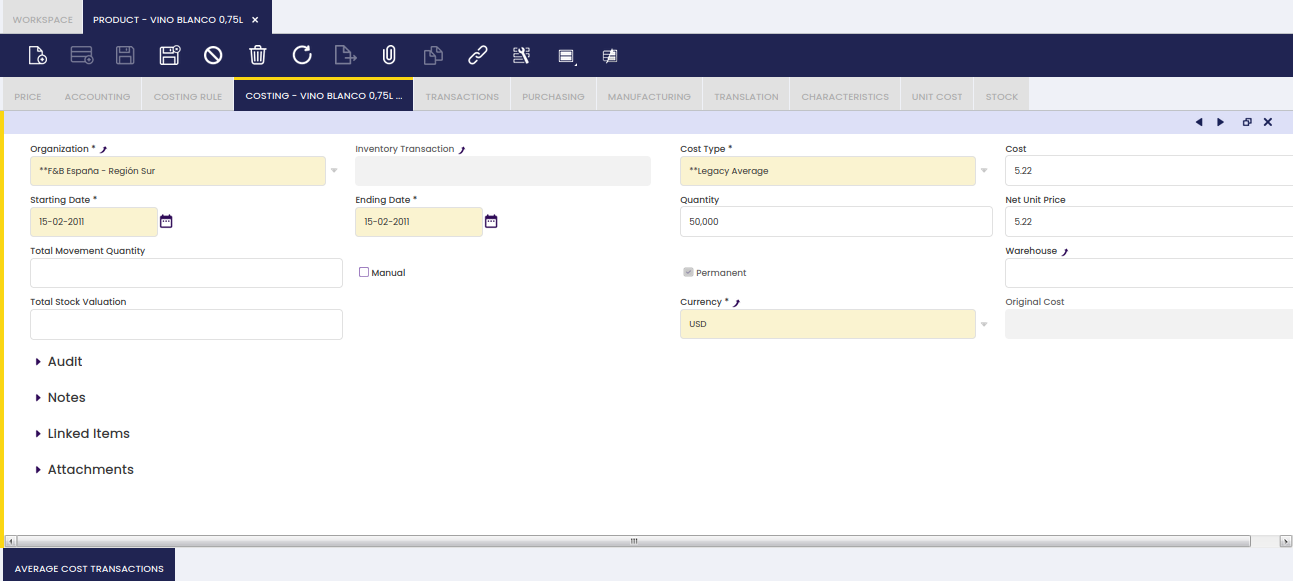
Costing tab collects and summarizes product cost related information as a result of every product transaction. Product's costs are valid during a fixed date range and can be calculated either by using an Average or a Standard costing algorithm.
One of the first things to do while creating or importing a product into Etendo is to inform Etendo about:
- the initial Cost of the products, if any, by entering it in this tab.
Keep reading to learn how to do it. - and the initial Stock of the products, if any, by creating and booking a Physical Inventory.
Overall, this tab allows to:
- define the Cost of stockable products, that cost can either be a standard cost or an average cost.
- define the Cost of non stockable products, that needs to be a standard cost.
In the same way, either a Standard or an Average Costing Rule needs also to be defined for the Organization as the way to calculate the cost of the products' transactions within that organization.
- review the average cost calculated by the Costing Server when using an Average Costing Algorithm.
Note that when using a Standard costing algorithm the cost of every product transaction is the default standard cost entered in this tab.
Info
The default standard cost can be used by the Default Cost method whenever it is not possible to get the price of a transaction for which its cost needs to be calculated.
Average algorithms override the behavior of the Default Cost method prioritizing the use of the current Average Cost if any.
- and finally to have a view of all the input transactions of the product which have impacted on product cost calculation.
- Input transactions such as vendor receipts are the ones which impact on product cost calculation, therefore the Inventory Transaction field clearly reflects those one by one.
- Similarly, a permanent manual cost adjustment executed in an output transaction, such as a Goods Movement From (M-) impacts on product cost calculation, therefore the Inventory Transaction field clearly reflects these type of output transactions.
- The very last transaction informs about:
- the last cost, valid until a given ending date
- and the total amount of units of that product which are valued at that cost.
Here, the costs calculated by the legacy engine are also visible.
It is possible to recognize them by their cost type:
- Legacy Average
- and Legacy Standard.
The way to define the Cost of a product implies to enter below detailed information:
- The Organization for which the calculated costs apply to. Note that the organization needs to be a Legal Entitytype organization.
- The Cost Type. There are two cost types available Standard and Average.
- The Cost of the product, that cost can either be the standard unit cost of the product or the average unit cost of the product.
- An Starting Date when the initial product cost entered is valid from.
- An Ending Date, when the initial product cost entered is valid until, i.e. 31-12-9999.
That is the same as saying that the cost entered is valid until a new movement of that product is dated on a given date prior to 31-12-9999. Obviously that new input movement will change the product cost.
Besides:
- the Manual flag, allows the user to differentiate the cost transactions you have manually entered from the ones automatically created by Etendo.
- manual ones created by you while entering default product cost information should be checked as Manual.
- automatic ones related to Material Transactions bookings will not be checked as Manual.
- the Permanent flag blocks the ability to delete the cost manually. All costs should be set as Permanent.
- the Warehouse allows having a different cost by warehouse when desired and whenever the Costing Rule defined allows to do that.
Warning
Note that you should not fill this field if the Costing Rule does not have the Warehouse Dimension field checked.
Transactions
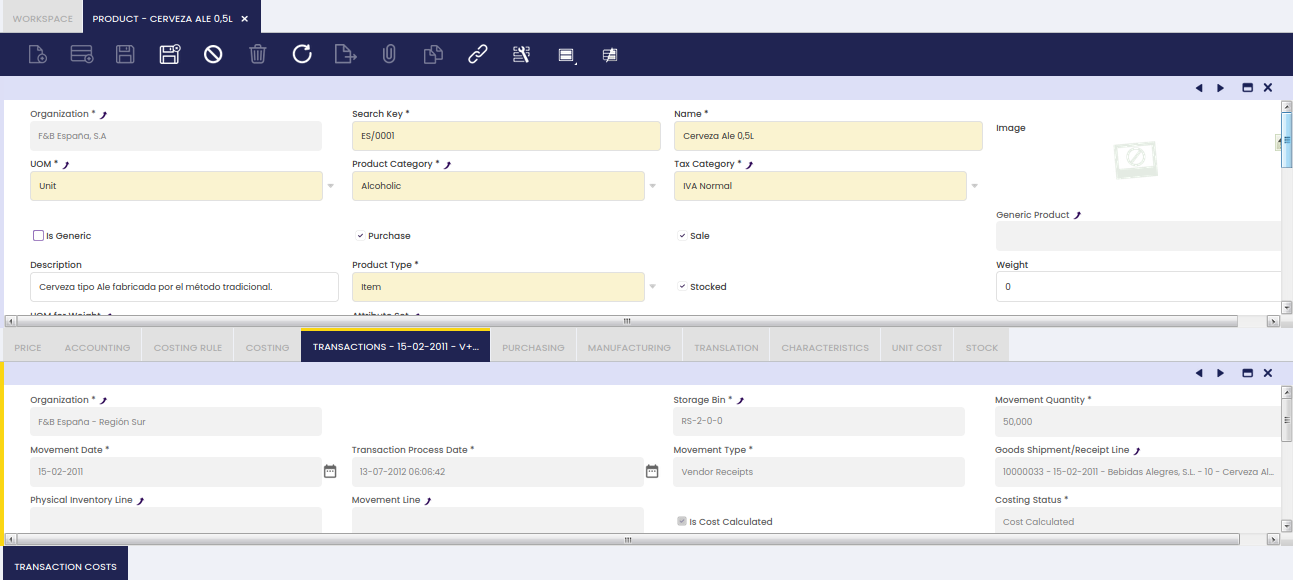
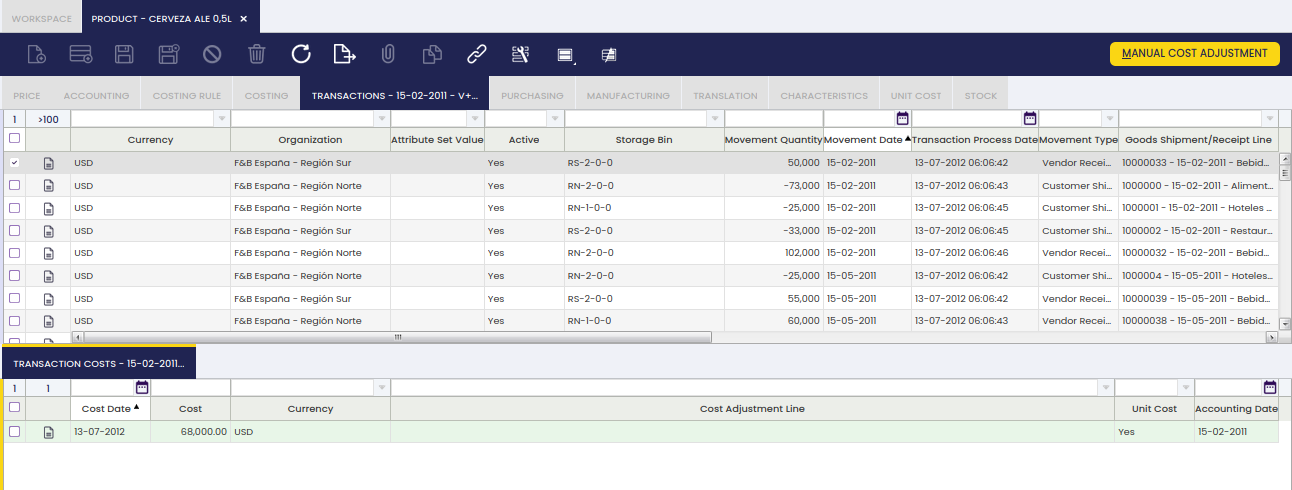
Transaction tab is a summarized view of all the transactions of a product.
There is not a way for the user to directly create new product transactions in the transactions tab.
Product transactions of any type are automatically saved and listed in this tab as they are booked in Etendo.
As shown in the image above, Etendo saves and informs us about below relevant data for each product transaction type:
- Storage Bin where the product has been stored in or taken from
- Movement Quantity, as the number of product units moved internally or either in or out
- Movement Date, as the date of the product transaction
- Movement Type, such as:
- Customer Shipment, this type can have:
- a negative movement quantity whenever a product is shipped to a customer in a Goods Shipment document.
- a positive movement quantity whenever a product is returned from a customer in a Return Material Receipt.
- Internal Consumption, as the units consumed in internal activities such as projects, reparations. This type can be:
- Positive if the units of the product reduce stock from the warehouse
- or Negative if an internal consumption transaction is canceled, this works like when a shipment is canceled.
- Inventory In, this one relates to a Physical Inventory Count higher than the Stock booked for a product in Etendo.
- Inventory Out, this one relates to a Physical Inventory Count lower than the Stock booked for a product in Etendo.
- Movement From, this one relates to Goods Movements from a Warehouse & Storage Bin
- Movement To, this one relates to Goods Movements to a Warehouse & Storage Bin
- Production, as the units of a product included in a work effort. This type can be:
- Positive, for P+ when products are added to the warehouse
- or Negative, for P- when products are consumed
- Vendor Receipts, this type can have:
- a positive movement quantity whenever a product is received from a vendor in a Goods Receipt document.
- a negative movement quantity whenever a product is returned to a vendor in a Return to Vendor Shipment.
Etendo also informs us about the specific:
- Goods Receipt/Shipment Line
- Physical Inventory Line
- Movement Line
- Production Line
- or Project Issue
information of the product transaction, as applicable.
It is also possible to review:
1. The Costing Status of a transaction.
Costing status of a transaction can be any of the ones listed below and has a lot to do with the Costing Background Process:
- Not Calculated. This status means that the costing background process has not taken the transaction yet to calculate its cost.
- Cost Calculated. This status means that the costing background process has already taken the transaction and its cost has been calculated.
- Pending. This status has been implemented to get that the costing background process does not throw an error whenever it is not possible to calculate the cost of a transaction.
This status is not used by the Costing Algorithms currently implemented in Etendo but can be used by other costing algorithms such as FIFO for those cases where a product output transaction is booked without booking its corresponding product input transaction. - Skip. This status has been implemented to make the costing background process not taking into account the transactions set as Skip while calculating costs.
This status is not used by the Costing Algorithms currently implemented in Etendo but could be used by other costing algorithms.
2. and whether the cost of a transaction has been calculated or not.
As soon as a product transaction gets its cost calculated by the Costing Background Process the field Is Cost Calculated gets the value Yes.
Once the cost of a transaction is calculated you can also view the:
- Trx Original Cost, that is the original cost of the transaction
- Total Cost, that is the sum of the original cost of the transaction and all adjustment costs of any type.
- Unit Cost, that is the sum of the original cost and all the unit cost type adjustments.
- Currency used for the calculations.
Additionally, Is Cost Permanent field informs whether the cost of a transaction is permanent or not. In case it is permanent, it will not be changed anymore.
Finally, it is important to remark that in the case of Average cost algorithm, the average cost of a product is calculated as Moving Average.
The average cost of a product is calculated based on the product's transaction flow, therefore it is the sum or subtraction of the Total Cost of the transactions listed for the product, divided by the sum of the Total Movement Quantity of the transactions.
For instance the average cost of a product which transactions are listed below is equal to 23.33 = (2000.00-1000.00+2500.00)/(100-50+100):
- goods receipt for Movement Qty 100 for a Total cost of 2000
- goods shipment for Movement Qty -50 for a Total cost of 1000
- goods receipt for Movement Qty 100 for a Total cost of 2500
Manual Cost Adjustment
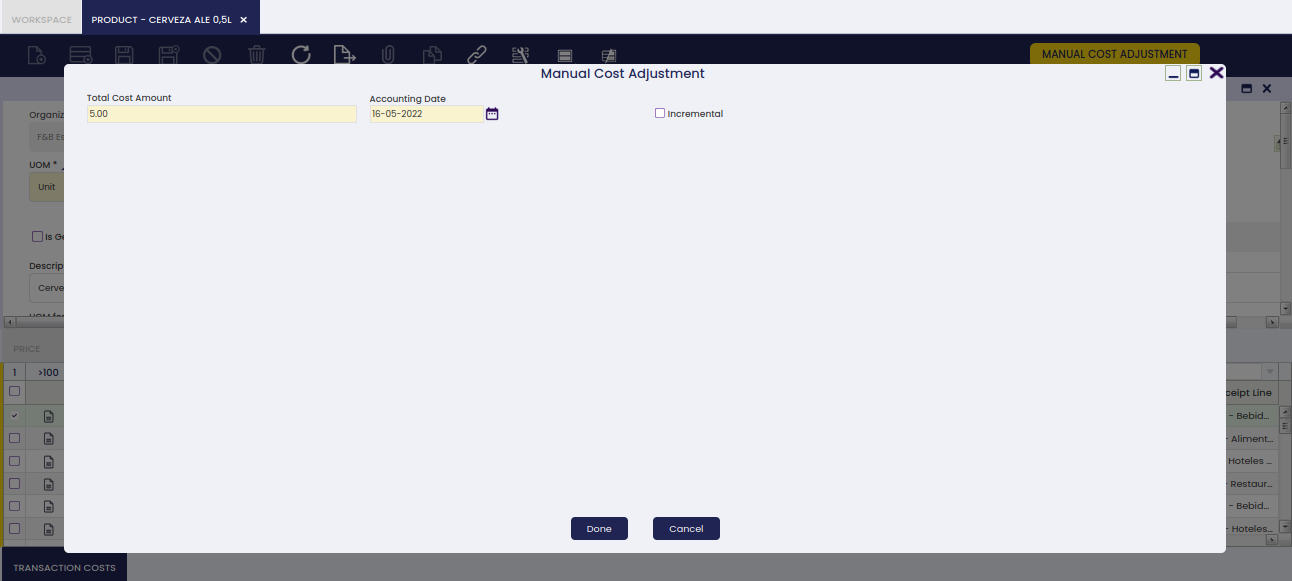
Additionally, the cost of a transaction can be modified by clicking the Manual Cost Adjustment process button. After clicking this button, a new popup is opened:
This pop-up allows entering below detailed data:
- Total Cost Amount: that is the new total cost of the product transaction
- Accounting Date: that is the date when this manual change which will imply a cost adjustment is going to be post to the ledger
- Incremental:
- if not checked, the amount entered in the total cost amount field is the new Total Cost of the transaction which, besides that, will be set as a Permanent cost which cannot be adjusted anymore.
- if checked, the amount entered in the total cost amount field is going to be added to the current total cost, besides Unit Cost checkbox is shown.
- Unit Cost: This checkbox is shown only if Incremental checkbox is selected.
- if not checked, the incremental amount entered in the field total cost amount is not going to be considered part of the transaction unit cost but total cost. This is like entering an extra cost such as Landed Cost, which does not change the unit cost of that transaction but the total cost.
- if checked, the incremental amount entered in the field total cost amount is going to be considered part of the unit cost of the transaction.
For additional information about which cost adjustment is, or it is not unit cost, please review the section Cost Adjustments - Overview.
Once done, a manual cost correction cost adjustment will be created.
This cost adjustment can be reviewed and posted to the ledger in the Cost Adjustment window.
In the same way, this cost adjustment can also be reviewed in the Transaction Cost tab.
Transaction Costs
Transaction Costs records are automatically created by the Costing Background Process and then listed for the product in this tab.
As soon as a product transaction gets its cost calculated, a new record is created in this tab.
As soon as a product transaction gets its cost adjusted, a new record is created in this tab referring to a Cost Adjustment Line.
Some relevant fields to note are:
- Cost Date: that is the date when the cost has been calculated (i.e. accounting date of a goods receipt)
- Cost: that is the total cost calculated by the costing background process
- Currency: that is the currency used to calculate the cost.
Currency cost is legal entity currency, therefore product transaction having a different currency (price list in USD currency for instance) gets its cost calculated in the legacy currency (i.e. EUR) - Cost Adjustment Line: if a calculated cost comes from a cost adjustment, this field populates the cost adjustment line that causes that cost.
At the end, the total cost of a product transaction is the sum of all the costs listed in this tab, original and adjusted ones which could be part of the unit cost or not (i.e landed costs). - Unit Cost: this field details whether the calculated cost is part of the unit cost of the product or not.
- Accounting Date: that is the accounting date when the cost has been calculated and post to the ledger (i.e. accounting date of a goods receipt post to the ledger)
Purchasing
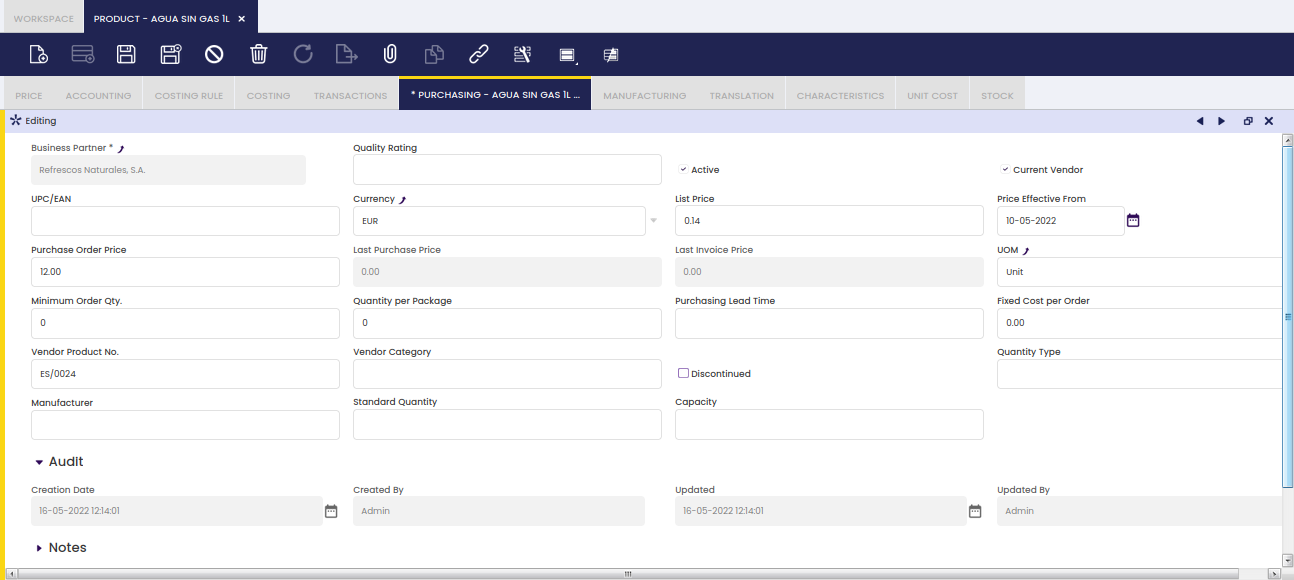
Purchasing tab information is used for products that are planned by the purchasing plan.
In this tab, the information that is required for the creation of the Purchasing plan and of the automatic creation of Purchase Orders from the Purchasing Plan is entered.
Also, the Requisition process uses the Business Partner information for the automatic creation of Purchase Orders.
- Business Partner, the vendor that will appear on the Purchase Order when created automatically from the Requisition or from the Purchasing Plan.
- Quality Rating: quality rating of the vendor. Information only field that is not used by the MRP process.
- Current Vendor checkbox: indication of the default vendor that will be taken into account by the MRP process.
- UPC/EAN: Universal Product Code/European Article Number (barcode) of the product as used by the selected vendor. Information only, this information does not appear on a created Purchase Order.
- Currency: currency of the purchase order.
- Net List Price: information only field of the Net List Price that has to be updated manually on the automatically created Purchase Order from the Purchasing Plan.
- Price Effective From: the date that the entered prices became valid. Information only, not used by the MRP process.
- Purchase Order Price: information only field of the Net Unit Price that has to be updated manually on the automatically created Purchase Order from the Purchasing Plan.
- Last Purchase Order Price: the Net Unit Price on the most recently added Purchase Order.
- Last Invoice Price: the Net Unit Price on the most recently added Purchase Invoice.
- UOM: the unit of measure of the product.
- Minimum Order Qty.: a minimum order quantity for the vendor. In the Purchasing plan, the quantity for suggested purchase orders is this value or above.
- Quantity per Package: information only for the packaging of the product. This information is not taken into account for the creation of the information in the Purchasing Plan nor for the creation of Purchase Orders.
- Purchasing Lead Time: time in calendar days between when the product is ordered from the vendor and when it is received in stock. In the Purchasing Plan, this information is used to calculate when purchase orders should be placed, resulting in the Planned Order Date for the suggested purchase order.
- Fixed Cost per Order: information only field of a fixed amount that has to be added manually to the automatically created Purchase Order from the Purchasing Plan.
- Vendor Product No.: the vendor reference for the product
- Vendor Category: information-only field to add vendor category information.
- Discontinued: information-only field to indicate that this product is no longer used. The Purchasing Plan does not take this set up into account when generating the plan and when creating Purchase Orders. When selected, the field Discontinued by date to indicate when the product is discontinued. For information-only purposes.
- Quantity Type:
- Exact: each suggested purchase order is for the exact required quantity. For example, if the demand is for 85 units, the quantity for the suggested purchase order is 85 units.
- Multiple: the quantity that appears as the quantity for the suggested purchase order is a multiple of the standard quantity (as defined on this screen). For example, if the standard quantity is 20 units and the demand is for 85 units, the quantity for the suggested purchase order is 100.
- Manufacturer: information-only field to indicate the manufacturer of the product.
- Standard Quantity: quantity that is taken into account in combination with the Quantity Type for the quantity value for the suggested purchase order.
- Capacity: quantity per day the vendor is able to supply. Based on this field and the lead time, the purchase order date is calculated. The number of days is calculated as the max value of the lead time and the required quantity / capacity.
Manufacturing
Manufacturing tab is used for products that are planned by the manufacturing plan.
The information in this tab is mainly used by MRP to process the Manufacturing Plan and Purchasing Plan. The storage bin field is filled out for products in production to indicate the default storage bin the product will be stored in when coming out of production.
- Storage Bin: default location in the warehouse of the product.
- Planning Method: definition of the elements of supply and demands that are taken into account and with which percentage for the creation of the Manufacturing Plan and Purchasing Plan. For more details, see the Planning Method section.
- Planner: the person responsible for the execution of the MRP plan of the product. For more details, see the Planner section.
- Capacity: production capacity per day for the product.
- Min. Quantity: minimum quantity to be entered on a work requirement.
- Quantity Type:
- Exact: each suggested work requirement is for the standard quantity (as defined on this screen). Multiple suggested work requirements appear for the total demand. For example, if the standard quantity is 20 units and the demand is for 85 units, 5 lines of suggested work requirements with quantity 20 appear.
- Multiple: the quantity that appears as the quantity for the suggested work requirement is a multiple of the standard quantity (as defined on this screen). For example, if the standard quantity is 20 units and the demand is for 85 units, the quantity for the suggested work requirement is 100.
- Standard Quantity: quantity that is taken into account in combination with the Quantity Type for the quantity value for the suggested work requirement.
- Minimum Lead Time: manufacturing lead time of the product.
- Safety Stock: the minimum level of stock that has to always be in the warehouse. For example, if there is a safety stock for 1000 units and stock is 900 units, a work requirement (Manufacturing Plan) or purchase order (Purchasing Plan) is suggested for 100 units. Typically, low cost products or products with a very long lead time are set up with a safety stock level.
-
Max not reserved stock: Maximum stock without taking into account the pre-reserved stock. This field is only visible when Stock reservation feature is enabled. See the below example to understand how it works:
-
Safety stock and Max not reserved stock are 200 and 1000 units, respectively
- There are several sales orders to be delivered by 3000 units in total
- These sales orders will generate the corresponding purchase orders (pre-reserved) when launching the MRP
- There are currently in stock 80 units
-
When MRP is launched it will create the corresponding pre-reserved and because being after below safety stock it will create another purchase order:
- As the Max not reserved stock is defined, the system will create a purchase order of 920 units (1000-80)
- If this parameter was not defined, it would work as usual and it would create a purchase order of 120 units (200-80)
-
Abc: value used in warehouse management to indicate a combination of the stock level and the cost of a part. The value is calculated by running the Pareto Product Report.
Translation
Product names can be translated to any language.
The way to get that is as simple as:
- select first the language required
- and then enter the product name translated into that language.
Characteristics
Relation of characteristics assigned to the Product.
Fields:
- Sequence number: Order of the characteristics
- Characteristic: List all the characteristic defined in Product Characteristics window
- Variant: When it is marked, it will explode/create combinations with its values. If it is not marked, it will not create combinations with other characteristics. For example
- Characteristic Color: Variant marked with value Blue and White
- Characteristic Size: Variant marked with value M and L
- Characteristic Fashion line: Variant not marked with value Sport
- It will create four variants/products and for all of them with the characteristic Sport
- Explode Configuration Tab: Flag available on Generic Products and Variant Characteristics. When it is checked, the values of the selected variant characteristic are automatically inserted in the Characteristic Configuration tab. If it is not checked, the values must be added manually.
- Defines Price: Every value of that characteristic will define the price of the new product. It will overwrite the price defined for the generic product. This price is defined in the Characteristic Configuration tab
- Price List Type: It is shown when Defines Price is marked. It allows the user to select in which type of price list you want to overwrite the price. For example:
- The generic product has two price lists: One is for sales and the other for purchase
- You select Sales Price List value. Then when creating the product variants it will only overwrite the price in price lists defined as Sales
- The opposite if the value selected is Purchase Price List
- Define image: Every value of that characteristic will define the image of the new product. It will overwrite the image of the generic product. This image is defined in the Characteristic Configuration tab
- Characteristic Subset: List all the subsets included for the selected Characteristic (i.e. Pants)
Once the record is saved, all the values of the characteristic are populated into the characteristic configuration tab
Characteristic Configuration
Characteristic Configuration tab contains the available values for each characteristic assigned to the generic product. Price modifiers to create the variants are defined in this tab as well.
Fields to take into account:
- Characteristic value: Cannot be editable since it is populated automatically when selecting the characteristic
- Code: Code for the value. It inherits what has been defined in product characteristic window
- Unit price: This field is displayed when the characteristic is marked as Defines Price. The aim of this field is to have different prices per value. For example, depending on the Sizes
- Image: This field is displayed when the characteristic is marked as Defines Image. The aim of this field is to have different images per value. For example, depending on the colour.
Stock
This Tab shows the available Stock for this Product in the application. It only shows Storage Bins for which the quantity available of the Product is not 0
For each not empty storage bin, it also shows information about the:
- reserved quantity
- and the allocated quantity
Unit Cost
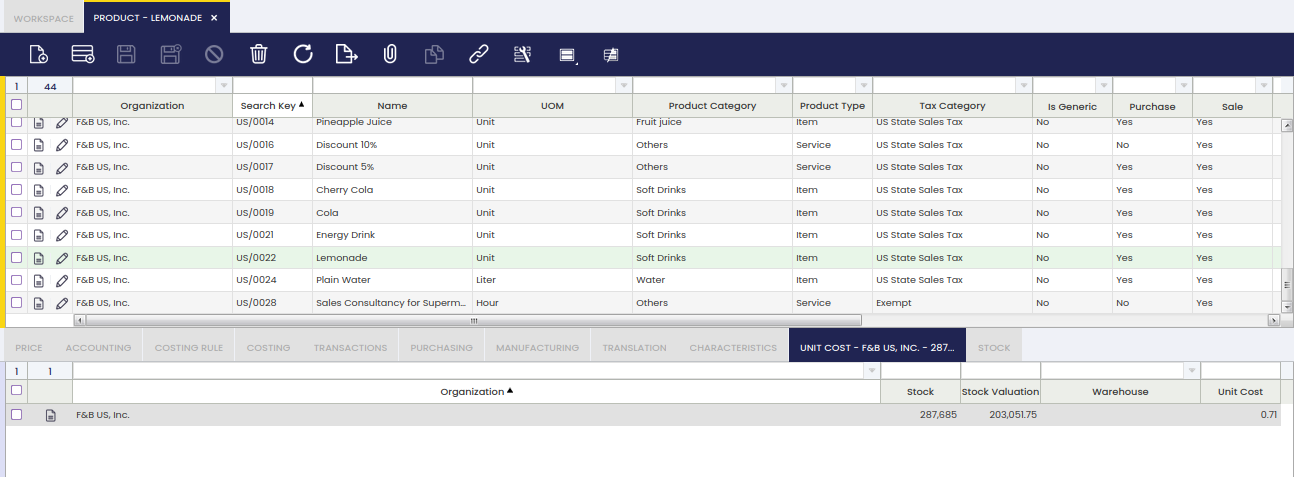
Unit Cost Tab displays information about the actual Unitary Cost (Unit Cost) of the product.
The Unitary Cost of a Product is the value of each stocked unit of the product no matter the costing algorithm used to calculate the cost of that product.
This cost is calculated using the Total Stock of a product and the Total Value of the stock of the product, as per formula below:
- Unit Cost = Total Stock Value / Total Stock
This way, the unitary cost calculated is independent of the Costing Algorithm used to calculate the cost of each transaction and product, therefore this unitary cost is compatible with all Costing Algorithms (Average, Standard, FIFO, ...)
In this Tab, there is going to be a record for:
- each Organization that is a Legal Entity that has a Costing Rule defined
- or each Organization and Warehouse, whenever Warehouse Dimension is defined as a costing dimension of the current Costing Rule defined for the Legal Entity.
Product Categories
The user can define if a product of a certain product category can be related to a product of 'Service' type by creating a relation between an Order Line of the Service product and another Sales Order Line of the product belonging to included/excluded product categories.
This tab will only be available when the field ‘Included Product Categories’ of the Service has a value. It contains all the product categories related to the service.
The following information about related products is available in the tab:
- Search Key: Search Key of the Product Category.
- Name: Name of the Product Category.
- Description: Description of the Product Category.
This tab is not editable, it is not possible to add records manually or edit them. It only allows to delete records. To add new records, it is necessary to click the ‘Relate Prod Categories’ button (Visible only when the field ‘Included Product Categories’ has a value). This button will open a Pick & Edit displaying all product categories not related to the service.
Category Price Rule Version
Products
The user can define if a product can be related to a product of 'Service' type by creating a relation between an Order Line of the Service product and another Sales Order Line of the product included/excluded.
This tab will only be available when the field ‘Included Products’ of the Service has a value. It contains all the products related to the service.
The following information about related products is available in the tab:
- Search Key: Search Key of the Product.
- Name: Name of the Product.
- Brand: Brand Key of the Product.
- Product Category: Product Category to which belongs the product.
- Generic Product: Generic Product of the Product, if it has any.
- Characteristic Description: Characteristics of the Product, if it has any.
This tab is not editable, it is not possible to add records manually or edit them. It only allows to delete records. To add new records, it is necessary to click the ‘Relate Products’ button (Visible only when the field ‘Included Products’ has a value). This button will open a Pick & Edit displaying all products not related to the service.
Product Price Rule Version
Alternate UOM
Info
The user must enable this preference by entering the Preference window, checking the Property list checkbox, choosing “Enable UOM Management” in the Property field with value Y.
Fields to note:
- UOM, that is the alternative unit of measure of the product, for instance Pallet.
It is important to remark that any unit of measure needs to be created and configured in Unit of Measure window. - Conversion Rate, that is the conversion between product's alternative unit of measure (AUM) to product's unit of measure.
For instance, if product's AUM conversion to product's UOM is 50; that means that 1 Pallet represents 50 Units. - Gtin, that is the Global Trade Item Number for the product defined in the corresponding AUM
- Sales, Purchase and Logistics, those fields allow defining the use of product's AUM within Sales, Purchase and Inventory flows.
Values allowed are: - Primary: Product's AUM defined in this tab is used as default unit of measure in the selected flow (Sales or Purchase), when creating a sales or purchase document such as an order or receipt/shipment.
Only one Primary AUM can be defined per Product and flow.
For instance, if Pallet is the primary AUM defined for a product within Purchase flow, that means that every time that a purchase document is created, Pallet will be the default unit of measure shown. - Secondary. Product's AUM defined in this tab can be selected for the selected flow when creating a Document.
For instance, if Pallet is the secondary AUM defined for a product within Sales flow, while Pack is primary one; that means that every time that a sales document is created, Pack will be the default unit of measure shown, but end-user can change it to Pallet. - Not Applicable. The AUM defined in this tab for the product will not be available for selection when creating Documents for the selected flow.
That is the option to select for Logistics as the use of alternative units of measure is currently implemented just for sales and purchase. Inventory transactions/documents always refer to the product's unit of measure.
Modify Taxes Categories
It defines tax modification for products linked to service. Products linked to this service that belong to the configured category will change the tax category when linked to this service.
