How to Create a New REST Webservice
IMPORTANT: THIS IS A BETA VERSION
This page is under active development and may contain unstable or incomplete features. Use it at your own risk.
Overview
This section explains how to create a new web service that returns all sales orders for a specific product. The focus is on reading data rather than updating the database. Because the response must be provided in XML format, the article also describes how to convert database objects into XML.
The final section explains how XML received through a web service request can be transformed into business objects and used to update the database.
Etendo REST provides a CRUD-like interface that allows external applications to retrieve, update, create, and delete business objects through standard HTTP requests.
The web service described here runs inside the Etendo REST framework, taking advantage of built-in features such as security and exception handling.
An Etendo REST web service implementation consists of two parts:
- A class that defines the web service behavior and implements the
org.openbravo.service.web.WebServiceinterface. - A configuration file that registers the web service within the Etendo REST framework.
Both elements are covered in this document.
Info
For an introduction to Etendo REST, refer to REST Web Services concepts
Module
All new developments must belong to a module that is not the core module.
Info
Please read the How to create a module section to create a new module.
Implementing the webservice logic
The webservice shall return all the sales orders for a certain product. Here is the workflow of the service:
- Receive the http request which contains the product ID as a parameter.
- Read all sales orders which have this product in any of the order lines.
- Convert the sales order(s) to an xml.
- Return the xml to the client browser sending the request.
As mentioned above the webservice class should implement the interface org.openbravo.service.web.WebService. This interface has four methods which correspond to the HTTP request methods: GET, POST, PUT, DELETE. The four methods all receive the same three parameters:
- path: the part of the path after the context path,
- request: the Http request object,
- response: the Http response object.
Within this scenario the request object is required in order to retrieve the productID parameter and the response object to return the xml to the client browser.
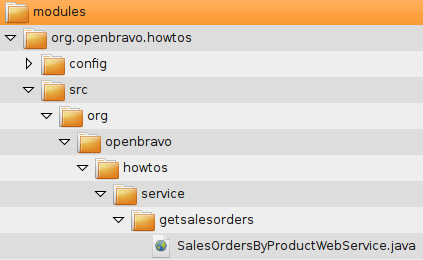
Now assume that the webservice will be created in a module with javaPackage: org.openbravo.howtos. After creating a module there should be a folder:
Create a src directory in this folder. Within this folder, create the full folder structure according to the full package name the webservice will reside in: org.openbravo.howtos.service.getsalesorders
Hence, the folder structure that should be created is:
Next create a new Java file in that folder:
EtendoERP/modules/org.openbravo.howtos/src/org/openbravo/howtos/service/getsalesorders/SalesOrdersByProductWebService.java
with the content given below:
/*
    *************************************************************************
    * The contents of this file are subject to the Openbravo  Public  License
    * Version  1.0  (the  "License"),  being   the  Mozilla   Public  License
    * Version 1.1  with a permitted attribution clause; you may not  use this
    * file except in compliance with the License. You  may  obtain  a copy of
    * the License at http://www.openbravo.com/legal/license.html
    * Software distributed under the License  is  distributed  on  an "AS IS"
    * basis, WITHOUT WARRANTY OF ANY KIND, either express or implied. See the
    * License for the specific  language  governing  rights  and  limitations
    * under the License.
    * The Original Code is Openbravo ERP.
    * The Initial Developer of the Original Code is Openbravo SLU
    * All portions are Copyright (C) 2001-2009 Openbravo SLU
    * All Rights Reserved.
    * Contributor(s):  ______________________________________.
    ************************************************************************
    */
package org.openbravo.howtos.service.getsalesorders;

import java.io.StringWriter;
import java.io.Writer;
import java.util.ArrayList;
import java.util.List;

import javax.servlet.http.HttpServletRequest;
import javax.servlet.http.HttpServletResponse;

import org.hibernate.criterion.Restrictions;
import org.openbravo.base.structure.BaseOBObject;
import org.openbravo.dal.service.OBCriteria;
import org.openbravo.dal.service.OBDal;
import org.openbravo.dal.xml.EntityXMLConverter;
import org.openbravo.model.common.order.OrderLine;
import org.openbravo.model.common.plm.Product;
import org.openbravo.service.web.WebService;

/**
 * Implementation of example webservice querying for all sales orders on the basis of a product.
 *
 * @author mtaal
 */
public class SalesOrdersByProductWebService implements WebService {

    private static final long serialVersionUID = 1L;

    public void doGet(String path, HttpServletRequest request, HttpServletResponse response)
        throws Exception {
    // do some checking of parameters
    final String productID = request.getParameter("product");
    if (productID == null) {
        throw new IllegalArgumentException("The product parameter is mandatory");
    }
    final Product product = OBDal.getInstance().get(Product.class, productID);
    if (product == null) {
        throw new IllegalArgumentException("Product with id: " + productID + " does not exist");
    }

    // select lines from C_ORDERLINE table that match the product
    final OBCriteria<OrderLine> orderLineList = OBDal.getInstance().createCriteria(OrderLine.class);
    orderLineList.add(Restrictions.eq(OrderLine.PROPERTY_PRODUCT, product));
    final List<BaseOBObject> orders = new ArrayList<BaseOBObject>();

    // iterate through the lines
    for (OrderLine orderLine : orderLineList.list()) {
        // get the order and only add each order once
        if (!orders.contains(orderLine.getSalesOrder())) {
        orders.add(orderLine.getSalesOrder());
        }
    }

    // get an xml converter and set some options
    final EntityXMLConverter exc = EntityXMLConverter.newInstance();
    // also export OrderLines
    exc.setOptionIncludeChildren(true);
    // and embed them in the OrderLines
    // element in an Order.
    exc.setOptionEmbedChildren(true);
    // do not read and convert referenced data in the xml
    // so for example a product reference (from orderLine)
    // will be just one tag with the product id and not a
    // complete product xml document
    exc.setOptionIncludeReferenced(false);

    // also export the client/organization elements
    exc.setOptionExportClientOrganizationReferences(true);

    // write the output to a String writer
    StringWriter sw = new StringWriter();
    exc.setOutput(sw);

    // convert
    exc.process(orders);

    // and get the result
    final String xml = sw.toString();

    // write to the response
    response.setContentType("text/xml");
    response.setCharacterEncoding("utf-8");
    final Writer w = response.getWriter();
    w.write(xml);
    w.close();
    }

    public void doDelete(String path, HttpServletRequest request, HttpServletResponse response)
        throws Exception {
    }

    public void doPost(String path, HttpServletRequest request, HttpServletResponse response)
        throws Exception {
    }

    public void doPut(String path, HttpServletRequest request, HttpServletResponse response)
        throws Exception {
    }
}
As can be seen, only the doGet method is implemented here, the update or delete would normally be handled in the other methods that do not apply to our requirements.
Here is the workflow of the doGet() method:
- first, it queries for the Product and then for the OrderLines,
- for each OrderLine the Order is added to the result list,
- the result list is then converted to xml using the
org.openbravo.dal.xml.EntityXMLConverter. This converter has different options as illustrated above. The javadoc of theEntityXMLConverterdescribes in detail what the meaning of these options is.
After adding the above Java file there should be something similar to the following file structure:
Registering the webservice
Once the webservice is written, register it so that Etendo knows about it. Use an xml configuration file for this. This file needs to be created in the config folder in the module's folder:
As this file is copied to the WEB-INF directory during the build with other configuration files it needs a unique name, hence:
where moduleJavaPackage is the module's Java package entered when defining the module. In this case, it would be:
Now, to the contents of this file:
<?xml version="1.0" encoding="UTF-8"?>
<provider>
<bean>
    <name>doIt</name>
    <class>org.openbravo.howtos.service.getsalesorders.SalesOrdersByProductWebService</class>
    <singleton>true</singleton>
</bean>
</provider>
Note
Make sure the first line defining the xml file contains no leading spaces or the webservice will not work due to the non well-formed syntax!
The content of the configuration file is used in order to map the URL of the webservice to the class which will execute the logic of that webservice. The singleton element is not used at the moment.
Info
The URL used to access the webservice is reflected by the name registered here, prefixed by the module's java package, separated by a dot. Hence, the URL is defined by this formula http://(serveraddress)/etendo/ws/(moduleJavaPackage).(name).
Note
Note that only the moduleJavaPackage is used and not the entire package of the class that implements the webservice!
Installing the webservice
The webservice can now be compiled, deployed and tested. To do so, use the following standard task used to compile manual code:
Then, restart Tomcat.
When installing the web service as a module, use the application's window Application Dictionary > Application > Module Management to install it and rebuild the application.
The org.openbravo.howtos-provider-config.xml file should now be present in the WEB-INF directory.
Calling the webservice
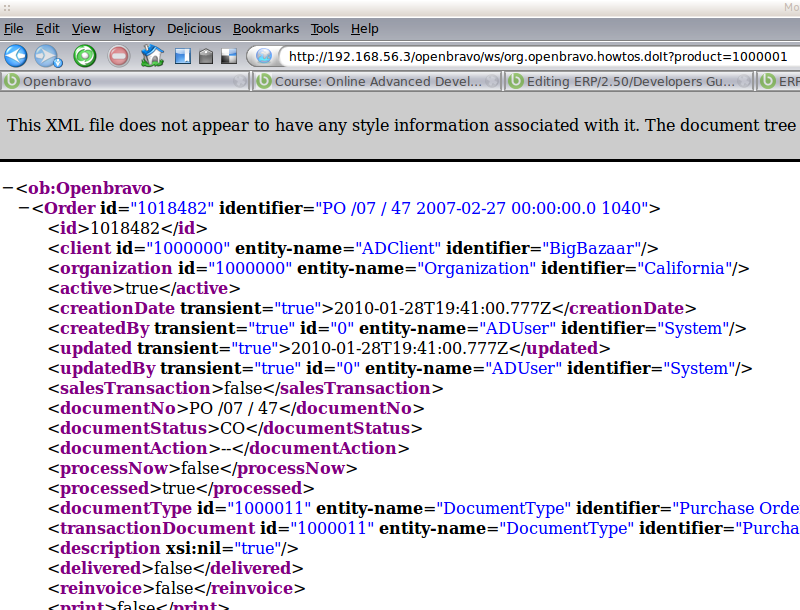
(Re-)Start Etendo and try out the webservice by entering this URL into the browser: http://localhost:8080/etendo/ws/org.openbravo.howtos.doIt?product=1000001&stateless=true
Note
Note that the product ID may be different with your installation. Also see that the java package of the module is prefixed to the webservice's name defined inside the config file. Remember the formula: http://(serveraddress)/etendo/ws/(moduleJavaPackage).(webservicename).
The system will probably ask to login.
Info
The user should have enough privileges to read sales orders and products. If you are using the standard Etendo SmallBazaar demo data and the Etendo user, then this article should work with the role System Administrator.
Note
The stateless parameter will prevent the server to create a http session. This is quite important for high frequency webservice calls which should not unnecessarily occupy resources on the server.
You should see the xml showing a sales order:
Stateless Webservice Requests - HTTP Session
Important for high frequency webservice calls: by default, Etendo webservice requests are statefull, meaning that each webservice call will create and use a http session in the Etendo server. Depending on how you setup the client to call the webservice this can even mean that each webservice request creates a new http session. This is not advisable for high-frequency webservice requests. In case of high volume calls it can make sense to move to a stateless implementation.
There are 2 ways in which a stateless handling of a webservice requests can be achieved:
-
Passing the parameter stateless=true in the request url. For example:
http://localhost:8080/etendo/ws/org.openbravo.howtos.doIt?product=1000001&stateless=true -
Annotating the webservice class with the
AuthenticationManager.Statelessannotation:
    @AuthenticationManager.Stateless
public class POSTestStatelessWebservice implements WebService {
...
}
VariablesBase object can not be used in stateless webservice requests.
Other than that, most base framework functionality (like the data-access-layer and the OBContext object) is available for the logic.
Adding logic to do updates
So far, retrieving information from the database and returning it as xml has been discussed here. Updating information should officially (according to the REST principle) be implemented in the PUT method, but it is necessary to choose what is practical.
For updating, a common flow is the following:
- Receive the XML string from the request object.
- Convert the XML string to a set of Business Objects.
- Process these Business Objects, for example save them in the database.
Below, find some sample code which follows this flow:
public void doPut(String path, HttpServletRequest request, HttpServletResponse response)
    throws Exception {
    // read the xml from the request inputstream into a Dom4j Document
    final SAXReader reader = new SAXReader();
    final Document document = reader.read(request.getInputStream());

    // create a converter from xml to Openbravo business objects
    final XMLEntityConverter xec = XMLEntityConverter.newInstance();
    xec.setClient(OBContext.getOBContext().getCurrentClient());
    xec.setOrganization(OBContext.getOBContext().getCurrentOrganization());

    // for a webservice referenced entities should not be created, see the javadoc
    // for more information
    xec.getEntityResolver().setOptionCreateReferencedIfNotFound(false);

    // process the dom4j document, does the actual conversion
    xec.process(document);

    // list the new objects (which do not yet exist in the db)
    for (BaseOBObject bob : xec.getToInsert()) {
        System.err.println("New business objects: " + bob.getIdentifier());
    }

    // list the objects which will be updated
    for (BaseOBObject bob : xec.getToUpdate()) {
        System.err.println("Updated business objects: " + bob.getIdentifier());
    }

    // and return something...
    final String returnMessage = WebServiceUtil.getInstance().createResultXMLWithObjectsAndWarning(
        "Action performed successfully", "", xec.getWarningMessages(), xec.getToInsert(),
        xec.getToUpdate(), null);
    try {
        final Writer w = response.getWriter();
        w.write(returnMessage);
        w.close();
    } catch (final Exception e) {
        throw new OBException(e);
    }

    // NOTE: as transaction handling is automatic the updated objects are updated automatically
    // in the db at the end of the request, this may fail as the new objects are not inserted in
    // the db, therefore rolling back, this is just for demo.
    OBDal.getInstance().rollbackAndClose();
}
Info
For a more detailed description, take a look at JSON REST Web Services.
This work is a derivative of How to Create a New REST Webservice by Openbravo Wiki, used under CC BY-SA 2.5 ES. This work is licensed under CC BY-SA 2.5 by Etendo.