Install Etendo Main UI
Overview
IMPORTANT: THIS IS A BETA VERSION
- It is under active development and may contain unstable or incomplete features. Use it at your own risk, especially in production environments.
- It should be used with caution, and you should always validate backups before executing any critical operation.
This guide provides instructions to install and run the Etendo Main UI, a modern React/TypeScript-based user interface that provides a new frontend experience for Etendo. The Main UI runs as a containerized service alongside your Etendo instance.
Requirements
- Etendo project properly set up.
-
This project depends on the following tools:
- Docker: version
26.0.0or higher - Docker Compose: version
2.26.0or higher
Warning
Avoid install Docker via Snap, can be confined by this sandbox and may not have access to host directories such as
/opt/, which can prevent Etendo Docker containers from starting correctly.Recommendation: install Etendo using the latest ISO(which includes Docker) or install Docker following the official installation guide from your distribution.
Info
The Docker Management module, included as a dependency, allows for the distribution of the infrastructure within Etendo modules, which include Docker containers for each service.
- Docker: version
-
Client Access Token
Application>General Setup>Client>ClientAn encryption token is required for authentication. This token is necessary for Etendo Main UI to start a session.
Note
Starting from Etendo 26.1, the SWS key is automatically generated during installation (
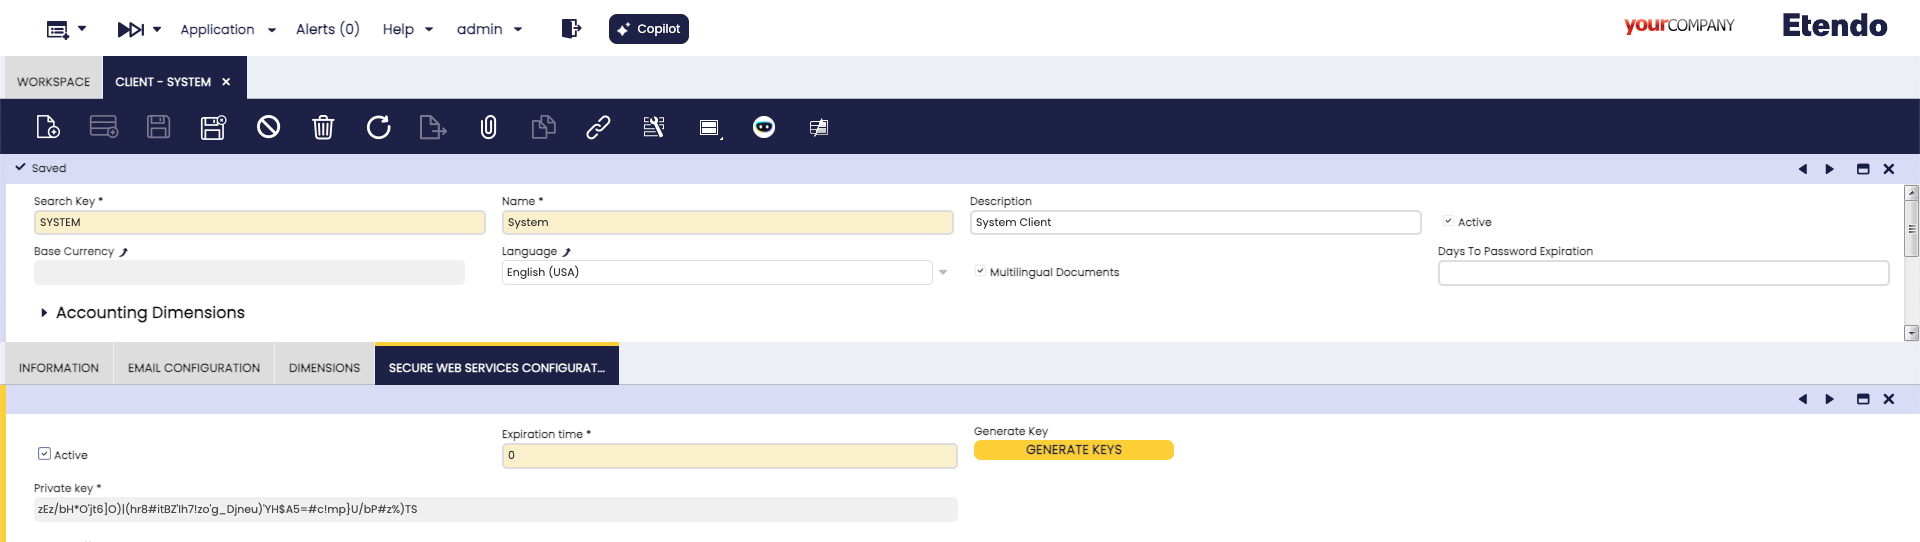
./gradlew install). No manual action is required for new installations.To verify or manage the token:
- Access Etendo Classic as a
System Administrator. - Navigate to
Client>Secure Web Service Configurationtab. - Verify that a key exists. If not, click the Generate Key button to create one.
- Check the expiration time (in minutes). If set to
0, the token does not expire. If a custom expiration was configured, ensure the token has not expired.
Security recommendation
While
0(no expiration) is the default, the Etendo team recommends setting a reasonable expiration time in production environments and rotating tokens periodically.Info
This token does not require any additional action; it just needs to exist for the authentication process to work properly.
- Access Etendo Classic as a
Installation
Etendo Main UI is distributed within the Platform Extensions bundle, which includes the Main UI Infrastructure and all required backend modules for the new interface.
Info
To be able to include this functionality, the Platform Extensions Bundle must be installed.
To do that, follow the instructions from the marketplace: Platform Extensions Bundle.
For more information about the available versions, core compatibility and new features, visit Platform Extensions - Release notes.
Running Etendo Main UI
The simplest configuration example uses Main UI running in Docker and Tomcat running locally.
Other configurations are detailed in the section Advanced Configurations.
Interactive Setup (Recommended)
-
You can configure Main UI interactively by running:
This will guide you through the configuration process for all required variables. For more information visit Interactive Instalation guide.
-
Start the Docker services:
This will start the Main UI container along with any other configured Docker services.
Manual Configuration
-
Add the following lines to the
gradle.propertiesfile:gradle.propertiesdocker_com.etendoerp.mainui=true etendo.classic.url=http://host.docker.internal:8080/etendo etendo.classic.host=http://localhost:8080/etendo authentication.class=com.etendoerp.etendorx.auth.SWSAuthenticationManager ws.maxInactiveInterval=3600 next.public.app.url=http://localhost:3000Variable Purpose (Simple Explanation) Notes Recommended Value (Local) Recommended Value (Production) docker_com.etendoerp.mainui Enables the Main UI Docker service. Default value may vary depending on the environment. truetrueetendo.classic.url Backend URL used by the Main UI server to connect to Etendo Classic. If Main UI runs in Docker and Tomcat runs locally, host.docker.internalmust be used.http://host.docker.internal:8080/etendohttps://your.backend.etendo.cloud/etendoetendo.classic.host Client-side URL that the browser uses to make direct requests to Etendo Classic. URL that the browser uses for direct requests. In Docker hybrid mode, use localhosthttp://localhost:8080/etendohttps://your-domain.com/etendoauthentication.class Java class that manages authentication between the Main UI and Etendo Classic. Required for Secure Web Services authentication. com.etendoerp.etendorx.auth.SWSAuthenticationManagercom.etendoerp.etendorx.auth.SWSAuthenticationManagerws.maxInactiveInterval Session duration (in seconds) for the Main UI WebSocket connection. Does not affect the session timeout of Etendo Classic. Recommended value is 3600 seconds (1 hour). 36003600next.public.app.url Public URL where users access the Main UI application. Must point to the reachable frontend URL; for local use, localhost is typical. http://localhost:3000https://your.frontend.etendo.cloud -
Run the following commands to setup the module and update resources:
-
Start the Docker services:
This will start the Main UI container along with any other configured Docker services.
Accessing the Main UI
Once all services are running, the Main UI will be available at:
http://localhost:3000 (default port)
Info
The exact URL may vary depending on your Docker configuration.
Advanced Configuration
This section is for developers who want to contribute to or customize the Main UI codebase directly.
Requirements for Development
- Node.js version ^18.0.0 or higher
- pnpm version ^9.15.2 (package manager)
- All requirements from the basic installation above.
Manual Module Installation (Development Only)
For development environments, you need to install the required modules manually:
com.etendoerp.openapicom.etendoerp.etendorxcom.etendoerp.metadatacom.etendoerp.metadata.template
Quick Clone Commands
cd modules

# Clone required modules for development
git clone git@github.com:etendosoftware/com.etendoerp.etendorx.git
git clone git@github.com:etendosoftware/com.etendoerp.openapi.git
git clone git@github.com:etendosoftware/com.etendoerp.metadata.git
git clone git@github.com:etendosoftware/com.etendoerp.metadata.template.git
Development Project Structure
The workspace is organized as a unique environment with multiple packages:
com.etendorx.workspace-ui/
├── packages/
│   ├── api-client/          # API client for backend communication
│   ├── ComponentLibrary/    # Reusable UI components
│   └── MainUI/             # Main application
├── package.json
├── pnpm-workspace.yaml
└── README.md
Development Installation Steps
-
Clone the Main UI development repository:
-
Install all project dependencies using
pnpm:This command will install dependencies for all packages in the workspace.
-
Create a
.env.localfile in thepackages/MainUIdirectory: -
Add your backend configuration:
Info
Replace the URLs with your actual Etendo backend URLs.
-
Build the required packages in the correct order:
-
Launch the development server for the Main UI:
The application will be available at http://localhost:3000 by default.
Development Workflow
Root-Level Commands (Recommended)
The workspace provides convenient aliases at the root level for common tasks:
# Start Main UI development server
pnpm dev

# Build all packages
pnpm build

# Run tests across all packages
pnpm test

# Lint all packages
pnpm lint

# Fix lint issues automatically
pnpm lint:fix

# Format code across all packages
pnpm format

# Auto-fix formatting issues
pnpm format:fix

# Clean all build artifacts
pnpm clean

# Install dependencies
pnpm install
Individual Package Commands
Each package can also be run independently using pnpm workspace commands:
# Run MainUI development server
pnpm --filter @workspaceui/mainui dev

# Build API Client
pnpm --filter @workspaceui/api-client build

# Build Component Library
pnpm --filter @workspaceui/componentlibrary build

# Run tests for API Client
pnpm --filter @workspaceui/api-client test

# Lint specific package
pnpm --filter @workspaceui/mainui lint
Linting and Formatting
The project uses Biome for linting and formatting across all packages:
# Lint all packages
pnpm lint

# Fix lint issues
pnpm lint:fix

# Format code
pnpm format

# Auto-fix formatting
pnpm format:fix
Package Details
API Client (@workspaceui/api-client)
Contains TypeScript definitions and API functions for communicating with the Etendo backend. Provides:
- Authentication APIs
- Metadata APIs
- Datasource APIs
- Copilot integration APIs
Component Library (@workspaceui/componentlibrary)
A collection of reusable React components built with Material-UI. Includes:
- Form components (inputs, selectors, etc.)
- Navigation components
- Modal and dialog components
- Data display components
Main UI (@workspaceui/mainui)
The main Next.js application that provides the complete user interface. Features:
- Modern React/TypeScript architecture
- Server-side rendering with Next.js
- Material-UI theme integration
- Responsive design
Run Tests
Execute the test suites to ensure everything works correctly
The development environment is now ready for building and customizing the Etendo Main UI.
This work is licensed under CC BY-SA 2.5 ES by Futit Services S.L.