Etendo Architecture
IMPORTANT: THIS IS A BETA VERSION
This page is under active development and may contain unstable or incomplete features. Use it at your own risk.
Overview
In Etendo, the system moves away from a classic servlet architecture to a Rich Internet Application (RIA) architecture. This is a radical paradigm shift resulting in a much more dynamic and versatile user interface. In a RIA architecture, the requests for data and for the page/user interface are separated. The page/user interfaces is loaded on the client once and then re-used while the user works in the application. This in contrast for requests for data and actions, these are executed continuously.
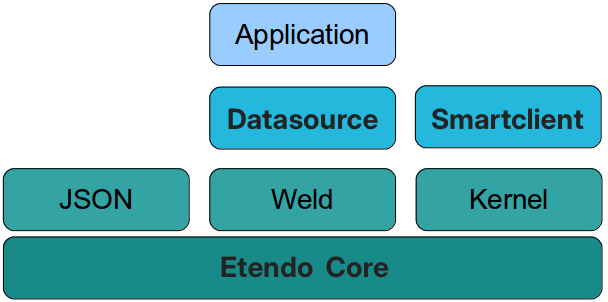
The Etendo architecture is implemented using Etendo Core and several related modules:
- The JSON module provides the JSON REST web service, it is used for the client-server data communication
- The Weld module provides dependency injection and component management
- The Kernel module takes care of infrastructure tasks as request processing, event handling, compression and caching
- The DataSource module uses the JSON module and provides higher level data request functionality for querying and data related actions
- The Smartclient module provides the Smartclient user interface library
- The application module contains the implementation of the navigation bar, grids and forms and other application oriented client and server side code.
This section explains the concepts implemented by these modules.
Main Concepts: Component and Component Provider
This section introduces central concepts of the Etendo user interface. The Etendo user interface is implemented by so-called components . A component is a specific part of the user interface. It can be a selector, a field on a form, but also a complete layout, or a form or grid.
Components are implemented in modules. A module has complete freedom on how to implement components (if there is a window table, a grid table or a generic view table etc.). The components within a module are managed by a Component Provider, it is responsible for creating a component and providing it to the Etendo kernel. A component provider is also responsible for registering the static content with Etendo, this is explained in more detail below.
A component can be retrieved using a URL (a component request). For example, this URL will retrieve the javascript for the sales invoice window:
http://localhost:8080/etendo/org.openbravo.client.kernel/OBUIAPP_MainLayout/View?viewId=_167
To explain the structure of this URL, the OBUIAPP_MainLayout identifies the client application module. The ComponentProvider of that module knows how to handle the last part of the URL: View?viewId=_167. It will create a StandardWindowComponent which gets the viewId (the ADWindow id) to generate the javascript. The generated javascript is postprocessed (compressed, syntax checking) before it is sent to the client.
The following image illustrates the request flow processing in more detail:
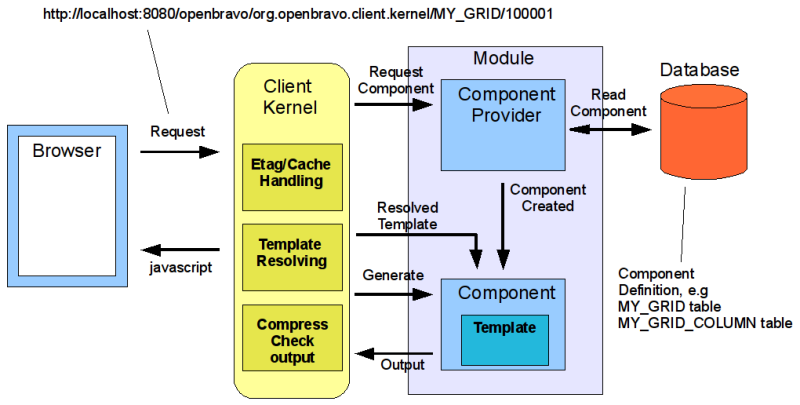
The overall request and generate flow operates as follows:
- a component request (with a component type and ID) is received by the Client Kernel module (in the KernelServlet).
- based on the component type the kernel module finds the module responsible for handling the requested component, that module is then called to create the component using the component ID.
- the module reads the component definition from tables or other sources and instantiates the Component instance.
- the component is called to generate its client-side representation.
- if it is a templated component (i.e. it has a specific template) then the component calls a template processor for the template.
- the view is generated using the template or by executing javacode which generates a String (javascript).
- the result (often a javascript string) is returned to the Client Kernel module.
- the Client Kernel module compresses the result using jsmin.
Note
The Client Kernel module also takes care of caching components and component requests. This is covered in a later section in this documentation in more detail.
Introducing Weld: dependency injection and more
Weld implements the JSR-299: Java Contexts and Dependency Injection for the Java EE platform (CDI). CDI is the Java standard for dependency injection and contextual lifecycle management. For general information on dependency injection concepts visit this page.
For more information, visit Weld.
Core parts of the Etendo architecture use Weld for dependency injection, component definition and business entity events. The starting point is defining components and the scope in which they live. The next step is using these components by injecting them in other components. Note, to make use of Weld dependency injection it is not possible to create objects using the classic java new keyword. See a later section below on this topic.
Note
Etendo supports CDI 2.0 as Weld was upgraded to version 3.1.0. CDI 2.0 is the JSR-365 specification.
Scope Definition
With Weld it is possible to define components which are available at different levels: ApplicationScoped, SessionScoped and RequestScoped. For each of these scopes examples can be found in the Etendo source code. Scoping is defined using an annotation:
@ApplicationScoped
@ComponentProvider.Qualifier(ExampleComponentProvider.EXAMPLE_VIEW_COMPONENT_TYPE)
public class ExampleComponentProvider extends BaseComponentProvider {
...
}

@SessionScoped
public class MenuManager implements Serializable {
....
}
Note
The above annotation for ComponentProvider is an Etendo specific annotation used to register ComponentProvider globally using a unique string. See the section on ComponentProviders for more information.
Scope Inheritance
Regarding the inheritance of scope annotations, Weld follows the expected behavior described on CDI 2.0 spec.
Suppose a class X is extended directly or indirectly by another class Y . If X is annotated with a scope type Z then Y inherits the annotation if and only if Z declares the **@Inherited ** meta-annotation and neither Y nor any intermediate class that is a subclass of X and a superclass of Y declares a scope type. Note that this behavior is different to what is defined in the Java Language Specification.
Therefore, as all @ApplicationScoped , @SessionScoped and @RequestScoped annotations declare the @Inherited meta-annotation, a subclass inherits the scope of its parent class if neither the subclass nor any intermediary class declares another scope.
This behavior does not apply to those classes implementing an interface with a particular scope: if an interface declares an scope, it is not inherited by the classes implementing that interface.
Injection
The defined components can be injected automatically in other components using injection points which are defined using the @Inject annotation:
Assignability Rules
CDI 2.0 defines under which circumstances the assignability of raw and parameterized types works within an injection point. This is specified with a set of rules defined here.
Starting from any Etendo version we need to use wildcards to define the injection point in order to follow the assignability rules:
public class BaseGenerator {

    @Inject
    @Any
    private Instance<DocGenerator<? extends BaseOBObject>> docGenerators;

    ...
}
Instantiating Weld Enabled Objects
Weld needs to be able to inject components into newly instantiated objects. This means that it is not possible to create objects using the java new keyword. Often you do not need to create objects directly, they should be injected. But, in some specific cases, it is not possible to use injection because your own object is created in a non-Weld way. For these cases, Etendo has a utility method to help you:
The created instance will be integrated with Weld and can make use of its dependency injection capabalities, also the scope defined for the component is taking into account. So when calling the above method for an ApplicationScoped component, always the same single instance is returned.
Analyzing the classpath
Weld will analyze the classpath to find components which have specific annotations.
As the default Weld searches in all the class files in WEB-INF/classes but as a default the jar files in WEB-INF/lib are excluded from this search. See here(Packaging and Deployment chapter of the Weld documentation) on how to create a jar file which is searched by Weld.
Etendo Weld will also exclude specific classes from WEB-INF/classes. This to prevent searching all classes specific exclusion filters have been specified. They can be found in the config/beans.xml file in the Weld
module. The classes which are caught by the exclusion filter will not be considered as components and will not be found by Etendo/Weld.
Weld module for developers
The Weld Development Mode is a special mode that provides several built-in tools suitable for development and testing purposes. By default this mode is disabled. Weld Probe is one of these tools.
The org.openbravo.base.weld.dev module can be used to enable the Development Mode. This module should never be used in productive environments because it may have a negative impact on performance.
ETags, Caching and Compressing
To improve the user experience and performance it is important to make use of caching functionality in the browser as well as on the server. For caching a distinction can be made between components and static js files. Components are generated on the basis of definitions in the database and can contain language specific strings. Static js files define javascript widgets which are re-used by components.
Etendo implements several types of caching in different layers of the application to optimize the user experience. It takes advantage of the modularity functionality, meaning that Etendo makes a distinction between a situation when a module is in development or not. For a module in development it makes sense to prevent caching as a consultant changing the user interface wants to get instant feedback. For a module not in development it makes sense to maximize caching as this improves the user experience. When a module is not in development then the module version is used to automatically refresh the client cache.
Caching and refreshing of static js files
A static js file contains a library or a standard widget which is used by components. The link to a static js file is created when the application starts and is generated in the 'top' of the page.
Static js files are normally cached in the browser. Static js files may however change during module upgrades or development.
This is implemented as follows. Static js files (i.e. global resources) are provided by modules. A module publishes its static resources through a ComponentProvider. The API of a ComponentProvider contains a
getGlobalResources method. Etendo concatenates all static resources into one large js file. The concatenation order is based on the dependency relations between the modules. The name of the js file is based on a guid (for example: 088afd247a8fe06c91a654891a1358a2.js). This guid is again based on the content of the file, so if the javascript changes then also the js file name is changed (and therefore reloaded in the browser). The js file is generated into the web/js/gen folder and served from there to the client.
Note
The concatenated javascript file will not be compressed if the core, client.kernel and client.application modules are in development. This facilitates client side debugging.
Caching and Refreshing of Components
Components are considered to be dynamic and contain runtime data read from databases. Components are generated on request and cached on the server. The server side can validate if a component has changed since the last request. This validation is not possible on the client as data on the server may have changed.
To support the concept of server side cache expiry the Client Kernel makes use of the ETag concept. An ETag is like a hashcode which is used to determine if content has changed since the last time the browser requested it. The BaseComponent implementation generates ETags in two ways:
- if the module of the component is not in development, then the ETag is: the concatenation of the language of the user and the version of the module
- if the module of the component is in development then the ETag is: the concatenation of the language of the user and a timestamp in milliseconds
This gives the same result as with static content: if a module is not in development client side code is only refreshed when a module is upgraded, when a module is in development client side code is not cached. This last behavior is very desirable when changing component definitions (adding columns, renaming fields etc.) as the system does not need to be restarted or the browser cache emptied to see the results.
The ETag generation logic can be overridden in a specific Component implementation.
Note
A Component can contain other components provided by other modules. The generation of the ETag only takes into account the indevelopment state of the module of the root Component.
Compression and Syntax Checking
The output generated by a module can be compressed and syntax checked. For compression, jsmin is used. For syntax checking Etendo makes use of JSLint and JSLint4Java. The compression/syntax checking is done depending on the in development status of a module:
- If a module is in development, then the output of its components are syntax checked but not compressed (to enhance readability for a developer in the browser).
- If a module is not in development then the output is not syntax checked but it is compressed (to enhance performance for endusers).
Information Regarding HTTP Caching and ETags
- http://www.infoq.com/articles/etags
- http://www.oreillynet.com/onjava/blog/2004/07/optimizing_http_downloads_in_j.html
- http://www.xml.com/pub/a/2006/02/01/doing-http-caching-right-introducing-httplib2.html
- http://bitworking.org/news/150/REST-Tip-Deep-etags-give-you-more-benefits
- http://blogs.atlassian.com/developer/2007/12/cachecontrol_nostore_considere.html
- http://www.w3.org/Protocols/rfc2616/rfc2616-sec13.html#sec13
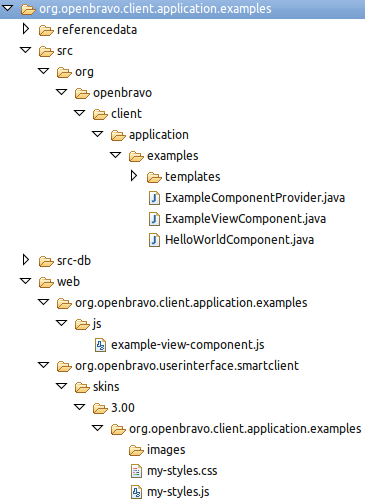
Standard Structure of a Module
A module implementing functionality in the Etendo architecture should follow a fixed structure. The image below reflects the standard structure:
- the java source code and templates are located in the src directory
- the static javascript should be located in this subdirectory:
web/<modulepackage>/js - the styling artifacts (images, css and javascript) should be located in this subdirectory:
web/org.openbravo.userinterface.smartclient/3.00/<modulepackage> - the javascript unit tests should be located in the
web-testdirectory.
By following this structure, the files will be copied to the correct location during the main build steps.
Component Provider
Each module needs to implement a component provider. A component provider takes care of the following tasks:
- It creates the components of the module on request from the Etendo kernel.
- It registers the static resources of the module into the Etendo kernel.
A ComponentProvider is a Weld component and has a standard structure which is explained here.
The ComponentProvider java class should have 2 annotations:
@ApplicationScopedflagging this component as being a singleton@ComponentProvider.Qualifierregisters the identifying name for this component, it should be unique so preferably use the dbprefix of the module.
@ApplicationScoped
@ComponentProvider.Qualifier(ExampleComponentProvider.EXAMPLE_VIEW_COMPONENT_TYPE)
public class ExampleComponentProvider extends BaseComponentProvider {
    public static final String EXAMPLE_VIEW_COMPONENT_TYPE = "OBEXAPP_ExampleViewType";
Note
The component provider must always be in the same root package as the package of the module it is in. The developer must NOT put it into a subpackage of the main module package.
The next thing for a component provider is to instantiate components on request:
public Component getComponent(String componentId, Map<String, Object> parameters) {
    if (componentId.equals(ExampleViewComponent.EXAMPLE_VIEW_COMPONENT_ID)) {
    final ExampleViewComponent component = new ExampleViewComponent();
    component.setId(ExampleViewComponent.EXAMPLE_VIEW_COMPONENT_ID);
    component.setParameters(parameters);
    return component;
    }
    throw new IllegalArgumentException("Component id " + componentId + " not supported.");
}
Note
Implementing this method is only needed if you have dynamic content, if the module only has static js/css files then this method can remain empty (or just throw an exception).
A component can be very simple, it only needs to implement the generate method if it extends the Etendo BaseComponent class. A very simple example of the implementation of the generate method:
A very important task of the component provider is to register static resources: javascript and css. These static resources are concatenated/compressed by the Etendo kernel:
public List<ComponentResource> getGlobalComponentResources() {
    final List<ComponentResource> globalResources = new ArrayList<ComponentResource>();
    globalResources.add(createStaticResource(
        "web/org.openbravo.client.application.examples/js/example-view-component.js", true));
    globalResources
        .add(createDynamicResource("org.openbravo.client.kernel/"
            + ExampleViewComponent.EXAMPLE_VIEW_COMPONENT_ID + "/"
            + ExampleViewComponent.EXAMPLE_VIEW_COMPONENT_ID));
    globalResources.add(createStyleSheetResource(
        "web/org.openbravo.userinterface.smartclient/openbravo/skins/"
            + KernelConstants.SKIN_VERSION_PARAMETER
            + "/org.openbravo.client.application.examples/my-styles.css", false));
    return globalResources;
}
The code above shows how to register javascript and css resources. Also an example of a dynamic resource is shown, this will call the component to generate javascript.
Finding all ComponentProviders
Etendo can find all the ComponentProviders because Weld will analyze the classpath and collect all classes which have a @ComponentProvider annotation. See the Weld section on classpath analyzing above.
Implementing Server Side Actions callable from the client
Etendo provides a convenient solution for executing actions on the server from the client. This is the so-called ActionHandler concept. The ActionHandler concept has a server and client-side part to it.
ActionHandler: server side, calling from the client
Note
By default ActionHandlers cannot be executed by Portal users. To make them accessible for portal users they must implement org.openbravo.portal.PortalAccessible interface.
On the server, the logic has to be implemented in a class which implements the ActionHandler interface.
For most cases, it makes sense to override/extend the BaseActionHandler class:
package org.openbravo.client.application.examples;

...

public class MyActionHandler extends BaseActionHandler {
    /**
    * Needs to be implemented by a subclass.
    *
    * @param parameters
    *          the parameters obtained from the request. Note that the request object and the session
    *          object are also present in this map, resp. as the constants
    *          {@link KernelConstants#HTTP_REQUEST} and {@link KernelConstants#HTTP_SESSION}.
    * @param content
    *          the request content (if any)
    * @return the return should be a JSONObject, this is passed back to the caller on the client.
    */
    protected JSONObject execute(Map<String, Object> parameters, String content) {
    try {
        // create the result
        JSONObject json = new JSONObject();
        json.put("result", "success");

        // and return it
        return json;
        } catch (Exception e) {
        throw new OBException(e);
        }
    }
}
This server side can be called from the client using this javascript:
// define the callback function which shows the result to the user
var callback = function(rpcResponse, data, rpcRequest) {
    isc.say('The result is : ' + data.result);
};

// and call the server
OB.RemoteCallManager.call('org.openbravo.client.application.examples.MyActionHandler', {}, {}, callback);
Info
For more information, visit How to add a button to the toolbar. It's contains an example of a server-side ActionHandler which is called from the client.
Implement Application Initialization Logic
In modules it sometimes makes sense to initialize something when the application starts. Etendo provides a mechanism to implement application initialization logic. You have to do the following:
- create a class which implements the
org.openbravo.client.kernel.ApplicationInitializerinterface -
annotate your class with
@ApplicationScoped@ApplicationScopedpublic class KernelApplicationInitializer implements ApplicationInitializer { public void initialize() { // put your initialization tasks here } }
Weld will automatically find your class and Etendo will call it when initializing the data access layer.
Info
You have access to the SessionFactory through the SessionFactoryController but not to a Hibernate Session. So, for accessing the database, you have to create a Hibernate session from the SessionFactory.
Note
If your application code is not being called, then check out this tip.
Business Entity Events
The Etendo architecture makes it possible to easily add components which listen to business entity events. Business entity events are creation, update and deletion of entities and transaction events. Etendo uses the business event framework to implement specific business logic (for example to generate/set document numbers in sales orders).
Business entity events are broadcasted on the event, so before the event is executed in the database. It is possible to change the relevant entity instance or do other database actions. The event handlers run in the same transaction as the business event itself.
Note
Business entity events only work when accessing the database through the data access layer, so they do not work for classic windows or direct jdbc calls.
Info
For more information, visit how to implement a business event handler. It's gives a detailed description on how to implement your own event handler listening to business entity events.
Event Classes and API
The events are implemented as java classes, when an event is fired, an instance of this class is broadcasted and received by event handlers. The event instances all inherit from the base EntityPersistenceEvent class:
EntityNewEventEntityUpdateEventEntityDeleteEventTransactionBeginEvent.javaTransactionCompletedEvent.java
The event classes have javadoc which gives more details.
The most relevant APIs are discussed here:
-
getTargetInstance(available for all events): returns the business object which is the target of the event,Note
Do not call set methods on this object directly, the new values are not persisted as Hibernate has already read the values from the object.
-
setCurrentState(Property property, Object value) (available for all events but only relevant for update/new events): sets a new value for the property on the target instance, the new value will be persisted and then the target instance is updated. The Property can be retrieved from the entity of thetargetInstance(callgetEntityon the target instance and thengetPropertiesorgetProperty). - Object
getPreviousState(Property property) (only available in the update event): returns the previous value (currently set in the database) for the property in the entity.
Implementing a new view
A view corresponds to the content of a main tab in the Etendo user interface, for example the purchase order window is a view. The Etendo architecture supports creating your own completely custom view from scratch. By creating a menu entry for your view you can integrate your custom view in the application menu, quick launch and in the recent views in your workspace. The implementation of a new view is explained in detail in this How To.
Client side coding
The usage of Rich Internet Application technology means that part of the coding is done client side and in javascript. Coding and debugging in javascript is very different from server side java coding and development. It can be vital to check out the client side coding tips.
Etendo provides and implements several client side components for sending requests to the server, internationalization etc. Visit Client Side Development and API for more information.
Smartclient
Etendo uses the Smartclient client side user interface library for implementing components. To work and development in Etendo and create new widgets you need to understand Smartclient. Check out these resources:
It can help to have the Smartclient source code and reference material in your IntelliJ workspace, it is very easy to search source code then. The latest Smartclient source code is available in this corresponding repository
This work is a derivative of Openbravo 3 Architecture by Openbravo Wiki, used under CC BY-SA 2.5 ES. This work is licensed under CC BY-SA 2.5 by Etendo.