Advanced Warehouse Management
Javapackage: com.etendoerp.advanced.warehouse.management
Overview
The Advanced Warehouse Management module extends the standard capabilities of Etendo to offer comprehensive, flexible, and automated inventory management, adding integration with mobile devices. Every action performed from the Etendo Mobile is automatically synchronized with Etendo, ensuring complete traceability and consistent updates in the corresponding system windows.
This module allows the user to:
- Manage inventory in multiple predefined and customized statuses.
- Make stock adjustments and physical inventories from mobile devices.
- Automate relocations and statuses with movement rules.
- Integrate traceability using barcodes, which can be scanned from Etendo Mobile.
- Extend and optimize the manual picking and packing process, incorporating the possibility of executing them from Etendo Mobile.
Initial Setup
To start using this module correctly, the following installation and configuration steps must be completed:
- Install the Warehouse Extensions bundle.
- Install the Etendo Mobile app.
- Enable the Advanced Warehouse App to the user roles that use it.
- Install datasets.
- Configure key parameters in Advanced Warehouse Configuration window.
- The necessary task types for picking and packing must be created.
- The picking generation option should be defined at Sales order level.
Steps to follow:
-
To be able to include this functionality, the Advanced Warehouse Management module of the Warehouse Extensions Bundle must be installed. To do that, follow the instructions from the marketplace: Warehouse Extensions Bundle.
For more information about the available versions, core compatibility and new features, visit Warehouse Extensions - Release notes.
-
Install Etendo Mobile on an Android or iOS device and follow the initial configuration steps. To do so, follow the instructions in Getting Started - Etendo Mobile
-
Be sure to follow all the steps to enable the Advanced Warehouse App.
-
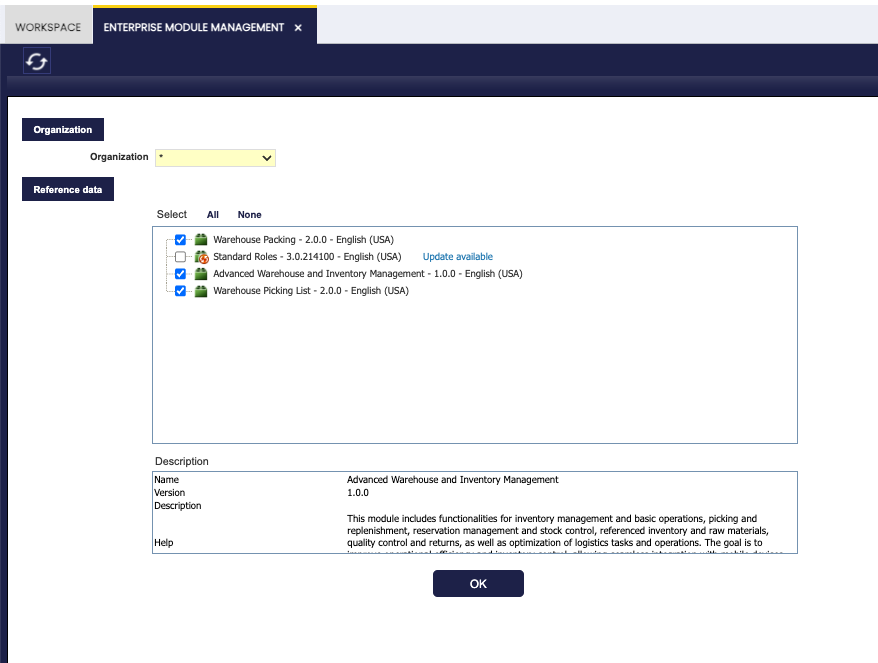
Install datasets:
Warehouse PackingWarehouse Picking ListAdvanced Warehouse Management
From the Enterprise Module Management window is required for all roles that will use this functionality.
-
Advanced Warehouse Configuration Window
Application>Warehouse Management>Setup>Advanced Warehouse ConfigurationBefore using the module, in the
Advanced Warehouse Configurationwindow, you must configure the key variables that define how inventory operations are managed for each organization.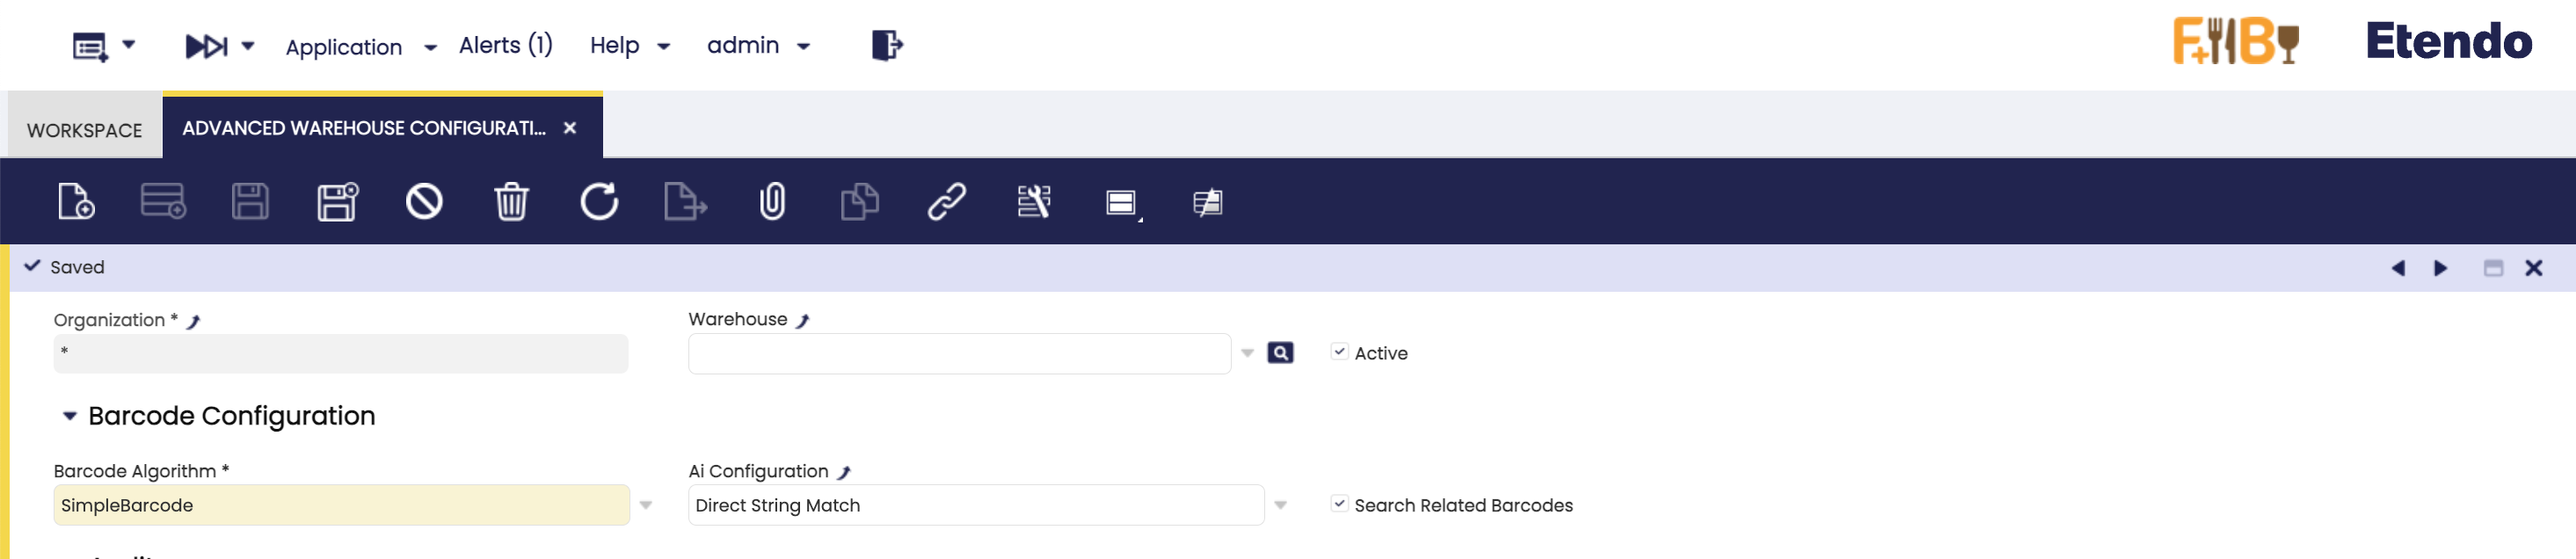
Fields to note:
- Organization: allows you to manage which organization will apply the configuration.
- Warehouse: is a non-mandatory field that can be used to apply the configuration to a specific warehouse or to all warehouses in the organization.
- Active: is checked or unchecked to enable or disable the configuration.
-
Barcode Algorithm: The default barcode algorithm that allows interpretation according to any of the standards defined by international organizations. The options to select are:
- EAN 128
- SimpleBarcode (Recommended)
-
AI Configuration: A set of Application Identifiers defined by GS1 standards that are used in barcodes. That helps to distinguish different types of information. Each AI specifies the type of data that follows it, such as product identifiers (GTINs), lot numbers, expiration dates, or quantities.
- GS1-128
- Direct String Match (Recommended)
-
Search Related Barcode: Checkbox, which allows the sub-app to search for the product by more than one barcode.
Warning
It is mandatory to create a configuration for the organization you are working with.
-
Task infrastructure:
The Task module, automatically installed as a dependency of this module, enables event management and triggering tasks creation and actions execution after dynamic changes, allowing automation of flows.
Required
In order to use this module, a developer must follow the initial settings described in Task - Initial Configuration.
When installing
Advanced Warehouse Managementmodule, the Task Types required for picking and packing are included by default:- Warehouse Picking (deactivated, since the picking and packing
Task Typeis active by default) - Warehouse Packing
-
Warehouse Picking & Packing
- User Algorithm: Each Task Type will allow selecting the warehouse operator assignment algorithm, by default
Round-Robin By Section Algorithmis used.
- User Algorithm: Each Task Type will allow selecting the warehouse operator assignment algorithm, by default
Picking Generation
-
System Preferences:
-
CreateWarehouseTask: This preference is set to "Y" (Yes) by default to enable automatic generation of warehouse tasks, such as picking tasks, when creating the Picking List. If set to "N" (No), tasks will not be generated automatically and the assignment option will not be available during picking creation. -
fromDateCompleted: Defines the number of days backward from the current date to display tasks with Completed status in Etendo Mobile. By default, the value is 1 and will show the tasks completed the previous day.
-
- Warehouse Picking (deactivated, since the picking and packing
Master Data Configuration
Creating Inventory Statuses
Application > Warehouse Management > Setup > Inventory Status
Inventory statuses allow the user to classify and manage stock units according to their condition or operational availability. The system includes some predefined statuses (such as Blocked, Damaged, In Quality Control, etc.), but it is possible to create new custom statuses as System Administrator according to the client needs.
Info
For more information on how to setup inventory statuses, visit Inventory Status.
The new status will be available in Etendo Mobile to be assigned to new or existing locators using the Adjust or Relocate options. In the latter case, the rules defined in the Movement Rules Configuration window, described below, are used.
Movement Rules Configuration Window
Application > Warehouse Management > Setup > Movement Rules Configuration
Movement rules allow you to automate the relocation or status change of inventory based on the action being performed. The purpose of this functionality is to automate inventory movements when they change status, exclude certain locations from operations such as picking or reservations due to their status, avoid errors in product handling, manage special products (Damaged, Blocked, etc.), and automatically handle virtual locations when there is no defined destination.
A Virtual Storage Bin is a location automatically generated by the system to correctly maintain inventory, even when no specific location has been defined for the status to which it is being moved.
Example
If the Available status does not have an associated storage bin, and a user marks a product as Damaged, then the system creates a virtual location in which to deposit the affected inventory. This virtual location inherits the properties of the storage bin where the product was located and is associated exclusively with the new status (e.g., Available).
This allows the user to maintain inventory traceability and consistency, even if the team has not yet defined all physical locations. It also streamlines operations by avoiding errors or blockages when working with exceptional statuses.
The application of these rules can be seen from two features of Etendo Mobile:
-
From the Relocate option, once you have selected the location defined in a rule, this will move the inventory to the new location and, according to the configured rule, change the inventory status.
-
From the Adjust option, when you select the new status, this will update the status and, depending on the configured rule, move the inventory to the defined location.
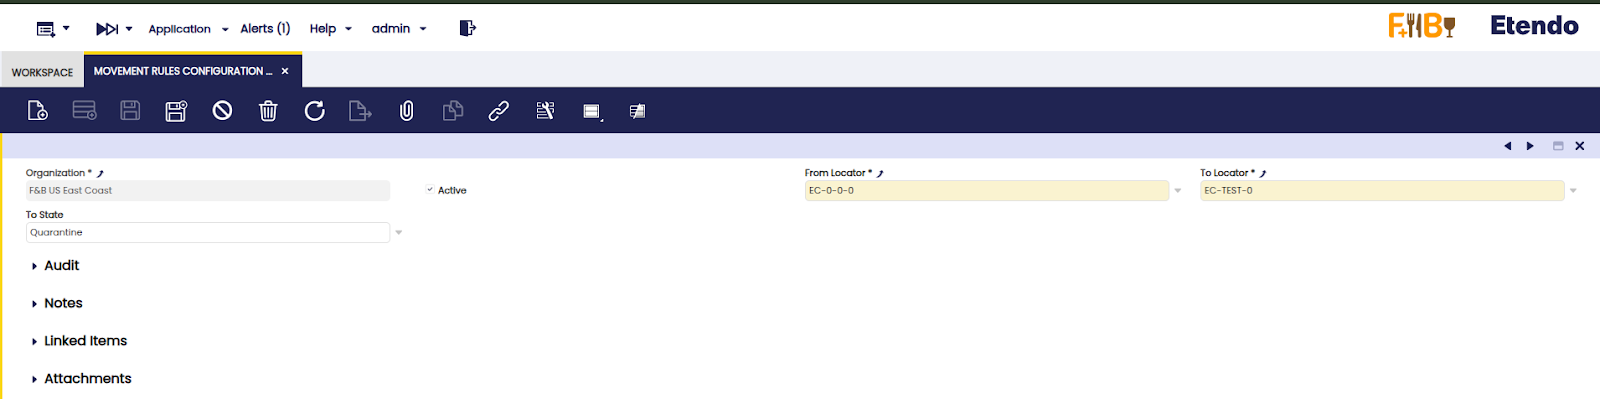
Fields to note:
- From Locator: Source location.
- To Locator: Destination location.
- To State: State to which the inventory will be transferred when the movement is done.
Note
If the To State field is filled in first, the To Locator field will be limited to the Storage Bins that have that state assigned.
Info
Actions performed using movement rules impact both Etendo Mobile and Etendo's Stock Report, reflecting the location.
Barcode
Barcode functionality is key for logistic operations. Storage bins and products with generated codes will be available to be scanned and managed both from Etendo Mobile and from Etendo, but it requires a previous configuration in Etendo.
- The
Advanced Warehouse Managementdataset must be loaded. - From the Advanced Warehouse Configuration window, you can define which barcode will be used by default.
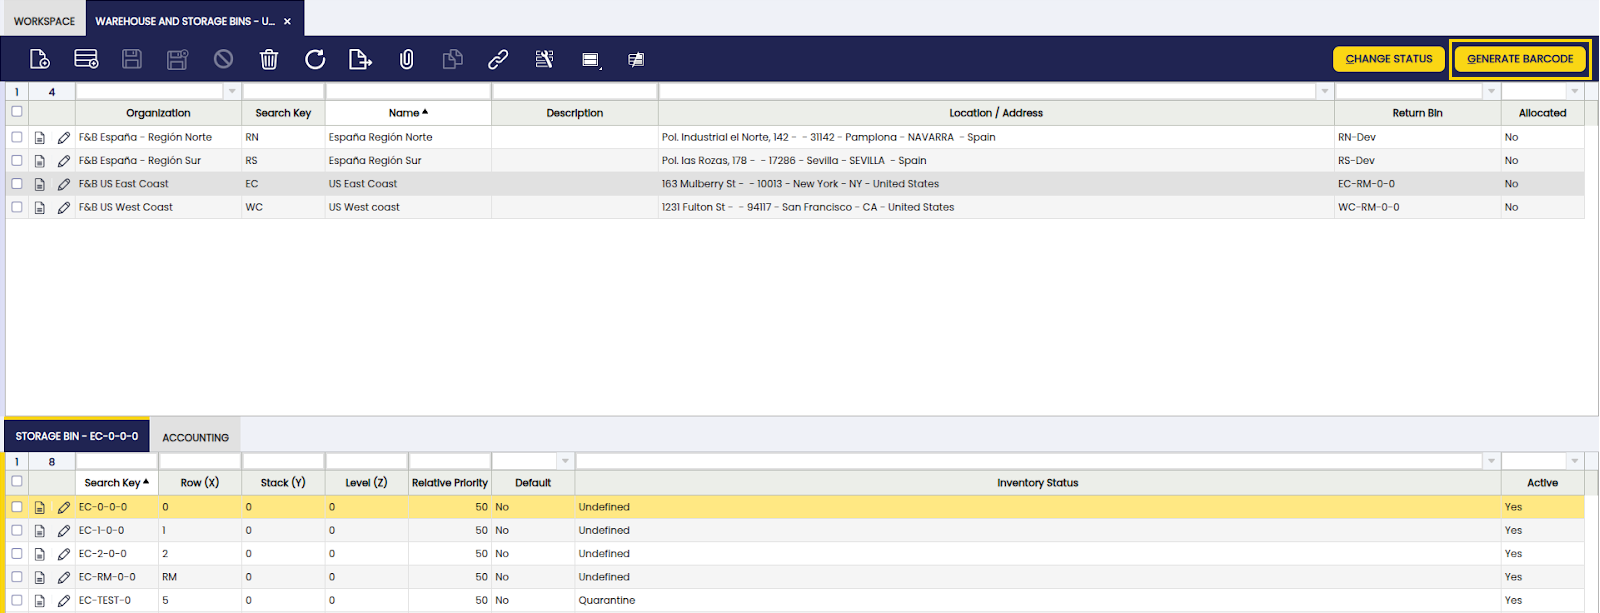
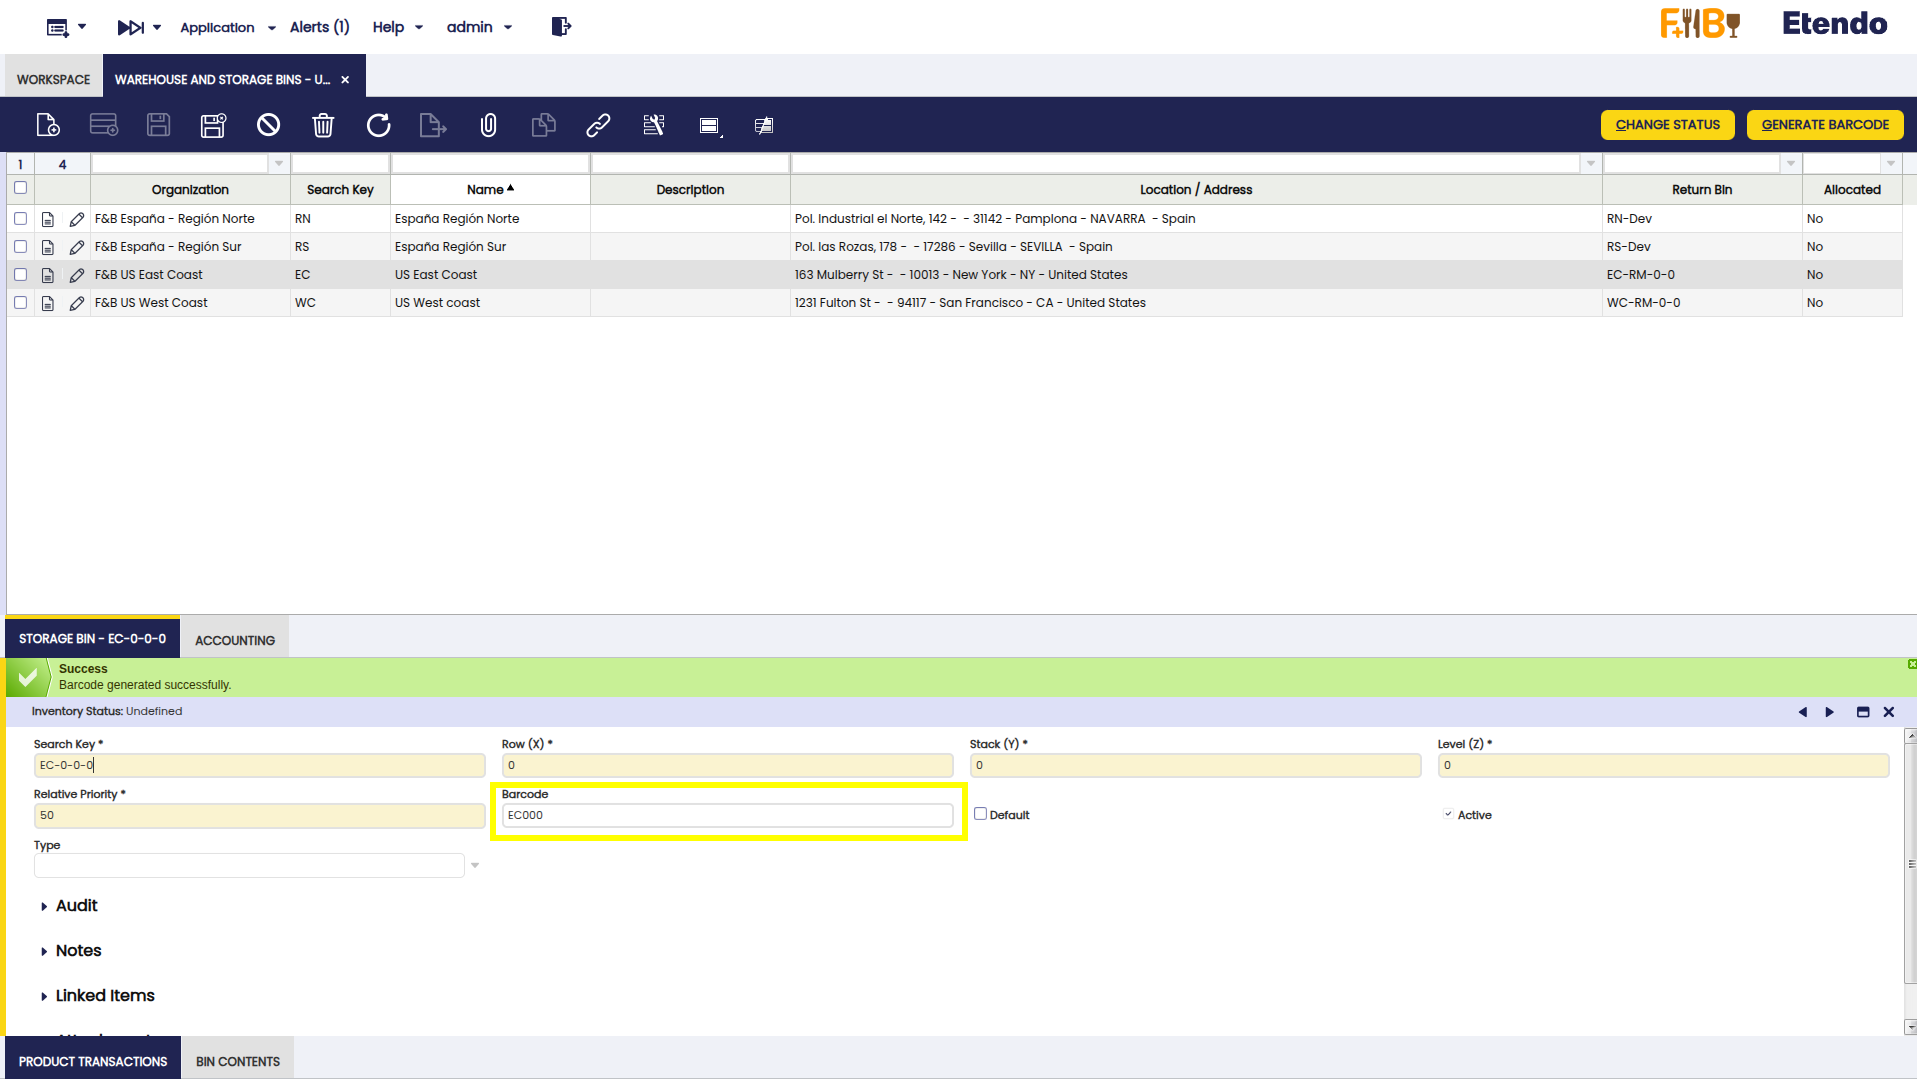
It is possible to generate these unique codes for storage bins in the Warehouse and Storage Bins and Product windows:
-
Select the warehouse and storage bin.
-
Click on Generate Barcode and confirm with Done.
-
The generated code is displayed in the Advanced Warehouse Management section of the storage bin. It can also be loaded manually or modified.
-
Select the product.
-
Click on Generate Barcode and confirm with Done.
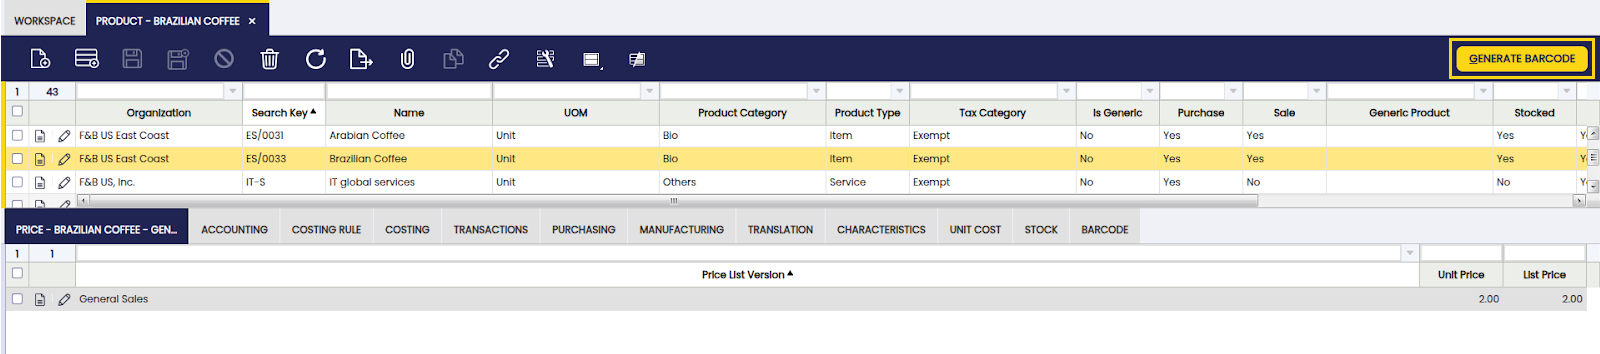
-
The generated code is displayed in the Advanced Warehouse Management section of the product. It can also be loaded manually or modified.
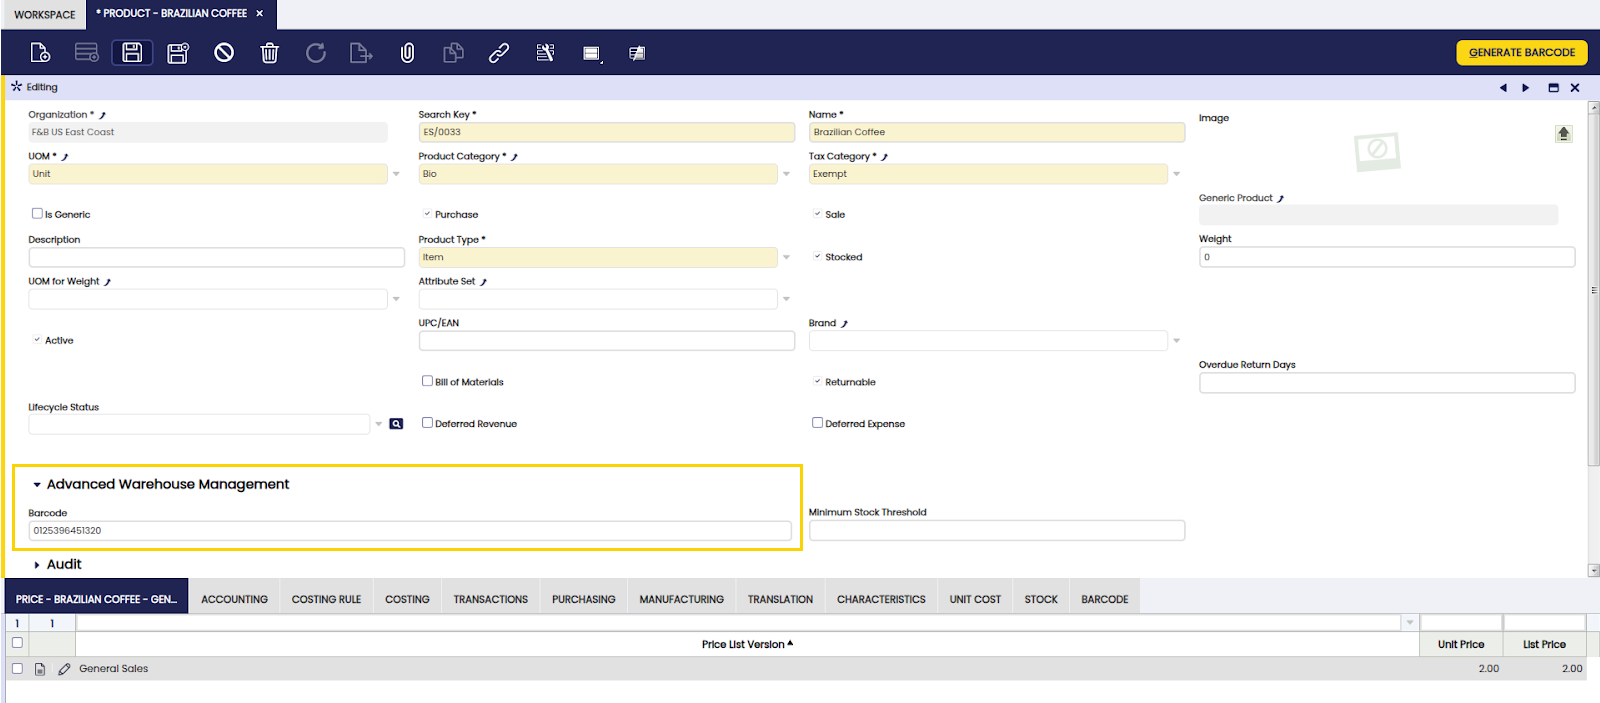
Info
In the Product window, there is a tab called Barcode, where various barcodes associated with the product, such as supplier codes, are listed. These codes are loaded manually.
To configure how the system searches for barcodes:
- In the Advanced Warehouse Configuration window, there is a checkbox labeled
Search Related Barcode - If the checkbox is enabled, when scanning a product from Etendo Mobile, the system will search for matches on all codes listed in the Barcode tab, in addition to the header code.
Using Etendo Mobile
When logging in to Etendo Mobile, the warehouse operator will be presented with the applications and menus available according to his role.
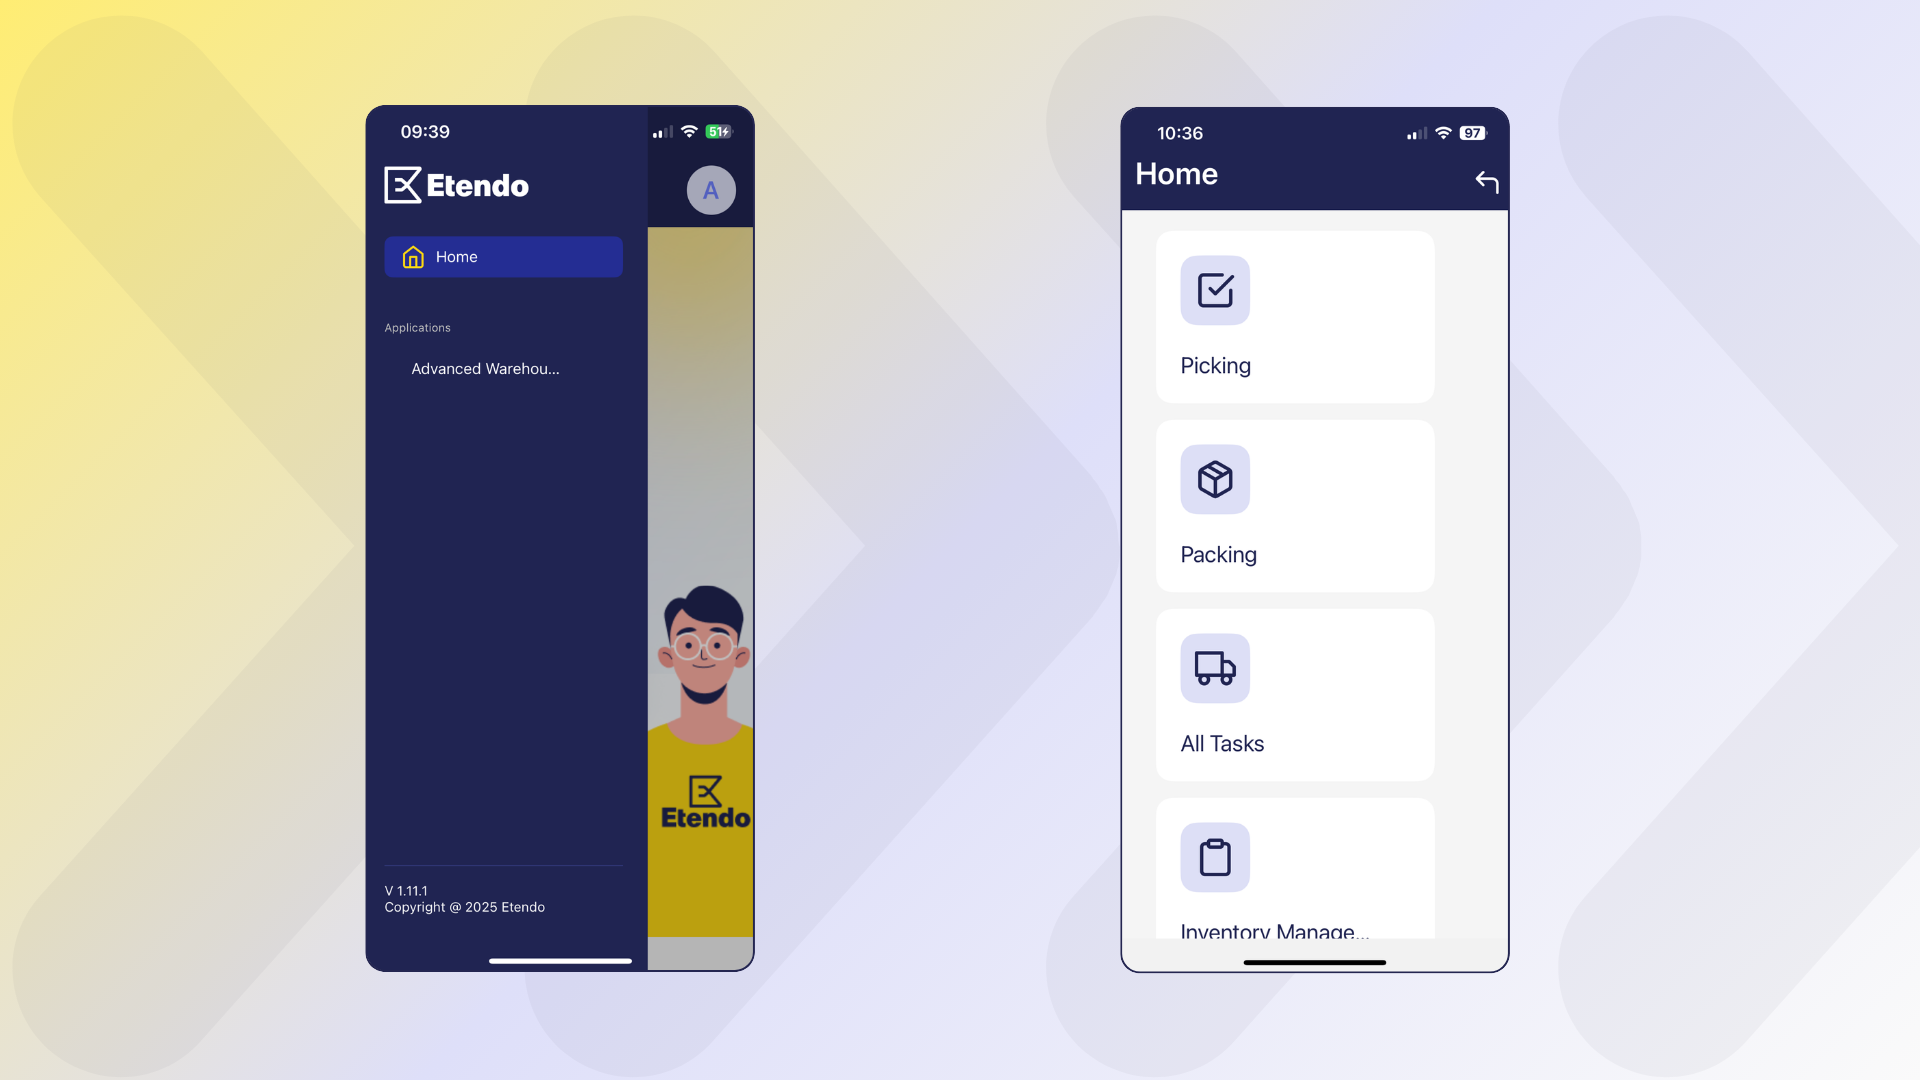
As seen above, the Advanced Warehouse Management option includes the following menus:
Picking
The picking process allows the operator to pick the products required for an order efficiently using Etendo Mobile. The complete process flow is detailed below.
Info
For more information about how to use this functionality in Etendo, visit Picking.
Process Start (Etendo)
The process is started in Etendo when a Picking List is created from the sales order, this process will create a new task that will be assigned to a user.
Important
Remember the only picking lists that are shown in Etendo Mobile are those marked as Direct Picking List to Customer type.
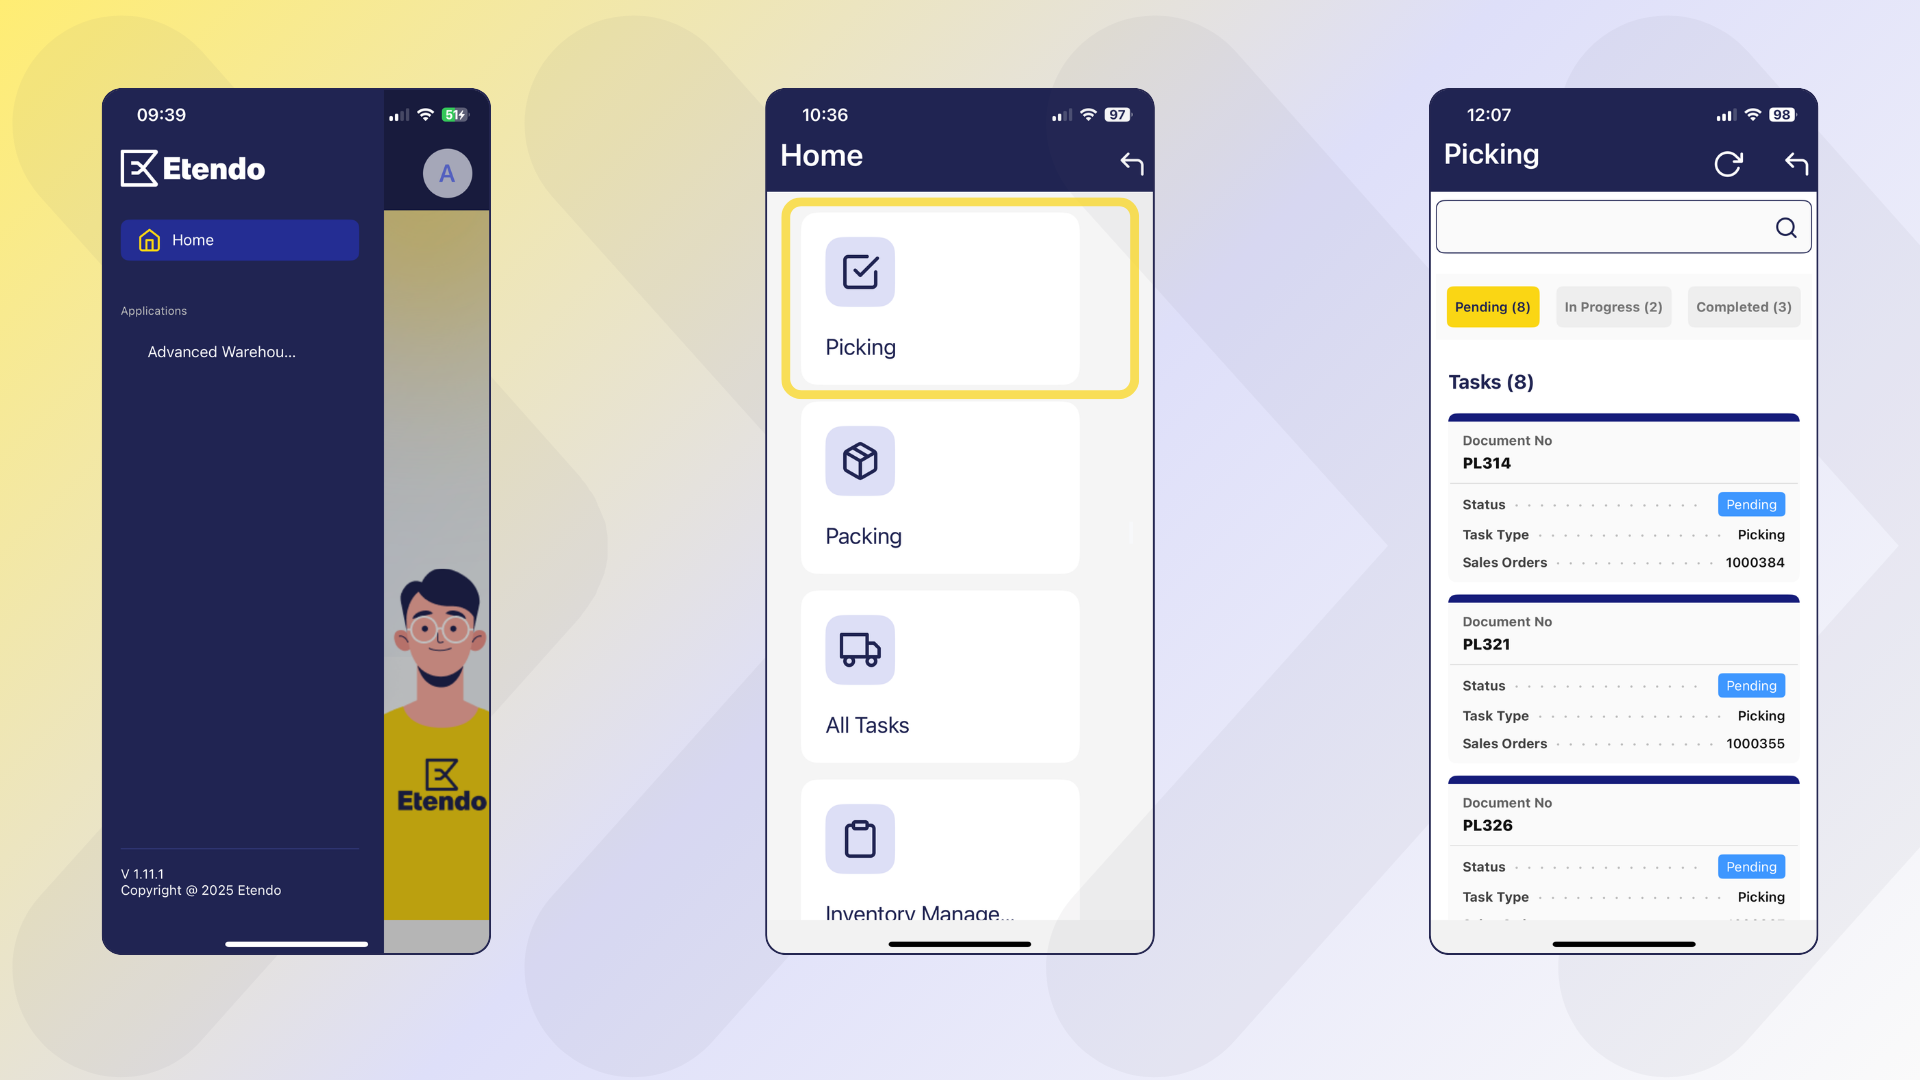
Access to Picking Tasks (Etendo Mobile)
When accessing Etendo Mobile into the Picking section, all tasks and their corresponding statuses, belonging to the logged in user, will be displayed. By default, the tasks are shown in Pending status.
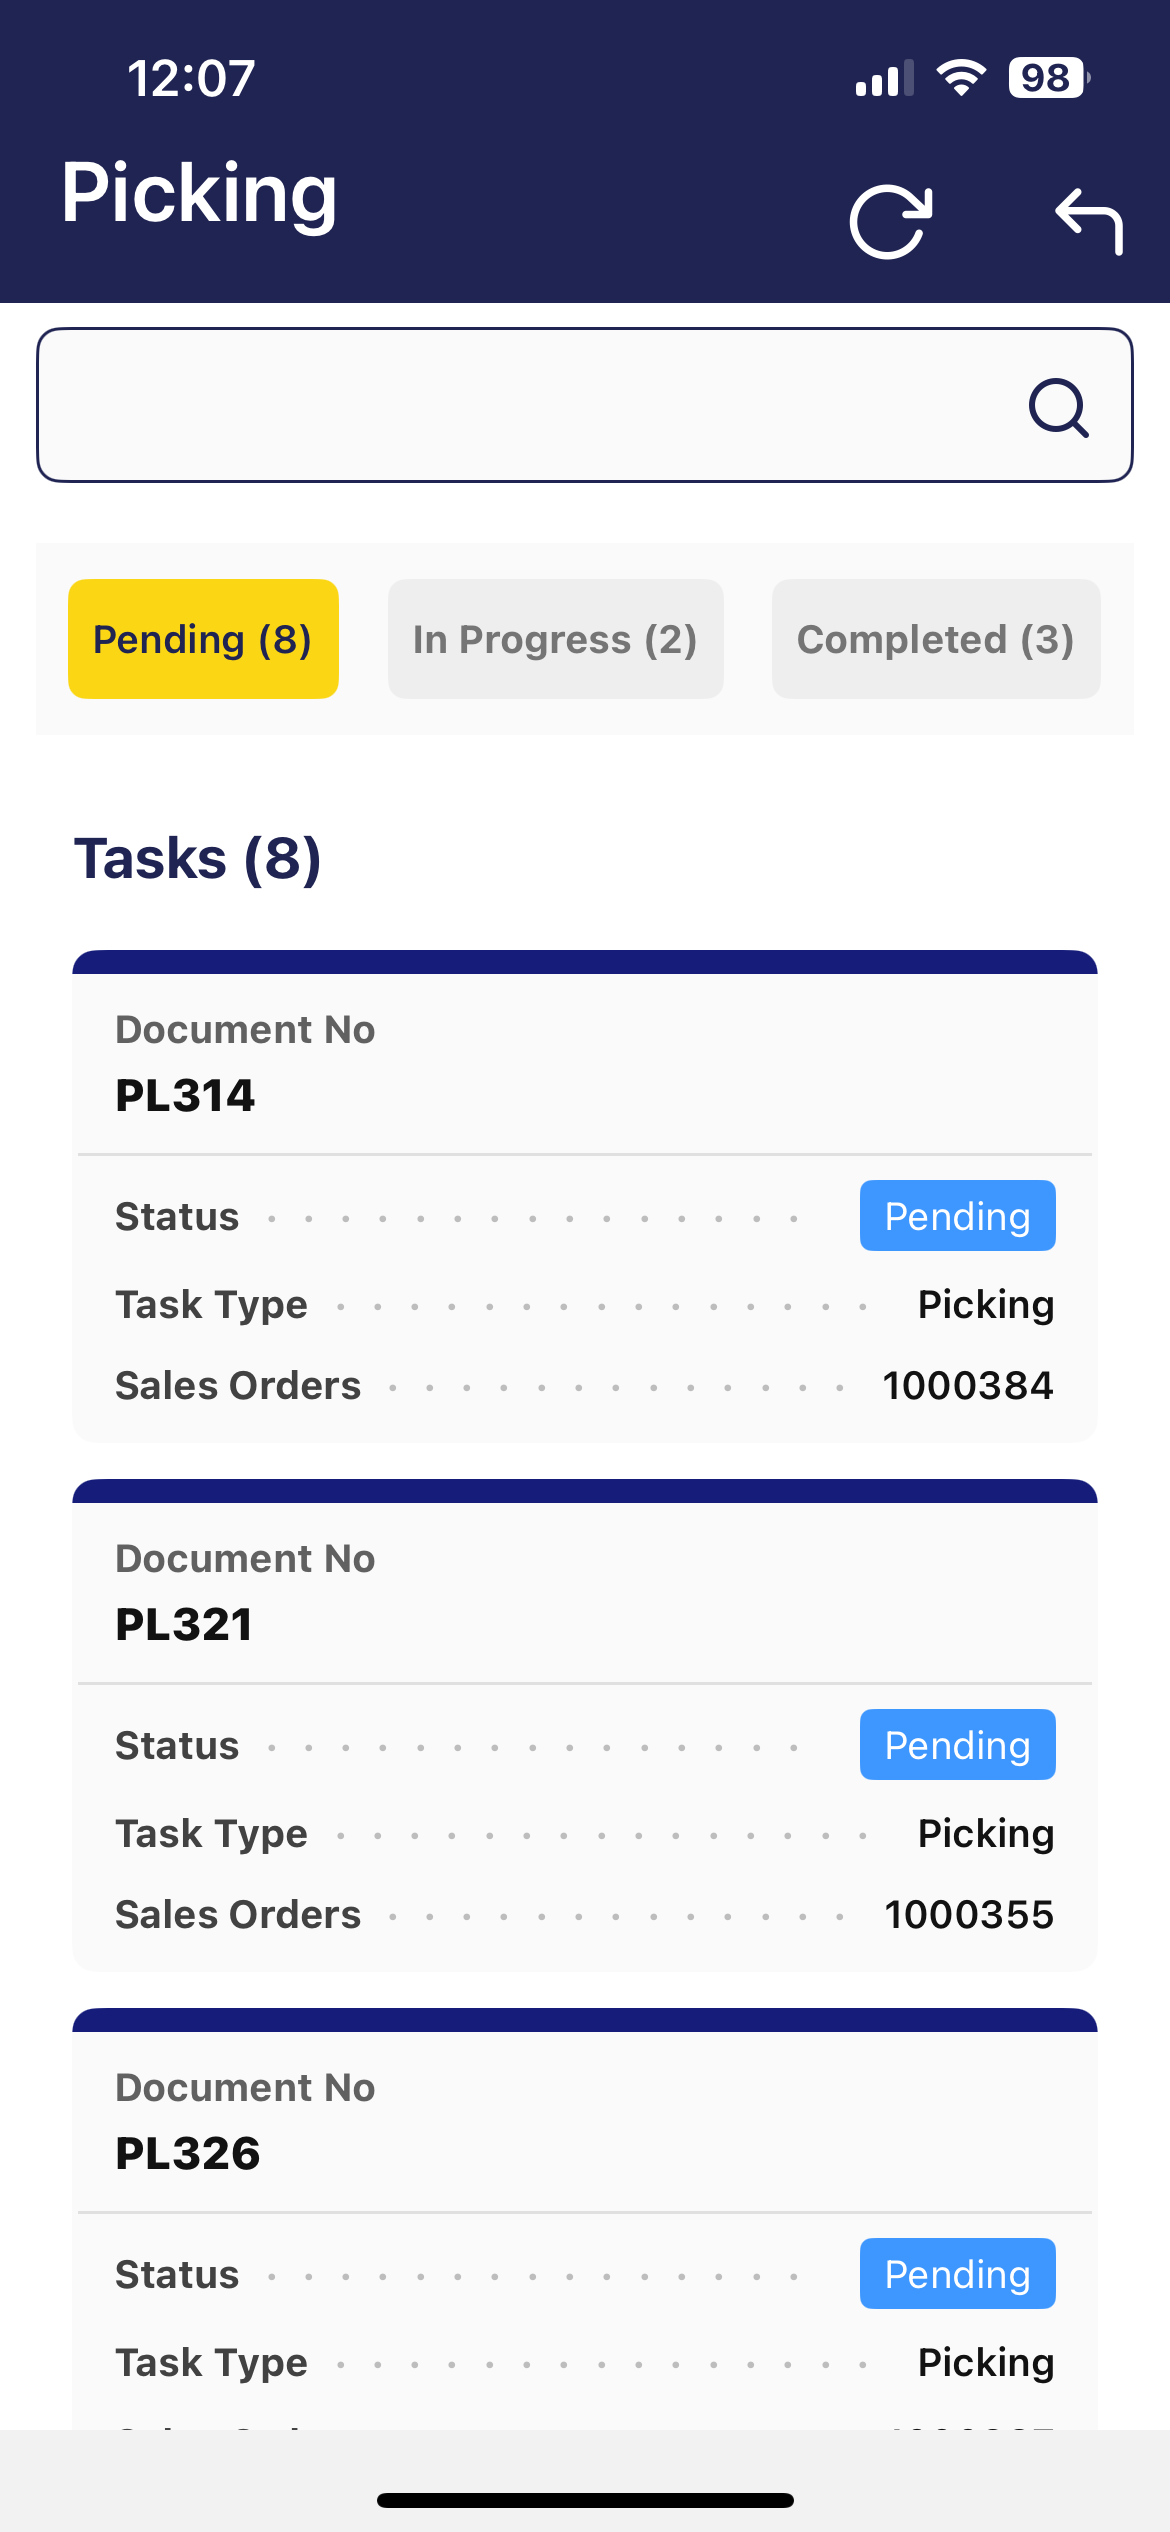
This screen contains:
- Refresh and Back buttons.
- A search field to filter tasks.
- Quick filters that limit between
Pending,In ProcessorCompletedtasks. - A list of cards with tasks.
Note
As explained above in the Tasks section of Initial Setup, there is a preference to define the days to show tasks in Completed status: fromDateCompleted. This allows the user to define the number of days backwards, from the current date, to be used as a criterion for displaying tasks in Completed status.
Product Picking
-
The warehouse operator must select a
Pendingtask. -
Once the task is selected, a window opens with the list of products to be picked.
-
To start the process, click on the Start Picking button located at the top; once this is done, the task goes to the
In Progressstatus.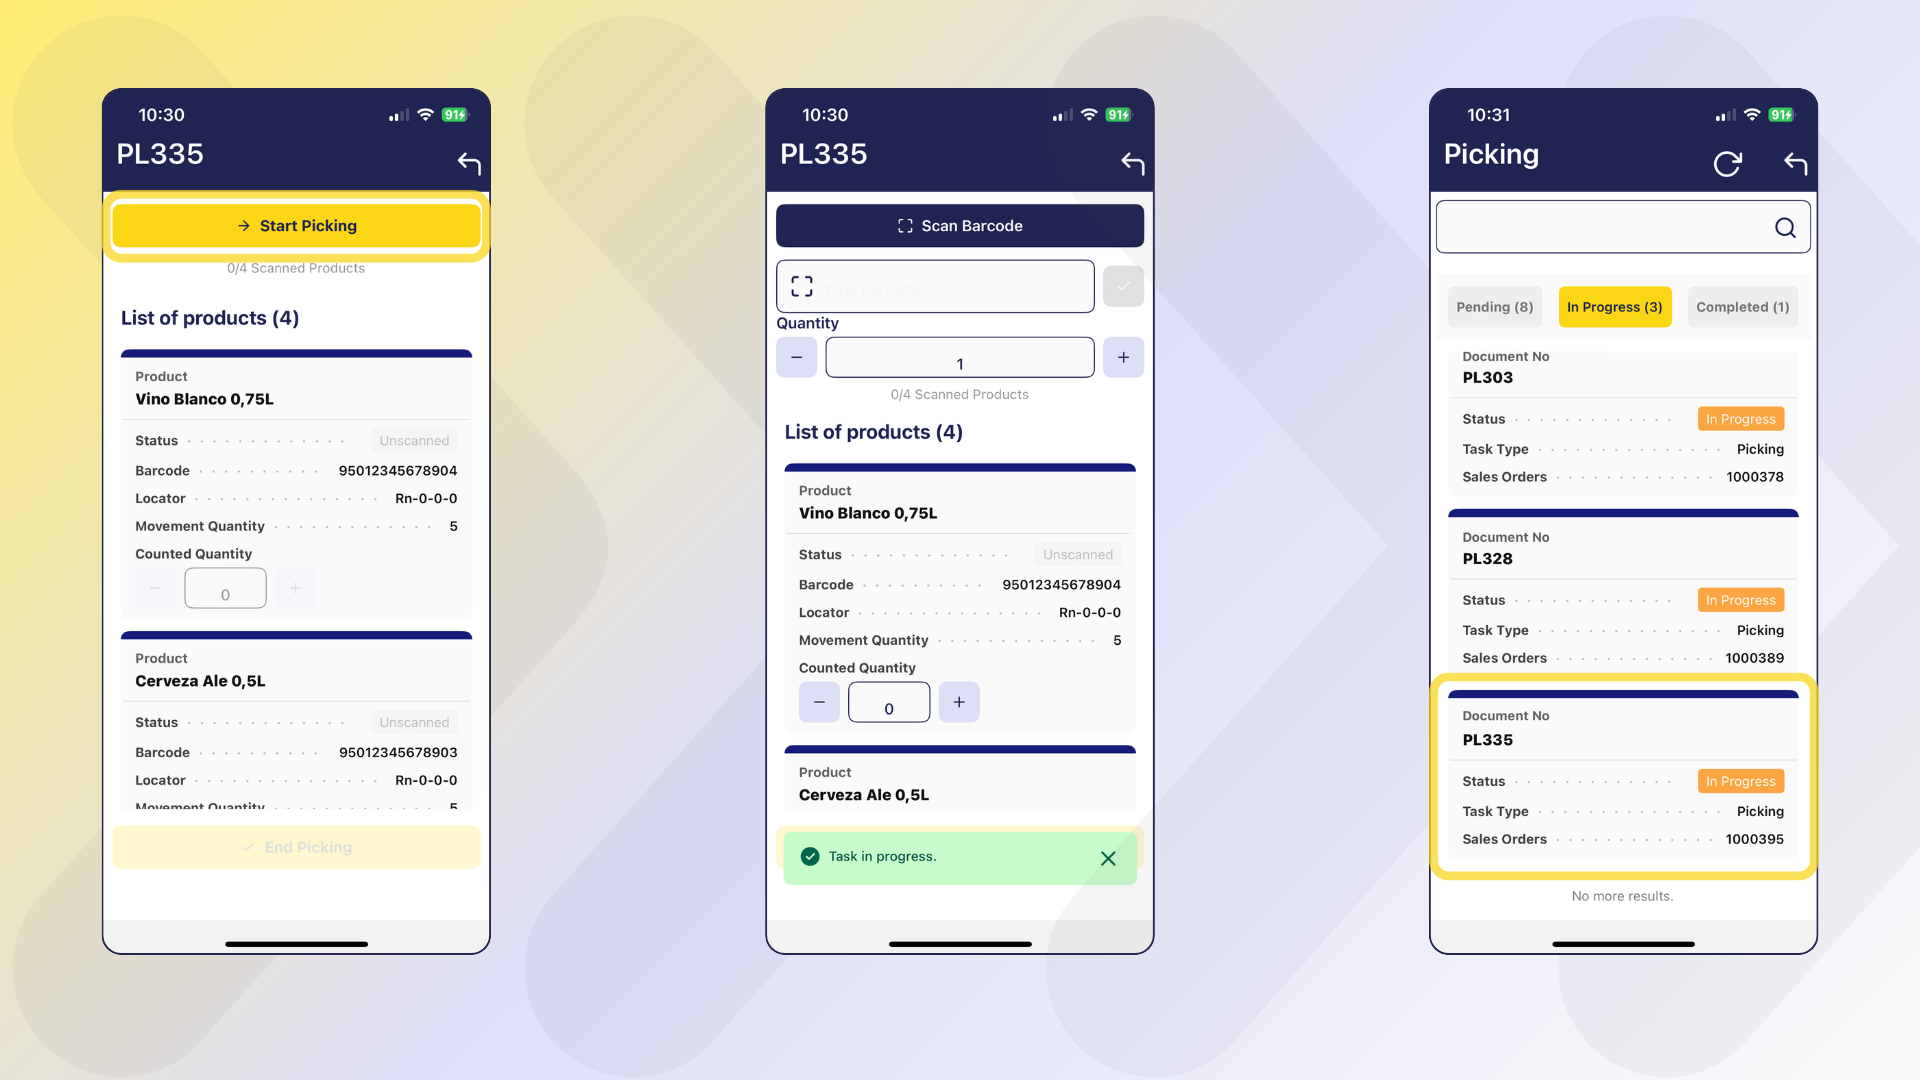
-
Once picking is started, a new window opens with the following items:
- Scan Barcode: activates the camera of the mobile device.
- Type barcode: allows to enter the barcode manually. A Validate button is available to trigger the barcode validation process.
- Quantity with:
+and-buttons allows manual loading of the quantity to be scanned. -
List of products (N): list of cards with product information, where (N) is the total quantity of products.
- Product
- Status:
- Unscanned
- Partially Scanned
- Scanned
- Barcode
- Locator
- Movement Quantity: total quantity to be collected.
- Counted Quantity with buttons
+and-: that allow to add or subtract one by one the quantity manually.
Picking Methods
The system allows flexibility in the mode of operation:
- Scan the product the requested number of times (ex: 10 scans for 10 units).
- Manually load "10" in the quantity field and scan once.
- Enter both code and quantity manually.
- Manually enter only the quantity in the Quantity field within a product card, using the + and - buttons or by entering the number from the keypad.
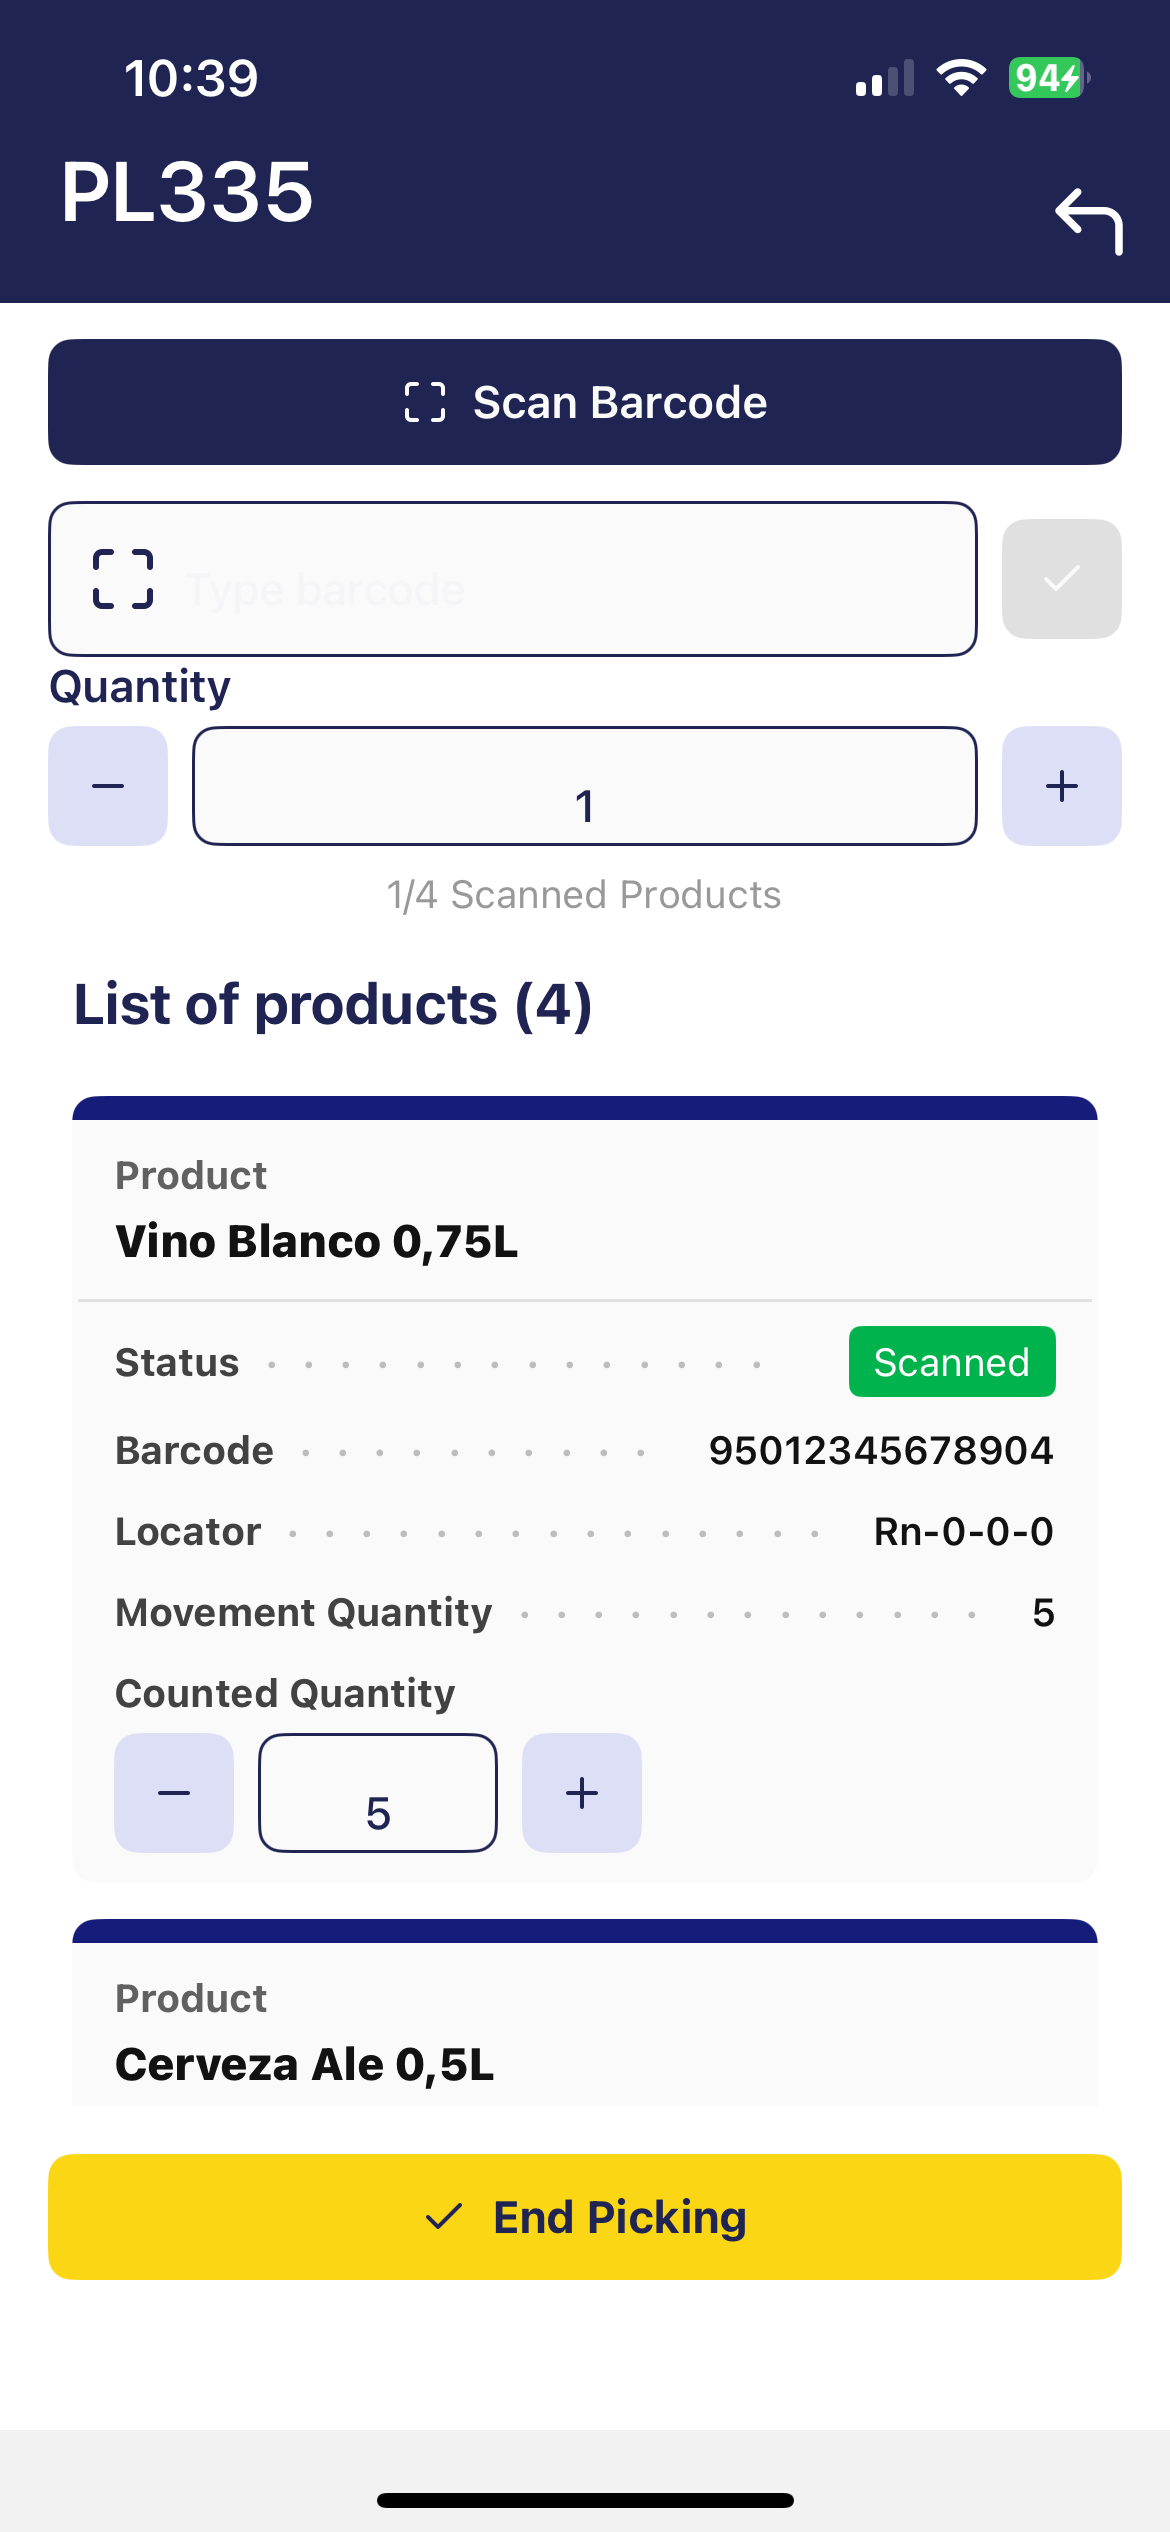
Tip
When scanning a valid product, the Barcode field is automatically filled in, the associated card is displayed and the value 1 is incremented in the product, if the quantity was not previously changed.
Tip
If a quantity other than the default quantity, e.g. 5, was previously entered in the Quantity field, and then the product is scanned, those 5 units will be added directly to the product card.
Warning
Possible error scenarios:
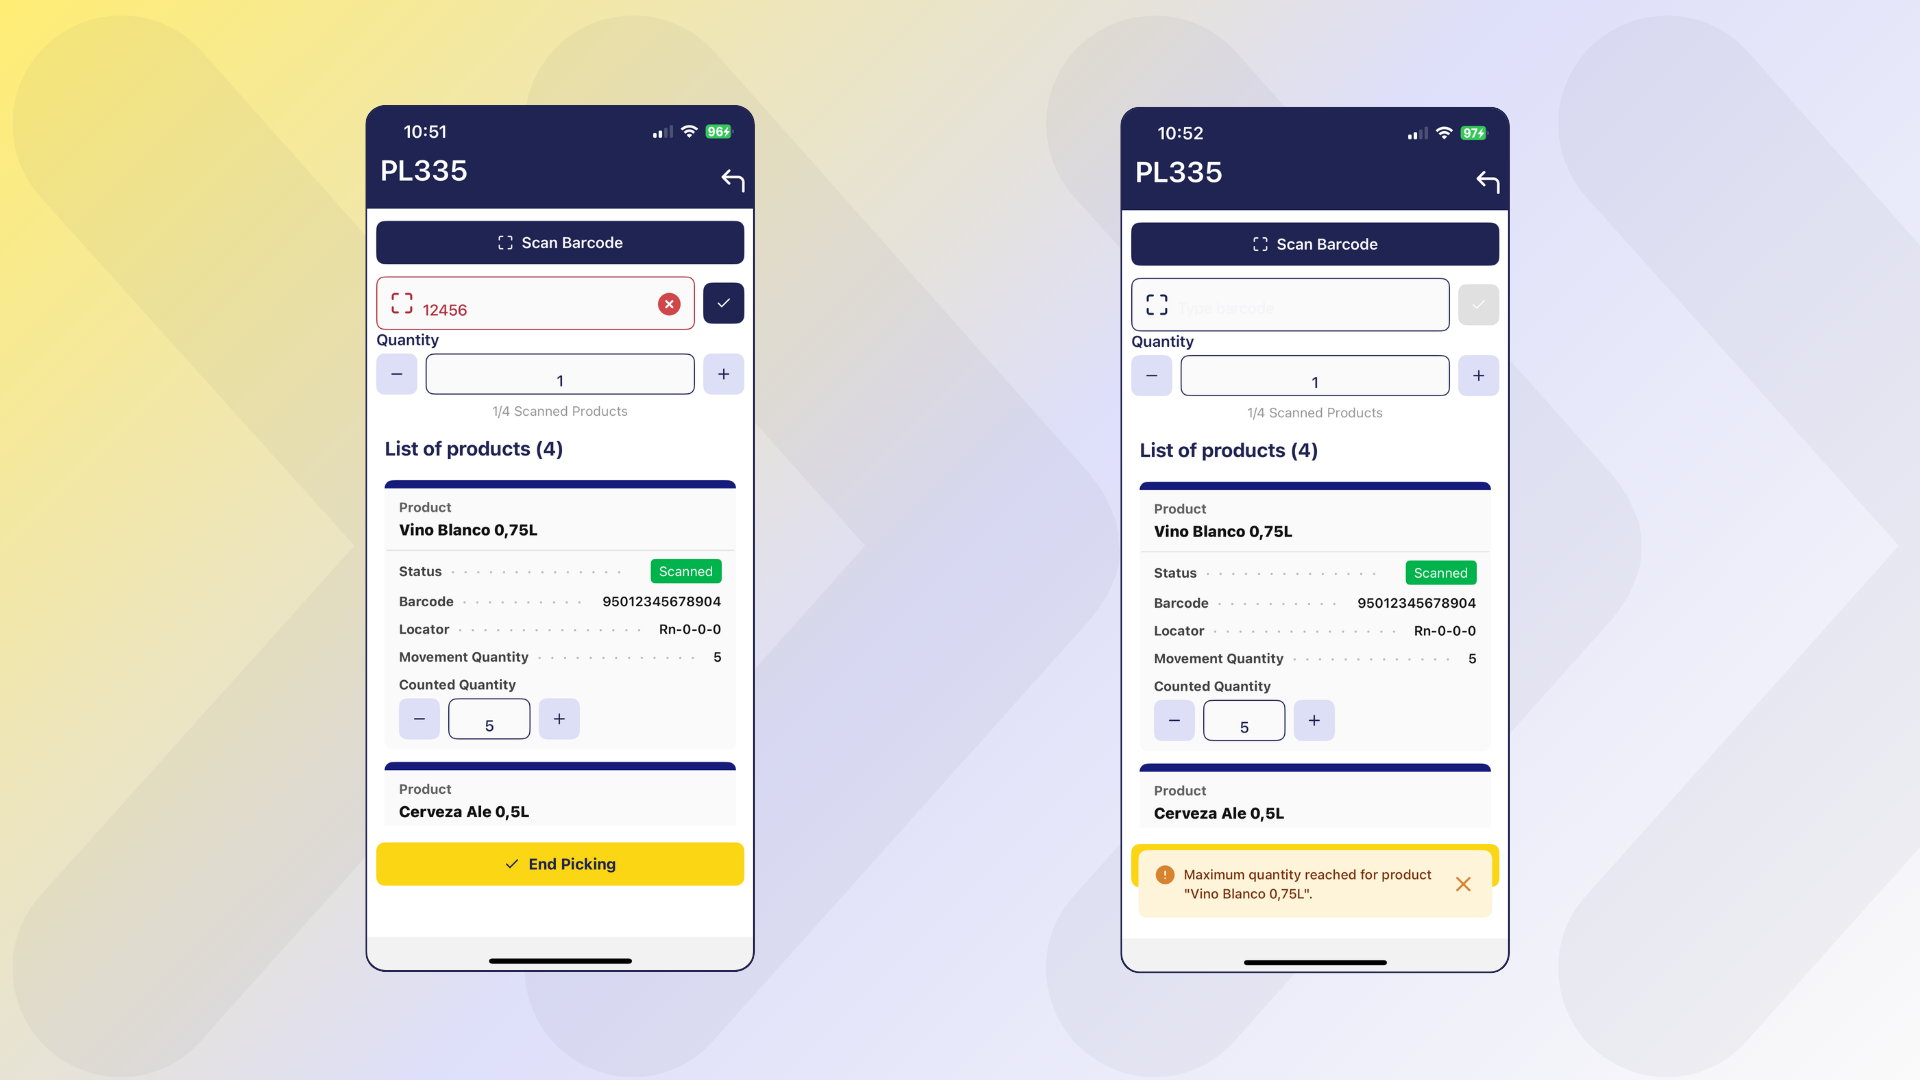
- If an incorrect code is scanned (does not match any product in the task), the barcode field is highlighted in red, shows a cross and does not add quantity to any product.
- If an attempt is made to enter a quantity greater than required, the system will charge the maximum defined in the product card. Once the quantity is completed and the product code is re-scanned or reloaded, the system does not add quantity to the product.
Additionally, if a quantity greater than the allowed maximum is entered, a popup will be displayed with the message: "Maximum quantity reached for product [ProductName]".
- If the quantity is manually loaded into the product card, the system allows loading the maximum quantity requested.
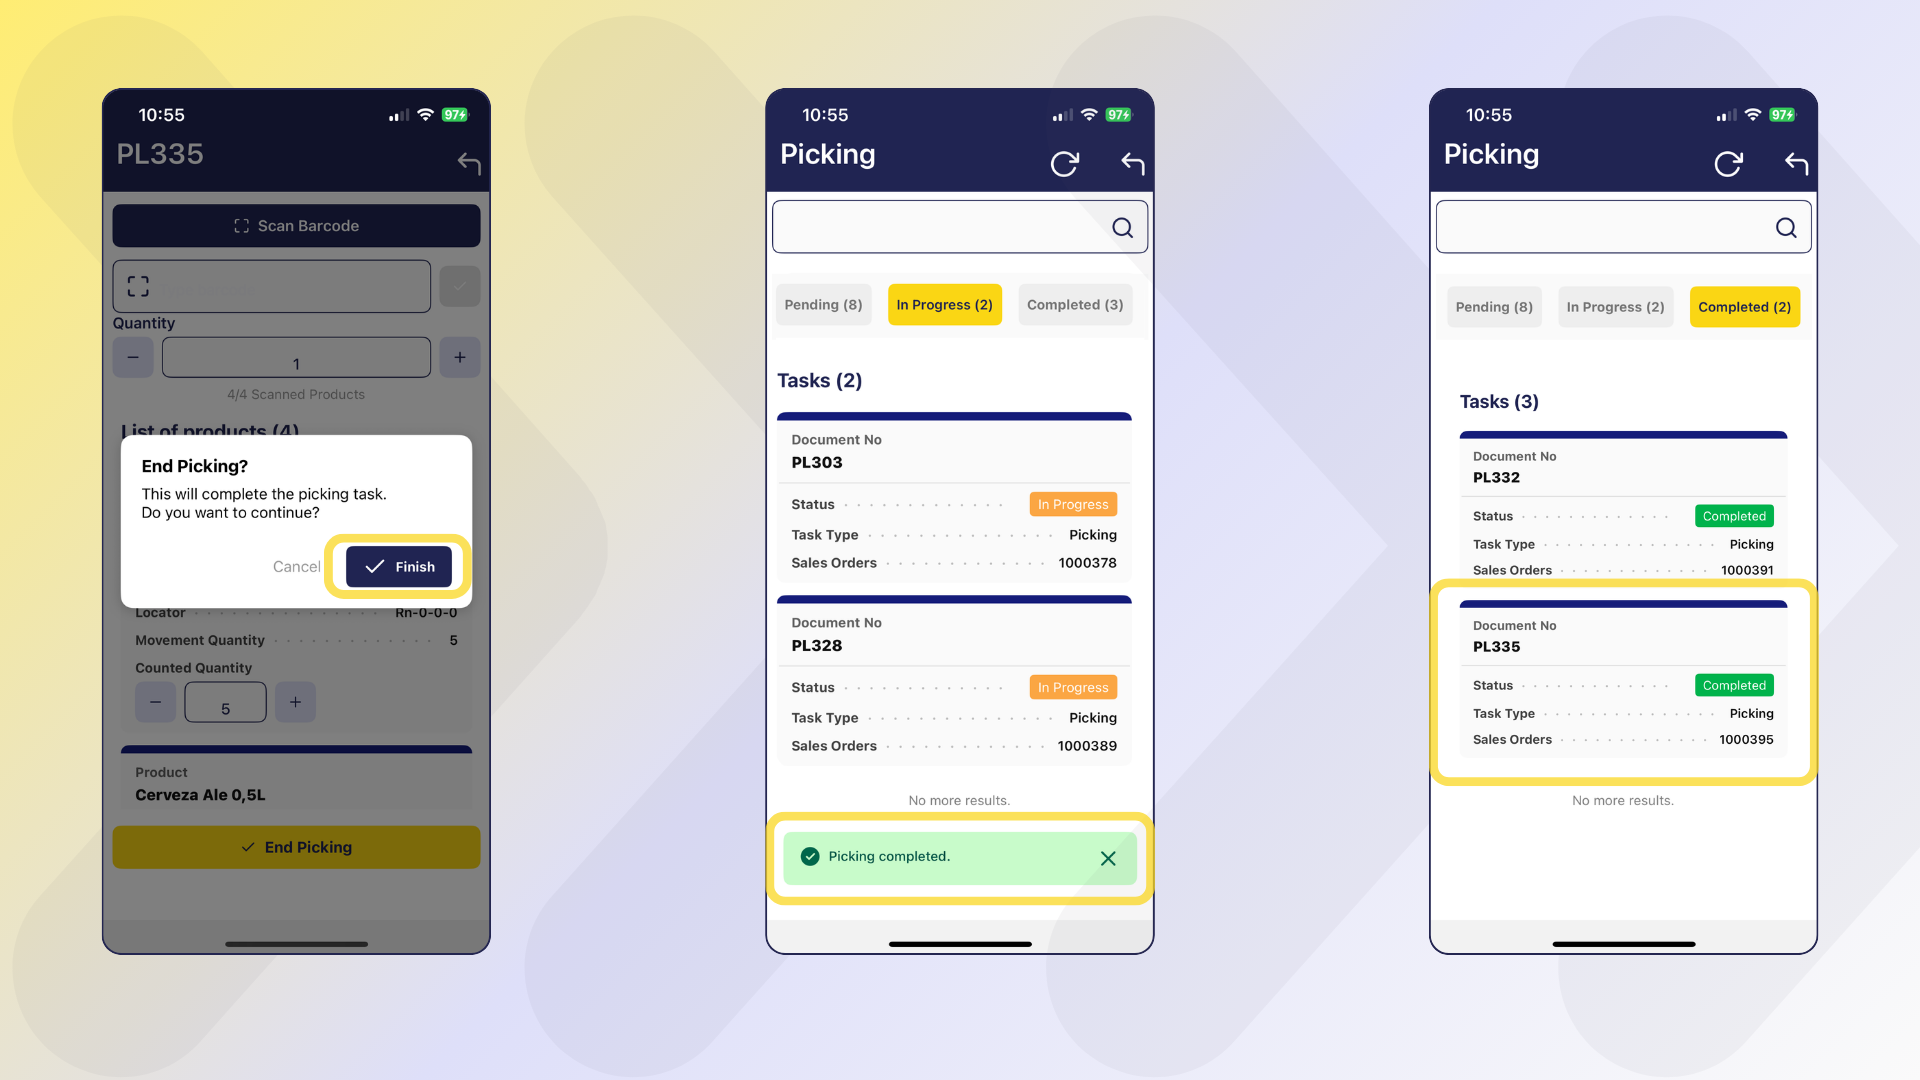
Picking Completion
Once at least one unit of any product is registered, the End Picking button becomes active. This allows partial picking, meaning only part of the requested quantity can be picked, which is useful when products are missing or unsuitable for use.
After confirmation, the task is marked as Completed.
Warning
For partial picking, the task is closed, and no new task is automatically created for the missing products. Any remaining quantities must be handled manually.
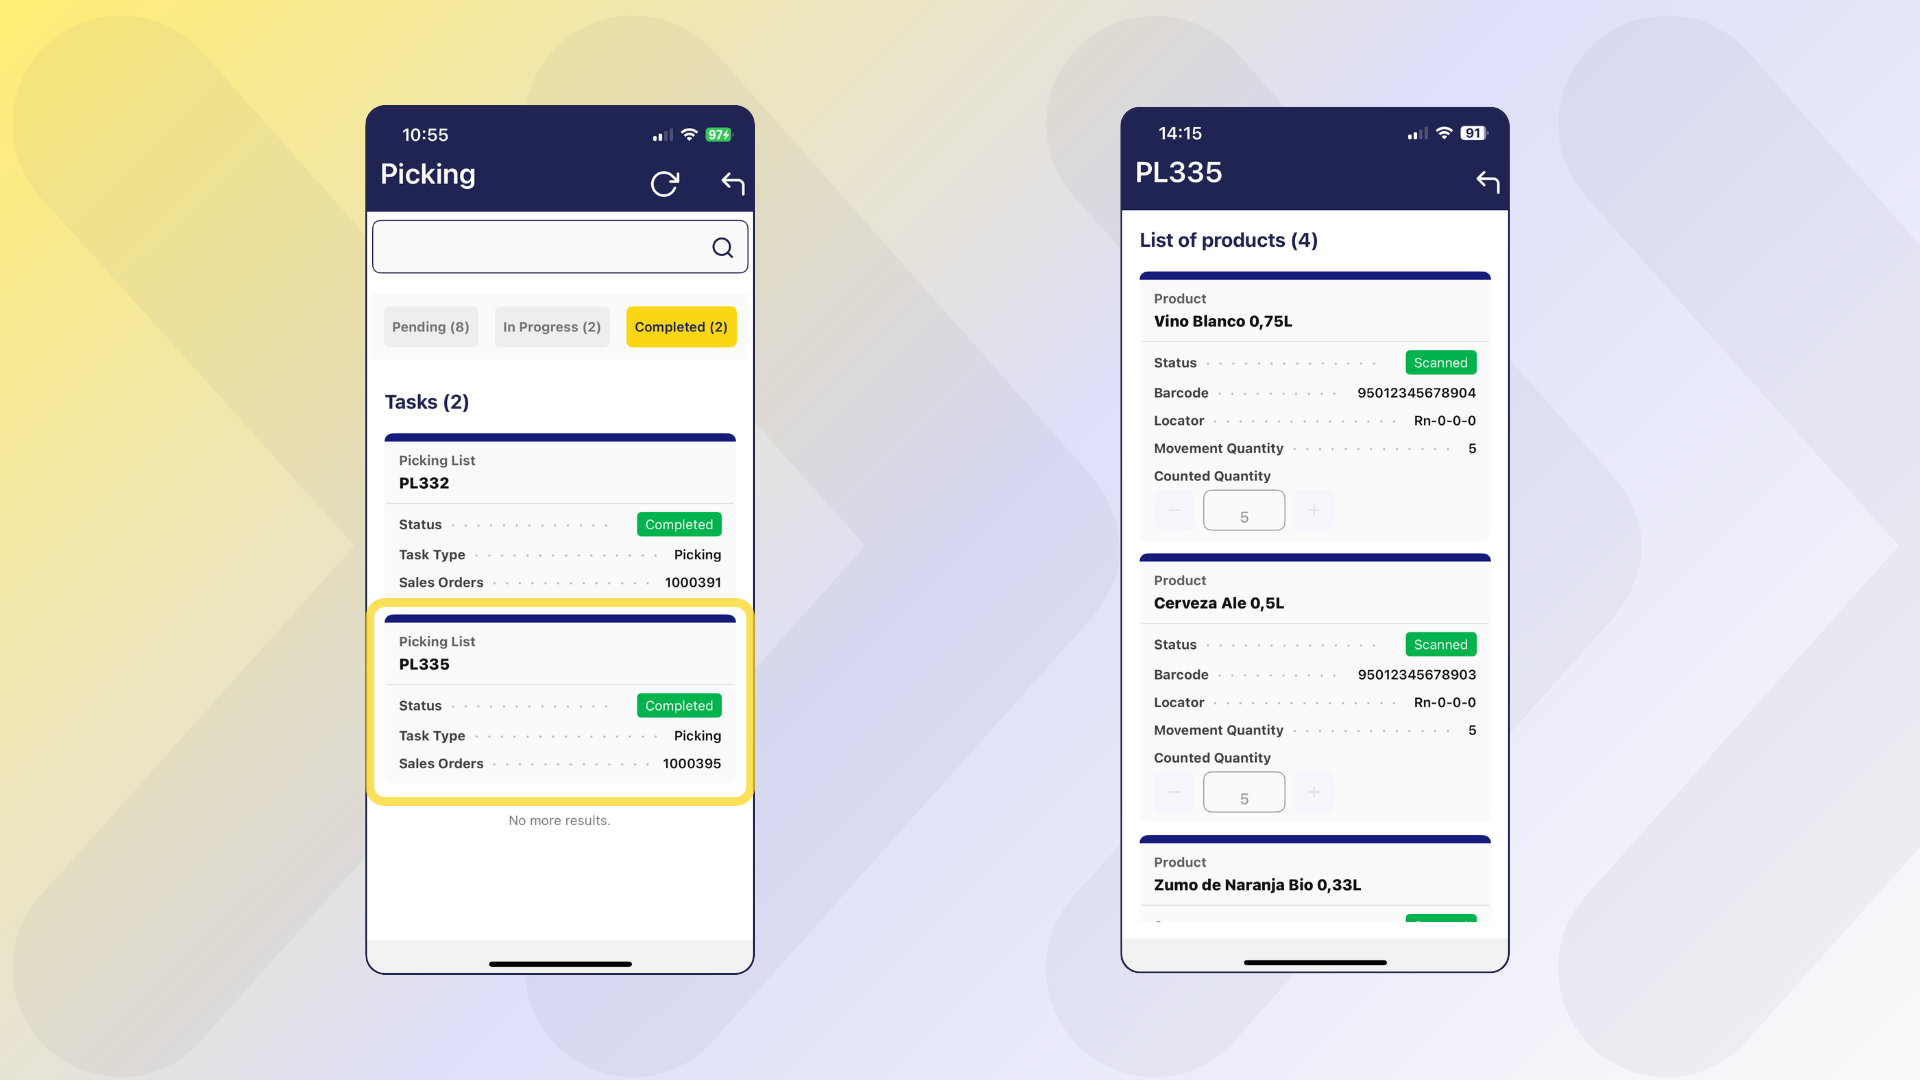
Once completed, the task will appear in the Completed Tasks section, where it is possible to review the validated products and quantities for that specific picking task.
Packing
The packing process allows the operator to pack the products efficiently using Etendo Mobile. The complete process flow is detailed below.
Info
For more information about how to use this functionality in Etendo, visit Packing.
Process Start (Etendo)
Packing tasks are linked to a record in the Packing window. The creation of a packing task is triggered after:
- The completion of a picking task (when the Task Type
Picking and Packingis active). - From the Packing window of Etendo when adding at least one sales order to a new Packing.
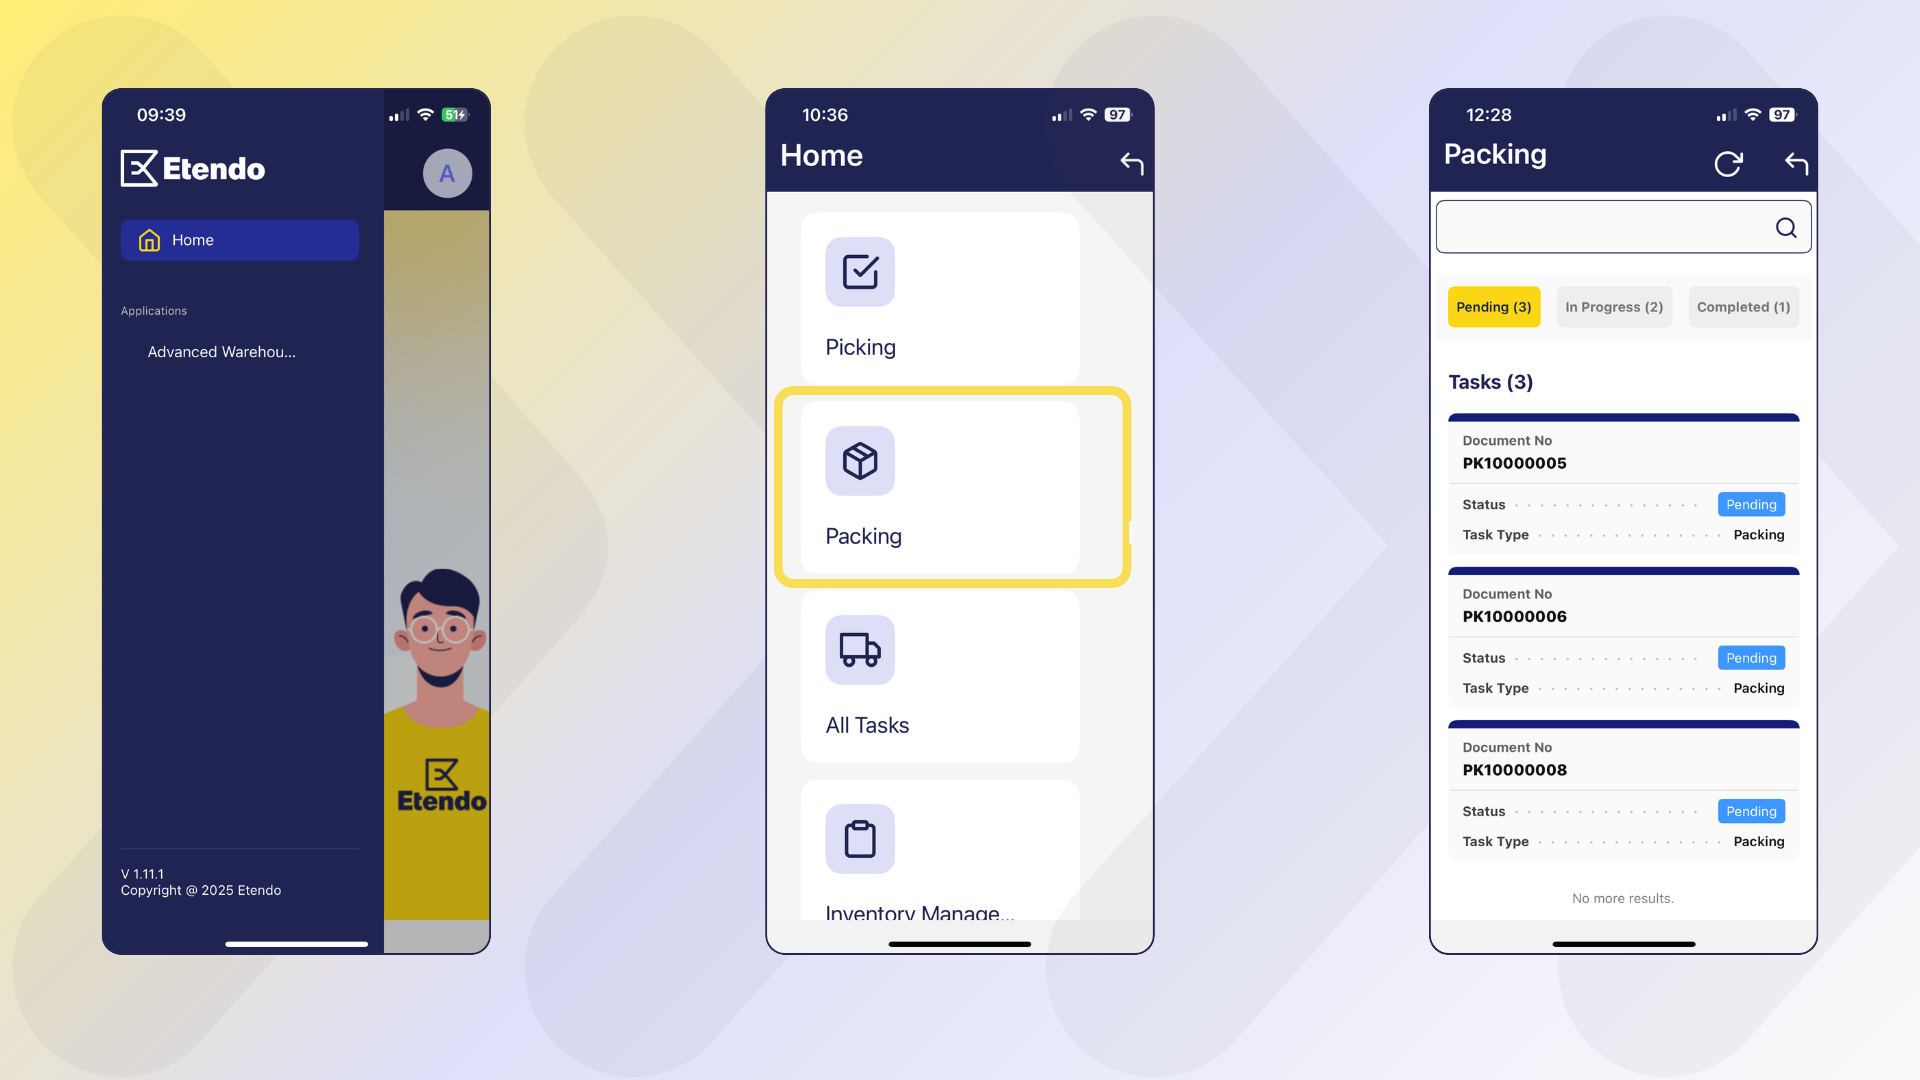
Access to Packing Tasks (Etendo Mobile)
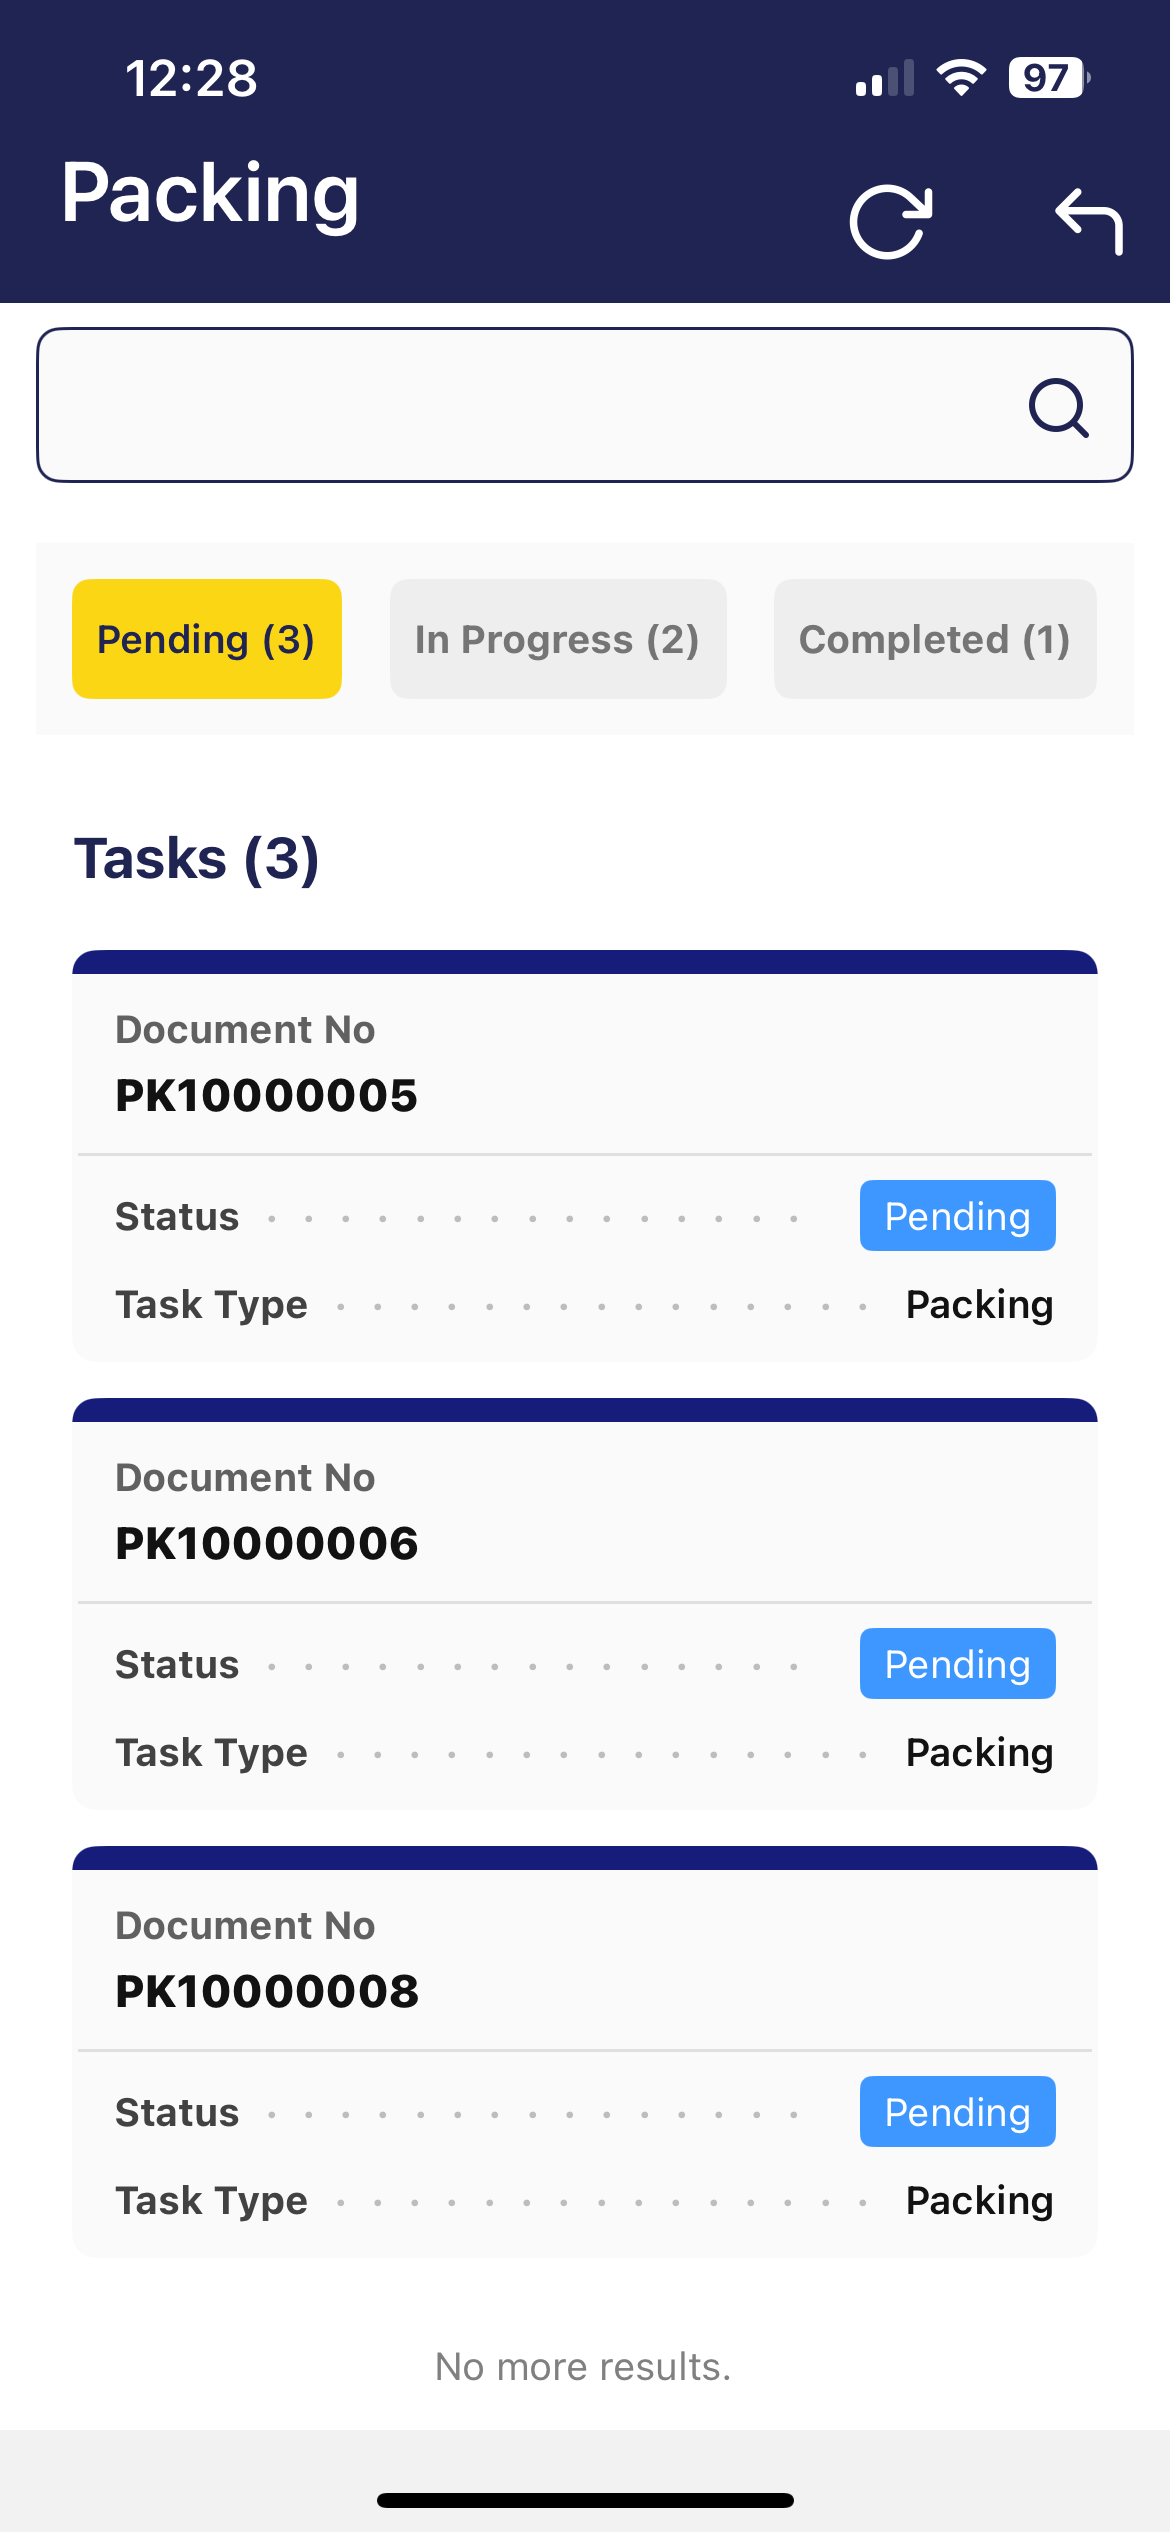
When accessing Etendo Mobile and selecting the Packing menu, the packing main screen with the number of available Packing tasks to the current user.
This screen contains:
- Refresh and Back buttons.
- A search field to filter tasks.
- Quick filters that limit between
Pending,In ProgressorCompletedtasks. By default it shows thePendingfilter selected, and in the case of tasks inCompletedstatus, there is a preference where it is defined from which day it will bring completed tasks. -
A list of cards, where each card represents a packing task and includes the following information:
- Packing as title: The document reference is shown.
- Status.
- Task Type.
Product Packing
-
The warehouse operator must select a task. To select the task, scroll or enter key data in the search engine.
-
When selecting a task, a screen opens with the packing list number and the Start Packing button.
-
When pressing Start Packing, the status of the task changes to
In Progressin both Etendo Mobile and Etendo.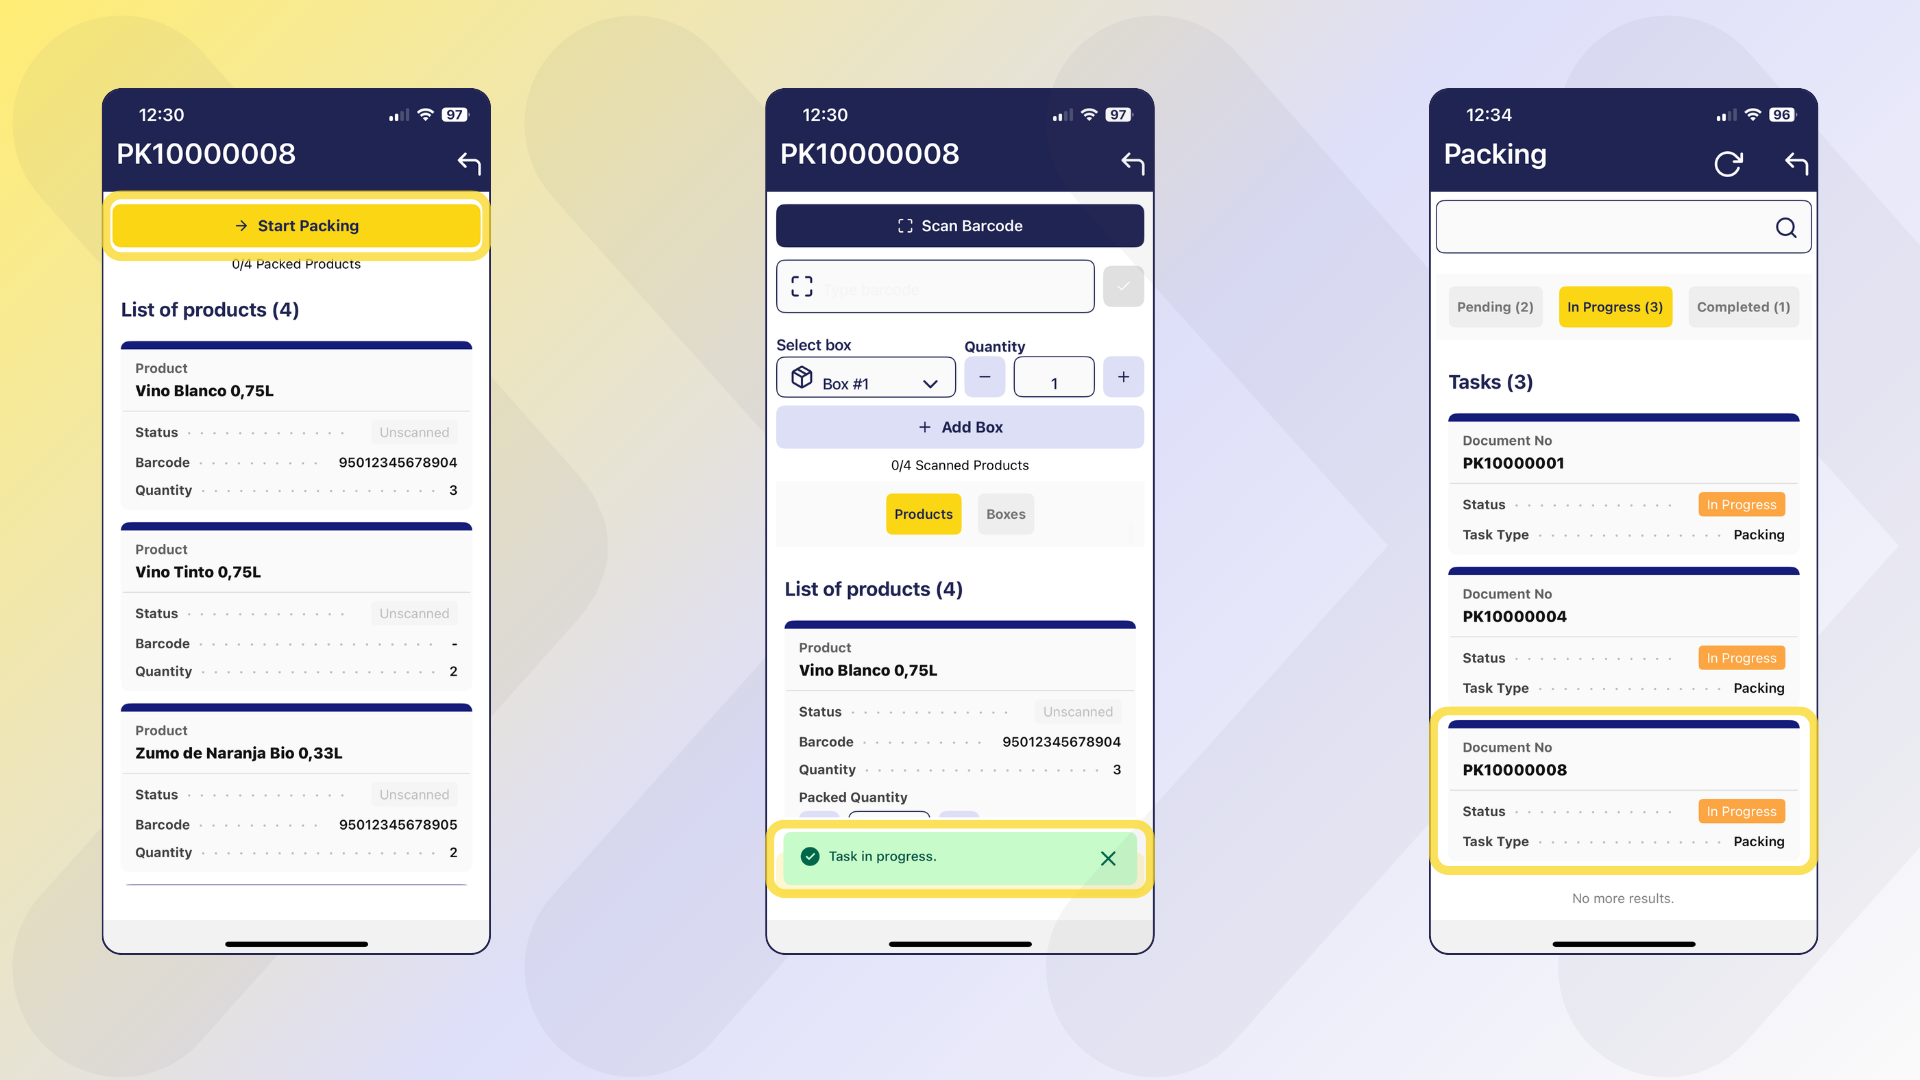
-
The window has the following elements:
- Scan Barcode button to activate the device camera and scan.
- Type barcode allows to enter the barcode manually. A Validate button is available to trigger the barcode validation process.
- Select Box field to select the destination box when scanning the product.
- Quantity field that acts as a multiplier to load the quantity when scanning the product.
- + Add Box button that allows you to add new boxes.
-
A list of Product cards, each showing:
- Product
- Status:
- Unscanned
- Scanning
- Scanned
- Barcode
- Quantity
- Packed Quantity with buttons
+and-: that allow to add or subtract one by one the quantity manually.
-
A list of Boxes, showing:
- Box name (or number)
- Products and their quantities

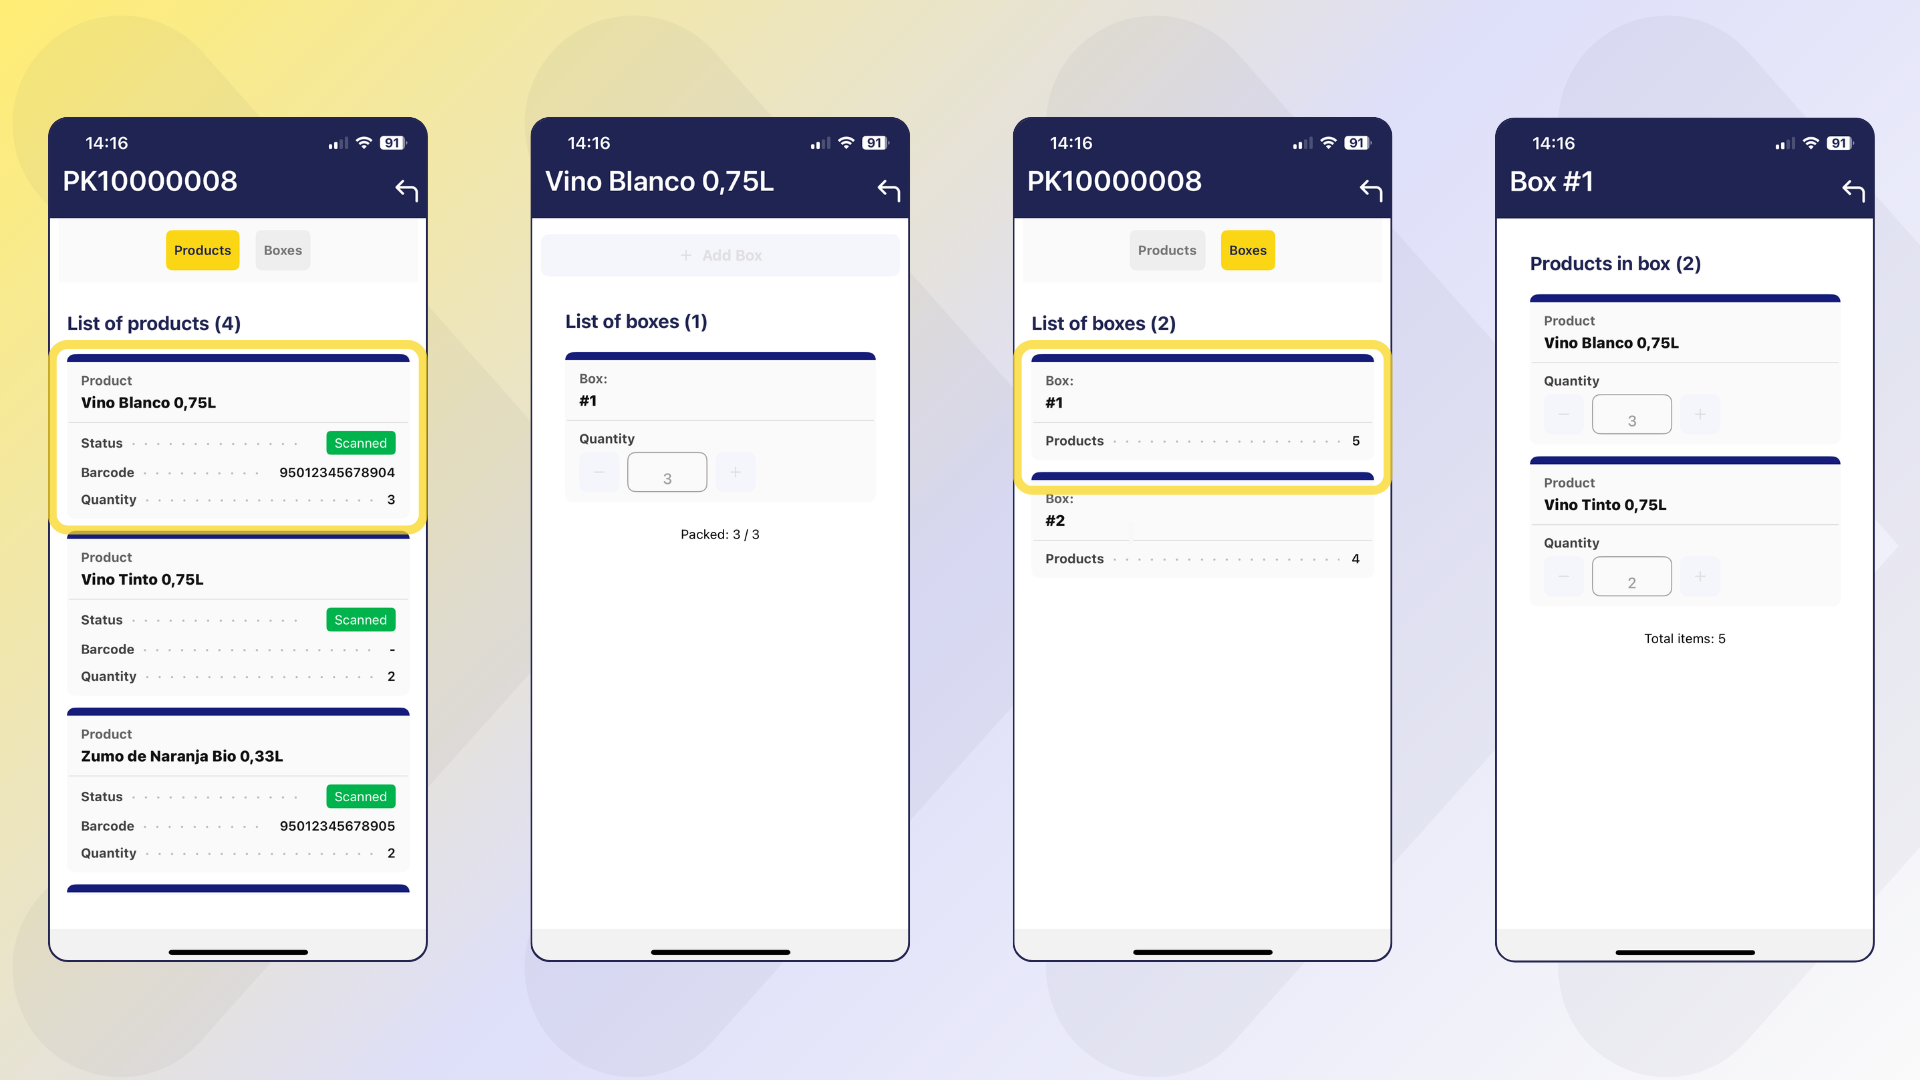
The view selectors by Product or by Box allow:
-
In the Products view, when entering a product card, it shows how that product was distributed in the different boxes, allowing you to browse product by product to review the quantities assigned per box.
-
In the Boxes view, when entering a box, the detailed contents are displayed with the possibility of browsing box by box to check which products are contained in each box.

Tip
In both views, it is possible to modify the quantities loaded and add boxes if necessary. However, in order to be able to assign content to the added boxes, one of the following conditions must be met:
- The total load of products has not yet been completed, or previously assigned quantities are modified (decreased) to allow their relocation to the new box.
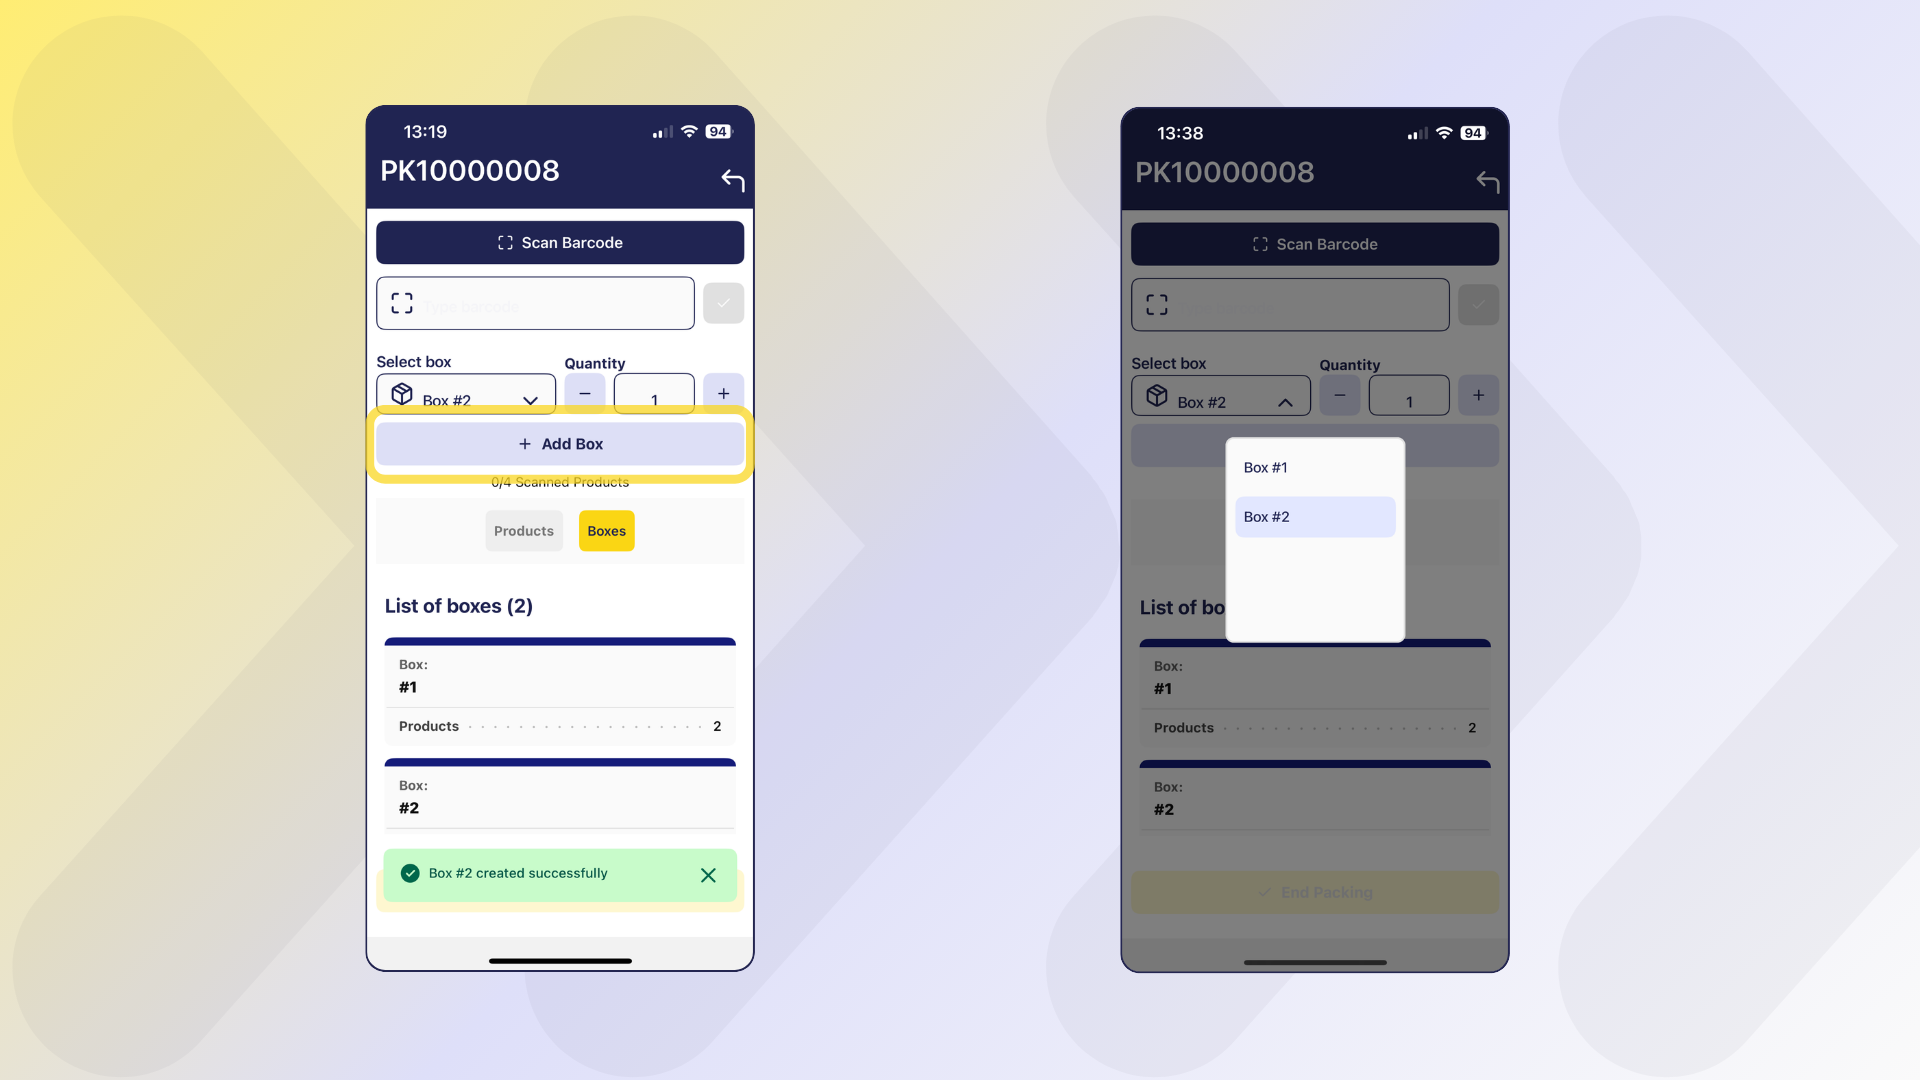
-
Once packing is started, the user selects or creates a box and starts loading products by scanning or manually entering data.
- Each packed product is registered under a specific box.
- You can switch between boxes to distribute products as needed.
Info
Newly created boxes cannot be deleted manually. However, if a box is left empty (no products added), it will be automatically removed at the end of the process. Only boxes with packed products will be saved and displayed.
Loading Options
The system allows flexibility in mode of operation:
-
Scan the product the exact number of times (ex: 10 scans for 10 units).
-
Load the amount manually in the Quantity field and then Scan the product.
-
Enter both quantity and code manually, and then press the Validate button to confirm the entry.
-
Enter the quantity manually from the Product view or from the Boxes view.
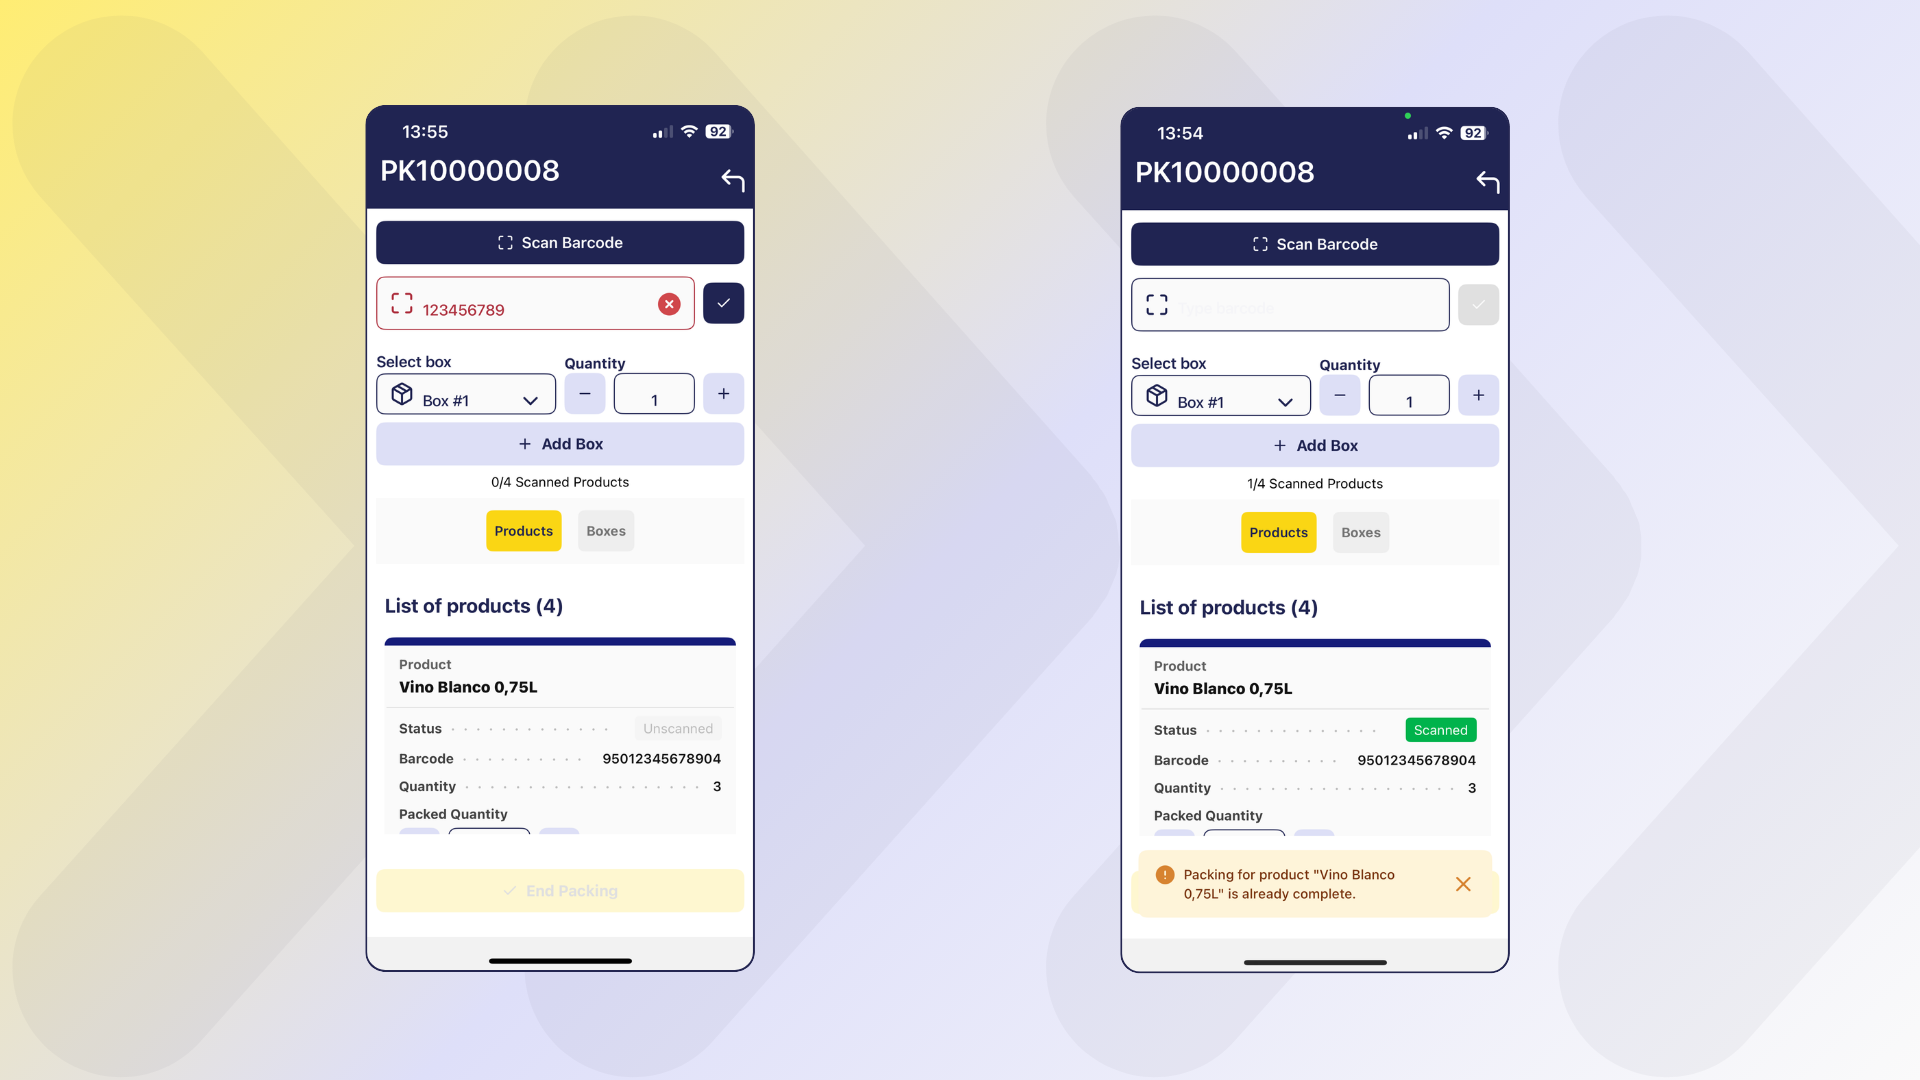
Warning
Possible error scenarios:
- If an incorrect code is scanned (does not match any product in the task), the barcode field is highlighted in red, shows a cross and does not add quantity to any product.
- If an attempt is made to enter more than the required quantity, an error message is also displayed "Packing for product [ProductName] is already complete.".
- If the quantity is manually loaded into the product card, the system allows loading the maximum quantity requested.
Packing Completion
Once the products have been packed:
-
The system displays a summary per box with the products included and the message Packing completed successfully is displayed.
-
Until confirmed, the contents of the boxes can be edited.
-
At the end, you can choose to calculate the weight of the boxes.
-
After confirmation, the task is marked as Completed.
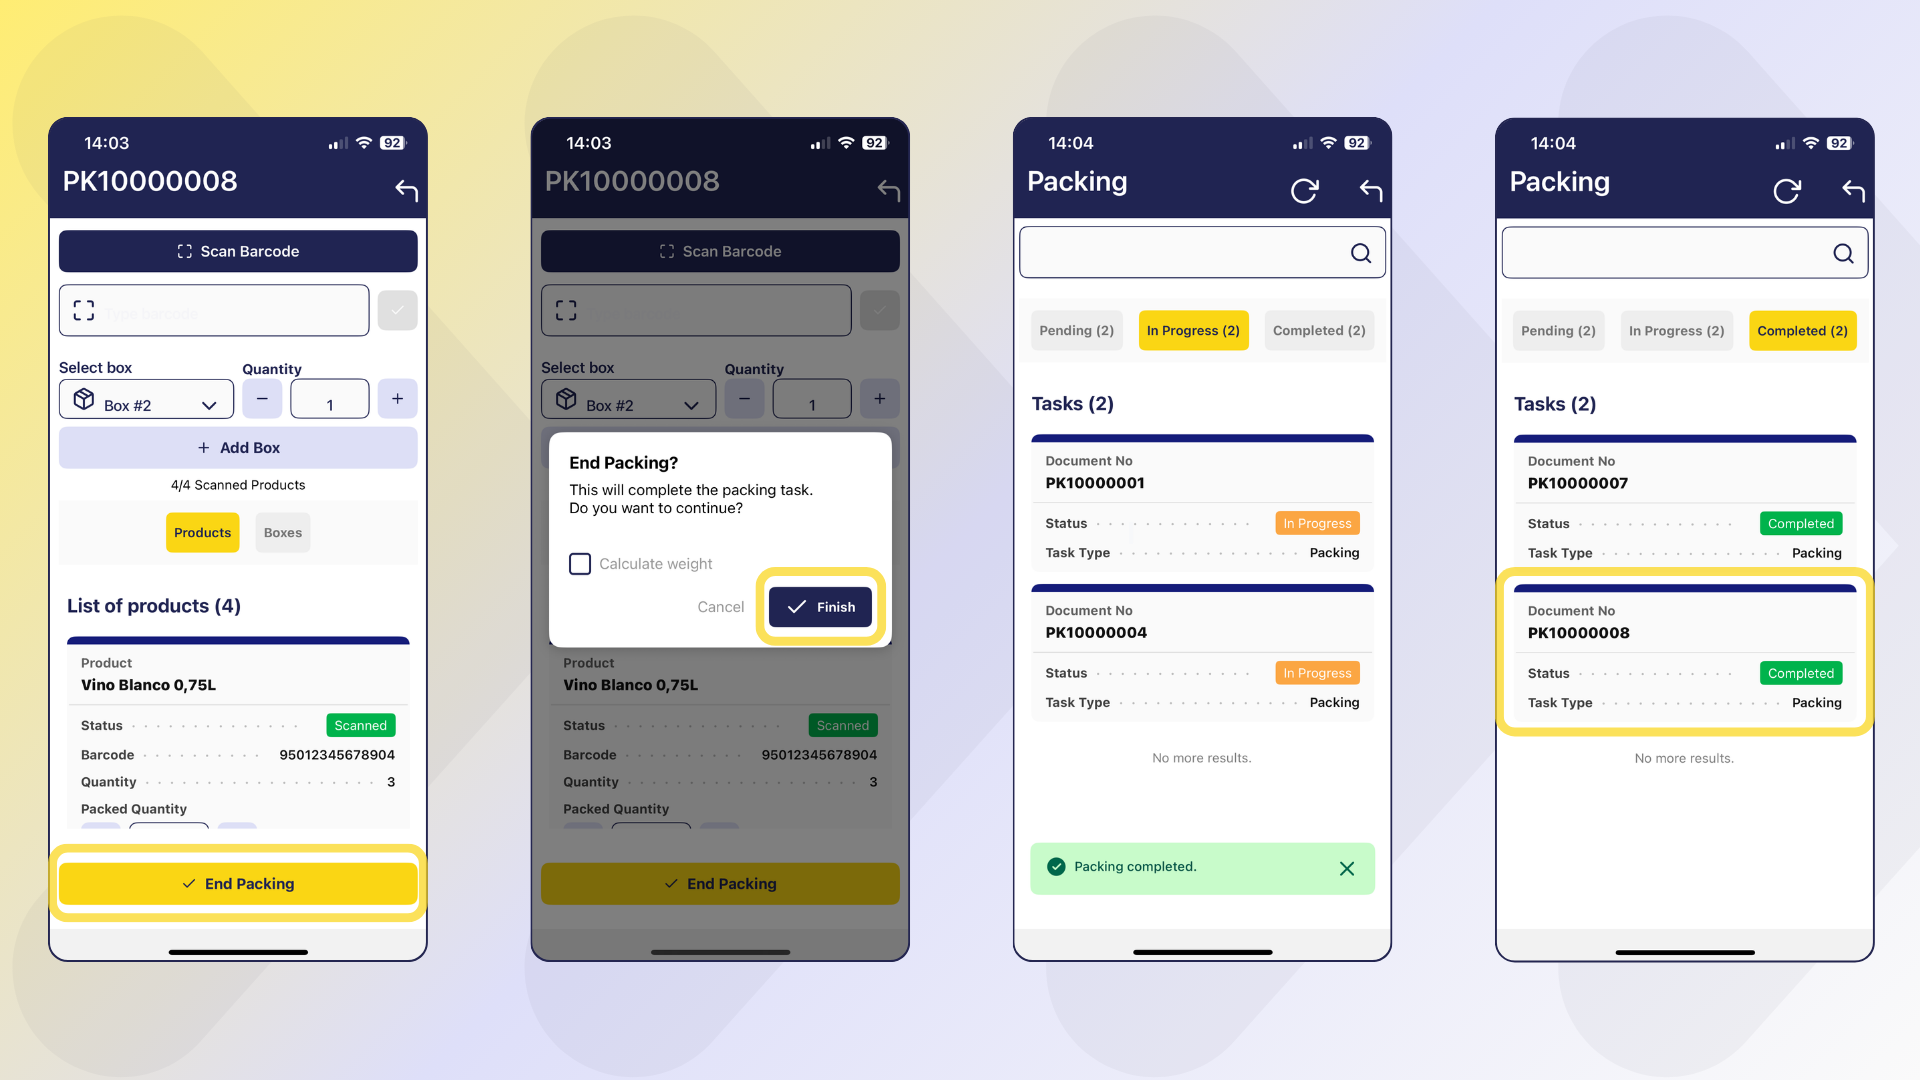
Once completed, the task will appear in the Completed Tasks section. From there, it is possible to review all validated information for that packing task, including:
- In the Product view: which boxes each product was packed into.
- In the Box view: which products were packed into each box.
All Tasks
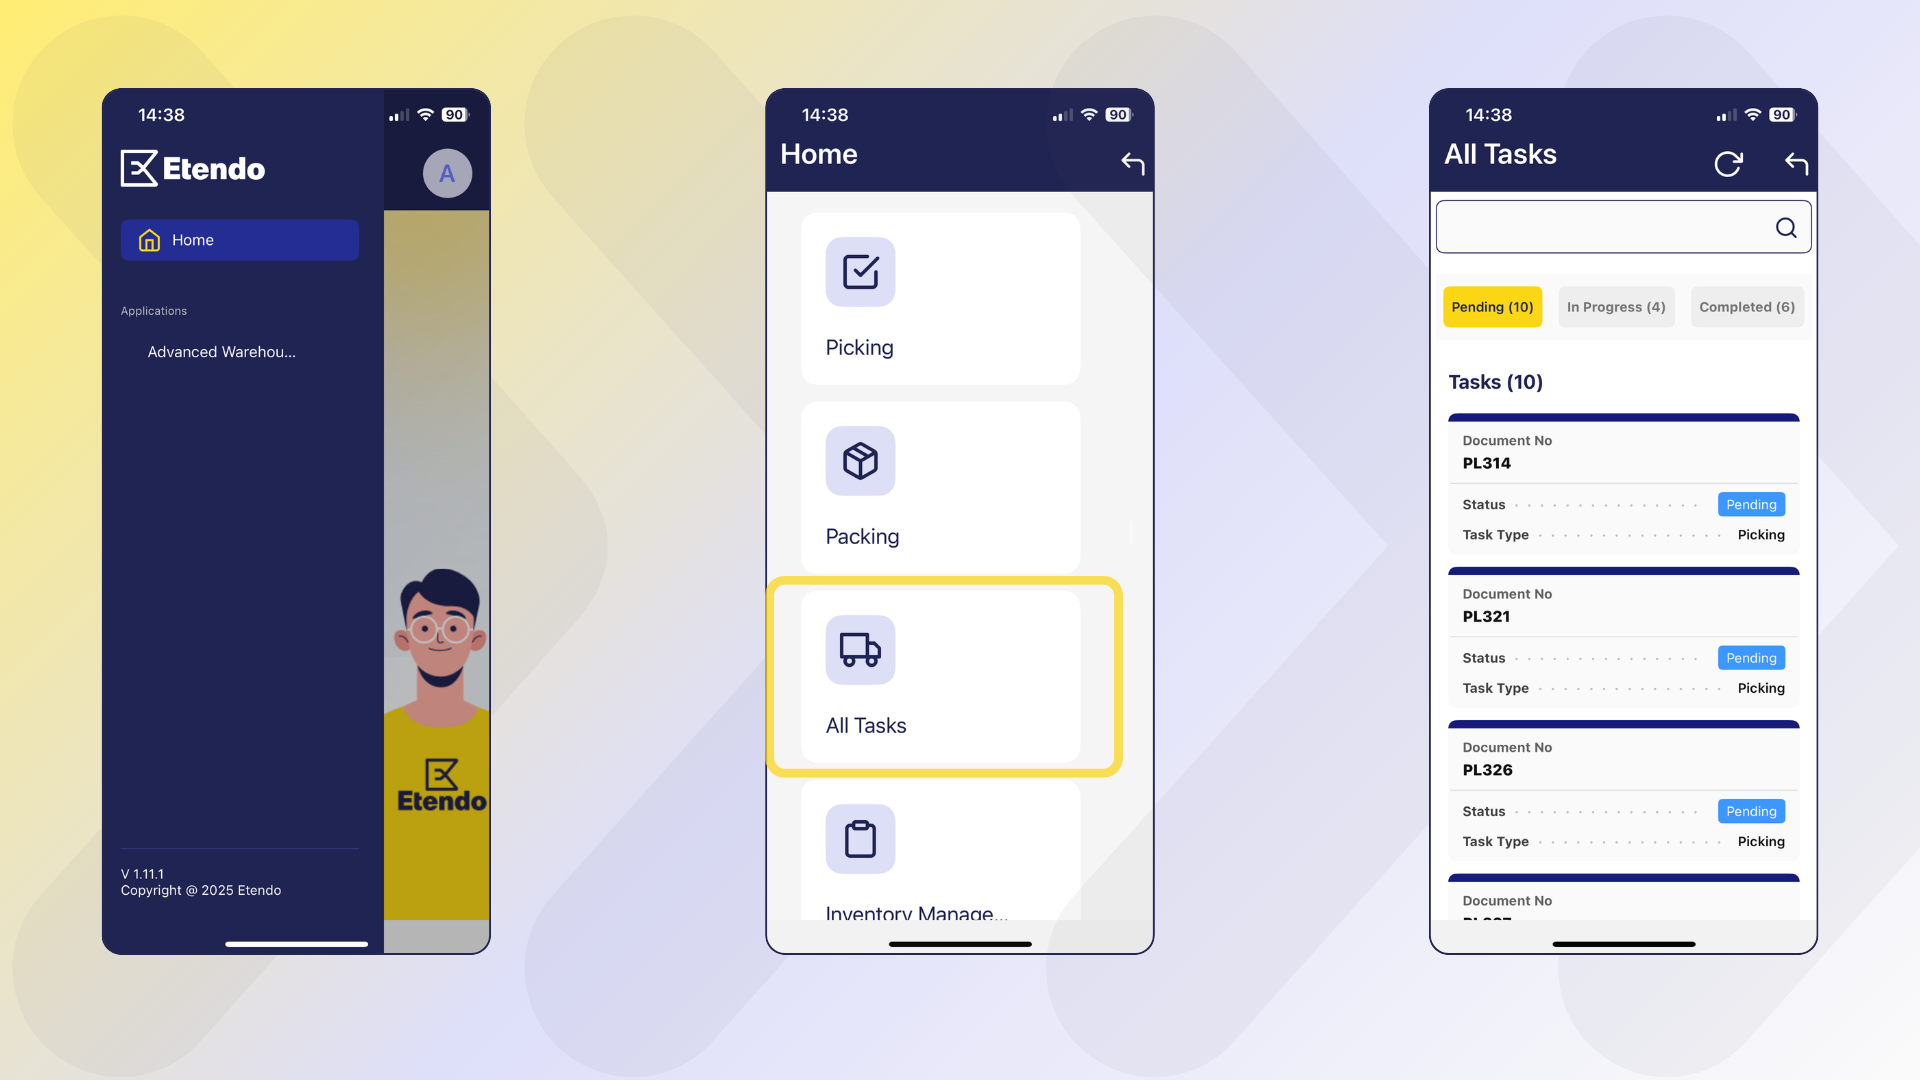
From this window you can view and work with all types of tasks, both Picking and Packing.
Inventory Management
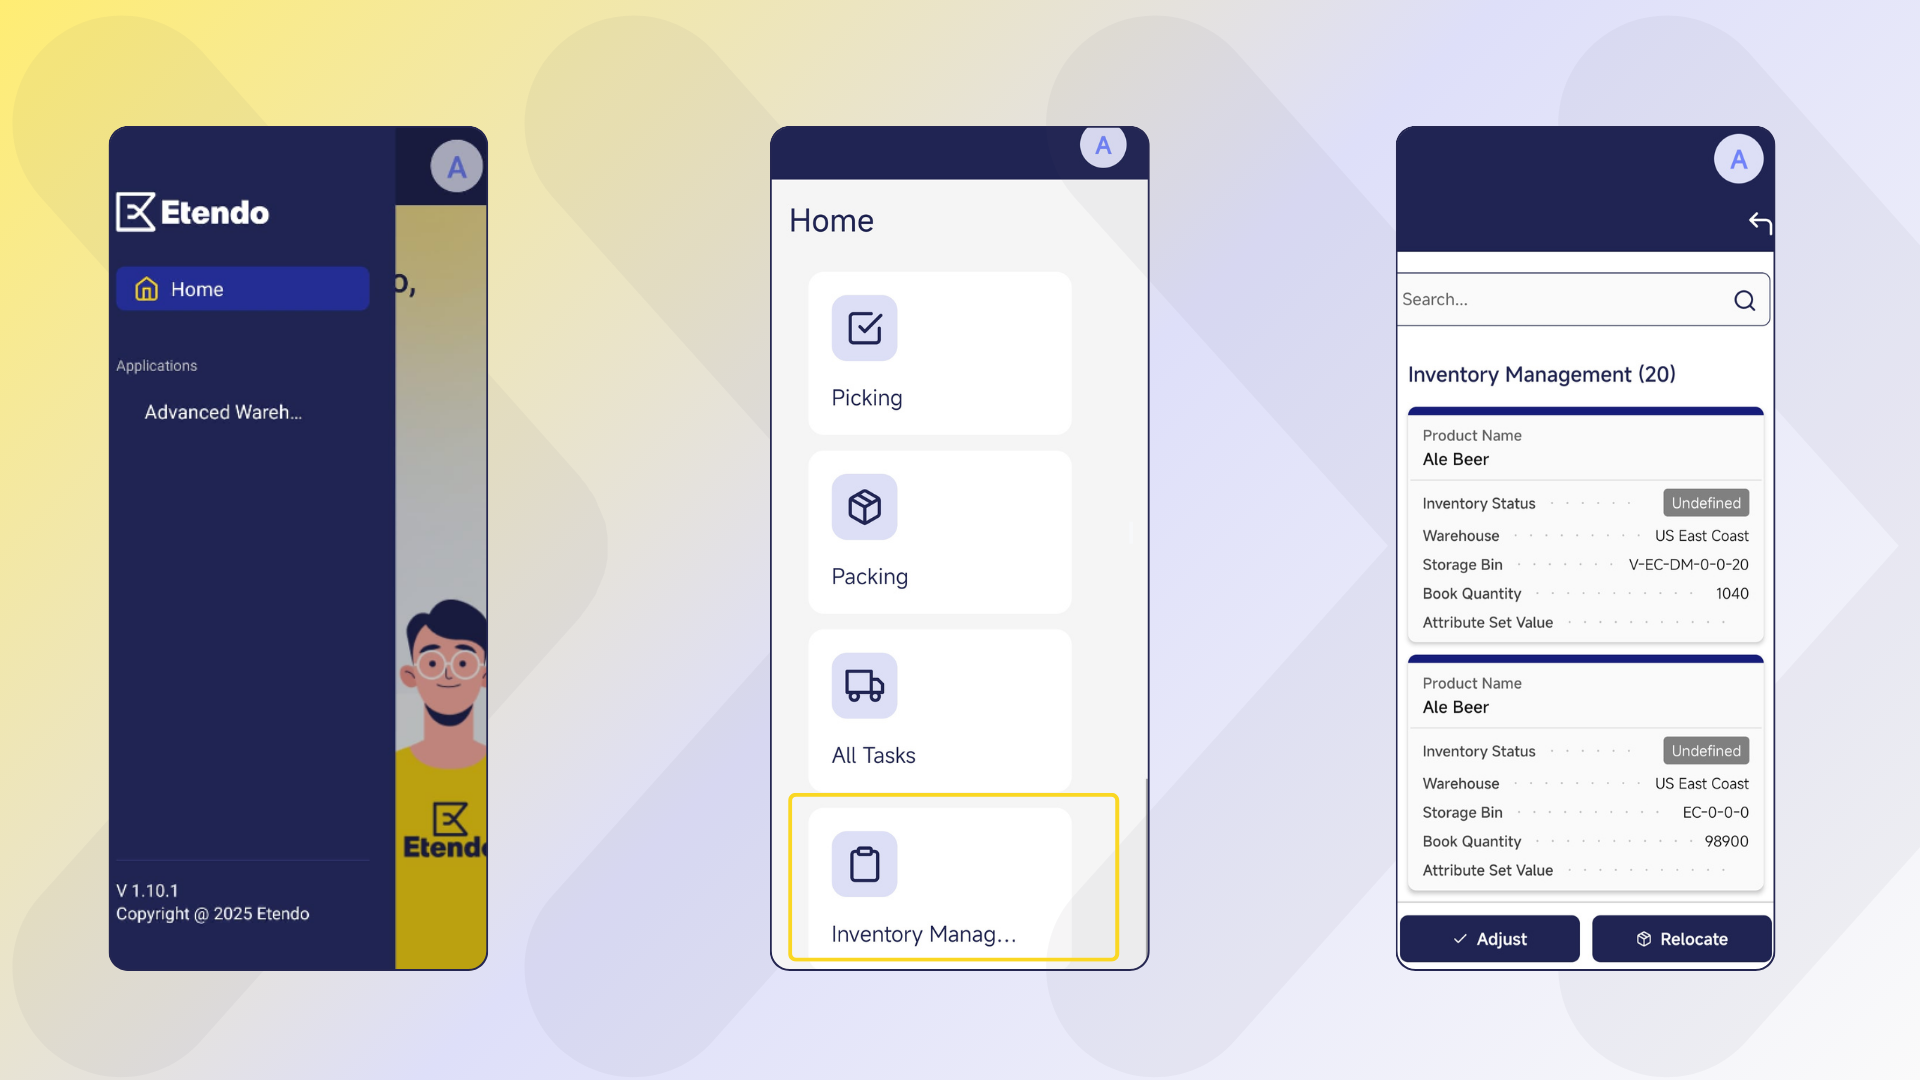
The flow of inventory management and statuses, involves the functionalities from Etendo Mobile of:
- Physical inventory.
- Change of status.
- Relocation.
Important
These actions are possible through the use of the movement rules functionality and the creation/use of custom statuses in Etendo, explained above.
Physical Inventory and Change of Status
Info
For more information about how to use this functionality in Etendo, visit Physical Inventory.
The Physical Inventory functionality from Etendo Mobile can be done with the following steps:
-
Enter the Inventory Management menu.
-
Search and select the product from the list or by the search engine. It is possible to unselect each selected product with the button
 .
. -
When selecting a product, the action buttons are enabled. Click on Adjust.
-
Enter the quantity counted in the Quantity Count field.
-
Confirm by pressing Process.

Once the adjustment has been processed, the result is reflected in real time in the same product list in Etendo Mobile, showing the updated quantity. Likewise, this information will also be seen in Etendo through the Stock Report, ensuring synchronization between both environments.
The To Status field, present in this screen, allows you to change the status of the selected inventory. Thus, by adding one more step, the status can be changed:
-
Enter the Inventory Management menu of Etendo Mobile.
-
Search and select the product from the list or by the search engine.
-
Press the Adjust button.
-
Enter the quantity to change the status in the Quantity Count field.
-
Select the status from the To Status field.
-
Confirm by pressing Process.
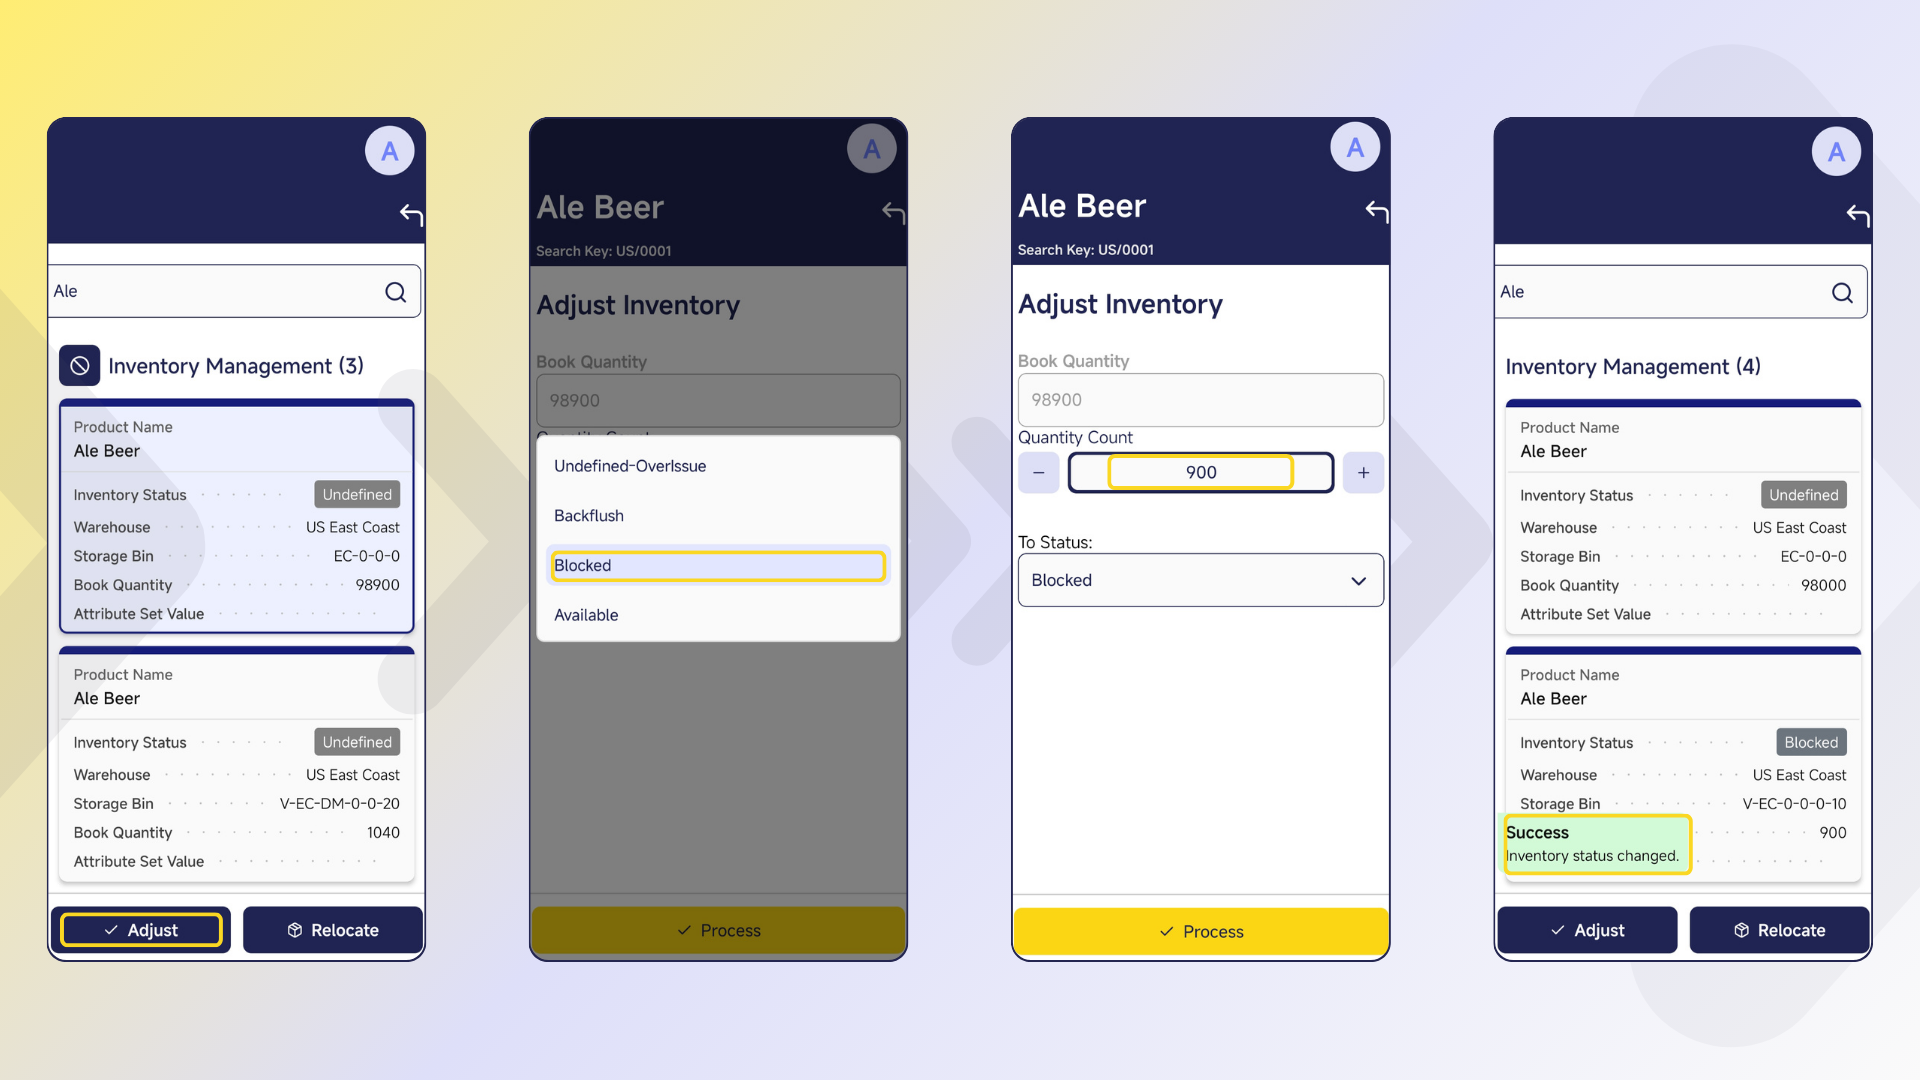
Thus, the Adjust button allows two functions, physical inventory and status change.
Inventory Relocation
Info
For more information about how to use this functionality in Etendo, visit Goods Movement.
The Relocate function allows you to relocate inventory by following the steps:
-
Enter the Inventory Management menu of Etendo Mobile.
-
Search and select the product from the list or by the search engine.
-
Press the Relocate button.
-
Enter the quantity to move in the Quantity to Relocate field.
-
Select the destination location in the To Locator field.
-
Confirm with Process.

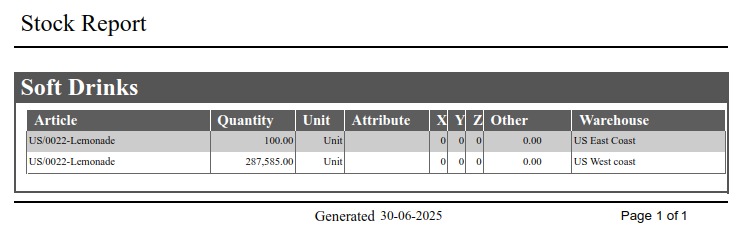
The result of this process is reflected both in Etendo Mobile, where the inventory location is updated, and in the Etendo Stock Report, ensuring traceability and visibility of the relocation in both platforms.
This work is licensed under CC BY-SA 2.5 ES by Futit Services S.L..