How to Create and Update Business Entities Using Web Services
Overview
The aim of this section is to show how to use some of Etendo's available web services to create business entities and/or to update them.
Therefore, these web services features will be explained in detail:
- JSON REST
- Secure Web Services
Execution Steps
To add or update entities, use HTTP commands. To execute any HTTP commands, a Java class could be created and use the available classes related to the HTTP protocol.
Note
We could do the same for any other protocol or scripting language like PHP.
Alternatively, use any plugin or application like Postman which allows executing any HTTP command on an URL of your choice. In the following examples we will make use of this plugin and we will assume that our Etendo environment is running on a local machine via http://localhost:8080/etendo.
JSON REST
We are about to create a new invoice header, so that the URL for this case will be:
http://localhost:8080/etendo/org.openbravo.service.json.jsonrest/Invoice
In Authorization we have to select the Basic Auth type and add the credentials which we use to get access to the Web Service (which are by the way the same that we use to get into the application). Take into account that the visibility of the data within the web service will be the same as if you logged into the application with the default role of this user. The Content-Type of the Request will be application/json and the body content of the request will be as follows, where the IDs will be replaced by those needed to be present in the invoice.
We have set the attribute salesTransaction to true, indicating that this is a sales invoice:
    {
      "data":
      {
        "entityName":          "Invoice",
        "active":              true,
        "organization":        { "id": "E443A31992CB4635AFCAEABE7183CE85" },
        "salesTransaction":    true,
        "documentType":        { "id": "7FCD49652E104E6BB06C3A0D787412E3" },
        "transactionDocument": { "id": "7FCD49652E104E6BB06C3A0D787412E3" },
        "documentNo":          "1000050",
        "accountingDate":      "2012-05-29",
        "invoiceDate":         "2012-05-29",
        "currency":            { "id": "102" },
        "priceList":           { "id": "AEE66281A08F42B6BC509B8A80A33C29" },
        "businessPartner":     { "id": "9E6850C866BD4921AD0EB7F7796CE2C7" },
        "partnerAddress":      { "id": "BFE1FB707BA84A6D8AF61A785F3CE1C1" },
        "paymentTerms":        { "id": "66BA1164A7394344BB9CD1A6ECEED05D" },
        "paymentMethod":       { "id": "A97CFD2AFC234B59BB0A72189BD8FC2A" }
      }
    }

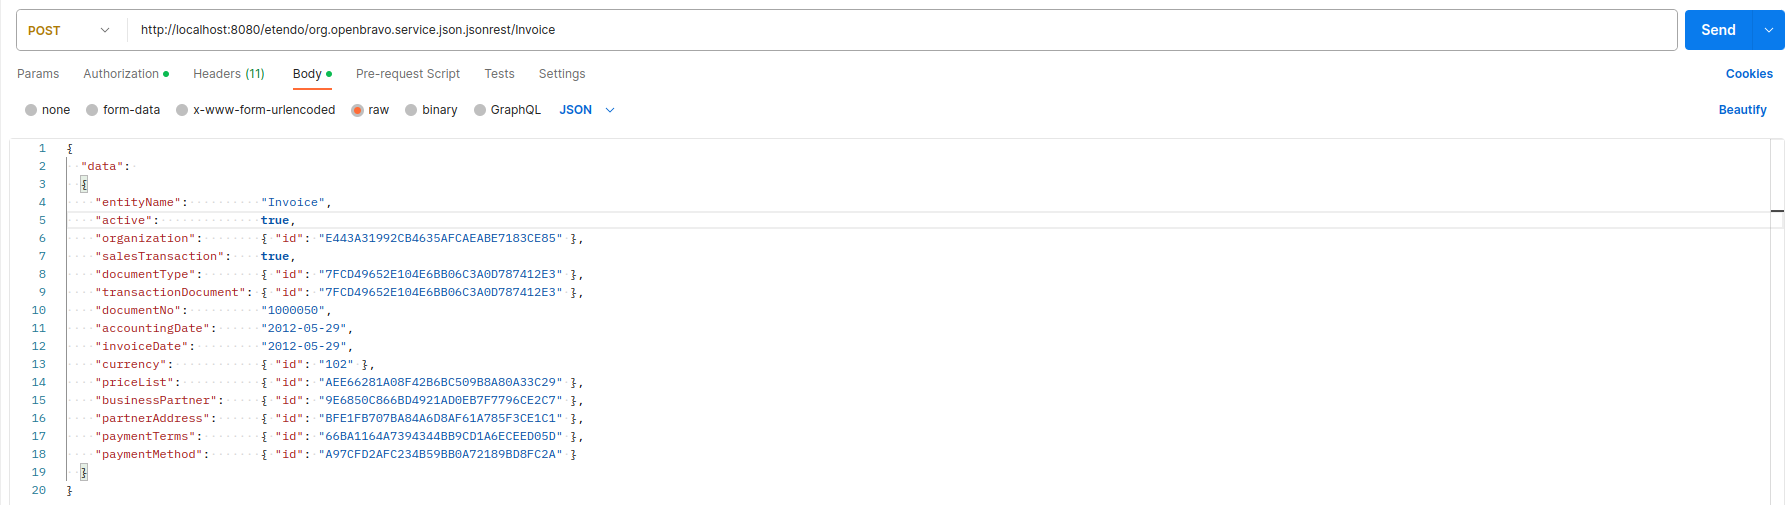
We use the HTTP POST command with this data. We will get a 200 OK response back, indicating that everything went well with the invoice data that was just created.

To make an update, we will use the PUT command. For instance, to update a Business Partner's name, we will execute that command on this URL:
http://localhost:8080/etendo/org.openbravo.service.json.jsonrest/BusinessPartner
with the following content:
    {
      "data":
      {
        "entityName": "BusinessPartner",
        "id":         "A6750F0D15334FB890C254369AC750A8",
        "name":       "New Name"
      }
    }
Secure Web Services
Note
To know more about how Etendo introduces its own Secure Web Services with unique features, visit How to Use Secure Webservices.
This work is a derivative of How to Create and Update Business Entities using Web Services by Openbravo Wiki, used under CC BY-SA 2.5 ES. This work is licensed under CC BY-SA 2.5 by Etendo.