Processes
Overview
A process is a systematic series of actions directed to some end. A process receives some parameters and taking them into account performs some actions to obtain a result. Etendo defines two main kinds of processes SQL Processes and Java Processes.
All processes (as well as Reports) are managed from the same window: Application Dictionary > Report and Process.
Once a process is defined it can be added to the menu to be called directly from there, it can be invoked through a button or it can be scheduled to be executed in the background.
Background processes can be set as Prevent Concurrent Executions . Before a process with this attribute is about to be executed, it is checked there are no other instances of the same process in execution at the same time, in this case another execution is aborted.
Parameters
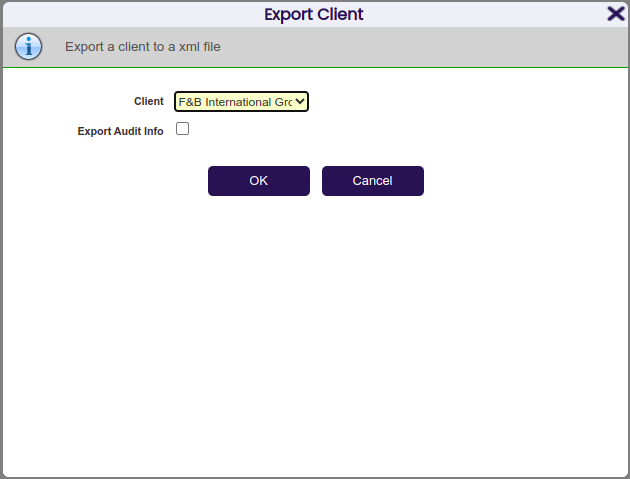
When a process (SQL or Java) or a Jasper Report is set as Standard, a pop-up message is automatically generated and displayed when invoking it, this message looks like this:
This pop-up has a section with information about the process, this information is obtained from the Help field in the Report and Process tab.
It also prompts for a number of parameters, and finally there are two buttons, OK to start the process and Cancel to close the pop-up and not to do anything else. In case the process did not require any parameter that section would be empty.
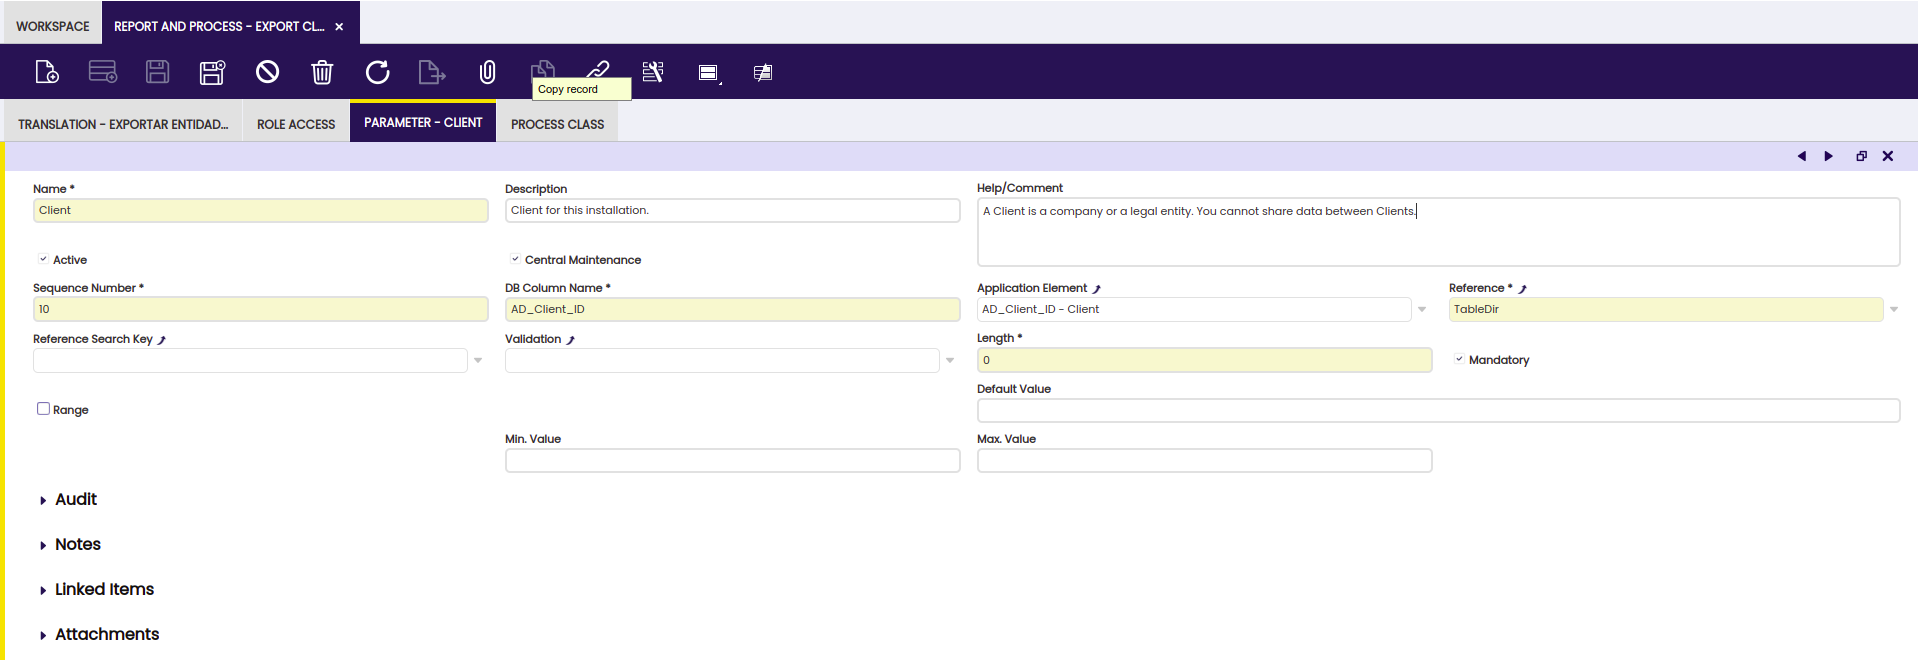
When this kind of process requires parameters they must be defined in the Application Dictionary > Report and Process > Parametertab.
Parameters are defined in a very similar way than columns are. Depending on the Reference field, the generated UI assigned for the parameter will be different.
Let's overview some of the most important fields in this tab:
- DB Column name : This is the name the parameter will be passed with to the process. When the process is going to use this parameter, it will have to use this name.
Note
Notice that Postgresql is case-sensitive. In case the parameter references an existing column in database (for example, it is a parameter of type search), then the DB Column name field must be cased the same way as the column in the Application Dictionary.
- Sequence : It is a numeric value to order the parameter in the pop-up.
- Application Element : It is the Element that will be used to get the label from, in this way parameters are translatable.
Note
It is also possible to set or not this element as Centrally Maintained.
- Reference , Reference Search Key and Validation: These three fields work exactly like the same ones when defining references for columns.
- Range : If it is checked, the pop-up will display two parameters in order to define a range, the first parameter will be named as specified in DB Column name field and the second one will have the same name with a TO suffix.
Defining Processes
Processes can be of two different types: SQL Processes and Java Processes . SQL processes are implemented in the SQL language and are executed by the database engine. Java proceses are implemented in the Java language and are executed by the application server.
SQL Processes
SQL Processes are implemented by database stored procedures.
Info
For more information, read How to create a Stored Procedure.
SQL processes are defined in Application Dictionary > Report and Process. The only field to take into account for this kind of processes is Procedure: It is the procedure name in the database.
Note
As SQL procedures are assigned to modules, they must be named according to following the naming rules: the name of the procedure must start with the module's DBPrefix.
As the pop-up for SQL processes is always automatically generated, the UI Pattern field must be set as Standard .
In case the process requires any parameter, it is possible to define them.
Info
To learn more about how to do it read Parameters.
Java Processes
Java processes are implemented by java classes.
Info
For more information, read How to create a Java Process .
Java processes are also defined in the Application Dictionary > Report and Process window. Depending on the UI pattern they use, they can be split into Standard and Manual. Additionally, if the UI Pattern is set to Manual, it is necessary to include an entry in the Process Mapping to make it accessible in the web.xml.
Note
The pop-up used to invoke Java processes defined with Standard UI pattern is automatically generated in the same way the interface for SQL processes is done.
To set a Java process to be have Standard UI just set the UI Pattern field to Standard in the Application Dictionary > Report and Process header.
It is also necessary to indicate the Java class that is going to implement the process. This is done by adding a new record in the Process Class tab. At least, one record in this tab must be checked as default.
Info
If the process requires parameters they can be defined in the Parameter tab as explained in the Parameters section of this document.
Executing processes
Note
It is required to define the process compilation in order to be able to
execute it. This step can be performed executing ./gradlew smartbuild and
restarting Tomcat afterwards.
Processes can be executed from the user interface from a menu or with a button. It can also be scheduled to be executed in the background without any user interaction.
Executing a process from a menu option
To execute a process from a menu option, you need to define a new menu option that executes the process. Menus are defined in General Setup > Application > Menu. In the Action field the Process entry must be selected, then in the Process field select the process. it will be executed immediately and then saved.
Finally, press the Tree button to organize the new menu option in the menu tree, and now the process defined can be executed selecting this new menu created.
Executing a process from a button
To execute a process with a button you need to define a column that references a button. In Application Dictionary > Tables and Columns, go to the column you want to use to execute the process and in the field Reference select the Button entry, then in the Process field select the process you want to execute and save.
When executing a process with a button, the record ID of the current record selected of the table will be passed to the process. This allows to execute functions for specific records.
Executing a process in the background
Backgroung processes are defined in General Setup > Process Scheduling > Process Request.
Info
For more information, read How to create a Background Process.
In this window you can define a background process. The process to be executed can be selected in the Process field. Then you define the scheduling for the background process and it is then ready to use.
Note
There is no user interaction necessary to execute the process, thus, no pop-up will appear prompting for additional parameters.
Kill a background Process
A button Kill Process is shown in the Process Monitor window on that processes that implement the KillableProcess interface while a process is being executed (Status = Processing). The interface KillableProcess will let you kill your process using a kill mechanism.
Mechanism to Kill
The mechanism that your background process uses to kill itself might vary between implementations. However, the main idea in any implementation should be to check some flag perodically during execution to see if a kill has been requested, and if the flag is set, somehow abort the execution of the rest of the job's work.
Let's see an example,
here we have a dummy process which simply prints the identifier in the log for all the business partners:
    package com.openbravo.example.killprocess.process;

    import org.apache.log4j.Logger;
    import org.hibernate.ScrollMode;
    import org.hibernate.ScrollableResults;
    import org.openbravo.dal.service.OBCriteria;
    import org.openbravo.dal.service.OBDal;
    import org.openbravo.model.common.businesspartner.BusinessPartner;
    import org.openbravo.scheduling.ProcessBundle;
    import org.openbravo.service.db.DalBaseProcess;
    import org.openbravo.service.db.DbUtility;
    import org.quartz.JobExecutionException;

    public class DummyProcess extends DalBaseProcess {

      private static final Logger log4j = Logger.getLogger(DummyProcess.class);

      @Override
      protected void doExecute(ProcessBundle bundle) throws Exception {
        try {

          // Get all business partners
          final OBCriteria<BusinessPartner> bpCri = OBDal.getInstance().createCriteria(
              BusinessPartner.class);
          bpCri.setFetchSize(1000);
          final ScrollableResults partnerScroller = bpCri.scroll(ScrollMode.FORWARD_ONLY);
          int i = 1;
          // Loop all business partners using a ScrollabeResults to avoid performance issues
          while (partnerScroller.next()) {
            final BusinessPartner bp = (BusinessPartner) partnerScroller.get()[0];
            // Print the Identifier for every business partner
            log4j.info(bp.getIdentifier());

            if ((i % 100) == 0) {
              OBDal.getInstance().getSession().clear();
            }
            i++;

          }
          partnerScroller.close();
        } catch (Exception ex) {
          Throwable e = DbUtility.getUnderlyingSQLException(ex);
          log4j.error("Error in DummyProcess", e);
          throw new JobExecutionException(e.getMessage(), e);
        }

      }

    }
Killable Process
Now, we will see the same process but with Interface KillableProcess implemented with the kill method.
    package com.openbravo.example.killprocess.process;

    import org.apache.log4j.Logger;
    import org.hibernate.ScrollMode;
    import org.hibernate.ScrollableResults;
    import org.openbravo.dal.service.OBCriteria;
    import org.openbravo.dal.service.OBDal;
    import org.openbravo.model.common.businesspartner.BusinessPartner;
    import org.openbravo.scheduling.KillableProcess;
    import org.openbravo.scheduling.ProcessBundle;
    import org.openbravo.service.db.DalBaseProcess;
    import org.openbravo.service.db.DbUtility;
    import org.quartz.JobExecutionException;

    public class DummyProcessKillable extends DalBaseProcess implements KillableProcess {

      private static final Logger log4j = Logger.getLogger(DummyProcessKillable.class);

      // Add a variable 'stop' to control the kill implementation and set false by default
      private boolean stop = false;

      @Override
      protected void doExecute(ProcessBundle bundle) throws Exception {
        try {

          // Get all business partners
          final OBCriteria<BusinessPartner> bpCri = OBDal.getInstance().createCriteria(
              BusinessPartner.class);
          bpCri.setFetchSize(1000);
          final ScrollableResults partnerScroller = bpCri.scroll(ScrollMode.FORWARD_ONLY);
          int i = 1;
          // Loop all business partners using a ScrollabeResults to avoid performance issues

          // Only continue with the process if the variable 'stop' is false
          while (partnerScroller.next() && !stop) {
            final BusinessPartner bp = (BusinessPartner) partnerScroller.get()[0];
            // Print the Identifier for every business partner
            log4j.info(bp.getIdentifier());
            // Add a timeout of 30 seconds
            Thread.sleep(30000);

            if ((i % 100) == 0) {
              OBDal.getInstance().getSession().clear();
            }
            i++;

          }
          partnerScroller.close();
        } catch (Exception ex) {
          Throwable e = DbUtility.getUnderlyingSQLException(ex);
          log4j.error("Error in DummyProcess", e);
          throw new JobExecutionException(e.getMessage(), e);
        }

      }

      @Override
      public void kill(ProcessBundle bundle) throws Exception {
        bundle.getLog().log("process killed")
        // When kill is called set variable 'stop' to true so the process will be interrupted in the
        // next iteration: while (partnerScroller.next() && !stop)
        stop = true;
      }

    }
Let us comment the code. First, we need to implement the KillableProcess interface.
We create a variable stop that will be used to check the continuity of the execution.
// Add a variable 'stop' to control the kill implementation and set false by default
  private boolean stop = false;
In the main loop of the process, we add the check to stop the execution when the variable is set to true.
      // Only continue with the process if the variable 'stop' is false
      while (partnerScroller.next() && !stop) {
We have also added a sleep (30 seconds) to make the execution time longer.
Finally, we implement the kill method that sets stop to true.
      @Override
      public void kill(ProcessBundle bundle) throws Exception {
        bundle.getLog().log("process killed")
        // When kill is called set variable 'stop' to true so the process will be interrupted in the
        // next iteration: while (partnerScroller.next() && !stop)
        stop = true;
      }
Now, we are able to kill the process from the Process Monitor.
When a process is killed, the status in the process monitor will be Killed by User.
This work is a derivative of Processes by Openbravo Wiki, used under CC BY-SA 2.5 ES. This work is licensed under CC BY-SA 2.5 by Etendo.

