✨ Getting Started
Overview
This guide provides detailed instructions on how to get started with Etendo Copilot, an API that allows interaction with a bot capable of selecting the appropriate tools to respond to user queries. It includes the necessary requirements, instructions for adding dependencies, environment variable configurations, and steps to run Copilot on an Etendo project. Additionally, it covers optional configurations to customize Copilot's behavior and provides links to detailed installation guides for required software.
Requirements
- Install Etendo. For this, follow the Etendo Installation Guide.
- This project depends on the following tools:
- Docker: version
26.0.0or higher. - Docker Compose: version
2.26.0or higher.
- Docker: version
Info
The Docker Management module, included as a dependency allows for the distribution of the infrastructure within Etendo modules, which include Docker containers for each service.
Installation
Etendo Copilot is distributed within the Copilot Extensions bundle, which in addition to including the Copilot Infrastructure, includes default agents and tools that can be used directly or compose their use in new agents.
Info
To be able to include this functionality, the Copilot Extensions Bundle must be installed. To do that, follow the instructions from the marketplace: Copilot Extensions Bundle. For more information about the available versions, core compatibility and new features, visit Copilot Extensions - Release notes.
Running Etendo Copilot
The simplest configuration we are going to follow as an example is to mount Copilot Dockerized and Tomcat running as a local service. Other configurations are detailed in the section, Advanced Configurations.
In addition, there are other optional variables to configure certain aspects of the copilot. If not specified, default values are used.
Configuration Variables
All possible configuration variables are listed below, however, the step-by-step instructions explain how to configure them.
| Environment Variable | Default | Required | Info |
|---|---|---|---|
docker_com.etendoerp.copilot |
true |
✅ (Required) | Enables Etendo Copilot Docker container. |
OPENAI_API_KEY |
none |
✅ If using OpenAI | API key for OpenAI. Contact Etendo or use your own. |
ANTHROPIC_API_KEY |
none |
✅ If using Anthropic | API key for Anthropic. Only needed if using Anthropic models. |
DEEPSEEK_API_KEY |
none |
✅ If using DeepSeek | API key for DeepSeek. Only needed if using DeepSeek models. |
ETENDO_HOST |
none |
✅ (Required) | URL where Copilot sends requests to communicate with the Etendo system. |
ETENDO_HOST_DOCKER |
none |
✅ (Required) | Used when Copilot runs in Docker and Etendo is not accessible from a domain. |
COPILOT_HOST |
none |
✅ (Required) | Host for Copilot service. |
COPILOT_PORT |
5005 |
✅ (Required) | Port used by Copilot service. |
COPILOT_DEBUG |
false |
❌ (Optional) | Enables verbose Copilot logs in the console. |
COPILOT_MAX_ITERATIONS |
100 |
❌ (Optional) | Max number of agent interaction steps. |
COPILOT_EXECUTION_TIMEOUT |
0 |
❌ (Optional) | Timeout in seconds for agent execution (0 = unlimited). |
COPILOT_STREAM_DEBUG |
false |
❌ (Optional) | Enables real-time response log in Copilot pop-up. |
CONFIGURED_TOOLS_FILENAME |
tools_config.json |
❌ (Optional) | File that defines which tools are enabled. |
DEPENDENCIES_TOOLS_FILENAME |
tools_deps.toml |
❌ (Optional) | File that defines dependencies between tools. |
COPILOT_PULL_IMAGE |
true |
❌ (Optional) | If true, pulls Docker image from Docker Hub; if false, uses local image. |
COPILOT_IMAGE_TAG |
master |
❌ (Optional) | Docker image tag to use. |
COPILOT_PORT_DEBUG |
5100 |
❌ (Optional) | Port for debugging Copilot (if enabled). |
-
Add to
gradle.propertiesthe variabledocker_com.etendoerp.copilot=trueto enable the Copilot Docker container and at least oneAPI_KEY, depending on the model provider you use.Remember that due to API level access limitations, paid versions are required. These variables are required to run the Copilot container and access the models used.
-
The
gradle.propertiesvariablesETENDO_HOST,ETENDO_HOST_DOCKER,COPILOT_HOST, andCOPILOT_PORTare used to configure the connection between Copilot service and Etendo.Etendo Copilot provides a Gradle task to automatically set these variables based on your Etendo instance configuration. To do this, execute the following command in the terminal:
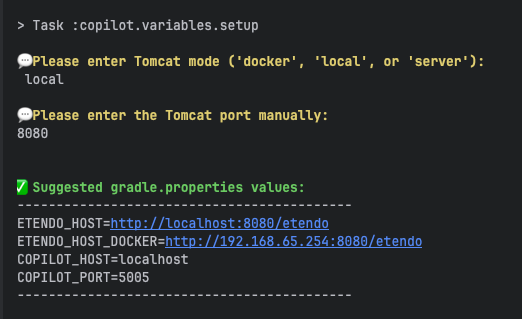
This command asks for characteristics of your Etendo instance. And based on your answers, it will print the values.
Copy the printed values and paste them into your
gradle.propertiesfile, replacing the existing values forETENDO_HOST,ETENDO_HOST_DOCKER,COPILOT_HOST, andCOPILOT_PORT. -
The
gradle.propertiesfile should now look like this:gradle.propertiesdocker_com.etendoerp.copilot=true OPENAI_API_KEY= **** // If you are using OpenAI ANTHROPIC_API_KEY= **** // If you are using Anthropic DEEPSEEK_API_KEY= **** // If you are using DeepSeek ETENDO_HOST=http://localhost:8080/etendo ETENDO_HOST_DOCKER=http://host.docker.internal:8080/etendo COPILOT_HOST=copilot COPILOT_PORT=5005
Run Copilot Service and Install
Once the Copilot Extensions Bundle dependency was added and the variables configurated, in the terminal execute the following command to apply the changes:
-
Apply the configuration variables
-
Then, the copilot container needs to be created/recreated:
-
Then recompile the environment, to ensure that the changes are applied and deployed correctly:
-
Start the Tomcat service and ¡Try Copilot in Etendo!
Info
To configure a new agent or to use a predefined one, follow the Copilot Setup and Usage guide.
Copilot Service Container Management
-
To start the copilot Docker image, execute:
-
To stop the Copilot container you can run:
-
Every time a new tool is added or the environment variables change, it's necessary to delete and create the Copilot container again. Execute the following command to delete the container:
Warning
Be aware that resources.stop and resources.down will also affect other services configured in the etendo container.
Warning
In Copilot Extensions bundle versions lower than 3.3.0, if you suffer from errors related to missing poetrydependency, you can use the legacy Docker image, with the tag poetry. To do that, you need to add the following variable in the gradle.properties file:
poetry dependency installed, instead of the new one with uv as the package manager installed.
Advanced Configurations
Run Copilot Locally (for developing copilot only)
Requirements
We recommend using PyCharm to run copilot locally. Download and install here PyCharm Community Edition
-
Open PyCharm, search for the copilot module and open it.

-
Open the
Run.pyfile, then add a new interpreter.

-
Add a new configuration file and select Python


-
Select the interpreter created before. In the script field, select the
run.pyfile, and in the .env field, select thegradle.propertiesfile.
-
Once done, open the PyCharm terminal and execute the following commands:
Warning
In versions before 3.3.0, the package manager used by Copilot was
poetry, so the command to run ispoetry installinstead ofuv sync. -
Execute
Run.pyfrom PyCharm
How to Debug Etendo Copilot?
There are two main ways to debug Etendo Copilot, depending on your setup.
-
Using PyCharm (Local Mode)
If you are running Copilot locally, you can use PyCharm’s built-in debugger. Simply set breakpoints in the code and run the debugger to inspect the execution flow step by step.
-
Using VSCode (Dockerized Copilot)
If Copilot is running in a Docker container, you can debug it with VSCode using the provided
launch.jsonconfiguration:- Make sure VSCode and the Python extension are installed and enabled.
-
Open the
build/copilotdirectory inside the Etendo project.Note
This is the directory containing the tools’ code, which is required for the debugger to locate the source files.
3. Go to the Run and Debug section in VSCode. You will see a configuration named Copilot Remote Debug. Click the green play button to start debugging.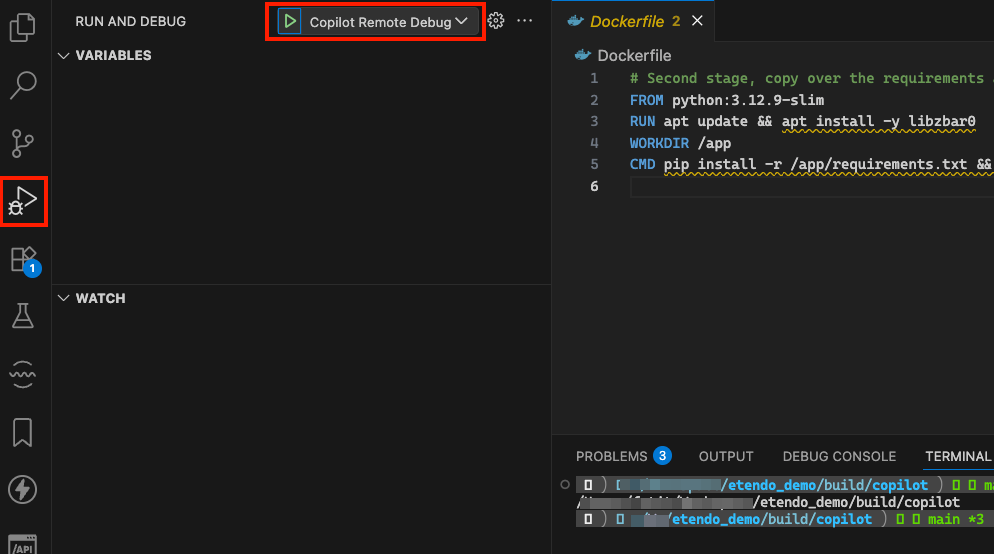
4. Once the debugger is running, set breakpoints as needed and execute Copilot. The debugger will pause at your breakpoints, allowing you to inspect variables and analyze the execution flow.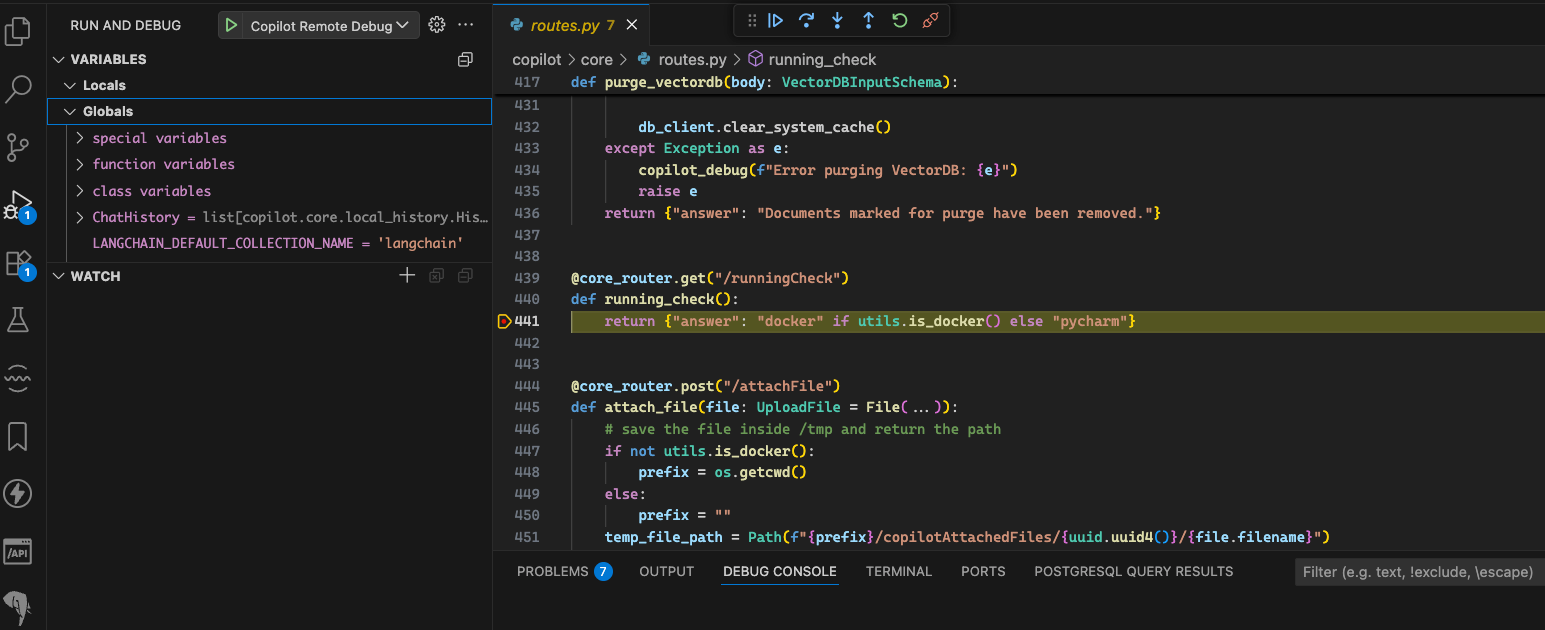
This work is licensed under CC BY-SA 2.5 ES by Futit Services S.L..